
When trying out a new framework, the first step is usually the most complex one. The documentation and numerous blogs on the Spring Framework already assume you know how to find your way around Spring applications. While sounding really impressive, sentences like "Spring favors programming to interfaces" or "Spring promotes lose coupling" do not mean much.
In this chapter, we will walk you through the first steps involved in creating a simple Spring application. We will first take a look at how to obtain the latest Spring distribution. Then we will take the plunge and write a simple "Hello, World" application. Once you have mastered that, we will take a more detailed look at all the code that comes with the Spring distribution. We will explain which libraries you typically need for a console application, a web application, a rich client application, and an enterprise application. Finally, we will take a look at how you can obtain the latest (and latest stable) Spring source code from CVS and how to build your own release of Spring.
Our first step will be to download the Spring Framework distribution. The Spring Framework is now part of the Spring portfolio, which includes projects that are closely associated with the framework. The portfolio includes Spring Web Flow (see Chapter 18), Spring Security (formerly Acegi Security for Spring), Spring Web Services (see Chapter 15), Spring Batch, and Spring Integration.
There are many other exciting projects, among the most notable are Spring Dynamic Modules for OSGi, Spring Rich Client, Spring IDE, and many others; all are available at www.springframework.org/projects.
For now, though, we only need the Spring Framework, which you can download at www.springframework.org/download. The link will take you to the SourceForge download page, where you should download the spring-framework-2.5.1-with-dependencies.zip archive.
Spring is under constant development with many new features being added almost daily. If you want to get a grip on new features before they make their way into a release, then obtaining the latest source code from CVS is the best way of going about it.
To check out the latest version of the Spring code, install CVS, which you can download from www.cvshome.org, and run the following command:
cvs -d:pserver:[email protected]:/cvsroot/springframework login
When prompted for your password, simply press Enter to send a blank password. Next, enter the following command to check out the HEAD of the CVS repository, which contains the latest changes that have been committed:
cvs -z3 -d:pserver:[email protected]:/cvsroot/springframework co -P spring
This command gives you the absolute latest version of the code, including two separate source trees: one contains the main source for Spring including any new features considered stable enough to be in the main tree; and the other, the sandbox, contains code still classified as work in progress. New code in the main tree is likely to make it into the next release, but code in the sandbox might not. Be aware that any new code is subject to change without notice; for this reason, avoid basing any of your new applications around unreleased code.
Older versions of Spring are stored in CVS tagged by their version number, so you can download any version of Spring directly from CVS. If you are unsure of the tags to use, you can find them by browsing the CVS repository online at http://springframework.cvs.sourceforge.net/springframework/.
Let's take a look at how we can compile the framework from the source code. Even though it is possible to compile the HEAD version from CVS, we recommend that you compile one of the final releases. In the following example, we will take the latest version of Spring available at the time of this writing, version 2.5.2. The CVS tag for the source is release-2–5–1; you will need to run the commands in Listing 2-1 to check out the tag.
Example 2.1. Commands to Check Out the 2.5.1 Release of Spring
cvs -d:pserver:[email protected]:/cvsroot/springframework login cvs -z3 -d:pserver:[email protected]:/cvsroot/springframework co -r release-2-5-2 -P spring
Assuming that you have Apache Ant installed, that you have set the $ANT_HOME environment variable, and that the $PATH includes $ANT_HOME/bin, you can run ant alljars. This will build all source code and produce the Spring JAR files. The JAR files will be created in the dist directory, whose full structure is shown in Listing 2-2.
Example 2.2. Showing the Compiled Modules
janm@janm-ff:~/spring/dist$ find -iname *.jar | sort -r
./weaving/spring-tomcat-weaver.jar
./weaving/spring-aspects.jar
./weaving/spring-agent.jar
./weaving-sources/spring-tomcat-weaver-sources.jar
./weaving-sources/spring-aspects-sources.jar
./weaving-sources/spring-agent-sources.jar
./spring-sources.jar
./spring.jar
./modules/spring-webmvc-struts.jar
./modules/spring-webmvc-portlet.jar
./modules/spring-webmvc.jar
./modules/spring-web.jar
./modules/spring-tx.jar
./modules/spring-test.jar
./modules/spring-orm.jar
./modules/spring-jms.jar
./modules/spring-jdbc.jar
./modules/spring-core.jar
./modules/spring-context-support.jar
./modules/spring-context.jar
./modules/spring-beans.jar
./modules/spring-aop.jar
./module-sources/spring-web-sources.jar
./module-sources/spring-webmvc-struts-sources.jar
./module-sources/spring-webmvc-sources.jar
./module-sources/spring-webmvc-portlet-sources.jar
./module-sources/spring-tx-sources.jar
./module-sources/spring-test-sources.jar
./module-sources/spring-orm-sources.jar
./module-sources/spring-jms-sources.jar
./module-sources/spring-jdbc-sources.jar
./module-sources/spring-core-sources.jar
./module-sources/spring-context-support-sources.jar
./module-sources/spring-context-sources.jar
./module-sources/spring-beans-sources.jar
./module-sources/spring-aop-sources.jar
These JAR files are the same ones you can get in the Spring binary distribution; in the next section, we will take a more detailed look at the packages.
With every distribution, you get the full source code for the test suite, along with the Ant script you need to run the tests and produce the test report. If you think your distribution has a bug, first run the test suite to see if the bug is highlighted in one of the tests. Although many open source projects claim that most bugs are in user code and not in their code, Spring can back this up with a test suite that consists of thousands of tests. Don't just take our word for it; you can run all Spring tests by running ant tests at the command line.
We do not recommend that you build Spring from source code and use the compiled code in your day-to-day development. It is much easier and much more convenient to use automated tools such as Maven 2 to determine which version of Spring, and other libraries, your application needs to compile, test, and run.
When you unzip the full Spring distribution or compile the source distribution, the dist subdirectory contains the full Spring distribution. However, there are many different JARs and, even more confusingly, spring.jar. The reason for this split is that some applications may not require the entire Spring Framework. The decision whether to use various smaller JARs or the entire spring.jar depends on the type of application you are writing and on its environment.
Most applications work absolutely fine with the entire spring.jar on the classpath. However, if you deploy your application in an application server that already contains other versions of the Spring Framework libraries, you may come across versioning conflicts. Another situation where you may not want to include the entire spring.jar in your application is if you wish to use only parts of the Spring's code. Table 2-1 summarizes all the Spring JARs that are included in the default distribution.
Table 2.1. Spring JAR Files
JAR File | Description |
|---|---|
| This JAR contains all the classes you need to use Spring's AOP features within your application. You also need to include this JAR in your application if you plan to use other features in Spring that use AOP, such as declarative transaction management. |
| This archive contains all of Spring's dependency injection. It contains the bean factories and supporting classes. In most cases, you will need to add |
| This JAR contains code needed to build the Spring application context; it packages the main |
| This package contains utility Spring code—this means caching, instrumentation, e-mail and scheduling support, and the very interesting scripting languages support. |
| This contains the core files of the Spring Framework: it deals with annotations, enumerations, task execution, resource loading, and other utilities and exceptions you may find useful even outside the context of the Spring Framework. |
| This package contains code for the JDBC support classes, namely the |
| This JAR contains code for JMS; see Chapter 15 for examples of transactional message queues. |
| This archive contains the files needed for object-relational mapping (ORM) tools. Including this package on your classpath will give you Spring support for Hibernate 3, iBATIS, JDO, JPA, and TopLink. |
| This package contains support code to write unit and integration tests using the Spring Framework. It supports the JUnit 3, JUnit 4, and TestNG testing frameworks. In addition, you can use classes from the |
| This one contains support for core data access exceptions and transaction technologies. These two areas are closely bound together, because the transactions generally work with some data access code. |
| This JAR contains code for the Spring web application support (utilities, binders, multipart resolvers). For more details, see Chapter 16. |
| This JAR contains code needed to build portlet-based (rather than servlet-based) web applications. If you have an application server that supports the Portlet API (JSR 168), you can use this package. |
| This package contains code needed to use Spring with the Jakarta Struts Framework. |
| This package contains the Spring MVC code; you will find much more detail about Spring MVC in Chapter 17. |
As we said before, each of these JARs contains fragments of the entire Spring distribution. However, spring.jar is still not the entire distribution of Spring. The spring.jar library does not include the code in the spring-mvc-*.jar files.
If we leave the dist directory and go to the lib directory, you will notice that it contains a large number of libraries. These dependencies are necessary to build and test the entire Spring Framework distribution, but not all of the dependencies will be needed in your applications. Table 2-2 lists the Spring 2.5 dependencies, including their short descriptions.
Table 2.2. Spring Dependencies
Dependency Group | JAR Files | Description |
|---|---|---|
|
| Spring uses Apache Ant as its build tool, as well as for many tasks such as generating documentation and running tests. Ant is not used at all at runtime, so you do not need to include this JAR file in your distribution. |
|
| The AOP Alliance ( |
|
| Spring uses the Apache Axis project to support the JAX-RPC capabilities in Spring remoting. You only need these files if you are using JAX-RPC remoting. |
|
| Spring remoting provides support for a wide variety of different protocols, including Caucho's Burlap and Hessian. You only need the JARs in this group if you are using the corresponding protocols in your application. |
|
| CGLIB is used to generate dynamic proxy classes for use in both the core DI and AOP implementations. You almost always need to include CGLIB with your application, because it is used to implement a wide range of Spring's functionality. |
|
| COS stands for |
|
| You must have dom4j when you are using Hibernate, so you need to include this JAR file if you plan to use Hibernate for ORM in your application. |
|
| EasyMock is used in the Spring test suite, so you only need to use this JAR for building and running the test suite; you do not need to distribute this with your application. |
|
| Spring provides wrapper classes around the FreeMarker templating engine and also provides support for using FreeMarker templates as views for your web applications. This is required whenever you are using FreeMarker. |
|
| These JAR files are required when you are using Spring's Hibernate integration and support classes. If you are using a different ORM tool, such as iBATIS, you can leave these JARs out of your application. When you are using Hibernate, you must also include the CGLIB JAR file in your application. |
|
| The |
|
| These files are required when you are using Spring's iBATIS integration classes, but you can leave them out of your application if you are using JDBC or another ORM tool such as Hibernate or JDO. |
|
| Spring uses iText to provide PDF support in the web tier. Only include this JAR if your web applications need to generate PDF output. |
|
| As you can see, there is a large array of different Java EE-related JAR files. You need the |
|
| Many of the components from the Jakarta Commons project are used by Spring. You need the |
|
| This is the Jakarta JSTL implementation, and it is used by some of the Spring sample applications. |
|
| This is required when you are using Spring's JDBC classes in an application running on the JBoss application server. |
|
| This is required for Spring's JDO support. |
|
| JDOM is required when you are using iBATIS 1.3 with Spring. The version of iBATIS covered in this chapter is 2.0. |
|
| The |
|
| JUnit is not required at all at runtime; it is only used for building and running the test suite. |
|
| This is required when you want to use Spring to configure log4j logging. |
|
| This adds support for Microsoft Excel output to Spring's MVC framework. |
|
| This is used for Spring Quartz-based scheduling support. |
|
| This is required when you are using regular expressions to specify point cuts in AOP. You can find more details on this in Chapter 6. |
|
| The Struts JAR is required whenever you want to use Struts in conjunction with Spring to build a web application. |
|
| Spring provides wrapper classes around Velocity to make it DI enabled and to reduce the amount of code you need to write to use Velocity in your application. In addition to this, Spring provides classes to support the use of Velocity as the view provider in the web tier. If you are using any of these features, you need to include the Velocity JAR files in your distribution. |
|
| Commons Attributes uses this to parse your source code files and extract the attribute information. Include this JAR file if you are using Spring's Commons Attributes support. |
We found that the best way to create applications is to start with the minimal set of dependencies and only add another JAR if necessary. The main reason for this is neither speed nor size but the possibility of conflict when two dependent libraries rely on different versions of the same library. In this case, most developers take the latest (or later) version and try to get the application to compile. If that works and the tests verify that the application is working correctly, they assume that the conflict is resolved. This approach usually works, and until there is more widespread support for OSGi modules, we have no other choice. Welcome to JAR hell!
An area where many open source, and indeed commercial, products fail is in providing enough well documented sample code to make it easy for people to get started. Thankfully, Spring comes with a complete set of nifty sample applications that demonstrate a wide selection of the features in Spring. A point to note is that the sample applications are treated as first-class citizens of the framework by the development team, and they are constantly being improved and worked on by the team. For this reason, you generally find that, after you get what you can from the test suite, the samples are a great place to get started when you are looking at new features.
The PetClinic Application
PetClinic is an interesting sample application that was built to showcase Spring's data access support. In it, you find a web-based application for querying and updating the database of a fictional veterinary office. The interesting thing about this application is that it comes with a selection of interchangeable data access implementations that highlight how easy it is to decouple your application from the data access logic when you are using Spring.
The Hibernate data access implementation really shows off Spring's Hibernate support by implementing each of the eight data access methods with a single line. The JDBC implementation is equally interesting. First, much of the JDBC logic is contained in an abstract base class. This class provides hook methods for subclasses when you need to use provider-specific SQL features—in the PetClinic case, this happens with the automatic generation of primary keys. Second, when you are looking at the base class, it is interesting to see how much of the repetitive error-handling code that is prevalent when you are using JDBC is removed. Third, it is very interesting to see how data access is handled in a much more object-oriented way.
This project also contains a very solid example of how to build a web application using Spring's MVC support, so if you are planning to use Spring MVC for one of your own applications, make sure you take a look at this sample first.
We cover JDBC support in Chapter 9, Hibernate in Chapter 11, and Spring MVC in Chapter 17.
The PetPortal Application
This application offers sample implementation of the Portlet MVC support in Spring using the favorite pet shop scenario. It is a simplified jPetStore application; it demonstrates wizard-style controllers and validators, file upload handling, and redirection to external web sites.
The jPetStore Application
The jPetStore application is based on the jPetStore sample created by Clinton Begin for iBATIS. As far as sample applications go, this one is huge. It contains a full DAO layer, created using Spring and iBATIS, with implementations for Oracle, Microsoft SQL Server, MySQL, and PostgreSQL. The business tier is fully Spring managed and, coupled with the DAO layer, it presents a good example of Spring-managed transactions.
Also included with this application is a solid example of how to use both Spring MVC and Struts. This application also highlights how to use Spring remoting using JAX-RPC.
Spring MVC is covered in Chapters 17, iBATIS in Chapter 10, and Spring remoting in Chapter 15.
The Tiles Example Application
Tiles is one of our favorite open source tools, because it reduces a lot of the drudge work when you are building user interfaces for the Web, and it really helps separate individual UI elements into reusable fragments. Because of this, the Tiles support in Spring is especially welcome, and this sample application makes getting started with Tiles in your own sample application easy.
We cover Tiles in detail in Chapter 17.
The ImageDB Application
This is one of our favorite sample applications, because it shows off loads of useful Spring features. Specifically, you see how to load and store large binary objects (LOBs) in a database, how to handle file uploads, and how to schedule jobs using the Quartz job scheduler. As if that weren't enough, you also see how to use Velocity as the view technology in the web tier.
We cover LOBs in Chapters 9 and 11, file uploads in Chapter 17, job scheduling in Chapter 12, and Velocity support in Chapter 17.
The JasperRepots Application
Reports are one of the most dreaded programming tasks; this application shows how to use the JasperReports framework to ease the development of PDF and Excel reports without a single line of Java web code. We discuss the reporting support in Chapter 17.
JCA-10 Application
The aim of the sample is to show how to use the support of JCA CCI 1.0 in Spring. It uses the sample JCA connector of the Java EE SDK version 1.3 modified to be used with Hypersonic and to execute SQL requests directly on the CCI interaction specification. The connector of the sample only supports local transactions and works in a stand-alone mode.
To use it in a managed mode, you must package the JAR in spring-cciblackbox-tx.rar and deploy it on your JCA 1.0-compliant application server (for example, JBoss 4).
The Countries Application
This is an intriguing example that demonstrates some of the more advanced features of Spring MVC. It looks at using HandlerInterceptors to provide common preprocessing for your controllers as well as utilizing Excel and PDF output for the view technology. This example is quite small and is certainly worth a look if you are planning to use Excel or PDF within your application. We cover HandlerInterceptors as well as Excel and PDF integration in Chapter 16.
Now that you have the full Spring distribution, it is time to look at how you set it up in your favorite IDE. While you can use command-line tools (such as ant and maven) to build your applications, working in an IDE is much more comfortable. Also, having the Spring libraries set up is useful, so you can step into their code. We will use IntelliJ IDEA, though other IDEs are just as easy to set up.
Regardless of your choice of IDE, let's first examine the directory structure of the applications we will show in this book. Figure 2-1 shows the directory structure of the sample application for this chapter.

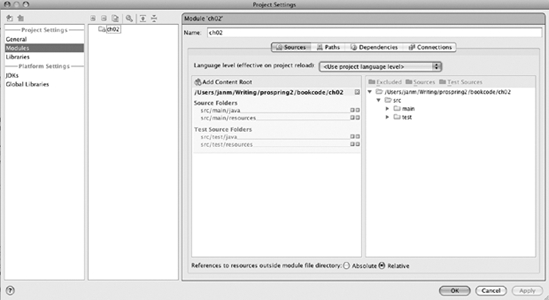
The directory structure shows that we have one src directory that contains code for the main code and test code. Each of the test and main source directories further has the java and resources subdirectories. All Java code goes into the java directory; all other files that are not Java source code, but make up part of the application, go to the resources directory. Next, we have the lib directory at the same level as the entire project. We do not just leave all JAR files in the lib directory; instead, we create subdirectories with some descriptive names. For the application in this chapter, we will only need the lib/org/springframework/spring.jar library. Figure 2-2 shows how we have set up the module in IntelliJ IDEA—you can clearly see the source and test source directories.
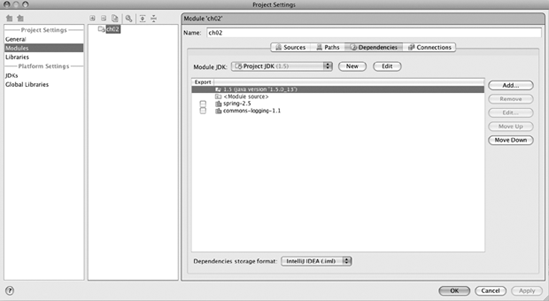
This would be enough to start writing plain Java code, but we know that we are going to write some Spring code! To prepare for that, we need to add the libraries we are going to need: spring.jar and commons-logging-1.1.jar. Figure 2-3 shows these libraries set up in IntelliJ IDEA.

In Figure 2-3, you can see that we have added the spring.jar library and its dependency, commons-logging-1.1. We have also attached the spring-sources.jar, which contains the source code compiled into spring.jar. Finally, Figure 2-4 shows that we have added the two libraries as module dependencies.
Once you have all this set up, you are ready to follow the source code we are going to show in this chapter. Alternatively, you can open the sample application project, which includes code for all chapters.
Let us put all worries about different versions of dependent libraries and even the JARs that make up the Spring distribution aside and write a "Hello, World" application. Throughout this chapter, we will improve this application using traditional programming and then refactor the application to use the Spring Framework. Listing 2-3 shows a typical "Hello, World" application.
Example 2.3. Typical "Hello, World"
public class TypicalHelloWorld {

    public static void main(String[] args) {
        System.out.println("Hello, world.");
    }

}
The code is trivial but also completely impossible to extend or modify. If we wanted to print the message to standard error stream, we would need to modify the source code and recompile. It would be nice if we had one piece of code that provided the message and other code that took care of outputting the message. Our first attempt could be the code in Listing 2-4.
Example 2.4. Attempt to Make the "Hello, World" Application More Generic
final class MessageSource {
    private final String message;

    public MessageSource(String message) {
        this.message = message;
    }

    public String getMessage() {
        return message;
    }
}

class MessageDestination {

    public void write(PrintStream out, String message) {
        out.println(message);
    }

}

public class CloselyCoupledHelloWorld {

    public static void main(String[] args) {
        MessageSource source = new MessageSource("Hello, world");
        MessageDestination destination = new MessageDestination();
        destination.write(System.out, source.getMessage());
    }

}
This code looks more generic and more configurable but is actually even worse than the original code in Listing 2-3: it is still too closely coupled but is more complicated. We can achieve significant improvement if we make the MessageSource and MessageDestination interfaces and change the MessageDestination's write method so that it does not require the PrintStream argument. Figure 2-5 shows a UML diagram of the changed solution.

Now, this approach is much better. The DecoupledHelloWorld class directly uses only the interfaces; each interface has only one implementation. However, the DecoupledHelloWorld still needs to create the instances of the interfaces (see Listing 2-5).
Example 2.5. Still Closely Coupled Implementation of "Hello, World"
public class DecoupledHelloWorld {

    public static void main(String[] args) {
        MessageSource source = new SimpleMessageSource("Hello, world");
        MessageDestination destination = new StdoutMessageDestination();

        destination.write(source.getMessage());
    }

}
The problematic lines are in bold: even though the rest of the code uses the interfaces, the DecoupledHelloWorld application is directly aware of the implementations. It would be better if we could use some kind of factory. This factory would could use arbitrarily complex configuration rules and ultimately return properly configured instances of the MessageSource and MessageDestination implementations. Review the UML diagram in Figure 2-6, which illustrates the factory.
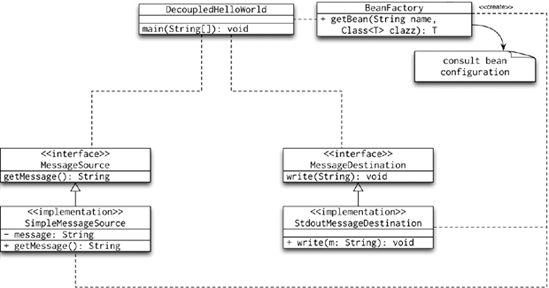
Now, DecoupledHelloWorld only uses the factory, and the factory manages the creation of the appropriate beans and returns them to DefaultHelloWorld. The name argument in the getBean method uniquely identifies the bean. Therefore, the factory takes care of the life cycle of the beans it manages. Take a look at Listing 2-6; it shows a possible implementation of the BeanFactory, which uses a properties file to determine the classes of beans it needs to instantiate.
Example 2.6. Implementation and Use of the BeanFactory Class
com.apress.prospring2.ch02.decoupled.beanfactory.BeanFactory
public class BeanFactory {
    private Map<String, String> beanDefinitions;

    public BeanFactory(String beanDefinitionsSource) {
        readBeanDefinitions(beanDefinitionsSource);
    }

    private void readBeanDefinitions(String beanDefinitionsSource) {
        Properties props = new Properties();
        InputStream is = BeanFactory.class.getResourceAsStream(
            beanDefinitionsSource);
        if (is == null) {
           throw new RuntimeException("Could not load properties file " +
               beanDefinitionsSource);
        }
        try {
            props.load(is);
            is.close();
            this.beanDefinitions = new HashMap<String, String>();
            for (Map.Entry<Object, Object> entry : props.entrySet()) {
                this.beanDefinitions.put(entry.getKey().toString(),
                    entry.getValue().toString());
            }
        } catch (IOException e) {
throw new RuntimeException("Could not read the properties file " +
beanDefinitionsSource);
}
}
public Object getBean(String name) {
String className = this.beanDefinitions.get(name);
if (className == null) return null;
try {
return Class.forName(className).newInstance();
} catch (Exception e) {
throw new RuntimeException("Could not create bean " + name);
}
}
}
com.apress.prospring2.ch02.decoupled.demo.FactoryDecoupledHelloWorld
public class FactoryDecoupledHelloWorld {
public static void main(String[] args) {
BeanFactory bf =
new BeanFactory("/META-INF/plain/helloworld-context.properties");
MessageSource source = (MessageSource) bf.getBean("source");
MessageDestination destination =
(MessageDestination) bf.getBean("destination");
destination.write(source.getMessage());
}
}
META-INF/plain/helloworld-context.properties
source=com.apress.prospring2.ch02.decoupled.source.SimpleMessageSource
destination=com.apress.prospring2.ch02.decoupled.destination. StdoutMessageDestination
This design is flexible enough, but there is one drawback: the BeanFactory class is directly tied to using Java properties files as the source of the bean configuration data.
It would be better if there were another interface that maintained the life cycles of all beans, some kind of BeanRegistry. Then, we would have BeanDefinitionReader implementations that understand particular format of the bean definition file. The readers would read the file and register all beans found in the file. The factory would then use the registry to obtain bean definitions (regardless of where the definitions came from) and create the required beans. But wait! We would be wasting our time, because this is exactly what Spring does!
Finally, we get to a point where we can take a look at using Spring in our "Hello, World" application. We have improved it in the previous listings, but we have ended up writing a lot of code to do that. Listing 2-7 shows how we can achieve the same result with just one Java source file, one properties file, and the Spring Framework.
Example 2.7. Using Spring to Simplify the Sample Code
import org.springframework.beans.factory.support.BeanDefinitionReader;
import org.springframework.beans.factory.support.DefaultListableBeanFactory;
import org.springframework.beans.factory.support.PropertiesBeanDefinitionReader;
import org.springframework.core.io.ClassPathResource;
import com.apress.prospring2.ch02.decoupled.MessageSource;
import com.apress.prospring2.ch02.decoupled.MessageDestination;

public class FirstSpringHelloWorld {

    public static void main(String[] args) {
        DefaultListableBeanFactory bf = new DefaultListableBeanFactory();
        BeanDefinitionReader reader = new PropertiesBeanDefinitionReader(bf);
        reader.loadBeanDefinitions(
           new ClassPathResource("/META-INF/spring/helloworld-context.properties"));

        MessageSource source = (MessageSource) bf.getBean("source");
        MessageDestination destination =
           (MessageDestination) bf.getBean("destination");

        destination.write(source.getMessage());
    }

}
This code works just like the code we would eventually get to using our refactoring techniques: it creates a BeanFactory as an instance of DefaultListableBeanFactory. The DefaultListableBeanFactory class also implements BeanDefinitionRegistry. Next, we create BeanDefinitionReader, in our case PropertiesBeanDefinitionReader, giving it reference to the BeanDefinitionRegistry instance. On the next line, we call the loadBeanDefinitions method, and we give it a Resource implementation called ClassPathResource. Once the loadBeanDefinitions method finishes, the BeanDefinitionRegistry is set up, and the BeanFactory can use it to give us instances of the defined beans. We do just that with the two calls of the getBean method. We only need to give it the bean name. Finally, we use the returned beans to get the "Hello, world" message.
Before we can run this application, we need to create the /META-INF/spring/helloworld-context.properties file. Listing 2-8 shows this file.
Example 2.8. The helloworld-context.properties File
source.(class)=com.apress.prospring2.ch02.decoupled.source.SimpleMessageSource destination.(class)=com.apress.prospring2.ch02.decoupled.destination.StdoutMessageDestination
As you can see, the format of this file is almost exactly the same as the format we have chosen for our non-Spring application. When you now compile and run the FirstSpringHelloWorld application, you will see the familiar "Hello, world" message.
The code you have seen until now does not use the DI pattern. It uses dependency lookup. We will explore the dependency injection pattern in far more detail in the next chapter, but for now, consider that the code in FirstSpringHelloWorld had to know the names of the MessageSource and MessageDestination beans. It had to look them up and then use them. This clouds the implementation, because in addition to the problem we are trying to solve, we need to know details about the setup of the application. It would be much better if the MessageSource and MessageDestination interfaces somehow got automatically set. To get you started, we will show you how to create a MessageService, which uses MessageSource and MessageDestination beans, but we will use Spring to inject the MessageSource and MessageDestination beans into the MessageService bean. Listing 2-9 shows the implementation of MessageService.
Example 2.9. MessageService Implementation
public interface MessageService {

    void execute();

}

public class DefaultMessageService implements MessageService {
    private MessageSource source;
    private MessageDestination destination;

    public void execute() {
        this.destination.write(this.source.getMessage());
    }

    public void setSource(MessageSource source) {
        this.source = source;
    }

    public void setDestination(MessageDestination destination) {
        this.destination = destination;
    }
}
We intend to use the implementation of the MessageService, the DefaultMessageService, in the main method in the DISpringHelloWorld example. If you look at the code in Listing 2-10, you will see that we only get the service bean, but we do not control the creation and life cycle of the service bean—we leave that to Spring.
Example 2.10. The Dependency Injection Spring Application
public class DISpringHelloWorld {

    public static void main(String[] args) {
        DefaultListableBeanFactory bf = new DefaultListableBeanFactory();
        BeanDefinitionReader reader = new PropertiesBeanDefinitionReader(bf);
        reader.loadBeanDefinitions(
          new ClassPathResource("/META-INF/spring/helloworld2-context.properties"));

        MessageService service = (MessageService) bf.getBean("service");
        service.execute();
    }

}
The last piece of puzzle is the helloworld2-context.properties file. Somehow, this file must contain enough information to tell Spring that to create an instance of bean named service, it must first create instances of the source and destination beans and then inject them (e.g., invoke the setSource and setDestination methods) on the service bean. Listing 2-11 shows just how easy it is to do that.
Example 2.11. The helloworld2-context.properties file
source.(class)=com.apress.prospring2.ch02.decoupled.source.SimpleMessageSource destination.(class)=com.apress.prospring2.ch02.decoupled.destination.StdoutMessageDestination service.(class)=com.apress.prospring2.ch02.spring.DefaultMessageService # 1 service.source(ref)=source # 2 service.destination(ref)=destination # 3
Line number one defines a bean named service as an instance of DefaultMessageService. The dependency injection instructions are on the lines numbered two and three. When we then call getBean("service") in the main method, Spring will use this information to create the three beans and return the fully constructed instance of the DefaultMessageService.
There is much more to dependency injection in Spring, and we give far more detail in the following chapters, but this is a good starting point for further experiments. The most difficult part to grasp for Spring newbies is that the objects seem to live in thin air; it is usually difficult to give up control over construction of objects and let the framework handle it.
If you design your application in a similar way to the design we have taken in the last section of this chapter, the impact of using the Spring Framework will be absolutely minimal. Spring heavily promotes coding to interfaces—your code should be split into interfaces and their implementations. The interfaces form the beans that other beans can use, as you have seen in MessageSource, MessageDestination, and more crucially, MessageService. The implementations then take full advantage of the dependency injection, but at no point do the various implementations of the interfaces need to be aware of each other. This gives the ultimate flexibility and testability of the applications you will create.
Even more importantly, the code in the interfaces and implementations is plain Java code; the implementations are not aware of the fact that they are running in a dependency injection context.
In this chapter, we have presented you with all the background information you need to get up and running with Spring. We showed you how to obtain both the Spring release distribution and the current development version directly from CVS. We described how Spring is packaged and the dependencies you need for each of Spring's features. Using this information, you can make informed decisions about which of the Spring JAR files your application needs and which dependencies you need to distribute with your application. Spring's documentation, sample applications, and test suite provide Spring users with an ideal base from which to start their Spring development, so we took some time to investigate what is available in the Spring distribution. Finally, we presented an example of how, using Spring DI, it is possible to make the traditional "Hello, World" application a loosely coupled, extendable message-rendering application.
The important thing to realize is that we only scratched the surface of Spring DI in this chapter, and we barely made a dent in Spring as a whole. In the next chapter, we take an in-depth look at the sample application that we will be building, paying particular attention to how we can use Spring to solve common design issues and how we have made our application simpler and more manageable using Spring.