
Transactions are pivotal parts of a reliable enterprise application. The simplistic view of a transaction includes the begin transaction command; SQL updates, deletes, and so on; and finally the commit/rollback command. But there's much more to transactions than this! In this chapter, we show you how to use declarative, rather than manually coded, transactions and how to span transactions across multiple transactional resources. We will also show you how to write code that can be synchronized with a transaction, in other words, how to write code that can participate in a transaction and receive commit/rollback notifications. Finally, we give you some advice on how to test transactional code.
Spring offers excellent support for declarative transactions, which means you do not need to clutter your code with transaction management code. You can use the traditional approach, where Spring creates proxies to the methods in a target bean, or you can use AOP and the tx-advice tag. In addition to these two methods, we will cover the following topics in this chapter.
First, we will take a look at the Spring transaction abstraction layer. We discuss the base components of Spring transaction abstraction classes and explain how to use these classes to control transaction properties.
Next, we will cover declarative transaction management. We show you how to use Spring to implement declarative transaction management using just plain Java objects. We offer examples for declarative transaction management using the configuration files as well as source-level metadata.
We will follow the declarative transaction management with programmatic transaction management. Even though programmatic transaction management is not used very often, we explain how to use the PlatformTransactionManager interface, which gives you ultimate control over the transaction management code.
Toward the end of the chapter, we will show you how to use the Java Transaction API (JTA) TransactionManager to manage transactions over multiple transactional resources. We also give examples of how to use the JtaTransactionManager, which allows you to include multiple transactional resources, such as a database and message queue, in a single transaction.
Finally, we will show you how to implement your own transaction synchronization to receive callbacks from the TransactionSynchronizationManager whenever the active transaction's status changes.
Whether you use Spring or not, you have to make a fundamental choice when you use transactions—whether to use global or local transactions. Local transactions are specific to a single transactional resource (a JDBC connection, for example), whereas global transactions are managed by the container and can include multiple transactional resources.
Local transactions are easy to manage, and because most operations work with just one transactional resource (such as a JDBC transaction), using local transactions is enough. However, if you are not using Spring, you still have a lot of transaction management code to write, and if at some time in the future the scope of the transaction needs to be extended across multiple transactional resources, you will have to drop the local transaction management code and rewrite it to use global transactions.
Global transactions in non-Spring applications are, in most cases, coded using JTA, a complex API that depends on JNDI, which means that you almost invariably have to use a Java EE application server. Rather than implementing JTA transactions programmatically, you can use EJB Container Managed Transactions (CMT) functionality, which is provided by a Java EE application server. This allows you to simply declare which operations are to be enlisted in a transaction; once you do, the container takes care of transaction management. This is the preferred management strategy because the code you write does not contain any explicit transactional code and all the hard work is delegated to the container. Another great advantage of EJB CMT is that it removes the need to work with the JTA API directly, though by definition, you still have to use EJBs.
Ideally, you will have a container that supports global and local declarative and programmatic transactions without needing EJBs. Even though declarative transactions are the favored approach, there can sometimes be a place for programmatic transactions.
We start with a summary of a standard transaction. However, keep in mind that everything we are going to write applies to more than just database operations. In most cases, it is true that a database is heavily involved, but nothing stops us from extending the concept of transactions from the database to other transactional resources.
Transactions have the four well-known ACID properties—atomicity, consistency, isolation, and durability—and the transactional resources must maintain these aspects of a transaction. You cannot control the atomicity, consistency, or durability of a transaction, but you can control the timeout, set whether the transaction should be read-only, and specify the isolation level.
Note
In an ideal situation, you would not have to worry about independence, either: all transactions would be completely independent. In reality, having independent transactions means executing the transactions serially (i.e., one after another). This ensures complete isolation but severely limits the throughput of the system. You can use the isolation level value to control how independent the transactions really are.
Spring encapsulates all these settings in the TransactionDefinition interface. This interface is used in the core interface of the transaction support in Spring, the PlatformTransactionManager, whose implementations perform transaction management on a specific platform, such as JDBC or JTA. The core method, PlatformTransactionManager.getTransaction(), returns a TransactionStatus reference, which is used to control the transaction execution; more specifically, it can be used to set the transaction result and to check whether the transaction is read-only or whether it is a new transaction.
As we mentioned earlier, the TransactionDefinition interface controls the properties of a transaction. Let's take a more detailed look at the TransactionDefinition interface (see Listing 16-1) and describe its methods.
Example 16.1. TransactionDefinition Interface
public interface TransactionDefinition {
    int getPropagationBehavior();
    int getIsolationLevel();
    int getTimeout();
    boolean isReadOnly();
}
The simple and obvious methods of this interface are getTimeout(), which returns the time (in seconds) in which the transaction must complete, and isReadOnly(), which indicates whether the transaction is read-only. The transaction manager implementation can use this last value to optimize transaction execution and to make sure that the transaction is performing only reads.
The other two methods, getPropagationBehavior() and getIsolationLevel(), need to be discussed in more detail. We begin with getIsolationLevel, which controls what changes to the data other transactions see. Table 16-1 lists the transaction isolation levels you can use and explains what changes made in the current transaction other transactions can access.
Table 16.1. Transaction Isolation Levels
Isolation Level | Description |
|---|---|
| This is the default isolation level for an individual |
| This is the lowest level of isolation; we cannot really call this an isolation level, because other transactions can see data modified by this transaction even before it completes. This transaction can also see all changes other transactions perform even before they are committed. |
| This is the default level in most databases; it specifies that other transactions cannot see the data modifications before this transaction completes. Unfortunately, you can select data inserted or updated by other transactions once they commit in this transaction. This means that at different points in this transaction, you can see different data as other transactions modify it. |
| More strict than |
| This is the most expensive and reliable isolation level; all transactions are treated as if they were executed one after another. |
Choosing the appropriate isolation level is very important for the consistency of the data, but the choices you make can have a great impact on performance. The highest isolation level, TransactionDefinition.ISOLATION_SERIALIZABLE, is particularly expensive to maintain.
The getPropagationBehavior method specifies what Spring does when your code requests a new transaction. The values for this method are listed in Table 16-2.
Table 16.2. Propagation Behavior Values
Propagation Behavior | Description |
|---|---|
| Spring will use an active transaction if it exists. If not, Spring will begin a new transaction. |
| Spring will use an active transaction; if there is no activetransaction, Spring will not start a new one. |
| Spring will use an active transaction; if there is no active transaction, Spring will throw an exception. |
| Spring will always start a new transaction. If an active transaction already exists, it is suspended. |
| Spring will not execute the code in an active transaction. The code always executes nontransactionally and suspends any existing transaction. |
| This always executes nontransactionally even if an active transaction exists. It throws an exception if an active transaction exists. |
| This runs in a nested transaction if an active transaction exists. If there is no active transaction, the code runs as if |
The TransactionStatus interface, shown in Listing 16-2, allows a transaction manager to control transaction execution. The code can check whether the transaction is a new one or whether it is a read-only transaction. You can also use the TransactionStatus reference to initiate a rollback.
Example 16.2. TransactionStatus Declaration
public_interface_TransactionStatus_{
    boolean_isNewTransaction();
    void_setRollbackOnly();
    boolean_isRollbackOnly();
}
The methods of the TransactionStatus interface are fairly self-explanatory; the most notable one is setRollbackOnly(), which marks the transaction as uncommittable. In other words, the only operation you can perform after calling setRollbackOnly() is a rollback. In most cases, the transaction manager will detect this and end the transaction immediately after it notices that it would have to commit. The pseudo code in Listing 16-3 demonstrates this.
Example 16.3. Usage of setRollbackOnly()
begin
SQL: select * from t_user;
Java: setRollbackOnly();
SQL: select * from t_user_address where user = ?
SQL: update t_user_address set primary = 1 where id = ?
SQL: select * from t_product
After the call to setRollbackOnly(), most databases allow the next select statement to execute but will fail on the update statement—it would be pointless to perform the update; because the transaction is read-only, the modification would not be committed.
The PlatformTransactionManager interface uses the TransactionDefinition and TransactionStatus interfaces to create and manage transactions. The actual implementations of this interface must have detailed knowledge of the transaction manager. The DataSourceTransactionManager controls transactions performed on JDBC Connection instances obtained from a DataSource; HibernateTransactionManager controls transactions performed on a Hibernate session; JdoTransactionManager manages JDO transactions; and JtaTransactionManager delegates transaction management to JTA.
The first part of this chapter gave you a quick overview of the transaction infrastructure in Spring, but we are sure you will appreciate an example that demonstrates how to use Spring transaction support.
There are three basic ways to implement an operation that uses transactions: you can use declarative transactions, where you simply declare that a method requires a transaction; you can use source-level metadata to indicate that a method requires a transaction; or you can actually write code that handles the transactions. Spring supports all three approaches; we begin with the most flexible and convenient one—declarative transaction management.
First, we will show you several implementations of transaction support. Take a look at the UML diagram in Figure 16-1 to get a sense of what is in store in the sample application.
Even though the class diagram may seem complex, we will be implementing a naïve banking application. We have the Account class that holds the account balance (this is a gross simplification of real bank accounts, but it is all we need for this example); we use the AccountIdentity to uniquely identify the bank account. The BalanceMutator interface has a single method, mutate(BigDecimal). We implement this interface in the BankServiceSupport; the CreditBalanceMutator adds the amount to be credited to the balance argument. The DebitBalanceMutator is slightly more complicated; it checks whether there is enough money in the account to debit the specified amount. If you want to explore this concept further, you can modify the DebitBalanceMutator to allow for overdrafts, for example.
The AccountDao defines a data access interface, which we implement in the JdbcAccountDao class. Next, we have the BankService interface with the transfer and getBalance methods. The BankServiceSupport implements these two methods, even if only as protected methods with the do prefix. We will use the BankServiceSupport subclasses to demonstrate the various transaction management techniques.

Before we can begin discussing transactional management, we need to write the necessary support code. Let's begin with the SQL code in Listing 16-4 that creates the t_account table and inserts several testing accounts.
Example 16.4. SQL Code for the Sample Banking Application
create table t_account (
    id number(19, 0) not null,
    sort_code varchar2(6) not null,
number_ varchar2(8) not null,
balance number(19, 2) not null,
constraint pk_account primary key (id)
)
/
insert into t_account (id, sort_code, number_, balance)
values (1, '011001', '12345678', 1000.0)
/
insert into t_account (id, sort_code, number_, balance)
values (2, '011001', '87654321', 100.0)
/
insert into t_account (id, sort_code, number_, balance)
values (3, '011001', '10203040', 0.0)
/
insert into t_account (id, sort_code, number_, balance)
values (4, '011001', '50607080', 30.0)
/
insert into t_account (id, sort_code, number_, balance)
values (5, '011001', '10000000', 1000000.0)
/There is nothing unusual about the SQL code; if you are not using an Oracle 10g database, you may need to tweak the SQL syntax to make the code run in your particular database. Next, we need to look at the Account and AccountIdentity classes and the BalanceMutator interface. For brevity, we show the two classes and interface in Listing 16-5.
Example 16.5. Account, AccountIdentity, and BalanceMutator
Account.java:
public class Account {
    private Long id;
    private AccountIdentity identity;
    private BigDecimal balance;

    public void changeBalance(BalanceMutator mutator) {
        this.balance = mutator.mutate(this.balance);
    }

    // getters and setters
}

AccountIdentity.java:
public final class AccountIdentity implements Serializable {
    private static final long serialVersionUID = 3287882727785753918L;
    private String sortCode;
    private String number;

    public AccountIdentity() {
    }

    public AccountIdentity(String sortCode, String number) {
        Assert.notNull(sortCode, "The 'sortCode' argument must not be null.");
        Assert.notNull(number, "The 'number' argument must not be null.");
this.sortCode = sortCode;
        this.number = number;
    }
    ...
    // getters and setters
}

BalanceMutator.java:
public interface BalanceMutator {

    BigDecimal mutate(BigDecimal balance);

}
You can see that the Account class has a synthetic identity (Long id). The synthetic identity is the implementation detail: we need the synthetic ID in our code, but it is meaningless to the users; they use the account number and sort code to identify their accounts. The Account class has only one significant method: changeBalance(BalanceMutator). This method uses the BalanceMutator instance to update the balance of the account.
Note
We have chosen to use the BalanceMutator to update the balance of the accounts, because we suspect that the rules that govern balance updates may be quite complex. Using an interface that we implement in the service layer is more flexible than having simple credit(BigDecimal) and debit(BigDecimal) methods on the Account class.
Next, we take a look at the sample application's data access layer. For simplicity, we will use the SimpleJdbcTemplate (go to Chapter 9 for more details on Spring JDBC support). We take an approach typical for Spring applications: we create the AccountDao interface and a single implementation, JdbcAccountDao. Listing 16-6 shows the source code of both the interface and the implementation.
Example 16.6. The AccountDao Interface and the JdbcAccountDao Implementation
AccountDao.java:
public interface AccountDao {

    void save(Account account);

    Account getByIdentity(AccountIdentity accountIdentity);

}

JdbcAccountDao.java
public class JdbcAccountDao extends SimpleJdbcDaoSupport implements AccountDao {
    private static final String INSERT_SQL =
            "insert into t_account (id, sort_code, number_, balance) values " +
                    "(?, ?, ?, ?)";
    private static final String UPDATE_SQL =
            "update t_account set balance=? where id=?";
    private static final String SELECT_SQL =
            "select id, sort_code, number_, balance from t_account " +
                    "where sort_code=? and number_=?";
public void save(Account account) {
        if (account.getId() == null) {
            // insert
            getSimpleJdbcTemplate().update(INSERT_SQL,
                    account.getId(),
                    account.getIdentity().getSortCode(),
                    account.getIdentity().getNumber(),
                    account.getBalance());
        } else {
            // update
            getSimpleJdbcTemplate().update(UPDATE_SQL,
                    account.getBalance(),
                    account.getId());
        }
    }

    public Account getByIdentity(AccountIdentity accountIdentity) {
        return getSimpleJdbcTemplate().queryForObject(SELECT_SQL,
                new ParameterizedRowMapper<Account>() {
                    public Account mapRow(ResultSet rs, int rowNumber)
                            throws SQLException {

                        Account account = new Account();
                        account.setId(rs.getLong(1));
                        AccountIdentity identity = new AccountIdentity(
                                rs.getString(2),
                                rs.getString(3)
                        );
                        account.setIdentity(identity);
                        account.setBalance(rs.getBigDecimal(4));
                        return account;
                    }
                }, accountIdentity.getSortCode(), accountIdentity.getNumber());
    }
}
We have tried to keep the code as simple as possible; keep in mind that we are not showing Spring JDBC, just implementing the data access layer code to demonstrate Spring transaction management. Finally, we implement the BankServiceSupport; we will use this class as the superclass for our transactional BankService implementations. To that effect, the BankServiceSupport implements the BankService methods as protected methods with the do prefix. Listing 16-7 shows the BankServiceSupport implementation.
Example 16.7. BankServiceSupport Code
public abstract class BankServiceSupport {
    private AccountDao accountDao;

    protected abstract static class BalanceMutatorSupport
            implements BalanceMutator {
        private BigDecimal amount;
BalanceMutatorSupport(BigDecimal amount) {
Assert.notNull(amount, "The 'amount' argument must not be null.");
this.amount = amount;
}
protected final BigDecimal getAmount() {
return this.amount;
}
protected abstract BigDecimal doMutate(BigDecimal balance);
public final BigDecimal mutate(BigDecimal balance) {
return doMutate(balance);
}
}
protected static class CreditBalanceMutator
extends BalanceMutatorSupport {
CreditBalanceMutator(BigDecimal amount) {
super(amount);
}
protected BigDecimal doMutate(BigDecimal balance) {
return balance.add(getAmount());
}
}
protected static class NoOverdraftDebitBalanceMutator
extends BalanceMutatorSupport {
NoOverdraftDebitBalanceMutator(BigDecimal amount) {
super(amount);
}
protected BigDecimal doMutate(BigDecimal balance) {
BigDecimal result = balance.subtract(getAmount());
if (result.compareTo(new BigDecimal(0)) < 0)
throw new InsufficientFundsException(getAmount().subtract(balance));
return result;
}
}
protected void doTransfer(AccountIdentity from, AccountIdentity to,
BigDecimal amount) {
Account fromAccount = this.accountDao.getByIdentity(from);
if (fromAccount == null) throw new UnknownAccount(from);
Account toAccount = this.accountDao.getByIdentity(to);
if (toAccount == null) throw new UnknownAccount(to);
fromAccount.changeBalance(new NoOverdraftDebitBalanceMutator(amount));
toAccount.changeBalance(new CreditBalanceMutator(amount));
this.accountDao.save(fromAccount);
this.accountDao.save(toAccount);
}
protected BigDecimal doGetBalance(AccountIdentity accountIdentity) {
Account account = this.accountDao.getByIdentity(accountIdentity);
if (account == null) throw new UnknownAccount(accountIdentity);
return account.getBalance();
}public void setAccountDao(AccountDao accountDao) {
this.accountDao = accountDao;
}
}The doTransfer and doGetBalance methods implement the functionality of the BankService.transfer and BankService.getBalance methods; we have implemented them as protected methods because we will create different subclasses of the BankServiceSupport to demonstrate the different transaction management techniques Spring offers. Let's complete our nontransactional code with a nontransactional implementation of the BankServiceSupport class (see Listing 16-8).
Example 16.8. Nontransactional Implementation of the BankServiceSupport Class
public class DefaultBankService extends BankServiceSupport
        implements BankService {

    public void transfer(AccountIdentity from, AccountIdentity to,
                         BigDecimal amount) {
        doTransfer(from, to, amount);
    }

    public BigDecimal getBalance(AccountIdentity accountIdentity) {
        return doGetBalance(accountIdentity);
    }
}
The last pieces of the sample application are the Spring XML configuration files. We will split the configuration into two files: dao-context.xml and svc-context-*.xml. The dao-context.xml file will define the dataSource and accountDao beans; the svc-context-*.xml file will define the bankService bean. Listing 16-9 shows the dao-context.xml file.
Example 16.9. The dao-context.xml Configuration File
<?xml version="1.0" encoding="UTF-8"?>
<beans xmlns="http://www.springframework.org/schema/beans"
       xmlns:xsi="http://www.w3.org/2001/XMLSchema-instance"
       xsi:schemaLocation="
            http://www.springframework.org/schema/beans
           http://www.springframework.org/schema/beans/spring-beans.xsd">


    <bean id="dataSource"
        class="org.apache.commons.dbcp.BasicDataSource" destroy-method="close">
        <property name="driverClassName" value="oracle.jdbc.driver.OracleDriver"/>
        <property name="url"
            value="jdbc:oracle:thin:@oracle.devcake.co.uk:1521:INTL"/>
        <property name="username" value="PROSPRING"/>
        <property name="password" value="x******6"/>
    </bean>

    <bean id="transactionManager"
       class="org.springframework.jdbc.datasource.DataSourceTransactionManager">
        <property name="dataSource" ref="dataSource"/>
    </bean>

    <bean id="accountDao"
class="com.apress.prospring2.ch16.dao.jdbc.JdbcAccountDao">
<property name="dataSource" ref="dataSource"/>
</bean>
</beans>There are no surprises here: the dataSource bean is the Apache DBCP implementation of the DataSource, and we use the Oracle 10g database. The accountDao bean is the JdbcAccountDao implementation from Listing 16-6. To verify that the application works without Spring transaction support, we will create the svc-context-nt.xml file (see Listing 16-10).
Example 16.10. Nontransactional bankService Bean Configuration
<?xml version="1.0" encoding="UTF-8"?>
<beans xmlns="http://www.springframework.org/schema/beans"
       xmlns:xsi="http://www.w3.org/2001/XMLSchema-instance"
       xsi:schemaLocation="
            http://www.springframework.org/schema/beans
            http://www.springframework.org/schema/beans/spring-beans.xsd">


    <bean id="bankService"
          class="com.apress.prospring2.ch16.services.DefaultBankService">
        <property name="accountDao" ref="accountDao"/>
    </bean>
</beans>
The final piece is the sample application that creates the ClassPathXmlApplicationContext and uses the bankService bean to transfer some virtual money between two accounts. Listing 16-11 shows a simple application that displays the account balances, transfers some money, and displays the final balances.
Example 16.11. Sample Application for bankService
public class Main {

    public static void main(String[] args) {
        ApplicationContext ac = new ClassPathXmlApplicationContext(
                new String[] {
                        "/META-INF/spring/*-context.xml",
                        "/META-INF/spring/*-context-nt.xml"
                }
        );
        BankService bankService = (BankService) ac.getBean("bankService");
        final AccountIdentity a1 = new AccountIdentity("011001", "12345678");
        final AccountIdentity a2 = new AccountIdentity("011001", "10203040");

        System.out.println("Before");
        System.out.println(a1 + ": " + bankService.getBalance(a1));
        System.out.println(a2 + ": " + bankService.getBalance(a2));
        try {
            bankService.transfer(a1, a2, new BigDecimal("200.00"));
        } catch (Exception ignored) {
}
System.out.println("After");
System.out.println(a1 + ": " + bankService.getBalance(a1));
System.out.println(a2 + ": " + bankService.getBalance(a2));
}
}Using the data we inserted in the SQL script in Listing 16-4, the application runs and prints the following:
Before
AccountIdentity {01-10-01 1234-5678}: 1000
AccountIdentity {01-10-01 1020-3040}: 0
After
AccountIdentity {01-10-01 1234-5678}: 800
AccountIdentity {01-10-01 1020-3040}: 200
The application works: it can find an account in the database using the AccountIdentity object, modify the amount in each account, and persist it to the database. The only trouble is that the debit and credit operations are not tied together. If the credit operation fails, the system will not reverse the debit operation: in other words, we take money out of the payer account, fail to pay it into the payee account, and the money is lost. We need to ensure that the debit and credit operations are treated as a single command. Accountants would also like to see that the amounts transferred match—the account records need to be consistent at all times. Also, we need to make sure that while we are debiting the payer account, the account holder cannot use an ATM card to withdraw more money than there would be when the transfer completes. Finally, we also need to guarantee that once we complete the transfer, the information about the transfer will survive even if the database server goes down. In short, our transfer method needs to conform to the ACID requirements.
Before we begin discussing the different transaction management approaches, we need to write code that will simulate possible problems. We will modify the JdbcAccountDao class to fail randomly; Listing 16-12 shows the unreliable implementation of JdbcAccountDao.
Example 16.12. Randomly Failing JdbcAccountDao Class
public class JdbcAccountDao extends SimpleJdbcDaoSupport implements AccountDao {
    ...

    public void save(Account account) {
        Grinch.ruin();
        if (account.getId() == null) {
            // insert
            getSimpleJdbcTemplate().update(INSERT_SQL,
                    account.getId(),
                    account.getIdentity().getSortCode(),
                    account.getIdentity().getNumber(),
                    account.getBalance());
        } else {
            // update
            getSimpleJdbcTemplate().update(UPDATE_SQL,
                    account.getBalance(),
                    account.getId());
        }
    }
    ...
}
The Grinch.ruin() method throws a RuntimeException randomly, which is precisely what we need in order to demonstrate transaction management fully. We complete the nontransactional code with Listing 16-13, which shows the Grinch class.
Example 16.13. Implementation of the Grinch Class
public final class Grinch {
    private static final Random RND = new Random();
    private static final String MESSAGE = "Muhehe! It's broken now.";

    private Grinch() {

    }

    public static void ruin() {
        if (RND.nextInt() % 3 == 0) {
            System.out.println(MESSAGE);
            throw new RuntimeException(MESSAGE);
        }
    }

}We begin by looking at how you can use the PlatformTransactionManager directly, that is, programmatically. We will use the nontransactional code from the previous section but implement another subclass of the BankServiceSupport. Listing 16-14 shows the ProgrammaticTxBankService.
Example 16.14. ProgrammaticTxBankService Implementaiton
public class ProgrammaticTxBankService
        extends BankServiceSupport implements BankService{
    private PlatformTransactionManager transactionManager;

    public void transfer(AccountIdentity from, AccountIdentity to,
                         BigDecimal amount) throws Throwable {
        TransactionDefinition transactionDefinition =
                new DefaultTransactionDefinition(
                        TransactionDefinition.PROPAGATION_REQUIRED);
        TransactionStatus transactionStatus =
                this.transactionManager.getTransaction(transactionDefinition);
        try {
            doTransfer(from, to, amount);
            this.transactionManager.commit(transactionStatus);
        } catch (Throwable t) {
            this.transactionManager.rollback(transactionStatus);
            throw t;
        }
    }

    public BigDecimal getBalance(AccountIdentity accountIdentity) {
        return doGetBalance(accountIdentity);
    }
public void setTransactionManager(
PlatformTransactionManager transactionManager) {
this.transactionManager = transactionManager;
}
}The ProgrammaticTxBankService demonstrates how to write transaction management code manually. If we take a closer look at the transfer method, it is not difficult code. We create a new TransactionDefinition instance (the DefaultTransactionDefinition) and, to be explicit, we set the transaction propagation to TransactionDefinition.PROPAGATION_REQUIRED. We could have used the DefaultTransactionDefinition() constructor, which assumes that the propagation level is TransactionDefinition.PROPAGATION_REQUIRED.
Next, we use PlatformTransactionManager.getTransaction to start a transaction. When the PlatformTransactionManager begins the transaction, it returns a TransactionStatus instance, which identifies the transaction. We will need TransactionStatus in calls to PlatformTransactionManager.commit or PlatformTransactionManager.rollback. The rules for commit and rollback are quite simple: if the doTransfer method completes without any exception, we commit the changes; if it throws any exception, we roll back the changes. While the code to manually manage the transaction is not difficult, it obfuscates the important code. In fact, the only line in the transfer method that actually implements the requirements is doTransfer(from, to, amount). The rest of the code just implements transaction management.
Nevertheless, we have the code now, so let's use the ProgrammaticTxBankService in a sample application similar to the one in Listing 16-11; the only difference is that instead of using *-context-nt.xml we are going to use *-context-ptx.xml in the ClassPathXmlApplicationContext constructor. Listing 16-15 shows the svc-context-ptx.xml configuration file.
Example 16.15. The svc-context-ptx.xml Configuration File
<?xml version="1.0" encoding="UTF-8"?>
<beans xmlns="http://www.springframework.org/schema/beans"
       xmlns:xsi="http://www.w3.org/2001/XMLSchema-instance"
       xsi:schemaLocation="
            http://www.springframework.org/schema/beans
            http://www.springframework.org/schema/beans/spring-beans.xsd">

    <bean id="bankService"
          class="com.apress.prospring2.ch16.services.ProgrammaticTxBankService">
        <property name="accountDao" ref="accountDao"/>
        <property name="transactionManager" ref="transactionManager"/>
    </bean>
</beans>
This XML configuration file defines the bankService bean as an instance of the ProgrammaticTxBankService and sets the transactionManager reference. If we run the application a few times, the Grinch.ruin() method will do its worst and the application will print this:
Before
AccountIdentity {01-10-01 1234-5678}: 600
AccountIdentity {01-10-01 1020-3040}: 400
Muhehe! It's broken now.
After
AccountIdentity {01-10-01 1234-5678}: 600
AccountIdentity {01-10-01 1020-3040}: 400
The Grinch.ruin() method threw the RuntimeException, but we caught the exception in the ProgrammaticTxBankService.transfer method and rolled back the transaction. Therefore, the payer and payee accounts show the same balances before and after the failed transaction. No money got lost during the transfer.
If we wanted to use programmatic transaction control in more than one area of the system, we should refactor the way we interact with the PlatformTransactionManager. If we take a closer look at the transfer method, we can see that we have some common code that surrounds some specific code. This calls for the template method pattern, and Spring transaction support provides the TransactionTemplate class that implements the common code for the programmatic transaction management. All we have to do is supply the TransactionCallback implementation; its doInTransaction method represents the specialized section of the algorithm in the template method pattern. Listing 16-16 shows the ProgrammaticTxBankService using TransactionTemplate.
Example 16.16. ProgrammaticTxBankService Using TransactionTemplate
public class ProgrammaticTxBankService
        extends BankServiceSupport implements BankService{
    private TransactionTemplate transactionTemplate;

    public void transfer(final AccountIdentity from,
                         final AccountIdentity to,
                         final BigDecimal amount) throws Throwable {
        this.transactionTemplate.execute(new TransactionCallbackWithoutResult() {
            protected void doInTransactionWithoutResult(TransactionStatus status) {
                doTransfer(from, to, amount);
            }
        });
    }

    public BigDecimal getBalance(AccountIdentity accountIdentity) {
        return doGetBalance(accountIdentity);
    }

    public void setTransactionManager(
            PlatformTransactionManager transactionManager) {
        this.transactionTemplate = new TransactionTemplate(transactionManager);
    }
}
You can see that the preceding code is much simpler: all the transaction creation and exception-handling code is in the TransactionTemplate. Also notice that we have not implemented the TransactionCallback interface directly. Instead, we have chosen to implement the abstract class TransactionCallbackWithoutResult. This was only for convenience: the TransactionCallback.doInTransaction implementation must return Object, but we do not want to return anything at all. The TransactionCallbackWithoutResult is an abstract class that implements the TransactionCallback.doInTransaction method as final and delegates the processing to protected abstract void doInTransactionWithoutResult; when this method completes, the TransactionCallbackWithouResult.doInTransaction returns null.
Even though you can use programmatic transaction support (and the TransactionTemplate class greatly simplifies this), it is still a lot of work. If you cast your mind back to the AOP chapters (Chapters 5 and 6), you can see that transaction management is a good application of around advices. In the next section, we will take a look at the different options for declarative transaction management.
Declarative transaction management means that you don't write transaction management code in your beans at all; instead, you configure the beans to be transactional. We can therefore take the DefaultBankService from Listing 16-8 and specify in the bean configuration that we want the transfer method to be transactional. The simplest way to achieve this is to use a proxy: the proxy will intercept all method calls, and if the method name is included in the transactional configuration, the proxy will act as around advice. It will begin the transaction before the call to the target method and execute the target method in a try / catch block. If the target method finishes normally, the proxy commits the transaction; if the target method throws a runtime exception, the proxy performs a rollback. To do all this work, the proxy will use the configured PlatformTransactionManager. This is the core concept of declarative transaction management; the differences are in the way we can create the proxy. Let's begin with the legacy way, using the TransactionProxyFactoryBean.
The TransactionProxyFactoryBean has been with us since Spring 1.0, and Spring 2.5 still supports its functions, even though the implementation has changed substantially. In short, the factory bean creates a JDK proxy to the target bean and intercepts every method call. It decides how to handle any transactional code depending on additional configuration. Let's jump straight into an example; Listing 16-17 shows how we can create the proxy bean. We are going to use the TransactionProxyFactoryBean to declaratively specify transactional behavior of your beans.
Example 16.17. Using the TransactionProxyFactoryBean
<?xml version="1.0" encoding="UTF-8"?>
<beans xmlns="http://www.springframework.org/schema/beans"
       xmlns:xsi="http://www.w3.org/2001/XMLSchema-instance"
       xsi:schemaLocation="
            http://www.springframework.org/schema/beans
            http://www.springframework.org/schema/beans/spring-beans.xsd">

    <bean id="bankService"
          class="org.springframework.transaction.interceptor.
                        TransactionProxyFactoryBean">
        <property name="target">
            <bean class="com.apress.prospring2.ch16.services.DefaultBankService">
                <property name="accountDao" ref="accountDao"/>
            </bean>
        </property>
TransactionProxyFactoryBean">
<property name="target">
<bean class="com.apress.prospring2.ch16.services.DefaultBankService">
<property name="accountDao" ref="accountDao"/>
</bean>
</property><property name="transactionAttributes">
<value>
*=PROPAGATION_REQUIRED
</value>
</property>
<property name="transactionManager" ref="transactionManager"/>
</bean>
</beans>This configuration is not pretty, but it does an excellent job: the code in the DefaultBankService is not aware that the transfer method now runs in a transaction. Even though the TransactionProxyFactoryBean is the Spring 1.x-style of declarative transaction management, we will describe it in more detail in case you encounter it in existing Spring applications.
The TransactionProxyFactoryBean creates a JDK, which intercepts calls to all methods. For any method whose name appears as the key in the transactionProperties, it starts a transaction with the specified propagation level. In the example in Listing 16-17, all methods will be transactional, and the proxy will call code equivalent to that shown in Listing 16-18.
Example 16.18. Pseudo Code for the Calls to the bankService.transfer Method
TransactionDefinition transactionDefinition = new TransactionDefinition() {
    public int getPropagationBehavior() {
        return TransactionDefinition.PROPAGATION_REQUIRED;
    }

    public int getIsolationLevel() {
        return TransactionDefinition.ISOLATION_DEFAULT;
    }

    public int getTimeout() {
        return TransactionDefinition.TIMEOUT_DEFAULT;
    }

    public boolean isReadOnly() {
        return false;
    }

    public String getName() {
        return "Transaction-1";
    }
};
TransactionStatus transactionStatus =
           this.transactionManager.getTransaction(transactionDefinition);
try {
    target.invoke(arguments);
} catch (Throwable t) {
    if (t ( allowedExceptions)
       this.transactionManager.commit(transactionStatus);
    else if (t ( disallowedExceptions || disallowedExceptions.isEmpty())
       this.transactionManager.rollback(transactionStatus);
    throw t;
}
You can see that the proxy handles the transaction in exactly the same way as in Listing 16-14. However, the code is slightly more complex because the TransactionProxyFactoryBean gives you finer control over the transaction-handling code than the TransactionTemplate or our programmatic code.
First, you may notice that the proxy sets all properties of the TransactionDefinition instance and that the proxy will commit the transaction even if the target method throws an exception, as long as that exception is in the set of allowed exceptions. You can control all aspects of transaction handling in the transactionAttributes property entry. Listing 16-19 shows the detailed syntax of the property entry.
Example 16.19. The Syntax of the transactionAttributes Property Expression
expr ::=
   method = propagation
       isolation? read-only? timeout? allowedExceptions? disallowedExceptions?

method ::= IDENT*;
propagation ::= 'PROPAGATION_' IDENT;
isolation ::= 'ISOLATION_' IDENT;
read-only ::= 'readOnly';
timeout ::= 'TIMEOUT_' INT;
allowedExceptions ::= '+' exceptions+;
disallowedExceptions ::= '-' exceptions+;
exceptions ::= exception (, exception)*;
exception ::= IDENT;

IDENT ::= java identifier pattern;
IDENT* ::= java identifier pattern + * (wildcard);
INT ::= integer pattern;
At the least, the expression must specify the method name and propagation, for example transfer=PROPAGATION_REQUIRED. The most complex expression can look like this:
transfer=PROPAGATION_REQUIRED, ISOLATION_SERIALIZABLE, readOnly,timeout_500, +MyBenignException, +AnotherAllowedException, -BadException
You may notice that the TransactionProxyFactoryBean has other properties, for example exposeProxy and pointcut; their names sound like some of the terms we explored in the AOP chapters. In fact, Spring 2.5 uses AOP in the implementation of the TransactionProxyFactoryBean. Moreover, AOP transaction handling is the preferred declarative transaction management approach in Spring 2.5.
If you recall, in Chapter 6, we discussed the impact of proxying on the advised objects. The transactional proxies are no different from any other proxies. Let's change our DefaultBankService to perform additional balance checking before calling the doTransfer method (see Listing 16-20).
Example 16.20. DefaultBankService Calling the getBalance Method in the transfer Method
public class DefaultBankService extends BankServiceSupport
        implements BankService {

    public void transfer(AccountIdentity from, AccountIdentity to,
                         BigDecimal amount) {
        if (getBalance(to).compareTo(new BigDecimal("1000000000")) > 0) {
            throw new RuntimeException("Billionaires do not need more money!");
        }
        doTransfer(from, to, amount);
    }
public BigDecimal getBalance(AccountIdentity accountIdentity) {
return doGetBalance(accountIdentity);
}
}If we run this application, the proxy will intercept the call to the transfer method and start a new transaction, but the getBalance(BigDecimal) method will not start a new transaction, because the getBalance(BigDecimal) method is being executed not on the proxy but on the proxy target.
In this simple example, the fact that the getBalance method is not being executed in its own transaction is not a problem; in fact, it is the desired behavior. There can be situations where nested transactions (or the lack of them) can cause problems. In Chapter 11, we explored the implications of nested transactions on Hibernate sessions and the problems transaction nesting may cause with lazy loading.
If you do require nested transactional behavior, you must take the approach we explored in Chapter 6: use ((BankService)AopContext.currentProxy()).getBalance(to), which binds the implementation to Spring AOP. Alternatively, you can use Spring AOP transaction management with load-time weaving.
AOP transaction management makes use of the Spring AOP infrastructure; in most cases, Spring AOP will create a JDK proxy to intercept the method calls. You can use load-time weaving to weave the aspect in at load time, eliminating the need for proxies (refer to Chapter 6 if you would like to refresh your memory about load-time weaving). You have two alternative ways to configure Spring AOP transaction management: annotation-based configuration or XML configuration.
You can use annotations with AOP automatic proxying to introduce transactional behavior to existing beans. Let's begin with Listing 16-21, which shows the DeclarativeTxBankService class.
Example 16.21. The DeclarativeTxBankService Implementation
public class DeclarativeTxBankService
extends BankServiceSupport implements BankService{
@Transactional
public void transfer(final AccountIdentity from,
final AccountIdentity to,
final BigDecimal amount) {
doTransfer(from, to, amount);
}
@Transactional
public BigDecimal getBalance(AccountIdentity accountIdentity) {
        return doGetBalance(accountIdentity);
    }
}Notice the @Transactional attribute; to allow Spring's transaction management infrastructure to use this attribute to create the appropriate pointcuts and advice, we need to use AOP's automatic proxying and transaction annotation-driven support. Listing 16-22 shows the XML configuration for annotation-based transaction management.
Example 16.22. Configuration for Annotation-Based Transaction Management
<?xml version="1.0" encoding="UTF-8"?>
<beans xmlns="http://www.springframework.org/schema/beans"
       xmlns:aop="http://www.springframework.org/schema/aop"
       xmlns:tx="http://www.springframework.org/schema/tx"
       xmlns:xsi="http://www.w3.org/2001/XMLSchema-instance"
       xsi:schemaLocation="
            http://www.springframework.org/schema/beans
            http://www.springframework.org/schema/beans/spring-beans.xsd
            http://www.springframework.org/schema/tx
            http://www.springframework.org/schema/tx/spring-tx.xsd
            http://www.springframework.org/schema/aop
            http://www.springframework.org/schema/aop/spring-aop.xsd">

    <bean id="bankService"
          class="com.apress.prospring2.ch16.services.DefaultBankService">
        <property name="accountDao" ref="accountDao"/>
    </bean>

    <tx:annotation-driven transaction-manager="transactionManager"/>
    <aop:aspectj-autoproxy />

</beans>
This XML configuration file shows the standard bankService bean declaration, followed by the <tx:annotation-driven /> and <aop:aspectj-autoproxy /> tags. The <tx:annotation-driven /> tag creates the appropriate transaction management aspects using the @Transactional annotation. The <aop:aspectj-autoproxy /> tag then advises the matching beans.
Exploring the tx:annotation-driven Tag
The <tx:annotation-driven /> tag is at the core of the annotation-driven transaction management support. Table 16-3 lists all attributes of the <tx:annotation-driven /> tag.
Table 16.3. Attributes of the <tx:annotation-driven /> Tag
Attribute | Description |
|---|---|
| Specify a reference to an existing |
| Specify how the Spring transaction management framework creates the advised beans. The allowed values are |
| Specify the order in which the created aspect will be applied. This is applicable if you have more than one advice for the target object. |
| Set to |
Exploring the @Transactional Annotation
The @Transactional annotation allows you to control all aspects of the transaction definition the advice is going to create. Just as with the transactionAttributes property expression, you can specify the propagation, isolation level, timeout, and allowed and disallowed exceptions. Table 16-4 lists all attributes of the @Transactional annotation.
Table 16.4. Attributes of the @Transactional Annotation
Attribute | Type | Description |
|---|---|---|
|
| Specifies the propagation to be used in the transaction definition |
|
| Sets the isolation level the transaction should have |
|
| Specifies the transaction timeout in seconds |
|
| If |
|
| Array of exceptions that the target method can throw but the advice will still commit the transaction |
|
| Array of exceptions that will make the advice roll back the transaction if the target method throws them |
Annotation-Based Transaction Management Summary
Using the @Transactional annotation is an easy way to declare a method transactional. The advantage is that you can immediately see that the method is transactional, because it has the annotation. The disadvantage is that you have to repeat the @Transactional annotation for every transactional method. This is not a problem if you are happy with the default transaction attributes but quickly becomes a clumsy copy-and-paste affair when you are setting additional transaction attributes. An alternative is to annotate the class with the @Transactional annotation. This would make all methods in the class transactional. The problem with this approach is that all methods, even simple getters and setters, would run in a transaction, even though there is absolutely no need for that. The XML AOP transaction management handles such situations much better.
Note
In saying that using @Transactional will make all methods execute in a transaction, we are being a bit sloppy: more accurately, we should say that all methods of a Spring bean instantiated from a class with the @Transactional annotation will be transactional.
XML AOP declarative transaction management is the preferred approach in Spring 2.5. Spring comes with the <tx:advice /> tag, which creates a transaction-handling advice. All we need do to get us started is to create a pointcut that matches all methods we wish to make transactional and reference the transactional advice. Listing 16-23 shows an XML configuration that uses XML AOP transaction management.
Example 16.23. XML AOP Transaction Management Configuration
<?xml version="1.0" encoding="UTF-8"?>
<beans xmlns="http://www.springframework.org/schema/beans"
       xmlns:aop="http://www.springframework.org/schema/aop"
       xmlns:tx="http://www.springframework.org/schema/tx"
       xmlns:xsi="http://www.w3.org/2001/XMLSchema-instance"
       xsi:schemaLocation="
            http://www.springframework.org/schema/beans
            http://www.springframework.org/schema/beans/spring-beans.xsd
            http://www.springframework.org/schema/tx
            http://www.springframework.org/schema/tx/spring-tx.xsd
            http://www.springframework.org/schema/aop
            http://www.springframework.org/schema/aop/spring-aop.xsd">


    <bean id="bankService"
          class="com.apress.prospring2.ch16.services.DefaultBankService">
        <property name="accountDao" ref="accountDao"/>
    </bean>

    <aop:config>
        <aop:pointcut id="allServiceMethods"
                      expression="execution(*
                              com.apress.prospring2.ch16.services.*.*(..))"/>

        <aop:advisor advice-ref="defaultTransactionAdvice"
                     pointcut-ref="allServiceMethods"/>
    </aop:config>

    <tx:advice id="defaultTransactionAdvice"
            transaction-manager="transactionManager"/>

</beans>
This configuration file may seem much more complex than the TransactionProxyFactoryBean in Listing 16-17, so let's examine it in more detail. First, we used the defaultTransactionAdvice, which can specify the actions the proxy needs to perform when it intercepts the method call. If we leave the tag empty, it will assume that all methods should be transactional, that the propagation level is PROPAGATION_DEFAULT, that the isolation is ISOLATION_DEFAULT, that the timeout is TIMEOUT_DEFAULT, that the read-only property is false, and that all runtime exceptions cause rollbacks. To use the advice, we create the allServiceMethods pointcut for all methods in all classes in the com.apress.prospring2.ch16.services package. Finally, we create an aspect using the defaultTransactionAdvice for all methods matched by the allServiceMethods pointcut.
Before we take a more detailed look at the <tx:advice /> tag, you may be wondering why this approach is preferred, because the TransactionProxyFactoryBean seems a lot easier. But the TransactionProxyFactoryBean is easier only if you have very few transactional beans. When you get to a point where you have several beans whose methods you want to declare transactional, you would have to create a TransactionProxyFactoryBean for every bean; moreover, you would have to repeat the transactionAttributes declaration in the proxy factory beans. The XML configuration in Listing 16-23 will apply the same transaction management to any number of new beans we create in the services package; all we have to do is to create a plain bean definition for every new bean. We won't have to configure anything else to have the transactional advice applied to all new service beans.
Exploring the tx:advice Tag
As you saw in Listing 16-23, you need to set the id and transaction-manager attributes in the <tx:advice /> tag. The id is the identity of the advice bean, and the transaction-manager must reference a PlatformTransactionManager bean.
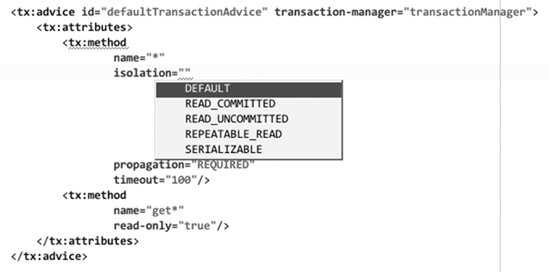
Beyond these two attributes, you can customize the behavior of the advice the <tx:advice /> tag creates by using the <tx:attributes /> tag. This allows you to configure everything that the transactionAttributes properties expression allowed you to do but in a more structured way. Let's take a look at Listing 16-24, which shows a more complicated <tx:advice /> tag.
Example 16.24. A More Complex <tx:advice /> Tag
<tx:advice id="defaultTransactionAdvice"
    transaction-manager="transactionManager">
    <tx:attributes>
        <tx:method
                name="*"
                isolation="READ_COMMITTED"
                propagation="REQUIRED"
                timeout="100"/>
        <tx:method
                name="get*"
                read-only="true"/>
    </tx:attributes>
</tx:advice>
We have transaction advice that will start a transaction using the PROPAGATION_REQUIRED propagation, READ_COMMITTED isolation level, and a 100-second timeout for all methods unless the method's name begins with get; in which case, the transaction definition will include PROPAGATION_DEFAULT, ISOLATION_DEFAULT, TIMEOUT_DEFAULT, and the read-only property will be set to true. In both cases, any runtime exception will cause a rollback.
As you can see, the <tx:attributes /> tag allows you to create the transactionAttributes property expression in a more concise way; in addition, most IDEs will offer code completion (see Figure 16-2).
The <tx:attributes /> tag allows only <tx:method /> tags to appear as its children. To complete the description of the <tx:attributes /> tag, Table 16-5 details the attributes of the <tx:method /> tag.
Table 16.5. <tx:method /> Tag Attributes
Attribute | Description |
|---|---|
| The pattern the method name needs to match for the advice to apply. You can use the asterisk ( |
| Sets the propagation level to be used in the transaction definition. |
| Sets the isolation level to be used for the transaction. |
| Specifies the transaction timeout in seconds. |
| Set to |
| Comma-separated list of class names of exceptions that the target method can throw without causing the advice to perform a rollback. |
| Comma-separated list of class names of exceptions that will cause the advice to perform a rollback when thrown from the target method. By default, this list is empty; therefore, any runtime exception that is not in the |
XML AOP Summary
Unlike annotation-based AOP transaction management, when you use XML AOP transaction management, the code in your beans does not reflect any transactional behavior at all. The XML configuration easily offsets this disadvantage with the fact that you do not need to repeat any details of the transaction management configuration. In addition, you can refer to pointcuts you use in your application's AOP configuration to allow the most effective code reuse.
We usually use the annotation-based approach during the implementation of the application, but in the production environment, we always try to use XML configuration only.
So far, all our examples have used only one resource in the transactions: the JDBC connection. If you need to implement an application whose transactions include multiple resources, you will need to use the JtaTransactionManager.
Note
You will also need to use the JtaTransactionManager if you are using an application-server-managed DataSouce.
Even though the Java EE application server specification does not require an application server to provide a javax.transaction.TransactionManager, all application servers we have used expose it, even though different application servers bind the TransactionManager to a different JNDI name. All that is required to start using the JtaTransactionManager in Spring applications is to define a JtaTransactionManager bean. Listing 16-25 shows the simplest possible configuration of a JtaTransactionManager bean.
Example 16.25. JtaTransactionManager Bean
<?xml version="1.0" encoding="UTF-8"?>
<beans xmlns="http://www.springframework.org/schema/beans"
       xmlns:xsi="http://www.w3.org/2001/XMLSchema-instance"
       xsi:schemaLocation="
                http://www.springframework.org/schema/beans
                http://www.springframework.org/schema/beans/spring-beans.xsd">

...

    <bean id="jtaTransactionManager"
          class="org.springframework.transaction.jta.JtaTransactionManager"/>

...
</beans>
By default, the JtaTransactionManager will attempt to automatically detect a UserTransaction bound to the java:comp/UserTransaction JNDI name; if the java:comp/UserTransaction object also implements the TransactionManager, the JtaTransactionManager will use that; if the java:comp/UserTransaction does not implement the TransactionManager, the JtaTransactionManager will attempt to find the TransactionManager under these JNDI names:
java:comp/UserTransaction: The default JNDI name, used by Resin 2.x, Oracle OC4J (Orion), JOnAS (JOTM), BEA WebLogic, and IBM WebSpherejava:pm/TransactionManager: JNDI name forTransactionManagerin Borland Enterprise Server and Sun Application Server (Sun ONE 7 and later)java:comp/TransactionManager: JNDI name used in Resin 3.xjava:/TransactionManager: The name used in the JBoss Application Server
As you can see, the default names cover most of today's application servers. You can configure the JtaTransactionManager to match your application server; Table 16-6 shows the properties you may need to configure for your application server.
Table 16.6. Properties of the JtaTransactionManager
Property | Description |
|---|---|
| The JNDI name that the application server uses to bind the instance of the |
| Specifies the JNDI name that contains the |
| If you are using the Java EE 5 specification, and if your application server does not use the default name |
These are the crucial properties to successfully create the JtaTransactionManager; the other properties specify the behavior of the transaction management—in particular, the boolean failEarlyOnGlobalRollbackOnly property specifies whether the transaction should fail as soon as possible when a global rollback is signaled, and boolean rollbackOnCommitFailure specifies whether the JtaTransactionManager should roll back when the commit command fails.
In most cases, you will not need to modify any of the properties exposed by the JtaTransactionManager. If this is the case, you can use the <tx:jta-transaction-manager /> element, which defines a JtaTransactionManager bean with its default values.
The Spring documentation outlines the latest notes about any potential issues with the JtaTransactionManager in different application servers.
If you are developing a large application, you may find yourself in a situation where you need to attach your code to the transaction. In this section, we will show how to implement transaction synchronization of your own object. We will create a simple Worker interface (see Listing 16-26).
Example 16.26. The Worker Interface
public interface Worker {

    void work(int value);

    void commit();

    void rollback();
}
The interface is very simple indeed. Ideally, we will only use the work(int) method in code that uses the implementation of the Worker interface; we would like the commit() and rollback() methods to get called automatically whenever we use an instance of the Worker interface in a transactional method. To demonstrate this behavior, we will create a simple AccountService interface and its implementation. Listing 16-27 shows the interface.
Example 16.27. AccountService and Its Implementation
public interface AccountService {

    AccountIdentity create();

}
We will use the AccountService in a small sample application. Listing 16-28 shows a pseudo code implementation of the AccountService.
Example 16.28. Pseudo Code Implementation of the AccountService
public class DefaultAccountService implements AccountService {
    private AccountDao accountDao;

    @Transactional
    public AccountIdentity create() {
       Worker worker = getWorker();
       worker.work(10);
       AccountIdentity id = createAndSaveAccount();
       Worker.work(20);

       Grinch.ruin();

        return id;
    }

}
This pseudo code implementation shows the core concepts. We have a transactional method, AccountIdentity create(). In the method's body, we somehow obtain an instance of the Worker class that is synchronized with the current transaction. We then call the worker.work(10) method. Next, we use createAndSaveAccount(), which returns the AccountIdentity of the new account. We follow that with another call to the worker.work method. Finally, we use Grinch.ruin() to randomly simulate failure. We would like to call the worker.commit() method when the transaction commits and worker.rollback() when the transaction rolls back.
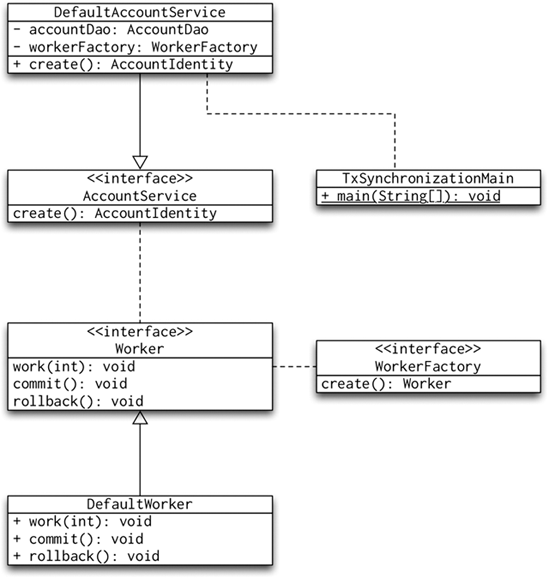
If we forget about transaction synchronization for a moment, we can implement the pseudo code from Listing 16-28 using the classes and interfaces from Figure 16-3.
You can see that we have a WorkerFactory interface, and we use this interface in the DefaultAccountService. The WorkerFactory implementation will be responsible for registering a TransactionSynchronization with the TransactionSynchronizationManager. The TransactionSynchronizationManager will then notify all registered TransactionSynchronization objects when the transaction completes. All we need to do is keep the instance of the worker we are synchronizing with the synchronization key. The UML diagram in Figure 16-4 shows the class diagram of the final solution.
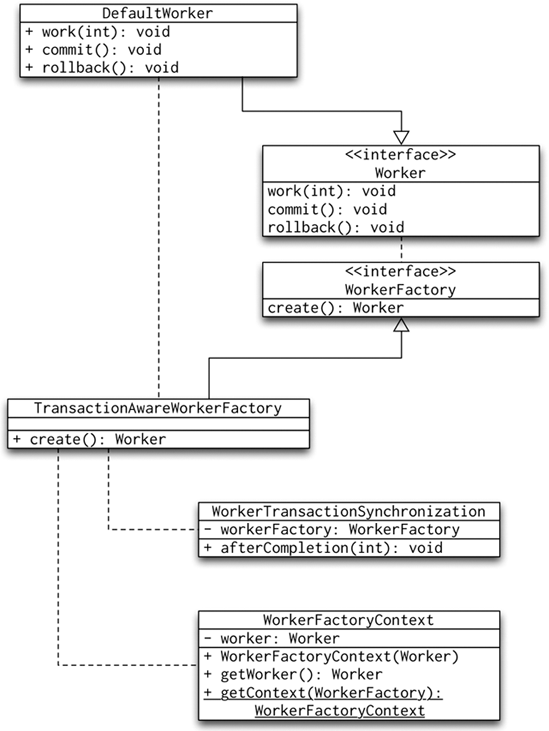
Let's explore the classes from Figure 16-4 in more detail. We will begin with Listing 16-29, which shows the code of the WorkerFactoryContext.
Example 16.29. The Implementation of the WorkerFactoryContext Class
public class WorkerFactoryContext {
    private Worker worker;

    public WorkerFactoryContext(Worker worker) {
        Assert.notNull(worker, "The argument 'worker' must not be null.");
        this.worker = worker;
    }

    public Worker getWorker() {
        return worker;
    }

    public static WorkerFactoryContext getContext(WorkerFactory workerFactory) {
        if (TransactionSynchronizationManager.isSynchronizationActive() &&
                TransactionSynchronizationManager.hasResource(workerFactory)) {
          WorkerFactoryContext context =
                    (WorkerFactoryContext) TransactionSynchronizationManager.
                            getResource(workerFactory);
            if (context == null) {
                throw new IllegalStateException(String.format(
                        "Null WorkerFactoryContext bound as " +
                                "transactional resource for [%s].",
                        workerFactory));
            }
            return context;
        }
        throw new IllegalStateException(String.format(
                "Cannot access WorkerFactoryContext for [%s] when " +
                        "transaction synchronozation is not active.",
                workerFactory));
    }

}
The constructor simply stores the worker argument in the worker field; the getWorker() method is a getter for the worker field. The getContext(WorkerFactory) method seems complex but only because of the error-handling code. If we removed all error-handling code, it would be simply this:
public static WorkerFactoryContext getContext(WorkerFactory workerFactory) {
    if (TransactionSynchronizationManager.isSynchronizationActive() &&
            TransactionSynchronizationManager.hasResource(workerFactory)) {
        return (WorkerFactoryContext) TransactionSynchronizationManager.
                getResource(workerFactory);
    }
    return null;
}
If we examine the code closely, we can see that it checks whether transaction synchronization is active (i.e., whether there is an active transaction) and whether we registered a resource (WorkerFactoryContext) with the key workerFactory. If so, the method returns the registered WorkerFactoryContext. We use the WorkerFactoryContext in the TransactionAwareWorkerFactory implementation of the WorkerFactory interface (see Listing 16-30).
Example 16.30. The TransactionAwareFactoryWorker Implementation
public class TransactionAwareWorkerFactory implements WorkerFactory {

    public TransactionAwareWorkerFactory() {
    }

    public Worker create() {
        if (TransactionSynchronizationManager.hasResource(this)) {
            return getTransactionBoundWorker();
        } else {
            return createNewTransactionBoundWorker();
        }
    }

    private Worker createNewTransactionBoundWorker() {
        Worker worker = new DefaultWorker();
        WorkerFactoryContext context = new WorkerFactoryContext(worker);

        TransactionSynchronization synchronization =
                new WorkerTransactionSynchronization(this);
        TransactionSynchronizationManager.registerSynchronization(synchronization);
        TransactionSynchronizationManager.bindResource(this, context);

        return worker;
    }


    private Worker getTransactionBoundWorker() {
        WorkerFactoryContext context = (WorkerFactoryContext)
                TransactionSynchronizationManager.getResource(this);
        return context.getWorker();
    }


}
The implementation of the create() method checks whether we registered a resource with the key this in this transaction. If so, we return the worker bound to the WorkerFactoryContext that we registered for the active transaction. If not, we need to create the WorkerFactoryContext and register the WorkerTransactionSynchronization with the TransactionSynchronizationManager. The createNewTransactionBoundWorker() method does just that. The final piece of code we need to look at is the WorkerTransactionSynchronization class in Listing 16-31.
Example 16.31. Implementation of the WorkerTransactionSynchronization
public class WorkerTransactionSynchronization
    extends TransactionSynchronizationAdapter {
    private WorkerFactory workerFactory;

    public WorkerTransactionSynchronization(WorkerFactory workerFactory) {
        this.workerFactory = workerFactory;
    }

   @Override
    public void afterCompletion(int status) {
        if (!TransactionSynchronizationManager.hasResource(this.workerFactory)) {
throw new IllegalStateException(String.format(
"Required synchronization resource missing under key '%s'.",
this.workerFactory));
}
WorkerFactoryContext context = WorkerFactoryContext.
getContext(this.workerFactory);
Worker worker = context.getWorker();
try {
if (STATUS_COMMITTED == status) {
worker.commit();
} else {
worker.rollback();
}
} finally {
TransactionSynchronizationManager.unbindResource(this.workerFactory);
}
}
}We have not implemented the TransactionSynchronization interface directly; instead, we used the convenience TransactionSynchronizationAdapter, which implements all methods of the TransactionSynchronization interface as empty and allows its subclasses to override them. This implementation allowed us to override only the afterCompletion(int) method; the TransactionSynchronizationManager calls this method after the transaction has completed, regardless of whether it was committed or rolled back. We obtain the WorkerFactoryContext from the TransactionSynchronizationManager using the workerFactory as the key. We call the context's getWorker() method, and depending on whether the transaction committed or rolled back, we call either worker.commit() or worker.rollback(). With all this code in place, we can finally show the DefaultAccountService implementation in Java in Listing 16-32.
Example 16.32. Java Implementation of the DefaultAccountService
public class DefaultAccountService implements AccountService {
    private AccountDao accountDao;
    private WorkerFactory workerFactory;

    @Transactional
    public AccountIdentity create() {
        Random random = new Random();
        StringBuilder number = new StringBuilder(8);
        for (int i = 0; i < 8; i++) {
            number.append(random.nextInt(9));
        }
        AccountIdentity ai = new AccountIdentity("011001", number.toString());
        Account account = new Account();
        account.setId(System.currentTimeMillis());
        account.setIdentity(ai);
        account.setBalance(BigDecimal.ZERO);

        Worker worker = this.workerFactory.create();
        worker.work(10);
        this.accountDao.save(account);
        worker.work(20);
Grinch.ruin();
return ai;
}
public void setAccountDao(AccountDao accountDao) {
this.accountDao = accountDao;
}
public void setWorkerFactory(WorkerFactory workerFactory) {
this.workerFactory = workerFactory;
}
}You can see that, apart from the Account creation code, we use the WorkerFactory to create an instance of the Worker. We then call the worker's work method, use the accountDao to insert the newly set up account, and then call the work method again. We complete with a potentially deadly call to Grinch.ruin(). The final class we need to show is TxSynchronizationMain, the sample program that demonstrates the transaction synchronization (see Listing 16-33).
Example 16.33. Sample Application for the Transaction Synchronization
public class TxSynchronizationMain {

    public static void main(String[] args) {
        ApplicationContext ac = new ClassPathXmlApplicationContext(
                new String[] {
                        "/META-INF/spring/*-context.xml",
                        "/META-INF/spring/*-context-worker.xml"
                }
        );
        AccountService accountService =
            (AccountService) ac.getBean("accountService");
        try {
            accountService.create();
        } catch (Exception ignored) {

        }
    }

}
The very last piece of code is the XML configuration file that contains definitions for the accountService and workerFactory beans in Listing 16-34.
Example 16.34. The XML Configuration for the Sample Banking Application
<?xml version="1.0" encoding="UTF-8"?>
<beans xmlns="http://www.springframework.org/schema/beans"
       xmlns:aop="http://www.springframework.org/schema/aop"
       xmlns:tx="http://www.springframework.org/schema/tx"
       xmlns:xsi="http://www.w3.org/2001/XMLSchema-instance"
       xsi:schemaLocation="
            http://www.springframework.org/schema/beans
            http://www.springframework.org/schema/beans/spring-beans.xsd
http://www.springframework.org/schema/tx
http://www.springframework.org/schema/tx/spring-tx.xsd
http://www.springframework.org/schema/aop
http://www.springframework.org/schema/aop/spring-aop.xsd">
<bean id="bankService"
class="com.apress.prospring2.ch16.services.DefaultBankService">
<property name="accountDao" ref="accountDao"/>
</bean>
<bean id="workerFactory"
class="com.apress.prospring2.ch16.synchronization.
TransactionAwareWorkerFactory"/>
<bean id="accountService"
class="com.apress.prospring2.ch16.services.DefaultAccountService">
<property name="accountDao" ref="accountDao"/>
<property name="workerFactory" ref="workerFactory"/>
</bean>
<tx:annotation-driven transaction-manager="transactionManager"/>
<aop:aspectj-autoproxy />
</beans>Depending on whether the Grinch did its damage in the JdbcAccountDao.save(Account) or in the DefaultAccountService.create() or not at all, the sample application will print something like the following:
Failure in the JdbcAccountDao.save(Account) method:
Muhehe! It's broken now.
Rolling back 10

Failure in the DefaultAccountService.create() method:
Muhehe! It's broken now.
Rolling back 20

Successful execution:
Committed 20
This clearly demonstrates that we have successfully registered the TransactionSynchronization callback with the TransactionSynchronizationManager and that the WorkerTransactionSynchronization correctly calls the Worker.commit() or Worker.rollback() methods depending on the completed transaction's status.
In the real world, the Worker class would be far more complex. It might be an e-mail-sending interface: if your application sends multiple e-mails during a transactional process and the process ultimately fails, you don't want to send any e-mails at all. Another example may be indexing using the Lucene index: if your application is modifying some database structures and the index, you should ensure that the data in the index will always match the data in the database, and one way of doing so is to implement transaction synchronization for the Lucene index bean.
Transactions are a key part of ensuring data integrity in almost any type of application. In this chapter, you learned how to use Spring to manage transactions with almost no impact on your source code. You now know how to use local and global transactions and can synchronize your code with the active transaction.
We provided various examples of transaction implementation—declarative using application context files, declarative using annotations, and programmatic—and discussed the practical uses and implications of the coding style and manageability of each.
Local transactions are supported outside a Java EE application server, and almost no additional configuration is required to enable local transaction support in Spring. Unfortunately, the setup for global transactions greatly depends on your Java EE application server, and you will most likely need to refer to your application server's configuration for details.