7
Records Management
WHAT'S IN THIS CHAPTER?
With the explosion of digital information and the requirements of keeping this information compliant with government and industry regulations, records management (RM) has become a critical component of any SharePoint deployment. If you haven't heard of records management, you will. RM is the process of classifying, securing, discovering, and managing your information from creation to destruction. With SharePoint 2010, there are a number of new enhancements, as well as enhancements to previous features such as the records center, that allow end users, developers, and IT pros to make their applications and information compliant.
Because this chapter is not the end all, be all introduction to RM, there are a number of Internet resources that will help give you a good introduction to RM. For cross-product RM topics, check out Association for Information and Image Management International (AIIM) at www.aiim.org. For SharePoint-specific RM information, look at the SharePoint ECM blog at http://blogs.msdn.com/b/ecm. Lastly, check out the SharePoint dev wiki at www.sharepointdevwiki.com.
SHAREPOINT 2010 RECORDS MANAGEMENT OVERVIEW
In SharePoint 2010, there are four feature areas in records management:
Recordization is the process of formally managing your information by making it an official record. As part of making it an official record, you specify a retention schedule, any auditing requirements, and also how to dispose of the information.
eDiscovery and legal holds work together in that eDiscovery allows you to uncover your information assets using search no matter where they live, and legal holds allow you to break this retention based on legal actions that require longer retention. eDiscovery is very tied to search so if you are interested in eDiscovery, you will want to evaluate the Microsoft FAST technologies.
Auditing and Reporting allows you to audit, down to an item level, the changes made to an item such as when and who modified the content. Combined with reporting, you can get a report out to Excel that shows you the information about your information across your site and also which content is following your information policies across your site.
Retention and Expiration lets you set policies for retention and expiration of your information. You can control this at the individual piece of content level or force policies based on the location the content lives in SharePoint. Expiration is the process of archiving or destroying your content when the content is no longer needed, or, for compliance reasons, when you want to remove the content from your system.
These four areas, when combined, provide you with a very robust records management application and platform to control the flow of information assets in your organization.
Recordization
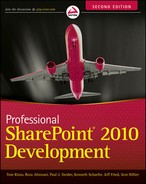
Recordization is the turning of information assets into declared records. Becoming a declared record has implications for activities such as managing the lifecycle of the asset, making it discoverable, and archiving the record for longer term storage. With SharePoint 2010, there are a number of new features in recordization. The first is support for in-place records management. With SharePoint 2007, you need to move the information from its location, such as a document library, into the SharePoint Records Center in order to manage the information as a record. With 2010, you can leave the asset in place in the library and manage the information as a record. Figure 7-1 illustrates declaring a record in place in a document library.
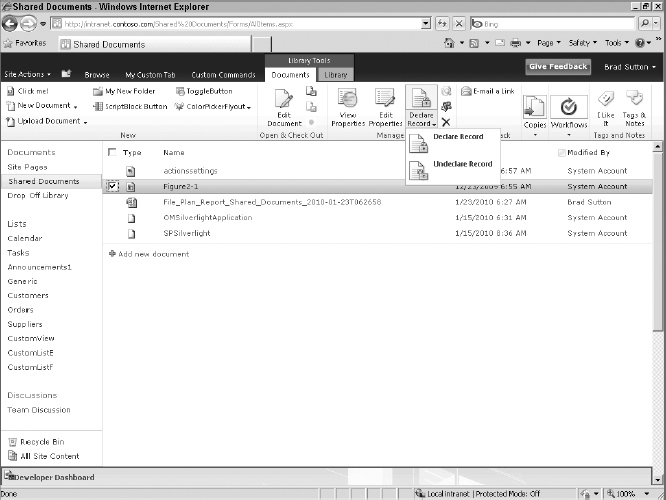
FIGURE 7-1
Another new feature of SharePoint 2010 is the ability to declare new types of information as records. With 2007, you could not use the records management features with social networking types, such as blogs and wikis. This was a major limitation, because this type of content is increasingly becoming a major source of new information in organizations. With 2010, all content can be used in records management.
Multi-stage disposition is a key new feature in records management. In SharePoint 2007, you have a single-stage disposition in that, when the timeframe set by the records manager is met, a single action is performed. That action could be complex, such as kicking off a workflow, but it still is a single stage. With 2010, you can have multiple stages based on different timeframes and criteria. This lets you set up policies, such as “check legal documents every year to see if they have expired or if the conditions on the contracts have been met,” while also having a policy that deletes a contract seven years after the document is approved. Also of note is that this technology can work with non-records, so think about the scenarios where you can use this technology even outside of records management. Figure 7-2 shows multi-stage disposition.
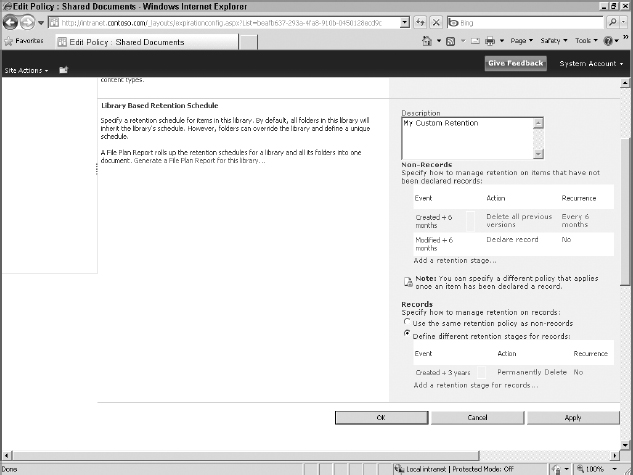
FIGURE 7-2
With 2010, there is a new Records Center template, which allows easier access for users submitting documents and records managers searching for documents based on document ID. The Records Center also uses some of the other Enterprise Content Management (ECM) features, such as metadata-driven navigation, to make it easier to browse the Records Center by metadata rather than by folder hierarchy. The last point about the new Records Center template is that you can have multiple Records Centers in a single site collection. Rather than forcing you to use a single Records Center, SharePoint 2010 allows you to have multiple Records Centers to which you can point different sets of users or content.
You may be wondering when to use the Records Center versus in-place records management. The real difference will be policy and preference. For example, if your company would rather manage active content separate from records content, using the Records Center makes sense. In addition, if you have a records manager for your organization and want centralized management of your records, rather than relying on individual groups to manage their policies, you will want to deploy the Records Center. If your users need access to their content after they declare it as a record, you will want to use in-place records management.
Figure 7-3 shows the new Records Center template.
As part of organizing your records, SharePoint 2010 supports a Content Organizer and Content Organizer rules. These rules allow you to specify where content should go based on a number of criteria, including properties such as content type. By having these rules, end users or applications can submit their documents to the Records Center; and the Records Center, or any SharePoint site where the Content Organizer is running, can route the content to the right location. Figure 7-4 shows the Content Organizer settings and you can see in the image that you can create customized content routing rules, both in the user interface and using the API.
FIGURE 7-3

FIGURE 7-4
Records management is also supported across many of the features of SharePoint. For example, workflows have records management built-in so when you design a SharePoint Designer workflow, “declare as record” is one of the actions you can perform on your content.
The last feature is the hierarchical, metadata-driven file plan in the archive. Having the ability to set file plans through the metadata contained in the content makes administration easier. File plans allow different record actions according to location or content type.
eDiscovery and Holds
With the growing push towards compliance, eDiscovery is becoming a critical component of SharePoint deployments. eDiscovery allows you to find information and, if need be, put a legal hold on that information, which will break the retention policies on that content until the legal hold is removed. With 2010, you can search across all SharePoint sites (not just the Records Center, as in SharePoint 2007) for records to add to your holds. Figure 7-5 shows how a records manager can configure a search and hold in SharePoint 2010.
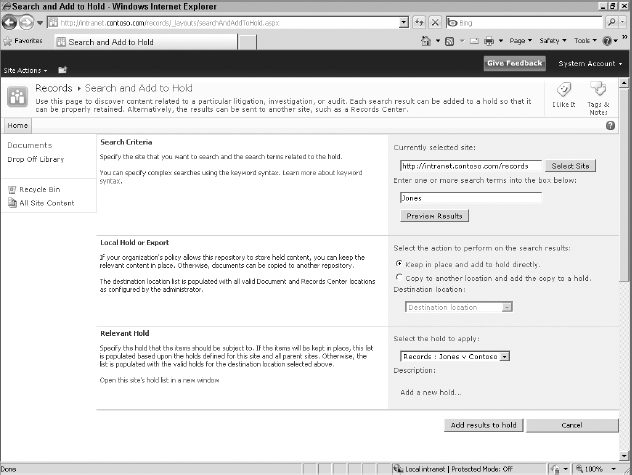
FIGURE 7-5
Auditing and Reporting
With any records management solution, good auditing and reporting are critical. Auditing allows you to track what users are doing with the content, whether they are accessing, deleting, or moving it. SharePoint supports per item reporting, so you can see the actions performed on content at an individual item level. SharePoint 2010 also supports reporting using the file plan, so you can understand the compliance details for your content. By providing a simple user interface similar to the Properties interface, SharePoint 2010 makes it very easy to understand the compliance details for your documents. Figure 7-6 shows the Compliance Details dialog box.
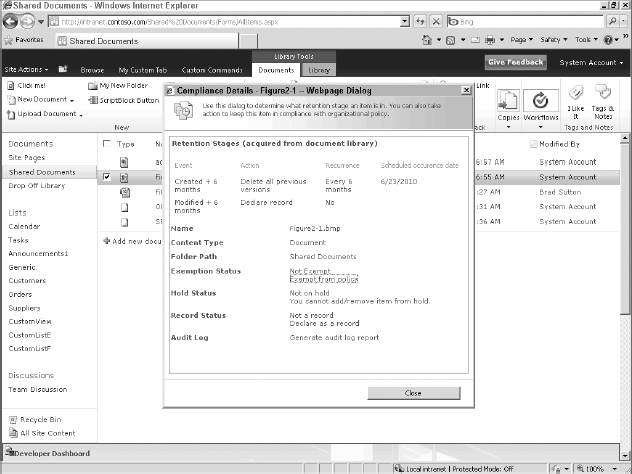
FIGURE 7-6
PROGRAMMING RM IN SHAREPOINT
Programming RM in SharePoint is familiar if you already know the SharePoint Server object model. Most of your programming involves accessing content, declaring records, creating new information management policies, performing discovery and holds, and generating reports. Most of the object model sits in two key DLLs: Microsoft.Office.DocumentManagement and Microsoft.Office.Policy. Both of these DLLs reside in the location where all other SharePoint DLLs reside: %Program Files%Common FilesMicrosoft SharedWeb Server Extensions14ISAPI. The following sections step you through performing actions using the different object models when working with records in SharePoint 2010. Please note that you need SharePoint Server 2010 and not just SharePoint Foundation 2010 to work with these capabilities, because Foundation does not support records management. In addition, these APIs are available only from full-trust SharePoint solutions, and are not available from Sandbox Solutions.
Declaring and Undeclaring a Record
One of the most common operations you will perform with RM in SharePoint 2010 will be declaring and undeclaring records. If you want to declare records in place, you need to turn on the in-place records management feature for your site collection, and then the Record Declaration Settings window appears in your site collection administration web page, as shown in Figure 7-7.
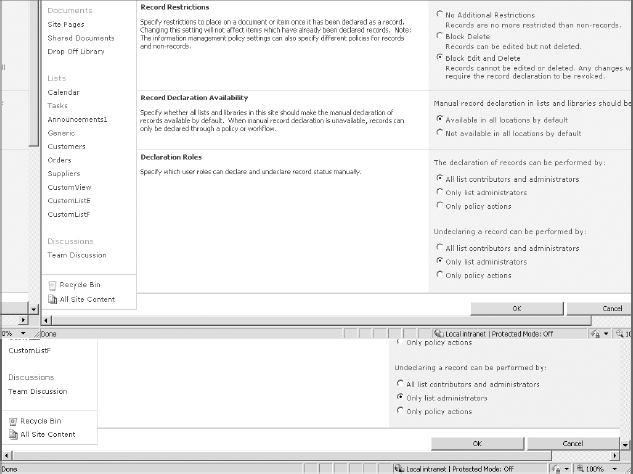
FIGURE 7-7
With SharePoint 2010, declaring records is straightforward. The methods you want to use are located in the Microsoft.Office.RecordsManagement.RecordsRepository namespace. The primary methods are DeclareItemAsRecord and UndeclareItemAsRecord. Both these methods take an SPListItem object and declare or undeclare the item as a record.
The following code uploads a file to a document library. It uses the IsInPlaceRecordsEnabled method to check to see if in-place records management is enabled. Then it calls DeclareItemAsRecord to declare the new document as a record. To make sure that the record is declared, you have two options. You can check the expiration time to make sure that it was set to the right date, or you can use the IsRecord method, which takes an SPListItem object and returns a Boolean indicating whether the item is a record or not.

private const string SharePointURL = “http://intranet.contoso.com”;
        private const string filePath = “c:\test.docx”;
        private const string SharePointListURL = “http://intranet.contoso.com/
shared%20documents/”;
        private const string fileSharePointURL =
“http://intranet.contoso.com/shared%20documents/test.docx”;


            using (SPSite site = new SPSite(SharePointURL))

                               {
            SPWeb web = site.RootWeb;
            SPList list = web.GetList(SharePointListURL);


           Stream fileStream = File.Open(filePath, FileMode.Open);

           SPFile file = list.RootFolder.Files.Add(
            fileSharePointURL, fileStream);

           SPListItem item = file.Item;

           file.Update();

           MessageBox.Show(“In Place Records enabled: ” +
            Records.IsInPlaceRecordsEnabled(site).ToString());

           //Declare the item as a record
           Records.DeclareltemAsRecord(item);

           bool currentStageRecurs = false;
           DateTime? ExpireDT = Expiration.
             GetExpirationDateForItem(item, out currentStageRecurs);

          //Make sure it declared

          if (ExpireDT == null)
          {
              MessageBox.Show(“Not declared!”);
          }
          else
          {
             MessageBox.Show(“Declared Expiration Date: ” +
            ExpireDT.ToString());
             //Also show if Record using IsRecord
             MessageBox.Show(“IsRecord: ” + Records.IsRecord(item);
           //Could also use OnHold to check if on hold
          }

         //Undeclare the object
         Records.UndeclareltemAsRecord(item);


       }
![]()
Creating Retention Schedules
Another common operation you will perform is creating retention schedules. Retention schedules are created by using XML. After you understand the pattern of the XML, generating and applying retention is a couple of lines of code. The hardest part is programmatically creating the XML using the XML Document Object Model (DOM). If you look at the easiest retention schedule, one that deletes content after six years, this would be the XML you need to generate:
<Schedules nextStageId=“2”>
<Schedule type=“Default”>
<stages>
<data stageId=“1”>
<formula id=“Microsoft.Office.RecordsManagement.PolicyFeatures.Expiration.Formula.
BuiltIn”>
<number>6</number>
<property>Created</property>
<period>years</period>
</formula>
<action type=“action”
id=“Microsoft.Office.RecordsManagement.PolicyFeatures.
Expiration.Action.Delete” />
</data>
</stages>
</Schedule>
</Schedules>
![]()
In the XML, there is a top-level Schedules node that contains a property that is the ID of the next stage, even if that next stage does not exist. Below that, the Schedule node contains the multiple stages you want to occur on your content. To have multiple stages, you add multiple data nodes, each with a unique, incrementing integer in your stageID property. You can specify the type, which can be Default or Record. Default allows you specify custom actions to occur on any items, whereas Record performs the actions only on declared records.
From the data node, you see the formula node. The id of the formula node is the ID of one of the built-in formulas in SharePoint. You could point at your own custom class to implement your own formulas by specifying the class name in the id attribute. The built-in formulas allow you to add days, months, or years to the column you specify in the property node. In the example, the formula is calculated from the Created property and six years are added to that property for the action to be triggered. The possible values for the period node are days, weeks, and years.
Next comes the action you want to perform if the formula's criterion is met. In the sample, this means six years from the creation date has expired. To specify the action you want to perform, you specify the action in the id attribute for the action node. Again, you can use a custom action here by specifying your custom action class implementation for the id value. In the example, Microsoft.Office.RecordsManagement.PolicyFeatures.Expiration.Action.Delete is specified, which is a delete action. Table 7-1 gives you the possible built-in action values. For brevity, Microsoft.Office .RecordsManagement.PolicyFeatures.Expiration.Action has been removed from all of them, so make sure to add this back before using the actions in your XML.
TABLE 7-1: Records Management Actions
Now that you understand how to create simple retention schedules, creating more complex retention schedules is a matter of building new XML nodes onto the simple example from earlier. The following XML sets three stages. The first stage recurs every six months and deletes the previous versions of the content. The second occurs six months from the modified date of the content and declares the content as a record. The last occurs five years from the created date and deletes the content.
<Schedules nextStageId=“4” default=“false”>
  <Schedule type=“Default”>
    <stages>
       <data stageId=“1” recur=“True” offset=“6” unit=“months”>
         <formula id=“
Microsoft.Office.RecordsManagement.PolicyFeatures.Expiration.Formula.BuiltIn”>
            <number>6</number>
            <property>
              Created</property><period>months</period>
         </formula>
         <action type=“action” id=“
Microsoft.Office.RecordsManagement.PolicyFeatures.Expiration.
Action.DeletePreviousVersions” />
      </data>
      <data stageId=“2”>
        <formula id=“Microsoft.Office.RecordsManagement.PolicyFeatures.Expiration
          .Formula.BuiltIn”>
          <number>6</number>
          <property>Modified</property>

         <period>months</period>
        </formula>
        <action type=“action”

 id=“Microsoft.Office.RecordsManagement.PolicyFeatures.Expiration.Action.Record” />
      </data>
     </stages>
   </Schedule>
   <Schedule type=“Record”>
      <stages>
         <data stageId=“3”>
            <formula

id=“Microsoft.Office.RecordsManagement.PolicyFeatures.Expiration.Formula.BuiltIn”>
            <number>5</number>
            <property>
              Created</property><period>years</period>
          </formula>
          <action type=“action”

id=“Microsoft.Office.RecordsManagement.PolicyFeatures.Expiration.Action.Delete” />
         </data>
       </stages>
    </Schedule>
</Schedules>
When it comes to applying your retention schedule to your content, you have two choices. You can attach the retention schedule to the content type or you can attach it to the list. When attached to the content type, the retention schedule is followed regardless of where the content type is created. With the new content type syndication functionality in 2010, your retention schedule can travel wherever a content type travels.
If you associate the retention schedule with a list, the schedule works on content in only that list. Normally, you will want to use the content type option so that your retention schedule works everywhere.
To check to see if you have a custom list policy, you can use the ListHasPolicy property on the Microsoft.Office.RecordsManagement.InformationPolicy.ListPolicySettings object. This Boolean property returns whether the list has a custom policy. To set the list to use a custom policy, set the UseListPolicy Boolean to True and then call Update on your ListPolicySettings object. Set this to False to use the content type retention policy. The constructor for your ListPolicySettings object takes a SPList object, which is the list you want to investigate. The following code shows how to use these objects and properties:
SPWeb web = site.RootWeb;
                SPList list = web.GetList(SharePointListURL);

              Microsoft.Office.RecordsManagement.InformationPolicy.
                ListPolicySettings policy =
                New Microsoft.Office.RecordsManagement.
                InformationPolicy.ListPolicySettings(list);

              if(!policy.ListHasPolicy)
               {
                  //make the list use a custom list policy

                policy.UseListPolicy = true;
                policy.Update();
               }

              //Check to see if setting was successful
              MessageBox.Show(“List Policy Set: ” +
                policy.ListHasPolicy.ToString());
![]()
To set a custom retention policy on the list, use the following:
 private const string SharePointURL = “http://intranet.contoso.com”;
     private const string SharePointListURL =
 “http://intranet.contoso.com/shared%20documents/”;
         private const string fileSharePointURL =
 “http://intranet.contoso.com/shared%20documents/test.docx”;


             using (SPSite site = new SPSite(SharePointURL))
             {
                 SPWeb web = site.RootWeb;
                 SPList list = web.GetList(SharePointListURL);
                 SPFolder folder = web.Folders[SharePointListURL];
                 SPWeb parentWeb = list.ParentWeb;


               SPList parentList = parentWeb.Lists[folder.ParentListId];
               Microsoft.Office.RecordsManagement.InformationPolicy.
               ListPolicySettings listPolicySettings =
                 new Microsoft.Office.RecordsManagement.InformationPolicy.
                 ListPolicySettings(parentList);


               string policyXml = @“
                 <Schedules nextStageId=““4”” default=““false””>
               <Schedule type=““Default””><stages><data stageId=““1””

                 recur=““True”” offset=““6”” unit=““months””>
                 <formula id=““Microsoft.Office.RecordsManagement.PolicyFeatures.
              Expiration.Formula.BuiltIn””>
                <number>6</number><property>Created</property>
                <period>months</period></formula>
                <action type=““action””
              id=““Microsoft.Office.RecordsManagement.PolicyFeatures.
               Expiration.Action. DeletePreviousVersions”” />
                </data><data stageId=““2””><formula
                  id=““Microsoft.Office.RecordsManagement.PolicyFeatures.
                  Expiration.Formula.BuiltIn””>
                <number>6</number><property>Modified</property>
                <period>months</period></formula>
                <action type=““action””
                  id=““Microsoft.Office.RecordsManagement.PolicyFeatures.
                Expiration.Action.Record”” />
                  </data></stages></Schedule>
                <Schedule type=““Record””><stages><data stageId=““3””><formula
               id=““Microsoft.Office.RecordsManagement.PolicyFeatures.
               Expiration.Formula.BuiltIn””>
               <number>3</number><property>Created</property5
               <period>years</period></formula>
                <action type=““action””
                  id=““Microsoft.Office.RecordsManagement.PolicyFeatures.
                Expiration.Action.Delete”” />
               </data></stages></Schedule></Schedules>”;

              if (!listPolicySettings.UseListPolicy)
               {
                  //Enable Location Based Policy if it isn't enabled
               listPolicySettings.UseListPolicy = true;
               listPolicySettings.Update();


                //Refresh to get the updated ListPolicySettings
                listPolicySettings = new
              Microsoft.Office.RecordsManagement.InformationPolicy.
              ListPolicySettings(parentList);
              }

             listPolicySettings.SetRetentionSchedule(folder.ServerRelativeUrl,
                      policyXml, “My Custom Retention”);
             listPolicySettings.Update();

             MessageBox.Show(listPolicySettings.
             GetRetentionSchedule(folder.ServerRelativeUrl));
 }
To create the same policy on a content type requires a bit more code, but the process is very similar. The code that follows is the same as the previous sample from the beginning of the chapter, but instead of getting the list policies, the code retrieves the content types in SharePoint, in particular the document content type. The code then uses the GetPolicy method to retrieve the expiration policy for the content type. If that policy does not exist, it creates the policy. Then, it sets the CustomData property for that policy and calls the Update method to set the retention policy for the content type.
 using (SPSite site = new SPSite(SharePointURL))
            {
                 SPWeb web = site.RootWeb;
                 SPList list = web.GetList(SharePointListURL);
                 SPFolder folder = web.Folders[SharePointListURL];
                 SPWeb parentWeb = list.ParentWeb;


              SPList parentList = parentWeb.Lists[folder.ParentListId];
              Microsoft.Office.RecordsManagement.InformationPolicy.
              ListPolicySettings listPolicySettings =
              new Microsoft.Office.RecordsManagement.InformationPolicy.
              ListPolicySettings(parentList);


               string policyXml = @“

               <Schedules nextStageId=““4”” default=““false””>
                 <Schedule type=““Default””><stages><data stageId=““1””
               recur=““True”” offset=““6”” unit=““months””>
                 <formula
               id=““Microsoft.Office.RecordsManagement.
                  PolicyFeatures.Expiration.
               Formula.BuiltIn””>
                 <number>6</number><property>Created</property>
                 <period>months</period></formula>
                 <action type=““action””
                   id=““Microsoft.Office.RecordsManagement.
                PolicyFeatures.Expiration.Action.
                DeletePreviousVersions”” />
                 </data><data stageId=““2””><formula
                  id=““Microsoft.Office.RecordsManagement.
               PolicyFeatures.Expiration.
               Formula.BuiltIn””>
                 <number>6</number><property>Modified</property>
                 <period>months</period></formula>
                 <action type=““action””
                   id=““Microsoft.Office.RecordsManagement.PolicyFeatures.
                 Expiration.Action.Record”” />
                  </data></stages></Schedule>
                 <Schedule type=““Record””><stages><data stageId=““3””><formula
                  id=““Microsoft.Office.RecordsManagement.PolicyFeatures.
                Expiration.Formula.BuiltIn””>
                 <number>3</number><property>Created</property5
                 <period>years</period></formula>

                 <action type=““action””
                   id=““Microsoft.Office.RecordsManagement.PolicyFeatures.
                   Expiration.Action.Delete”” />
                 </data></stages></Schedule></Schedules>”;

                SPContentType contentType = web.ContentTypes[“Document”];


                Policy policy = Policy.GetPolicy(contentType);


               //Check to see if it exists, if not create it
               if (policy == null)
                {
                   Policy.CreatePolicy(contentType, null);
                   policy = Policy.GetPolicy(contentType);
                }


               PolicyItem retentionPolicy = policy.Items[Expiration.PolicyId];
                //See if a policy already exists, if not create one
                if (retentionPolicy == null)
                {
                    policy.Items.Add(Expiration.PolicyId, policyXml);
                    policy.Update();
                }
                else
                {
                    retentionPolicy.CustomData = policyXml;
                    retentionPolicy.Update();
                }

               //Return back policy XML to make sure it worked
                retentionPolicy = policy.Items[Expiration.PolicyId];
                MessageBox.Show(“Policy XML: ” +
                 retentionPolicy.CustomData.ToString());
![]()
Creating Organizer Rules
SharePoint 2010 supports a new Content Organizer feature that allows SharePoint to route documents based on the rules you specify. Although you can create these rules through the user interface, as shown in Figure 7-8, you can also create rules through the object model. The object model offers a class called Microsoft.Office.RecordsManagement.RecordsRepository.EcmDocumentRoutingWeb. This is the base class that you will start working with, using the object model (OM). From this class, you can access the rules contained for the Content Organizer feature. One thing to remember is that you must activate the Content Organizer feature in your site feature settings. If you do not, you won't see the user interface for creating rules, and the object model won't work.
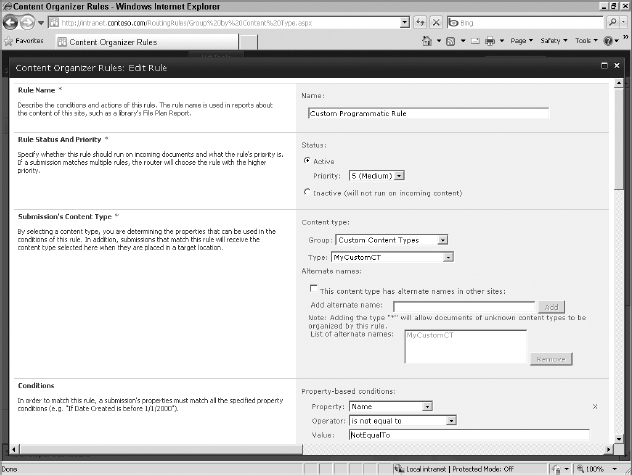
FIGURE 7-8
From the routing web object, you can access the RoutingRuleCollection that contains your EcmDocumentRouterRule. With the rule object, you can access the properties of an existing rule. To create a new rule, you create a new ECMDocumentRouterRule and pass the SPWeb object, which represents the SharePoint location where you want to create the rule.
Since content rules require XML conditions, the easiest way to create a content rule is by using the user interface and then copying the XML from the rule. Table 7-2 lists the properties you need to set to create a rule.
TABLE 7-2: Properties to Create a Rule
| NAME | DESCRIPTION |
| Name | Name of the rule. |
| Description | Description for the rule. |
| Priority | String that is the priority of the rule compared to other rules. 1 is highest, 9 is lowest. |
| ContentTypeString | Content type string used to specify your content type. The format has to be ID|Name. |
| TargetPath | Relative path to the target folder such as /Shared Documents. |
| ConditionString | XML fragment that contains the conditions that you want met before the rule fires. Table 7-3 shows the different Operator options for this property, but the general format is <Conditions><Condition Column=“Column ID|Column Internal Name|Column Title” Operator=“Operator” Value=“Value” /></Conditions>. |
| Enabled | Boolean that specifies whether the rule is enabled. |
TABLE 7-3: Operators for Content Organizer Rules
| NAME | DESCRIPTION |
| IsEqual | Checks to see if the value of the column is equal to the value specified. |
| IsNotEqual | Checks to see if the value of the column is not equal to the value specified. |
| GreaterThan | Checks to see if the value of the column is greater than the value specified. |
| LessThan | Checks to see if the value of the column is less than the value specified. |
| GreaterThanOrEqual | Checks to see if the value of the column is greater than or equal to the value specified. |
| LessThanOrEqual | Checks to see if the value of the column is less than or equal to the value specified. |
| BeginsWith | Checks to see if the value of the column begins with the value specified. |
| NotBeginsWith | Checks to see if the value of the column does not begin with the value specified. |
| EndsWith | Cecks to see if the value of the column ends with the value specified. |
| NotEndsWith | Checks to see if the value of the column does not end with the value specified. |
| Contains | Checks to see if the value of the column contains the value specified. |
| NotContains | Checks to see if the value of the column does not contain the value specified. |
| IsEmpty | Checks to see if the value of the column is empty. You specify a blank string for the value. |
| IsNotEmpty | Checks to see if the value of the column is not empty. You specify a blank string for the value. |
If you want to enable autofoldering based on a unique property, you use the DocumentRouter AutoFolderSettings class. This class contains a number of properties you need to set to make autofoldering work. Table 7-4 shows the properties for the DocumentRouterAuto FolderSettings class. The code following the table shows how to set these properties and use them in your code.
TABLE 7-4: DocumentRouterAutoFolderSettings Properties
| NAME | DESCRIPTION |
| Enabled | Boolean that specifies whether these settings are enabled. |
| AutoFolderPropertyInternalName | The internal name of the field to use for autofoldering. |
| AutoFolderPropertyId | The property ID of the field to use for autofoldering. |
| AutoFolderPropertyName | The property name of the field to use for autofoldering. |
| AutoFolderPropertyTypeAsString | The property type as a string of the field to use for autofoldering. |
| AutoFolderFolderNameFormat | The name format to use for the folder. By default, this will be %1 - %2. %1 will be replaced by the name of the property. %2 will be replaced with the unique value for the property. |
             SPWeb web = site.RootWeb;
             SPList list = web.GetList(SharePointListURL);
             SPFolder folder = web.Folders[SharePointListURL];
             SPWeb parentWeb = list.ParentWeb;

             EcmDocumentRoutingWeb router = new EcmDocumentRoutingWeb(web);
             foreach (EcmDocumentRouterRule rule in router.RoutingRuleCollection)
             {
                string s = “Alias: ” + rule.Aliases + “ AFP:” +
                 rule.AutoFolderPropertyName + “ Cond:” +
                 rule.ConditionsString + “ CTS:” +
                 rule.ContentTypeString + “ CR: ” +
                 rule.CustomRouter + “ pri:” +
                 rule.Priority + “ TP:” + rule.TargetPath +
                 “ Name:” + rule.Name +
                 “ Desc:” + rule.Description;


                try
                {
                    DocumentRouterAutoFolderSettings autoFolder =
                     rule.AutoFolderSettings;

                    s = “name Format: ” +
                     autoFolder.AutoFolderFolderNameFormat + “ PropID:” +
                     autoFolder.AutoFolderPropertyId.ToString()

                     + “ InternalName:” +
                     autoFolder.AutoFolderPropertyInternalName
                     + “ PropName:” +
                     autoFolder.AutoFolderPropertyName +
                     “ TypeasString:” +
                     autoFolder.AutoFolderPropertyTypeAsString +
                     “ MaxItem:” +
                     autoFolder.MaxFolderItems.ToString() +
                     ” Term:” +
                     autoFolder.TaxTermStoreId.ToString();
                     }
                     catch { }


                 }

                //Create a new rule

               //Can use helpers to get Content Type Info and Field Info

               SPContentType contentType = web.ContentTypes[“MyCustomCT”];

               string contentTypeString = contentType.Id.ToString() + “|”
               + contentType.Name;

             //Field Internal Name
             SPField fieldName = contentType.Fields[“Name”];

               string fieldNameString = fieldName.Id.ToString() +
              “|” + fieldName.InternalName + “|” + fieldName.Title;


               EcmDocumentRouterRule newRule = new EcmDocumentRouterRule(web);
               newRule.Name = “Custom Programmatic Rule”;
             newRule.Description = “Created by OM”;
             newRule.Priority = “5”;
             //Can be the content type ID and any aliases separated by |
             newRule.ContentTypeString = contentTypeString;
             //Relative path to target
             newRule.TargetPath = “/Shared Documents”;
             newRule.ConditionsString = @“<Conditions>
                   <Condition
                    Column=““8553196d-ec8d-45 64-9861-
3dbe931050c8|FileLeafRef|Name”
                “Operator=““IsNotEqual””
                Value=““NotEqualTo”” />
                <Condition
                 Column=““8553196d-ec8d-45 64-9861-
3dbe931050c8|FileLeafRef|Name””
                 Operator=““GreaterThan””
                   Value=““GreaterThan”” />
                   <Condition
                 Column=““8553196d-ec8d-45 64-9861-
3dbe931050c8|FileLeafRef|Name””

                     Operator=““LessThan””
                 Value=““LessThan”” />
                    <Condition
                    Column=““855319 6d-ec8d-45 64-9861-
3dbe931050c8|FileLeafRef|Name””
                     Operator=““GreaterThanOrEqual””
                   Value=““GreaterThanEqual”” />
                   <Condition
                    Column=““855319 6d-ec8d-45 64-9861-
3dbe931050c8|FileLeafRef|Name””
                     Operator=““LessThanOrEqual””
                   Value=““LessThanOrEqual”” />
                   <Condition
                     Column=““855319 6d-ec8d-4564-9861-
3dbe931050c8|FileLeafRef|Name””
                     Operator=““BeginsWith””
                   Value=““BeginsWith”” />
                   </Conditions>”;

                //Create autofolder settings
                //Get Field Properties (must be required and single value property
             SPField customField = contentType.Fields[“MyCustomString”];


             DocumentRouterAutoFolderSettings aFolder =
                 newRule.AutoFolderSettings;
              aFolder.Enabled = true;
             aFolder.AutoFolderPropertyInternalName =
                  customField.InternalName;
                aFolder.AutoFolderPropertyId = customField.Id;
             aFolder.AutoFolderPropertyName = customField.Title;
              aFolder.AutoFolderPropertyTypeAsString =
                    customField.TypeAsString;
             aFolder.AutoFolderFolderNameFormat = “%1 - %2”;


             newRule.Enabled = true;


             router.RoutingRuleCollection.Add(newRule);
![]()
Creating Workflows that Use RM
One of the exciting additions to RM is the addition of workflow actions that take advantage of RM. With SharePoint Designer and Visio, RM has a number of actions you can perform on your content. The first is special to document sets, in that as an action in SPD, you can send the document set to the records repository. For RM in particular, there are two actions and they are opposites: Declare Record and Undeclare Record. As the names imply, these actions declare or undeclare the current item as a record. Figure 7-9 shows using these actions in an SPD workflow. Figure 7-10 shows an example with the same actions in a SharePoint workflow using Visio.
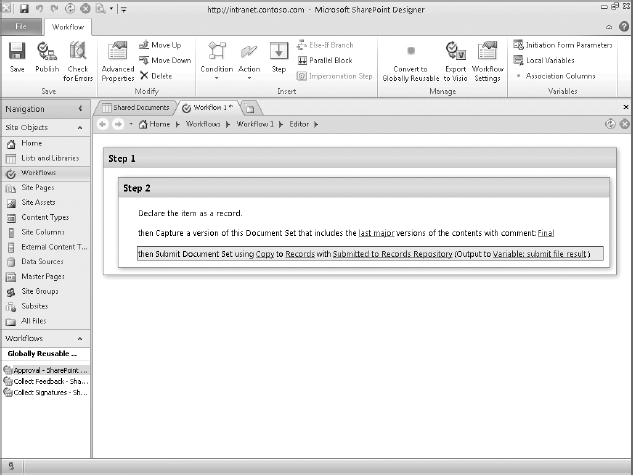
FIGURE 7-9

FIGURE 7-10
SUMMARY
In this chapter, you have seen how you can use records management in SharePoint 2010. Declaring records and creating Content Organizer rules become commonplace if you build compliance applications on SharePoint. Combine the new RM features with the new document management features, and SharePoint becomes a very capable information management system for handling large amounts of data. This combination also allows you to build powerful information management solutions with SharePoint.