
9
Electronic Forms
WHAT'S IN THIS CHAPTER?
In today's world, most business processes rely on capturing information from the end users and translating it into appropriate and timely actions. A majority of these business processes simply start with a form and may use other forms throughout their lifecycle. Unfortunately, in many cases forms are received with inaccurate information, which leads to bad decision making, significant cost, and damage to organizations.
SharePoint ships with a great object model that can be used to build sophisticated forms for gathering data and feeding it to the enterprise business processes, such as workflow sequences and composite applications. The vision behind the product, as an application development platform, however, has always been based on its ability to build powerful enterprise applications quickly and easily. The emphasis on the words easy and quickly in the product's vision statement means that there should be an easier way to create, distribute, and manage electronic forms with little or no code.
InfoPath 2003 was Microsoft's first attempt to uniquely position this product to handle the problems in business data collection and presentation needs. The main feature of InfoPath 2003 was the ability to author and render XML-based electronic forms with support for custom-defined schema. InfoPath 2003 native support for XML made it a compelling solution for integration with many backend systems that can understand and communicate in XML. In SharePoint 2003, a form library and its form template were designed to glue the two products together. Collectively, the form library and its template allowed customers to create new instances of a single form template and translate the field values into column values upon saving the form, all done within the context of a SharePoint site but filled out via the InfoPath 2003 client.
Because of some architectural and deployment limitations in InfoPath 2003, this product never achieved adoption beyond simple departmental solutions that allowed members of small teams to collect, route, and store data within their own little collaborative sandboxes. But, how about the Enterprise?
Not all users who interact with business processes have access to the InfoPath client application; neither do they use one particular device, such as their computer, all the time! For example, sales agents need to take the forms offline and use their PDAs and smart phones to fill them out, partners use only their browser to interact with forms, and internal employees may use a combination of the InfoPath client and browsers to participate in various business processes across the enterprise.
When the Office 2007 suite hit the streets, Microsoft introduced a very exciting feature: Forms Services 2007 — included in the enterprise version of Microsoft Office SharePoint Server 2007.
![]() If you are interested in learning about electronic forms integration with Microsoft Office SharePoint 2007, Chapter 14 (by John Holliday) in the book Professional SharePoint 2007 Development (Wrox, 2007), is a great resource.
If you are interested in learning about electronic forms integration with Microsoft Office SharePoint 2007, Chapter 14 (by John Holliday) in the book Professional SharePoint 2007 Development (Wrox, 2007), is a great resource.
In a nutshell, Forms Services was all about allowing end users to use their browsers to fill out InfoPath forms and allowing administrators to manage those forms. Form Services 2007 was a great move to help extend the reach of electronic forms by ensuring that electronic forms can render content for a wide range of users using various client applications and different devices. The concept of content types and their association with form templates, two-way synching between form data fields and columns, and a better deployment model were all among major improvements Microsoft made to the product at that time.
With the power of the SharePoint Server 2010 platform, InfoPath 2010 and Forms Services 2010 represent even more significant improvements over their predecessors. Some of the improvements came from the core platform itself and some were made available in each product.
InfoPath 2010, available in the Professional Plus volume license SKU, is a form creation and data-gathering tool that ships with the Microsoft Office 2010 package. If we consider InfoPath 2003 Service Pack 1 as a major iteration in the product's lifecycle, then InfoPath, in its fourth iteration with the 2010 release, has evolved way beyond the product that was released back in August 2003. InfoPath 2010 is the most compelling release to date and is the quickest way to have a common form rendition in the browser as well as in rich and offline clients.
Once you install InfoPath 2010, the first thing that you may notice is that InfoPath 2010 comes with two flavors: InfoPath Designer and InfoPath Filler. InfoPath Designer 2010 is the primary tool used by designers to create and design the forms with easy-to-use features based on pre-built templates and baked-in functionalities. As the name implies, InfoPath Filler 2010 comes with a Fluent UI, which provides a much improved and yet simpler end user experience for filling out forms.
The following list provides a sneak peek of some of the new features introduced in InfoPath 2010 and InfoPath Form Services 2010:
- Richer browser forms with shorter load time.
- The capability to handle more requests per second.
- The capability to customize SharePoint list forms.
- A brand-new InfoPath Form web part.
- Equal rendition across the major browsers. Compliant browser forms (WCAG 2.0, XHTML 1.0, and strict CSS).
- Integration with Business Connectivity Services (BCS).
- Ability to query REST web services/ SharePoint REST APIs.
- Native offline integration with SharePoint through SharePoint Workspace 2010 client.
- New controls like the People/Group Picker, Date Time Picker, and Picture button.
- On-premises or multi-tenant hosting support (i.e., SharePoint online).
- Ability to script various operations using PowerShell, backup, and restore.
- Seamless integration with new Health Rule Definitions.
Enterprise forms is a broad topic that could make up several chapters, if not its own book. However, after reading this chapter, you will have a good understanding of how to leverage InfoPath in SharePoint to rapidly design and create forms used in enterprise management processes across your organization.
And with that, it is time to get started.
INTRODUCING THE TRAINING MANAGEMENT APPLICATION
In this chapter, you'll use an example of a Training Management application at a fictitious company, Adventure Works, which illustrates some of the new capabilities of InfoPath 2010 and Forms Services 2010. First, take a look at how this application works from the user's perspective.
The Human Resources (HR) department at Adventure Works uses SharePoint and InfoPath to implement a training-course system. You can think of the Training Management application as a set of three use cases as follows:
- New training creation use case
- Training registration use case
- Increment stat counter use case
As illustrated in Figure 9-1, Adventure Works staff can perform various activities in this application. For example, the training coordinator can create trainings and add them to a SharePoint list named Trainings. This list will be customized and enhanced by InfoPath 2010 to facilitate the training creation use case.
Also, the Human Resources department at Adventure Works allows its employees to register for a training opportunity. The training registration form is designed in InfoPath and hosted inside the new InfoPath Form web part on a web part page named Trainings Dashboard. The training registration form must be rendered in a typical desktop web browser and in browsers on handheld or mobile devices.
Once a training request is filled out and saved, the result is stored in a form library named Registrations, and an event handler associated with the Registrations form library fires and updates a counter in another custom SharePoint list, named Stats. The Stats list is hidden from employees so that its content can't be modified and it does not clutter navigation. At the end, the registration form is connected to the Stats list through the web part connections framework in SharePoint to demonstrate a simple form-driven mashup scenario.
As you may notice, the primary forms in driving the business process just described are all electronic forms and implemented in InfoPath 2010. The following diagram demonstrates a high level overview of the Training Management application.
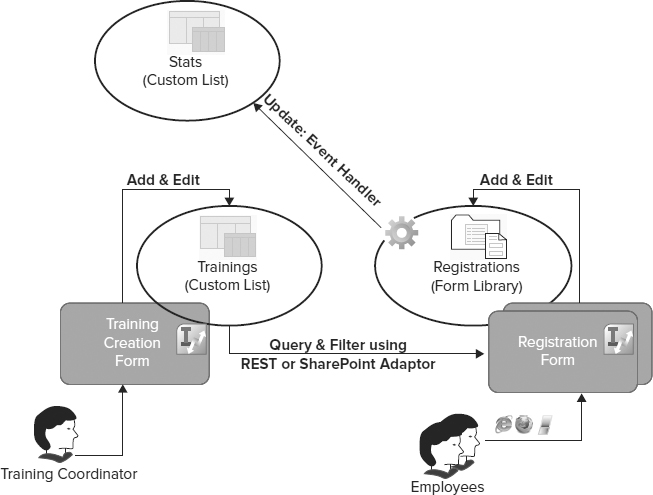
FIGURE 9-1
CUSTOMIZING SHAREPOINT LIST FORMS
In Windows SharePoint Services 3.0, list forms were regular ASP.NET pages serving as the visual interfaces to add an item to, or edit or display an item in, that list. Typically, list forms were defined in the list template and instantiated upon the creation of a new list instance. Although there are several ways to replace the out-of-the-box list forms (DispForm.aspx, EditForm.aspx, and NewForm.aspx) with custom ASPX pages, as described in the following list, each approach introduces its own challenges:
- SharePoint Designer Customization: In this approach, you use SharePoint Designer 2007 to modify the layout of list forms and add custom business logic. For example, you could create a new NewForm.aspx form from scratch. This approach introduces a very limited customizability that limits you to using HTML, JavaScript, and Extensible Stylesheet Language (XSL) only. Additionally, customizing list forms using SharePoint Designer 2007 results in inserting a fairly big chunk of XSL into the HTML markup of the form, which makes it even harder to maintain!
- Customizing List Forms via a Browser: You can add web parts to the Display, Edit, and New forms via a browser to add business logic for the inserting and editing of list item data. The problem with this approach is that Microsoft clearly states that it is not supported, meaning that if something breaks you'll have to remove the web part and leave the default List Form web part as the only web part on the page. This is certainly not a solution that you can always rely on either.
- Using Custom Content Types with Associated Custom Forms: This is a better approach than the other two, because you can use all your ASP.NET coding skill sets and deploy the list forms in a much cleaner way. However, you cannot leverage this approach for the existing content types or lists that are not yours. You must add to this the extra code that you would have to write to handle the CRUD (create, read, update, and delete) operations that your custom UI requires when interacting with lists, such as wrapping your calls to Update() methods in a try/catch block and trap for exceptions like concurrency violations and so on.
One of the exciting features in InfoPath 2010 is the ability to extend or enhance the forms used by SharePoint lists for creating, editing, or showing list items. Today, you can modify list forms layouts, set validation rules, or create additional views using little or no code. When you are finished modifying the list forms, reflecting your changes back to SharePoint is just a matter of using the one-click publishing capability that comes out of the box with the list form.
In this section, you will explore some of the new functionalities of InfoPath 2010 used to customize SharePoint list forms in the context of a Training Management application, which you will build throughout the chapter.
Creating the Trainings List
Before diving into customizing the Trainings list forms using InfoPath, you need to create the SharePoint list and add the required fields to it. Business requirements of the Training Management application dictate that the training coordinator be able to create new training opportunities by selecting Add New Item in the Trainings list. This list resides on the Human Resources website and requires the following information:
- Title: A title for the training opportunity
- Code: A code that uniquely identifies the training (unique eight-character fixed)
- Description: The description of the training
- Start Date: The training's start date
- End Date: The training's end date
- Cost: The cost of the training (American dollars)
- Level: The difficulty level associated with the training (a number from one to five)
- Enrollment Deadline: The date that enrollment ends
- Address: The address of the training facility (multiple lines of text)
- Additional Information: Optional information about the training itself (enhanced rich text with pictures, tables, and hyperlinks)
Figure 9-2 illustrates all the fields of the new Trainings list, their types and whether they are required when submitting to the list.
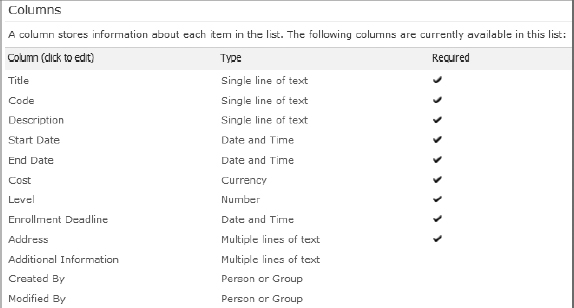
FIGURE 9-2
Customizing SharePoint List Forms
To customize the list forms in the Trainings list, navigate to the list and click Customize Form on the List tab that appears on the Ribbon, as shown in Figure 9-3.
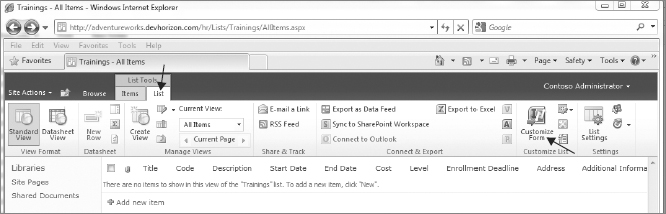
FIGURE 9-3
This will launch InfoPath Designer in SharePoint list mode, and a basic form will be autocreated from the fields specified in the list's schema. You can see the fields in the Fields task pane on the right side of the design canvas in which mandatory fields are designated with a red asterisk.
Before going further, look at the controls that have been placed on the form (see Figure 9-4). For each Date and Time column in the Trainings list, a Date and Time Picker control has been generated by InfoPath. The Date and Time Picker is a new control in InfoPath 2010 that allows you to type a date and time or select a date from a calendar display.
Also notice that, when you click on one of the existing form fields (for example, Level), the control tools' contextual Ribbon appears on the top and gives you the ability to interact with the list columns inside the InfoPath Designer. Any changes at this point will be persisted later to the SharePoint list when the form is published. For example, if you change a control's binding to a new field, that field will be automatically added to the list's schema when the form template is published to SharePoint.
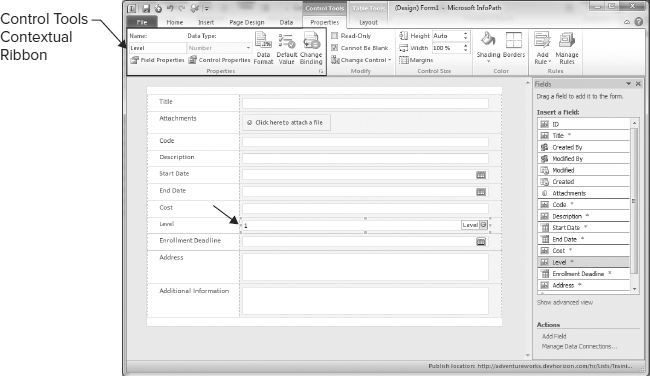
FIGURE 9-4
In addition to autogenerating the form through the Fluent UI interface, you can launch InfoPath Designer by going to the New tab in the Backstage and choosing SharePoint List as the template. You then enter the URL of the Trainings list, and the same InfoPath form will be autogenerated for you.
To save some real estate on the form, let's create an optional section that the training coordinator can use to insert or remove additional information about the training if necessary. Right-click on the autogenerated Additional Information rich textbox on the form and delete it. In the Fields task pane, switch to Show Advanced View, then click on the drop-down menu next to the Additional Information field and choose Optional Section with Controls. This adds an optional section, and the same rich textbox bound to the Additional Information field is inserted into the form, as shown in Figure 9-5.
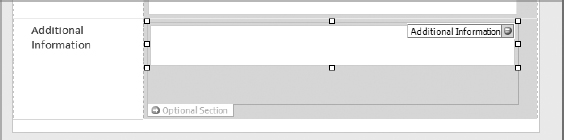
FIGURE 9-5
Adding Intelligence Using Rules and Views
Rules in InfoPath are a set of one or more event-centric actions used to create a dynamic experience for the users of the form when they fill it out. There is always an event that triggers a rule, and in response, the rule performs some action such as a format change or a validation check.
The training form sample provided in this chapter contains two validation rules and one business logic rule, which must be satisfied as follows:
- If End Date < Start Date, then show a validation error message.
- If Enrollment Deadline > Start Date, then show a validation error message.
- Only the Address and Additional Information fields can be edited after the training is created.
To implement these requirements, click on the End date control (date picker) to select it. Next, on the Home tab, click Add Rule, then Manage Rules. This will open the Rules task pane. Click New button, then Validation. Give the rule a name (e.g., RuleEndDate). Click the None hyperlink in the Condition section, and define the rule to run when the condition shown in Figure 9-6 is true. Click OK to save the rule.

FIGURE 9-6
Repeat the same steps for Enrollment Deadline.
BEST PRACTICE #1
InfoPath rules and formulas (collectively referred to as declarative logic) are powerful ways of adding intelligence to your electronic forms. It's not a best practice to write custom code where declarative logic can do the job!
As stated in Rule 3, you need to make sure that, when the training is created, there is no way someone can make changes in any fields except the address and additional information fields. To implement Rule 3, you need to leverage another powerful feature of InfoPath, called views. Views are a great way to present your form differently to the users based on different states that the form is in. In the case of the training creation form, you need to set a different view when a training is being edited than what it is when the training coordinator creates a new training. (It is called insert mode.)
To add the Edit View to your form, go to the Page Design tab and in the Views group, click New. Call the new view Edit Training, and click OK. One special attribute of views is that you can display the same fields on multiple views using separate controls — just copy (Ctrl+C) the layout and controls from the default view and paste them (Ctrl+V) onto the second view. Next, add a meaningful title to the top of the form for both the default and Edit Training Views — say, New Training and Edit Training. In Edit Training View, remove the attachment row and make Title, Code, Description, Cost, and Level controls read-only (Right-click ![]() Text box properties
Text box properties ![]() Display tab
Display tab ![]() Read-only).
Read-only).
Because you can't make the Start Date, End Date, and Enrollment Deadline controls read-only (they're Date Picker controls), let's just delete them all and replace them with three textbox controls instead (Home Tab ![]() Control section
Control section ![]() Text box). At this point, right-click on each textbox control and choose Change Binding to bind it to the appropriate date field, as shown in Figure 9-7.
Text box). At this point, right-click on each textbox control and choose Change Binding to bind it to the appropriate date field, as shown in Figure 9-7.
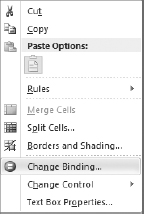
FIGURE 9-7
It's very important that you delete the field1, field2, and field3 fields that InfoPath automatically added to the Fields pane as a result of adding the new textboxes. Otherwise, the new fields will be promoted as list columns when you publish your form to SharePoint.
At this point, your Edit Training View should look like Figure 9-8.

FIGURE 9-8
To glue everything back together, you need to set something up that flips the view between the new and edit modes based on a condition. Navigate to the Data tab and go to the section called Form Load. Click on the New button, select Action, and then type an appropriate name for the rule, such as RuleSwitchToEditView. Essentially this sets up a rule and runs when the form loads. Now, you need to specify under which condition this rule runs.
The condition is clear: you want to switch the view when users edit an existing training. Because Code is a mandatory field, it cannot be blank when training is created. Therefore, you can use this field to handle this particular situation, as shown in Figure 9-9.
After the condition is set, it's time to define the action that needs to kick in. Click on Add Button just below where you defined condition and select Switch Views. In the View drop-down box specify Edit Training View, if it's not already selected (see Figure 9-10). That's it!

FIGURE 9-9
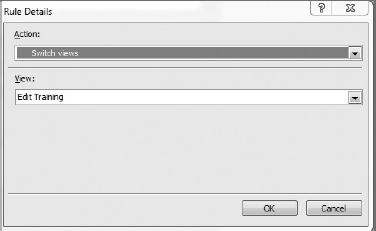
FIGURE 9-10
![]() Because external lists are just like lists with some extra hooks added to the backend Business Connectivity Services data source, they can be treated like typical lists in InfoPath. However, the steps you need to take to customize external list forms are different from those for typical list forms. External list form customization is mostly done in the SharePoint Designer 2010.
Because external lists are just like lists with some extra hooks added to the backend Business Connectivity Services data source, they can be treated like typical lists in InfoPath. However, the steps you need to take to customize external list forms are different from those for typical list forms. External list form customization is mostly done in the SharePoint Designer 2010.
Publishing List Forms
At this point, you are done with designing your form and empowering it with rules and views. Now, go ahead and publish the form to the SharePoint list from which it came. In the Backstage go to the Info tab.
In Figure 9-11, a nice screenshot of the current state of the form is shown on the right side. Also, InfoPath already knows which list this form belongs to, meaning that there is no additional configuration required on your side to publish the form to SharePoint. Just click on the button that says Quick Publish, and you are done.

FIGURE 9-11
After the form is published to the Trainings list, do not close the form. Instead, click on Save As and save the template somewhere on your local drive. The important point to remember here is that saving a form template locally or on a network share is a totally different process from publishing it. Publishing versus saving a form template will be covered in greater detail later in this chapter, but for now just accept these as two different terms in the InfoPath lexicon.
Once the form has been successfully published and its template is locally saved, return to the Trainings list in the HR site and create a new training item. Sure enough, the default ASPX page is replaced with the default view of the form template you just customized and published. After filling out the form (see Figure 9-12), you can submit it by clicking Save on the top Ribbon. At this point, the form applies the appropriate rules to validate your input and adds a new list item to the Trainings list.
While you are still on the form, notice that the Additional Information field is partially invisible on the form because it is hosted in an optional section.

FIGURE 9-12
If you click anywhere on the rendered form and get a property of the page, you will see that the form, unlike uncustomized list forms, is not loaded by the NewForm.aspx page. Instead, it is loaded by another out-of-the-box web part page called newifs.aspx.
The newifs.aspx, displayinf.aspx, and editifs.aspx pages are new additions to the list's infrastructure in SharePoint 2010. They are all web part pages that can be customized via browser. All three pages are accessible from the List Ribbon ![]() Form Web Part drop-down, as shown in Figure 9-13. Each page hosts an instance of InfoPath Form web part that knows how to locate and load the form template associated with the Trainings list.
Form Web Part drop-down, as shown in Figure 9-13. Each page hosts an instance of InfoPath Form web part that knows how to locate and load the form template associated with the Trainings list.
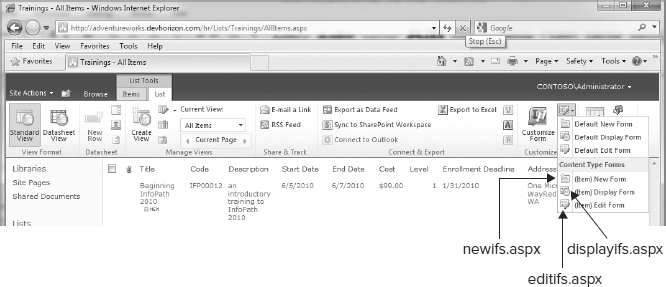
FIGURE 9-13
When editing an existing training, you will see that the rule you placed in the Load event of the form kicks in and switches the view from New Training to Edit Training, where you can edit the last two fields of the form only, as illustrated in Figure 9-14.

FIGURE 9-14
If, at some point during the customization process, you decide to undo everything and revert to the out-of-the-box ASPX forms, it's easy. Browse to the list's List Settings page, click Form Settings, select Use the Default SharePoint form, and click OK. Optionally, if you leave the Delete the InfoPath Form from the server unchecked, the InfoPath form you customized will remain on the server. Thus, the next time you click Customize Form, the saved InfoPath form will be used in InfoPath Designer instead of a new one being autogenerated from scratch.
Two things about SharePoint list forms to consider: First, custom code is not supported in customized list forms using InfoPath 2010. Right-click on the form template you just saved in your local drive, and select Design to launch InfoPath Designer 2010. There is no Developer tab on the Ribbon to launch Visual Studio Tools for Applications (VSTA) for writing custom code (see Label 1 in Figure 9-15). Second, you can only publish a list form to the list it belongs to (see Label 2 in Figure 9-15). This also means that converting your list form to a form library is not possible.
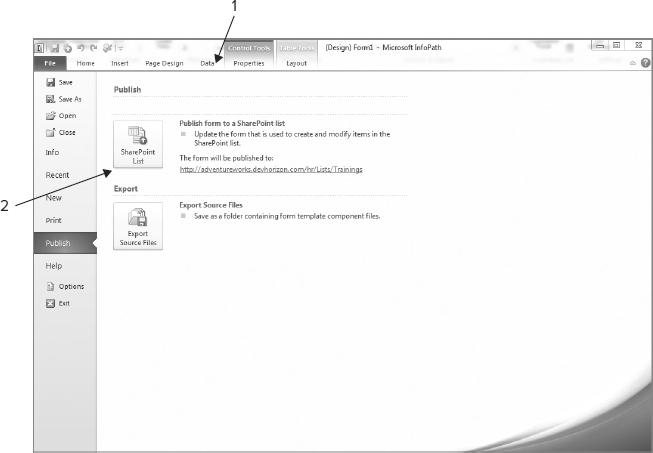
FIGURE 9-15
Distributing the Trainings List
To distribute the InfoPath forms attached to the Trainings list, you need to export the Trainings list as a template and make the template available for use in other sites by uploading it to their List Template gallery, as shown in Figure 9-16.
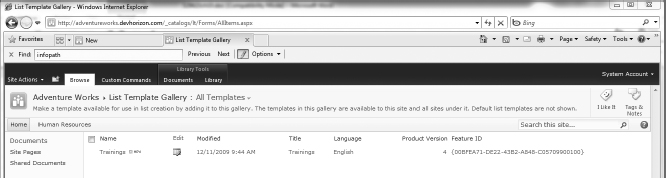
FIGURE 9-16
DESIGNING INFOPATH FORM TEMPLATES
The second use case to implement is the registration use case, which demonstrates how Adventure Works employees can register for a training opportunity. To implement this use case, Adventure Works has decided to create a form library named Registrations in which to store the training requests and a form template, which is used as the default template for the form library.
InfoPath separates data from schema and presentation. As such, every time an employee fills out the form, an instance of the form template is stored in the form library. The result is just an .xml file that contains only the data that was entered into the form, such as the alternate email address, emergency contact information, and so forth. Everything else that makes up the form is provided by its form template.
To begin the registration process, Adventure Works employees can use either of two custom actions. One option is to browse directly to the Registrations form library and file a new request for a specific training. The other option is to navigate to the Training Dashboard, where an InfoPath form web part hosts the registration form. Users fill out the form and press the Save button, and the result is saved in the Registrations library. So, there are two paths to complete a registration.
In this section, you will learn about various new and existing features. Here are some of the takeaways:
- Designing a form template
- Querying SharePoint list items using SharePoint REST APIs
- Writing custom managed code in forms
- Publishing form templates
- Form security
- Deploying forms as Sandbox Solutions
What Is a Form Library?
In nutshell, a form library is just a special document library that includes an InfoPath form as its primary template and easily allows users to fill out a new InfoPath form or edit an existing one.
Although InfoPath Designer 2010 allows you to create a form library on a SharePoint site when you publish your form template, there are situations in which you may want to create the form library beforehand. For example, you may want to create the form library, change its settings such as versioning, and set up permissions to it before publishing the form template simply because people who publish may not have enough permissions to complete such a task. Follow these steps to create a form library to host registration forms:
- Click Site Settings
 More Options.
 - In Filter By category, select Library, and then click Form Library.
- In the Name box, type Registrations. If you plan to enable the Registrations library to receive registrations by email, then click on More Options and type the email address of the Registrations library in the description textbox, so that Adventure Works employees can easily find it.
- If you want to add a link to this library on the SharePoint Quick Launch menu, Select Yes in the Navigation section.
- In the Document Version History section, click Yes only if you think that creating a version (minor or major) each time a request is checked into the form library is necessary.
- Click Create.
Once the form library is created, you can specify how its form templates should be opened. Browse to the Registrations form library ![]() Form Library Settings, and select Advanced Settings. These settings are listed under Opening Documents in the Browser, as shown in Figure 9-17. The default behavior when you create the form library from within SharePoint is to open the forms in the browser, but nothing stops you from changing it to InfoPath filler 2010 (Open in the client application).
Form Library Settings, and select Advanced Settings. These settings are listed under Opening Documents in the Browser, as shown in Figure 9-17. The default behavior when you create the form library from within SharePoint is to open the forms in the browser, but nothing stops you from changing it to InfoPath filler 2010 (Open in the client application).

FIGURE 9-17
Designing Your Form Template
With the Registrations form library complete, the next logical step is to build the Registration Form template. Adventure Works employees will fill out this form and save it to the form library you created in the previous section. One of the very first decisions you need to make here is how to design and lay out your form.
Start InfoPath Designer 2010.The best starting point is to select the type of form you want to design. When you choose a template as the basis of your form, descriptive text is displayed in the top-right corner of the dialog box, as shown in Figure 9-18. It is important to take a moment and review pre-built templates, their concepts, the matching color schemes, and the optimal layout used in each.
BEST PRACTICE #2
Using pre-built templates accelerates the form creation process and saves you a considerable amount of time if you are new to InfoPath 2010.
All available form templates are grouped into four main categories:
- Popular Form Templates: A wide range of popular form templates to start your design. When customizing SharePoint lists and document libraries, this is the category that you want to focus on.
- Advanced Form Templates: This category covers templates for more advanced scenarios, mostly for querying and submitting data to databases, web services, or other external data sources.
- InfoPath 2007 Form Templates: Form templates that also work in InfoPath 2007 in backward-compatible mode.
- Templates Parts: Contains three templates for building reusable components — also known as mini-form templates. Once built, mini-form templates can simplify the creation of more complex forms, much like splitting the page into user controls in classic ASP.NET.
From the Available Form Templates, choose the SharePoint Form Library template, and click Design This Form on the right side of the dialog box.
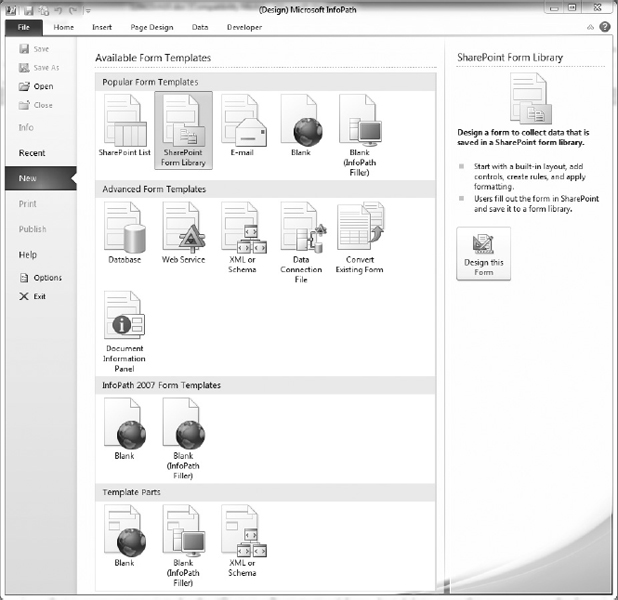
FIGURE 9-18
Right after you open InfoPath Designer 2010, you may notice that laying out your form to get a professional look and feel is now really easy. InfoPath uses page layouts as a framework to organize your form's content, including controls, graphics, and tables (also called section layouts).
First, you need to replace the page layout that InfoPath gives you by default with something that is more appropriate for the Training registration form. Just delete everything you see on the form (Ctrl+C/Delete). On the Page Design tab, select one of the five page layout templates, for example Color Bar. Add an appropriate title and adjust it so that it is centered. At this stage, your form contains only one page layout and a title, as shown in Figure 9-19.

FIGURE 9-19
Next, you need to add a section layout to the form to create a logical grouping of information that you want to collect in your form. From the Insert tab under the Tables gallery, choose Single Column 4 — No Heading, and insert it where it says “Add Tables,” right underneath the title. The template adds three rows by default and you need to add three more rows so that the following controls can be placed on the form:
- Event Name: A required Drop-Down Listbox control linked to the Trainings list
- Alternate Email: A required textbox with validation rules
- Emergency Contact Name: A required textbox
- Emergency Contact Phone Number: A required textbox with validation rules
- Short BIO: An optional textbox
- Manager: An optional People/Group Picker control
From the new Controls galley in the Home tab, add the required controls to the main section layout on the design canvas. You can set the controls to be required by right-clicking on each control and selecting the Cannot Be Blank checkbox in the control's Properties dialog box (Validation section). Because each control on the form and its autogenerated field represent the data on the form, let's give them more descriptive names. To do this, name the controls and the fields (field1 to field6) as described in the bulleted list above.
![]() It's a common misconception in InfoPath that fields, controls, and groups are interchangeable terms. A field represents the data that is collected by your form. All the fields available in your form can be accessed from Data tab
It's a common misconception in InfoPath that fields, controls, and groups are interchangeable terms. A field represents the data that is collected by your form. All the fields available in your form can be accessed from Data tab ![]() Show Fields
Show Fields ![]() Fields task pane. A group is an element in the data source that can contain fields or other groups. A control can be bound to a field or a group. When bound, the data collected by a control is saved in the form's underlying XML file. However, a control can also be left unbound, meaning that it doesn't save any data.
Fields task pane. A group is an element in the data source that can contain fields or other groups. A control can be bound to a field or a group. When bound, the data collected by a control is saved in the form's underlying XML file. However, a control can also be left unbound, meaning that it doesn't save any data.
Now, you need to change the overall look of your form. One of the new additions to this release of InfoPath is the ability to apply themes. In the Page Design tab, in the Themes (also called Layout Styles) gallery, you can select an appropriate style that best describes your form's personality. One of the available groups is exclusive to SharePoint, and all the themes match out-of-the box SharePoint themes. Let's go ahead and pick a color scheme from that group, for example, SharePoint — Gray Scale.
If you still have your cursor within a table cell on your form, then in the Table Tools contextual tab, click on the borders button and make some adjustments to the form so that there is a border around the entire layout page. When these steps are complete, the form should look like the one in Figure 9-20.

FIGURE 9-20
At this point, everything from the design perspective has been handled, and you can start adding the necessary business logics to your form.
Click on the emergency contact phone number textbox, and from the Controls Tools Properties tab, click the Manage Rules button to launch the Rules Manager. Here, you need to set a validation rule that fires when the emergency contact number doesn't match the Phone Number pattern. As you can see in Figure 9-21, there are many ready-to-use data entry patterns that you can choose from. You can even customize each pattern's associated regular expressions and create your own customized pattern.
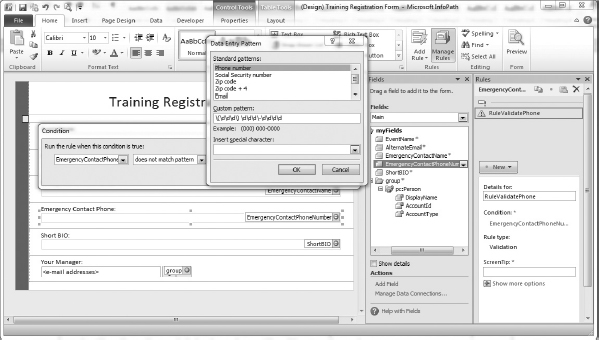
FIGURE 9-21
To validate the Alternate Email Address field, copy the rule you just created for the Phone Number field and paste it into the alternate email control's Rules task pane. You just need to change one thing: in the Data Entry Pattern dialog box, choose Email pattern instead of Phone Number pattern.
![]() In InfoPath Designer 2010, one new improvement in the Rules task pane is the option to copy and paste rules. This helps you save time and work efficiently when designing your forms. Copying and pasting rules doesn't work across multiple forms.
In InfoPath Designer 2010, one new improvement in the Rules task pane is the option to copy and paste rules. This helps you save time and work efficiently when designing your forms. Copying and pasting rules doesn't work across multiple forms.
Employees who fill out this form will be asked to specify their direct manager in the respected People/Group Picker control. Notice how, by adding this control to the design canvas, a group has been added in the Fields task pane containing three fields: DisplayName, AccountlD, and AccountType.
First, go to the People Picker control's Properties dialog box, and in the SharePoint Server tab, specify the SharePoint site URL to query for people and groups. Notice in the General tab how you can narrow down the people/group picking query to choices like People Only, People, and Groups, Allow multiple selections, or even a specific SharePoint group, as illustrated in Figure 9-22.

FIGURE 9-22
Note that if you added People/Group Picker control to a customized SharePoint list form (such as Trainings list forms), then you wouldn't need to go through all these additional steps in order to set it up. The control is smart enough to pick the right context for you.
Querying SharePoint Lists in Forms
With the people picker properly configured, it's time to return to the Event Name Drop-Down Listbox control and wire it up to query the Trainings list you created earlier in this chapter.
From the Data tab, click on the From SharePoint List in the Get External Data gallery. In the first page of the Data Connection Wizard, type the full URL of the Trainings list, and click Next, as shown in Figure 9-23.
In the second screen, the Trainings list is already highlighted on the available list of libraries, so go ahead and click Next. Figure 9-24 illustrates the third screen of the wizard, where you should select the fields that must be included in the data source. Simply select all the columns you created in the Trainings list and click Next.
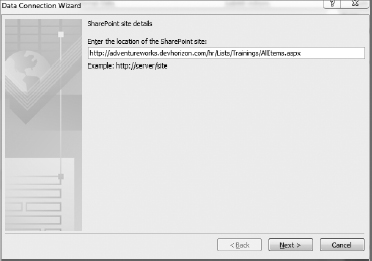
FIGURE 9-23
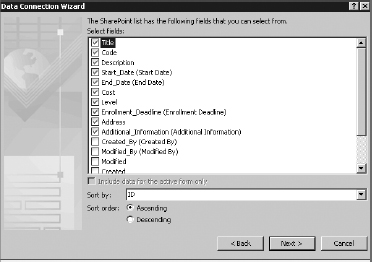
FIGURE 9-24
In the fourth step of the wizard, leave “Store a copy of data in the form template” unchecked, and click Next.
You're almost done. In the last step, type a proper name for the data source and check the “Automatically retrieve data when form is opened” option to create a secondary data source in your form, as shown in Figure 9-25. Finally, click Finish.

FIGURE 9-25
BEST PRACTICE #3
Before selecting “Automatically retrieve data when form is opened” when creating a data source with the Data Source Wizard, consider the following two tips: Loading large data sources can significantly increase your form's initial rendering time and should be avoided if possible. You should postpone such queries to a later time during the form's lifecycle or make them on demand, based on user-initiated actions. One solution is to create wizards (using views) and have a splash screen in the default view that takes users' inputs and then queries a parameterized data source in the subsequent views. This option should not be selected if either the data source changes frequently or it contains sensitive information that must not be included in the form's schema (for offline use).
Note that, to keep the samples provided in this chapter relatively simple, querying external data sources in the form load event is not much of a concern. In general, this is not an ideal situation because it adds to the form's load time.
In the Event Name control's properties dialog box, select “Get choices from an external data source,” and in the Data source, select the secondary data source. Click the XPath image next to the Entries box, and choose the ns2:SharePointListltem_RW element. Set the Value and Display name to Code and Title fields, as shown in Figure 9-26, and click OK.
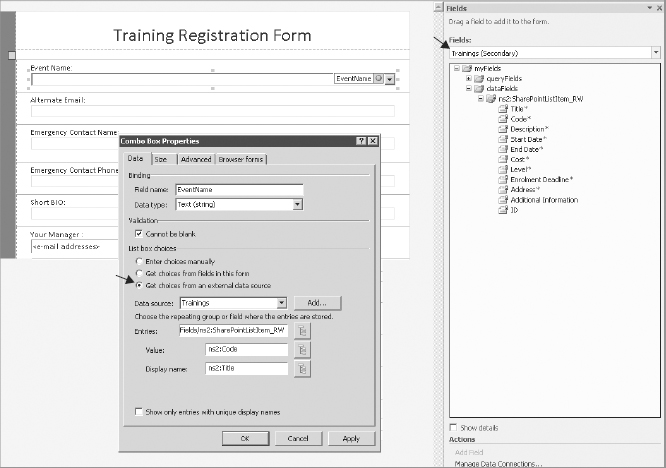
FIGURE 9-26
Last, but certainly not least, the data source must bring only a subset of data that's relevant to the users because, at present, it fetches all the training courses. As more training courses are created over time, there is a chance that employees will register for a training course that's already passed its registration due date. To address this issue, you can use a filter that enables employees to view only relevant trainings.
In InfoPath 2007, filters could be used only in form templates that were designed to be filled out in the InfoPath client and were not supported in browser-compatible form templates. There were workarounds, such as using conditional formatting or using web services to overcome this limitation. For example, a proof of concept implementation of cascading filters in browser-enabled forms can be found in my blog at www.devhorizon.com/go/14. Thankfully, in InfoPath 2010, filtering functionality is fully supported in both client and browser-compatible form templates.
In the Trainings list, each training opportunity has an associated Enrollment Deadline column that indicates when the registration for the training is due. You will use this column to define the filter by following seven steps:
- In the Event Name control's property dialog box, click the button next to the Entries box.
- Select the ns2:SharePointListItem_RW group as the group to apply the filter to.
- Click the Filter Data button to load the Filter Data dialog box.
- Click the Add button to show the Specify Filter Conditions dialog box.
- Select Enrollment Deadline as one the two operands participating in the filter condition.
- Select “is greater than” as the operator of the filter.
- For the second operand of the filter, select Use a Formula and use the now() function.
Querying REST Web Services
In the previous section, you used the traditional technique for querying SharePoint lists, which has been around for a while. Alternatively, you can query the Trainings list using a new capability in SharePoint 2010, called WCF Data Services.
WCF Data Services is a framework that allows interactions with SharePoint data in a RESTful manner.
![]() WCF Data Services is not a one-way street for just browsing data; it provides full REST (Representational State Transfer) over HTTP support for browsing data as well as manipulating it using regular HTTP verbs (GET, PUT, DELETE, and so on).
WCF Data Services is not a one-way street for just browsing data; it provides full REST (Representational State Transfer) over HTTP support for browsing data as well as manipulating it using regular HTTP verbs (GET, PUT, DELETE, and so on).
Everything starts with a URI, because REST is all about using URIs to identify resources, modify them, and transfer them using a representation of the resource. The most obvious advantage of using REST is simplicity. Anyone who can craft a URL can work with REST APIs, which makes REST even more powerful compared to other data access methodologies. Because InfoPath 2010 supports connecting to REST APIs, you can query the Trainings list (a resource in the REST context) using SharePoint's WCF Data Services.
![]() In order to use WCF Data Services in beta 1 of SharePoint 2010, the ADO.NET Data Services 1.5 runtime must be installed before you install SharePoint on your server. This prerequisite will likely be changed with the RTM release of SharePoint 2010.
In order to use WCF Data Services in beta 1 of SharePoint 2010, the ADO.NET Data Services 1.5 runtime must be installed before you install SharePoint on your server. This prerequisite will likely be changed with the RTM release of SharePoint 2010.
Navigate to the Data tab in the Ribbon, and in the Get External Data gallery, click From Web Service, and then click From REST Web Service. Assuming that your SharePoint site is http://adventureworks.devhorizon.com/hr, your WCF Data Services endpoint can be accessed at: http://adventureworks.devhorizon.com/hr/_vti_bin/ListData.svc/Trainings
Type the URL in the Address textbox, and click Next in the wizard. In the next step, give the new data source a name, and check the “Automatically retrieve data when form is opened” option to create a secondary data source.
Before you consume this feed in your InfoPath form, step back and examine the XML output from the endpoint by typing the feed URL in the browser and pressing the Enter key. To see the returned raw XML, you may need to turn off the feed reader view in your browser. In Internet Explorer 8, this option can be turned off by unchecking the “Turn on feed reading view” option in Tools ![]() Internet Options
Internet Options ![]() Content Tab
Content Tab ![]() Feed and Web Slices
Feed and Web Slices ![]() Settings.
Settings.
One great advantage of using REST data sources is that you can easily restrict the returned entities by applying the $filter expression to the entity set, identified in the last segment of a REST URI. In other words, you filter data right in the source as opposed to using form-level filtering.
On the Data tab, click Form Load from the Rules category. This will open the Rules task pane in which you can create rules that will run when the form is opened. Create a new rule and leave the condition section empty. This particular rule runs whenever your form loads and is not based on a specific condition — that's exactly what you want.
Next, click on Add Button and select Change REST URL (see Figure 9-27). Change REST URL is a new rule action that the InfoPath team has added to the product. It allows developers to change the REST URI dynamically when an event is triggered, such as form load or submit. This will bring up the Rule Details dialog box, which gives you more options for manipulating the URI you initially set for the data source, as shown in Figure 9-28.
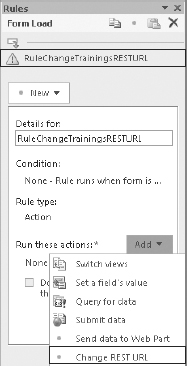
FIGURE 9-27
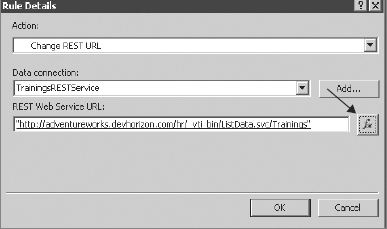
FIGURE 9-28
To implement the filter, click on the function (fx) button next to the URL and insert the following:
concat(“http://adventureworks.devhorizon.com/hr/_vti_bin/ListData.svc/Trainings”,
“?$filter=EnrollmentDeadline gt datetime‘”, now(), “’”)
Another rule action needs to be added to the Form Load that fires after the Change REST URL action runs. Again, click on Add Button in the Rules task pane, but this time, choose Query for the data rule action. As illustrated in Figure 9-29, in the Rule Details dialog box, you just need to click OK, because the Action and Data Connection values have already been set. Figure 9-30 shows both rules and their order in the Rules task pane for the Form Load event.

FIGURE 9-29
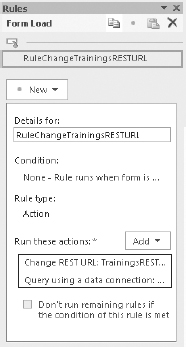
FIGURE 9-30
At this stage, the Event Name Drop-Down Listbox must be bound to the atom:entry element. In the Control's Properties dialog box, select “Get choices from an external data source,” and in the Data source, select the secondary data source. Next, click on the XPath image next to the Entries box and choose the entry element. The entry atom element represents an individual list item in the returned feed and acts as a container for metadata and data associated with each list item. Set the Value and Display name to the Code and Title fields, and click OK.
That's it! Press F5 and preview the form. Your form should load only the trainings in which the enrollment deadline is greater than today. This example proves that it is quite easy to combine the power of REST data sources with formulas in InfoPath 2010 to create filters using absolutely no code.
BEST PRACTICE #4
Use query parameters to stop loading unnecessary data in your data sources. If you can't filter data at source, at least filter your data at form level if possible. Filtering data saves rendering time and boosts the overall performance of your form when the underlying data sources contain a lot of data.
Submit Behavior
Although not an absolute requirement for building the Training Management application, Submit is a very powerful capability of InfoPath forms.
Essentially, submitting provides the ability to control the behavior of the form and where the collected data ends up. Submitting an InfoPath form is different from saving it, and these two actions shouldn't be confused. The most obvious difference is that you cannot submit a form that has validation errors, but that's not the case when you save the form. Another difference is that, when you save an InfoPath form, the result is saved as XML in the form library. When you submit the form, not only do you have the option of saving the result as XML, but you also have plenty of other options, such as closing the form or running rules without writing any custom code. In many scenarios, the level of control you get out of the box for submitting your forms is what makes it a more appealing option than just saving the form.
If you go to the Data tab and select the Submit Options button, you will find several settings to define the submission behavior of the form. You can design your form to submit to a series of powerful connection points, such as the SharePoint form library, email, a web service, a web server, a DCL connection, or even a hosting environment. Finally, if you want to satisfy complex submission requirements, you can write custom code by selecting the appropriate option, as shown in Figure 9-31.
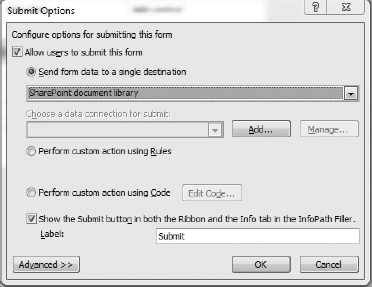
FIGURE 9-31
BEST PRACTICE #5
You should think about scalability when you are designing your forms, not when it becomes an issue. For example, if a form template is available on a publicly accessible website, chances are the form will be filled out and submitted (or saved) many times. Although lists and document libraries are much more scalable and can be throttled in SharePoint 2010, you should still consider bucketizing the form library and distributing the forms evenly in it; otherwise, you may experience performance degradation if more than 5000 forms exist per container (folder). Writing custom code to submit to multiple folders or libraries is one solution to address this capacity limitation of SharePoint and yet another reason that you may want to use Submit.
Also, you can define your own submit button. Simply add a regular button, and in the Control Properties tab, set its action to Submit, as shown in Figure 9-32. Alternatively, you can click on the button and choose submit Data from Add Rule in the Control Tools Properties contextual menu (see Figure 9-33). Both actions will result in the same behavior for the button.
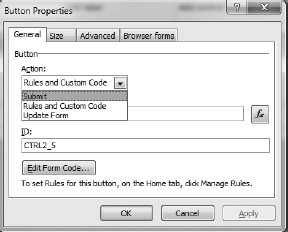
FIGURE 9-32

FIGURE 9-33
After submit is enabled in a form and it is determined what it does, a submit button appears in the Ribbon next to the Save and Save As options when the form is first opened, as shown in Figure 9-34.

FIGURE 9-34
Some of the behaviors in the Ribbon are customizable from within the form template (Form Options ![]() Web Browser). For example, you can hide the Save button and leave Submit as the only option to persist the form's data.
Web Browser). For example, you can hide the Save button and leave Submit as the only option to persist the form's data.
Form Programming
The requirements of the registration form dictate two more use cases to be implemented, so there is still some work to do before you can consider this form complete. First, employees at Adventure Works must be able to submit their registrations using their mobile devices. Second, when employees select a training course in the default view, training details should appear in a section control at the bottom of the form.
To implement a mobile-friendly registration form, you need to write custom code in the form's load event to detect whether the form is rendered in a mobile browser, and then switch the default view to a lighter view accordingly. There is guidance about this code below.
Nearly everything in the mobile view is identical to the default view with three exceptions. First, nobody enjoys writing a biography while being mobile, so the optional Short BIO control needs to be hidden. Second, because the People Picker control is rendered as just a textbox in mobile web browsers (there is no search for a user capability), it should be hidden as well. Third, the mobile view doesn't have the training details section. Instead, the mobile view needs to store a value in a field to indicate that the form is being submitted using a mobile browser.
BEST PRACTICE #6
Unlike InfoPath 2007, where you could explicitly set “Enable rendering on a mobile device” in the form option, in InfoPath 2010 every form can be viewed on mobile devices by default. The key differences in rendering between desktop web browsers and browsers on handheld or mobile devices require taking into account special considerations when designing a form template for use on a mobile device. There are limitations on the behavior of some controls when rendered in mobile web browsers. There are unsupported controls and controls that are rendered as plain textboxes such as the Date/Time Picker and People/Group Picker.
To write custom code in your form and work with the InfoPath object model, the minimum requirements are:
- Microsoft .Net Framework 2.0, Microsoft .Net Framework 2.0 SDK, and Microsoft Core XML Services 6.0.
- Visual Studio Tools for Applications (VSTA). By default, this is an optional component and is not selected in the InfoPath installation tree of the Microsoft Office setup application. You should explicitly set this component to Run from My Computer when you install InfoPath 2010, as shown in Figure 9-35.
FIGURE 9-35
- Selection of the default programming language (C# or VB.NET) to use when writing the code for a form. This can be set on the Developer Language. The programming language can be changed only before any code has been written for the form, so for example, you cannot mix and match VB.NET and C# code in one form.

BEST PRACTICE #7
In InfoPath 2010, you can write custom code in different versions of the InfoPath object model and use C# or Visual Basic as the primary language. It's a best practice to select your language and its compatibility mode based on what you want to accomplish. For example, if you are writing custom code for an InfoPath 2007–compatible form, then your options should be either Visual Basic (InfoPath 2007–compatible) or C# (InfoPath 2007–compatible). In any other situation, Visual Basic or C# (without the word “compatible” next to the language name) must be selected as your preferred language.
To begin implementing the mobile view, you need to create the mobile field. In the Fields task pane, click Add Field and define a field named IsMobileField of type True/False(Boolean). Next, follow the same steps outlined earlier to create a new view in the registration form named Mobile. Simply copy and paste everything from the default view into the new view, and change the title to something different to differentiate between views. In mobile view, delete the entire rows that contain Short BIO and Manager controls to make the form more compact. Next, you need to select Loading Event from the Developer tab. This will launch the code editor, and you're now ready to begin developing in VSTA (Visual Studio Tools for Applications), as shown in Figure 9-36.
While it's entirely possible to write the code for event handlers beforehand and wire them up manually later by changing the form definition file (.xsf), the approach recommended by Microsoft is to create the event handlers in design mode — just as you did for the Form Load event. This way, InfoPath automatically creates the declarations of the event handlers in the code and makes the required modification to the form definition file that enables a form template to use those event handlers. The form definition file (.xsf) will be covered in greater detail later in this chapter.

FIGURE 9-36
The first step is to complete the FormEvents_Loading event handler, as shown in Listing 9-1. The event handler uses the MainDataSource property of the XMLForm class to call the CreateNavigator method to return an instance of the XPathNavigator class. The returned object defines a random and read-only access cursor model over the form's underlying XML data, which at this point is positioned at the root node.
Using the InfoPath object model, you can access and change pretty much everything in the form at runtime. You just need to know how to get a reference to the element you wish to change. Thankfully, the underlying data in InfoPath is all XML, so XPathNavigator and XmlForm classes can be easily used for interacting with the form's data. The XmlForm object is initialized in the form load, so you don't need to use the this keyword in C# (or the Me keyword in Visual Basic) to access its members, such as MainDataSource or NamespaceManager.
Next, the code uses the Environment object to determine which runtime environment and program was used to open the form. This class provides a property called IsMobile, which returns true if the form is viewed by a mobile browser.
Finally, the overloaded SelectSingleNode method is used to navigate to the IsMobileField field. Then, the code uses the SetValue method of the second XPathNavigator object to set the value of the field to true; otherwise, it is set to false. The SelectSingleNode method takes an XPath expression (string) and a resolver parameter for resolving namespace prefixes (via the NamespaceManager property of the XmlForm class). To determine the absolute XPath to the IsMobileField field in the SelectSingleNode method, right-click the field in the Fields task pane in InfoPath Designer, and from the context menu, click Copy XPath.
 LISTING 9-1: Code for Setting the IsMobileField Value
public void FormEvents_Loading(object sender, LoadingEventArgs e)
      {
          XPathNavigator rootNav = MainDataSource.CreateNavigator();
          if (Environment.IsMobile)
          {
              XPathNavigator mobileFieldNav = rootNav.SelectSingleNode(
“/my:myFields/my:IsMobileField”, NamespaceManager);
              mobileFieldNav.SetValue(“true”);
          }
      }
![]()
To fulfill the second business requirement of the registration form, there should be a section in the registration form that tracks the training details such as address, cost, start date, and so forth. This section and all its contents will appear only in the default view, because the mobile view should be kept as light as possible. Additionally, this section appears only when an employee selects a training opportunity from the Event Name Drop-Down Listbox control; otherwise, it is hidden.
To implement this dynamic behavior, in the Fields task pane click Add Field and create a field named HideEventDetailsField of type True/False(boolean). You will use this field to show/ hide the Event Details section in the default view. Next, add a new row to the form's main table after the People Picker control, and insert a section (available in the Controls gallery on the Home tab) to the new row. Next, add a new table to the section and insert three textboxes in each row to host Start Date, Cost, and Address controls. Figure 9-37 shows the registration form with the changes applied.

FIGURE 9-37
In InfoPath Designer, select the Event Details section, and then from the Rules task pane, add a new Conditional Formatting rule. With formatting rules in InfoPath 2010, you can apply text formatting and background shading to controls, and disable or highlight controls based on user input or a condition.
On the Conditional Formatting dialog box, click Add, and set up a formatting condition that says:
HideEventDetailsField is equal to TRUE
The last step to complete the formatting rule is to check the Hide This Control check box, as shown in Figure 9-38.
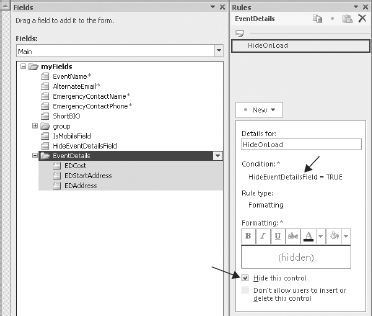
FIGURE 9-38
At this point, the formatting rule you just created, in conjunction with the custom code in Listing 9-2, ensures that the Event Details section is hidden when the registration form loads in default view.
LISTING 9-2: Code for Setting the HideEventDetailsField Value
public void FormEvents_Loading(object sender, LoadingEventArgs e)
      {
         XPathNavigator rootNav = MainDataSource.CreateNavigator();
         if (Environment.IsMobile)
         {
            // Code Omitted for brevity
         }
         else
         {
         XPathNavigator hideEventDetailsFieldNav = rootNav.SelectSingleNode(
“/my:myFields/my:HideEventDetailsField”, NamespaceManager);
         hideEventDetailsFieldNav.SetValue(“true”);
         }
     }
![]()
With the Event Details section hidden at the form's startup, now you need to add the necessary logic to show this section and populate its content when the Event Name Drop-Down Listbox changes. First, save the form, and then right-click on the EventName field. From the context menu, select Programming ![]() Changed Event to launch VSTA, if it is not already open.
Changed Event to launch VSTA, if it is not already open.
As you can see, the event binding code is placed in the InternalStartup() method of the FormCode.cs (or FormCode.vb) file in your form template project. The binding is done using the XmlChangedEventHandler delegate that represents the method that will handle the Changed event of the EventName field.
EventManager.XmlEvents[“/my:myFields/my:EventName”].Changed +=
new XmlChangedEventHandler(EventName_Changed);
The Event_Changed event handler is autogenerated with no code in it. The code you write in this event handler will use the training code the employee selects from the Event Name drop-down listbox as a key to select the rest of the training's details. After the matching training is found, your code will populate the Event Details section with the rest of the details so that the employee can review the form before saving it, as shown in Listing 9-3.
The first three lines of the code are used to set the HideEventDetailsField field to false so that the formatting rule in the form kicks in and the Event Details section is toggled so that it is visible.
Notice the first bolded lines in the code, where a reference to the Trainings secondary data source is constructed, and an XPathNavigator object is created for accessing the data source. Next, the cursor is positioned at the root of data source and an iterator (of type XPathNodelterator) over all of the Code nodes is returned. Because the returned XPathNodelterator object is not pointing to the first node in a selected set of Code nodes, a call to the MoveNext method must be made to position the cursor on the first node in the selected set of nodes. This is done in the While expression.
The rest of the code is simply looping through the selected nodes and finding the one that matches the training code selected by the user. When the control flows into the while loop, two conditions are checked in the beginning:
- The training code in the current context node equals the training code selected by the user.
- User has not selected a blank value from the Event Name control.
If both of these conditions are met, this means that a node in data source with matching training code has been found. Notice the second bolded lines. The matching node is stored in the matchedTraining variable, and the corresponding XPathNavigator is moved to the parent node of the current Code node, which is the node that contains all the information about the training. The outerXML of the parent node is stored in the training object of type XMLDocument, and a navigator (detailsNav object) is created for it. Another navigator (domNav object) is created to access the fields in the Event Details section of the form.
The rest of the code is pretty straightforward. The controls in the Event details section are populated with information retrieved from the detailsNav navigator object.
LISTING 9-3: Code for EventName_Changed Event Handler
public void EventName_Changed(object sender, XmlEventArgs e)
        {
                XPathNavigator rootNav = MainDataSource.CreateNavigator();

                XPathNavigator hideEventDetailsFieldNav = rootNav.SelectSingleNode(
“/my:myFields/my:HideEventDetailsField”, NamespaceManager);
                hideEventDetailsFieldNav.SetValue(“false”);
                XPathNavigator eventNameNav = rootNav.SelectSingleNode(
“/my:myFields/my:EventName”, NamespaceManager);

                 XPathNavigator trainingsNav = DataSources[“Trainings”]
.CreateNavigator();
                trainingsNav.MoveToRoot();
                XPathNodeIterator codeSelectionIterator = trainingsNav.
Select(“//*[local-name() = ‘Code’]”);

                while (codeSelectionIterator.MoveNext())
               {
                   if (codeSelectionIterator.Current.InnerXml.Equals(eventNameNav.
Value) && !codeSelectionIterator.Current.InnerXml.Equals(“”))
                   {

                          XPathNavigator matchedTraining = codeSelectionIterator.
Current;
                          matchedTraining.MoveToParent();
                          XmlDocument training = new XmlDocument();
                          training.LoadXml(matchedTraining.OuterXml);
                          XPathNavigator detailsNav = training.CreateNavigator();
                          XPathNavigator domNav = MainDataSource.
CreateNavigator();

                         // Populate the Start Date Field

                         XPathNavigator detailNav = detailsNav.
SelectSingleNode(“//*[local-name() = ‘Start_x0020_Date’]”);
                         XPathNavigator formNav =
                         domNav.SelectSingleNode(
“/my:myFields/my:EventDetails/my:EDStartAddress”, NamespaceManager);
                         String eDate = detailNav.Value;
                         eDate = eDate.Substring(0, 10);
                         formNav.SetValue(eDate);

                         //Populate the Cost Field
                         detailNav = detailsNav.SelectSingleNode(
“//*[local-name() = ‘Cost’]”);
                         formNav = domNav.SelectSingleNode(
“/my:myFields/my:EventDetails/my:EDCost”, NamespaceManager);
                         formNav.SetValue(detailNav.Value);

                         // Populate the Address Field
                         detailNav = detailsNav.SelectSingleNode(
“//*[local-name() = ‘Address’]”);
                         formNav = domNav.SelectSingleNode(
“/my:myFields/my:EventDetails/my:EDAddress”, NamespaceManager);
                         formNav.SetValue(detailNav.Value);

                         break;
                    }
                }
        }
![]()
BEST PRACTICE #8
As demonstrated in this chapter, the code for an event handler associated with the Changed event that uses the XmlChangedEventHandler delegate should be autogenerated only from within InfoPath Designer 2010. Writing the event handlers beforehand and manually modifying the form definition file (.xsf) to wire them up is not a best practice. This is mainly because changes made to this file outside of InfoPath Designer 2010 might be lost if the form template is modified in InfoPath Designer 2010.
Now, the additional information section and all its contents show up only if an employee selects a training opportunity; otherwise, they are hidden. In general, showing and hiding parts of your forms help you design organized forms in which only relevant information is shown to the users. Click the Preview button (From the Quick Access Toolbar) to test your form before publishing it. Typically, the Preview button is your friend when designing InfoPath forms; use it as much as possible.
Publishing an InfoPath Form
InfoPath is all about collecting, parsing, and validating data from multiple sources. The data that's collected in a form needs to be persisted somewhere. In the design phase of your forms, it's important to know where the form eventually ends up, because determining the final destination of your form defines your form's publishing model.
Again, just as with submitting a form versus saving it, publishing and saving a form template are not identical processes. Saving a form template is just saving it so that it can be reopened for further changes. However, publishing a form template refers to a process that prepares the form for distribution. If you do not publish a form template, you haven't distributed it properly and users will not be able to fill it out. Unlike list forms, form templates created by InfoPath Designer can be published to a variety of destinations. You can publish them to a SharePoint Server, a list of email recipients, a network location, or a shared folder on a computer, as listed in the Publish tab in the Backstage.
In the Training Management application, the registration forms are saved in a form library called Registrations, which was created earlier in this chapter. Before going any further into the actual process of publishing the Registration Form template, let's iterate through some of pros and cons of publishing to form libraries.
BEST PRACTICE #9
Although SharePoint 2010 makes it very easy to flip out-of-the-box SharePoint list forms to custom InfoPath forms, the traditional approach of publishing to form libraries is still the preferred method in many scenarios.
The most obvious advantage is that you can abstract complex logic in your form by using custom code. As discussed previously, SharePoint list forms do not support custom code.
Not every electronic form contains simple schemas like examples shown in this chapter. The second advantage of using a form library is that you can hide complex schema in your form, while every bit of data in the form's underlying data remains accessible through either InfoPath Designer or the InfoPath Object Model. A SharePoint list is just not sufficient to handle a form with complex schema, period.
Last, but not least, with form libraries, the possibilities are endless. If you know that, at some point in the future, you will need to take advantage of the functionalities that form libraries offer, just start off with a form library in the first place. You cannot convert a list form to a form library.
To publish your form to the Registrations form library, from the Backstage click Publish, and then click on the SharePoint Server button to launch the Publishing Wizard. The wizard is very similar to InfoPath 2007. First, you choose the location of the SharePoint site. Next, you select “Enable this form to be filled out by using a browser” and choose Form Library option, as shown in Figure 9-39.

FIGURE 9-39
In the next wizard, specify that the form template should be updated in an existing form library, and from the available libraries choose Registrations. Click Next to proceed to the next step.
The next step of the wizard offers two important options:
- Property Promotion: This option allows you to set specific fields in your form to be visible as columns in the SharePoint library, which can be used in SharePoint as metadata or workflow variables.
- Web Part Connection Parameter Promotion: One of the new features in InfoPath 2010 is that forms can participate in web part connections. Unlike SharePoint list forms in which every field is, by default, available to participate in a web part connection scenario, when you publish a form to a SharePoint form library, you need to take explicit actions to determine what fields are available to be used in web part connections. You also need to specify whether a promoted field is used as a subscriber (Input), publisher (Output), or subscriber/publisher (Input/Output) parameter, as shown in Figure 9-40. Obviously, subscriber parameters can only receive data from other web parts but cannot send data. Publisher parameters can send data to other web parts but cannot receive data. More about forms with web part connection will be covered in the “Building Web Parts using InfoPath 2010” section later in this chapter.

FIGURE 9-40
Both of these options are also available in the Property Promotion category in the Form Options dialog in the Backstage ![]() Info tab.
Info tab.
While it's entirely possible to promote all the fields inside the registration form and make them available as columns, in forms with complex schemas this technique may not be efficient. Again, remember that one reason to use a form library is to hide the schema and encapsulate everything in the form itself. The business requirement for the registration form dictates no property promotion, so you can safely skip this step to the last screen of the wizard, where you are presented with a summary of some of the information collected throughout the Publishing Wizard, as shown in Figure 9-41.
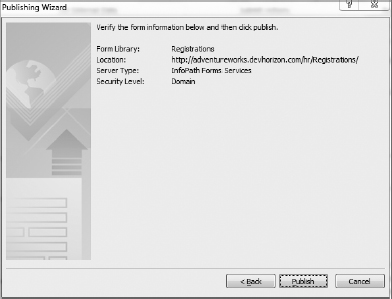
FIGURE 9-41
There are two things that need to be highlighted here. First, in InfoPath 2007, you had to go through the whole Publishing Wizard every time you made a minor change. In InfoPath 2010 and using the Quick Publish option (available in the Quick Access Toolbar), it's very convenient to just use One-Click Publish and have the form template updated in the destination. You only have to go through the Publishing Wizard for the first time or when you want to promote new properties.
Second, unlike with list forms, when a form is published to a form library it cannot be accessed using Form Options in the library settings page or from the Ribbon. Instead, it is configured in the Document Template section of the Advanced Settings option in the library setting page. Click the link that says Edit Template, and this will launch InfoPath Designer 2010 and download the form template for further changes.
With the form successfully published to the Registrations document library, you can now open the form in your web browser of choice. Navigate to the Registrations library, click Documents on the Library Tools contextual menu, and click the New Document button. Figure 9-42 shows the registration form opened and filled out in Internet Explorer 8.
Once you complete filling out the form, press the Save button and give the form a proper name to save it in the Registrations document library. Notice that the Event Details section is not visible when the form loads up or in editing mode, which is exactly what the business requirements call for.
You have just registered for a training course using the same form you developed throughout this chapter. Congratulations!
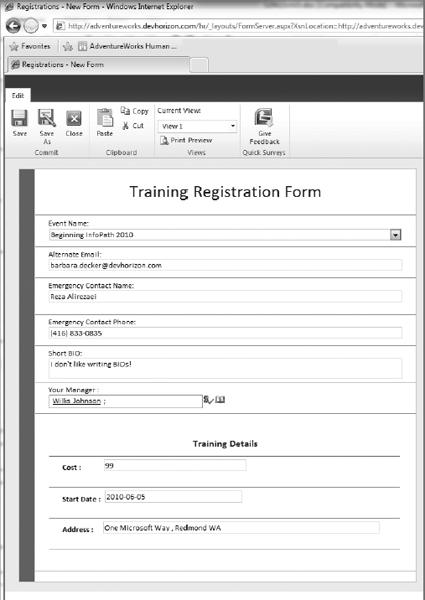
FIGURE 9-42
![]() This form template can be found in the code download for this book, in the Chapter 9 zip file. It is called Training Registration Form.xsn.
This form template can be found in the code download for this book, in the Chapter 9 zip file. It is called Training Registration Form.xsn.
Publishing to a Form Library vs. Publishing to a Content Type
The form library is a perfect place to host forms, but you should also consider a couple of disadvantages. When you publish your form template directly to a form library, there are two major downsides:
- One inconvenience of publishing a form template directly to a form library is that the publishing process strongly associates the form template with that particular library; therefore, this approach lacks reusability. If, at any point in the future, you decide to make the same template available in another form library, you need to go through the same publishing process, which can be painful!
- Another major downside to this approach is that the publishing process creates a 1:1 relationship between the library and the template, which results in lack of support for the heterogeneous types of forms to be stored in the same library. This can quickly lead to chaos for site collection administrators who must deal with many standalone form libraries spread all over the site.
Thankfully, when publishing a form template to SharePoint, you have another option: publishing to a content type. Binding a form template to a content type opens up that template to be reused in other form libraries and essentially addresses all the issues mentioned above.
During the publishing wizard when you promote fields, always make sure that mappings between the promoted fields and the site columns are exactly what you expect them to be; otherwise you may end up causing duplicate site columns and making the previously published site columns orphaned. In the Publishing Wizard (see Figure 9-43), select each field name and click Modify to see the mapping with the site column. Typically, the first time you publish the form template to a server, you expect fields to be promoted to new site columns (None: Create new site column). However, in subsequent republishing processes, you want to map to an existing site column (This Content Type) rather than creating another new column.
If you continue publishing to the same server, the association is remembered in the form's schema and you don't need to take any further action. The problem occurs when you publish a form template to multiple servers and then you come back, make some changes to the form template, and republish it again to the first server. In this case, your promoted site columns are recreated multiple times under the Microsoft Office InfoPath site column group with the same name but different IDs! Remember, always check the mappings before pressing the Publish button in the last step of the Publishing Wizard.

FIGURE 9-43
Form Security
Let's return to the last page of the Publishing Wizard, as shown earlier in Figure 9-41, to address a critical issue: security level. Each form template created in InfoPath 2010 should have one of the available three security levels:
- Restricted
- Domain
- Full Trust
By default, InfoPath Designer 2010 adjusts the security level of your form according to the functionalities included in the form template, and that's the recommended option, as shown in Figure 9-44. When you start out, all new blank form templates come with the Restricted security level, meaning that the form can only access content inside the form. As you complete your form and add functionality, such as querying SharePoint lists, scripts, or HTTP submit, the security level of the form will be automatically raised to Domain. The Domain security level is the maximum trust level that can be set automatically by InfoPath Designer 2010. This security model allows access outside of the form, but only within the domain in which the form template physically resides. Note that InfoPath Designer 2010 has a new capability — called Sandbox Solutions — that is tied to form templates with the Domain security model. Sandboxing will be covered in the next section.

FIGURE 9-44
If you need to do things that the Domain security level doesn't allow (for example, deploying certificate-signed form templates), then you need to manually set the security level to Full Trust. Note that the Full Trust security level requires your form to be administrator-approved. This means that the form template must first be reviewed and approved by the farm's administrator and then deployed through the Central Administration site.
Sandboxing Your Forms
Like rules and formulas, writing custom code enables form developers to greatly enhance the functionality of their forms with managed assemblies that become part of the form template. In the previous release of InfoPath, designing forms with custom code would have forced the developer to manually set the security level of the form to Full Trust and required an administrator's approval to publish the form.
With the advent of Sandbox Solutions in SharePoint 2010, form developers are now able to sandbox their forms (with managed code) and directly publish them to a form library while the security level of the form is still set to Domain. This is a major departure from the previous version and opens a whole new world of opportunities in browser-enabled forms. If you are interested to know more about Sandbox Solutions, you should read Chapter 3.
A unique characteristic of Sandbox Solutions is that they run in a partially trusted mode. So, using them doesn't conflict with the Domain security model. Moreover, this means that forms can be deployed using the site collection administrator privilege and right from within the InfoPath Designer, instead of through the Central Administration site.
The sandboxing infrastructure comes from the core platform and is widely used to limit the security vulnerabilities of the farm, while giving developers easy deployment of their code to any site collection.
Sandboxing your forms is a big time saver when developing and deploying electronic forms, but like anything else, it comes with its own limitations. The four major limitations related to electronic forms that have emerged as of this writing are:
- Only InfoPath 2010 forms can be sandboxed; there is absolutely no 2007 support.
- Sandboxed forms cannot submit to email data sources.
- Promoting fields as web part connection parameters is not allowed in Sandbox Solutions.
- Any managed metadata control on the form is not allowed in Sandbox Solutions.
Once a form with custom code is published to a SharePoint form library, it ends up in the site collection's User Solution gallery and it's activated, by default, as shown in Figure 9-45.

FIGURE 9-45
Essentially, the Solution gallery is a repository for all InfoPath and non-InfoPath Sandbox Solutions deployed to a given site collection. The Solution gallery can be accessed from the site collection's Administration panel (Site Actions ![]() Site Settings
Site Settings ![]() Galleries
Galleries ![]() Solutions). In addition to the repository at the site collection level, the sandboxing infrastructure uses a Windows service called Windows SharePoint Services User Code Host v4, which is used to host sandboxed solutions within its process to control their behavior, as shown in Figure 9-46.
Solutions). In addition to the repository at the site collection level, the sandboxing infrastructure uses a Windows service called Windows SharePoint Services User Code Host v4, which is used to host sandboxed solutions within its process to control their behavior, as shown in Figure 9-46.
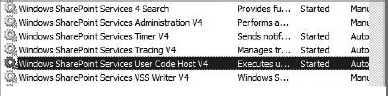
FIGURE 9-46
Before you can publish your form to a form library as a Sandbox Solution, you should examine the service status in the Services MMC snap-in. Like other services in SharePoint 2010, this service should be managed only in the Central Administration ![]() System Settings
System Settings ![]() Services on Server
Services on Server ![]() Microsoft SharePoint Foundation User Code Service.
Microsoft SharePoint Foundation User Code Service.
Form Anatomy
The result of saving an InfoPath form template is a file with an .xsn extension. An XSN file is a kind of compressed CAB (cabinet) file that contains other XML files. If you change the extension to .CAB and double-click on the file, it will open the form template as an archive file. Alternatively, you can select Export Source Files from the Publish tab in the Backstage to export the source files of a form template. Figure 9-47 shows the exported files for the Registration Form template.

FIGURE 9-47
The form definition file (manifest.xsf) contains a listing of all other files that make up the template, as well as other information, including views used in the form, external data sources, and error messages. If you open this file in a text editor such as Notepad and scan it, you will soon realize why this file is considered the heart of the form template.
Scroll through the XML code until you locate the xsf:extensions element. This element is used to specify properties and features of the form templates such as managed code form template project settings for VSTA, settings for the views included in the form, and whether the form should be browser-compatible. If the form includes any property promotion or if the form is published to a content type, then relevant child elements appear in the xsf:extensions element to instruct SharePoint how to perform the bindings.
As you complete your form design, you should examine the content of manifest.xsf often to become familiar with the different parts of the form template and the underlying hooks to the form library.
Toward the end of the manifest.xsf file content, there is an xsf:dataObjects element that is used to define all the secondary data sources in the form. This element contains a collection of xsf:dataObject child elements.
Notice the bolded section in the code snippet below. Within the parent collection, each xsf:dataObject element is an in-memory representation (XML Document object model) of the associated external data source. The XML Document Object Model (DOM) programming interface enables form developers to traverse the secondary data source's tree-like structure and manipulate its nodes. The association between the xsf:dataObject element and the secondary data source is created via the xsf:query element. In this particular example, a SharePoint adaptor that points directly to the Trainings list is used to query for data. The xsf:dataObject element also has a schema attribute that references the schema file used for the data object — in this example, Trainings.xsd. The schema file is also part of the form template (see Figure 9-47).
<xsf:dataObjects>
<xsf:dataObject name=“Trainings” schema=“Trainings5.xsd” initOnLoad=“yes”>
 <xsf:query>
  <xsf:sharepointListAdapterRW queryAllowed=“yes” submitAllowed=“no” siteURL=“
../../” sharePointListID=“{37D0C58F-EA48-44A4-A30E-C26B4ABF6170}”
name=“Trainings” contentTypeID=“” sortBy=“ID” sortAscending=“yes”
relativeListUrl=“../../Lists/Trainings/”>
<xsf:field internalName=“Title” required=“yes” type=“Text”></xsf:field>
<xsf:field internalName=“Code” required=“yes” type=“Text”></xsf:field>
<xsf:field internalName=“Description” required=“yes” type=“Text”></xsf:field>
<xsf:field internalName=“Start_x0020_Date” required=“yes” type=“DateTime”></xsf:
field>
<xsf:field internalName=“End_x0020_Date” required=“yes” type=“DateTime”></xsf:field>
<xsf:field internalName=“Cose” required=“yes” type=“Currency”></xsf:field>
<xsf:field internalName=“Level” required=“yes” type=“Number”></xsf:field>
<xsf:field internalName=“Enrollment_x0020_Deadline” required=“yes” type=“DateTime”>
</xsf:field>
<xsf:field internalName=“Address” required=“yes” type=“Plain”></xsf:field>
<xsf:field internalName=“Additional_x0020_Information” required=“no”
type=“FullHTML”>
  </xsf:field>
  <xsf:field internalName=“ID” required=“no” type=“Counter”></xsf:field>
 </xsf:sharepointListAdapterRW>
</xsf:query>
</xsf:dataObject>
![]() Data connections inside the InfoPath form template are now relative URLs and are no longer hard-coded.
Data connections inside the InfoPath form template are now relative URLs and are no longer hard-coded.
In addition to the schema files created for each secondary data source, the form template itself maintains a schema for the main XML data that it recognizes in a file named myschema.xsd. Listing 9-4 shows the schema file for the Registration Form template.
The schema file contains a set of predefined types such as boolean and string, as well as new types, for example, complexType and simpleType. In addition to the type declarations, the schema imposes some constraints on the structure and content of the form's data. For example, the my:requiredString type means the element cannot be blank, and the xsd:sequence element defines a specified sequence within the containing element, such as the myFields element.
Notice the first bolded line in Listing 9-4. This line identifies the http://schemas.microsoft.com/office/infopath/2007/PartnerControls namespace, whose schema components (inside the BuiltInActiveXControls.xsd file) are referenced in the myschema.xsd file. This is because of the Manager People Picker Control you placed on the registration form.
Also, notice the myFields bolded section in Listing 9-4, which appears to be the first element in the myschema.xsd file. This element references other elements that each represent a control in the Registration Form template.
While this isn't relevant now, it's also important to note that the BuiltInActiveXControls.xsd file also contains the required schema for the External Item Picker control for selecting an instance of an external content type from BCS.
LISTING 9-4: Training Registration Form Schema
<?xml version=“1.0” encoding=“UTF-8” standalone=“no”?>
<xsd:schema
targetNamespace=“http://schemas.microsoft.com/office/infopath/2003/myXSD/2009-12-
02T01:21:42”
xmlns:xsi=“http://www.w3.org/2001/XMLSchema-instance”
xmlns:pc=“http://schemas.microsoft.com/office/infopath/2007/PartnerControls”
xmlns:my=“http://schemas.microsoft.com/office/infopath/2003/myXSD/2009-12-
02T01:21:42”
xmlns:xd=“http://schemas.microsoft.com/office/infopath/2003”
xmlns:xsd=“http://www.w3.org/2001/XMLSchema”>
<xsd:import schemaLocation=“BuiltInActiveXControls.xsd” namespace=“
http://schemas.microsoft.com/office/infopath/2007/PartnerControls”/>
<xsd:element name=“myFields”>
 <xsd:complexType>
  <xsd:sequence>
    <xsd:element ref=“my:EventName” minOccurs=“0”/>
    <xsd:element ref=“my:AlternateEmail” minOccurs=“0”/>
    <xsd:element ref=“my:EmergencyContactName” minOccurs=“0”/>
    <xsd:element ref=“my:EmergencyContactPhone” minOccurs=“0”/>
    <xsd:element ref=“my:ShortBIO” minOccurs=“0”/>
    <xsd:element ref=“my:group” minOccurs=“0”/>
    <xsd:element ref=“my:IsMobileField” minOccurs=“0”/>
    <xsd:element ref=“my:HideEventDetailsField” minOccurs=“0”/>
    <xsd:element ref=“my:EventDetails” minOccurs=“0”/>
 </xsd:sequence>
<xsd:anyAttribute processContents=“lax” namespace=
“http://www.w3.org/XML/1998/namespace”/>
</xsd:complexType>
 </xsd:element>
  <xsd:element name=“EventName” type=“my:requiredString”/>
  <xsd:element name=“AlternateEmail” type=“my:requiredString”/>
  <xsd:element name=“EmergencyContactName” type=“my:requiredString”/>
  <xsd:element name=“EmergencyContactPhone” type=“my:requiredString”/>
  <xsd:element name=“ShortBIO” type=“xsd:string”/>
  <xsd:element name=“group”>
  <xsd:complexType>
   <xsd:sequence>
    <xsd:element ref=“pc:Person” minOccurs=“0” maxOccurs=“unbounded”/>
   </xsd:sequence>
  </xsd:complexType>
</xsd:element>
 <xsd:element name=“IsMobileField” nillable=“true” type=“xsd:boolean”/>
 <xsd:element name=“HideEventDetailsField” nillable=“true” type=“xsd:boolean”/>
 <xsd:element name=“EventDetails”>
<xsd:complexType>
 <xsd:sequence>
  <xsd:element ref=“my:EDCost” minOccurs=“0”/>
  <xsd:element ref=“my:EDStartAddress” minOccurs=“0”/>
  <xsd:element ref=“my:EDAddress” minOccurs=“0”/>
  </xsd:sequence>
</xsd:complexType>
   </xsd:element>
   <xsd:element name=“EDCost” type=“xsd:string”/>
   <xsd:element name=“EDStartAddress” type=“xsd:string”/>
   <xsd:element name=“EDAddress” type=“xsd:string”/>
<xsd:simpleType name=“requiredString”>
<xsd:restriction base=“xsd:string”>
   <xsd:minLength value=“1”/>
   </xsd:restriction>
   </xsd:simpleType>
   <xsd:simpleType name=“requiredAnyURI”>
   <xsd:restriction base=“xsd:anyURI”>
   <xsd:minLength value=“1”/>
   </xsd:restriction>
   </xsd:simpleType>
   <xsd:simpleType name=“requiredBase64Binary”>
   <xsd:restriction base=“xsd:base64Binary”>
   <xsd:minLength value=“1”/>
 </xsd:restriction>
 </xsd:simpleType>
</xsd:schema>
![]()
![]() The form's schema file provides a view of the underlying data that the form recognizes at a relatively high level of abstraction. By scanning the schema, you can quickly see that the data is structured in a hierarchy of data types and exactly as they appear in the Fields task pane.
The form's schema file provides a view of the underlying data that the form recognizes at a relatively high level of abstraction. By scanning the schema, you can quickly see that the data is structured in a hierarchy of data types and exactly as they appear in the Fields task pane.
The next files to analyze in Figure 9-47 are the view1.xsl and mobile.xsl files. These two XSL-based files are the views that you created in the form template.
Most of the formatting rules or form-level filters you apply to data end up as XSL code and are placed in the respective view file. For instance, the following code snippet is taken from the view stylesheet for the EventName field of the registration form. In this file you can find how XSL is used to filter the returned training courses in which the Enrollment Deadline column contains a value greater than the now() function.
Three more files in Figure 9-47 warrant some attention.
First, the Form3.dll file is the generated assembly for the code you added to EventName_Changed and FormEvents_Loading event handlers in the Form Programming section. Second, the template.xml file contains the actual XML data that is edited by InfoPath. By default, when debugging or previewing a form template, the data in template.xml file is used. Optionally, you can create your own data file and instruct InfoPath Designer 2010 to use it when previewing the form in InfoPath Designer 2010 or debugging it in VSTA. First, create a new XML file by copying and pasting the content of the template.xml file but with the sample data you want to use. Next, from Form Options, click the Preview category. Under Sample Data, type the file location and press the OK button, as shown in Figure 9-48.
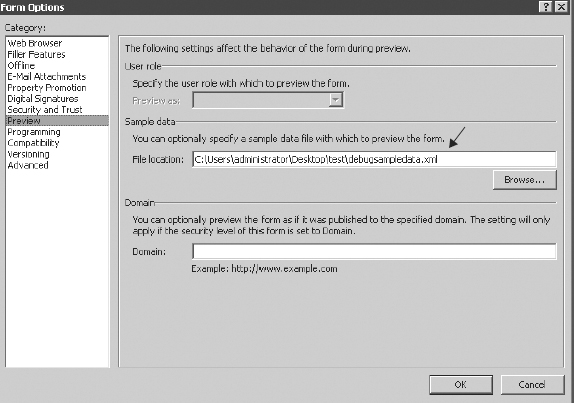
Figure 9-48
The third file is sampledata.XML. This file specifies the default values of the fields when the form opens in the client or browser application. This file is not used for previewing or debugging purposes, as the template.xml file is! In this file, you can only find the field definitions, type, and option to supply a default value and the actual value itself.
Extracting the Form's Data
The last use case to implement is the increment stat counter use case. In the Training Management application, there should be a way to see the total number of registrations for every training course, along with available seats when a registration is selected. To keep this information, you need to create a hidden SharePoint list named Stats, which contains one list item per training course. This list has four fields:
- A single line of text field named Code
- An integer field called Counter
- An integer field called Capacity (Default = 30)
- A Calculated field called Available Seats (Capacity — Counter).
The Counter field gets incremental updates every time a registration form is dropped in the Registration form library. One possible solution to implement this use case is to associate an event handler with the Registrations form library that extracts the form's data after the form is saved and updates the counter.
The XML data that is stored in the form library conforms to the form's schema (myschema.xsd), so technically any code that conforms to this schema can intercept the XML and interact with it. Recall from an earlier discussion that one of the primary reasons for creating the Registrations form library is to easily access all the data stored within the InfoPath form without having to promote any fields. One advantage of using an event handler over other solutions is that event handlers can run asynchronously with minimal overhead on the form itself.
BEST PRACTICE #10
Before overloading your form with extra functionality, always ask yourself: Does this logic change anything in the form itself? Does the form require this logic to function properly? If the answer is no, then you may need to consider other options. Remember, you develop solutions on top of a rich composite application development platform: SharePoint. The possibilities are endless!
Before you go any further in implementing the event handler, you should use the XSD.EXE utility to generate a wrapper class that represents the data elements. This class allows you to access the form's data in a strongly typed fashion instead of parsing the XML data by using XPath (like all the other samples so far). First, navigate to the location of the registration form's exported files (see the previous section) and run the following command:
Xsd.exe /c myschema.xsd BuiltInActiveXControls.xsd
The XSD.exe utility is not following the imports and/or includes in the myschma.xsd file, so you need to specify the BuiltInActiveXControls.xsd schema file directly on the command line, too. Otherwise, the utility will throw a missing element exception. The generated file is named after the schema files used in the command line, myschema_BuiltInActiveXControls.cs. Change the file name to RegistrationsSchema.cs instead. Note that the generated partial classes in this file are given the same name as the root elements, as shown in Listing 9-5.
LISTING 9-5: Partial myFields Class
namespace RegistrationsStatEventHandler {

    using System.Xml.Serialization;

    public partial class myFields {

        private string eventNameField;
        private string alternateEmailField;
        private string emergencyContactNameField;
        private string emergencyContactPhoneField;
        private string shortBIOField;
        private Person[] groupField;
        private System.Nullable<bool> isMobileFieldField;
        private bool isMobileFieldFieldSpecified;
        private System.Nullable<bool> hideEventDetailsFieldField;
        private bool hideEventDetailsFieldFieldSpecified;
        private EventDetails eventDetailsField;
        private System.Xml.XmlAttribute[] anyAttrField;


        public string EventName {
            get {
                return this.eventNameField;
            }
            set {
                this.eventNameField = value;
            }
        }

        public string AlternateEmail {
            get {
                return this.alternateEmailField;
            }
            set {
                this.alternateEmailField = value;
            }
        }
        public string EmergencyContactName {
            get {
                return this.emergencyContactNameField;
            }
            set {
                this.emergencyContactNameField = value;
            }
        }
        public string EmergencyContactPhone {
            get {
                return this.emergencyContactPhoneField;
            }
            set {
                this.emergencyContactPhoneField = value;
            }
        }
        public string ShortBIO {
            get {
                return this.shortBIOField;
            }
            set {
                this.shortBIOField = value;
            }
        }
        public Person[] group {
            get {
                return this.groupField;
            }
            set {
                this.groupField = value;
            }
        }
        public System.Nullable<bool> IsMobileField {
            get {
                return this.isMobileFieldField;
            }
            set {
                this.isMobileFieldField = value;
            }
        }
        public bool IsMobileFieldSpecified {
            get {
                return this.isMobileFieldFieldSpecified;
            }
            set {
                this.isMobileFieldFieldSpecified = value;
            }
        }
        public System.Nullable<bool> HideEventDetailsField {
            get {
                return this.hideEventDetailsFieldField;
            }
            set {
                this.hideEventDetailsFieldField = value;
            }
        }
        public bool HideEventDetailsFieldSpecified {
            get {
                return this.hideEventDetailsFieldFieldSpecified;
            }
            set {
                this.hideEventDetailsFieldFieldSpecified = value;
            }
        }
        public EventDetails EventDetails {
            get {
                return this.eventDetailsField;
            }
            set {
                this.eventDetailsField = value;
            }
        }
        public System.Xml.XmlAttribute[] AnyAttr {
            get {
                return this.anyAttrField;
            }
            set {
                this.anyAttrField = value;
            }
        }
    }

    // Code Omitted For Brevity
}
![]()
With the wrapper class generated by the XSD.EXE tool, you can start coding the event handler. Start Visual Studio 2010, and create a new project using the Event Receiver template. Next, choose Deploy as a farm solution and click the Next button. In this example, your code should be able respond to “An item is being added” event of type List Item Events for a Form Library, as shown in Figure 9-49.
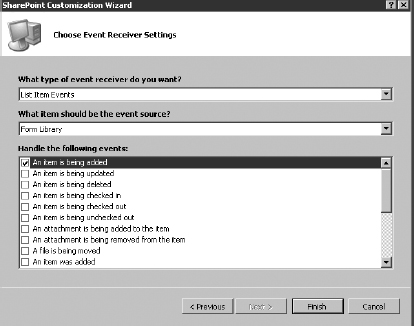
FIGURE 9-49
After you finish the wizard, Visual Studio will stub out all the necessary code and the Feature and Solution package necessary to deploy this event handler as a farm WSP solution.
At this point, you can add to your project the wrapper class (RegistrationsSchema.cs) that XSD.EXE utility generated.
 If you ever make changes to the form's schema, you will need to rerun the XSD.EXE utility against the new schema file, and then just delete the old wrapper class and add the new one to the project.
When the package is deployed and the associated feature is activated, the callout code in Listing 9-6 is used to access and increment the counter value in the Stats list for a particular training. Next, you will want to rename EventReceiver1.cs to UpdateStatSink.cs and add the call out code within the class to override the ItemAdded method.
In the code, notice the first bolded section. In this section, the InfoPath form that was just added is retrieved and stored in a variable of type SPFile. Next, InfoPath's XML file is deserialized into a strongly typed C# object of type myFields. This is done via a call into a helper method called DeserializeFormData(SPFile,Type), which will be covered a bit later. If the returned object is not null, then a LINQ query is used to see if the selected training code exists in the Stats list.
The second bolded section indicates if the Count function returns a number greater than zero, meaning the matching training code is found in the Stats list. Then, the code proceeds with incrementing its Counter field by one. This is all done through a call to a second helper method named IncrementCo unter(SPListItem). On the opposite, if the matching training code is not found, a new list item is added to the Stats list and the Code and Counter columns are set accordingly.
LISTING 9-6: Overridden ItemAdded Method
public override void ItemAdded(SPItemEventProperties properties)
      {
          SPFile ifpFile = properties.ListItem.File;
          myFields fields = (myFields)DeserializeFormData(ifpFile,
          typeof(myFields));
          if (fields != null)
          {

              SPLinqDataContext cdc = new SPLinqDataContext(
“http://adventureworks.devhorizon.com/hr”);

              var result = from trs in cdc.Stats
                         where trs.Code.Equals(fields.EventName)
                         select new { trs.Id };

              SPList statList = properties.Web.Lists[“Stats”];
              if(result.Count() > 0)
              {
                  SPListItem matched = statList.GetItemById((int) result.
First().Id);
                  IncrementCounter(matched);
              }
              else
              {
                  SPListItem newItem = statList.Items.Add();
                  newItem[“Code”] =fields.EventName;
                  newItem[“Counter”] = 1;
                  newItem.Update();
             }
       }
  }
![]()
Listing 9-7 demonstrates the DeserializeFormData() helper method, which was called from the ItemAdded method. This method starts with receiving two parameters of type SPFile and Type. In the code, the SPFile parameter is opened in binary format and the actual content is stored in a byte array, which is read into a memory stream a bit later.
Notice the highlighted lines in the code. First, a new instance of the XmlSerializer class is initialized and an object of type rootElementType is serialized into it. The rootElementType parameter is of type myFields, because that's what passed in to it from the ItemAdded code. In the next line, a new XmlReader instance is created using the memory stream and, in the line after, it's deserialized into the result variable. Finally, the result variable is returned to the caller, which contains the actual content of the form data in a strongly typed object.
LISTING 9-7: DeserializeFormData Helper Method
private object DeserializeFormData(SPFile ipfFile, Type rootElementType)
        {
            byte[] xmlFormData = ipfFile.OpenBinary();
            object result = null;
            if (xmlFormData != null)
            {
               using (MemoryStream fileStream = new MemoryStream(xmlFormData))
               {
                   XmlSerializer serializer = new XmlSerializer(rootElementType);
                   XmlReader reader = XmlReader.Create(fileStream);
                   result = serializer.Deserialize(reader);
                   fileStream.Close();
               }
            }

            return result;
        }
![]()
Listing 9-8 demonstrates the second helper method used in the ItemAdded method. The only thing that needs to be highlighted about this method is the extra logic that is written to handle race condition when multiple instances of the event handler try to update the Counter column in the Stats list. This condition can occur when two or more registration forms are saved at the same time by different users.
Thankfully, the SharePoint object model automatically locks the list tem when retrieving and incrementing the Counter field's value, so all you need to do is to place your code in a try/catch block. If race condition occurs, SharePoint object model throws an exception, meaning the existing counter value is dirty. If the value is considered dirty, there will be three attempts to retrieve and increment it. If all three attempts fail, the exception will be logged and the update won't happen.
LISTING 9-8: IncrementCounter Helper Method
private void IncrementCounter(SPListItem item)
        {
             int retryUpdate = 0;

        doUpdate:
            try
            {
                 int currentCounter = int.Parse(item[“Counter”].ToString());
                 item[“Counter”] = currentCounter + 1;
                 item.Update();
            }
            catch (Exception ex)
            {
                retryUpdate += 1;
                if (retryUpdate <= 3)
                {
                    System.Threading.Thread.Sleep(3000);
                    goto doUpdate;
                }
                else
                {
                    // Log the exception
                }
            }
        }
![]()
The last step to getting your event handler to work is to update the Class node in the Elements.xml to include the changes you have just made to the project. Listing 9-9 shows the Elements.xml file of the Feature that has been added to the project by Visual Studio 2010. This file identifies the assembly's fully qualified name, class (UpdateStatSink), and ItemAdded method to implement in the event handler.
In this particular example, the event handler is associated with all the form libraries of the site as specified by the ListTemplateId attribute in the bold line. In general, this is not an ideal situation. Instead, the event handler should be associated with a content type or a particular custom form library so that it is not kicked off every form library in the site.
LISTING 9-9: Elements.xml File
 <?xml version=“1.0” encoding=“utf-8”?>
<Elements xmlns=“http://schemas.microsoft.com/sharepoint/”>
  <Receivers ListTemplateId=“115”>
      <Receiver>
        <Name>RegistrationsStatEventHandlerItemAdding</Name>
        <Type>ItemAdded</Type>
        <Assembly>$SharePoint.Project.AssemblyFullName$</Assembly>
        <Class>RegistrationsStatEventHandler.UpdateStatSink</Class>
        <SequenceNumber>10000</SequenceNumber>
      </Receiver>
  </Receivers>
</Elements>
![]()
All you need to do is to press F5! Visual Studio will deploy the WSP package as a farm solution and activate the features, and the event handler will be associated with all the form libraries on the site. Navigate to Central Administration site ![]() Solution Management and verify that the solution has been successfully deployed, as shown in Figure 9-50.
Solution Management and verify that the solution has been successfully deployed, as shown in Figure 9-50.
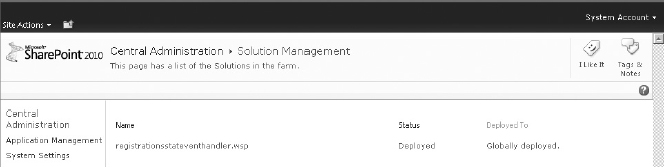
FIGURE 9-50
To prove this, browse to the Registrations library and create a new registration form. You should now have a fully functional solution so that when forms are saved to the Registrations form library, the event handler is kicked off to update the related counter in the Stats list, as shown in Figure 9-51.
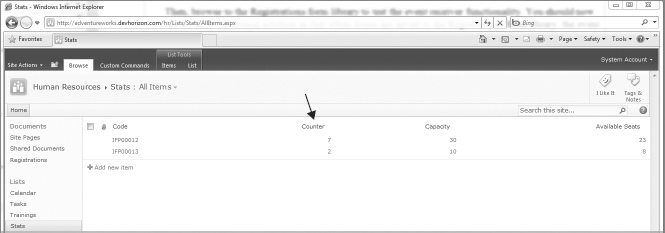
FIGURE 9-51
TOOLS FOR FORM DEVELOPERS
As you have seen so far, InfoPath 2010, along with Form Services 2010, provides a highly extensible platform on which you can build electronic forms that play an important role in various business processes across your organization.
Thankfully, a number of tools and utilities can make the form development journey much easier. Also, these tools can be used to investigate the issues that may arise during the lifecycle of your InfoPath projects. While it's entirely out of the scope of this book to evaluate all existing tools and utilities, let's have a quick look at a few of them that you will no doubt leverage when working with InfoPath forms.
The Rule Inspector
When adding declarative business logic or even custom code (imperative logic) to your form, it is often challenging to keep track of all fields and groups that invoke this logic or how this logic may affect other fields, groups, or logic in the form template.
To address this challenge, InfoPath Designer 2010 includes a tool called the Rule Inspector (formerly known as the Logic Inspector). When you access this tool, you initially see either the Overview pane alone or both the Overview pane and the Details pane, depending on how the tool is accessed, as shown in Figure 9-52.
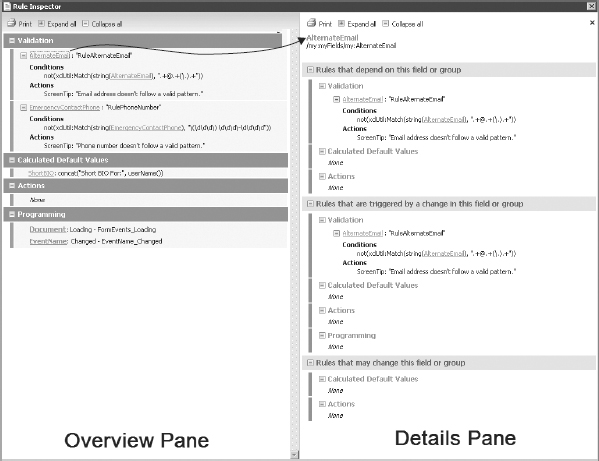
FIGURE 9-52
The overview pane on the left lists all of the business logic currently used in the form template, grouped into four categories: Validation, Calculated Default Values, Actions, and Programming. This grouping allows you to easily see what fields or groups contain the business logic, the type of the logic, and some information about each rule. If you click on any orange links in the overview pane, the details pane expands with more specific information, mostly about dependencies on other fields, groups, or rules in the form. Although the imperative logic in the Programming group is not disassembled, it is still helpful to know what's going on in the code behind in a high level view without having to launch VSTA.
For many form developers, when troubleshooting or reviewing an InfoPath form, the Rule Inspector is a helpful tool, and the first place they go after they open the form in the design mode.
The Design Checker
In InfoPath 2010, one of the driving forces behind browser-enabled forms was parity with the InfoPath client and parity with SharePoint. Although a lot of previously unsupported controls and scenarios are now supported in browser-enabled forms, before you publish your form to SharePoint, you should still run the Design Checker to identify incompatibility issues and to ensure that your form template works correctly. This tool can be found in Info tab in the Backstage, as shown in Figure 9-53. The text in the middle indicates that the form template is currently compatible with Forms Services as a web browser form.

FIGURE 9-53
The compatibility mode of the form can be changed via the Form Options ![]() Compatibility category, as shown in Figure 9-54. Additionally, you have the option to specify the destination site's URL (or the URL for the Forms Services web service). The advantage of this is that during the design check process, the form is verified on the server without your having to walk through the full Publishing Wizard and later verify the form in the browser.
Compatibility category, as shown in Figure 9-54. Additionally, you have the option to specify the destination site's URL (or the URL for the Forms Services web service). The advantage of this is that during the design check process, the form is verified on the server without your having to walk through the full Publishing Wizard and later verify the form in the browser.
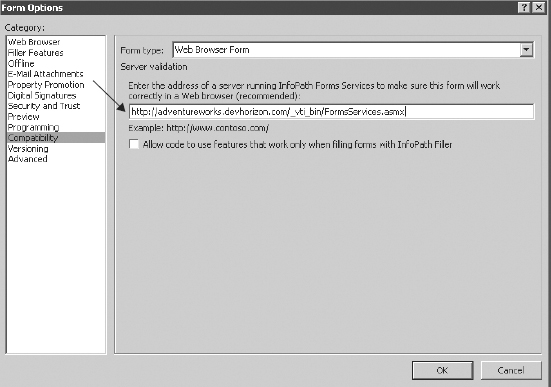
FIGURE 9-54
With the compatibility settings applied, you can click the Design Checker button in the Backstage to bring up the Design Checker task pane. At this point, all local and online checks are performed, and potential errors or warnings are revealed in the task pane, as shown in Figure 9-55.

FIGURE 9-55
Typically, errors will prevent the form template from being published as a browser-enabled form. However, warnings can be discarded, which may result in a dysfunctional browser-enabled form. Simply go through the list of issues, review them, and take appropriate actions to resolve them.
IE Developer Tools
Internet Explorer 8 ships with a powerful set of tools called Developer Tools, which you can access by pressing F12 or by selecting the Developer Tools from the Tools menu.
In browser-enabled forms, this tool can help form developers see what's going on underneath the HTTP request and simplifies the process of debugging their forms. In addition, IE8 Developer Tools provide visibility into IE's internal representation of the form and allow developers to switch between different document and browser modes (IE 7, IE 8, and IE8 Compatibility View) to ensure that the form renders properly when viewed across different versions of Internet Explorer.
Another interesting usage of IE Developer Tools is to learn how the underlying HTML is populated from the form's data elements, because there have been a lot of improvements in this area in the new release of InfoPath 2010.
For example, navigate to the Registrations form library and click on the New Document in the Ribbon to load the registration form. Do not select any training yet. Start the Developer Tools and search for the word “Cost” (one of the controls on the Event Details Section). As you can see, there is no HTML element that represents the Cost control yet. Now, select a training course from the Event Name drop-down listbox to make the details section visible. Press F5 to refresh the tool and perform the search again. This time the Cost control is found, as shown in Figure 9-56. This proves that the formatting rule you set up earlier in this chapter to make the Event Details section and all its controls invisible at form's loading, indeed, doesn't include them in the form's underlying HTML, and that this is not just a CSS hack!
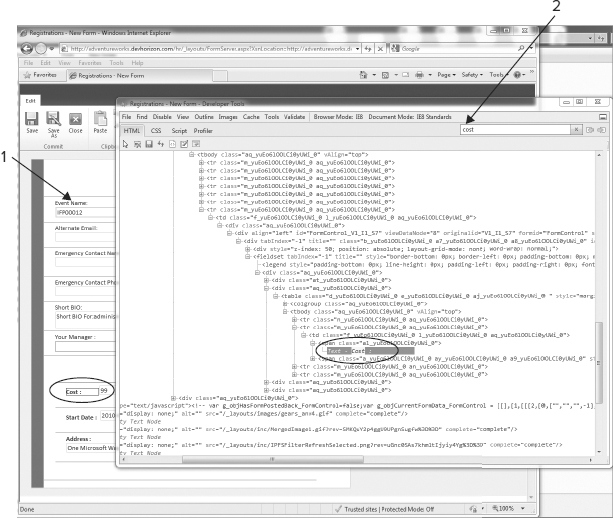
FIGURE 9-56
Fiddler Tool
When an InfoPath form is rendered in the browser, two types of transactions happen behind the scenes: initial load and postback. The initial load transaction occurs when first opening the form. It loads the form's HTML and the required resources (for example, JavaScript), so the form can be edited in the browser.
As the user interacts with the form, one or more postbacks to the server are made, so the State Service (a new shared service used by Forms Services 2010) can store temporary data for user sessions in a SQL database. At this point, the conversation between the form and server is used to recreate the state of the form across related HTTP requests. The final postback occurs when the form is either submitted or saved and finally closed.
You can use Fiddler to watch all HTTP traffic between the form and server. One of the reasons that you may want to use this tool is to identify unnecessary postbacks and adjust your form design or logic to avoid them. For example, by using Fiddler and after monitoring the Trainings list custom InfoPath form (see the “Customizing SharePoint List Forms” section), it's obvious that having an Additional Information control in an optional section may cause a lot of unnecessary round trips to the server.
Figure 9-57 shows all the partial postbacks to the server (/_layouts/Postback.FormServer.aspx) as a result of adding and removing the Additional Information control several times. Do you really need this control to be in an optional section? Is it worth all these potential postbacks that users may cause? Truthfully, there is no definite answer to these types of questions, but one thing is crystal clear here, thanks to Fiddler: the optional section causes unnecessary postbacks. If you don't need it, just get rid of it.
![]() You can use Fiddler or Visual Studio's Web Test Recorder to record all HTTP requests between a browser-enabled InfoPath form and the server. The recorded information can be saved as web test files and added to Visual Studio Team Edition for Testers projects. For more information, see InfoPath Forms Services 2007 Web Testing Toolkit at www.devhorizon.com/go/15.
You can use Fiddler or Visual Studio's Web Test Recorder to record all HTTP requests between a browser-enabled InfoPath form and the server. The recorded information can be saved as web test files and added to Visual Studio Team Edition for Testers projects. For more information, see InfoPath Forms Services 2007 Web Testing Toolkit at www.devhorizon.com/go/15.
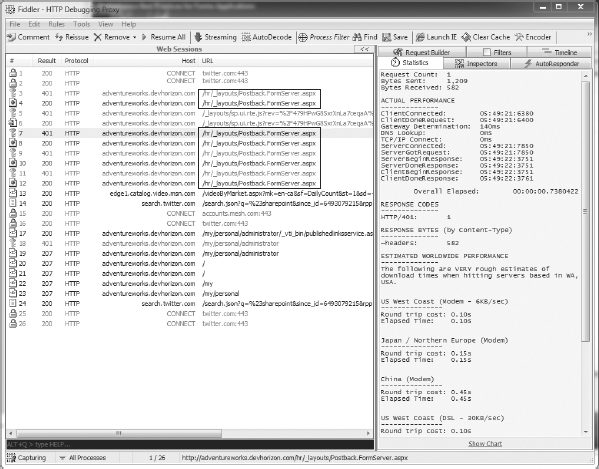
FIGURE 9-57
Tiny Inline Tools
In addition to the tools discussed so far, there are two more tools that can be executed right from within Internet Explorer when the form first loads:
- IP_DebugComplexity.ComposeSummary()
- CurrentFormData_OptimizedForFirstRequest()
As its name implies, the first tool provides a summary of the following counters in a browser-enabled form:
- View Data Tree Node
- Included Hidden Controls
- HTML InfoPath Controls
- HTML Elements
As shown in Figure 9-58, in order to run this tool, you should type the following JavaScript code into the address bar of the browser and press the Enter key.
javascript:alert(IP_DebugComplexity.ComposeSummary())
The Compose Summary tool doesn't fix anything in the form, nor does it give you guidelines on how fix the issues. It just provides some facts that can be used to reduce the form's complexity. The total number of HTML elements that a form produces is an important factor in measuring the form's complexity.

FIGURE 9-58
The second tool is used to see if the form is optimized for the initial load. As with the complexity tool, all you need to do is type the following JavaScript code into the address bar and press the Enter key:
javascript:alert(CurrentFormData_OptimizedForFirstRequest(‘FormControl’))
This tool spits out true or false. True means that the form is first-request optimized, and false means it's not. If the result is false, review your form design to find the potential issues and fix them.
BUILDING WEB PARTS USING INFOPATH
In Forms Service 2007, the out-of-the-box behavior for rendering browser-enabled forms is to use a call to the FormServer.aspx layout page and pass the .XSN location of the published form as a query string parameter (?XsnLocation=|0). Unfortunately, this technique presents a few challenges.
First, the displayed form occupies the entire page, and it does not reference either the application or system Master Pages. This limitation results in an inconsistent look and feel between the published InfoPath forms and the rest of the site's pages. The second issue is related to the first issue, because once the users visually lose the overall look and feel of the site, they think the form has opened in a brand new page. Therefore, they may close the browser once they have completed filling out the form. Obviously, closing the browser results in losing the state and context of the site — again, this is not ideal! The third issue is that, because the form is rendered on a completely different page from the one that was requested, it is not easy to establish a conversation with the form without passing additional query string parameters to the FormServer.aspx page and using custom coding in the form template to read those parameters.
Although there are a few solutions for embedding InfoPath forms in SharePoint pages, such as using the XmlFormView web part (in the Microsoft.Office.InfoPath.Server assembly) or boxing the XmlFormView ASP.NET control in your own web part, none of these solutions truly represent a tight integration between the form template and the rest of the functionalities on the page. Needless to say, they all require common SharePoint development techniques and configuration steps.
In this section, we will look at some of the ways Microsoft has improved the integration between InfoPath and SharePoint.
InfoPath Form Web Part
In SharePoint Server 2010, it's much easier than ever to host your forms on SharePoint pages using a brand new web part called the InfoPath Form web part. Assuming that you've already created a SharePoint web part page called the Trainings Dashboard, there are a couple easy steps for configuring the InfoPath Form web part on that page.
On the Trainings Dashboard page, click Add a Web Part in the left column Web Part zone. On the Page menu, select Office Client Applications category ![]() InfoPath Form Web Part, and then click the Add button. Next, click on the link in the web part to open the Tool pane. Select the Registrations form library and Click OK, as shown in Figure 9-59. As you can see, the Content Type is set to Form, because that's the only content type currently available in the Registrations form library. If you have published your form to a content type, you need to specify it in the Content Type dropdown. Also, note that you have the option to exclude the InfoPath toolbar (also called the Ribbon), in case you have implemented custom submit behavior.
InfoPath Form Web Part, and then click the Add button. Next, click on the link in the web part to open the Tool pane. Select the Registrations form library and Click OK, as shown in Figure 9-59. As you can see, the Content Type is set to Form, because that's the only content type currently available in the Registrations form library. If you have published your form to a content type, you need to specify it in the Content Type dropdown. Also, note that you have the option to exclude the InfoPath toolbar (also called the Ribbon), in case you have implemented custom submit behavior.
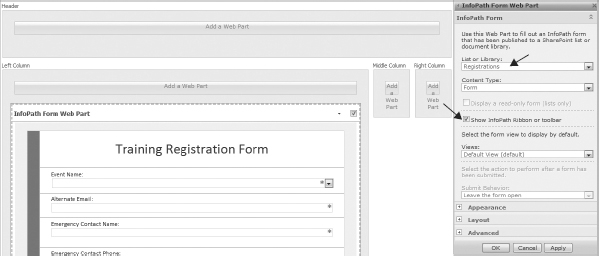
FIGURE 9-59
Using InfoPath to Create Connected Web Parts
In addition to the InfoPath Form web part, another major improvement in browser-enabled forms is the addition of a new rule action called “Send data To Web Part.” This rule can run anytime you can run an action in InfoPath, for example, on form's loading or submission, on the click of a button, or on changing a field. This action allows users to build InfoPath forms that interact with other web parts on the same page or across two pages, all without a single line of code.
The web part connection scenario you build here enables Adventure Works employees to see the total number of available seats for a particular training course on their Trainings Dashboard. The registration form is used as a source that filters the Stats List View web part using a web part connection.
Recall from the “Publishing an InfoPath Form” section that one of the two promotion options you get in the Publishing Wizard is to promote fields as web part connection parameters.
On the registration form, add a Picture button next to the Event Name drop-down listbox. The Picture Button control (new in InfoPath 2010) supports all the actions that a standard button supports, but it allows you to use an image as a button, instead of the default ugly gray rectangular shape. Right-click on the control, and set an image to the control. The picture button can show a different picture when the user hovers over it.
Next, in the Rules task pane for the picture button, click Add and select “Send Data To Web Part,” as shown in Figure 9-60. Selecting this option will bring up the Rule Details dialog box, where you need to specify which fields will be participating in the web part connection. Select the EventName field as an output parameter, and click OK to promote the field.
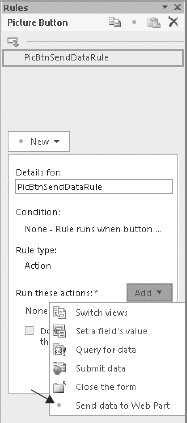
FIGURE 9-60
This action rule is enabled when two conditions are met. First, when the condition in the rule is satisfied. By default, this condition is set to “None — Rule runs when button is clicked,” but you can change the condition to satisfy your needs. The second condition is that a connection has been established between InfoPath web part, containing the Registration Form template, and another web part.
With the picture button and “Send Data to Web Part” rule action in place, use the Quick Publish option and publish the form to the Registrations form library.
But the journey isn't over yet!
The Publishing Wizard errors out, referring you to the Design Checker for more information, as shown in Figure 9-61.

FIGURE 9-61
The error message is self-explanatory. You can't sandbox a form with promoted fields as web part connection parameters. Instead, you should switch the security model of your form to administrator-approved and publish it through the Central Administration site.
To begin the process of publishing your form as an administrator-approved form template, go to the Forms option, and under Security and Trust, select the Full Trust option. Next, from the Publish tab in the Backstage, choose SharePoint Server and go through the wizard one more time. Notice that in the second screen step (see Figure 9-62) the first two options are grayed out. In the next step, you will be asked to save the form template so that the farm administrator can review the form and take further action. You will also notice that the EventName field you just promoted as web part connection parameter shows up in the property promotion step. Complete the Publishing Wizard and provide the farm administrator with the information in the last step of the Publishing Wizard.
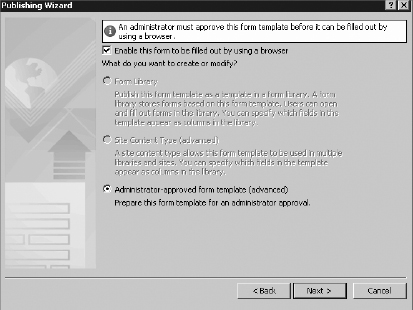
FIGURE 9-62
Switching hats here, let's suppose that you are the farm administrator and you have reviewed the form template and it looks harmless. Now, you want to deploy it. Navigate to the Central Administration site, and from the General Application Settings, click Upload Form Template under the InfoPath Forms Services category to upload the form and make it available on the farm, as shown in Figure 9-63.

FIGURE 9-63
If everything has gone smoothly, you should be able to see the status of the uploaded form template change from Installing to Ready after a couple of seconds. At this point, select Activate to a Site Collection to activate the form as a feature on a specified site collection (see Figure 9-64). Alternatively, you can browse to any site collections and activate the feature yourself. Just remember, it is a site collection feature.

FIGURE 9-64
But what happens after a form template is activated on a site collection? This is a major point of confusion for many people who deploy an administrator-approved InfoPath form for the first time.
Essentially, activating an administrator-approved form adds a new content type to the site collection with the InfoPath form attached to it. Recall from the earlier discussion that attaching an InfoPath form to a content type makes it much more reusable and is a more compelling approach than strongly associating a form with a form library.
Figure 9-65 shows how you can add the new content type to the Registrations from library. It's no different from adding any content type to a document library.

FIGURE 9-65
With the new content type added to the Registrations form library, you can start putting different pieces together and finalize the web part connection scenario. Go back to the Trainings Dashboard and delete the old InfoPath form web part and add a new one. Again, make it point to the Registrations library, but this time around, you have a new content type added to the form library that you can choose in the Content Type drop-down, as shown in Figure 9-66.
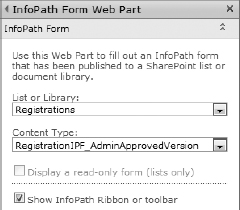
FIGURE 9-66
Now, add the Stats List View web part to the right column Web Part zone on the Trainings Dashboard and establish a web part connection, as shown in Figure 9-67. Next a pop-up window called Configure Connection — Webpage Dialog asks about the provider and consumer fields used in the web part connection, as shown in Figure 9-68. In this example, the EventName field from the form template and the Code column from the Stats list are the publisher and the consumer, respectively.
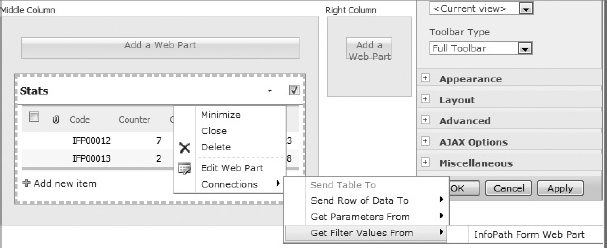
FIGURE 9-67
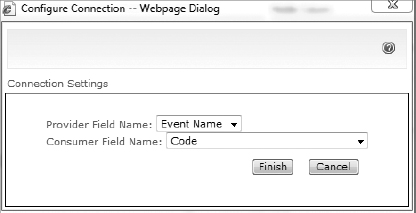
FIGURE 9-68
With the web part connection properly configured, it's time to test everything. When users click on the picture button in the registration form, the InfoPath form web part sends the training code to the wired Stats List View on the page, enabling it to automatically filter and display the relevant information in a customized way, as shown in Figure 9-69.

FIGURE 9-69
WEB PART CONNECTION WITH MULTIPLE PARAMETERS
If you are sending a single parameter, you can set the web part connection in the web part page, but what if you are sending multiple parameters? You need to use SharePoint Designer 2010.
Getting Data from Other Web Parts
The scenario in the previous section covered only inputting data in the registration form and sending it over to another web part to be processed, but the InfoPath Form web part supports getting data from other web parts, too. All you need to do is to make sure that, in the property promotion step during publishing, the parameters you choose to have participate in web part connection are specified as Input.
Even though getting data from other web parts is not a requirement in the Training Management application, here are just two examples that show how this feature may be used:
- In a help desk application: When a ticket is selected in the Help Tickets List View web part, the Ticket ID is sent to the InfoPath Form web part, which displays the ticket's details.
- In a customer relationship management application: When a customer is selected in the Customers List View web part, the Customer ID is sent to the InfoPath Form web part, which displays the customer requirement details.
Empowering Users with Mashups
In the web development lexicon, mashup is a buzzword, as mashups are fast becoming part of many web-based services offered across the Net. People have different perceptions about the term mashup and different images of it.
According to Wikipedia:
A mashup is a web page or application that combines data or functionality from two or more external sources to create a new service. The term mashup implies easy, fast integration, frequently using open APIs and data sources to produce results that were not the original reason for producing the raw source data.
As for SharePoint, Wikipedia's definition helps describe that SharePoint is already a mashup! But why?
SharePoint is a composite application platform that can easily be integrated with various technologies without hardwired dependences. It provides the plumbing through which many services, such as BCS or Excel Services, can easily build solutions that combine data and functionalities from multiple external sources and surface them on a single SharePoint page.
Simplicity and modularity in the parts that participate in a mashup scenario are critical. SharePoint provides a set of rich web parts and the glue (web part connections) to build complex scenarios by using modular and simple pieces that can communicate with each other.
SharePoint empowers business users to have more influence and control over business applications, their day-to-day work tasks, and their participation in them. All of these reasons support that SharePoint is already an enterprise mashup.
In recent years, many customers have started to use InfoPath (or other Office Products) to provide a better presentation layer on top of their business processes. That's mainly because users who interact with these processes are much more familiar with a Microsoft Office–style frontline than an entirely brand new interface. This not only motivates users to adopt it but also increases the productivity. In this way, forms drive business today.
As you saw throughout this chapter, InfoPath 2010 is a crucial building block in the mashupfriendly platform of SharePoint. The InfoPath Form web part and the ability to connect forms to other web parts on the page is a game changer in InfoPath 2010 and drastically extends the reach of electronic forms to a much broader set of users. Remember, SharePoint is all about empowering business users — with or without code!
The connectable web part scenario presented in this chapter is just a proof of concept of how the data inside an InfoPath form can relate to the data outside of the form. Using the techniques described in this chapter, you can quickly and easily create rich applications by using the InfoPath Form web part to host forms that take user input and send the values to other web parts on the page or the other way around.
SUMMARY
When you put together all the pieces presented in this chapter, you have a powerful array of options for designing and displaying your InfoPath forms in SharePoint. So what you have learned in this chapter?
This chapter began with customizing SharePoint list forms with InfoPath Designer 2010. List forms are great ways of interacting with SharePoint list data, but they are not always the best solutions. In the second part of the chapter, you learned how to design forms that are deployed to form libraries. Many aspects of an InfoPath form template were covered in the second part of the chapter, such as form programming and the files that make up a form template. Toward the end of the chapter, you learned how to use some of the existing tools to facilitate form development and troubleshooting.
At the end of this chapter, even though the presented web part connection scenario itself was a pretty simple one, you learned some very fundamental changes in the way that Microsoft is envisioning that SharePoint applications should be constructed, delivered, and experienced by end users.