
12
Advanced Business Connectivity Services
WHAT'S IN THIS CHAPTER?
In Chapter 11, significant attention was paid to creating Business Connectivity Services (BCS) solutions with little coding. However, there are many situations in which the limitations of no-code solutions make it necessary to write custom components. This chapter explores custom coding in BCS by presenting .NET Assembly Connectors and the BDC Server object model. This information lays the foundation for custom solutions built with BCS.
CREATING .NET ASSEMBLY CONNECTORS
A .NET Assembly Connector associates a custom assembly with an ECT so that you can precisely control how information is accessed, processed, and returned from external systems. You create a .NET Assembly Connector in Visual Studio 2010 using the Business Data Connectivity Model project type.
The Visual Studio Business Data Connectivity Model project template is a complete working sample. Immediately after it is created, you can press F5 and make external lists in SharePoint. This is a good start because the tooling can be somewhat confusing when you first use it; a complete working sample helps guide you to success. The detailed examination of the project template in the next section will help you understand.
Understanding the Project Tooling
When you're working with the Business Data Connectivity Model project template, there are three explorers and designers available: the BDC Model Explorer, the Entity Design Surface, and the Method Details pane. The BDC Model Explorer is used to navigate the nodes of the BDC Metadata Model. The Entity Design Surface is used to design the ECT that will be associated with the .NET Assembly Connector. The Method Details pane is used to create the function signatures for ECT operations. Along with these three new elements, the Business Data Connectivity Model project template also gives you the standard windows such as the Solution Explorer and the Properties pane. Figure 12-1 shows the new tooling in Visual Studio 2010.
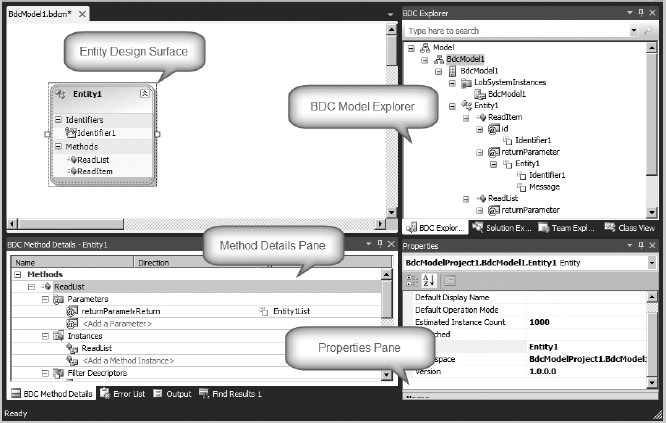
FIGURE 12-1
Although the Visual Studio tooling is helpful, there are times when you must access the underlying BDC Metadata Model as XML either for direct editing or simply to verify the work you have done using the tools. The BDC Metadata Model can be found in the Solution Explorer as the file with the .bdcm extension. You can open this file as XML by right-clicking it and selecting Open With from the context menu. From the Open With dialog box, open the file with the XML Editor.
To be successful with the tooling you must understand how the various explorers and designers relate to the underlying model XML. Furthermore, you must understand which elements of the project are affected as you make changes. In particular the BDC Model Explorer and the Method Details pane can be confusing if their relationships to the underlying XML are not well understood.
Not all of the underlying BDC Metadata Model can be represented in the BDC Model Explorer. In particular, the BDC Model Explorer shows methods, but not method instances. Methods are used in the BDC Metadata model as prototypes, which are subsequently implemented by method instances. The Method Details pane provides the interface necessary to define the method instances.
The Entity Design Surface is also used to edit the underlying BDC Metadata Model. However, it is focused on the creation of entities. Using this tool you can create new entities, assign the Identifier, and create new methods.
Regardless of which tool you are using, the Properties pane can be used to edit the selected node. The Properties pane lists the type of node and its attributes. Although the nodes have many attributes, most of them are not required. It is not always clear, however, which attributes are required to implement any given node. The better you understand the model, the more likely you are to create the one you need.
For the most part, the tooling is designed to edit the underlying BDC Metadata Model, with one exception. A class module is used to implement the method instances that you define in the model. This class module is created automatically and is always given the name of the entity followed by the word Service. This class is known as the service class. If you change the name of the entity in your model, the service class name is updated automatically. If you delete the service class from the project, it is recreated the next time you make any changes to the method definitions.
The methods implemented in the service class have types defined by the input and return parameters in the BDC Metadata Model. These types can be simple types or classes. Typically, however, the Finder and SpecificFinder methods return classes that represent the ECT associated with the .NET Assembly Connector. In the Business Connectivity Model project template, a class named Entity1.cs is created by default and is returned from the Finder and SpecificFinder methods. These methods are also created by default when you create a project with the Business Connectivity Model project template.
Even though the project template includes a class that has the same name as the entity, there is actually no connection between the entity definition and the entity class as far as the tooling is concerned. Changing the name of the entity in the model does not change the name of the class, and the class is never automatically generated. The class is really just a payload returned from the .NET Assembly Connector. Its name is meaningless, but it is a best practice to keep the name of the class synchronized with the name of the entity it represents. The methods in the service class return instances of the entity class that are passed on to external lists for display. In more advanced scenarios, you may choose to implement the entity classes in a separate project so that they can be easily referenced by custom web parts that will display the data.
The tooling is largely focused on defining and implementing methods as opposed to defining the data returned by the entity class. In the default project template, the entity has a data field named Message, which is defined as a TypeDescriptor with a TypeName of System.String. The entity class has a corresponding property whose value is set during the execution of the Finder or SpecificFinder methods. To add or modify data fields for the ECT, you must make changes to the model in the BDC Model Explorer and add new properties to the entity class. This is a manual process — the tooling never automatically generates members for the entity class.
Walking Through the Development Process
The easiest way to become familiar with the Visual Studio Business Data Connectivity Model project is to create a solution. This example walks you through the complete development process for building a .NET Assembly Connector. It makes use of a subset of product and category data from the AdventureWorks database to create a connector that allows full CRUD operations. As a starting point, an object relational model (ORM) was created over the database using the Entity Framework so that the .NET Assembly Connector can simply access the database through LINQ. Readers interested in learning more about the Entity Framework can find complete coverage on MSDN at http://msdn.microsoft.com/en-us/library/bb399572.aspx.
Creating a New Project
The first step in developing the connector is to create a new Business Data Connectivity Model project. For this walkthrough, we'll use a model named ProductModel that makes use of data from the AdventureWorks database. Although the default model created by the project template is valuable for learning about the tooling, it provides little help in developing a connector. For this reason, it is best simply to delete the default Entity1 entity from the Entity Design Surface. Along with the entity, you should also delete the entity service class and the entity class from the Solution Explorer. This leaves you with a simple BDC Metadata Model that looks like the following XML, which you can view as text directly in Visual Studio:

<?xml version=“1.0” encoding=“utf-8”?>
<Model xmlns:xsi=“http://www.w3.org/2001/XMLSchema-instance”
       xmlns:xsd=“http://www.w3.org/2001/XMLSchema”
       xmlns=“http://schemas.microsoft.com/windows/2007/BusinessDataCatalog”
       Name=“ProductModel”>
  <LobSystems>
    <LobSystem Name=“ProductSystem” Type=“DotNetAssembly”>
      <LobSystemInstances>
        <LobSystemInstance Name=“ProductSystemInstance” />
      </LobSystemInstances>
    </LobSystem>
  </LobSystems>
</Model>
![]()
The LobSystem element is a critical part of the model. Note how the element indicates that the system will be implemented through an assembly. This syntax differs significantly from that of the examples in previous chapters, which used databases and web services. This element is also used by both SPD and Visual Studio 2010 to determine whether to provide tooling support for a model. SPD does not provide tooling support for .NET Assembly Connectors and Visual Studio provides tooling support only for .NET Assembly Connectors.
Also notice in the preceding XML that careful attention has been paid to naming the elements. The Model, LobSystem, and LobSystemInstance nodes have all been named appropriately. When you are creating connectors, naming is critical for maintaining clarity as the BDC Metadata Model becomes more complex. Remember to name elements correctly early in the development process. Renaming elements later can cause problems, as described in the section entitled “Packaging Considerations,” later in the chapter.
Creating a New Entity
Because the default entity was deleted, the next step is to add a new entity to the project. You can add entities to the project from the toolbox, which has an Entity object that can be dragged onto the Entity Design Surface. When you add a new entity, you'll notice that a new service class is automatically created. Additionally, the Properties pane presents several properties that you can set. Here you will at least set the Name property for the entity. In this case, the entity is named Product.
The next step is to add the Identifier for the entity. The Identifier is the primary key by which a unique entity instance can be identified. You can create a new Identifier by right-clicking the entity and selecting Add, Identifier. Using the Properties pane you can set the name and data type for the Identifier. For the walkthrough, an Identifier named ProductID was created, with a data type of System.Int32. The following code shows the BDC Metadata Model for the entity:
<Entities>
 <Entity Name=“Product” Namespace=“AdventureworksConnector.ProductModel”
 Version=“1.0.0.133” DefaultDisplayName=“Adventureworks Product”
 DefaultOperationMode=“Online” EstimatedInstanceCount=“1000”
 IsCached=“false”>
  <Properties>
   <Property Name=“Class” Type=“System.String”>
   AdventureworksConnector.ProductModel.ProductService, ProductSystem</Property>
  </Properties>
  <Identifiers>
    <Identifier Name=“ProductID” TypeName=“System.Int32” />
  </Identifiers>
 </Entity>
</Entities>
![]()
The next step is to create the entity class that will contain the data from the external system. Remember that Visual Studio does not automatically create an entity class, so you must add a new class manually. Within the class you must add properties for each of the data fields you want to return. The following code shows the entity class created for the walkthrough:
namespace AdventureworksConnector
{
    public class Product
    {
        public int ProductID { get; set; }
        public string Name { get; set; }
        public string Number { get; set; }
        public string Color { get; set; }
        public decimal Price { get; set; }
        public string Description { get; set; }
    }
}
![]()
Although the preceding entity class is fairly simple, there are a couple of things to point out. First, each of the properties in the class correspond to a column in an external list. Second, the data is strongly typed; the types defined in the class are returned from the connector.
Creating a Finder Method
The next step is to create the methods for the entity. Returning to the Entity Design Surface, you can create new methods by right-clicking the entity and selecting Add Method. You can also create a new method in the Method Details pane, which is a better idea because Visual Studio defines the model for the stereotype when you start here. Remember that a method is just a stereotype and that you must create a method instance to implement the method. You can create a new method instance by clicking the Add Method Instance link in the Method Details pane. After you have created the method instance, you can specify the Type of the method instance in the Properties pane. Typically, your first method will be a Finder method. For the walkthrough, a Finder method named ReadProducts was created.
Once the method instance is defined, you must define its parameters. In the case of the default Finder method, you will typically define a return parameter only. Other method instances may require input parameters as well as filters. You can create a new parameter by clicking Add a Parameter in the Method Details pane. Using the Properties pane you can then change the parameter name and direction. For the walkthrough, a return parameter named ProductList was created.
When a parameter is defined, Visual Studio automatically creates a TypeDescriptor for the parameter. The TypeDescriptor acts as a mapping between the data types found in the external system and the data types returned by the .NET Assembly Connector. Clicking the TypeDescriptor in the Method Details pane enables you to define the TypeName for the TypeDescriptor. In the case of a Finder method, the TypeDescriptor is typically a collection of entity instances. Therefore, the IsCollection property should be set to True before you select the TypeName. After the TypeDescriptor is designated as a collection, you can open the TypeName picker, click the Current Project tab, and select the Product class. Visual Studio automatically sets the return type to be a collection. Figure 12-2 shows the Type Name picker in Visual Studio.
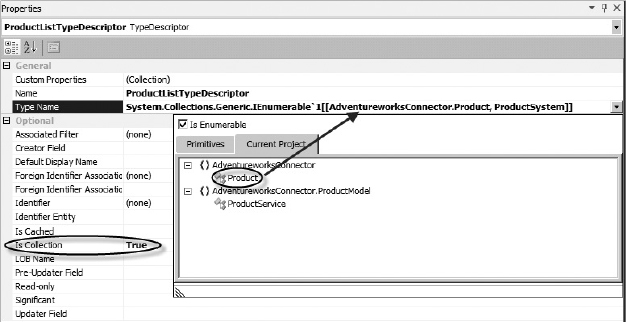
FIGURE 12-2
At this point, you can open the code for the service class and see that Visual Studio has created a method whose signature is based on the method, parameter, and TypeDescriptor settings.
However, your work is not yet done because the return TypeDescriptor was designated as a collection. Therefore a new TypeDescriptor must be added to represent the member of the collection. Additionally, each field in the collection member must be defined.
To create the additional TypeDescriptors, you work in the BDC Model Explorer. In the Explorer, you can see the TypeDescriptor defining the collection. You may define a collection member by right-clicking the collection TypeDescriptor and selecting Add Type Descriptor from the context menu. This TypeDescriptor has a TypeName of Product, but will not be a collection. Finally, you must add a TypeDescriptor for every property of the entity you want to return. Take care to set the Identifier property for the TypeDescriptor that represents the Identifier of the entity in order to designate this property as the one containing the Identifier value.
Finally, return to the Method Details pane and select the method instance for the Finder. In the Properties pane, set Return Parameter Name and Return TypeDescriptor to reference the items already created. This completes the definition of the Finder. The following code shows the completed Finder method definition in the BDC Metadata Model.
<Method Name=“ReadProducts”>
 <Parameters>
  <Parameter Name=“ProductList” Direction=“Return”>
    <TypeDescriptor Name=“ProductListTypeDescriptor”
     TypeName=“System.Collections.Generic.IEnumerable`1[
     [AdventureworksConnector.ProductModel.Product, ProductSystem]]”
     IsCollection=“true”>
      <TypeDescriptors>
       <TypeDescriptor Name=“ProductTypeDescriptor”
        TypeName=“AdventureworksConnector.ProductModel.Product, ProductSystem”
        IsCollection=“false”>
         <TypeDescriptors>
          <TypeDescriptor Name=“Name” TypeName=“System.String” />
          <TypeDescriptor Name=“Number” TypeName=“System.String” />
          <TypeDescriptor Name=“Color” TypeName=“System.String” />
          <TypeDescriptor Name=“Price” TypeName=“System.Decimal”
           IsCollection=“false” />
          <TypeDescriptor Name=“Description” TypeName=“System.String” />
         <TypeDescriptor Name=“ProductID” TypeName=“System.Int32”
          IsCollection=“false” IdentifierName=“ProductID” ReadOnly=“true” />
        </TypeDescriptors>
       </TypeDescriptor>
      </TypeDescriptors>
     </TypeDescriptor>
    </Parameter>
  </Parameters>
  <MethodInstances>
   <MethodInstance Name=“ReadProductsInstance” Type=“Finder”
           ReturnParameterName=“ProductList”
           ReturnTypeDescriptorPath=“ProductListTypeDescriptor” />
  </MethodInstances>
 </Method>
![]()
Creating a SpecificFinder Method
Because the minimum requirements for an external list include a Finder and SpecificFinder method, the next step is to create the SpecificFinder method. You do this using the same procedure as for the Finder method, with two exceptions. First, the return type is a single entity instance as opposed to a collection. Second, SpecificFinder requires an input parameter that contains the Identifier of the entity instance to return. You must explicitly designate this input parameter as accepting an identifier by setting the Identifier property.
As with the Finder method, you must also add a TypeDescriptor for every property of the entity you want to return and set the Identifier property for the TypeDescriptor that contains the Identifier value. In this case, however, you can simply copy the TypeDescriptors from the Finder method in the BDC Model Explorer and paste it under the SpecificFinder method.
One last thing you must do is set the Read-Only property to True for the TypeDescriptor that represents the identifier. You must do this because the ProductID is handled as an identity column in the database. Users cannot update the value of this field. Setting the Read-Only property ensures that the auto-generated forms in SharePoint reflect the fact that the field cannot be changed. The following code shows the completed SpecificFinder method definition in the model.
<Method Name=“ReadProduct”>
 <Parameters>
  <Parameter Name=“ProductID” Direction=“In”>
   <TypeDescriptor Name=“ProductID” TypeName=“System.Int32”
           IsCollection=“false” IdentifierName=“ProductID” />
  </Parameter>
  <Parameter Name=“Product” Direction=“Return”>
   <TypeDescriptor Name=“ProductTypeDescriptor”
    TypeName=“AdventureworksConnector.Product, ProductSystem”
    IsCollection=“false”>
    <TypeDescriptors>
     <TypeDescriptor Name=“Color” TypeName=“System.String” />
     <TypeDescriptor Name=“Description” TypeName=“System.String” />
     <TypeDescriptor Name=“Name” TypeName=“System.String” />
     <TypeDescriptor Name=“Number” TypeName=“System.String” />
     <TypeDescriptor Name=“Price” TypeName=“System.Decimal”
      IsCollection=“false” />
     <TypeDescriptor Name=“ProductID” TypeName=“System.Int32”
      IsCollection=“false” IdentifierName=“ProductID”
      ReadOnly=“true” />
    </TypeDescriptors>
   </TypeDescriptor>
  </Parameter>
 </Parameters>
 <MethodInstances>
  <MethodInstance Name=“ReadProductInstance” Type=“SpecificFinder”
   ReturnParameterName=“Product”
   ReturnTypeDescriptorPath=“ProductTypeDescriptor” />
 </MethodInstances>
</Method>
![]()
Handling Connection Information
At this point the minimum required methods are defined and you can turn your attention to implementing them in code. As a first order of business, you must consider how to handle connection information for the external system. The simplest way to store connection information is as a property in the BDC Metadata Model. You can add custom properties to any node in the BDC Metadata Model, and connection information is typically attached to the LobSystemInstance node.
In the BDC Explorer you can select the LobSystemInstance node and then click the Custom Properties ellipsis in the Properties pane. This opens the Property Editor dialog box, where you can add a new custom property to hold the connection string. Figure 12-3 shows the custom property for the walkthrough and the BDC Metadata Model follows.
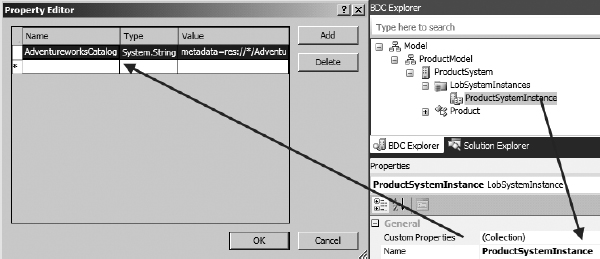
FIGURE 12-3
<LobSystemInstance Name=“ProductSystemInstance”>
 <Properties>
  <Property Name=“AdventureworksCatalog” Type=“System.String”>
   Connection string goes here
  </Property>
 </Properties>
</LobSystemInstance>
![]()
After the custom property is created, the service class can be modified to support reading the connection information. You start this process by setting a reference to the Microsoft.BusinessData.dll assembly located in the ISAPI folder beneath the SharePoint system directory. After the reference is made, the service class must be updated to implement the Microsoft.BusinessData.SystemSpecific.IContextProperty interface.
You don't need to write any code to implement the interface, because the BDC Server runtime takes care of managing the properties that must be set. You can, however, now use the interface to retrieve the property previously stored in the model. The following is the interface and connection information retrieval code.
internal string GetConnectionInfo()
{
    INamedPropertyDictionary props =
      this.LobSystemInstance.GetProperties();

    if (props.ContainsKey(“AdventureworksCatalog”))
        return props[“AdventureworksCatalog”].ToString();
    else
        return string.Empty;
}

public Microsoft.BusinessData.Runtime.IExecutionContext
       ExecutionContext
{
    get;
    set;
}

public Microsoft.BusinessData.MetadataModel.ILobSystemInstance
       LobSystemInstance
{
    get;
    set;
}

public Microsoft.BusinessData.MetadataModel.IMethodInstance
       MethodInstance
{
    get;
    set;
}
![]()
Implementing the Methods
Now that the connection information can be stored and retrieved, you can turn your attention to implementing the methods. This is a matter of writing the necessary code to return the data from the external system, but there are two changes that must be made to the service class first.
If you examine the code that Visual Studio generates in the project, you may notice that all the methods are static. This is because the .NET Assembly Connector performs slightly better with static methods. However, once the IContextProperty interface is implemented, the class can no longer use the static methods. Therefore, the static keyword must be removed. The code generated by Visual Studio also uses IEnumerable<T> as the return type for the Finder method. If you want to be able to open the ECT in the SharePoint Designer, however, this must be changed to IList<T>.
Once the changes are made, the code for the methods can finally be added to the connector. After you finish and compile the code, the .NET Assembly Connector can be deployed. At this point, you can create a new external list. The following code shows the complete implementation for the methods, which uses LINQ queries against the Entity Framework layer discussed previously.
namespace AdventureworksConnector.ProductModel
{
    public partial class ProductService : IContextProperty
    {
        public IList<Product> ReadProducts()
        {
            AdventureworksCatalog catalog =
              new AdventureworksCatalog(GetConnectionInfo());

            var q = from p in catalog.Products
                    orderby p.ProductName
                    select p;

            List<Product> products = new List<Product>();

            foreach (var i in q)
            {
                products.Add(
                    new Product()
                    {
                        ProductID = i.ProductID,
                        Name = i.ProductName,
                        Number = i.ProductNumber,
                        Description = i.ProductDescription,
                        Color = i.ProductColor,
                        Price = i.ProductPrice
                    });
            }

            return products;
        }

        public Product ReadProduct(int ProductID)
        {
            AdventureworksCatalog catalog =
              new AdventureworksCatalog(GetConnectionInfo());

            var q = from p in catalog.Products
                    where p.ProductID == ProductID
                    select p;

            if (q.Count() == 1)
            {
                return new Product()
                {
                    ProductID = q.First().ProductID,
                    Name = q.First().ProductName,
                    Number = q.First().ProductNumber,
                    Description = q.First().ProductDescription,
                    Color = q.First().ProductColor,
                    Price = q.First().ProductPrice
                };
            }

            else
                return null;
       }
    }
}
![]()
Adding Creator, Updater, and Deleter Methods
For the .NET Assembly Connector to be fully functional, it must have methods to create, update, and delete items. You can create new methods by clicking the Add a Method link in the Method Details pane. As stated previously, when you start from the Method Details pane, Visual Studio generates model elements appropriate for the method.
The Creator method takes an entity instance as input and returns a new entity instance. The input entity instance is simply a container for the new values, with the exception of Identifier, because that value is created in the external system. Each field that contains information necessary for the creation of the new item has a CreatorField property set to True. The following code shows the Creator method model definition.
<Method Name=“CreateProduct”>
 <Parameters>
  <Parameter Name=“ProductOut” Direction=“Return”>
   <TypeDescriptor Name=“ProductOutTypeDescriptor”
     IsCollection=“false”
     TypeName=“AdventureworksConnector.ProductModel.Product, ProductSystem”>
     <TypeDescriptors>
      <TypeDescriptor Name=“Color” TypeName=“System.String” />
      <TypeDescriptor Name=“Description” TypeName=“System.String” />
      <TypeDescriptor Name=“Name” TypeName=“System.String” />
      <TypeDescriptor Name=“Number” TypeName=“System.String” />
      <TypeDescriptor Name=“Price”
       IsCollection=“false” TypeName=“System.Decimal” />
      <TypeDescriptor Name=“ProductID” IdentifierName=“ProductID”
       IsCollection=“false” TypeName=“System.Int32” />
      </TypeDescriptors>
     </TypeDescriptor>
    </Parameter>
    <Parameter Name=“ProductIn” Direction=“In”>
     <TypeDescriptor Name=“ProductTypeDescriptor”
      IsCollection=“false”
      TypeName=“AdventureworksConnector.Product, ProductSystem”>
      <TypeDescriptors>
       <TypeDescriptor Name=“Color” TypeName=“System.String”
        CreatorField=“true” />
       <TypeDescriptor Name=“Description” TypeName=“System.String”
        CreatorField=“true” />
       <TypeDescriptor Name=“Name” TypeName=“System.String”
        CreatorField=“true” />
       <TypeDescriptor Name=“Number” TypeName=“System.String”
        CreatorField=“true” />

       <TypeDescriptor Name=“Price” IsCollection=“false”
        TypeName=“System.Decimal” CreatorField=“true” />
    </TypeDescriptors>
   </TypeDescriptor>
  </Parameter>
 </Parameters>
 <MethodInstances>
  <MethodInstance Name=“CreateProductInstance” Type=“Creator”
   ReturnParameterName=“ProductOut”
   ReturnTypeDescriptorPath=“ProductOutTypeDescriptor” />
 </MethodInstances>
</Method>
![]()
The Updater method takes an entity instance as an input. The input entity instance is the entity to update. Each field that contains information necessary to update the item in the external system has an UpdaterField property set to True. The following code shows the Updater method model definition.
<Method Name=“UpdateProduct”>
 <Parameters>
  <Parameter Name=“ProductIn” Direction=“In”>
   <TypeDescriptor Name=“ProductTypeDescriptor” IsCollection=“false”
    TypeName=“AdventureworksConnector.ProductModel.Product, ProductSystem”>
     <TypeDescriptors>
     <TypeDescriptor Name=“Color” TypeName=“System.String”
      UpdaterField=“true” />
     <TypeDescriptor Name=“Description” TypeName=“System.String”
      UpdaterField=“true” />
     <TypeDescriptor Name=“Name” TypeName=“System.String”
      UpdaterField=“true” />
     <TypeDescriptor Name=“Number” TypeName=“System.String”
      UpdaterField=“true” />
     <TypeDescriptor Name=“Price” IsCollection=“false”
      TypeName=“System.Decimal” UpdaterField=“true” />
     <TypeDescriptor Name=“ProductID” TypeName=“System.Int32”
      IsCollection=“false” ReadOnly=“false” UpdaterField=“true” />
    </TypeDescriptors>
   </TypeDescriptor>
  </Parameter>
 </Parameters>
 <MethodInstances>
  <MethodInstance Name=“UpdateProductInstance” Type=“Updater” />
 </MethodInstances>
</Method>
![]()
Although it is less likely that you will want to allow end users to edit the identifier of an entity instance, you can provide this capability in the Updater method. For the identifier to be updated, the Updater method must accept a separate parameter containing the new value for the identifier. This parameter must have the PreUpdaterField property set to True. The following code shows the BDC Metadata Model for the parameter and the resulting function signature.
<Parameter Name=“NewProductID” Direction=“In”>
 <TypeDescriptor Name=“ProductID” TypeName=“System.Int32”
  IsCollection=“false” PreUpdaterField=“true”
  IdentifierName=“ProductID” />
</Parameter>


public void UpdateProduct(Product ProductIn, int NewProductID){}
![]()
The Deleter method takes an Identifier as an input. The Identifier is the entity to delete. The following code shows the Deleter method model definition.
<Method Name=“DeleteProduct”>
 <Parameters>
  <Parameter Name=“ProductID” Direction=“In”>
   <TypeDescriptor Name=“ProductID” TypeName=“System.Int32”
    IdentifierEntityName=“Product”
    IdentifierEntityNamespace=“AdventureworksConnector.ProductModel”
    IdentifierName=“ProductID” />
  </Parameter>
 </Parameters>
 <MethodInstances>
  <MethodInstance Name=“DeleteProduct” Type=“Deleter” />
 </MethodInstances>
</Method>
![]()
Visual Studio offers you a list of several methods to create and even builds the correct function signature for you. The only modification you must make is to remove the static keyword from the signatures. Then the methods can be implemented with the following code.
public Product CreateProduct(Product ProductIn)
{
    AdventureworksCatalog catalog =
     new AdventureworksCatalog(GetConnectionInfo());
    AdventureworksData.Product newProduct = new AdventureworksData.Product()
    {
        ProductName = ProductIn.Name,
        ProductNumber = ProductIn.Number,
        ProductColor = ProductIn.Color,
        ProductPrice = ProductIn.Price,
        ProductDescription = ProductIn.Description
    };

    catalog.AddToProducts(newProduct);
    catalog.SaveChanges();

    ProductIn.ProductID = newProduct.ProductID;
    return ProductIn;
}

public void UpdateProduct(Product ProductIn)
{
    AdventureworksCatalog catalog =
     new AdventureworksCatalog(GetConnectionInfo());

    AdventureworksData.Product product =
     catalog.Products.First(p => p.ProductID == ProductIn.ProductID);

    product.ProductName = ProductIn.Name;
    product.ProductNumber = ProductIn.Number;
    product.ProductColor = ProductIn.Color;
    product.ProductDescription = ProductIn.Description;
    product.ProductPrice = ProductIn.Price;

    catalog.SaveChanges();
}

public void DeleteProduct(int ProductID)
{
    AdventureworksCatalog catalog =
     new AdventureworksCatalog(GetConnectionInfo());
    AdventureworksData.Product product =
     catalog.Products.First(p => p.ProductID == ProductID);
    catalog.DeleteObject(product);
    catalog.SaveChanges();
}
![]()
Adding a StreamAccessor Method
The .NET Assembly Connector supports far more method stereotypes than SPD. Because of this support, .NET Assembly Connectors are often written solely to implement stereotypes not available in SPD. A good example of one of these additional methods is the StreamAccessor. The StreamAccessor method is used to return a stream from the .NET Assembly Connector typically associated with a file. In the walkthrough, the external system contained a photo for each product. You can use StreamAccessor to return the photo. The input parameter is the identifier and the output parameter is the stream. The following code shows the BDC Metadata Model for the StreamAccessor method definition.
<Method Name=“ReadPhoto”>
 <Parameters>
  <Parameter Name=“ProductID” Direction=“In”>
   <TypeDescriptor Name=“ProductID” TypeName=“System.Int32”
    IdentifierName=“ProductID” IsCollection=“false” />
  </Parameter>
  <Parameter Name=“Photo” Direction=“Return”>
   <TypeDescriptor Name=“PhotoTypeDescriptor” TypeName=“System.Stream” />
  </Parameter>
 </Parameters>
 <MethodInstances>
  <MethodInstance Name=“ReadPhotoInstance” Type=“StreamAccessor”
   ReturnParameterName=“Photo”
   ReturnTypeDescriptorPath=“PhotoTypeDescriptor” />
 </MethodInstances>
</Method>
![]()
Implementing StreamAccessor is a matter of reading the file contents and returning them as a stream. In this case, the file is kept as a BLOB in the database. The following code shows how the method is implemented in the walkthrough.
public Stream ReadPhoto(int ProductID)
{
    AdventureworksCatalog catalog =
     new AdventureworksCatalog(GetConnectionInfo());

    var q = from p in catalog.Products
            where p.ProductID == ProductID
            select p;

    if (q.Count() == 1)
    {
        byte[] buffer = q.First().ProductPhoto;
        return new MemoryStream(buffer);
    }
    else
        return null;
}
![]()
StreamAccessor methods are not supported in external lists, but they are supported in the External Data web parts. Of course, you can also use the BDC runtime API to call the method in your own custom code as well. Entities that expose StreamAccessor show a hyperlink in the External Data web part that will allow a download of the file. This hyperlink opens the DownloadExternalData.aspx page, sending a set of query string parameters to invoke the StreamAccessor method for the correct entity instance. The MIMETypeField and MIMEType properties of the MethodInstance element can be used to specify the MIME type of the ECT, which determines which application is used to open the document.
Creating Associations Among Entities
In production systems you will undoubtedly define multiple ECTs, and these ECTs will have relationships among themselves. In the walkthrough, each product was assigned to a category, so it makes sense that there should be a new ECT to represent the category, and that it should be related to the Product. To get started, a new entity named Category was created, along with the Finder and SpecificFinder methods. The process of creating the new ECT is identical to the process of creating the Product entity.
In addition to the new Category entity being created, the Product entity must be updated to contain the CategoryID of the associated category. The model, entity class, and service class will all require changes to support the new CategoryID field. The changes, however, are straightforward and similar to those required by the other fields defined in the entity.
After the entities are defined, you can define an association using the Association item in the toolbox. This item works a little differently than most toolbox items. Instead of dragging and dropping the shape, you must click the shape in the toolbox. Then you can click the one (parent) entity and drag an association to the many (child) entity.
When you create the association, Visual Studio presents the Association Editor dialog box. In this dialog box, you must map each TypeDescriptor that represents the foreign key from the many (child) entity to the one (parent) entity. In the walkthrough, each of the TypeDescriptors representing the CategoryID in the Product entity was mapped to the CategoryID Identifier in the Category entity.
The Association Editor creates a one-to-many association and a reverse association by default. The one-to-many association returns all child entity instances for a given parent and the reverse association returns the parent entity instance for a given child. In the case of the walkthrough, only the one-to-many association was retained; the reverse association was deleted.
When the Association Editor dialog box is closed, the underlying model is updated with AssociationNavigator methods. These methods pass in an identifier and return associated entities. In the walkthrough, Category Identifier was passed in and multiple Product entity instances were returned. The following code shows the resulting model XML.
<Method Name=“CategoryToProduct”>
 <Parameters>
  <Parameter Name=“categoryID” Direction=“In”>
   <TypeDescriptor Name=“CategoryID” TypeName=“System.Int32”
    IdentifierEntityName=“Category”
    IdentifierEntityNamespace=“AdventureworksConnector.ProductModel”
    IdentifierName=“CategoryID”
    ForeignIdentifierAssociationEntityName=“Category”
    ForeignIdentifierAssociationEntityNamespace=
      “AdventureworksConnector.ProductModel”
    ForeignIdentifierAssociationName=
      “CategoryToProductAssociationNavigator” />
  </Parameter>
  <Parameter Name=“productList” Direction=“Return”>
   <TypeDescriptor Name=“ProductList”
   TypeName=“System.Collections.Generic.IEnumerable`1[
   [AdventureworksConnector.ProductModel.Product, ProductSystem]]”
   IsCollection=“true”>
    <TypeDescriptors>
     <TypeDescriptor Name=“Product” IsCollection=“false”
      TypeName=“AdventureworksConnector.ProductModel.Product, ProductSystem”>
      <TypeDescriptors>
       <TypeDescriptor Name=“Color” TypeName=“System.String” />
       <TypeDescriptor Name=“Description” TypeName=“System.String” />
       <TypeDescriptor Name=“Name” TypeName=“System.String” />
       <TypeDescriptor Name=“Number” TypeName=“System.String” />
       <TypeDescriptor Name=“Price” IsCollection=“false”
        TypeName=“System.Decimal” />
       <TypeDescriptor Name=“ProductID” IsCollection=“false”
        ReadOnly=“true” TypeName=“System.Int32”
        IdentifierEntityName=“Product”
        IdentifierEntityNamespace=“AdventureworksConnector.ProductModel”
        IdentifierName=“ProductID” />
       <TypeDescriptor Name=“CategoryID”
        IdentifierEntityNamespace=“AdventureworksConnector.ProductModel”
        IdentifierEntityName=“Category” IdentifierName=“CategoryID”
        ForeignIdentifierAssociationEntityNamespace=
         “AdventureworksConnector.ProductModel”
        ForeignIdentifierAssociationEntityName=“Category”
        ForeignIdentifierAssociationName=
         “CategoryToProductAssociationNavigator”
        IsCollection=“false” TypeName=“System.Int32” />
      </TypeDescriptors>
     </TypeDescriptor>
    </TypeDescriptors>
   </TypeDescriptor>
  </Parameter>
 </Parameters>
 <MethodInstances>
  <Association Name=“CategoryToProductAssociatioriNavigator”
   Type=“AssociationNavigator” ReturnParameterName=“productList”
   ReturnTypeDescriptorPath=“ProductList”>
  <SourceEntity Name=“Category”
   Namespace=“AdventureworksConnector.ProductModel” />
  <DestinationEntity Name=“Product”
   Namespace=“AdventureworksConnector.ProductModel” />
  </Association>
 </MethodInstances>
</Method>
![]()
Function stubs are created in the service class for each AssociationNavigator method. Implementing these methods requires executing the necessary code to return the required entities. The following code shows the implementation for the walkthrough.
public IList<Product> CategoryToProduct(int categoryID)
{
    AdventureworksCatalog catalog =
     new AdventureworksCatalog(GetConnectionInfo());

    var q = from p in catalog.Products
            where p.CategoryID == categoryID
            orderby p.ProductName
            select p;

    List<Product> products = new List<Product>();

    foreach (var i in q)

                                 {
               products.Add(
                   new Product()
                   {
                       ProductID = i.ProductID,
                       Name = i.ProductName,
                       Number = i.ProductNumber,
                       Description = i.ProductDescription,
                       Color = i.ProductColor,
                       Price = i.ProductPrice,
                       CategoryID = i.CategoryID
                   });
            }

            return products;
}
![]()
Understanding Non–Foreign Key Relationships
Although it is common to have associations between entities through foreign keys, that is not always the case. The situation in which you're most likely to find a non–foreign key relationship is that of a many-to-many relationship. A database may be designed, for example, to keep the relationships in a separate table so that they are not directly available through a foreign key.
In addition to the AssociationNavigator methods, you might need to include Associator and Disassociator methods. These are intended to modify the data in the external system that manages the relationship. You can use the methods to modify the table that contains a many-to-many relationship in the database.
As a quick sidebar example, consider an external system that relates people to action items. A table named Resources maintains information about the people, whereas a table named ActionItems maintains tasks. In the system design, many tasks can be assigned to a single resource and many resources can be assigned to a single task. Your application will want to show the tasks assigned to a given resource and show the resources assigned to a given task. In this case you use the Association Editor, but uncheck the Is Foreign Key Association check box. Additionally, you will add Associator and Disassociator methods.
The Associator and Disassociator methods have two input parameters. These are the identifiers of the entity instances to associate or disassociate. In code you can use these values to modify the table defining the many-to-many relationship. The following code shows the BDC Metadata Model for the Associator method.
<Method Name=“AssociateResourceToTask”>
 <Parameters>
  <Parameter Name=“resourceID” Direction=“In”>
   <TypeDescriptor Name=“ResourceID” TypeName=“System.Int32”
    IdentifierEntityName=“Resource”
    IdentifierEntityNamespace=“ActionItems.ActionItemsModel”
    IdentifierName=“ResourceID”
    ForeignIdentifierAssociationEntityName=“Resource”
    ForeignIdentifierAssociationEntityNamespace=“ActionItemsModel”

    ForeignIdentifierAssociationName=“AssociateResourceToTaskAssociator” />
  </Parameter>
  <Parameter Name=“taskID” Direction=“In”>
   <TypeDescriptor Name=“TaskID” TypeName=“System.Int32”
    IdentifierEntityName=“Task”
    IdentifierEntityNamespace=“ActionItemsModel”
    IdentifierName=“TaskID” />
  </Parameter>
 </Parameters>
 <MethodInstances>
  <Association Name=“AssociateResourceToTaskAssociator” Type=“Associator”>
   <SourceEntity Name=“Resource” Namespace=“ActionItemsModel” />
   <DestinationEntity Name=“Task” Namespace=“ActionItemsModel” />
  </Association>
 </MethodInstances>
</Method>
![]()
Testing the Connector
Once the .NET Assembly Connector is complete, you can deploy and test it. Using the connector developed in the walkthrough, you should be able to create external lists and use the External Data web parts. The associations between the entities should result in appropriate pickers appearing when entity instances are created or edited. As with all features created in Visual Studio 2010, you can easily debug the .NET Assembly Connector by setting breakpoints in the code and pressing F5.
Handling Runtime and Validation Errors
Handling runtime and validation errors in connectors is straightforward because unhandled errors are simply bubbled back up to the browser and displayed in the external list. The general approach is to handle any errors within the connector code when it makes sense to do so, but if the error needs to be returned to the user, a Microsoft.BusinessData.Runtime.RuntimeException should be thrown instead. The RuntimeException class has several derivations that are useful for connectors, but it is easiest to just throw a LobBusinessErrorException, which is the most generic derivation.
PACKAGING CONSIDERATIONS
As with all SharePoint projects, Business Data Connectivity Model projects are packaged for deployment as cabinet files with a .wsp extension. When projects containing BDC Metadata Models are packaged in WSP files, special attention must be given to the values set for the feature properties. Feature properties are set within Visual Studio 2010 and appear as Property elements within the Feature.xml file of the project. Business Data Connectivity Model projects have five key feature properties, as shown in the following code.
<?xml version=“1.0” encoding=“utf-8”?>
<Feature xmlns=“http://schemas.microsoft.com/sharepoint/”
 Description=“A .NET Assembly Connector”
 Id=“bc975901-3142-4fbf-9e3c-1f124b6c890d”
 ReceiverAssembly=“…”
 ReceiverClass=“…”
 Scope=“Farm”
 Title=“My Connector”>
  <Properties>
    <Property Key=“GloballyAvailable” Value=“true” />
    <Property Key=“MyModel”
     Value=“BdcAssembliesMyConnector.dll” />
    <Property Key=“IncrementalUpdate” Value=“true” />
    <Property Key=“ModelFileName” Value=“MyModelMyModel.bdcm” />
    <Property Key=“SiteUrl” Value=“http://awserver/bcs/” />
  </Properties>
  <ElementManifests>
    <ElementFile Location=“MyModelMyModel.bdcm” />
    <ElementFile Location=“BdcAssembliesMyConnector.dll” />
  </ElementManifests>
</Feature>
Most of the properties in the file are set by Visual Studio and do not require any editing. However, these properties should always be verified before packaging. Renaming elements during development and the particulars of the target SharePoint environment may necessitate changes to the values.
The first property is GloballyAvailable. All BDC Metadata Models are available globally in SharePoint. The GloballyAvailable property is set to true as part of the project template and should not be changed.
The second property uses the name of the LobSystem as the Key. The Value references the assembly that implements the operations defined in the model. This property is set by Visual Studio and generally does not need to be changed. In some scenarios, this property may be set incorrectly if you rename LobSystem after creating operations in the BDC Metadata Model.
The third property is the IncrementalUpdate property, and it supports modifying parts of the BDC Metadata Model. This property is set by Visual Studio and also does not need to be changed.
The fourth property is ModelFileName. This property references the BDCM file that contains the model. This property is set by Visual Studio and generally does not need to be changed. In some scenarios, this property may be set incorrectly if you rename the model during development.
The fifth property is SiteUrl. This property is used to identify the BDC Service Application where the BDC Metadata Model should be deployed. The SiteUrl property is not present by default in the Business Data Connectivity Model project. When the property is not present, the deployment assumes a value for the property of http://localhost:80. This means that the BDC Metadata Model will be deployed to the BDC Service Application associated with the site located at http://localhost:80. If, however, no site exists at http://localhost:80, the deployment fails. In this case, you must explicitly set the SiteUrl value to reference a site associated with the correct BDC Service Application.
You can review and modify the Feature properties directly in Visual Studio 2010. First, select the BDC Metadata Model project item in the Solution Explorer. Second, select Feature Properties from the Properties window, which will open a dialog box. Finally, set the property values in the dialog box.
ENABLING SEARCH SUPPORT
When creating BCS solutions, you are required to define at least Finder and SpecificFinder methods to support the creation of external lists. Additionally, these methods are used to support indexing and search. To enable SharePoint to search an external system through the BDC Metadata Model, you must include a RootFinder property in a Finder method instance. The following code shows how the property is used.
<MethodInstances>
 <MethodInstance Type=“Finder” ReturnParameterName=“Read List”
  Default=“true” Name=“Read List” DefaultDisplayName=“Product Read List”>
  <Properties>
   <Property Name=“RootFinder” Type=“System.String”></Property>
  </Properties>
 </MethodInstance>
</MethodInstances>
![]()
Notice that the RootFinder property has no value. If you include a value for this property, it is simply ignored. Sometimes you may see a value of x in the property, but this is simply a style choice. The presence of the property is enough to designate the Finder method as the RootFinder.
Although the RootFinder property is the only one necessary to support indexing the external system, an additional property is required to allow the ECT to be selected as a content source in the search service application (SSA). The ShowInSearchUI property must be present on the LobSystemInstance for the ECT to be selectable as a content source. The following code shows the property.
<LobSystemInstances>
 <LobSystemInstance Name=“AWProducts”>
  <Properties>
   <Property Name=“AuthenticationMode” Type=“System.String”>
    PassThrough
   </Property>
   <Property Name=“DatabaseAccessProvider” Type=“System.String”>
    SqlServer
   </Property>
   <Property Name=“RdbConnection Data Source” Type=“System.String”>
    AWSERVER
   </Property>
   <Property Name=“RdbConnection Initial Catalog” Type=“System.String”>
    AdventureworksProducts
   </Property>
   <Property Name=“RdbConnection Integrated Security” Type=“System.String”>
    SSPI
   </Property>
   <Property Name=“RdbConnection Pooling” Type=“System.String”>
    True
   </Property>
   <Property Name=“ShowInSearchUI” Type=“System.String”></Property>
  </Properties>
 </LobSystemInstance>
</LobSystemInstances>
![]()
Just like the RootFinder property, the ShowInSearchUI property does not require a value. Its presence is enough to allow the ECT to appear as a content source in the SSA. Again, as with the RootFinder property, you may occasionally see examples in which this property has a value of x.
Once the RootFinder and ShowInSearchUI properties are added to the model, you can configure the ECT as a content source. Simply create a new content source in the SSA and select Line of Business Data as the type. All the ECTs with the ShowInSearchUI property appear next to check boxes. Check the ECT and you can immediately begin a full crawl of the external system, provided the account performing the crawl has permission to use the BDC Metadata Model and can access the external system. Figure 12-4 shows the Add Content Source page with some ECTs visible.

FIGURE 12-4
In addition to full crawls, BCS solutions can also support incremental crawls with the LastModifiedTimeStampField property. This property has a value that refers to a DateTime field, which indicates the last time the item was modified. If the item has not been modified since the last incremental crawl, it isn't included in the current incremental crawl. The following code shows an example of the property mapping to a field in the ECT named ChangedDateTime. This mapping specifies that the ChangedDateTime field in the external system will be used to determine whether the row of data has changed since the last crawl.
<MethodInstances>
 <MethodInstance Type=“Finder” ReturnParameterName=“Read List”
  Default=“true” Name=“Read List” DefaultDisplayName=“Product Read List”>
  <Properties>
   <Property Name=“RootFinder” Type=“System.String”></Property>
   <Property Name=“LastModifiedTimeStampField” Type=“System.String”>
    ChangedDateTime
   <Property Name=“UseClientCachingForSearch”
             Type=“System.String”></Property>
  </Properties>
   </Property>
  </Properties>
 </MethodInstance>
</MethodInstances>
![]()
When defining an ECT in the SharePoint Designer, you can designate a field that supports incremental crawls by checking the Timestamp Field box when defining the Finder method in the wizard. Checking this box adds the LastModifiedTimeStampField property to the model and sets the property value to the designated field.
Along with the LastModifiedTimeStampField property, note the use of the UseClientCachingForSearch property in the Metadata Model. The presence of this property indicates that the RootFinder is capable of returning all content for an entity instance within an 8KB data block. This tells the crawler that it does not need to make a subsequent call to the SpecificFinder method because all required data was returned from the RootFinder. Note that the cache size is fixed and works on a per-item basis, so only those items that cannot return all required data result in an additional call. If the UseClientCachingForSearch property is not present, the LastModifiedTimeStampField property must also be included under the SpecificFinder method instance because it will be called for each item crawled. It is generally a good idea to use the UseClientCachingForSearch property whenever possible, because it makes crawling more efficient.
Search results are displayed in the results page by the Core Search Results web part. The columns that appear in the search results are specified by the Fetched Properties property located under the Display Properties category. Although you can customize the list of columns that appear in search results, it is not necessary for simple BCS solutions. Fields defined in the Metadata Model can be mapped to the Title, Author, and Description fields by means of simple properties. In more complex scenarios, the hyperlink in the search results can be directed to an external system that supports hyperlink access.
You can map the Title field in the search results by using the Title property under the Entity element in the Metadata Model. The value of the Title property refers to the name of the ECT field that should be used for the Title field. The Title field will then be used as the header for each entity instance in the search results. When creating ECTs in SPD you can set the Title property through the Ribbon. You can display the ECT in SPD and then select from the list of available field names. The following code maps the ProductName field of the Entity to the Title field of the search results.
<Entity Namespace=“http://aw/bcs” Version=“1.0.0.0”
 EstimatedInstanceCount=“10000” Name=“AWProduct”
 DefaultDisplayName=“AWProduct”>
 <Properties>
  <Property Name=“Title” Type=“System.String”>ProductName</Property>
 </Properties>
</Entity>
![]()
The Author, Description, and Link fields in the search results are mapped through the AuthorField, DescriptionField, and DisplayUriField properties, respectively. The values of these properties map to fields in the ECT. The SharePoint Designer does not support the creation of these properties through its tooling; they must be manually added to the Metadata Model, as in the following code.
<MethodInstances>
 <MethodInstance Name=“ReadAllItems” Type=“Finder”
  ReturnParameterName=“documentList”
  ReturnTypeDescriptorPath=“DocumentList”
  DefaultDisplayName=“Read All Items” Default=“true”>
  <Properties>
   <Property Name=“RootFinder” Type=“System.String”></Property>
   <Property Name=“LastModifiedTimeStampField” Type=“System.String”>
    Modified
   </Property>
   <Property Name=“DisplayUriField” Type=“System.String”>
    Url
   </Property>
   <Property Name=“DescriptionField” Type=“System.String”>
    Description
   </Property>
   <Property Name=“AuthorField” Type=“System.String”>
    Author
   </Property>
   <Property Name=“UseClientCachingForSearch”
             Type=“System.String”></Property>   </Properties>
 </MethodInstance>
</MethodInstances>
![]()
If the UseClientCachingForSearch property is present, the AuthorField, DescriptionField, and DisplayUriField properties need be defined only beneath the RootFinder. If the UseClientCachingForSearch property is not present, these properties must also be defined under the SpecificFinder method instance.
WORKING WITH THE BDC SERVER RUNTIME OBJECT MODEL
The BDC Server Runtime object model is the API used to write custom solutions that run on the SharePoint 2010 server and utilize BCS artifacts. Using the object model is fairly straightforward, but it gives you significant control over how and when operations are performed. Additionally, using the object model allows you to create custom user interface elements such as console applications and web parts.
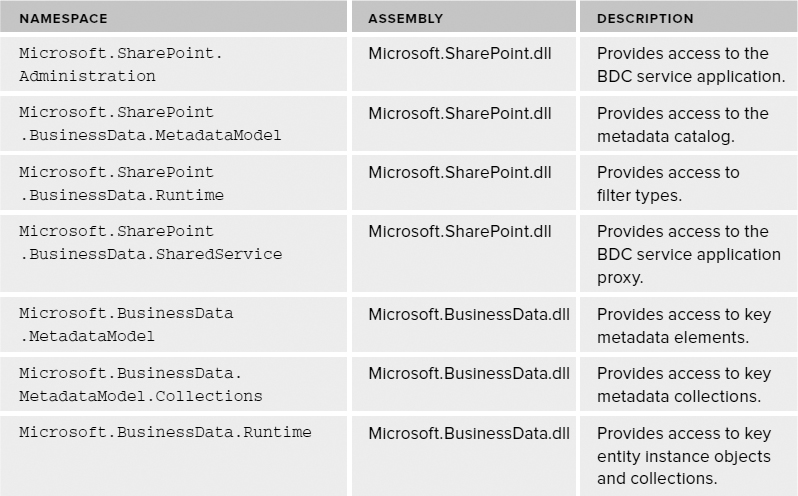
The BDC Server Runtime object model is contained in the Microsoft.SharePoint.dll and Microsoft.BusinessData.dll assemblies. Both of these assemblies are located in the ISAPI directory. Any solution you create needs a reference to both of these assemblies, which contain many namespaces. Table 12-1 lists the key namespaces used when working with the BDC Server Runtime object model and the following code shows the typical using statements.
//Reference to Microsoft.SharePoint.dll
using Microsoft.SharePoint;
using Microsoft.SharePoint.Administration;
using Microsoft.SharePoint.BusinessData;
using Microsoft.SharePoint.BusinessData.Runtime;
using Microsoft.SharePoint.BusinessData.SharedService;
using Microsoft.SharePoint.BusinessData.MetadataModel;

//Reference to Microsoft.BusinessData.dll
using Microsoft.BusinessData;
using Microsoft.BusinessData.MetadataModel;
using Microsoft.BusinessData.Runtime;
using Microsoft.BusinessData.MetadataModel.Collections;
![]()
TABLE 12-1: Key Namespaces
Connecting to the Metadata Catalog
To execute code against BCS solutions using the BDC Server Runtime, you must establish a connection to the metadata catalog where the ECTs are stored. The first step in this process is to make a connection to the BDC Service Application. You establish this connection in different ways, depending upon whether your code is running within a SharePoint context or is simply on the SharePoint server. In either case, however, you'll use the Microsoft.SharePoint.SPServiceContext class.
The SPServiceContext class allows your code to communicate with SharePoint service applications. When your code is running inside of a SharePoint context (for example, a custom web part), you can use the Current property to retrieve the current service context. The GetDefaultProxy() method may then subsequently be used to get the service proxy for any service. If your code is running outside of a SharePoint context (for example, a console application), the context must be explicitly set using a SPSite object. In either case, you then use the Microsoft.SharePoint.BusinessData.SharedService.BdcServiceApplicationProxy class to get a reference to the BDC Service Application proxy. The GetDefaultProxy() method of the SPServiceContext class returns the default service application proxy for the type specified. The GetProxies() method returns all available service application proxies for the type specified. The following code shows first how to get the default BdcServiceApplicationProxy object from within a SharePoint context and then from outside of a SharePoint context.
//Within SharePoint Context
BdcServiceApplicationProxy proxy =
  (BdcServiceApplicationProxy)SPServiceContext.Current.
   GetDefaultProxy(typeof(BdcServiceApplicationProxy));

//Outside SharePoint Context
using (SPSite site = new SPSite(siteCollectionUrl))
{
    BdcServiceApplicationProxy proxy =
    (BdcServiceApplicationProxy)SPServiceContext.GetContext(site).
     GetDefaultProxy(typeof(BdcServiceApplicationProxy));
}
In addition to using the BdcServiceApplicationProxy object to establish context, you can also use the Microsoft.SharePoint.BusinessData.SharedService.BdcService class. The BdcService class is an abstraction of the BDC Service Application, which is useful for determining whether a BDC Service Application is available in the farm. The following code shows how to check the availability of the BDC Service Application in a farm.
BdcService service = SPFarm.Local.Services.GetValue<BdcService>();

    if (service == null)
        throw new Exception(“No BDC Service Application found.”);
Once you have established a context, you can connect to the metadata catalog in the BDC Service Application. The metadata catalog on the server is represented by the Microsoft.SharePoint.BusinessData.MetadataModel.DatabaseBackedMetadataCatalog class. Both the BdcServiceApplicationProxy object and the BdcService object are capable of returning a DatabaseBackedMetadataCatalog object. The following code shows both approaches.
//Using BdcServiceApplicationProxy
DatabaseBackedMetadataCatalog catalog =
  proxy.GetDatabaseBackedMetadataCatalog();

//Using BdcService
DatabaseBackedMetadataCatalog catalog =
  service.GetDatabaseBackedMetadataCatalog(
  SPServiceContext.GetContext(site));
Retrieving Model Elements
Once you establish a connection to the metadata catalog, you can retrieve elements of the BDC Metadata Models. This includes ECTs, systems, and operations. The purpose of retrieving these items is to execute the defined method instances against the defined external system. The DatabaseBackedMetadataCatalog class has five methods for retrieving model elements: GetEntity(),GetEntities(), GetLobSystem(), GetLobSystems(), and GetById().
Typically, your solution will start by retrieving a reference to the ECTs that represent the data you want to use. The simplest way to retrieve an ECT is to use the GetEntity() method passing in the name and namespace for the desired entity. The method returns a Microsoft.BusinessData.MetadataModel.IEntity interface representing the ECT, as shown in the following code.
IEntity ect = catalog.GetEntity(“MyNamespace”, “MyEntity”);
Although the code for retrieving an ECT is simple, it is not the most efficient. Although the BDC Server Runtime object model generally interacts with cached metadata models, the GetEntity(), GetEntities(), GetLobSystem(), and GetLobSystems() methods do not. Instead, they call directly to the Metadata Catalog database, which is less efficient. The solution to this problem is to use the GetById() method to retrieve the ECTs and LobSystems. The GetById() method takes the ID and type of the element to return and executes against the cached model. The challenge in using the GetById() method is determining the ID of the desired element. The best approach is to use the GetEntity() method on the first call and save the ID of the element for future use. The following code shows the relationship between the GetEntity() method and the GetById() method.
//Get Entity the easy way on first call
IEntity ect = catalog.GetEntity(entityNamespace, entityName);

//Save Entity data
uint ectId = Convert.ToUInt32(ect.Id);
Type ectType = ect.GetType();

//Get Entity the fast way on subsequent calls
ect = (IEntity)catalog.GetById(ectId, ectType);
Along with retrieving ECTs and LobSystems from the DatabaseBackedMetadataCatalog object, many objects have methods for retrieving related objects. For example, the GetLobSystem() method of the IEntity interface returns the related LobSystem for the ECT. In this way, you can retrieve whatever model elements are required for your application.
Executing Operations
The whole point of connecting to the metadata catalog and retrieving the ECT is to allow for the execution of the operations defined as method instances within the BDC Metadata Model. With full access to the operations, you can create complete custom applications. These applications can use any of the available method stereotypes, thus leaving behind any of the limitations found in the SharePoint Designer and the Business Data web parts.
The approach used to execute an operation varies slightly from stereotype to stereotype. In the case of the Finder methods, for example, you must first retrieve the method instance before executing. This is because a BDC Metadata Model may define multiple Finder methods. In the case of the Creator, Updater, and Deleter methods, the object model provides a more direct approach because only a single method instance of these stereotypes can exist in the model for any entity.
Along with specific support for various stereotypes, discussed later in the chapter, the object model also provides generic support to execute any method instance. The following code shows a console application that uses the Execute() method of the IEntity to execute a Finder method and display the results. This code works for any model and any Finder method based on the arguments passed to it.
static void Main(string[] args)
{
    try
    {

        if (args.Count() != 5)
            throw new Exception(“Usage: ExecuteFinder.exe
                                 SiteCollectionUrl,
                                 LobSystemInstance,
                                 EntityName,
                                 EntityNamespace,
                                 FinderMethodInstance”);

        string siteCollectionUrl = args[0];
        string lobSystemInstance = args[1];
        string entityName = args[2];
        string entityNamespace = args[3];
        string finderMethodInstance = args[4];

        using (SPSite site = new SPSite(siteCollectionUrl))
        {
            //Connect to the BDC Service Application proxy
            BdcService service =
              SPFarm.Local.Services.GetValue<BdcService>();

            if (service == null)
                throw new Exception(“No BDC Service Application found.”);

            //Connect to metadata catalog
            DatabaseBackedMetadataCatalog catalog =
              service.GetDatabaseBackedMetadataCatalog(
              SPServiceContext.GetContext(site));

            //Get Entity

            IEntity ect = catalog.GetEntity(entityNamespace, entityName);

           //Get LobSystem
           ILobSystem lob = ect.GetLobSystem();

           //Get LobSystemInstance
           ILobSystemInstance lobi =
             lob.GetLobSystemInstances()[lobSystemInstance];

           //Get Method Instance
           IMethodInstance mi =
             ect.GetMethodInstance(finderMethodInstance,
                                   MethodInstanceType.Finder);

           //Execute
           IEnumerable items = (IEnumerable)ect.Execute(mi, lobi);

           //Display
           foreach (Object item in items)
           {
               PropertyInfo[] props = item.GetType().GetProperties();

               foreach (PropertyInfo prop in props)
               {
                   Console.WriteLine(prop.GetValue(item, null));
               }
            }
        }
    }
    catch (Exception x)
    {
        Console.WriteLine(x.Message);
    }
}
![]()
When executing methods using the generic approach provided by the Execute() method, you often need to pass in parameters such as when you execute a SpecificFinder method. In these cases, you must retrieve the required parameters from the method and set them. The following code snippet shows how to do this for a SpecificFinder method associated with a BDC Metadata Model that uses the SQL connector.
//Get Method Instance
IMethodInstance mi = ect.GetMethodInstance(specificFinderMethodInstance,
  MethodInstanceType.SpecificFinder);

//Get Parameters
IParameterCollection parameters = mi.GetMethod().GetParameters();

//Set Parameters
object[] arguments = new object[parameters.Count];
arguments[0] = entityInstanceIdentifier;

//Execute
ect.Execute(mi, lobi, ref arguments);

//Display
PropertyInfo[] props = arguments[1].GetType().GetProperties();
PropertyInfo prop = props[0];
SqlDataReader reader = (SqlDataReader)(prop.GetValue(arguments[1], null));

if (reader.HasRows)
{
    while (reader.Read())
    {
        Console.WriteLine(reader.GetString(3) + “ ” + reader.GetString(5));
    }
}
![]()
In the code, note how the arguments are passed by reference to the Execute() method. This is required because the Return parameter is placed in the array during execution. You can then read the Return parameter and cast it to an appropriate type for display. In the code sample, the Return parameter is cast to a SqlDataReader, which is the type returned from methods that use the SQL connector.
Although CRUD operations are certainly the most common in BCS solutions, accessing documents through streams is often a critical part of any SharePoint solution. Therefore, the StreamAccessor stereotype stands out as important. The Execute() method can be used to invoke a StreamAccessor method and return a stream for downloading. The following code shows a typical StreamAccessor method defined in a BDC Metadata Model.
<Method Name=“ReadContents” DefaultDisplayName=“Read Contents”>
 <Parameters>
  <Parameter Name=“id” Direction=“In”>
   <TypeDescriptor Name=“ID” IdentifierName=“ID”
    TypeName=“System.Int32” IsCollection=“false” />
  </Parameter>
  <Parameter Name=“contents” Direction=“Return”>
   <TypeDescriptor Name=“Contents” TypeName=“System.IO.Stream” />
  </Parameter>
 </Parameters>
 <MethodInstances>
  <MethodInstance Name=“ReadContents” Type=“StreamAccessor” ReturnParameterName=“contents” ReturnTypeDescriptorPath=“Contents”
   DefaultDisplayName=“ReadContents”>
  </MethodInstance>
 </MethodInstances>
</Method>
The method instance returns a System.IO.Stream object based on a System.Int32 value. You can use the Execute() method to invoke the StreamAccessor. The following code shows how the method instance can be invoked and the stream downloaded to the client based on query string parameters passed into an ASPX page.
//Connect to server-side BCS
BdcServiceApplicationProxy proxy =
  (BdcServiceApplicationProxy)SPServiceContext.
  Current.GetDefaultProxy(typeof(BdcServiceApplicationProxy));

DatabaseBackedMetadataCatalog catalog =
  proxy.GetDatabaseBackedMetadataCatalog();

IEntity ect = catalog.GetEntity(“MyNamespace”, “DocumentECT”);
ILobSystem lob = ect.GetLobSystem();
ILobSystemInstance lobi = lob.GetLobSystemInstances()[“MyDMSInstance”];
IMethodInstance mi =
  ect.GetMethodInstance(“ReadContents”,
                       MethodInstanceType.StreamAccessor);

//Call BCS to get stream
object[] args = { int.Parse(Request.QueryString[“DocumentId”]), null };
ect.Execute(mi, lobi, ref args);
byte[] buffer = ((MemoryStream)args[1]).ToArray();

//Download
this.Page.Response.Clear();
this.Page.Response.ClearHeaders();
this.Page.Response.AddHeader(“Content-Disposition”,
  “attachment; filename=“” + Request.QueryString[“fileName”] + ”“”);
this.Page.Response.AddHeader(“Content-Length”, buffer.Length.ToString());
this.Page.Response.BinaryWrite(buffer);
this.Page.Response.Flush();
this.Page.Response.End();
Although the Execute() method provides good functionality for executing any method instance, most often the application code is tailored for the specific stereotype being invoked. The following sections detail the support provided by the BDC Server Runtime object model for invoking specific method stereotypes.
Executing Finder Methods
Finder methods are the backbone of any custom BCS application. To invoke a Finder method instance, you use the FindFiltered() method of the IEntity. The FindFiltered() method returns entity instances from a Finder method using filter criteria. Table 12-2 shows the overloads available for the FindFiltered() method.
TABLE 12-2: The FindFiltered() Method
| SIGNATURE | DESCRIPTION |
| FindFiltered(IFilterCollection, ILobSystemInstance) | Executes the default Finder method using the given filters. |
| FindFiltered(IFilterCollection, String,ILobSystemInstance) | Executes a named Finder method using the given filters. |
| FindFiltered(IFilterCollection, String, ILobSystemInstance, OperationMode) | Executes a named Finder method using the given filters and operation mode. |
If the method is the default Finder method, its name does not need to be provided. If the Finder method to execute is not the default, its name is provided as a String value to the FindFiltered() method. Be careful to use the name of the method instance as defined in the BDC Metadata Model and not the name of the method.
If the Finder method defines filters (such as a limit, wildcard, or page filter), these values must be provided in the call to the FindFiltered() method. An IFilterCollection can be returned by calling the GetFilters() method of the IMethodInstance. The values for the filters can then be set. The following code shows how to get the filter collection and set values.
IMethodInstance mi = ect.GetMethodInstance(FinderMethodInstanceName,
                                           MethodInstanceType.Finder);
IFilterCollection filters = mi.GetFilters();
(filters[0] as LimitFilter).Value = 10;
(filters[1] as PageNumberFilter).Value = 2;
(filters[3] as WildcardFilter).Value = “Bike”;
(filters[4] as ComparisonFilter).Value = “CN123720”;
In most applications, you already know which filters the method instance is expecting. In these cases, you can set the filters directly, as shown in the preceding code. If, however, you do not know which filters are expected, you can determine this dynamically by iterating through the collection of filters, as shown in the following code.
foreach (IFilter filter in filters)
{
    Console.WriteLine(“Filter Type:     ” +
      filter.FilterDescriptor.FilterType.ToString());
    Console.WriteLine(“Filter Field:    ” +
filter.FilterDescriptor.FilterField);
}
![]()
When executing the FindFiltered() method, you may optionally specify an OperationMode for the call that allows data to be read from a cache. However, the OperationMode has no effect on server-side operations. The presence of the OperationMode is solely to maintain complementary signatures between the BDC Client and BDC Server APIs. Remember that the server never caches data — only model elements. The OperationMode only has meaning on the client.
The FindFiltered() method returns a Microsoft.BusinessData.Runtime.IEntityInstanceEnumerator. The IEntityInstanceEnumerator object provides a forward-only collection of entity instances that you can read. After reading the entity instances from the collection, the Close() method must be called to release the resources used to access the external system. The following code shows the basic approach.
//Connect to BDC Service Application
BdcService service = SPFarm.Local.Services.GetValue<BdcService>();

if (service != null)
{
//Get Metadata elements

  DatabaseBackedMetadataCatalog catalog =
    service.GetDatabaseBackedMetadataCatalog(SPServiceContext.Current);
  IEntity ect = catalog.GetEntity(EntityNamespace, EntityName);
  ILobSystem lob = ect.GetLobSystem();
  ILobSystemInstance lobi =
    lob.GetLobSystemInstances()[LobSystemInstanceName];
}

IMethodInstance mi = ect.GetMethodInstance(FinderMethodInstanceName,
                                           MethodInstanceType.Finder);
IFilterCollection filters = mi.GetFilters();

IEntityInstanceEnumerator items =
  ect.FindFiltered(filters, FinderMethodInstanceName);

while (items.MoveNext())
{
  Console.WriteLine(items.Current[FieldName].ToString());
}

items.Close();
In addition to enumerating entity instances, you can also return entity instances in a System.Data.DataTable. You can use a DataTable to return entity instances by calling the CreateDataTable() method of the Microsoft.BusinessData.Runtime.IRuntimeHelper interface. You can obtain this interface through the Helper property of the DatabaseBackedMetadataCatalog object. The CreateDataTable() method takes an IEntityInstanceEnumerator object and builds a DataTable from it. The CreateDataTable() method can make it easier to work with entity instances because the DataTable is a familiar and flexible object. Additionally, the CreateDataTable() method supports options that allow for paging through entity instances. The following code shows an example of the CreateDataTable() method.
//Connect to BDC Service Application
BdcService service = SPFarm.Local.Services.GetValue<BdcService>();

if (service != null)
{
//Get Metadata elements
DatabaseBackedMetadataCatalog catalog =
  service.GetDatabaseBackedMetadataCatalog(SPServiceContext.Current);
IEntity ect = catalog.GetEntity(EntityNamespace, EntityName);
ILobSystem lob = ect.GetLobSystem();
ILobSystemInstance lobi =
  lob.GetLobSystemInstances()[LobSystemInstanceName];
}

IMethodInstance mi = ect.GetMethodInstance(FinderMethodInstanceName,
                                           MethodInstanceType.Finder);
IFilterCollection filters = mi.GetFilters();

IEntityInstanceEnumerator items =
  ect.FindFiltered(filters, FinderMethodInstanceName);

DataTable dt = ect.Catalog.Helper.CreateDataTable(items);
Executing SpecificFinder Methods
To invoke a SpecificFinder method, you use the FindSpecific() method of the IEntity interface. The FindSpecific() method returns an entity IEntityInstance from a SpecificFinder method given an Identifier. Table 12-3 shows the overloads available for the FindSpecific() method.
TABLE 12-3: The FindSpecific() Method
| SIGNATURE | DESCRIPTION |
| FindFiltered(Identity, ILobSystemInstance) | Executes the default SpecificFinder method with an entity instance Identity. |
| FindFiltered(IFilterCollection, ILobSystemInstance, Boolean) | Executes the default SpecificFinder method with an entity instance Identity with the option to execute immediately. |
| FindFiltered(Identity, String, ILobSystemInstance) | Executes the named SpecificFinder method with an entity instance Identity. |
| FindFiltered(Identity, String ILobSystemInstance, OperationMode) | Executes the named SpecificFinder method with an entity instance Identity in the specified OperationMode. |
| FindFiltered(Identity, String, ILobSystemInstance, Boolean) | Executes the named SpecificFinder method with an entity instance Identity with the option to execute immediately. |
| FindFiltered(Identity, String, ILobSystemInstance, OperationMode, Boolean) | Executes the named SpecificFinder method with an entity instance Identity in the specified OperationMode with the option to execute immediately. |
If the method is the default SpecificFinder method, its name does not need to be provided. If the SpecificFinder method to execute is not the default, its name is provided as a String value to the FindSpecific() method. Be careful to use the name of the method instance as defined in the BDC Metadata Model and not the name of the method.
When calling the FindSpecific() method, you will always provide an Identity object, which represents the Identifier for the desired entity instance. Simply create a new Identity object using the appropriate value and pass the object as an argument. Identity objects can be created with any data type, but be aware that string values are case sensitive when used as identifiers. The following code shows how to call the FindSpecific() method.
//Connect to BDC Service Application
BdcService service = SPFarm.Local.Services.GetValue<BdcService>();

if (service != null)
{
//Get Metadata elements
  DatabaseBackedMetadataCatalog catalog =
    service.GetDatabaseBackedMetadataCatalog(SPServiceContext.Current);
  IEntity ect = catalog.GetEntity(EntityNamespace, EntityName);
  ILobSystem lob = ect.GetLobSystem();
  ILobSystemInstance lobi =
    lob.GetLobSystemInstances()[LobSystemInstanceName];
}

//Execute SpecificFinder
int id = 5;
IMethodInstance mi =
  ect.GetMethodInstance(SpecificFinderMethodInstanceName,
                        MethodInstanceType.SpecificFinder);
IEntityInstance item =
   ect.FindSpecific(new Identity(id),
                    SpecificFinderMethodInstanceName,
                    lobi, true);
Executing Updater Methods
To invoke an Updater method, you first use the FindSpecific() method to return the entity to update. The value of the fields associated with the return entity may then be modified and those modifications are committed through the Update() method of the IEntityInstance interface. The following code shows how to use the Update() method.
//Connect to BDC Service Application
BdcService service = SPFarm.Local.Services.GetValue<BdcService>();

if (service != null)
{
//Get Metadata elements
  DatabaseBackedMetadataCatalog catalog =

    service.GetDatabaseBackedMetadataCatalog(SPServiceContext.Current);
  IEntity ect = catalog.GetEntity(EntityNamespace, EntityName);
  ILobSystem lob = ect.GetLobSystem();
  ILobSystemInstance lobi =
    lob.GetLobSystemInstances()[LobSystemInstanceName];
}

//Execute SpecificFinder
int id = 5;
IMethodInstance mi =
  ect.GetMethodInstance(SpecificFinderMethodInstanceName,
                        MethodInstanceType.SpecificFinder);
IEntityInstance item =
   ect.FindSpecific(new Identity(id),
                    SpecificFinderMethodInstanceName,
                    lobi, true);

//Update entity instance
item[“Title”] = “My Item”;
item[“Description”] =“An updated item”;

item.Update();
Executing Creator Methods
To invoke a Creator method, you use the Create() method of the IEntity interface. The Create() method returns an Identity for the new entity instance. Table 12-4 shows the overloads available for the Create() method.
TABLE 12-4: The Create() Method
| SIGNATURE | DESCRIPTION |
| Create(IFieldValueDictionary, ILobSystemInstance) | Creates an entity instance. |
| Create(IFieldValueDictionary, AssociationEntityInstancesDictionary, ILobSystemInstance) | Creates an entity instance and associates it with other entity instances. |
| Create(IFieldValueDictionary, Identity,ILobSystemInstance) | Creates an entity instance with the given identifier. |
| Create(IFieldValueDictionary, Identity, AssociationEntityInstancesDictionary, ILobSystemInstance) | Creates an entity instance with the given identifier and associates it with other entity instances. |
When calling the Create() method, you pass the values for the new entity instance in a Microsoft.BusinessData.Runtime.IFieldValueDictionary. The IFieldValueDictionary can be created from a Microsoft.BusinessData.MetadataModel.IView interface. This interface represents all of the fields that are associated with a given method instance. After obtaining the IFieldValueDictionary object, you can either set values for the new entity instance or use the default values, as shown in the following code.
//Connect to BDC Service Application
BdcService service = SPFarm.Local.Services.GetValue<BdcService>();

if (service != null)
{
//Get Metadata elements
  DatabaseBackedMetadataCatalog catalog =
    service.GetDatabaseBackedMetadataCatalog(SPServiceContext.Current);
  IEntity ect = catalog.GetEntity(EntityNamespace, EntityName);
  ILobSystem lob = ect.GetLobSystem();
  ILobSystemInstance lobi =
    lob.GetLobSystemInstances()[LobSystemInstanceName];
}

//Create new entity instance with default values
IView createView = ect.GetCreatorView(CreatorMethodInstanceName);
IFieldValueDictionary fieldValueDictionary = createView.GetDefaultValues();
ect.Create(fieldValueDictionary, lobi);
Executing Deleter Methods
To invoke a Deleter method, you first use the FindSpecific() method to return the entity instance to delete. You can then delete the entity instance using the Delete() method of the IEntityInstance interface. The following code shows how to use the Delete() method.
//Connect to BDC Service Application
BdcService service = SPFarm.Local.Services.GetValue<BdcService>();

if (service != null)
{
//Get Metadata elements
  DatabaseBackedMetadataCatalog catalog =
    service.GetDatabaseBackedMetadataCatalog(SPServiceContext.Current);
  IEntity ect = catalog.GetEntity(EntityNamespace, EntityName);
  ILobSystem lob = ect.GetLobSystem();
  ILobSystemInstance lobi =
    lob.GetLobSystemInstances()[LobSystemInstanceName];
}

//Execute SpecificFinder
int id = 5;
IMethodInstance mi =
  ect.GetMethodInstance(SpecificFinderMethodInstanceName,
                        MethodInstanceType.SpecificFinder);

IEntityInstance item =
   ect.FindSpecific(new Identity(id),
                    SpecificFinderMethodInstanceName,
                    lobi, true);

//Delete entity instance
item.Delete();
Executing AssociationNavigator Methods
To invoke an AssociationNavigator method, you first use the FindSpecific() method to return the source entity in the association. In order to return the entity instances associated with the source entity, you call the FindAssociated() method of the IEntity interface. The FindAssociatedMethod() returns the associated entity instances in an IEntityInstanceEnumerator just like a Finder method. You can then use any of the techniques discussed previously to access the data contained in the associated entity instances. The following code shows a complete Console application that returns associated entity instances.
static void Main(string[] args)
{
    try
    {

        if (args.Count() != 8)
            throw new Exception(“Usage: ExecuteAssociationNavigators
             SiteCollectionUrl,
             LobSystemInstance,
             SourceEntityName,
             DestinationEntityName, EntityNamespace,
             SpecificFinderMethodInstance,
             AssociationNavigatorMethodInstance,
             EntityInstanceIdentifier”);

        string siteCollectionUrl = args[0];
        string lobSystemInstance = args[1];
        string sourceEntityName = args[2];
        string destinationEntityName = args[3];
        string entityNamespace = args[4];
        string specificFinderMethodInstance = args[5];
        string associationNavigatorMethodInstance = args[6];
        string entityInstanceIdentifier = args[7];

        using (SPSite site = new SPSite(siteCollectionUrl))
        {
            //Connect to the BDC Service Application proxy
            BdcService service =
              SPFarm.Local.Services.GetValue<BdcService>();

            if (service == null)
                throw new Exception(“No BDC Service Application found.”);

            //Connect to metadata catalog
            DatabaseBackedMetadataCatalog catalog =

              service.GetDatabaseBackedMetadataCatalog(
              SPServiceContext.GetContext(site));

            //Get Source ECT and Destination ECT
            IEntity sourceEct = catalog.GetEntity(
              entityNamespace, sourceEntityName);
            IEntity destinationEct = catalog.GetEntity(
              entityNamespace, destinationEntityName);

            //Get LobSystem
            ILobSystem lob = sourceEct.GetLobSystem();

            //Get LobSystemInstance
            ILobSystemInstance lobi =
              lob.GetLobSystemInstances()[lobSystemInstance];

            //Get SpecificFinder Method Instance
            IMethodInstance mi =
              sourceEct.GetMethodInstance(specificFinderMethodInstance,
              MethodInstanceType.SpecificFinder);

            //Get AssociationNavigator method instance
            IAssociation association =
              (IAssociation)destinationEct.GetMethodInstance(
              associationNavigatorMethodInstance,
              MethodInstanceType.AssociationNavigator);

            //Get Source Entity Instance
            IEntityInstance sourceItem = sourceEct.FindSpecific(
              new Identity(int.Parse(entityInstanceIdentifier)), lobi, true);
            EntityInstanceCollection sourceInstances =
              new EntityInstanceCollection(1);
            sourceInstances.Add(sourceItem);

            //Get Associated Entity Instances
            IEntityInstanceEnumerator destinationItems =
              destinationEct.FindAssociated(sourceInstances,
              association, lobi, OperationMode.Online);

            //Display
            IView destinationView =
              destinationEct.GetDefaultSpecificFinderView();
            DataTable dt =
              destinationEct.Catalog.Helper.CreateDataTable(
              destinationItems);

            foreach (DataRow row in dt.Rows)
            {
                for (int i = 0; i < row.ItemArray.Length; i++)
                {
                    Console.WriteLine(row.ItemArray[i]);
                }
            }
        }

    }
    catch (Exception x)
    {
        Console.WriteLine(x.Message);
    }
}
![]()
SUMMARY
Although many BCS solutions can be created with no code, there are many limitations associated with data presentation and functionality that require custom coding to overcome. The .NET Assembly Connector allows significant control over how external systems are accessed by SharePoint and supports indexing of nearly any external system. As your solutions become more complex, custom coding through the BDC Server object model will help to create professional and efficient solutions that can scale along with your SharePoint farm.