2
Developer Tools for SharePoint 2010
WHAT'S IN THIS CHAPTER?
Although SharePoint 2007 has a decent set of tools, including out-of-the-box customizations, SharePoint Designer, and Visual Studio Extensions for WSS, the 2010 family enhances these tools and makes it easier for developers to design, develop, test, and deploy their solutions. The main enhancements come in SharePoint Designer (SPD) and Visual Studio (VS), both of which had major overhauls in the 2010 release. SPD now provides much more granular control of editing by end users so that they do not cause issues on your sites, a redesigned user interface to make the creation of SharePoint artifacts easier, and support for the Web Solution Package format so that you can upsize SPD projects to Visual Studio (VS). Visual Studio now has a completely revamped developer experience built into the VS environment.
Unlike Visual Studio Extensions for WSS (VSeWSS), which was a separate download, many of the tools you need to quickly develop SharePoint applications are right in VS. This chapter takes a deeper look at each of these tools so you will understand what they can do for development with SharePoint.
OOB DEVELOPER EXPERIENCE
With SharePoint 2010, the out-of-the-box (OOB) experience has been enhanced in several ways for the developer customizing the SharePoint environment, including easier customization of sites, a new web part page design experience, and new web parts.
Customization of sites is one of the main actions that a developer needs to perform, whether that is modifying the master page, creating and designing the layout, or just working with web parts on the page. With 2010, all of these actions have become easier in a number of ways.
For example, you can now customize application pages with your master page so that the look and feel of the application pages are the same as the rest of your site, unlike in SharePoint 2007. In addition, SharePoint protects you from broken master pages by having some default application pages, such as the site administration page, fail back to a simple master page if your dynamic master page is broken.
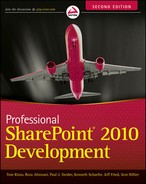
In terms of creating and designing your layouts, SharePoint now has a much richer layout experience because of the new user interface. If you are working with publishing pages, you can quickly change the layout of your publishing pages with a single click. The Ribbon user interface makes it easier for you to work with your page design and web part properties by showing contextual tabs based on the web parts that you click. The ability to discover part properties for both the developer and end user of web is improved by this new Ribbon interface, and with your custom web parts, you can perform the same steps as the out-of-the-box (OOB) features and web parts to add your actions to the Ribbon. Figure 2-1 shows a custom Ribbon menu for OOB features.
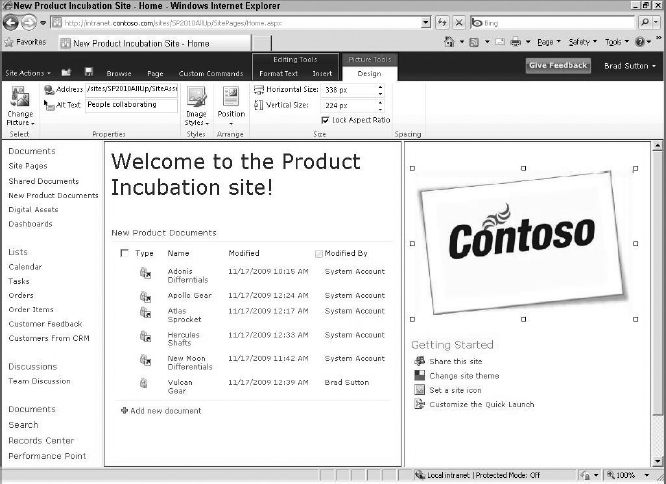
FIGURE 2-1
Getting your web part onto the page and customizing it has changed in SharePoint 2010. The web part gallery, which appeared on the right side of the page in 2007, has been replaced with a web part menu on the Ribbon for inserting your web parts. With this new user interface, you can select your web parts and insert them into the page as in the previous version. However, you can now also preview the web part before inserting it into the page to make sure it is the web part you are looking for. Figure 2-2 shows the new web part insert functionality with preview.
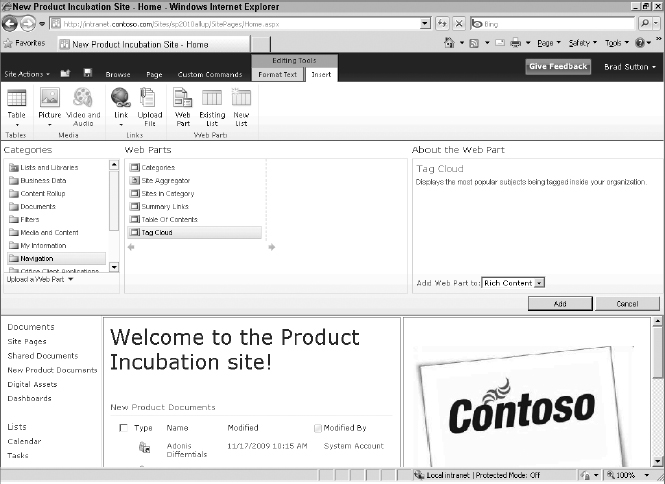
FIGURE 2-2
The modify web part settings have not changed from SharePoint 2007 to SharePoint 2010. They continue to appear on the right-side tool pane, allowing you to customize the properties for the web part, change its appearance, or modify its layout.
One of the nice things about SharePoint development is that you get a number of OOB web parts to speed your development so that you do not have to write everything from scratch. While the following isn't an exhaustive list of all the web parts in SharePoint, it includes a number of key new web parts that you should be aware of: Silverlight, Visio, Chart Viewer, the Chart web part, Web Analytics, the Tag Cloud, the InfoPath form, the Media web part, and the Profile Browser.
The Silverlight web part is exactly what its name implies — a generic Silverlight web part for you to add to your site. You point the web part to your Silverlight package, a XAP (XAP is the file extension for Silverlight applications) file, and then your Silverlight application is rendered in the site. In SharePoint 2007, you had to hack the web.config and adjust a number of other settings to get Silverlight to work, but with 2010, the Silverlight web part is baked right in with no configuration changes needed.
The Visio web part is used to graphically display Visio files. You use this in combination with Visio Services to display static or data-connected Visio diagrams. SharePoint uses the Visio web part as part of its workflow technology to graphically display the status of a workflow. Figure 2-3 shows the Visio web part used in an application.

FIGURE 2-3
You may be wondering what the differences are among the Chart Viewer, Chart web part, and Excel Services. Before I cover that, let's quickly discuss the business problem these web parts are trying to solve, which is to graphically display data in an easy-to-consume format such as a chart. You could write your own web parts to do this, but having something available out of the box makes it easier and faster to build an application.
So, here's the difference. The Chart Viewer web part is a simple web part that allows you to chart data from a SharePoint list. It doesn't allow for complex scenarios, formulas, or the like. The Chart web part is a more general-purpose web part that provides a wizard-based user interface and can connect to more datasources, such as the business connectivity services, lists, web part connections, or even Excel Services. Excel Services is the ultimate tool, because it is Excel rendered through SharePoint. It has the most functionality, including spreadsheets, formulas, charts, and data connectivity. The only downside of Excel Services is that it can't connect to SharePoint data, so for charting data in SharePoint, you must use one of the other web parts.
The Web Analytics web part uses the web analytics engine in SharePoint to display the most popular content, search queries, or search results on the site. It is customizable so that you can filter by content type, show the popularity rank and trend, and also expose its data via an RSS feed. Whereas before you may have used the Content Query web part to try to figure this out, the Web Analytics web part makes it easier to display this information quickly and reliably in your site.
The Tag Cloud web part, another new feature in SharePoint 2010, allows you to graphically display the tags in your environment and rank them according to the number of items tagged by making more frequently tagged items appear larger in the cloud than less frequently tagged items. You can specify the length of time to query the system from retrieving all tags regardless of date to tags created as recently as one month ago. In addition, you can specify how to filter the tags: by you, your colleagues, a particular group, or everyone. Finally, you can show the number of times the tag is used in the user interface in addition to the scaling based on the count. Figure 2-4 shows the Tag Cloud web part.
FIGURE 2-4
UNDERSTANDING SHAREPOINT DESIGNER 2010
Right about now, you might be thinking: How can a development book talk about SharePoint Designer? Isn't SPD the tool for the nonprofessional developer or end users, who break their site with it? Before you jump to conclusions about SPD, take a moment to understand how it can fit into your development tool continuum for SharePoint: SPD 2010 has a number of enhancements that you will want to take advantage of. You can extend SPD with Visual Studio so that it can be a tool you harness for others to use with your solution. And, because SPD has interoperability with Visual Studio, you can upsize your SPD projects to Visual Studio. All of these facts combined make SPD a tool that you definitely want to look at for certain scenarios.
New User Interface
The first thing you will notice about SPD is its new user interface. SPD now has the Ribbon UI, which makes it easier to discover the tasks you can perform in SPD against your SharePoint sites. In addition, the navigation of SPD has changed from a raw view of your SharePoint hierarchy to a more refined view of your SharePoint artifacts grouped in a logical way such as Site Pages, Master Pages, Page Layouts, Content Types, Workflows, and so forth. This new view makes navigation and discovery of your SharePoint sites and information architecture easier. Figure 2-5 shows the new user interface for SPD.
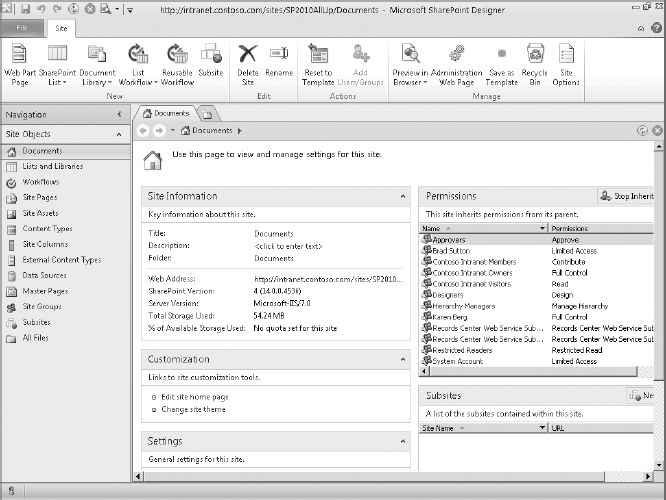
FIGURE 2-5
Top Ten New Features in SPD
Because this is a professional development book, you will not see deep coverage of SPD here, but you still should know the top features, beyond the new user interface, that SPD 2010 provides. These include enhancements to workflow design, integration with Business Connectivity Services, and even lockdown capabilities.
Improved Workflow Design
One of the first things you will notice when designing workflows in SPD is that the Workflow Designer has been enhanced. The user interface has been streamlined with a simplified wizard that you use to design the steps, allowing you to get more done with fewer clicks. Also, moving to the Ribbon user interface has resulted in the design steps being contained not in the Workflow Designer but in the Ribbon itself, which makes it easier to find the tools you need to perform specific tasks. Plus, you can now start typing your workflow items, and SPD will search for conditions or actions, based on what you're typing. It's a sort of IntelliSense built into SPD. Figure 2-6 shows the new user interface for the Workflow Designer.

FIGURE 2-6
The other enhancement in workflow design is the support for parallel branches in your workflow. You can have particular blocks of your workflow run in parallel with the main parts of your workflow. This is useful if you want a particular action to occur while you are performing another action. In addition, SPD now supports nested actions so that you can show those nested actions in a simpler way through the user interface.
Another nice addition to SPD for workflow design is the new Task/Approval Designer. With an SPD workflow, you often want to be able to create a task or approval process. The previous version was very simplistic in the way you could assign a task to a user and have them complete that task. With SPD 2010, there is an entirely new user interface for task creation and assignment, as shown in Figure 2-7.

FIGURE 2-7
As you can see in the figure, you can design exit criteria for a task, such as what happens when someone approves or rejects the task. This exit criteria is a workflow itself, so you get the richness of the SPD workflow for your task subprocesses. With 2010, tasks also throw events that you can capture in SPD, such as when a task is assigned, pending, expired, deleted, or completed. All of these events are workflows as well, so you can log the task, email the task, or perform other workflow actions based on what your application requires.
Figure 2-8 shows the overall task process that you can modify in SPD. If you don't like the way the default task process is handled and want to add additional steps or change criteria, you can modify the approval process, which as stated earlier is just a workflow that you can modify. The main point to remember about the Task Process Designer is that it implements everything as workflows that you can modify.

FIGURE 2-8
Task design in the Task Designer is enhanced by options that provide you with the ability to control the settings of a task in a richer way than in previous versions. A major new feature is the ability to have SPD automatically set the permissions of a task so that only the person to whom the task is assigned can read and edit it. Because SPD uses a SharePoint task list only to store tasks, people who access the task list cannot see the tasks assigned to others in the workflow and cannot approve or change the tasks.
The last piece for the task design is the forms used for your tasks. Because SPD is integrated with InfoPath, you can modify your task forms with InfoPath and use its power to perform database lookups or more complex logic. Figure 2-9 shows the customization of a workflow task form with InfoPath 2010. Make sure to publish the workflow, because SPD won't generate your forms before you do this step.
Another new capability of workflow design is the ability to take an entire step in a workflow and use impersonation to interact with it as the workflow's author. If you don't know the history here, it may not sound that impressive, but with the previous version, all workflows were run in the context of the user who initiated the workflow, not the workflow's author, so the workflow had permission to do only what the person who started the workflow could do. Previously, people hacked around this by making workflows start as the system account, which is bad for security, as the system account has access to everything. Therefore, users could see things that they were not intended to see by running particular workflows.

FIGURE 2-9
Impersonation of the workflow's author is a serious step, so you must consider what allowing someone to use impersonation means. The user will have access through your workflow actions to everything that you, as the workflow's author, have access to. Because you are writing the workflow, you can control what those actions do. It is useful to allow impersonation if you need users to perform actions in your workflow on items or lists that they normally wouldn't have access to. One example is when you want to be able update another list item from the workflow to which the user does not have permissions, such as a status update or having the approval of one item update the approval of another item to which they may not have access.
One challenge that still exists in workflow design is that SPD does not support looping. You still must go to the Visual Studio Workflow Designer to do this. Given all the enhancements to workflow, even without looping, SPD has taken a big step forward in workflow design.
New Workflow Actions
To complement the new workflow design, SPD has added a number of new workflow actions that resolve a lot of difficulties in the previous release. Remember that in SPD workflows, you can have conditions and actions. Actions perform the functions you want, and you can customize workflows by writing custom actions. For many developers, the first task when working with SPD was to write their own lookup manager and permission-setting custom actions, because SPD didn't provide those capabilities. With 2010, both ship with SPD out of the box.
The lookup manager action is straightforward. You pass in the person whose manager you want to find, using the standard SPD lookup mechanics for the user, which could be a particular person, a user from your workflow context, or something from the item, such as the person who created the item or some other field. SPD performs the lookup and passes back the value to you in a variable of your choosing. You can even specify the type for the variable returned — for example, you could return the name of the manager as a string or the user ID or email address of the manager. SPD can do all of this.
To assign permissions, you select the permissions you want to assign such as author, contributor, and so on, and then the item you want to assign the permissions to. SPD always runs this action in the context of the workflow's author even if you don't explicitly create an impersonation step in your workflow. The reason for this is security. You can also remove permissions or inherit parent permissions as actions.
Another improvement in actions is the ability to work with Document Sets, a new feature in the SharePoint ECM technologies. You can capture a version of the document or route a document set for approval right from SPD actions.
Lastly, SPD includes new actions to work with SharePoint's records management capabilities. One new action allows you to declare the current item as a record. Depending on how you have records management configured, this could leave the item in place as a record or move it to the Records Center with a stub left in its place. This action is good to use if your workflow works with content that needs to be managed by the records system. If any approvals or changes happen to the item, you can quickly declare the item to the records management system.
Reusable Workflows
One of the new additions to workflow is the ability to reuse workflows rather than having to pin your workflows to a list. With SPD, you can now create global workflows, which are usable by any user in any site in the site collection you publish to. SPD will publish your workflow to a global workflow catalog, which SharePoint now has. This is useful if you want to share a global approval workflow or some other workflow that you think will be used by all your users.
If you don't want to publish your workflow globally, you can also associate your workflow with a content type. Previously, this could be done only with Visual Studio workflows, so this new capability makes your SharePoint workflow usable across multiple lists where your content type is used. Combine that with the new support for enterprise content types, which allow content types to be used across site collections, and you have a powerful way to create workflows that will work across your content types anywhere in your organization.
Site Workflows
Sometimes, when you are writing your workflows, you want to trigger your workflow not off of a list item but instead off of other artifacts or time. For example, you may want to start a workflow on a folder to perform actions on all the items in that folder or you might want to run a workflow on an external list where there are no real items stored in SharePoint, but they come from a backend SQL Server database. The last example is that you may want to run a workflow using the new permission actions to provision a user for your site and set his or her permissions. Site workflows let you perform all of these tasks and extend the reach of the workflows that you can create in SPD.
InfoPath Integration
There are many places where InfoPath integrates better with SharePoint in 2010 than it did in 2007. To design the experience and connect InfoPath to SharePoint, SPD does a good job of revealing these integration points. For example, you can customize your workflow forms using InfoPath. In fact, SPD automatically generates your InfoPath forms for your workflows, so you have a starting point from which to customize these forms later with the InfoPath Designer.
Integration with Visio
One of the biggest requests users had for SPD workflows was to improve the status page of the workflow so that users could quickly see what was happening with their workflow. Another request was to make it easier for end users to generate workflows using diagramming tools such as Visio. SharePoint 2010 fulfills both requests, using the new Visio integration with SPD to model workflows and using Visio Web Access to show a diagram of the status of the workflow to the end users.
Visio 2010 ships with OOB stencils for SharePoint workflow design. Right in the Visio client you can draw your workflow using SharePoint conditions and actions. You can also validate your workflow using SharePoint rules so that you will know if your workflow will import correctly into SPD. Figure 2-10 shows the new workflow design capabilities in Visio 2010 for SharePoint.
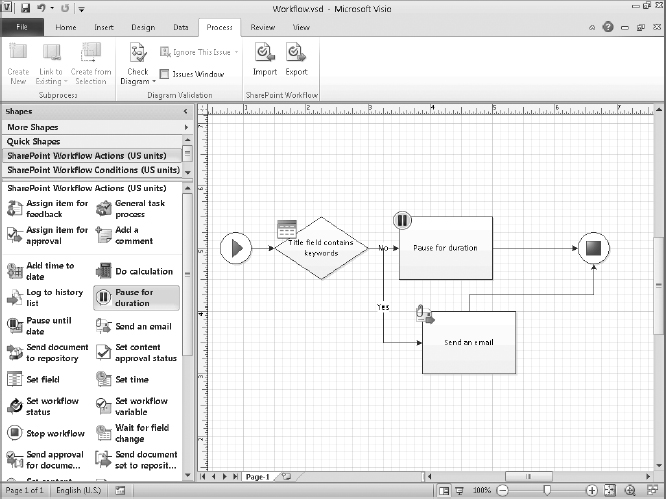
FIGURE 2-10
When you are finished designing your workflow, you can export your workflow into SPD. You can also do the reverse and export existing workflows from SPD into Visio. Note that you cannot set the conditions or actions inside of Visio. You still must create your comparisons and action parameters inside of SPD. After you import and set up your Visio workflow in SPD, you can then use the Visio diagram to display a graphical representation of the status of your workflow to your users by just checking a box on the setting for your workflow. Figure 2-11 shows what a user sees when viewing the status of his or her workflow in SharePoint.

FIGURE 2-11
Task Process Designer
Often workflows are nothing more than a simple wrapper around a task assignment. Take for example a document approval workflow. Most times you want to route the document between a number of approvers and track their approval status. The overall process is pretty simple in that you need to collect the names of the approvers and when they need to approve by, and then create tasks for them to do that work. Most of the intelligence goes into the tasks you assign to the approvers rather than the wrapper process that sends the email to the approvers or tracks their status. Similarly, many workflows are task-intensive and process-light.
For this reason, SPD now includes a Task Process Designer to make it easier for you to design the tasks that go with your workflow. You might recall an introduction of this capability earlier in the chapter; this section provides more detail on what the Task Process Designer provides. It addresses conditions such as completion, behaviors for the overall task process, settings such as locking down the task items using permissions to allow only the assignee to see the items, and any task form fields and outcomes you want to associate with the task.
Having this designer makes it easier to build your tasks and workflows because all of these capabilities are accessed through one central user interface, as shown in Figure 2-12. As you can see in the figure, you can quickly navigate all the settings for your task design, and if you look under the covers, you design task processes as workflows within workflows. The innovation here improves the experience and makes it easier to automate one of the most common operations in building workflows.
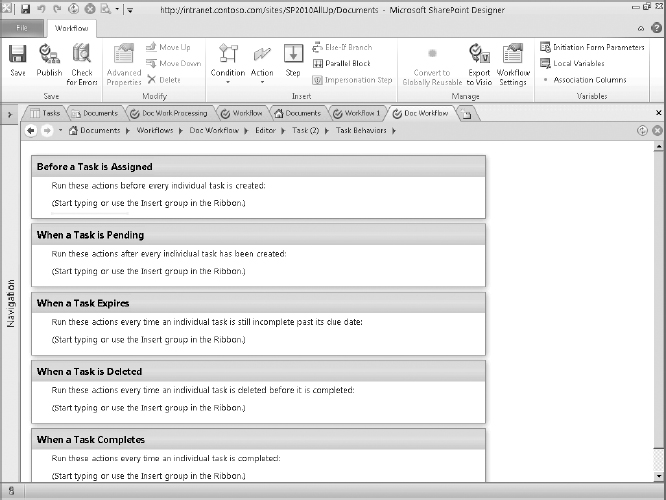
FIGURE 2-12
Editable OOB Workflows
Imagine the scenario in which the OOB workflows, such as the approval and collect feedback workflows, meet the needs of your application with one or two tweaks. Imagine your surprise when you discover that those OOB workflows are not editable and that you must rebuild them yourself to just add a single step to them. That's what happened to all developers in 2007. With 2010, all the OOB workflows are editable and appear in SPD for modification. Therefore, you can modify the flow, actions, conditions, and even forms, using SPD for the OOB workflows. All of the workflows use the new task process design features discussed earlier. Figure 2-13 shows editing of the approval workflow.
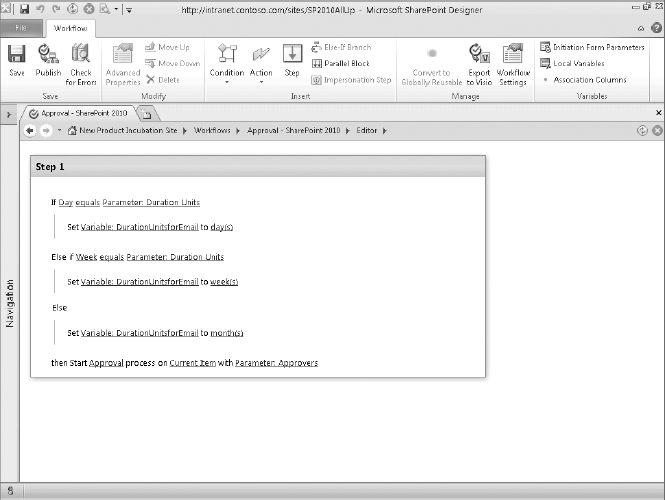
FIGURE 2-13
BCS Integration
One of the most exciting additions to SPD is the ability to create, design, and work with the Business Connectivity Services (BCS) in SharePoint 2010. SPD integrates with BCS through the new External Content Type feature in 2010. Figure 2-14 shows the user interface for external content types in SPD, which lets you view your external content types and make new ones. The external content types can connect to databases, .NET types, or web services, and you can have SPD autogenerate the methods needed to perform your create, read, update, and delete (CRUD) changes, and finder/query operations against these backends. Finally, you can create the external lists associated with your external content type in SPD.
You will learn more about BCS in Chapter 11, so jump ahead if this topic interests you. One interesting thing you can do with SPD and BCS is connect your external content type to Office so that the external data maps to Word or Outlook, synchronizes offline with SharePoint Workspace, and is read/write. The most powerful way to see this in action is shown in Figure 2-15, which is a database found and displayed in Outlook as a contact list. Right within Outlook, you can do all your normal contact activities, such as mapping the address, and you can edit all the contact properties as you would a normal contact. BCS will synchronize those changes to the backend datastore.

FIGURE 2-14

FIGURE 2-15
Browser to SPD
In SharePoint 2007, it was difficult for end users to open a site in SPD and quickly start editing. You had to open SPD and then find your site using the Open dialog box. SPD now supports an Edit Site in SharePoint Designer action directly off the Site Actions menu, which reduces the number of steps, making it easier to open and edit your site.
WSP Integration
To make integration easier between SPD and Visual Studio, SPD has moved to packaging solutions using the Web Solution Package (WSP) format. This allows you to build a workflow or other type of solution in SPD and up-level it into Visual Studio to continue to work on that solution. Note that you may not be able to down-level it from Visual Studio back to SPD, depending on what you create in the solution. Also, using WSPs makes the deployment easier, because you can deploy your WSP right into your SharePoint site and move it around, if you have a multi-tiered environment for development, test, QA, and production.
Locking Down SPD
Previously, one of the biggest complaints about SPD (at least from IT, not developers) was that because it was so powerful, end users could modify something to the point where it no longer worked and in the process break their site. A number of enhancements to both SharePoint and SPD have remedied this problem. First, you can turn off SPD access for the entire site collection through the site collection settings. Previously, you had to modify the ONET.XML file, which then prevented all users from accessing the site collection with SPD; this was a binary on/off that you may not want.
Given that SPD is a valuable design tool for building sites, you may not want just the binary option, so there are some additional options other than just turning off SPD. For example, you can turn off the feature that allows the SPD user to detach pages from the site definition. In essence, this means that when a user customizes a page, her edits can cause the page to detach from the site definition and no longer be stored in the filesystem but instead be moved to the database. SPD, even in the previous version, warned the user that she was going to detach the page, but now you can explicitly stop the user from doing this.
Another option is to disallow the customizing of Master and Page Layout pages. This allows you to stop end users from modifying these files, which control the site's default look and feel, and also the core operating files in the Layouts directory, which control the site's functionality. SPD also has new editable regions support in which SPD locks your pages by default so that users can modify only content placeholders, unless you turn on the advanced edit mode in SPD. Combined, these options provide a powerful way to make sure that end users can use the tool to modify only the areas that they should modify.
Another area for improvement is that an administrator can control whether users can unghost their pages by enabling or disabling the ability to detach pages from the Site Template. If an administrator disables this functionality, SharePoint Designer will disable advanced mode, which supports the ability to ghost and unghost pages. This in turn stops SPD users from having the ability to edit files that will result in ghosting.
Lastly, SPD allows you to turn off the feature that enables users to see the hidden URL structure, so the structure, such as _catalogs, disappears from the users' sight, so they don't hunt around in the underpinnings of SharePoint trying to modify folders and files.
UNDERSTANDING VISUAL STUDIO 2010 TOOLS
SharePoint developers will rejoice when they start Visual Studio 2010 for the first time. Rather than being a bolt-on or an afterthought, SharePoint development tools now are first-class citizens inside Visual Studio, with VS shipping a number of new templates and tools that make SharePoint development easier. Before VS 2010, you needed an assortment of tools such as VseWSS, WSPBuilder, or STSDEV. Now you can just learn VS and quickly start developing applications for SharePoint.
![]() Your previous tools will work with SharePoint 2010 so if you have invested in learning and customizing existing tools, you do not have to replace your tools. However, you may not be able to take advantage of new 2010 features, depending on the tool.
Your previous tools will work with SharePoint 2010 so if you have invested in learning and customizing existing tools, you do not have to replace your tools. However, you may not be able to take advantage of new 2010 features, depending on the tool.
Those of you who have used VseWSS will be happy to discover that there is an upgrade capability from VseWSS to Visual Studio. As you know, upgrades may not work 100 percent of the time, so be sure to check the upgrade and fix any errors that are produced.
Before diving into the project types that Visual Studio supports for SharePoint, let's spend some time doing a quick walk around Visual Studio and the capabilities it provides for SharePoint regardless of the project type you select. These features include the ability to import Web Solution Packages (WSPs) in the VS environment, a new SharePoint node in Server Explorer, integration with the Project Explorer, and finally a Package Designer that makes it easy for you to build your SharePoint Web Solution Packages.
Importing WSPs
When working with SharePoint, you will want to export and import items, or even entire sites, to move the information around or modify it. With VS, you can import a Web Solution Package (WSP), which could be your exported site or your workflow that you have exported from SPD to move over to VS. VS imports your lists, fields, content types, and other artifacts, so you can start working on them in VS. WSPs are now the recommended packaging format for all SharePoint development, so if you are unfamiliar with WSPs, you should learn more about them, as they provide valuable features that allow you to install and ship your SharePoint solutions to multiple environments.
SharePoint Server Explorer
The VS Server Explorer provides a powerful way to visually represent different components of your server infrastructure, such as browsing through your data connections, services, event logs, and performance counters. When developing against SharePoint, you may want to browse your SharePoint site to understand what content types, fields, workflows, lists, and libraries are in your site. With the new SharePoint Server Explorer, you can see all of this information inside of the treeview and browse the properties of these items. Note that you cannot create new items in the Explorer, because it is a read-only experience. Having the Explorer saves you the time required to pop into the web browser to understand your site. Figure 2-16 shows the SharePoint Server Explorer.
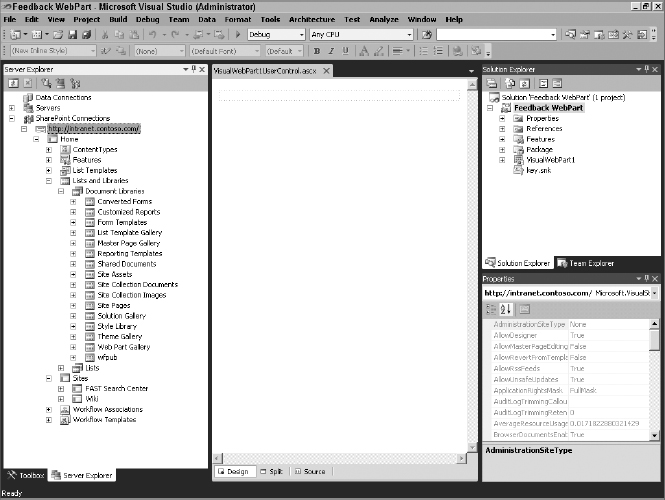
FIGURE 2-16
Solution Explorer Integration
As part of your general Visual Studio experience, the SharePoint tools for Visual Studio integrate with the Solution Explorer so that you can see the files that make up your solution. By default, when you select your project type, VS creates a number of files for your solution, such as the feature XML file, the package XML file, and a key to sign your feature, so you can deploy it. In addition, VS logically lays out your solution so that you can quickly add new features or other projects to it.
Feature Designer
With SharePoint, the recommended way to deploy your applications is to use features and packages. A feature can have multiple items in it, such as a visual web part and a list definition. In addition, features can be dependent on the activation of other features. For example, Feature A may require that Feature B be activated. Features are also scoped to different levels in SharePoint, whether that is at the Farm level, which means that the feature will be available for the entire SharePoint farm, at the Site level, which means that it is available for all sites in a site collection, at the Web level, which means that it is available for a particular site, and finally at the Web Application level, which means that it is available for all websites in a web application. The Feature Designer allows you to configure your features with all this functionality. Figure 2-17 shows the Feature Designer.

FIGURE 2-17
In addition to working with the graphical designer, you can also work with the XML that Visual Studio creates for your feature. You have two choices in working with the XML. First, you can add custom XML to the autogenerated XML that Visual Studio creates. Second, you can edit all the XML, even the autogenerated parts. Keep in mind that if you get your edits wrong, it could stop you from being able to work with your feature in Visual Studio. Editing all the XML is recommended only for advanced users who cannot meet their needs by inserting new XML into the VS autogenerated XML.
Package Designer and Explorer
After you have created your features, you need to package them together and deploy them to your server. This is where the new Package Designer and Explorer come into play. If you have used SharePoint previously, you'll know that SharePoint supports a format called a Web Solution Package (WSP), which is just a CAB file that contains your solution files and a manifest or XML file that tells SharePoint what to do with your solution when deployed. You could write all the XML yourself and compile your CAB file, but Visual Studio makes this much easier. Figure 2-18 shows the Package Designer.

FIGURE 2-18
Some highlights of the Package Designer include giving you the ability to add multiple items to the solution using a graphical interface, the ability to control whether the web server resets, the ability to add assemblies to your package, and, finally, the ability to write package rules that allow you to validate your package programmatically before deploying it to the server.
Project Type Templates
Besides all of the nice productivity tools found in VS for SharePoint, the heart of the new tools is the different SharePoint project-type templates that you can create with VS 2010. Combining the project-type and project-item templates, there are over 20 new templates for you to take advantage of. Table 2-1 lists the different project-type templates, and Table 2-2 lists the item-type templates that you can use.
TABLE 2-1: SharePoint Project-Type Templates
| NAME | DESCRIPTION |
| Business Data Connectivity Model | This template is used to build BCS models that allow you to connect SharePoint to your line-of-business systems, databases, or web services. VS includes a graphical designer for BCS models. |
| Content Type | Use this template to create a custom content type. While there is no graphical designer for content types, VS does support IntelliSense for creating the XML to define your content type. |
| Empty SharePoint Project | This template allows you to set up an empty project that has all the necessary elements for you to get started, such as folders for references, features, solutions, and a key to strong name your assembly. |
| Event Receiver | Use this template to start writing event receivers. Event receivers can be on a List, List Item, List Email, Web, or List Workflow event. VS will create the event receiver class for you, which you can customize for your application. |
| Import SharePoint Solution Package | This template allows you to import an existing WSP. |
| Import Reusable Workflow | This template allows you to import an existing reusable workflow that you created in SPD, which you can then customize and deploy from VS. Note that the import is one way, and once it is modified in VS, you cannot go back to SPD. |
| List Definition | You can create a list definition and list instance using this template. You can base your list on the Announcements, Calendar, Contacts, Custom List, Document Library, Links, or Tasks list types. |
| Module | A module type allows you to add files to your SharePoint projects. Included are an Elements.xml file and a sample.txt file that you can modify to meet your needs or you can add new files to the module. |
| Sequential Workflow | This template creates a new sequential workflow. The workflow can be a list or site workflow, and you can use the graphical workflow design tools to create your workflow in VS. |
| Site Definition | This template allows you to create a new site definition. Once it is created, you will see a number of files for this project type, including a default ASPX page; a onet.xml file, which defines the items in your site; a global resource file; local resource files; and a webtemp file used to tell SharePoint about your site. |
| State Machine Workflow | This template creates a new state machine workflow. You can use the graphical workflow design tools in VS to modify your workflow. |
| Visual Web Part | This template creates a new Visual web part, which allows you to drag and drop controls onto your web part for your user interface rather than having to write the user interface in code. It contains a web part and a User Control item. |
TABLE 2-2: SharePoint Item-Type Templates*
| NAME | DESCRIPTION |
| Application Page | Use this template to create an application page, which is just an ASP.NET page hosted in SharePoint. |
| Business Data Connectivity Resource Item | Use this template to create a resource file for your BCS model. A resource file allows you to localize the names in your model and apply permissions to objects. |
| Empty Element | This template creates an elements.xml file that allows you to define SharePoint artifacts using XML. The most common usage would be defining a field in your SharePoint project. |
| Global Resources File | Use this template to create a resource file, which will contain all the localized text strings for your project. |
| List Definition from Content Type | This template creates a list definition based on a content type in your project. |
| List Instance | This template creates an instance of a list by generating a new instance and an elements.xml file that describes the properties for the instance. |
| User Control | You can create a user control that you can use in an application page or web part with this template. You can design the control using the graphical designers in VS by dragging and dropping your controls onto the design surface. |
| Web Part | This template allows you to create a web part for your SharePoint environment. |
| Workflow Association Form | This template allows you to create a form that is displayed when a workflow is associated with its intended target, such as a list. The form will be an ASP.NET form, and the template creates two files, a Designer file and your code-behind file. You can use this form to collect any properties you need from the user for your workflow to create the workflow instance. |
| Workflow Initiation Form | This template creates a workflow initiation form, which is used when the workflow is activated. This template creates a designer and a code-behind file for your ASPX form. |
*Duplicates from Table 2-1 are not repeated.
Mapping Folders
Previously, getting files into the SharePoint Hive (%Program Files% Common FilesMicrosoft Sharedweb server extensions14), now called the SharePoint Root, was an exercise in filesystem navigation, as the Root is buried deep in the filesystem. You can use different techniques, such as creating Windows Explorer shortcuts, to get to the different folders quickly, but that doesn't help you in your Visual Studio projects, where you may want to place an image in or add something to the layouts folder.
With VS 2010, you can add mapped folders right into your project that will map to their SharePoint counterparts, such as the Layouts folder in the SharePoint Root. To add a mapped folder, you simply right-click your project in the Solution Explorer, and under the Add menu, you will see three commands: SharePoint Images “Mapped” Folder, SharePoint Layouts “Mapped” Folder, and SharePoint Mapped Folder. The last one will display a user interface for you to select the folder you want to map to. By using these capabilities, you can drag and drop items into your mapped folders, and VS will deploy your artifacts to the right location in SharePoint.
SETTING UP YOUR DEVELOPMENT ENVIRONMENT
Before you can start development, you need to set up your development environment. There are some new twists with SharePoint 2010 when it comes to the development environments that it supports. One of these twists is that SharePoint can run, for development purposes, on a desktop OS such as Vista or Windows 7. The other twist is that SharePoint, at the time of writing, supports only the .NET Framework 3.5, which requires some extra configuration on your part when you're building applications and could cause some gotchas if you forget to target the 3.5 Framework.
System Requirements
There are a couple of system requirements you should be aware of when setting up your development workstation and also some choices that you need to make. First and foremost, SharePoint supports only 64-bit hardware. If you have a 32-bit desktop or server, you're out of luck. You need access to 64-bit hardware to get started with SharePoint 2010.
Operating System Requirements
Once you have 64-bit hardware, you can decide which operating system you want to run. SharePoint supports Windows Server 2008 with SP2 or above or Windows Server 2008 R2 for server operating systems and Windows Vista or Windows 7 for desktop operating systems. If you are using a desktop operating system, be aware that the prerequisite installer does not work with those operating systems. Instead, Microsoft ships you a script that performs the operations that the prerequisite installer performs, such as downloading and installing required DLLs.
Virtual or Physical?
Whether to install SharePoint virtually or physically on your machine is always a tough question. Most times, the answer will depend on the operating system you want to run for your guest OS and also whether you want to trade off performance for flexibility. Let's step through each issue in a little more detail.
In terms of the host OS, if you don't mind using Windows Server 2008 as your primary operating system, you will have many options for installing SharePoint, whether that's physical or virtual, because Windows Server 2008 supports Hyper-V. Note that you need to make sure you have hardware that supports Hyper-V. Then, you can decide whether you want a physical or virtual deployment of SharePoint. If you're a developer, virtual is the better way to go, except when you want to do capacity planning or large-scale testing, if your production environment is physical.
If you prefer to run Vista or Windows 7 as your operating system, your choices are more limited, because these desktop OSs don't support Hyper-V. This means that, if you want to virtualize, you need to use VMWare or Sun's Virtual Box, because Virtual PC and Virtual Server don't support 64-bit.
When you have the right virtualization technology for your host OS, the question becomes whether or not to virtualize. Virtualization provides a lot of nice features, such as portability, ability to roll back changes, different environments on a single host OS, and so forth. There are many positives to virtualization. The only negative is the performance cost. To run a virtual environment, you need to give the guest OS and SharePoint a few GBs of memory, and you definitely need a fast disk, preferably 7200 RPM and above. If you don't, performance will be terrible. So, if you have the necessary hardware and you're developing solutions, your first choice should be to virtualize. The new boot to VHD capabilities in Windows 7 and Windows Server 2008 R2 makes it easy to build a dual-boot system that is virtual.
An exception to the virtualization choice is if you don't mind running SharePoint on your client OS. You will need to make sure to turn off the services when they aren't in use, as they can use a lot of memory and you do not want them hogging your machine when you're checking email or working on other projects.
One script that helps make installing SharePoint on Windows 7 easier is the SharePoint 2010 Easy Setup Script which you can find at www.microsoft.com/download/en/details.aspx?id=23415. This script helps you provision your SharePoint installation and also the required development tools to set up your SharePoint 2010 developer workstation.
SQL Server Version
SharePoint supports multiple versions of SQL Server, 2005 and 2008. The main difference is in the SQL Server features, as most SharePoint features work across both versions. The only exception will be using the new Remote Blob Storage and SQL Server FileStream technology, which is supported only in SQL Server 2008. You can decide whether you want SQL Server Express or another version of SQL Server for your installation and development.
.NET Framework Support
One potential gotcha is that SharePoint supports only the .NET Framework 3.5. With VS 2010, you get the .NET Framework 4.0. Because the .NET Framework supports installing and running side-by-side, this shouldn't affect your SharePoint development installation. However, when you develop your solutions in VS, you must remember to target the 3.5 Framework, because VS will usually target 4.0 by default if it is installed out of the box. If you don't target 3.5, you get errors that can be difficult to track down, as they can appear to be problems with your code rather than framework-targeting problems.
SOME THINGS TO CHECK: CPU TYPE
When you change your targeting from .NET 4.0 to .NET 3.5, you may find that Visual Studio changes the CPU type from AnyCPU to x86. This will break your application if you are running a WinForms or Windows Presentation Framework (WPF) application that runs out of the SharePoint context. So, it's a good idea to check not only the framework version that you are targeting, but also whether the CPU is x64 or AnyCPU. Otherwise, you may get weird errors that are difficult to track down, for example, a return of null when trying to get the local farm from SPFarm.
TROUBLESHOOTING WITH DEBUGGING AND TESTING
As a developer, you write perfect code the first time, right? No one does. This is why debugging, testing, and troubleshooting are critical components in any development lifecycle. With VS 2010, the tools and techniques for doing this against SharePoint are infinitely better than in its predecessor. Having capabilities like one-click deployment and debugging, the new Developer Dashboard's better logs, and customizable testing make development and debugging a lot easier. Let's take a look at these new capabilities.
F5 Debugging
VS supports the ability to deploy and debug your SharePoint solutions by setting a breakpoint and starting the debugger. The first time you debug a SharePoint solution in VS, VS asks if you want it to automatically configure your web.config on your SharePoint server to support the debugging session. Allowing VS to do this saves you a number of steps and removes the propensity to make mistakes setting this up. Note that you need administrative permissions to your server, and that you should not do this, if you can avoid it, on your production systems.
VS takes three steps on your behalf. First, it turns on the call stack in web.config by adding the line CallStack=true. Second, it disables custom errors in ASP.NET so that you receive detailed error information if there is an error, using <customErrors mode=“Off” /> in your system.web section. Lastly, VS enables compilation debugging, which makes ASP.NET compile your binaries with additional information to make debugging easier using <compilation debug = “true” />.
Besides making these changes, VS performs a number of steps when you start the debugging session from deployment to attaching the debugger:
- Runs your predeployment commands that you can customize.
- Creates your WSP using MSBuild.
- If you are deploying to the farm, it recycles the IIS application pool to free resources.
- If you are deploying a new version of an existing solution, it deactivates your feature, uninstalls your existing solution, and deletes the existing solution package on the server. If you have feature receivers, your code is triggered.
- Installs your new solution and features onto the server.
- If you are building a workflow, it installs your workflow assemblies.
- Activates your Site or Web features. You need to activate Web Application or Farm features yourself. Again, your feature receivers are triggered.
- For workflows, it associates your workflow with the list or library you selected in the Workflow Wizard.
- Runs your postdeployment commands.
- Attaches the debugger to the SharePoint process (w3wp.exe) for Full Trust solutions and to SPUCSPUWorkerProcess.exe for Sandbox Solutions.
- If you are deploying to the farm, it starts the JavaScript debugger.
- Launches your browser and displays the correct SharePoint site for your solution.
A few notes about these steps. First, if you are debugging a workflow, you need to trigger the workflow through the web browser, the client applications, or custom code that you have written. VS doesn't automatically trigger your workflow. Also for workflows, any additional assemblies you reference must be in the global assembly cache (GAC).
Second, if you are working with feature event receivers, don't have VS activate that feature event receiver for you. Instead, manually activate your feature event receiver so that it is in the same process as the debugger. You can disable activation in your deployment in your project settings.
Last, because SharePoint builds on many layers below it, such as Windows Communications Framework (WCF), you may want to enable advanced debugging in your VS environment. To do this, go into the Registry Editor, find [HKEY_CURRENT_USERSoftwareMicrosoftVisualStudio10.0SharePointTools], and change the DWORD value for EnableDiagnostics from 0 to 1. If the DWORD value does not exist, create it as a new DWORD value. When you set this value, you see in the output window in VS all the information that VS is getting from SharePoint via the stack trace. Figure 2-19 shows debugging inside of Visual Studio.
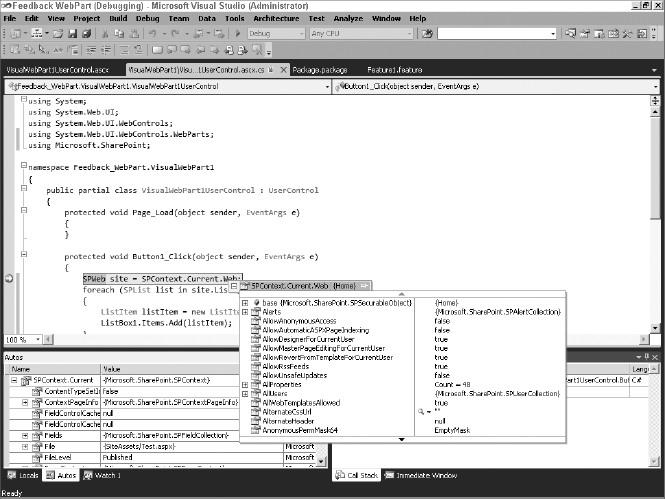
FIGURE 2-19
Debugging Using the Developer Dashboard
One of the new features in SharePoint 2010 is the Developer Dashboard. Often when you are writing code, you might wish you could see what is happening with the system, for example whether it is SharePoint or your custom code that is causing the system to run slowly. With the Developer Dashboard, you get this view into your SharePoint environment and can understand what calls are being made and where the issues might be occurring. If you wrap your code correctly, you can also see your code and how it interacts in the SharePoint environment. Figure 2-20 shows the Developer Dashboard and its components.

FIGURE 2-20
Notice in the figure that the database calls are hyperlinked. You can click on the call, and SharePoint displays a dialog box that tells you the SQL command that it called, with the call stack that triggered the call and the IO statistics. Figure 2-21 shows the database call dialog box.
Turning On the Developer Dashboard
By default, the Developer Dashboard is off. You have a couple of options when turning on the Dashboard. First, you can make it available on demand, which will put an icon in the upper-right corner in your SharePoint site. When you click it, it displays the Dashboard at the bottom of the screen. Your other option is to turn it on all the time so that the Dashboard is always displayed on every page at the bottom of the screen. If you tire of clicking the icon, always on is a great option. Just remember to turn it off after you're done debugging.
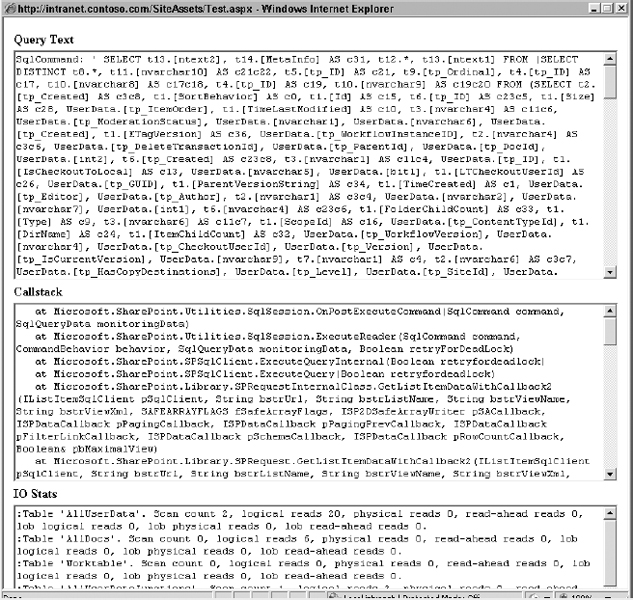
FIGURE 2-21
There are a number of ways to turn on the Developer Dashboard based on whether you want to use STSADM or PowerShell, or write code. At the end of the day, they are all using the same calls to the APIs; it really is your preference which way you write your solution. The following PowerShell script turns on the Developer Dashboard all the time. You can also specify OnDemand or Off. To run the script, just use the following command line: powershell.exe -noexit “c:devdash.ps1”

write-host
write-host “Loading PowerShell environment for SharePoint” -foregroundcolor Green
write-host
# unload & load the sharepoint powershell snapin
$snapin = Get-PSSnapin | where-object { $_.Name -eq
‘Microsoft.SharePoint.PowerShell’ }
if ($snapin -ne $null){
 write-host “Unloading SharePoint PowerShell Snapin…” -foregroundcolor Blue
 remove-pssnapin “Microsoft.SharePoint.PowerShell”
 write-host “SharePoint PowerShell Snapin unloaded.” -foregroundcolor Green
}
$snapin = Get-PSSnapin | where-object { $_.Name -eq
‘Microsoft.SharePoint.PowerShell’ }
if ($snapin -eq $null){
 write-host “Loading SharePoint PowerShell Snapin…” -foregroundcolor Blue
 add-pssnapin “Microsoft.SharePoint.PowerShell”
 write-host “SharePoint PowerShell Snapin loaded.” -foregroundcolor Green
}
write-host “Enabling the developer dashboard… “ -foregroundcolor Blue
$contentService =
[Microsoft.SharePoint.Administration.SPWebService]::ContentService
$dashboardSetting = $contentService.DeveloperDashboardSettings
$dashboardSetting.DisplayLevel =
[Microsoft.SharePoint.Administration.SPDeveloperDashboardLevel]::On
$dashboardSetting.Update()
write-host “Developer dashboard enabled.” -foregroundcolor Green
![]()
If you prefer to use STSADM, you can use the following command line with STSADM to turn on the Developer Dashboard: stsadm -o setproperty -pn developer-dashboard -pv ondemand.
Finally, if you want to write code, here's a little code snippet that turns on the Developer Dashboard. Note that this code requires that you run it in a web part; you can use the new visual web part template in VS to create it. You will need a using reference to Microsoft.SharePoint.Administration in your code, and the web part must run in your Central Administration site, because the Developer Dashboard is a farm-wide setting. If you attempt to run the code in a normal SharePoint site, you get a security exception, which is the correct default behavior.
SPWebService cs = SPWebService.ContentService;
cs.DeveloperDashboardSettings.DisplayLevel = SPDeveloperDashboardLevel.On;
cs.DeveloperDashboardSettings.Update();
Why Use the OnDemand Setting? The best setting to use for your Developer Dashboard is the OnDemand setting, because it allows the site collection administrators to decide which sites they want to enable the Developer Dashboard for. Plus, the Developer Dashboard can be customized via permissions to allow only certain users with certain permissions to be able to see the Dashboard. You learn how to do that later in this section. Finally, by making the setting OnDemand, you're not paying the price to bring up the trace every time you open a page.
Customizing the Developer Dashboard
One of the things you may want to do is customize the Developer Dashboard. The object model for the Developer Dashboard does provide some customizations, but don't expect a lot of control over what you can see in the user interface or the settings because the Developer Dashboard does a lot of the preconfiguration for you. To customize the Developer Dashboard, use the properties and methods of the SPDeveloperDashboardSettings class, which you can instantiate from the SPWebService's class DeveloperDashboardSettings property. Note that you need to call the Update method after you make any changes to the settings for your changes to be persisted back to SharePoint.
One of the customizations that you can do is to change the number of events to track. By default, SharePoint tracks up to 50 critical events and up to 50 SQL queries. By using the MaximumCriticalEventsToTrack and MaximumSQLQueriesToTrack properties, you can modify both these values. By setting them to 0, you turn off the tracking of these events.
The other customization you may want to perform is changing the permissions required for users to view the Developer Dashboard. By default, users who have the AddAndCustomizePages permission can view the Dashboard. By using the RequiredPermissions property, you can modify the permissions of the user using a permissions mask from the SPBasePermissions enumeration, such as requiring ManagePermissions or ManageWeb before they can see the Developer Dashboard.
One other method that makes using the Developer Dashboard easier is EnableDiagnosticMode. If you want to quickly turn on diagnostics on your system, just call this method, and the Developer Dashboard is turned to the OnDemand setting. All users will have permissions to the Dashboard, because the permissions mask will be EmptyMask. This method turns on verbose tracing below the Dashboard, which is normally off by default of the TraceEnabled property on your SPDeveloperDashboardSettings object. This is your nuclear option, so use it with care when you need to diagnose a problem, and when you need the most debugging information you can get.
Monitoring Your Own Code with the Dashboard
Although being able to see what SharePoint is doing is a great diagnostic tool, looking at your own custom code in the context of the SharePoint calls is also important. You may find times when your code is slowing down SharePoint, and it is not the product itself causing issues. By default, the Developer Dashboard shows some information about custom code, but the information is about the calls the code is making, not the source code itself. For example, let's imagine that you've added a visual web part to the page, and you accidentally put in some bad code that takes a long time to render. If you looked at the Developer Dashboard, you would see the time it took to add your web part to the page and how long the pre-rendering or rendering for your web part took. However, you wouldn't see how long your code took to run, unless you calculated this from the total rendering time of the page and how long it took SharePoint to do its operations.
So, to add your own monitored code sections to the Developer Dashboard, you need to implement the SPMonitoredScope class in your custom code. As a best practice, wrap all your custom code that runs in SharePoint using the SPMonitoredScope class. Note that SPMonitoredScope works only with full trust solutions, so even if you wrap your code that runs in a Sandbox Solution, your sandbox code doesn't appear in the Developer Dashboard even though the sandbox executes your code. SPMonitoredScope is part of the Microsoft.SharePoint.Utilities namespace, so you need to add directives to your code to add this namespace.
As an example of using SPMonitoredScope, you're going to see some badly performing code that just sleeps the thread for five seconds so that you can see this time change in the Developer Dashboard. As you'll see in the code that follows, you can create an instance of the SPMonitoredScope in two ways. One constructor allows you to pass in only a string, which is the name of your new scope. The other constructor takes a string with the name of the scope, an integer that is the maximum execution time for the monitored scope in milliseconds, and a parameter array of objects that implement the ISPScopedPerformanceMonitor class. When the maximum execution time is exceeded, the border around the Developer Dashboard user interface turns red, and SharePoint increases the trace level for the code. Table 2-3 lists the different classes that implement this interface that you can use.
TABLE 2-3: SharePoint Item-Type Templates*
| NAME | DESCRIPTION |
| SPCriticalTraceCounter | Traces critical events and asserts. |
| SPExecutionTimeCounter | Allows you to track execution time for your scope. You can use properties such as ElapsedTime, StartTime, EndTime, MaximumValue, and ValuelsExcessive to track usage and whether you are exceeding your allocated execution time. |
| SPRequestUsageCounter | Allows you to track the number of SPRequest objects your code uses. You can pass to the constructor for this object an integer that is the number of maximum SPRequest objects to use, and then you can check to see whether you have exceeded that value and the logging level is increased in the Dashboard. |
| SPSqlQueryCounter | Tracks the number of SQL queries for your scope. The text, call stack, and duration are all tracked and accessible in your code. |
* Information presented in previous tables not duplicated here.
using (new SPMonitoredScope(“My Code”))
            {
                Thread.Sleep(5000);
            }

using (new SPMonitoredScope(“My Scope Name”,
                1000,
                new SPRequestUsageCounter(3),
                new SPSqlQueryCounter()))
            {
                Thread.Sleep(5000);
            }
Debugging Using SharePoint Logs
With the introduction of the Developer Dashboard, there are fewer times when you need to go to the logs than in 2007. The nice thing is, if you do need to go to the logs, the Developer Dashboard includes the Correlation ID, which enables you to look up events quickly in the log that you saw in the Developer Dashboard user interface. Although you could browse the Unified Logging System (ULS) logs yourself, using your favorite text editor, one great tool to check out is ULSViewer, which is a free download from MSDN at http://code.msdn.microsoft.com/ULSViewer. It is an unsupported tool, but it is good at parsing the ULS logs and provides real-time viewing, smart highlighting, in which it highlights similar log entries when you hover over them, and a number of other features. This tool works with SharePoint 2007 and SharePoint 2010.
Debugging Silverlight Code
VS enables script debugging by default. If you want to debug a Silverlight application that runs in SharePoint, you need to change the properties under your project in the SharePoint section to check the Enable Silverlight Debugging check box.
Keep in mind, also, that Silverlight does not allow cross-domain scripting by default. If you are making calls across domains, such as copying from one SharePoint site to another that may be in a different farm or use a different URL, you need to become familiar with the clientaccesspolicy.xml file that you can use with Silverlight to override this policy. You have to place this file in the root of your SharePoint web server in the filesystem so that Silverlight has access to the new policy file.
![]() MSDN has good resources to understand these restrictions at http://msdn.microsoft.com/en-us/library/cc645032(VS.95).aspx.
MSDN has good resources to understand these restrictions at http://msdn.microsoft.com/en-us/library/cc645032(VS.95).aspx.
Unit, Capacity, and Load Testing
After you've done some smoke testing on your dev machine, it is important to perform more formal testing of your code before deploying it. This is where unit, capacity, and load testing come into play. There are a couple of areas to look at with SharePoint related to these topics.
First, writing your code so that unit testing is easier starts with your development best practices. The Model-View-Controller (MVC) pattern is popular for ASP.NET development, and Microsoft does ship ASP.NET MVC. Unfortunately, ASP.NET MVC does not support SharePoint. You can hack together ASP.NET MVC to make it integrate with SharePoint, but instead you may want to look at the patterns and practices documentation from Microsoft, which implements a Model-View-Presenter (MVP) framework. This book doesn't devote a ton of pages to MVP and unit testing, because this is a major topic and is not that different between SharePoint 2007 and 2010. For more information on MVP and unit testing, check out http://msdn.microsoft.com/en-us/library/dd206923.aspx. Separating data, data access, business logic, and presentation layers is important, especially for making testing easier, and both models provide this pattern.
When it comes to capacity or load testing, it's a good idea to test your code to make sure that it can scale to meet the needs of your users. You do not want to be one of those developers who continually says that it worked on your machine! With capacity testing, you need to define up-front what success looks like. Is it responses per second under a certain user load? Is it testing your custom code with a certain data size? Is it to test latency across a wide area network (WAN) for your code? Or is it all of the above? After you decide why you are doing your testing, you can set up your test environment to make sure that you simulate your production environment and perform the right tests to get the results you want.
There are a couple of best practices and new tools when it comes to testing. You'll first look at the new tools, and then you can see the best practices for your environment.
Visual Studio 2010 Test Tools
All versions of Visual Studio include some test tools. Depending on which version you buy, you may get more than just unit testing. For example, the Ultimate edition of Visual Studio includes unit testing, code coverage, impact analysis, coded UI testing, web performance testing, and load testing.
When it comes to capacity and load testing, you will spend most of your time working on web tests, which allow you to record your keystrokes through a web browser, create validation rules and dynamic parameters, and create user loads from those tests that you can scale to multiple agents that simulate different connectivity speeds or multiple browser types.
Although it's too big a topic to cover in this book, the test tools in Visual Studio, beyond the web tests, help you write better code. One tool to look at immediately is the coded UI test. It records your actions on the screen and then creates code in VS that performs those actions. It allows you to automate tests that you would otherwise have to perform manually through the user interface.
Load Testing Kit
As part of the Administration Toolkit released for SharePoint 2010, Microsoft released a Load Testing Kit (LTK). This kit contains pre-built web tests for the most common SharePoint scenarios, such as team collaboration, web content management, and social networking applications. The nice thing about these web and load tests is that you can customize them for your own needs. They are just Visual Studio tests. Using the LTK tests as a template makes creating your own tests much faster.
Another component of the LTK is a data generation utility. As you will see in the best practices section, trying to simulate your production environment is the best way to understand how your code will run in that environment under load and also with different users and different commands being sent to it. Many times, though, you can't get your production data into your testing environment, so you need to mimic that data in a reasonable way. Who wants to create 100,000 documents manually? That's where the data-generation utility from the kit comes into play. It automatically creates usage pools that represent a subset of users with a particular load profile, creates users in Active Directory (AD), creates datasets on the farm, and creates the run-tables for use with Visual Studio.
You can use the data generation utility to test new hardware configurations to see if they will withstand your needs. You can use it to test migrations, or you can use it to stress test your custom code.
The last area of the LTK is the log analysis tool. There may be times when you don't want to generate datasets, but instead you want to point the log analysis tool at your SharePoint farm and have the tool mine your Internet Information Service (IIS) logs for usage information. For example, you may want to mimic your real-world usage from your production systems in your tests. This means finding which sites people browse, the documents they use, and the operations they perform. The log analysis tool scans the IIS log and creates test loads using VS based on those logs so that you get real-world usage in your tests.
SharePoint Diagnostic Studio
Also in the Administration Toolkit you'll find the SharePoint Diagnostic Studio. Although technically not a load testing or capacity tool, it will be invaluable for you in your development and deployment of SharePoint solutions. The tool collects data from the ULS logs, event logs, and performance counters and the SharePoint usage database. The combined data is presented through a graphical user interface that makes it easier for you to pinpoint any issues that your application may be causing in your development, test, and deployed environments.
Best Practices for Capacity and Load Testing
There are a couple of best practices when it comes to your capacity and load-testing efforts, such as mimicking your production environment and making sure that you're really validating the results in VS. This section looks at some of the ways you can make sure that you're getting the most out of your testing.
First, running tests in an environment where the data, user profiles, or user load is not similar to what you do in production is not always useful. Instead, try to mimic the production environment as best as you can. Now, if your production environment is a server farm of four servers with big hardware, it's going to be hard to mimic that environment unless you have a lot of money to spend on testing. But you can get as close to production as possible, by setting up Active Directory (AD) the same way in terms of hierarchy, security groups, and domain topology. The same goes for your network infrastructure in terms of load balancers, accelerators, and any other network topology that will be important for simulating your production environment.
Second, make sure that you are following best practices for SQL Server. You may generate your test data in your test farm and then immediately start running your tests. After inserting all that data, SQL may not have rebuilt the indexes or rerun statistics on your databases. So, you may get poor performance, but it's not because of your code; it's because SQL Server hasn't been optimized in the way that SharePoint would optimize it. SharePoint does run a nightly timer job to rebuild indexes and update statistics, so be sure that you do that if you are not leaving your test dataset running overnight.
The other best practice for SQL Server is to pre-grow all your databases. It's an expensive operation for SQL Server to autogrow databases, and you should turn that on only as an insurance policy in your production environment. Be sure that you test hitting the autogrow in your tests.
Finally, there are a couple of best practices for web tests. First, set the Parse Dependent Requests property to False for your tests. VS will, by default, parse the HTML response for your web test and any dependent requests, such as images or style sheets that are automatically submitted. Because the SharePoint Web Front Ends (WFEs) and user machines cache these resources, you may see a larger Requests Per Second (RPS) than your users will see when the WFE does not have these cached. Therefore, you should set up a separate web test to test having to go back to the content database when you miss on the WFE cache for a resource rather than relying on this capability inside of VS.
Another best practice is to design your tests to perform atomic operations versus user scenarios. The recommended approach is to make every web test an atomic operation, such as viewing a list or displaying an item, and then string together your atomic web tests to perform a user scenario rather than doing one long user-scenario-based test that performs all those operations in a single recording. The reason for this is that, when simulating a user scenario, you may perform one step in your test that slows down the entire test, such as retrieving a large document. This may give you a false positive that your server is performing well, because you starve the server for actions to perform.
Be sure to parameterize your server name, URLs, users, and Globally Unique Identifiers (GUIDs). Otherwise, your web tests will fail because of encoded URLs, wrong GUIDs, and other factors.
This is why the Load Testing Kit is so helpful, as it does include canned tests as well as utilities to help you parameterize your SharePoint tests.
Last, use validation rules in your web tests. With SharePoint, you receive a response saying that the test was a success, effectively a 200 status code from SharePoint, even though you may not have successfully performed the operation you thought your test was performing. The two primary examples of this are getting a general error, which returns error.aspx, and getting an access denied response, which returns accessdenied.aspx. The web server reports success, because both are valid pages, yet you just errored out the request. To get around this, create three validation rules on your web requests:
- One rule to check for SharePoint returning error.aspx by finding the text action=“error.aspx” and telling VS to fail the test.
- One rule to check for SharePoint returning “access denied” by finding the text action=“AccessDenied.aspx” and telling VS to fail the test.
- One rule that finds the text of the page you expected to render, such as mysite.aspx, and tells VS to pass the test if that rule is met.
Figure 2-22 shows the validation rules inside of VS.

FIGURE 2-22
Other Useful Tools for Debugging and Testing
Beyond VS, there are other useful tools to help you with debugging and testing in SharePoint. Following are some recommended ones, but there are more on popular sites like codeplex (www.codeplex.com).
SPDisposeCheck
The SharePoint APIs allocate COM-based memory that the Common Language Runtime (CLR) garbage collector does not release. For this reason, you need to explicitly call the Dispose() method on certain objects such as the SPSite and SPWeb objects. If you don't, you get memory leaks in your application, and it can be hard to track down which pieces of your code are causing the leaks.
For this reason, Microsoft released a tool called SPDisposeCheck, which will scan your code and tell you where you are not releasing this memory because of not calling the Dispose() method. This tool saves you a lot of time and heartache in tracking down memory leaks. You can download SPDisposeCheck from http://code.msdn.microsoft.com/SPDisposeCheck.
Internet Explorer Developer Tools
Sometimes the best debugging tools are the ones built right into the product. Internet Explorer provides you the capability to browse your HTML, script, and Cascading Style Sheets (CSS) code right inside of its developer tools. To get to the developer tools, just press F12 in the browser. In fact, you can debug your HTML and CSS by using the treeview and editing both sources on the fly. It also has a built-in debugger for JavaScript, so that you can set a breakpoint and have the tools break when they hit your breakpoint. You get watch windows, local variables, call stacks, and an immediate window called the console. IE also includes a JavaScript profiler that shows you the performance of your script code, including the number of times a function was used and the amount of time it took. With these tools, you can track down any issues in your client-side code.
Firefox and Firebug
If you use Firefox as your browser, you can use Firebug as your HTML development and debugging tool. Firebug provides very similar functionality to the IE developer tools in the Firefox environment.
Visual Round Trip Analyzer
The Visual Round Trip Analyzer (VRTA) sits on top of the network monitor tool from Microsoft and is a free add-on. It provides a graphic representation of how long it takes a client to talk to a server — information that you can then use to determine whether you are making excessive round trips, if your code is slowing down the pages (for example, because of loading many small JavaScript or CSS files), or if there are network issues causing any problems between your application and the server. You can download VRTA from www.microsoft.com/downloads/details.aspx?FamilyID=119f3477-dced-41e3-a0e7-d8b5cae893a3&displaylang=en.
Fiddler
No discussion of debugging tools would be complete without mentioning Fiddler (www.fiddlertool.com). Fiddler is a web debugging proxy that logs all HTTP traffic between your computer and the Internet. Fiddler allows you to inspect all HTTP traffic, set breakpoints, and view your incoming and outgoing data. It is an essential tool to help you understand what server variables are coming back from your server, what the payload is, how many calls your client-side code took, and other factors that provide insight into your applications.
DEPLOYING AND MAINTAINING YOUR CODE
After you develop and debug your code, you need to deploy and maintain it, because you probably need to update it, for example, to fix bugs or add new enhancements. With the enhanced SharePoint VS tools in VS 2010, there are a lot more options for you to deploy and maintain your code in your environment. The areas you read about here include customizing the deployment actions in VS with the new VS tools, using the application lifecycle management tools in VS to do nightly builds or continuous integration, and debugging your production deployments where you can't run things like load tests or invasive debuggers.
Customizing Deployment in VS
In your project properties in VS 2010, you can customize how your project is deployed to SharePoint, including any pre- and post-steps you want VS to perform when it deploys your package. You can also control whether your assemblies are deployed to the global assembly cache (GAC) or to your bin directory for your web application just by setting a single property. Figure 2-23 shows the default configuration for the deployment steps inside of Visual Studio.

FIGURE 2-23
As shown in the figure, VS performs several steps on your behalf, from deploying the solution to recycling the application pool. Using the user interface in VS, you can add or remove steps for your configuration. Note that, if you do create a new configuration, you need to set it as the active configuration, because VS does not do that by default. Otherwise, you will wonder why your new configuration may not be the one VS is using when you deploy.
You can customize the pre- and post-deployment steps by adding command lines that direct VS to perform operations. These can be DOS or MSBuild command lines that copy files, run PowerShell scripts, or any other operations you need to perform for your SharePoint deployment.
ALM with VS 2010 and SharePoint
Application lifecycle management (ALM) and team development are important pieces in Visual Studio, and they now work with SharePoint because of the VS integration. As part of your SharePoint development, you can add your solution to your source control system just by checking the Add to Source Control check box when you create a new project. VS takes care of the rest in terms of checking your code in and out as you work on your project. You can also use the work management capabilities of VS to assign and track bugs and work items to the individuals on your team.
New in VS 2010 Service Pack 1: IntelliTrace and Unit Testing
When you need help understanding your application in more detail, IntelliTrace is a great tool to use. IntelliTrace enables you to track the state of your application including the events that occurred and the context in which they occurred. In addition, you can move these events to a particular point in time to understand the state of the application and the values in your variables. You can also save the IntelliTrace so that you can later reload it and perform debugging against it even when the application is not running.
The other new feature in SP1 is the ability to do unit testing of your SharePoint code. Unit testing allows you to isolate your code and test it to make sure it works. The unit tests can continue to be used as the main source of your application changes so you can continue to verify that the code you changed did not introduce any new bugs.
The easiest way to understand these new features is to see them in action. This section shows a simple unit test that returns the name of the SharePoint site collection. The code of the application follows.
using System;
using System.Collections.Generic;
using System.Linq;
using System.Text;
using Microsoft.SharePoint;

namespace SharePoint_Project_to_Unit_Test
{
    public class GetSiteName
    {
        public string GetSiteTitle(string Url)
        {
            using (SPSite site = new SPSite(Url))
            {
                using (SPWeb web = site.OpenWeb())
                {
                    return web.Title;
                }
            }
        }

    }
}
![]()
The class and function must be marked public otherwise you need to change your code or use accessors created using reflection to access your private methods.
Visual Studio has a built-in menu option you can use to create a unit test from your code. Just hover over the function you want to test, right-click, and select Create Unit Tests, as shown in Figure 2-24.
Visual Studio generates your unit test for you but there are some changes you need to make to the code and configuration. For the code, you need to set up the variables that are required to initialize your functionality and the expected return values from your functions so VS can test actual values versus expected values. VS conveniently marks the things you need to update with the TODO moniker so you can quickly find the work you need to do to customize your unit test. A modified unit test with the variables configured is shown in Figure 2-25.

FIGURE 2-24

FIGURE 2-25
Beyond code changes, you also need to change some configuration details such your hosts settings, which you must modify to make your tests run in the default host and in a 64-bit process, as shown in Figure 2-26. This ensures that the test tools are running in a process that can access SharePoint functionality since SharePoint requires 64-bit.

FIGURE 2-26
In addition, remember that SharePoint supports only the .NET 3.5 Framework, so you need to change the properties for your unit test project to target the 3.5 Framework, as shown in Figure 2-27.
After this is all done, you can run your unit test. If you debug your tests, you get the IntelliTrace functionality so you can see each step in the process such as the calls, stack, and other variables, as shown in Figure 2-28. Note that the IntelliTrace functionality is available only in the VS Ultimate edition.

FIGURE 2-27
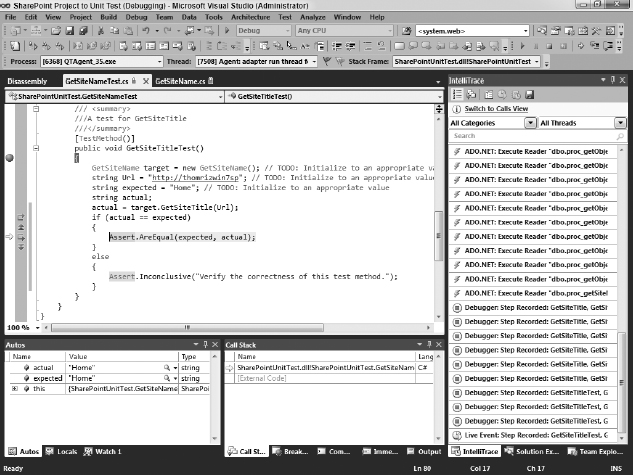
FIGURE 2-28
Moving from Test to Production
After you have tested your code, you are ready to move from test to production. This means deploying your code to your production servers, a process you can automate using a script or perform manually by placing it into your SharePoint environment. Note that if you use continuous integration or a nightly build with SharePoint, many times your build server won't have SharePoint on it, so it can't compile the code that you want to build. You need to copy the SharePoint DLLs from your SharePoint Server to your build server into the GAC so that your builds work.
SPDiag, which is part of the Administrative Toolkit for SharePoint 4.0, is a helpful tool when you are moving to a production environment. SPDiag collects information on your farm that you can analyze in a connected and disconnected way so that your analysis is not happening real-time on your farm. SPDiag makes debugging your production system much easier, as it collects data from SharePoint, SQL, the IIS logs, and performance counters. You should also look at the SharePoint Diagnostic Studio, which is the next generation of SPDiag and was discussed earlier in this chapter.
UPGRADING CODE FROM 2007
The last issue you need to consider is avoiding the common gotchas when upgrading your code from SharePoint 2007 to SharePoint 2010. The main ones that will probably hit your upgrade are changes in the infrastructure around throttling, removal of STP files, deprecated APIs, and the new user interface.
In terms of changes to the throttle, SharePoint 2010 limits the number of lists you can call in a lookup and also the number of items in a view. If your code is expecting to make a number of multiple list lookups, you receive an error from SharePoint. Be sure to test your code on upgrade to see if you hit the throttles, and turn them off to see if it fixes your code in your test environment. Then, you can either rebuild or work with IT to make sure that the throttles are set to the appropriate level for your code to work.
STP files are no more. If you have STP files, you need to upgrade an existing SharePoint 2007 farm with your sites to 2010 and use the export functionality to export your sites to WSP files, so you can continue to deploy those on 2010 farms.
Some APIs are deprecated in SharePoint 2010. Most of them live under the Microsoft.SharePoint.Portal namespace, but check the documentation to see if the APIs you are using are deprecated. Also, make sure to recompile your code against the 2010 version of the DLLs in VS. The compiler displays warnings if you are using deprecated objects or methods so that you don't have to track this down yourself.
The other thing to take into consideration for your upgraded code is that SharePoint has the Ribbon UI and has refactored the CSS files. This may break code that relies on certain CSS styles from the 2007 CSS files or items in the 2007 Master Page. You can programmatically get the UI version that 2010 is running under, as 2010 does support visual upgrading, which means that you can keep the 2007 UI but run a 2010 server. Over time, you can visually upgrade that 2007 UI to the 2010 UI on a site-by-site basis. To get the UI version, you can use the SPWeb.UlVersion property, which returns 3 if the site is running in 2007 mode or 4 if it is using the new 2010 UI.
Also, you can place in your ASP.NET code the ability to detect the UI version and make certain content render only if a certain version of the UI is running. The code puts a placeholder control and a content control on the page only if the 2010 UI is running. The VersionedPlaceHolder control is for post-execution so that your content will be placed on the page after rendering is finished.
<SharePoint:VersionedPlaceHolder ID=“vph4” runat=“server” UIVersion=“4”>
   <div>Your Content Here</div>
</SharePoint:VersionedPlaceHolder>

<SharePoint:UIVersionedContent ID=“vc4” runat=“server” UIVersion=“4”>
<ContentTemplate>
<div>Your Content Here</div>
</ContentTemplate>
<SharePoint:UIVersionedContent>
One of the new features that will make your life easier is the new binding redirect functionality. Sometimes you may want to redirect your existing code to new assemblies without having to recompile your code. Many developers avoided versioning their assemblies with 2007, because it led to other headaches that forced them to update all their files. With binding redirect, you can just tell SharePoint to redirect any references to a certain version of the assembly to another version you specify. The following snippet from a manifest.xml shows how to use the binding redirect feature.
<Assemblies>
  <Assembly DeploymentTarget=“GlobalAssemblyCache” Location=“CustomWebPart.dll”>
    <BindingRedirects>
      <BindingRedirect OldVersion =“1.0.0.0” />
    </BindingRedirects>
    <SafeControls>
      <SafeControl Assembly=“CustomWebPart, Version=2.0.0.0, Culture=neutral” Namespace=“CustomWebPart” TypeName=“*” Safe=“True” />
    </SafeControls>
  </Assembly>
</Assemblies>
Another nice enhancement to SharePoint 2010 is that it supports the ability to version your features and upgrade between feature versions. Part of the new feature set is the ability to require a minimum feature level so that, if your feature is dependent on another feature to be activated, you can make sure that the other feature is a particular minimum version.
Another new feature upgrade function is declarative feature upgrading. By specifying an XML block in your feature.xml, you can give a range of feature versions on which to perform the actions in that block, so you can say for versions 1.0 to 2.0, perform action X and for versions 2.1 through 3.0, perform action Y. A sample XML block is shown here:
<Feature …>
  <UpgradeActions>
     <VersionRange BeginVersion=“1.0.0.0” EndVersion=“2.0.0.0”>
       …
     </VersionRange>
     <VersionRange BeginVersion=“2.0.0.1” EndVersion=“3.0.0.0”>
       …
     </VersionRange>

  </UpgradeActions>
</Feature>
Sometimes when you want to update a feature, you just want to add another field to a content type or you want to change file paths for your files. SharePoint 2010 supports this functionality through the AddContentTypeField and MapFile elements shown here:
<Feature>
  <UpgradeActions>
     <VersionRange BeginVersion=“1.0.0.0” EndVersion=“4.0.0.0”>
       <AddContentTypeField ContentTypeId=“” FieldId=“” PushDown=“True”/>
       <MapFile FromPath=“OldPathAppPage.aspx” ToPath=“NewPathAppPage2.aspx”/>
     </VersionRange>
  </UpgradeActions>
</Feature>
There may be scenarios in which you want to add new elements to your elements.xml file on upgrading. To inject these elements, use the ApplyElementManifest XML block shown here:
<Feature>
  <UpgradeActions>
     <ApplyElementManifests>
        <ElementManifest Location =“CustomAppElements.xml”/>
     </ApplyElementManifests>
  </UpgradeActions>
</Feature>
There is also a new CustomUpgradeAction element that you can use with the new FeatureUpgrading event to give you even more flexibility in controlling what happens when your feature upgrades, because you can write code. The XML code shows how to specify a feature receiver event in your CustomUpgradeActionElement. You can specify the version range for the action to fire on. In addition, you can pass parameters to the event so that you can pass custom properties to your code. The code that follows shows the XML for the CustomUpgradeAction.
<CustomUpgradeAction>
<Feature>
  <UpgradeActions>
      <VersionRange BeginVersion=“1.0.0.0” EndVersion=“4.0.0.0”>
        <CustomUpgradeAction Name =“MyCustomAddSiteColumnAction“>
          <Parameters>
            <Parameter Name=“ColumnName”>MyCustomSiteColumnText</Parameter>
        <Parameter Name=“ColumnType”>Text</Parameter>
            <Parameter Name=“ColumnDisplayName”>My Custom Site Column Name</Parameter>
          </Parameters>
        </CustomUpgradeAction>
      </VersionRange>
    </UpgradeActions>
</Feature>
You then can implement your FeatureUpgrading event code inside of VS using your language of choice. As part of the event, you can determine whether the upgrade action is being performed, and you can read in the parameters passed to your event receiver. You can then write your code to perform whatever custom actions you need as part of your upgrade.
public override void FeatureUpgrading(SPFeatureReceiverProperties
properties,string upgradeActionName,
System.Collections.Generic.IDictionary<string, string> parameters)
        {
            // Check upgrade being performed
            if (upgradeActionName.Equals(“MyCustomAddSiteColumnAction”) == true)
            {
                // Read parameters
                String ColumnName = parameters[“ColumnName”];
                String ColumnType = parameters[“ColumnType”];
                String ColumnDisplayName = parameters[“ColumnDisplayName”];
//Perform your actions
        }
        }
As part of the object model, there is a new QueryFeatures method that you can use to find all the features at a number of different scopes in SharePoint, from your farm to your site. After you have the features, you can determine which ones you need to upgrade. Take a look at the Software Development Kit (SDK) for all the different overloaded versions of the QueryFeatures method.
SUMMARY
This chapter introduced the new tools that accompany SharePoint 2010. One of those tools, SharePoint Designer, while not targeted at professional developers, is an invaluable tool for the professional developer because it can troubleshoot SharePoint deployments quickly. With the new SharePoint tools in Visual Studio 2010, developers can quickly build SharePoint applications and use VS to deploy and debug these solutions. Finally, this chapter showed you some tips and tricks for testing your solutions to make sure they can scale as your application requirements grow.