
Connecting to a Bluetooth LE Device
Manny de la Torriente
Thanks to its open standards, Bluetooth Low-Energy (LE), also known as BLE,has established itself as a leader for hardware manufacturers looking to create connected accessories for iOS. This chapter introduces Core Bluetooth, Apple’s framework for Bluetooth-based communication, to send and receive messages from a Bluetooth LE device. Additionally, we will discuss Bluetooth best practices for battery life and a positive user experience.
Introduction to the Apple Bluetooth stack
Apple’s Core Bluetooth is the representation of Bluetooth LE on iOS platforms. It’s the framework that you will use to talk to accessories and host peripherals.
The framework is an abstraction of the Bluetooth LE protocol stack, and it hides many of the low-level details of the specification so you can focus on your application.

The framework is built on the Bluetooth 4.0 Standard and provides all the classes you’ll need to easily communicate with other Bluetooth LE devices.
Key Terms and Concepts
The framework adopts many key concepts and terminology from the specification.
Central
A device that supports the central role scans and listens for peripheral devices that are advertising information. A central role device is responsible for initiating and establishing a connection. We refer to a device operating in the central role as a central.
Peripheral
A device that supports the peripheral role transmits advertising packets, which describe what services the peripheral has to offer. A peripheral role device is responsible for accepting the establishment of connection. We refer to a device operating in the peripheral role as a peripheral.
Service
A service is a collection of data called characteristics that describes particular functions or features of a peripheral’s services.
Characteristic
A characteristic is a value used in a service along with properties and descriptors that contain information that describes the value.
Discovery
Bluetooth devices use advertising and scanning either to be discovered or to discover nearby devices. Advertising peripherals broadcast advertising packets. A scanning central device will scan and listen and can use filters to prevent discovery of all nearby devices.
The Core Bluetooth framework is mapped to Bluetooth LE communication in a straightforward way.
A device that supports the central role uses the CBCentralManager object to scan for, discover, connect, and manage discovered peripherals. The peripheral is represented by a CBPeripheral object to handle services and characteristics. CBService and CBCharacteristic objects represent a peripheral’s data. Figure 9-2 illustrates the peripheral’s tree of services and characteristics.

Figure 9-2. Peripheral’s tree of services and characteristics
Peripheral Role Objects
A device that supports the peripheral role is represented by the CBPeripheralManager object to advertise services, manage published services, and respond to read/write requests from centrals. A CBCentral object represents a central. CBMutableService and CBMutableCharacteristic objects represent a peripheral’s data when in this role. Figure 9-3 illustrates the peripheral’s tree of services and characteristics.

Figure 9-3. Peripheral’s mutable tree of services and characteristics
Building Your First Bluetooth LE Application
In this section you’ll build a simple application using an agile approach that will support both central and peripheral roles. The application is designed to run on two separate Bluetooth LE-capable iOS devices, with each device running in the different roles. The central role device will scan and connect to the peripheral device, which will be advertising a simple service. Once connected, the peripheral device will transfer data to the central device, which will then present that data to the user.
The feature requirements are straightforward and we present them in a story form. The main focus for the first part of this exercise will be on setting up the application to accommodate each mode using a simple user interface (UI) followed by a deep dive into Core Bluetooth.
When you complete this exercise, you should have a solid understanding of the central and peripheral roles and how they work using the Core Bluetooth framework, as well as several reusable modules that you can bring into your own projects.
There are several features that are represented by stories and are labeled “must have.” They are the focus in this section. The story labeled “nice to have” is left as an exercise for you do to later on if you wish. You can find the full implementation for this chapter in the Source Code/Download area of the Apress web site (www.apress.com).
Base Application and Home Scene
The following are “must have” features.
Story
As an iOS developer, I want an application that runs on a Bluetooth LE-capable device and provides access to two scenes, so I can run each scene in a different mode.
Acceptance Criteria
- The home scene provides a button labeled Central Role that, when pressed, transitions to new blank scene titled Central Role.
- The home scene provides a button labeled Peripheral Role that, when pressed, transitions to a new blank scene titled Peripheral Role.
- The home scene provides a single indicator that shows when Bluetooth is powered on or off.
- The application prohibits any transition if Bluetooth is not powered on, or the device doesn’t support Bluetooth LE.
- The application displays an alert to the user if Bluetooth is not powered on, or the device doesn’t support Bluetooth LE.
- Each scene provides a Back button in the navigation bar that transitions back to the home scene when pressed (see Figure 9-5).

Figure 9-4. The home scene mock-up
Importance: must have.
Story
As an iOS developer, I want a scene that implements the central role, so I can scan for peripherals that I can connect to and retrieve data.
Acceptance Criteria
- The scene provides a Scan button that toggles device scanning on and off.
- The scene provides a view that will be populated with data transferred from a discovered peripheral device.
- The scene provides a progress indicator when scanning.
- The application can scan for peripherals.
- The application uses a filter for a specific service when scanning.
- The application can initiate a connection and connect to a discovered peripheral with the desired service.
- The application can request data.
- The application can receive data.
- The application disconnects from the peripheral when data transfer completes
- The application can present the data to the user.

Figure 9-5. The central role scene mock-up
Peripheral Role Scene
The following are must have features”
Story
As an iOS developer, I want a scene that implements the peripheral role and advertises a service, so a central role device can connect and retrieve data.
Acceptance Criteria
- The scene provides a switch labeled “Advertise” that toggles advertising on and off.
- The scene provides a text view that contains preset text.
- The application sets up a simple transfer service.
- The application will broadcast advertising packets when advertising is enabled so that the application can be discovered.
- The application can stop broadcasting when disabled.
- The application connects to a central device that initiates a connection.
- The application sends data when it receives a request.

Figure 9-6. The peripheral role scene mock-up
The following are “nice to have” features.
Story
As a Core Bluetooth transfer application user, I want an editable text view in the peripheral role scene (see Figure 9-7), so I can enter text that can be transferred to a central role device.
Acceptance Criteria
- The existing text view is editable and presents a keyboard when I tap inside the text view.
- The title bar presents a Done button to dismiss the keyboard when the user is done typing.
- The text that I type is the same text that is transferred to a connected central device.

Figure 9-7. Editable text view
Setting Up the Project
This application will use a single-view application project template (see Figure 9-8). To create a new single-view Swift application project, from Xcode select File ![]() New
New ![]() Project.
Project.

Figure 9-8. Creating a single-view application project
After clicking Next, you’ll be prompted to enter a project name and select the language and the target device. Make sure you choose Swift for the language and Universal for the device. Leave the option User Core Data unchecked. Click the Next button, choose a location for your project, and click the Create button.
Once the project is created, to keep things tidy, you may want to move some of the files/folders you use less often (e.g., AppDelegate.swift, Images.xcassets, and LaunchScreen.xib) into the Supporting Files folder. Next you’ll start laying out the UI.
Building the Interface
Now it’s time to lay out the UI, so refer to the mock-ups in section “Backlog.” Look at the subsection “Base Application and Home Scene Story.” There you will see acceptance criteria that call for navigation controls to navigate back to the home scene. So, the first thing you need to add is a Navigation Controller. Open up the Main.storyboard and select the View Controller from either the storyboard or the Document Outline. Then, from the menu, select Editor ![]() Embed In
Embed In ![]() Navigation Controller. Xcode will add a Navigation Controller to the storyboard and set as the Storyboard Entry Point, and add a relationship between the Navigation Controller and the existing View Controller. Your storyboard should look something like Figure 9-9.
Navigation Controller. Xcode will add a Navigation Controller to the storyboard and set as the Storyboard Entry Point, and add a relationship between the Navigation Controller and the existing View Controller. Your storyboard should look something like Figure 9-9.
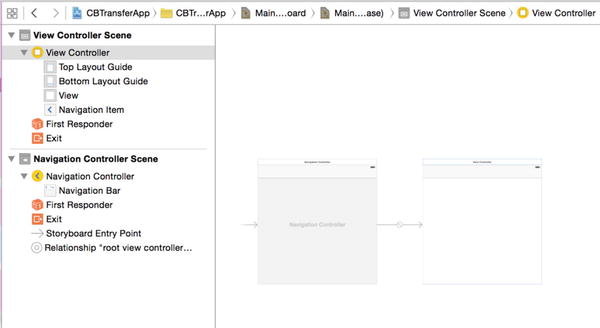
Figure 9-9. Adding a Navigation Controller
At this point, you should be able to build and run your app. If all went well you should see an empty white scene.
To change the color of the View Controller background to match the mock-up, select View in the View Controller tree, and show the attribute selector by clicking Attributes Inspector at the top of the Utilities panel. Then bring up the color picker by clicking Background control and selecting “Other…” In the color picker, choose Web Safe Colors and then find and select value 0066CC. Remember these steps because in future sections, you’ll only be given the color values.
I’ll assume you already know how to add controls to the scene, so I won’t cover that here. Next you’ll add two buttons, one labeled Central Role and the other labeled Peripheral Role. Set the button background color to white. Make the corners of each button rounded using User Defined Runtime Attributes. In the Utilities panel click the Identity inspector tab. In the User Defined Runtime Attributes section, click the Add button (+) in the lower left of the table. Double-click the Key Path field of the new attribute and change the value to layer.cornerRadius. Set the type to Number and the value to 4.

Tip Use user-defined runtime attributes to set an initial value for objects that do not have an Interface Builder inspector. The user-defined values are set when the storyboard is loaded.
Later in the chapter you’ll learn how to use IBInspectable and IBDesignable attributes, which are new features in Xcode 6.
Now you need to add constraints for each button. See Figures 9-11 and 9-12 for constraint type and values for each button. There are a few ways to add constraints in Interface Builder. You can let Interface Builder add them for you; you could use the Pin and Align tools located at the bottom of the storyboard canvas or you can control-drag between views. To create a Leading Space constraint, control-click the Central Role button and drag to the left edge of the View Controller. When you release the mouse, a pop-up menu is displayed with a list of possible constraints. Choose Leading Space to Container Margin. When you drag vertically, Interface Builder will present options to set vertical spacing between the views and options to horizontally align the views. Likewise, when you drag horizontally, you’ll be presented with options to set the horizontal spacing between the views and options to vertically align the view. Both gestures may include other options such as setting the view size.
Apply the constraints in Figure 9-11 to the Central Role button.

Figure 9-11. Constraints for Central Role button
Now apply constraints shown in Figure 9-12 to the Peripheral Role button.

Figure 9-12. Constraints for Peripheral Role button
Next you will add two scenes to the storyboard, one for central role and the other for peripheral role. Drag and drop a View Controller for each scene onto the storyboard and situate them so they look like Figure 9-13.

Figure 9-13. Add central and peripheral View Controllers
To add a segue for the central role scene, select the Central Role button from the Document Outline on the left, then control-drag to the top View Controller on the right and release. Select show from the Action Segue pop-up. (See Figure 9-14.)

Figure 9-14. Adding a segue for central role scene
Repeat the same steps for the Peripheral Role button. Your layout should look similar to the one in Figure 9-15.

Figure 9-15. Segues for central and peripheral scenes
Now set the title for each of the new View Controllers. Open up the Utilities panel and click the Attributes Inspector. Now select the top View Controller and set its title to Central Role from the View Controller section of the Attribute Inspector. Repeat these steps for the peripheral role View Controller.
Set the background colors for each of the views. The value for the central role view is FF6600, and for the peripheral role view, 009999.
Now build and run the app. Press each button and verify that you transition to the appropriate scene, that it has the proper title, and that you can navigate back to the home scene.
There is one more UI element that you need to add, and then it’s time to jump in and start writing some code. Add a UILabel to the home scene and set the text to “Bluetooth Off” (see Figure 9-16) and the text color to FF0000. You can set up constraints so it stays centered in the view.

Figure 9-16. Connect Label to ViewController class
Now you need to connect the label to a property of the ViewController. First, close the Utilities view on the right if it’s open, and click the Assistant Editor. You should now see a split window in Xcode with the Main.storyboard on the left and the ViewController.swift file on the right (you could dismiss the Document Outline for even more room). Next, control-drag the Label from the storyboard, to the ViewController source and drop it inside your ViewController class.
In the pop-up, name the outlet bluetoothStateLabel and use the default options, then click the Connect button. Your ViewController class should now have an outlet defined.
@IBOutlet weak var bluetoothStateLabel: UILabel!
If you review the acceptance criteria, you’ll see that we need to satisfy the requirement “The home scene provides a single indicator that shows when Bluetooth is either powered on or off.” That means you now have to utilize the Core Bluetooth framework. In the next section, you’ll learn how to start up a central manager and use it to determine the Bluetooth state.
Using a Central Manager
In this section, you’ll learn how to start up a central manager and use it to determine if a device supports Bluetooth LE and is available to use on the central device.
The CBCentralManager object is a Core Bluetooth representation of a central role device. When a central manager is initialized, it calls the centralManagerDidUpdateState method of its delegate. This means you must adopt the delegate protocol and implement this required method.
Open the MainViewController.swift file and import the framework and add the CBCentralManagerDelegate protocol to your class declaration.
import CoreBluetooth

class ViewController: UIViewController, CBCentralManagerDelegate {
You’ll see an error indicator, which says the ViewController, does not conform to protocol. That’s because you need to implement the required delegate method.
func centralManagerDidUpdateState(central: CBCentralManager!) {

}
Now add a property for a CBCentralManager and initialize it in the viewDidLoad method.
var centralManager: CBCentralManager!

override func viewDidLoad() {
    super.viewDidLoad()
    centralManager = CBCentralManager(delegate: self, queue: nil)
}
The central manager is initialized with self as the delegate so the ViewController will receive any central role events. By specifying the queue as nil, the central manager dispatches central role events using the main queue. The central manager starts up after this call is made and begins dispatching events.
Listing 9-1 shows how to examine the central manager state in the centralManagerDidUpdateState callback when the state change event fires. Here is where you can update the text and text color of the bluetoothStateLabel property based on the central state.
The PoweredOn state indicates that the central device supports Bluetooth LE and the Bluetooth is on and available for use. The PoweredOff state indicates that Bluetooth is either turned off, or the device doesn’t support Bluetooth LE.
Build and run the application. If your device has Bluetooth enabled, the indicator label should read “Bluetooth On” and its color should be green. Use the slide-up settings panel to turn Bluetooth off. The indicator label should now read “Bluetooth Off” and its color should be red.
Now that you can determine the Bluetooth state, you can use that information to satisfy the remaining acceptance criteria. Add the Bool property isBluetoothPoweredOn that will be used to reflect the Bluetooth state.
var isBluetoothPoweredOn: Bool = false
Set its value in the centralManagerDidUpdateState method accordingly.
You’ll use this value to determine whether or not transition is allowed to the central or peripheral mode scenes. You set up two segues in the previous section to those scenes. In order to interact with the storyboard, you need to add identifiers for each segue. Create a new file named Const.swift and add a global constant for each.
let kCentralRoleSegue: String = "CentralRoleSegue"
let kPeripheralRoleSegue: String = "PeripheralRoleSegue"
Open Main.storyboard and select the segue for the central role scene. Open the Utilities panel and click the Attributes Inspector. You will see a section named Storyboard Segue with a field where you can enter an identifier (see Figure 9-17). Enter the string value you defined for the central role segue. This string is only used for locating the segue inside the storyboard.

Figure 9-17. Adding segue identifiers
Repeat the foregoing steps for the peripheral role segue.
The UIViewController provides an override method which allows you to control whether a particular segue should be performed. Open ViewController.swift and add the method shouldPerformSegueWithIdentifier to the ViewController class (see Listing 9-2).
When you initiate a segue, this method will be called with the string value that identifies the triggered segue, and the object that initiated the segue. The return value for this method should be true if you want the segue to be executed; otherwise, return false.
In this method you’re only interested in the identifier; the sender object is for informational purposes only and can be ignored here. Compare the identifier value with the constants you defined earlier. If you find a match, then check the Bluetooth state. If Bluetooth is powered on, you can allow the segue to execute by returning a value of true.
In the case where Bluetooth is powered off, you want to display an alert and provide an option to go to the Settings app where the Bluetooth setting can be changed. Add the method shown in Listing 9-3 to the ViewController class. Call this method from within the shouldPerformSegueWithIdentifier method.
if !isBluetoothPoweredOn {
        showAlertForSettings()
    return false;
}
This method configures a UIAlertController object to display an alert modally with a title, a message, and a style. Additionally, actions are associated with the controller. The cancel action is labeled Settings and is used to open the Settings app. The OK action is used to simply dismiss the alert.
Build and run the application. Turn Bluetooth off, and then press each button to verify that the alert is displayed and access to the other scenes is prohibited. Press the Settings button on the alert to make sure it opens the Settings app. At this point you’ve satisfied all the requirements for the first backlog item. In the next section, you’ll move on to the next backlog item and implement the central role.
Connecting to a Bluetooth LE Device in Your App
In this section, you’ll build the central role scene. You’ll learn how to
- Scan for peripherals that advertise a specific service
- Connect to a peripheral and discover services
- Discover and subscribe to characteristics for a specific service
- Retrieve characteristic values
- Customize and animate a button
At this point, you have a running application that can detect whether or not Bluetooth is powered on and has the ability to transition to two different scenes.
Building the Interface
The UI for this scene has a single custom UIButton object and a read-only UITextView object. Refer to the mock-up in the section “Central Role Scene.”
Tip Use the Interface Builder Live Rendering feature in Xcode 6 to design and inspect a custom view. The custom view will render in Interface Builder and appear as it will in your application.
Start by adding a new Swift file to your project named CustomButton.swift, and declare the class CustomButton as a subclass of UIButton using the new IBDesignable attribute. Then add inspectable properties using IBInspectable for cornerRadius, borderWidth, and borderColor (see Listing 9-4).
When you add the IBDesignable attribute to the class declaration, Interface Builder will render your custom view. Your custom view will update automatically as you make changes by using the IBInspectable attribute to declare variables as inspectable properties.
Now open up the storyboard and add a UIButton to the central role scene. In the Utilities panel, click the Identities Inspector tab and change the class type from UIButton to CustomButton you just created. Now click the Attributes Inspector tab and set the button title to Scan. Notice that there’s a section named Custom Button with a field for each of the inspectable properties you declared. Set the values for Corner Radius to 50, Border Width to 4, and Border Color to White Color. In the Button section, set the Shows Touch on Highlight to checked so when a user presses the button, there will be a white glow where the touch event occurred on the button (see Figure 9-18).
Tip Set the corner radius to half the width of the view to give it a circular shape.

Figure 9-18. Setting button attributes
If you haven’t added constraints, you won’t see the constraint graphics. In that case you will only see layout handles. See Figure 9-19 as a guide to set up your constraints.

Figure 9-19. Scan button constraints
Now you need to add a UITextView object to the scene and position it so it looks similar to the illustration in Figure 9-20. Then in the Attributes Inspector, set the Text View text color to White Color and the background color to Clear Color. Set the Font to System 18.0.
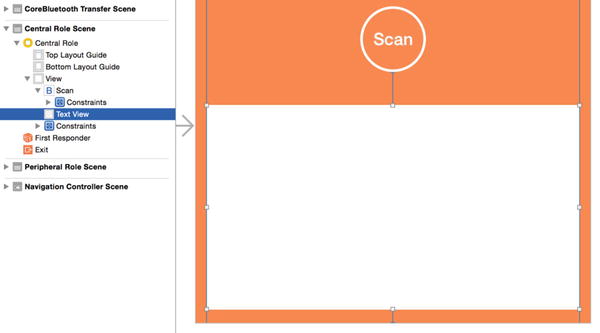
Figure 9-20. Setting attributes for UITextView
Set the constraints for the text view to match the illustration in Figure 9-21.

Figure 9-21. Constraint settings for UITextView
For the last steps in building the UI, you need to connect the button and text view to a property of the View Controller. First, add a new Swift file to the project named CentralViewController.swift and declare the class CentralViewController as a subclass of UIViewController. Then assign the CentralViewController as the class for the central role identity by opening the storyboard and selecting the central role scene (see Figure 9-22). In the Utilities panel on the right, click the Identity Inspector tab. In the Custom Class section, use the class drop-down to select CentralViewController.

Figure 9-22. Assign central role identity
Now using the Assistant Editor, control-drag and drop each of the UI controls inside the CentralViewController class. Name the UIButton connection scanButton and the UITextView to textView; use the default options. Your class should look like that shown in Listing 9-5.
At this point build and run the app. When you transition to the central role scene, it should resemble the mock-up in the section “Central Role Scene.” In the next section, you’ll start implementing the central role.
Keeping Things Clean with Delegation
The approach taken here is slightly different than that of the home scene where you created the CBCentralManager object and the ViewController used it directly. You’ll utilize the Delegation pattern, which is commonly used by Apple frameworks. The delegate is typically a Custom Controller object. The delegating object maintains a weak reference to its delegate.
You’ll implement the design pattern by defining a protocol for a TransferServiceScannerDelegate. The CentralViewController will adopt this protocol and implement the methods that respond to central role actions. You’ll create a new class TransferServiceScanner that will be the delegating object. It will hold a reference to the CentralViewController, which will act as the delegate. The TransferServiceScanner object will act as the delegate for the CBCentralManager and CBPeripheral objects. The sequence diagram in Figure 9-23 illustrates the interaction between the objects. ,

Figure 9-23. Sequence diagram for TransferServiceScanner
Create a new Swift file named TransferServiceScanner.swift and define a protocol for the TransferServiceScannerDelegate. The delegate will respond to scan start and stop actions, which will be used to start a scanning progress indicator. It will also respond to data transfer action that will be used to present data to the user (see Listing 9-6).
Now update the CentralViewController to adopt the TransferServiceScannerDelegate protocol and add stubs for the required delegate methods (see Listing 9-7). You’ll complete the method implementation once we build out the TransferServiceScanner.
Tip In Swift, the comment // MARK: is the equivalent to the Objective-C pre-processor directive #pragma mark. Use it to define areas in your source code.
Next, in the file TransferServiceScanner.swift, declare the class TransferServiceScanner as a subclass of NSObject, and adopt the protocol for both CBCentralManagerDelegate and CBPeripheralDelegate. Also you’ll need to import Core Bluetooth. Then add properties for CBCentralManager, CBPeripheral, NSMutableData, and TransferServiceScannerDelegate.
You must make sure that you declare the delegate property weak to avoid a strong reference cycle. A strong reference cycle will prevent TransferServiceScannerDelegate from being deallocated, which will cause a memory leak in your application. Also, a weak reference is allowed to have no value, so it must be declared as having an optional type.
At the top of the class body, implement an initializer method that you will call when you create a new instance of TransferServiceScanner (see Listing 9-9). The primary role of an initializer is to ensure that a new instance of a type is set up properly before first use.
The initializer starts by calling super.init(), which calls the initializer of TransferServiceScanner class’s superclass, NSObject. Then the centralManager property is initialized with an instance of CBCentralManager and initialized with self as the delegate. Finally the delegate property is initialized with the TransferServiceScannerDelegate object that is passed as a parameter.
Next, you must implement the required protocol method centralManagerDidUpdateState. Add the code from Listing 9-10 to the TransferServiceScanner class. The implementation is similar to the one in section “Using a Central Manager,” except in this case the state information is being output to the log window. Later in this section, you’ll update this method.
Build and run the application. You should see the log output “Central Manager powered on” when you transition to the central role scene.
At this point, you are ready to start interacting with the central manager. Refer back to the section “Central Role Scene” and look at the requirements. The requirements call for the ability to toggle scanning on and off. In this section, you will provide support for that.
You will focus on the following requirements:
- The application can scan for peripherals
- The application uses a filter for a specific service when scanning
- The scene provides a Scan button that toggles device scanning on and off
- The scene provides a progress indicator when scanning
First you need to define a constant that will be used to uniquely identify the specific service that the scanner is interested in. In the file Const.swift add the following line:
let kTransferServiceUUID: String = "3C4F8654-E41B-4696-B5C6-13D06336F22E"
You will use this constant to initialize a CBUUID instance. The CBUUID object represents the 128-bit identifier. The advantages are that the class provides some factory methods for dealing with long UUIDs (universally unique identifiers), and the object also can be passed around instead of the string.
Note If you want to provide your own UUID, you can open up a terminal window and type the command uuidgen. It will generate a UUID that you can then copy and paste.
Now you’ll implement the method startScan (see Listing 9-11). The CentralViewController will call this method when the user taps the Scan button when the application is not scanning.
In this method you create two local variables that will be passed to the centralManager. The services variable is an array of CBUUID objects that represent the services the app is scanning for. In this case it’s an array with a single element. The options local variable is a dictionary specifying options to customize the scan. The key CBCentralManagerScanOptionAllowDuplicatesKey specifies whether or not the scan should run without duplicate filtering. The value assigned to that key is false. What this means is that notification should be sent each time the peripheral is discovered. If the value were set to true, then notification would only be sent once per discovery.
Next, the method centralManager.scanForPeripheralsWithServices is called which starts the scan for peripherals that are advertising services. And, finally, the delegate is notified that the scan did start by calling through didStartScan.
Next, you’ll implement the method stopScan (Listing 9-12). The CentralViewController will call this method when the user taps the Scan button while the application is scanning. It will also be called when the central manager state changes to the powered off state.
This method tells the central manager to stop scanning and then notifies the delegate that scanning has stopped. Update the switch block in the centralManagerDidUpdateState method for the PoweredOff case, adding a call to stopScan.
To keep track of the scanning state, add a Bool property isScanning to the CentralViewController class and set its initial value to false.
var isScanning: Bool = false
Add an action method to handle the Scan button tap event. Open the storyboard and control-drag the Scan button into the CentralViewController class and name the method toggleScanning (see Listing 9-14). You’ll use this method to start and stop the scanning based on the isScanning property value.
The CentralViewController is a delegate for the TransferServiceScanner, so when scanning starts or stop, the View Controller will be notified through the delegate methods. Update the delegate methods to set up the scan state.
Build and run the application. Transition to the central role scene and then tap the Scan button. You should see the text “Scanning . . .” displayed in the text view. Tapping the Scan button a second time should clear the text.
Scan Progress
This simple text that is displayed could serve as an indicator for the scanning state, but it’s static and it’s boring. It’s hardly a scanning progress indicator. Adding a simple rotation animation to the Scan button is quick and easy and will serve as an effective progress indicator for when scanning starts and stops.
You’ll implement an extension to the UIView class that adds functionality to rotate the view using keyframe animation.
Open the CentralViewController.swift and above the class declaration add the code in Listing 9-16.
The parameters fromValue and toValue represent rotation and are specified in radians. The duration is specified in seconds.
The CABasicAnimation class provides single-keyframe animation for a layer property. It will allow you to interpolate between two values over time. It also allows you to set a delegate so you can receive notification when the animation completes by calling the delegate’s animationDidStop method.
For this use case, rotating the Scan button 360 degrees would constitute one animation cycle. Each time an animation cycle completes the delegate is notified.
Override the animationDidStop method of the View Controller (see Listing 9-17). This method will evaluate the scan state and restart the animation if scanning is still in progress.
Now update the didStartScan method so it starts the rotation animation.
scanButton.rotate(0.0, toValue: CGFloat(M_PI * 2), duration: 1.0, completionDelegate: self)
When the scanning stops, the animation will end when the animation cycle completes. This guarantees that the Scan button will be in the correct orientation.
Build and run the application. Transition to the central role scene and tap the Scan button. You should see the Scan button spinning. The animation should stop when you tap the Scan button again.
Discover and Connect
While scanning, if a central manager discovers a peripheral that is advertising, it will notify its delegate by calling the didDiscoverPeripheral method (see Listing 9-18).
Included in the parameters are the discovered peripheral, advertising data, and the signal strength. In this method you need to determine if the peripheral is within range. If so, then you can initiate a connection to it. You must, however, store a local copy of the peripheral; otherwise, Core Bluetooth will dispose of it.
Once you initiate a connection, the central manager will notify the delegate as to whether or not the connection was successful. There is a separate method for each case, didConnectPeripheral or didFailToConnectPeripheral (see Listings 9-19 and 9-20).
If the connection is successful, scanning should stop to save power, and any data previously held should be released. In order to receive discovery notifications, you must assign the peripheral’s delegate to self. Now you’re ready to explore the specified services. In this case you are interested in a transfer service.
Explore Services and Characteristics
When a specified service is discovered, the peripheral will notify its delegate by calling the didDiscoverServices method with a reference to the peripheral that the services belong to, and an NSError object. You must evaluate the error to determine whether the discovery was successful.
If the service discovery is successful, you must iterate the services to find the characteristic of interest. In this case you want the kTransferCharacteristicUUID.
Add a definition for the transfer characteristic to the Const.swift file.
let kTransferCharacteristicUUID: String = "DEB07A07-463E-4A65-BABB-0DA17E4E517A"
Subscribe and Receive Data
When you discover a specified characteristic, the peripheral will notify its delegate by calling the didDiscoverCharacteristicsForService method with a reference to the peripheral that is providing the information, the service that the characteristic belongs to, and an NSError object. You must evaluate the error to determine whether the discovery was successful (see Listing 9-22).
If the characteristic discovery is successful, you must iterate the service characteristics to verify that the characteristic is the one you’re interested in. You must subscribe to the characteristic by calling the peripherals setNotifyValue method. The first parameter is a Boolean which indicates whether or not you want to receive notifications for the specified characteristic. In this case you pass true, signaling to the peripheral that you want to receive the data it contains. Notification is sent each time a characteristics value changes.
The peripheral will now start sending data and notify its delegate by calling its didUpdateValueForCharacteristic method with a reference to the peripheral that is providing the information, the characteristic whose value is being retrieved, and an NSError object (see Listing 9-23).
Not all characteristics have readable values. Typically, you would determine whether the value is readable by examining its properties. For the purposes of this example, it’s known that the characteristic value is of type String.
Here, the transfer service peripheral sends text from a text field in small amounts. The data is accumulated until you receive an end-of-message (EOM) string indicating that the data transfer is complete. At this point, you notify the TransferServiceScannerDelegate that the transfer is complete and pass the data. You then unsubscribe from the characteristic and disconnect.
When you attempt to subscribe to a characteristic, the peripheral calls its delegate method didUpdateNotificationStateForCharacteristic with a reference to the peripheral that is providing the information, the characteristic for which notifications are to be configured, and an NSError object. You must evaluate the error to determine whether the discovery was successful. This method is also invoked when you unsubscribe (see Listing 9-24).
Here you are only interested in the transfer characteristic. In the case where you unsubscribe, notifications will stop and you can disconnect from the peripheral.
Peripheral Role
At this point, you have an application that implements the central role. In the following sections, you will implement the peripheral role. You’ll learn how to
- Start up a peripheral manager
- Set up a service and characteristic for the peripheral
- Advertise the service
- Handle requests from a connected central device
- Send data to a subscribed central device
Building the Interface
The UI for this scene has a single UISwitch object and an editable UITextView object. Refer to the mock-up in the section “Peripheral Role Scene.”
Start by adding a new Swift file to your project named PeripheralViewController.swift and declare the class PeripheralViewController as a subclass of UIViewController. Then assign the PeripheralViewController as the class for the peripheral role identity by opening the storyboard and selecting the peripheral role scene. In the Utilities panel on the right, click the Identity Inspector tab. In the Custom Class section, use the class drop-down to select PeripheralViewController.
Now open up the storyboard if not already open and add the following controls to peripheral role scene; then arrange them so they look similar to the illustration in Figure 9-24.
- UILabel titled Advertise
- UISwitch
- UITextView

Figure 9-24. Peripheral role scene
Now control-drag and drop the UISwitch and the UITextControl inside the PeripheralViewController class. Leave the default text in the text view. Your PeripheralViewController class should look like the code in Listing 9-25.
Add an action method to handle the advertise switch event. Open the storyboard and control-drag the advertise switch into the PeripheralViewController class and name the method advertiseSwitchDidChange. You’ll use this method to start and stop advertising.
@IBAction func advertiseSwitchDidChange() {
}
At this point build and run the app. When you transition to the peripheral role scene, it should resemble the mock-up in the section “Peripheral Role Scene.” In the next section, you’ll start implanting the peripheral role.
Delegate Setup
You’ll use the Delegation pattern again and implement the design pattern by defining a protocol for a TransferServiceDelegate. The PeripheralViewController will adopt this protocol and implement the methods that respond to peripheral role actions. You’ll create a new class TransferService that will be the delegating object. It will hold a reference to the PeripheralViewController that will act as the delegate. The TransferService object will act as the delegate for the CBPeripheralManager object. The sequence diagram in Figure 9-25 illustrates the interaction between the objects. Remember that the delegating object maintains a weak reference to its delegate.

Figure 9-25. Sequence diagram for TransferService
Create a new Swift file named TransferService.swift and define a protocol for the TransferServiceDelegate. The delegate will respond to power on/off events which will change the advertise switch state. It will also respond to a send data request that will be used to pass text data to the service.
Now update the PeripheralViewController to adopt the TransferServiceDelegate protocol (Listing 9-27) and add stubs for the required delegate methods. In the didPowerOff method, set the advertiseSwitch state to off. In the method getDataToSend return the textView object’s text value.
Next, in the file TransferService.swift, declare the class TransferService as a subclass of NSObject and adopt the protocol for CBPeripheralManagerDelegate (Listing 9-28) Also you’ll need to import CoreBluetooth. Then add properties for CBPeripheralManager, CBMutableCharacteristic, NSData, an index counter, and TransferServiceDelegate.
Make sure that you declare the delegate property as weak to avoid a strong reference cycle.
Now implement an initializer method (see Listing 9-29) that will be called when you create a new instance of TransferService.
The initializer starts by calling super.init(), which calls the initializer of TransferServiceScanner class’s superclass, NSObject. Then the peripheralManager property is initialized with an instance of CBPeripheralManager and initialized with self as the delegate. Finally the delegate property is initialized with the TransferServiceDelegate object that is passed as a parameter.
Next, you must implement the required protocol method peripheralManagerDidUpdateState (see Listing 9-30).
In this method, you set up or tear down services and notify the delegate according to the state. In the next section you will implement both methods: setupServices and teardownServices.
Setting up a Service
The services and characteristics of a peripheral are identified by UUIDs. The Bluetooth Special Interest Group (SIG) has published a number of commonly used UUIDs. However, the transfer service doesn’t use any of those predefined Bluetooth UUIDs. Earlier in this chapter, you defined UUIDs for the transfer service and characteristic in Const.swift.
Now implement the setupServices method that will be called when the peripheral manager’s state changes to PoweredOn. Make the method private so that it’s only accessible from within the TransferService class (see Listing 9-31).
In this method you create a mutable characteristic and set its property, value, and permissions. The property and permissions are set to readable. The value is set the value to nil because this will ensure that the value will be treated dynamically and is requested by the peripheral manager when it receives a read/write request. Otherwise the value is cached and treated as read-only.
Next, you create a mutable service and associate the mutable characteristic with it by setting the service’s array of characteristics. Finally, publish the service by calling addService that adds the service to the peripheral’s database. The service cannot be changed once this step is complete. Once the service is published, the peripheral calls the delegate method didAddService.
Now implement the teardownServices method that will be called when the peripheral manager’s state changes to PoweredOff (see Listing 9-32).
The only step in this method is to remove all published services from the peripheral’s database.
Build and run the application. You should see the log output “Peripheral Manager powered on” when you transition to the peripheral role scene.
Once services and characteristics have been published, you can start advertising one or more of them by calling the peripheral manager’s startAdvertising method. Add the code in Listing 9-33 to the TransferService class.
You construct a dictionary with CBAdvertisementDataServiceUUIDsKey as the only key, with a value of an array of CBUUID objects that you want to advertise, then pass that dictionary as a parameter to the peripheral manager’s startAdvertising. The peripheral manager will then call its delegate method peripheralManagerDidStartAdvertising. Once advertising begins, any remote central role device can discover and initiate a connection. To stop advertising, you call the peripheral manager’s stopAdvertising method (see Listing 9-34).
In the PeripheralViewController class, add a property to hold a TransferService object.
var transferService: TransferService!
Then initialize it in the viewDidLoadMethod as such:
transferService = TransferService(delegate: self)
Now update the method advertiseSwitchDidChange to start and stop advertising (see Listing 9-35).
Sending Data
Once connected, a remote device will subscribe to one or more characteristic values. You are responsible for sending notifications to the subscribers when the value of any characteristic they are subscribed to changes. The peripheral manager will then call its delegate method didSubscribeToCharacteristic. From this method, you should start sending data (see Listing 9-36).
This method calls the TransferServiceDelegate method getDataToSend to retrieve the data to be sent to the remote device. It then initializes a data index counter and starts sending data (see Listing 9-37).
In this method, you send data in MTU-sized chunks until there is no more data to send, followed by an EOM indicator. The MTU (Maximum Transmission Unit) is defined at 20 bytes. For each chunk you call the peripheral manager’s updateValue method, which will then forward the data to the connected central role device. The return value indicates whether the update was successfully sent or not. If the underlying queue was full, the method returns false. In that case the peripheral manager will call its delegate method peripheralManagerIsReadyToUpdateSubscribers when more space becomes available. You will implement that method to resend the data.
Enabling Your App for Background Communication
System resources are limited on iOS devices, so by default many of the Core Bluetooth tasks are disabled while your app is in the background. In order for the application to support background mode, you can declare your app to support the Core Bluetooth background execution modes. This will enable your app to wake up from a suspended state and process Bluetooth-related events.
In the Project navigator right-click the Info.plist file and select Open As ![]() Source Code and add the UIBackgroundMode key, and set the keys value to an array containing the following strings:
Source Code and add the UIBackgroundMode key, and set the keys value to an array containing the following strings:
- bluetooth-central: The app communicates with Bluetooth LE peripherals using the Core Bluetooth framework.
- bluetooth-peripheral: The app shares data using the Core Bluetooth framework.
<key>UIBackgroundModes</key>
<array>
    <string>bluetooth-central</string>
    <string>bluetooth-peripheral</string>
</array>
Bluetooth Best Practices
The Core Bluetooth framework gives you control over implementing most aspects of both the central and peripheral roles. This section provides guidance for using this control in responsible way.
- Only scan for devices when you need to. Once you discover a device you’re interested in, stop scanning for other devices. This will help limit radio usage and power consumption.
- When exploring peripheral end-of-sentence services and characteristics, use a filter to look for and discover only the services and characteristics you need. Otherwise it can negatively affect your battery life.
- It’s best to subscribe to a characteristic’s value when possible especially if the value changes often. This will eliminate the need to poll.
- Cancel any subscriptions and disconnect from a device when you have all the data you need. This will help reduce your app’s radio usage.
- Advertise data only when you need to. Advertising peripheral data uses your device’s radio, which affects your device’s battery. Once a device is connected, stop advertising.
- Let the user decide when to advertise, since your app is unaware of nearby devices.
- Allow connected central role devices to subscribe to your characteristics. When you create a mutable characteristic, configure it to support subscriptions by setting the characteristics properties with the CBCharacteristicsPropertyNotify constant.
Summary
In this chapter, you learned some key terms and concepts related to the Bluetooth specification, and how Apple adopted these in its Core Bluetooth framework. You also learned how to use the Core Bluetooth framework to discover and connect to Bluetooth LE-compatible devices, as well how to send and receive data between devices. Apply this knowledge along with best practices to build your own high-quality Bluetooth LE application.