
Building Location Awareness with iBeacons
Manny de la Torriente
This chapter introduces iBeacon technology and will show you how to use the Core Location framework to interact with beacons. You’ll learn how to establish a region around an object, determine when a region has been entered or exited, and estimate your proximity to a beacon. You’ll also learn how to configure your iOS device to act as an iBeacon transmitter.
Introduction to iBeacons
Apple standardized the iBeacon technology, which introduces a class of low-cost transmitters that utilize Bluetooth Low Energy (LE). A device with iBeacon technology is used to establish a region that allows an iOS device to determine when it has entered or exited the region and to estimate its proximity to the transmitter. The Apple Store, for example, uses beacons to bring up its app on your phone when you enter the store.
A device that is configured to be an iBeacon transmitter provides information via Bluetooth LE. The information contains a unique user ID (UUID) that is specific to a deployment use case and major and minor values, which provide identifying values for the iBeacon.
When an iOS device detects an iBeacon’s signal, it uses the RSSI (received signal strength indicator) to determine its proximity to the beacon. The signal strength increases as the receiver moves closer to the beacon.
The calibrated transmission power of a device is its known measured signal strength in RSSI at 1 meter. The distance provided by iOS is in meters and is an estimate based on the ratio of the beacon’s signal strength over the transmission power.
User authorization is required in order to use any location services on an iOS device, which means the user can choose to allow access. Applications that utilize iBeacon functionality will also appear in the Settings app.
An application can be notified when a user enters or exits a region that is defined by a beacon. A beacon region is an area defined by a device’s proximity to a Bluetooth LE beacon, not geographical coordinates. In iOS, registered regions persist between launches of an app, so regions associated with an application are monitored at all times, even when the app is in a suspended state or not running.
Regions are a shared application resource, and the number of regions available system-wide is limited. Therefore, a single application is limited to 20 regions that can be monitored simultaneously.
Ranging
The process of determining the approximate proximity of one or more beacons to a device is known as ranging. Filters are applied to a distance estimate to determine an estimated proximity to a beacon. iOS defines four proximity states: unknown, immediate, near, and far (see Table 10-1).
Table 10-1. Proximity States
Proximity State | Description |
|---|---|
Unknown | Indicates that the proximity of a beacon can’t be determined. Ranging may have started, or there are insufficient measurements to determine state. |
Immediate | Indicates that a device is physically very close or directly held up to the beacon. |
Near | Indicates that a device is approximately within 1 to 3 meters of a beacon. This state may not be reported if there are any obstructions between the device and the beacon. |
Far | Indicates that a beacon is detected, but the signal strength is too low to determine a near or immediate state. When in this state, use the accuracy property to determine potential proximity to the beacon. |
Core Location will report multiple beacons in an order that’s based on a best guess of their proximity. This order may not be correct if there are any obstructions that affect signal strength. Also, some beacon devices may emit stronger signals than others, so a device that is physically further away than others may be reported first.
Building the iBeaconApp Application
In this section you’ll build a simple dual-purpose application that demonstrates how to scan for specific nearby iBeacons and configure your Bluetooth LE-capable iOS device as an iBeacon transmitter. The app consists of three master scenes: a home scene, a Region Monitor scene, and an iBeacon scene. The home scene provides segues to the other scenes and an indicator label that reflects the current Bluetooth on/off state of the device. The Region Monitor scene supports two basic methods for interacting with beacons, region monitoring and ranging. The iBeacon scene allows you to configure your iOS device as an iBeacon transmitter. Figure 10-1 illustrates the storyboard view of the iBeaconApp.

Figure 10-1. Storyboard view of iBeaconApp
Creating the Project
This application will use a single-view application project template. To create a new single-view Swift application project, from Xcode file menu select File ![]() New
New ![]() Project and you’ll be presented with the view shown in Figure 10-2.
Project and you’ll be presented with the view shown in Figure 10-2.

Figure 10-2. Creating a single-view application project
After selecting Next, you’ll be prompted to enter a project name, select the language, and select the target device. You can name it iBeacon App or choose another name. Make sure you choose Swift for the language and Universal for the device. Leave the option User Core Data unchecked. Click the Next button, choose a location for your project, and click the Create button.
Setting Background Capabilities
System resources are limited on iOS devices, so by default many of the Core Bluetooth tasks are disabled while your app is in the background. In order for the application to support background mode, you can declare your app to support the core Bluetooth background execution modes. This will enable your app to wake up from a suspended state and process Bluetooth-related events.
From the main project in Xcode select the Capabilities tab. In the Background Modes section, turn the switch to ON, then check Location updates and Acts as a Bluetooth LE accessory (see Figure 10-3).

Figure 10-3. Setting background capabilities in Xcode
Enabling the Background Modes option adds the UIBackgroundModes key and the corresponding background mode values to your app’s Info.plist file. Table 10-2 lists the background modes you must specify so your iOS device can act as an iBeacon transmitter.
Table 10-2. Xcode Background Settings
Xcode Background Mode | UIBackgroundMode Value | Description |
|---|---|---|
Location updates | Location | The app keeps users informed of their location, even while it is running in the background. |
Acts as a Bluetooth LE accessory | Bluetooth-peripheral | The app supports Bluetooth communication in peripheral mode through the Core Bluetooth framework. Note: using this mode requires user authorization. |
Building the Home Scene
In this section you’ll build out the home master scene. It’s assumed that you’re already familiar with the basics of building an application and using Interface Builder, so this section will briefly cover creating a project, how to add user interface (UI) elements, adding constraints, and how to connect interface behaviors to your code.
The scene is very basic. It will contain a label for the app title, a label that will be used as an indicator for the Bluetooth power status, and two custom buttons used to segue to the other scenes (see Figure 10-1).
The first thing you need to add is a navigation controller. Its primary job is to manage the presentation of your view controllers as well as providing a back button that makes it easy to return to the previous level. Open up the Main.storyboard and select the view controller from either the storyboard or the Document Outline. Then from the menu, select Editor ![]() Embed In
Embed In ![]() Navigation Controller. Xcode will add a v controller to the storyboard, set it as the Storyboard Entry Point, and add a relationship between the navigation controller and the existing view controller. Your storyboard should look like the one in Figure 10-4.
Navigation Controller. Xcode will add a v controller to the storyboard, set it as the Storyboard Entry Point, and add a relationship between the navigation controller and the existing view controller. Your storyboard should look like the one in Figure 10-4.
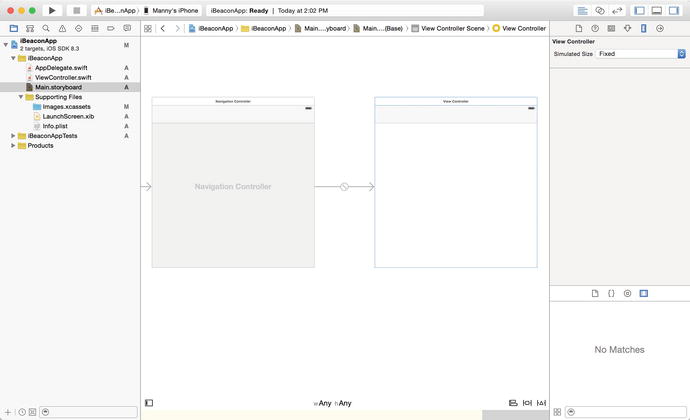
Figure 10-4. Adding a Navigation Controller
At this point, you should be able to build and run your app. If all goes well you should see an empty white scene.
On the storyboard, double-click the navigation bar of the view controller and set the title text of the navigation item to iBeacon Home. Now select the view inside view controller and then, from Attributes Inspector, change the color of the background to 0066CC.
For the application title, drag a UILabel from the Object library to the center of the storyboard. With the label selected, open the Utilities panel and use the Attributes Inspector to set the text to iBeacon App (or to the name you chose for the app). Set the font color to white, the font size to 26, and the text alignment to centered. With the label still selected, use the Align control and select Horizontal Center in Container to create an X alignment constraint. Control-drag upward from the label to the View and select Top Space to Top Layout Guide to create a Vertical Space constraint.
For the Bluetooth indicator, add another UILabel just below the title label and set the text to Bluetooth Off. Set the font color to FF0000, the font size to 17, and the text alignment to centered. Use the Align control and select Horizontal Center in Container to create an X alignment constraint. Control-drag upward from the label to the title label directly above and select Vertical Spacing.
Now connect an outlet from the label to the ViewController implementation. Using the Document Outline, control-click the Bluetooth Off label and drag a connection from the New Referencing Outlet well and drop it onto the controller source (see Figure 10-5).

Figure 10-5. Connecting a new referencing outlet
In the pop-up, name the outlet bluetoothStateLabel and click the Connect button (see Figure 10-6).

Figure 10-6. Naming the outlet connection
Your ViewController class should now have an IBOutlet defined.
@IBOutlet weak var bluetoothStateLabel: UILabel!
Later in this chapter, you’ll utilize the Core Bluetooth framework and start up a central manager and use it to determine the Bluetooth state and set the indicator accordingly.
There are two custom buttons on the home screen that you will use to switch between different modes of operation. The steps that follow will guide you through the process of adding the first button, and then you can repeat those steps to add the second button.
Add a UIButton to the scene and place it below the Bluetooth indicator label. From the Attributes Inspector, set the button title to Region Monitor, set the font size to 20.0, and set the text color to white. In the Button section, set the Shows Touch on Highlight to checked so when a user presses the button, there will be a white glow where the touch event occurred on the button. Don’t worry about the button size and borders; you’ll fix that shortly.
Setting up Constraints
Set up the constraints to match those shown in Figure 10-7. These constraints should be used for both buttons. There are a few ways to add constraints in Interface Builder. You can let Interface Builder add them for you; you could use the Pin and Align tools located at the bottom on the storyboard canvas; or you can control-drag between views. To create an Align Center X constraint, control-click on the Region Monitor button and drag vertically toward the top of the view controller, and then release the mouse. A pop-up menu is displayed with a list of possible constraints. Choose Center Horizontally in Container. When you drag vertically, Interface Builder will present options to set vertical spacing between the views, and options to horizontally align the views. Likewise, when you drag horizontally, you’ll be presented with options to set the horizontal spacing between the views and options to vertically align the view. Both gestures may include other options such as setting the view size.

Figure 10-7. Setting up button constraints
Creating a Custom Button
You don’t see the border around the buttons because there isn’t a way to set all the required layer properties for the view from Interface Builder alone. This is where the new Xcode Live Rendering feature comes into play.
Tip Use the Interface Builder Live Rendering feature in Xcode 6 to design and inspect a custom view. The custom view will render in Interface Builder and appear as it will in your application
Start by adding a new Swift file to your project named CustomButton.swift, and declare the class CustomButton a subclass of UIButton using the new IBDesignable attribute (Listing 10-1). Then add inspectable properties using IBInspectable for cornerRadius, borderWidth, and borderColor.
When you add the IBDesignable attribute to the class declaration, Interface Builder will render your custom view. Your custom view will update automatically as you make changes by using the IBInspectable attribute to declare variables as inspectable properties.
Now open up the storyboard and in the Utilities panel, click the Identities Inspector tab and change the class type from UIButton to CustomButton for the buttons you just created. Now click the Attributes Inspector tab. Notice that there’s a section named Custom Button with a field for each of the inspectable properties you declared. Set the values for Corner Radius to 6; set the Border Width to 2; set the Border Color to White Color. Your buttons should now look similar to those in Figure 10-8.

Figure 10-8. Configuring a CustomButton
Build and run the app to make sure the constraints are set properly and your scene looks similar to the mock-up in Figure 10-1.
Next you’ll be adding two new scenes to the storyboard, one for each button you’ve just added. Start by renaming the file ViewController.swift to HomeViewController.swift so it can be easily identified later on. Currently, Xcode doesn’t support the Refactor feature with Swift, so you’ll have to manually rename the class in the source file as well as in the storyboard. Select the view controller from the Identity Inspector, manually type it in or select HomeViewController from the pulldown (see Figure 10-9). You must do this in order to connect interface elements to your code.

Figure 10-9. Assigning View Controller identity
Now drag two view controllers to the right of the iBeacon Home view controller on the storyboard. Create a segue to each view controller by selecting the appropriate button, then control-drag and release on top of each view controller you placed on the right. Once you release, the Action Segue pop-up is displayed where you can select the show option (see Figure 10-10).

Figure 10-10. Creating a segue to a new scene
For each segue you’ve just created, select the connector on the storyboard, and then from the Attributes Inspector set the identifier. Use the names RegionMonitorSegue and iBeaconSegue
For each scene, drag a navigation item from the Object Library onto the navigation bar area. Set the names to match those in the buttons, Region Monitor and iBeacon.
When you’re finish creating the segues, your storyboard should look similar to the one in Figure 10-11.

Figure 10-11. Home scene with segues
Build and run the application, tap the buttons, and verify that the segues and navigation controls are working as expected.
In this section, you’ll learn how to start up a central manager and use it to determine if a device supports Bluetooth LE and is available to use on the central device.
The CBCentralManager object is a Core Bluetooth representation of a central role device. When you initialize a central manager, it calls the centralManagerDidUpdateState method of its delegate. This means you must adopt the delegate protocol and implement this required method.
Open the HomeViewController.swift file and import the framework and add the CBCentralManagerDelegate protocol to your class declaration.
import CoreBluetooth

class HomeViewController: UIViewController, CBCentralManagerDelegate {
You’ll see an error indicator, which says that the HomeViewController does not conform to protocol. That’s because you need to implement the required delegate method.
func centralManagerDidUpdateState(central: CBCentralManager) {

}
Now add a property for a CBCentralManager and initialize it in the viewDidLoad method as shown in Listing 10-2.
The central manager is initialized with self as the delegate so the view controller will receive any central role events. By specifying the queue as nil, the central manager dispatches central role events using the main queue. The central manager starts up after this call is made and begins dispatching events.
Listing 10-3 shows how to examine the central manager state in the centralManagerDidUpdateState callback when the state change event fires. Here is where you can update the text and text color of the bluetoothStateLabel property based on the central state.
As we discussed in Chapter 9, the PoweredOn state indicates that the central device supports Bluetooth LE and the Bluetooth is on and available for use. The PoweredOff state indicates that Bluetooth is either turned off or the device doesn’t support Bluetooth LE.
Build and run the application. If your device has Bluetooth enabled, the indicator label should read “Bluetooth On” and its color should be green. Use the slide-up settings panel to turn Bluetooth off. The indicator label should now read “Bluetooth Off” and its color should be red.
Add a Boolean property isBluetoothPoweredOn near the top of the HomeViewController class that will be used to reflect the Bluetooth state.
var isBluetoothPoweredOn: Bool = false
Set its value in the centralManagerDidUpdateState method accordingly, as shown in Figure 10-3. You’ll use this value to determine whether or not transition is allowed to any other scene.
The UIViewController provides an override method which allows you to control whether a particular segue should be performed. Open HomeViewController.swift and add the method shouldPerformSegueWithIdentifier to the ViewController class (see Listing 10-4).
When a segue is initiated, this method will be called with the string value that identifies the triggered segue and the object that initiated the segue. The return value for this method should be true if you want the segue to be executed; otherwise, return false.
In this method you’re only interested in the identifier; the sender object is for informational purposes and can be ignored here. Compare the identifier value with the constants you defined earlier. If you find a match, then check the Bluetooth state. If Bluetooth is powered on, you can allow the segue to execute by returning a value of true.
In the case in which Bluetooth is powered off, you want to display an alert and provide an option to go to the Settings app where the Bluetooth setting can be changed. Add the method shown in Listing 10-5 to the ViewController class. Call this method from within the shouldPerformSegueWithIdentifier method as shown in Listing 10-4.
This method configures a UIAlertController object to display an alert modally with a title, message, and a style. Additionally, actions are associated with the controller. The cancel action is labeled Settings, and is used to open the Settings app. The OK action is used to simply dismiss the alert.
Build and run the application. Turn Bluetooth off, then press each button to verify that the alert is displayed and access to the other scenes is prohibited. Press the Settings button on the alert to make sure it opens the Settings app.
Building the Region Monitor Scene
In this section, you’ll build the master scene for the Region Monitor as shown in Figure 10-12. The Region Monitor will support two basic methods for interacting with beacons, region monitoring and ranging. The UI will utilize four labels to display the status during monitoring, and three input fields where the user can enter information to scan for a specific beacon type. There will be a single custom button used to toggle monitoring on and off.

Figure 10-12. Region Monitor scene mock-up
Create a new Swift file named RegionMonitorViewController.swift and declare the class RegionMonitorViewController as a subclass of UIViewController. Then adopt the protocol for UITextFieldDelegate by adding the UITextFieldDelegate protocol declaration.
import UIKit
import CoreLocation

class RegionMonitorViewController: UIViewController, UITextFieldDelegate, RegionMonitorDelegate {

}
Assign the RegionMonitorViewController as the class for the Region Monitor identity by opening the storyboard and selecting the Region Monitor scene. In the Utilities panel on the right, click the Identity Inspector tab. In the Custom Class section, use the class drop-down to select RegionMonitorViewController.
Set the background color to for the Region Monitor view to FF6600. Add a UIButton to the scene and place it so that it looks similar to Figure 10-12. Set the button title to Monitor, the text color to white, and the font size to 26.0. In the Utilities panel, click the Identities Inspector tab and change the class type from UIButton to CustomButton. Click the Size Inspector tab and set both the width and height to 110. Now click the Attributes Inspector tab. In the section named Custom Button set the values for Corner Radius to 55, Border Width to 4, and Border Color to White Color. In the Button section, set the Shows Touch on Highlight to checked so when a user presses the button, there will be a white glow where the touch event occurred on the button.
Next, add UILabel and UITextField objects to the scene such that it looks similar to the one in Figure 10-13. The yellow tags A, B, C, and D are labels that will be used to display status related to ranged beacons. The blue tags 1, 2, and 3 are text fields that are used as search criteria when monitoring beacons. The property names correspond to those in Table 10-3.

Figure 10-13. Region Monitor scene after label and text field placement
Table 10-3. Region Monitoring Properties
Tag | Property Name | Description |
|---|---|---|
A | regionIdLabel | This is a CLBeaconRegion identifier: a user-defined unique identifier to associate with the returned region object. You use this identifier to differentiate regions within your application. This value must not be nil. |
B | proximityLabel | This value corresponds to the CLProximity constants that represents the relative distance to the beacon: unknown, immediate, near, far. |
C | distanceLabel | This value is the estimated distance in meters to a beacon. You can use this value to differentiate between beacons with the same proximity values. A negative value signifies that the accuracy could not be determined. |
D | rssiLabel | This value represents the average received signal strength indicator. It’s a measurement of the power present in a received radio signal in decibels. |
1 | uuidTextField | This is a unique identifier of the beacon being targeted; use this to identify your beacon. You typically generate only one UUID for your beacons. You can use the uuidgen command-line tool to generate this value. |
2 | majorTextField | The value identifying a group of beacons. |
3 | minorTextField | The value identifying a specific beacon within a group. |
You should already be familiar enough with autolayout and constraints, so we won’t cover that topic here. For each of the UITextField objects, you can add placeholder text that will be visible when a field is empty. The placeholder text is a hint to the user as to what information is expected to be input in each of the fields. From the Attributes Inspector, set the Capitalization field for the uuidTextField object to All Characters. For the majorTextField and the minorTextField objects, set the Keyboard Type to Number Pad.
Open the Main.storyboard file and select the Region Monitor scene. For each of the UI objects that you’ll be interacting with programmatically, connect an outlet to the view controller by control-dragging and dropping them inside the view controller implementation and name each accordingly (see Listing 10-6).
The UITextField objects will be taking user input, so a keyboard will be presented. You’ll want to know when the user starts and stops editing to perform certain actions. In order to handle messages sent as part of the text editing sequence, implement the delegate methods textFieldDidBeginEditing and textFieldDidEndEditing shown in Listing 10-7. When the text fields take focus, you want to present a Done button in the navigation bar so the user can dismiss the keyboard as needed. As a convenience, when the user leaves each field, the values the user entered are stored in the standard user defaults and used to initialize the text fields.
Override the viewDidLoad method and set the text field delegates to self, otherwise you won’t receive any notifications. The doneButton property is initialized only once and is used to set the navigationItem.rightBarButtonItem each time text field takes focus. Notice that in the last parameter to UIBarButtonItem initializer, the action is set to “dismissKeyboard” (see Listing 10-8). This corresponds to a method you define. The action is called automatically for you when the user taps the Done button.
When initializing the text fields from user defaults, you can use the Optional Binding feature of Swift.
if let uuid = defaults.stringForKey(kUUIDKey) {
    uuidTextField.text = uuid
}
Tip Use optional binding to find out whether an optional contains a value or not. It’s a clean way to check for a value inside an optional and extract it in a single line of code (see Listing 10-9).
To make sure the user defaults are persisted, call the NSUserDefaults.synchronize() method when the app is about to go in the background or exit. Take note that this method is called periodically in the background so you shouldn’t need to call it at any other time. Add the method from Listing 10-10 to the RegionMonitorViewController class.
The RegionMonitor Class
The RegionMonitor class manages all the interactions with CLLocationManager. At appropriate times, the Region Monitor will inform its delegate, the view controller, of events that it handled, or that it is about to handle.
Using the Delegation Pattern
For region monitoring, you’ll utilize the Delegation pattern, which is commonly used by Apple frameworks. The delegate is typically a Custom Controller object that acts on behalf of another object.
You’ll implement the pattern by defining a protocol for a RegionMonitorDelegate. The RegionMonitorViewController will adopt this protocol and implement the methods that respond to Location Monitoring actions. You’ll create a new class RegionMonitor that will be the delegating object. It will hold a weak reference to the RegionMonitorViewController that will act as the delegate. The RegionMonitor object will act as the delegate for the CLLocationManager object. The example sequence diagram in Figure 10-14 illustrates the interaction between the objects.

Figure 10-14. Sequence diagram—delegation pattern example
Create a new Swift file named RegionMonitor.swift and define a protocol for RegionMonitorDelegate as shown in Listing 10-11.
Creating the RegionMonitor Class
Next, in the file RegionMonitor.swift below RegionMonitorDelegate, declare the class RegionMonitor as a subclass of NSObject, and adopt the protocol for CLLocationManagerDelegate. Also, you’ll need to import CoreLocation. Then add properties (Listing 10-12) for CLLocationManager, CLBeaconRegion, CLBeacon, and RegionMonitorDelegate.
You’ll want to store a strong reference to the CLLocationManager, but you must make sure that you declare the delegate property for RegionMonitorDelegate as weak to avoid a strong reference cycle. A strong reference cycle will prevent RegionMonitorDelegate from being deallocated, which will cause a memory leak in your application. Also, a weak reference is allowed to have “no value,” so it must be declared an optional type. We cover the property pendingMonitorRequest later in section RegionMonitor Methods.
Now implement an initializer method (Listing 10-13) that will be called when you create a new instance of RegionMonitor. The primary role of an initializer is to ensure that a new instance of a type is set up properly before first use.
The initializer starts by calling super.init(), which calls the initializer of RegionMonitor class’s super class, NSObject. Then the locationManager property is initialized with an instance of CLLocationManager and then initializes self as its delegate. Finally, the delegate property is initialized with the RegionMonitorDelegate object that is passed as a parameter.
Delegate Methods
onBackgroundLocationAccessDisabled
The onBackgroundLocationAccessDisabled delegate method is called after RegionMonitor invokes CLLocationManager.authorizationStatus and receives a return value of Restricted, Denied, or AuthorizedWhenInUse. The delegate should respond to this notification by prompting the user to change his location access settings. Add the code shown in Listing 10-14 to the RegionMonitorViewController class.
Note NSLocalizedString is used to pull string resources from a file. You can add a file to your project named Localizable.strings and define your strings there. The format is simple, one string per line: "regmon.alert.title.location-access-disabled" = "Background Location Access is Disabled";
The code from Listing 10-14 will present an alert prompting (Figure 10-15) the user to change the location access settings.

Figure 10-15. Prompt for location access settings change
The didStartMonitoring delegate method is called when RegionMonitor receives the notification didStartMonitoringForRegion from CLLocationManager. The delegate can respond to this notification by updating its state and displaying a progress indicator. Add the code shown in Listing 10-15 to the RegionMonitorViewController class.
The didStopMonitoring delegate method is called when the RegionMonitor.stopMonitoring method is called. The delegate can respond to this notification by updating its state. Add the code shown in Listing 10-16 to the RegionMonitorViewController class.
The didEnterRegion delegate method is called when RegionMonitor receives the notification didEnterRegion from CLLocationManager. The CLRegion object is passed as a parameter and is provided to the delegate. The delegate can respond to this notification by providing feedback to the user. Add the code shown in Listing 10-17 to the RegionMonitorViewController class.
The didExitRegion delegate method is called when RegionMonitor receives the notification didExitRegion from CLLocationManager. The CLRegion object is passed as a parameter and is provided to the delegate. The delegate can respond to this notification by providing feedback to the user. Add the code shown in Listing 10-18 to the RegionMonitorViewController class.
The didRangeBeacon delegate method is called when RegionMonitor receives the notification didRangeBeacons from CLLocationManager. The RegionMonitor is passed an array of CLBeacon objects and determines which one is the closest. That CLBeacon object is provided to the delegate. The delegate can respond to this0 notification by providing feedback to the user. Add the code shown in Listing 10-19 to the RegionMonitorViewController class.
Caution Formatters are expensive to create. It’s recommended that you create an instance once and reuse that instance.
Add a property to the RegionMonitorViewController class.
let distanceFormatter = NSLengthFormatter()
Notice the distanceLabel text is set using a specialized formatter object NSLengthFormatter. The formatter provides property formatted, localized descriptions of linear distances.
The onError delegate method is called when RegionMonitor encounters an error. An NSError object is provided to the delegate. The delegate can respond to this notification by handling the error and/or providing feedback to the user. This notification is currently ignored by this example app. Add the code shown in Listing 10-20 to the RegionMonitorViewController class.
There are only two public functions for the RegionMonitor class, startMonitoring and stopMonitoring. The view controller is responsible for configuring a beacon region and telling the Region Monitor when to start and stop monitoring.
Upon entering, the property pendingMonitorRequest is set, signaling that a start monitoring request has been made. In the event that the request to start monitoring is deferred, this value will be used in a notification to determine whether startMonitoringForRegion should be called. Also, a strong reference to the beaconRegion is held so that it can be used by the delegate methods.
Before monitoring can actually start, authorization status must be taken into consideration. To get the authorization status for your application, you must call CLLocationManager.authorizationStatus. Only when the status AlwaysAuthorized is returned can monitoring for a beacon region start. We will cover the authorization sequence in detail in the section “Authorization and Requesting Permission.” Add the code shown in Listing 10-21 to the RegionMonitor class.
In this method, location manager is told to stop ranging and monitoring beacons and to stop updating location. The delegate is also notified that monitoring has now stopped. Add the code in Listing 10-22 to the RegionMonitor class.
Authorization and Requesting Permission
In order to use location services, you must request authorization from the user to use those services.
Caution You should request authorization at the point where you will use location services to perform a task. Requesting authorization may display an alert to the user. If it’s not clear to the user that location services are about to be used for a useful purpose, the user may deny the request to use those services.
In the Region Monitor startMonitoring method, when CLLocationManager.authorizationStatus() is called and returns a value of NotDetermined, you need to call the requestAlwaysAuthorization() method. The user will then be presented with an alert requesting permission to use location services where he or she can choose to allow access as shown in Figure 10-16.
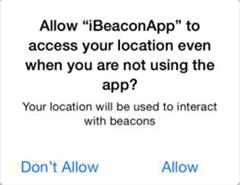
Figure 10-16. Request location services authorization prompt
If the user chooses Don’t Allow from the alert shown in Figure 10-16 the next time he calls the startMonitoring method, the CLLocationManager.authorizationStatus() will return Denied, causing the Region Monitor to notify its delegate by calling the onBackgroundLocationAccessDisabled method (see Listing 10-21). The user will be presented with an alert to change the settings as shown in Figure 10-17.

Figure 10-17. Request settings change prompt
If the user selects Settings, the app will transition to the Settings.app where the user can change permission settings for location services as shown in Figure 10-18.

Figure 10-18. Location services settings for iBeaconApp in the Settings.app
CLLocationManagerDelegate Methods
The RegionMonitor adopts the CLLocationManagerDelegate so that it can receive notifications from the location manager. The Region Monitor will need to respond to events such as a change in authorization state, when beacon region boundaries have been crossed and when one or more beacons have come into range. In this section you’ll learn how to interact with the location manager and respond to these events through delegation.
The diagram shown in Figure 10-19 illustrates the interaction between the location manager and the Region Monitor, which is acting as the delegate. It shows the complete sequence for the “start monitoring” event which also includes authorization.

Figure 10-19. Sequence diagram for start monitoring sequence
Note Right after the location manager has been initialized, it will call its delegate method with a status value of NotDetermined.
The next sections cover each of the location manager delegate methods you’ll be using in the iBeaconApp application.
Regions Are Shared Resources
Following are a few things you’ll want to keep in mind when dealing with regions:
- Recall that regions are a shared resource; therefore, the manager object that gets passed in to the callback represents the location manager object reporting the event. This may not be the one you stored in the locationManager property.
- The region object passed as a parameter to delegate methods may not be the same object that was registered. When determining equality, use the region’s identifier string.
- It’s possible that multiple location managers share a delegate object. When this is the case, that delegate will receive a message multiple times.
The location manager calls this delegate method when the authorization status for the application has changed. Consider the use case where a user taps a button to start monitoring but has not yet granted the application permission to access location services. See the flow diagram in Figure 10-20.

Figure 10-20. Flow diagram for the “start monitoring” event
The implementation in Listing 10-23 checks for the AuthorizeWhenInUse and AuthorizeAlways status. You can see that it’s also testing the value of pendingMonitorRequest. If the call to startMonitoringForRegion was deferred, it can be called here.
The location manager calls this delegate method after startMonitoringForRegion has been called, and when a new region is being monitored (Listing 10-24). The Region Monitor notifies its delegate by calling didStartMonitoring so a progress indicator can be presented to the user at the right time. At this point, the Region Monitor can ask the location manager about the new region’s state by calling requestStateForRegion with the new region object passed as a parameter.
The location manager calls this delegate method in response to a call to its requestStateForRegion method. The region along with its state is passed in as a parameter. The state contains a value of the CLRegionState type. The values reflect the relationship between the device and the region boundaries. The Region Monitor uses these values to determine which location manager method to call. If the device is inside the given region, then startRangingBeaconsInRegion is called; otherwise stopRangingBeaconsInRegion is called. The property beaconRegion that was set in the call to startMonitoring is passed in as a parameter. Add the code in Listing 10-25 to the RegionMonitor class.
The location manager calls this delegate method when the user enters the specified region. The Region Monitor notifies its delegate by calling didEnterRegion and passes the region object containing information about the region that was entered. Add the code in Listing 10-26 to the RegionMonitor class.
The location manager calls this delegate method when the user exits the specified region. The Region Monitor notifies its delegate by calling didExitRegion and passes the region object containing information about the region that was exited. Add the code in Listing 10-27 to the RegionMonitor class.
The location manager calls this delegate method when one or more beacons become available in the specified region, or when a beacon goes out of range. This method is also called when the range of a beacon changes (i.e., getting closer or farther). The implementation here only notifies the Region Monitor’s delegate with the closest beacon. Add the code in Listing 10-28 to the RegionMonitor class.
Several of the location manager delegate error reporting methods are optional, but it is recommended that you implement them in your applications. The iBeaconApp sample only dumps a message to the log.
The location manager calls this delegate method when region monitoring has failed. It passes in the region for which the error occurred and an NSError describing the error. Implementation of this method is optional but recommended. Add the code in Listing 10-29 to the RegionMonitor class.
rangingBeaconsDidFailForRegion
The location manager calls this delegate method when registering a beacon region failed. If you receive this message, check to make sure the region object itself is valid and contains valid data. Add the code in Listing 10-30 to the RegionMonitor class.
If the user denies your application’s use of the location service, this method reports a Denied error. If you receive this error, you should stop the location service. Implementation of this method is optional but recommended. Add the code in Listing 10-31 to the RegionMonitor class.
Configuring Region Monitoring
The view controller is responsible for handling user input starting the monitoring process, so that is where you’ll configure your beacon regions.
The CLBeaconRegion is the key class for managing your beacons. It defines a region that you’re interested in that is based on the beacon’s proximity to a Bluetooth LE device. A beacon’s identity is programmed directly into its hardware using tools provided by the manufacturer. In your application you use those values to identify one or more beacons. When a device comes into range with matching criteria, the region triggers a notification.
Open the file RegionMonitorViewConroller.swift file, and in the RegionMonitorViewController class add a property to hold a RegionMonitor object.
var regionMonitor: RegionMonitor!
Then create an instance in the viewDidLoad method.
regionMonitor = RegionMonitor(delegate: self)
Beacon Identity
You specify a beacon’s identity by using a combination of three properties.
- proximityUUID—this property holds a unique identifier for the beacons you want to target. This property is required.
- major—this property holds a value used to identify a group of beacons you want to target. This value is optional, and if not assigned, it will be ignored during the matching process.
- minor—this property holds a value used to identify a specific beacon within a group. This value is optional, and if not assigned, it will be ignored during the matching process.
Depending on how specific you want to be when receiving notifications, you can set up a region in one of three ways.
- Target a beacon with a specific proximity ID. The beacon’s major and minor values will be ignored.
beaconRegion = CLBeaconRegion(proximityUUID: uuid, identifier: "my.beacon") - Target a beacon with a specific proximity ID and major value. The beacon’s minor value will be ignored.
beaconRegion = CLBeaconRegion(proximityUUID: uuid, major: CLBeaconMajorValue(major), identifier: "my.beacon") - Target a beacon with a specific proximity ID, major value, and minor values. This would be used in a more complex environment.
beaconRegion = CLBeaconRegion(proximityUUID: uuid, major: CLBeaconMajorValue(major), minor: CLBeaconMinorValue(minor), identifier: "my.beacon")
An additional user-defined unique identifier is associated with the beacon during initialization. You use this identifier to differentiate regions with your application. This value cannot be nil.
Initializing Beacon Notifications
There are three properties you will use to indicate the types of notifications you want to receive.
- notifyEntryStateOnDisplay—this property indicates whether beacon notifications should be sent while the device’s display is on. When this value is true, beacon notifications are sent when the user turns on the display when the device is already inside a region. If your app isn’t running, the system will launch your app in the background so the notification can be handled. The location manager’s delegate method didDetermineState is called.
- notifyOnEntry—indicates that a notification should be sent upon entry to the region. The system will launch your app in the background to handle the notification. The location manager’s delegate method didEnterRegion is called.
- notifyOnExit—indicates that a notification should be sent upon exit from the region.
Start and Stop Region Monitoring
To start and stop the region monitoring process, add the code in Listing 10-32 to the RegionMonitorViewController class.
Handling a Ranged Beacon
A beacon that was encountered during region monitoring is sent through delegate notifications using the CLBeacon class. The identity of the beacon corresponds to the information used when you initialized the beacon region.
Note You don’t create an instance of a CLBeacon class directly; this is done by the location manager.
The Region Monitor delegate method simply updates the appropriate fields.
Monitoring Progress Indicator
There’s one last detail to cover, and that’s a progress indicator. It’s important that when a user interacts with the application, you provide some type of feedback for each action. When the user taps the Monitor button, you want to indicate that monitoring is in progress. You could use a static text field and toggle the text, but that’s boring. Adding a simple rotation animation to the Monitor button is quick and easy and will serve as an effective progress indicator for when monitoring starts and stops.
Animating the Monitor Button
An extension will be used to apply an animation to the Monitor button. You use an extension to add functionality to an existing class for which you don’t have the original source code. The extension will add a function to rotate a view object using keyframe animation.
At the top of the RegionMonitorViewController.swift file after the import statements, add the code from Listing 10-33.
The parameters fromValue and toValue represent rotation and are specified in radians. The duration is specified in seconds. The CABasicAnimation class provides single-keyframe animation for a layer property. It will allow you to interpolate between two values over time. It also allows you to set a delegate so you can receive notification when the animation completes by calling the delegate’s animationDidStop method.
For this use case, rotating the Scan button 360 degrees would constitute one animation cycle. Each time an animation cycle completes the delegate is notified.
Override the animationDidStop method of the view controller. This method will evaluate the scan state and restart the animation if scanning is still in progress. Add the code in Listing 10-34 to the RegionMonitorViewController class.
The animations will be controlled from the delegate methods that you implemented earlier. The delegate method didStartMonitoring started the animation by calling the rotate method of the Monitor button.
monitorButton.rotate(0.0, toValue: CGFloat(M_PI * 2), duration: 1.0, completionDelegate: self)
The delegate method didStopMonitoring stopped the animation by simply setting the value of the property isMonitoring to false. Notice in the override method, the value of isMonitoring is checked; when set to false, the animation is not applied. The animation will end when the animation cycle completes. This guarantees that the Scan button will be in the correct orientation.
Build and run the application. Transition to the Region Monitor scene and tap the Monitor button. You should see the button spinning. The animation should stop when you tap the button again.
Building the iBeacon Scene
In this section, you’ll build the master scene for the iBeacon (Figure 10-21). The iBeacon scene allows you to configure your iOS device as an iBeacon transmitter. The UI is similar to that of the Region Monitor. It will utilize a switch to turn the transmitter on and off; one button to autogenerate a UUID; four input fields to where the user can configure the device, and several labels for informational purposes; and one text view which will display help text for each input field.
This section will briefly cover the steps on how to build the UI for this scene. Many of the steps are a repeat of those found in the section “Building the Region Monitor Scene.”
Create a new Swift file named BeaconTransmitterViewController.swift and declare the class BeaconTransmitterViewController a subclass of UIViewController. Then adopt the protocol for UITextFieldDelegate by adding the UITextFieldDelegate protocol declaration (Listing 10-35).
Assign the BeaconTransmitterViewController as the class for the Beacon Transmitter identity by opening the storyboard and selecting the iBeacon scene. In the Utilities panel on the right, click the Identity Inspector tab. In the Custom Class section, use the class drop-down to select BeaconTransmitterViewController.
Set the background color to for the iBeacon view to 009999. Add controls to the storyboard so that it looks like the mock-up shown in Figure 10-21.
- For the Advertise UISwitch add two connections: IBOutlet named advertiseSwitch and IBAction named toggleAdvertising.
- For the Generate UIButton add two connections: IBOutlet named generateUUIDButton and IBAction named generateUUID.
- For each UITextField add a single connection: IBOutlet named uuidTextField, IBOutlet named majorTextField, IBOutlet named minorTextField, and IBOutlet named powerTextField. Add placeholder text.
- For the UITextView add a single connection: IBOutlet named helpTextView.

Figure 10-21. iBeacon scene mock-up
Add constraints for each of the controls in the scene.
Implement the UITextFieldDelegate methods. Add the code in Listing 10-36 to the BeaconTransmitterViewController class.
Just like the RegionMonitor class, the BeaconTransmitter class manages all the interactions with the CBPeripheralManager. The Delegation pattern will be used so the beacon transmitter can inform its delegate of events that it handled, or is about to handle.
Defining the BeaconTransmitterDelegate Protocol
You’ll start by defining a protocol for a BeaconTransmitterDelegate. The BeaconTransmitterViewController will adopt this protocol and implement the methods that respond to CBPeripheralManager actions. You’ll create a new class BeaconTransmitter that will be the delegating object. It will hold a weak reference to the BeaconTransmitterViewController that will act as the delegate. The BeaconTransmitter object will act as the delegate for the CBPeripheralManager object.
Create a new Swift file named BeaconTransmitter.swift and define a protocol for BeaconTransmitter. Add the code in Listing 10-37 to the BeaconTransmitterViewController class.
Delegate Methods
The BeaconTransmitter will use the methods in the BeaconTransmitterDelegate protocol to communicate back to its delegate to notify when a device’s Bluetooth powers on or off, and to report any errors it may encounter.
The didPowerOn delegate method is called after the BeaconTransmitter receives notification from the CBPeripheralManager method peripheralManagerDidUpdateState and peripheral manager’s state accessor returns PoweredOn. The delegate should update its state to reflect that. Add the code in Listing 10-38 to the BeaconTransmistterViewController class.
The didPowerOn delegate method is called after the BeaconTransmitter receives notification from the CBPeripheralManager method peripheralManagerDidUpdateState and peripheral manager’s state accessor returns PoweredOff. The delegate should update its state to reflect that. Add the code in Listing 10-39 to the BeaconTransmistterViewController class.
The onError delegate method is called when the BeaconTransmitter encounters an error. An NSError object is provided to the delegate. The delegate can respond to this notification by handling the error and/or providing feedback to the user. This method is currently not used by this example. Add the code in Listing 10-40 to the BeaconTransmitterViewController class.
Creating the iBeaconTransmitter Class
Next, in the file BeaconTransmitter.swift below BeaconTransmitterDelegate protocol, declare the class BeaconTransmitter a subclass of NSObject, and adopt the protocol for CBPeripheralManager. Also, you’ll need to import CoreLocation and CoreBluetooth. Then add properties for CBPeripheralManager and BeaconTransmitterDelegate. Add the code in Listing 10-41 to the BeaconTransmitter class.
Store a strong reference to the CBPeripheralManager, but you must make sure that you declare the delegate property for BeaconTransmitterDelegate as weak to avoid a strong reference cycle.
Now implement an initializer method that will be called when you create a new instance of BeaconTransmitter. The primary role of an initializer is to ensure that a new instance of a type is set up properly before first use. Add the code in Listing 10-42 to the BeaconTransmitter class.
The initializer starts by calling super.init(), which calls the initializer of BeaconTransmitter class’s super class, NSObject. Then the peripheralManager property is initialized with an instance of CBPeripheralManager, passing in self as delegate. Finally, the delegate property is initialized with the RegionMonitorDelegate object that is passed as a parameter.
There are only two public functions for the BeaconTransmitter class, startAdvertising and stopAdvertising. The view controller is responsible for configuration and telling the beacon transmitter when to start and stop advertising.
In this method, the peripheralManager is told to start advertising given a specific beacon region and transmit power value. Add the code in Listing 10-43 to the BeaconTransmitter class.
In this method, the peripheralManager is told to stop advertising. Add the code in Listing 10-44 to the BeaconTransmitter class.
Configure Your iOS Device as an iBeacon
The magic behind setting up your iOS device to act as an iBeacon transmitter is calling the peripheralDataWithMeasuredPower of the CLBeaconRegion class. The return value will be a dictionary that is encoded with the device’s identifying information that can be used to advertise the device with the Core Bluetooth framework.
let data = NSDictionary(dictionary: (beaconRegion?.peripheralDataWithMeasuredPower(power))!) as! [String: AnyObject]
peripheralManager.startAdvertising(data)
The peripheralDataWithMeasuredPower takes a single parameter representing the measured power. The measured power of a device is its known measured signal strength in RSSI at 1 meter. The distance provided by iOS is in meters and is an estimate based on the ratio of the beacon’s signal strength over the transmission power.
The power values typically have a negative value.
As covered previously in the section “Configuring Region Monitoring,” the view controller is responsible for handing user input and setting up the beacon region.
The first step is to specify the beacon identity. For easy setup of the UUID, there’s a Generate button just above the UUID field. You created a connection for an IBAction named generateUUID. You can easily generate the UUID programmatically by creating an instance of NSUUID and getting its UUIString property. Take that value and assign it to the uuidTextField text (see Listing 10-45). That’s it.
For an explanation of the property values for major and minor, look back at the section “Initializing a Beacon Region.” For a recap on setting up the notification properties, see the section “Initializing Beacon Notifications.”
Earlier you created a connection for an IBAction named toggleAdvertising. This, of course, is where you make the request to start and stop advertising. Listings 10-46 and Listing 10-47 show the complete implementation.
Build and run the application and transition to the iBeacon scene. Test each of the fields to make sure they behave as you expect. Press the Generate button to make sure a UUID is generated.
At this time you should perform some basic testing of the functionality that was covered in this chapter.
If you already have an iBeacon device and you know the UUID, you can run the app and go into region monitoring mode. Enter the UUID and tap the Monitor button. You should see the fields populate as soon at the beacon is detected. Move closer to the beacon to see that the fields being reported make sense. Place your iOS device right next to the beacon. The proximity should be reported as immediate.
If you don’t have an iBeacon but have a second iOS device, install and run the app on that device. Go into iBeacon mode and configure your device and then start advertising. Now, on your first device running in Region Monitor mode, enter the same UUID and then perform the same steps as previously.
Summary
In this chapter you learned how to use the CoreLocation framework to interact with beacon. You learned about region monitoring and how to scan for specific beacons and receive notification when entering or exiting an area defined by a beacon’s proximity. You learned how to use your iPhone to act as an iBeacon transmitter.