
Home Automation Using HomeKit
Manny de la Torriente
Much like Apple sought to unify health data with HealthKit, HomeKit is Apple’s entry into home automation. Apple created a unified communications protocol—HomeKit Accessory Protocol— for connected home manufactures. HomeKit is a common set of APIs (application programming interfaces) for applications that provides integration between iOS devices and accessories that support the HomeKit Accessory Protocol.
This chapter explains the key concepts behind the HomeKit framework (home, room, accessory, services) and how to easily build an app that can configure, monitor, and control home automation accessories, as well as integrate with Siri for voice commands. Additionally, you’ll learn how to set up and use the HomeKit simulator to help develop and debug your application.
Introduction to HomeKit Concepts
HomeKit provides integration between iOS devices and accessories that support Apple’s HomeKit Accessory Protocol. HomeKit allows an application to discover these accessories and add them to a cross-device home configuration database where the data can then be accessed and modified to suit the needs of the end user. The database is also available to Siri, which gives the user the capability of controlling the accessories with voice commands.
A home manager is represented by the HMHomeManager class, which manages a collection of homes. It is used to access HomeKit objects such as home, room, accessory, service, and other related objects from the HomeKit database.
A home is considered to be a single-dwelling home and is represented by the HMHome class. It provides access to a collection of automated accessories with which you can communicate and configure. Each home may optionally have one or more rooms. HomeKit will assign accessories to a default room if you have not configured any rooms. A room is represented by the HMRoom class. A zone is an arbitrary optional grouping of rooms that a user considers a single area; for example, upstairs or downstairs. Rooms can be added to one or more zones. A zone is represented by the HMZone class.
Note your application should provide the means for users to create their own useful groupings and labels.
An accessory is a physical home automation device that is assigned to a room, such as a ceiling fan. An accessory is represented by the HMAccessory class, and can provide one or more services; for example, a ceiling fan has a service to turn the fan on and off, and another service that can change the speed of the fan. A service can be a user-controllable function provided by an accessory, like a light, or it can be an activity internal to a device, such as a firmware update. HomeKit is most concerned with user-controllable services. A service is represented by the HMService class.
Each service is described by a collection of characteristics; for example, if a light is on or off, or what the brightness value is set to. A characteristic is represented by the HMCharacteristic class and is described by an array of properties and metadata. Characteristics can be queried to discover their state, or they can be modified to affect an accessory’s behavior.
Like many other Apple frameworks, HomeKit uses the delegation pattern for the notification of events or changes in the application. An important note about HomeKit delegation is that when your application initiates a change, the delegate messages won’t be sent to your app. Instead, they are sent to other apps that might be running on your iOS device that also support HomeKit. For example, you might purchase a thermostat that includes an app to control it. You would want to see any changes you make in your app reflected in the thermostat app or vice versa. Your app is expected to use completion handlers to reload data and update views. However, you still need to add code to both the completion handler and the associated delegate methods. Applications need to be in the foreground to receive delegate messages, as they are not batched while your app is in the background. When an app comes back to the foreground it will receive a homeManagerDidUpdateHomes message which signals your app to reload all its data.
Building a HomeKit Application
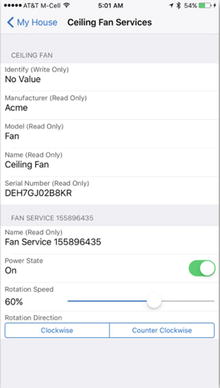
The application you’ll create in this chapter will use grouped table views to present information. The app will provide a simple user interface (UI) for creating homes, browsing for and adding accessories, and controlling the accessories in a home, such as a ceiling fan with services for turning the fan off and on, as well as for changing the rotation speed and the rotation direction. When you’re finished, your app should look similar to the one in Figure 11-1.


HomeKit is a service that is only available to applications that are distributed through the App Store, so you must have the ability to provision and code-sign your app. To do so, you’ll need the following:
- Membership in the iOS developer program.
- Permission to create code signing and provisioning assets in the member center.
Note To create your team provisioning profile, follow the steps in the online document App Distribution Quick Start which can be found in the iOS developer library.
Apple provides a HomeKit Accessory Simulator to help you develop your HomeKit apps. The simulator communicates with an iOS device the same way an actual HomeKit accessory would using the HomeKit Accessory Protocol (HAP) over Bluetooth Low Energy (LE) or Wi-Fi, so there’s no need buy specific hardware to develop your app. With the simulator, you can create accessories with services and add characteristics to those services.
The simulator is not provided with Xcode, so you’ll have to download it from the developer’s web site at https://developer.apple.com/downloads/ (Figure 11-2). Click the download button in the HomeKit row. Alternatively, from the menu, Xcode ![]() Open Developer Tools
Open Developer Tools ![]() More Developer Tools . . ., which will also open the browser and display the same page.
More Developer Tools . . ., which will also open the browser and display the same page.

Figure 11-2. Downloads for Apple Developers web page
Search for Hardware IO Tools and select the download which is compatible with your version of Xcode. Once downloaded, double-click the .dmg file, and drag HomeKit Accessory Simulator to the /Applications folder. Later on in this chapter, you’ll use the simulator to build and test your app.
Creating the Project
We will create an iOS single-view application Xcode project named HomeKitApp. Select Swift as the Language and use the defaults for Language and Devices (see Figure 11-3). You can use HomeKit-enabled accessories with your iPhone, iPad, and iPod touch.

Figure 11-3. Creating a new single-view Xcode project
Choose the HomeKitApp target from the Targets list and click the General tab to view the General pane (Figure 11-4). In the lower portion of the Identity section, click the Team pop-up menu and select your profile.

Figure 11-4. Selecting the team profile
Enabling HomeKit
HomeKit requires an explicit App ID which is created when you enable HomeKit. Click the Capabilities tab and locate the HomeKit row (see Figure 11-5). Click the switch to the ON position to enable HomeKit. Notice that a new file named HomeKitApp.entitlements was added to your project.

Figure 11-5. Enabling HomeKit in app services
Building the Homes Interface
There is one HomeKit database per home. A collection of homes are managed by an HMHomeManager object. You’ll use the home manager to add homes, retrieve a list of homes, track changes to homes, and remove homes. You’ll start out by building an interface that will support adding one or more homes and the means to assign a primary home. A grouped table view will work well for this.
The table view controller will use sections to present a list of user-defined homes. The first section will be used to add and remove homes. The user can also select a home from that section to configure and control. The second section will display the available homes and allow the user to assign the primary home. At runtime, the table will look similar to the illustration shown in Figure 11-6.

Figure 11-6. The HomesViewController scene at runtime
Open the storyboard, then delete the current view controller and replace it with a table view controller. Select the table view controller, then from the Attributes Inspector, set it as the initial view controller for the storyboard by setting the check box Is initial view controller. Embed the table view controller in a navigation controller by selecting the table view controller and then from Xcode menu choose Editor ![]() Embed In
Embed In ![]() Navigation Controller. From the Documents Outline on the left, select the Table View object and change its style to Grouped in the Attributes Inspector. Set the title for the navigation item in the table view controller to Homes. Your storyboard should look similar to the one Figure 11-7.
Navigation Controller. From the Documents Outline on the left, select the Table View object and change its style to Grouped in the Attributes Inspector. Set the title for the navigation item in the table view controller to Homes. Your storyboard should look similar to the one Figure 11-7.

Figure 11-7. Main.storyboard initial view
In order to track changes to a collection of one or more homes, you’ll need to implement the HMHomeManagerDelegate protocol. The home manager will notify its delegate when there are any changes to the home configuration.
Begin by changing the class declaration for your new custom table view controller (see Listing 11-1). From the navigator, change the name of the file ViewController.swift to HomesViewController.swift, then change the name of the class to HomesViewController, the parent class to UITableViewController, and add the protocol for HMHomeManagerDelegate.
Then in the storyboard, set the Custom Class for the table view controller to HomesViewController in the Identity Inspector (Figure 11-8).

Figure 11-8. Setting custom class HomesViewController
Implementing the Home Manager Delegate Methods
The home manager communicates changes when homes are added, when they are removed, or when significant changes are made to the home configuration. These changes are communicated through the following delegate methods:
- didAddHome: Tells the delegate that the home manager added a home.
- didRemoveHome: Tells the delegate that the home manager updated its collection of homes.
- homeManagerDidUpdateHomes: Tells the delegate that the home manager updated its collection of homes.
Implement these methods in HomesViewController (see Listing 11-2). In the homeManagerDidUpdateHomes method call tableView.reloadData().
Instantiating the HMHomeManager
For the purposes of this application, you’ll utilize the singleton pattern to provide a global point of access to an HMHomeManager object as well as the current selected HMHome object. Create a new file named HomeStore.swift and add the code from Listing 11-3.
Listing 11-4 updates the HomesViewController to define a computed property homeStore and then assign self as the home manager delegate.
The HomesViewController will be responsible for setting the value of the HomeStore.home to reflect the current home, based on user input.
Open the storyboard and add four custom prototype cells to the Homes table view as shown in Figure 11-9.
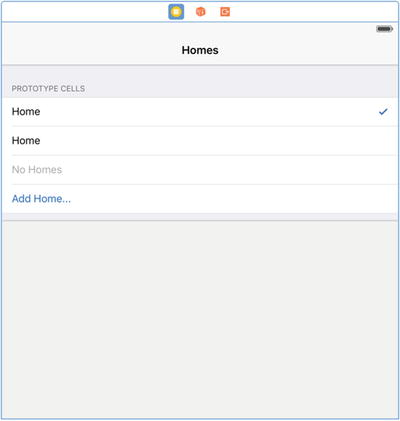
Figure 11-9. Custom prototype cells in the storyboard
At the top of the HomesViewController class body, add a structure named Identifiers and define a constant property for each of the prototype cells. The cells are listed in the same order as shown in Listing 11-5.
Now in the storyboard using the Attributes Inspector, assign each of the custom table view cells to the corresponding reuse identifier from the Identifiers struct. This is the same reuse identifier you will send to the table view in the dequeueReusableCellWithIdentifier message. Make sure you assign Checkmark in the Accessory pop-up window for the PrimaryHomeCell shown in Figure 11-10.

Figure 11-10. Assign a custom table view cell identifier
Implementing UITableView Methods
At the top of the HomesViewController class body, add an enum named HomeSections with values for Homes and PrimaryHome. These values correspond to the IndexPath.section index number which is passed in as a parameter to table view delegate methods and will be used to identify a specified section of a UITableView object (Listing 11-6).
To help determine which type of table row is associated with a table view section, use the helper method shown in Listing 11-7. The isHomesListEmpty method simply returns whether or not the homes count equals zero, and the isIndexPathAddHome method returns true if the specified row in the homes section is the last row.
The value of the HomeSections count, which is currently defined at 2, determines the number of sections in the table view (see Listing 11-8).
The number of rows in a section will be dependent on which section of the table view is specified. In the case where the section is PrimaryHome, the number of rows value should be at least 1. In the case where the section is Homes, the number should always return the actual count plus 1. This guarantees that there will always be at least one row in each of the sections to accommodate the AddHome . . . and No Homes cells (see Listing 11-9 and Figure 11-11).

Figure 11-11. Initial empty state of homes view
The delegate method cellForRowAtIndexPath returns a UITableViewCell object that corresponds to the specified row and section. In the case where the row/section corresponds to a row which contains a home defined by the user, the reuse identifier is set based on whether or not the home section is for the primary home. The cell object is then initialized with the home name and corresponding cell accessory type (see Listing 11-10).
Listing 11-11 indicates that the section for the primary home has a header and a footer.
Adding a New Home to the Home Manager
When the user selects the table row labeled Add Home . . ., the onAddHomeTouched method is invoked from the didSelectRowAtIndexPath method and the user is presented with a simple UIAlertController prompting for a name. Once you enter a valid name, the home is added using the home manager method addHomeWithName (see Listing 11-12).
On success, the table view is refreshed, and the new home appears in the list. If the home is the first home, it’s assigned as the primary home. You can find the complete method in Listing 11-13.
When the user selects a home listed in the Primary Home section, the home manager’s updatePrimaryHome method is called (Listing 11-14). The completion handler reloads the table view if the call succeeded.
Siri recognizes home, room, zone, accessory, and characteristic names. Siri uses the primary home when the command does not specify a home name.
When the user selects a home listed in the first section, the current home is set in the home store.
homeStore.home = homeStore.homeManager.homes[indexPath.row]
The view will then transition to a detailed view for the home where the user can configure or control its accessories.
When you swipe a table row, it enters into editing mode. The table view invokes its canEditRowAtIndexPath method where the application can determine on a row-by-row basis to allow editing.
If editing is allowed for a row, the row displays a Delete button. If the user taps the Delete button, the view controller receives a commitEditingStyle message from the table view. If the editingStyle is Delete, removeHome can be called on the home manager.
let home = homeStore.homeManager.homes[indexPath.row] as HMHome
homeStore.homeManager.removeHome(home, completionHandler: { error in
})
In the completion block, if there is no error, tableView.deleteRowsAtIndexPaths is called. See Listing 11-17 for the complete method.
When home manager has been called for the first time on a device, it will alert the user and ask for permission to access the user’s accessory data.
Selecting “Don’t Allow” (Figure 11-12) prevents HomeKit from providing information to your application, in which case the settings will have to be changed in the Settings.app in the Privacy/Homekit section.

Figure 11-12. Don’t Allow stops HomeKit from supplying data to your app
If the user is signed into an iCloud account on the device but hasn’t enabled the iCloud keychain, HomeKit will prompt the user to turn on the iCloud keychain to allow access from the user’s other devices.
Building the Home Interface
The Home scene will display all the accessories that are associated with the selected home. It will also provide the means to add discoverable accessories. For this scene, you will need a table view that uses a standard prototype cell and a navigation bar item to invoke an accessory browser.
The Home table scene will use a grouped table view to present a list of accessories for the selected home. The Add (+) navigation bar item will open an accessory browser. Selecting an accessory from the browser will add the accessory to the current home, then send a notification and return to the Home scene. The HomeViewController will handle the notification and refresh the view. When you select an accessory from the table, the scene will transition to the Services scene where accessories can be controlled.
At runtime, the table will look similar to the illustrations in Figure 11-13. The first view is empty; the second is populated with three accessories.


Open the storyboard and add a new UITableViewController to the storyboard canvas.
Select the table view and in the Attributes Inspector, change the style to Grouped.
Select the table view cell (Figure 11-14) and in the Attributes Inspector, change its style to Subtitle; Identifier to AccessoryCell; Accessory type to Detail Disclosure.
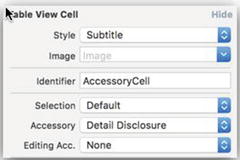
Figure 11-14. Setting up the table view cell
Now add a segue from the HomeCell of the HomesViewController to the new table view controller you’ve just added (see Figure 11-15).

Figure 11-15. Adding a segue to the home view controller
Notice a navigation bar was automatically added for you. Change the navigation bar title to Home (see Figure 11-16).

Figure 11-16. The home view controller interface
Next, add a Bar Button Item to the navigation bar. From the Attributes Inspector in the Bar Button Item section, change the System Item Add so that a plus (+) symbol is displayed. This control will be used to invoke an Accessory Browser, which you’ll build in the section “Building the Accessory Browser” (see Figure 11-26).
Create a new Swift file named HomeViewController.swift. Declare a new class HomeViewController that subclasses UITableViewController and adopt the protocol for HMHomeDelegate, and then define computed properties for homeStore and home (see Listing 11-18).
In the storyboard set the custom class for the table view controller to HomeViewController in the Identity Inspector.
Assign self as the current home delegate, and set the view controller’s title to the name of the current home in the viewDidLoad method after the line with super.viewDidLoad() (see Listing 11-4).
home?.delegate = self
title = homeStore.home!.name
Implement the home manager delegate methods didAddAccessory and didRemoveAccessory such that the table view is updated when changes are made by other HomeKit apps (see Listing 11-19).
Signaling Changes within the Application
Remember, your app is expected to use completion handlers to reload data and update its views. A convenient method is the use of NSNotificationCenter.
In the HomeStore class, add a constant for AddAccessoryNotification at the top of the class body as shown in Listing 11-20.
In the viewDidLoad method of the HomeStore class, add the following line shown in 11-21 to register an observer for the AddAccessoryNotification.
Add a new method shown in Listing 11-22, which will be used for the notification selector. This method will reload the data for the table view when the notification is received.
Implementing More UITableView Methods
There will be two sections in the Home table view. The first section will be used as the “Accessories” section heading, and the second is for the accessories list (see Listing 11-23).
A background message is also set in the numberOfSectionsInTableView method if the table is empty; otherwise no message is displayed (see Listing 11-24).
The number of rows in the first section of table view is 0, as only the section heading is displayed. The number of rows in the second section is determined by the number of accessories associated with the current home (see Listing 11-25).
The data source for the table is a list of accessories that are assigned to the current home. Each row maps to an element in the accessories list. Accessories are added by the Accessory Browser (see Listing 11-26).
Removing an Accessory from a Home
When an accessory table row is swiped, the table enters into editing mode. The table view invokes its canEditRowAtIndexPath method where the application can determine on a row-by-row basis to allow editing. In this case, the accessories list row is always editable (see Listing 11-28).
If editing is allowed for a row, the row displays a Delete button. If the user taps the Delete button, the view controller receives a commitEditingStyle message from the table view (see Listing 11-29). If the editingStyle is Delete, then removeAccessory can be called on the current home. In the completion block, if there is no error, tableView.deleteRowsAtIndexPaths is called.
Using the HomeKit Accessory Simulator
The HomeKit Accessory Simulator is a developer tool that allows you to define accessories for which you don’t have a physical accessory. You can create accessories and add services and characteristics to closely represent physical devices. For example, you can define a ceiling fan and then add services to turn power on and off and change the rotation speed and rotation direction. From your application, you can scan for and add the accessories you define in the simulator, and then control the services just as you would with a physical accessory. The simulator allows you to pair with a device, change values, and receive changed values. So when you flip a switch in your app you can see the result immediately in the simulator, and vice versa; if you change values in the simulator, it sends the changed values to your app.
You can start by creating a lamp accessory. Launch the simulator (/Applications/HomeKit Accessory Simulator.app) and then, located in the lower left corner of the app, click the Add button (+) and select New Accessory from the pop-up. When prompted, enter a name and manufacturer for accessory and leave the default for serial number as shown in Figure 11-17. Click the Finish button.

Figure 11-17. Configure new accessory options pop-up
You should see a new accessory item in the left panel under IP Accessories, and the main view on the right where you can add services and characteristics (see Figure 11-18).

Figure 11-18. Accessory detail view
Your new lamp accessory needs a service with characteristics that you can control from your app. Select your accessory from the list on the left side of the window, and then click the Add Service button located in the upper portion of the main view. From the options pop-up, click the Service pull-down, select Lightbulb Service, and then click the Finish button (see Figure 11-19). The new service appears in the detail view.

Figure 11-19. Configure new service options pop-up
The simulator automatically creates a common characteristic for each service type, so for the lamp accessory you just created, an On characteristic was added for you (Figure 11-20). Some characteristics are mandatory, like the On power switch, but if you wanted to add an additional characteristic like a dimmer, for example, you would click the Add Characteristic button and add a Brightness characteristic from the Characteristic pull-down in the options pop-up.

Figure 11-20. Accessory detail view with On characteristic
You now have an accessory that can be discovered and controlled from your app. Later in this chapter, you’ll add support to browse for available accessories.
In your application when you attempt to add a new accessory, the system will present an Add HomeKit Accessory dialog that states that the accessory is not certified. This is allowed when using the HomeKit Accessory Simulator, so click the Add Anyway button (see Figure 11-21).

Figure 11-21. Add HomeKit accessory dialog
The system will present a screen that asked you to provide a setup code for the accessory. Click the Enter code manually button located at the bottom of Figure 11-22.

Figure 11-22. Add Accessory option screen
Another screen is presented that allows you to enter an eight-digit code. Enter the setup code from the simulator’s main view detail area below the accessory name (Figure 11-23).

Figure 11-23. Add setup code entry screen
The system displays a progress indicator while it processes the setup code. If you entered the wrong code (or selected cancel), you will be presented with a screen that allows you to enter the code again. If you entered the correct code, the system presents a screen that states that the accessory was added and is ready to use (Figure 11-24).


Building the Accessory Browser
The accessory browser is used to scan for HomeKit-enabled accessories. The scene will use a grouped table view to present a list of HomeKit-enabled accessories that are not already associated with the selected home.
At runtime, the table will look similar to the illustration in Figure 11-25.

Figure 11-25. The Accessory Browser scene with available accessories
Open the storyboard and drag a new navigation controller from the Object library onto the storyboard canvas. A new UITableViewController will automatically be added to the storyboard canvas.
Change the title of the table view navigation item to Accessory Browser.
Select the table view and in the Attributes Inspector and change the style to Grouped.
Select the table view cell and in the Attributes Inspector, change its style to Subtitle and Identifier to AccessoryCell.
Drag a View from the Object library and insert it above the table view cell.
Add a Label to the view you just added and set the text to Searching for new accessories.
Add an Activity View Indicator to the right of the label you just added. The Accessory Browser Scene in the Document outline should look similar to the one in Figure 11-26.

Figure 11-26. Accessory Browser Scene outline
Add a Bar Button Item to the navigation bar. From the Attributes Inspector in the Bar Button Item section, change the System Item to Done. This control will be used to dismiss the Accessory Browser.
Your Accessory Browser scene should look similar to the illustration in Figure 11-27.

Figure 11-27. Complete Accessory Browser scene
Create a new Swift file named AccessoryBrowser.swift. Declare a new class AccessoryBrowser that subclasses UITableViewController and adopts the protocol for HMAccessoryBrowserDelegate (see Listing 11-30). Add the properties accessoryBrowser, accessories, and selectedAccessory.
In the storyboard set the Custom Class for the table view controller to AccessoryBrowser in the Identity Inspector.
Assign self as the accessory browser delegate in the viewDidLoad method after the line with super.viewDidLoad().
accessoryBrowser.delegate = self
Implement the accessory browser delegate methods didFindNewAccessory and didRemoveNewAccessory such that the specified accessory is added or removed from the table view (see Listing 11-31). When adding a new accessory, check that it doesn’t already exist.
Scanning for Accessories
To start scanning for available accessories, call the accessory browser’s startSearchingForNewAccessories method. In this example app, it’s called from the viewDidLoad method of the view controller.
accessoryBrowser.startSearchingForNewAccessories()
To stop searching, call the accessory browser’s stopSearchingForNewAccessories method. The example app calls this from the viewWillDisappear method of the view controller.
override func viewWillDisappear(animated: Bool) {
    accessoryBrowser.stopSearchingForNewAccessories()
}
Implementing UITableView Methods
The data source for the table is a list of accessories that are assigned to the current home. Each row maps to an element in the accessories list.
The number of rows is determined by the number of available accessories (Listing 11-32).
Reload the table data from the viewWillAppear method of the view controller of the AccessoryBrowser class as shown in Listing 11-34.
Adding a New Accessory to the Home
When the user selects an accessory from the list, the table view delegate method didSelectRowAtIndexPath is called. Assign the selectedAccessory to the corresponding element in the assessor’s list.
selectedAccessory = accessories[indexPath.row]
To add the accessory to the current home, you call the home objects addAccessory method as shown in Listing 11-35, and pass in the selectedAccessory as the parameter. The completion block is executed after the request is processed. The value of error will be nil on success.
When the accessory has been successfully added to the home, post a notification so any registered observers can update their views (see Listing 11-35).
To assign the new accessory to a room, you call the home objects assignAccessory method and pass in the selectedAccessory along with the room to which the accessory will be assigned. The accessory must already have been added to the home. The room must already exist in the home. In this example, the default room for the home is being used. Later, you can extend the application and provide support to add new rooms (see Listing 11-35).
Dismissing the Accessory Browser
To dismiss the accessory browser and return to the Home scene, create an action connection (see Listing 11-36). Control-drag from the Done Button Bar Item control to the implementation file. In the Connection pop-up, set the name of the action to done and then click Connect. Add a call to dismissViewControllerAnimated.
Building the Services Interface
The Services scene will display all the services that are available for a specific accessory. Each service will be presented in its own section followed by a list of associated characteristics.
At runtime, the table will look similar to the illustration in Figure 11-28.

Figure 11-28. The available services
Open the storyboard and add a new UITableViewController to the storyboard canvas.
Select the table view and in the Attributes Inspector, change the style to Grouped.
Add two labels to the table view cell and position them on the left in Figure 11-29. From the Attributes Inspector, change the font for the top label to Footnote and the bottom label to Body.

Figure 11-29. Setting up a predefined prototype table view cell
Select the table view and, from the Attributes Inspector, change the number of prototype cells to four. You should see four identical cells.
Change the table view cell identifier for the first cell to CharacteristicCell.
Change the table view cell identifier for the second cell to PowerStateCell, and then add a UISwitch and position it on the right side.
Change the table view cell identifier for the third cell to SliderCell, and then add a UISlider and position it to the right.
Change the table view cell identifier for the fourth cell to SegmentedCell. Remove the second label and replace it with a UISegmentedControl, and then position it so that your result appears as in Figure 11-30.

Figure 11-30. The Services scene
Your Services scene should now look similar to the illustration shown in Figure 11-30.
Create a new Swift file named ServicesViewController.swift. Declare a new class ServicesViewController that subclasses IUTableViewController and adopt the protocol for HMAccessoryDelegate as shown in Listing 11-37.
In the storyboard, set the custom class for the table view controller to ServicesViewController in the Identity Inspector.
Add a stored property called services and initialize it with a new, empty array of HMService values.
var services = [HMService]()
Add a stored property called accessory to hold a HMAccessory and define a property observer to set self as delegate (see Listing 11-38).
In the viewDidLoad method, set the view controller’s title to the accessory’s name.
title = "(accessory!.name) Services"
Configuring Services
Recall that each service will be presented in its own section followed by a list of its characteristics. The first section will show information about the accessory, so you’ll need to iterate through the services for the accessory, checking its type. Insert the service of type HMServiceTypeAccessoryInformation at the front of the array. Call the configureServices method shown in Listing 11-39 from the viewDidLoad method.
Receiving Value Change Notifications for Characteristics
To display the current state of a services characteristic, you’ll want to receive notifications when the characteristic’s value changes. You do this by calling the enableNotification method for a characteristic that supports notifications. You can check this by testing if the characteristics properties contain the constant HMCharacteristicPropertySupportsEventNotification. You want to selectively turn notifications on or off, so create a method called enableNotifications that takes a Boolean as a parameter (see Listing 11-40).
You’ll want to call enableNotifications(true) to enable notifications from the viewDidLoad method after you’ve set up the services array and call enableNotifications(false) to disable notifications from the viewWillDisappear method.
Implementing UITableView Methods
The data source for the table view will be the services array, so the number of sections in the table is determined by the number of services, and the number of rows for each section is determined by the number of characteristics for each service (Listing 11-41).
The cell style presented for each row is determined by the properties and metadata of a characteristic. Character properties are represented by the following constants:
- HMCharacteristicPropertySupportsEventNotification: The characteristic supports notifications using the event connections established by the controller.
- HMCharacteristicPropertyReadable: The characteristic is readable.
- HMCharacteristicPropertyWritable: The characteristic is writable.
Characteristic metadata is information that further describes a characteristic’s value. Character metadata is represented by the HMCharacteristicMetadata object. You query the metadata to find out information such as the data format, units, numeric value ranges, and manufacturer’s descriptions.
In the delegate method cellForRowAtIndexPath, evaluate each characteristic to determine the cell style (see Listing 11-42).
At the top of the ServicesViewController class, define a structure named Identifiers with properties for each cell prototype in the table (see Listing 11-43).
Create a new file named HMCharacteristicExtension.swift and declare a new extension for HMCharacteristic. The purpose of this extension is to provide stored properties and constants that can be used that help determine data formats, units, and such by inspecting a characters properties and metadata (see Listing 11-44).
Subclass UITableViewCell for Characteristics
Characteristic Information
Create a new file named CharacteristicCell.swift and declare a new class CharacteristicCell that subclasses UITableViewCell. This will act at the base class for all characteristic table view cells (see Listing 11-45).
Power State Control
Create a new file named PowerStateCell.swift and declare a new class PowerStateCell that subclasses CharacteristicCell. A UISwitch is used to toggle the value that represents a characteristics power state (see Listing 11-46).
Slider Control
Create a new file named SliderCell.swift and declare a new class SliderCell that subclasses CharacteristicCell. A UISlider control is used to change a characteristic’s numeric value (see Listing 11-47).
Segmented Control
Create a new file named SegmentedCell.swift and declare a new class SegmentedCell that subclasses CharacteristicCell. A UISegmentedControl is used to represent a range of values that represents descriptions.
Accessory Delegate Methods
When a characteristic value of an accessory changes, the accessory notifies its delegate through the didUpdateValueForCharacteristic method (see Listing 11-49). The accessory parameter represents the object for which the characteristic value has changed. The service parameter represents the service with a changed characteristic value. The characteristic parameter represents the characteristic whose value changed.
Transitioning to the Services Scene
Add a segue to transition to the Services scene when the user selects an accessory from the table. Open the storyboard and control-drag from the Home scene table view cell to the services view controller. Set the segue identifier to ServicesSegue.
In the HomeViewController class, override the prepareForSegue method and set the accessory property of the ServicesViewController (see Listing 11-50).
Running the Application
Build and run the application. Add a new home; you should see a new entry in the first table section. You should also see an entry with that home name in the Primary Home section with a check mark to the right side of the cell. Now add a second home; you should see a second entry in the first table section as well as in the second section. The first home added should still be marked as the Primary Home. Select the second home in the Primary Home section; the check mark should now appear to the right of the table cell indicating that the second home is now the Primary Home.
Adding Accessories
- Select a home from the first section; the app should transition to a view with the home name shown in the navigation bar and an empty table view. The background should show a label with the text No Accessories.
- Tap the (+) Add button in the navigation bar; the view should transition to the Accessory Browser. If you’ve added any accessories to the simulator, you should list them here.
- Select an accessory from the list; a pop-up should appear warning that the accessory is not certified and may not work reliably with HomeKit. This is normal when using the simulator.
- Select Add Anyway; you should be presented with a scene prompting you for an eight-digit accessory setup code.
- Tap the Enter code manually text at the bottom of the view; you should be presented with a scene that has a keypad where you can enter the eight-digit accessory setup code which can be found in the simulator app at the top of the main view.
- Enter the code; if you’ve entered the incorrect code, you should see the message Adding Failed. If you’ve entered the correct code then the message Accessory Added will appear briefly and the view should automatically transition back to the Accessory Browser. Notice that the accessory you selected is no longer listed in the table view.
- Tap the Done button in the navigation bar; you should now see the accessory listed in the home view.
- Select the accessory in the table view; you should transition to the Services scene. The accessory name should appear as the title in the navigation bar. You should see several table sections. The first section is informative only. It should show the same information as shown in the simulator. The second table section should be labeled with the service name. There will be one or more table cells, one for each characteristic, with a control that can be used to change the value or state of the characteristic. For example, if you see a Lightbulb service, there should be a switch available to turn the power on and off.
- Change the state of the characteristic; notice that the associated value in the simulator changes as well.
- Change the value from the simulator; notice the associated value in your app changes.
Experiment with the simulator by adding more accessories and then add the accessories to the homes you have in your app. Notice that you can’t add an accessory to more than one home.
Summary
This chapter covered some of the basic concepts of HomeKit and how you can use the HomeKit framework in an application. It also covered the basics for using The HomeKit Accessory Simulator to help you develop and test your application.
There’s so much more that can be done. The sample app only scratches the surface of what can be done using the HomeKit framework. It’s up to you to extend the functionality to accommodate your needs.