
Using Apple Pay to Accept Payments
Gheorghe Chesler
In the short time since its introduction, Apple Pay has driven Near-Field Communication (NFC) payments with unprecedented momentum. Apple now takes this a step further by allowing developers to use Apple Pay to accept payments for physical goods in their apps, a feature which has been successfully adopted by Uber and Starbucks. This chapter introduces readers to Apple Pay by demonstrating how to integrate the framework for in-app payments, as well as discussing traditional challenges in implementing payment systems.
Apple Pay vs. Alternative Payment Systems
In a normal e-commerce transaction that was initiated from a web site, there are multiple ways to wrap up a payment. The following are some examples:
One-stop-shop: The back-end software on the shopping cart server processes an order submit form and connects synchronously with the merchant gateway where it submits the payment. The pass or fail of the transaction is received and delivered back over the same connection to the browser. This is typical usage for shops using established merchant gateways like Authorize.Net, Worldpay, Stripe, and many others.
Offline card processing: The shopping cart back-end captures the credit card information, stores it securely, and then uses that information to process an order asynchronously. High-volume sites (e.g., Amazon) prefer this method. These sites cannot afford to have synchronous transactions that take too long, and that block the server resources until the payment is processed. This method is also used when your order is not ready to ship right away, and you can only charge the card when the goods have shipped. You might have noticed that Amazon splits your order in smaller suborders that can be shipped separately, and you are billed separately as they ship. This is also very convenient when you expect that parts of the order could be canceled due to delays in availability, and you don’t want to deal with the fallback of doing partial refunds on tax and shipping costs.
Delegate to the merchant pay interface: Smaller shops with less trust/visibility or those that don’t want to deal with the hassles of managing a merchant account use a payment broker like PayPal, which offers a feature called IPN (Instant Payment Notification). Instead of taking the credit card number, the back end only validates the input and then redirects the user to PayPal. The customer has the confidence of a large and trusted entity to perform a transaction that can be disputed if necessary. Once the user decides whether to complete the transaction, PayPal gives the user the ability to go back to the shop site, while completing the final part of the transaction by sending a callback to the web site with a predefined set of parameters. The shop will then know to show the customer the order invoice for the completed order.
Taking payments through a mobile device app using one of the methods shown previously, requires you to do the same kind of wiring as is done for a server. You can still choose to process a payment by collecting the user credit card information (number, expiration date, pin) and sending it to the merchant gateway along with the user mailing, billing, and shipping address (for those gateways that require that level of information). This requires you to either enter the credit card information in a form field or use a card reader to scan that information and then place an order.
Naturally, the systems that collect this user information have an issue of liability: just as with back-end applications; we don’t know with certainty that the agent/application/API that handles the data for this process is secure and does not “call home” to the developer with the credit card number of the user. At the same time, the credit card information goes over the wire, increasing the risk of a third party (man-in-the-middle) snooping around your sensitive data.
In a mobile app that allows you to pay for a good or service, there has to be a way to avoid handling the credit card information directly. This is where Apple Pay comes in.
Apple introduced the in-app purchase to allow application developers to take in payments for virtual goods like extended functionality or premium content for an app. This is wrapped up using your Apple account, which is why you see those charges on your iTunes bill.
For other software or hardware goods, and especially for the case when your shop already uses a merchant gateway, Apple Pay allows your app to use the information stored in your Apple Wallet to submit a payment, without actually exposing this information to the application itself.
You can use Touch ID within your app to authorize payments, releasing tokenized credit and debit card payment credentials that are securely stored on your iOS device (iPhone, iPad). Users can also save their billing and shipping information in the Wallet app, and that information can then be relayed to the merchant gateway to process your payment.
The Apple Pay Programming Guide provides details on how to use the PassKit framework to integrate Apple Pay. The In-App Purchase Programming Guide (found in the iOS developer library) provides details on how to use the StoreKit framework to integrate in-app purchases.
You can find the Apple Pay Programming Guide at https://developer.apple.com/library/ios/ApplePay_Guide/.
In addition to implementing Apple Pay with the PassKit framework, you must
- Set up an account with a payment processor or gateway
- Register a merchant identifier via Certificates, Identifiers & Profiles
- Submit a Certificate Signing Request (CSR) to obtain Public and Private keys that will be used to encrypt and decrypt Payment Tokens
- Include an Apple Pay entitlement in your app
If you don’t already have an account with a payment processor/gateway, you can find a list at https://developer.apple.com/apple-pay.
Depending on what your app is offering for sale, you might not be able to use Apple Pay. Apple Pay is only available to businesses offering physical goods or services for use outside their iOS app. If the goods or services are used in the app itself, then you must still use Apple for your in-app payments.
In addition, the payment provider might not support all processors: for example, Authorize.Net only supports processors that support the Visa token service and the tokenization solutions developed by MasterCard and American Express. For example, at the time of this writing, Authorize.Net supported:
For Authorize.Net you can see what processor is assigned to your merchant account on the payment provider account page (account / merchant profile / payment methods). If your processor is not supported, you will not be able to configure and use Apple Pay.
An extract from the Authorize.Net documentation shows this in detail:
http://developer.authorize.net/api/reference/features/apple_pay.html
“The Apple Pay solution uses payment network tokenization. You can sign up for this solution only if your payment processor supports tokenization. If your processor does not support payment network tokenization or if Authorize.Net does not support your payment processor’s tokenization interface, you will not be able to sign up for this payment solution.”
Using Apple Pay to accept payments
The first thought you might have is to provide your own server-side solution to receive payments from your app, decrypt payment tokens, and interface with the payment provider. Handling credit and debit card payments can be complicated, and unless you already have the expertise and systems in place, it could turn into a complex project that has its own issues of security and maintenance.
Most payment gateways offer for that purpose a Software Development Kit (SDK) that aims to be the most reliable way to support Apple Pay in your app. You can find a list of payment providers that support Apple Pay with their SDKs at https://developer.apple.com/apple-pay/.
Using one of these SDKs is highly recommended. Contact your payment provider for more information. Most providers that offer Apple Pay support make SDKs available for common programming languages; this means that you might get just Objective-C support and not Swift support. This is expected, since Swift is still rather new and merchant gateways don’t usually provide code for fast-moving targets such as Swift. Fortunately, you can easily embed Objective-C code in your Swift app, if there is an Objective-C SDK available.
The basic elements required to process an Apple Pay transaction are as follows:
- Present the Apple Pay button
- Present the payment sheet
- Allow the user to authorize the transaction with Touch ID
- Finalize the transaction using the payment token
To allow the user to pay with Apple Pay, the following requirements have to be met:
- The device needs to provide a secure element that is in charge of the request encryption
- The user has to have registered on the device payment modes that you as a vendor support
To be able to identify these requirements, we have to use the APIs from PassKit. The same APIs give you the ability to present the user a “Buy with Apple Pay” button.
Should the device not be set up for Apple Pay, you can present instead a “Set up Apple Pay” button. Finally, if there is no available payment method that would work with Apple Pay, you can decide not to show the Apple Pay button at all.
The Payment Sheet
Once the user has added items to the shopping cart and selects the Apple Pay button; you have to create a payment request, and use the PassKit API to show to the user a summary of the order.
Your app provides the information that will be displayed on the payment sheet, where the user can see the order total and select a shipping address with a valid zip code. You can calculate the correct shipping charges based on the zip code from the shipping address.
To minimize confusion, only ask for information that is strictly necessary to process the order. The user is at all times in control and can change the billing and shipping information, so the tax and shipping charges will be recalculated as necessary. The user can also enter on the payment sheet a different e-mail address or phone number for the order confirmation.
The proper flow is to show the payment sheet immediately after the user selects Apple Pay as the payment method, without any pop-ups or intermediary screens.
The data (updated) on the payment sheet is submitted when the user confirms it using Touch ID.
The Payment Token
When the user authorizes the transaction with Touch ID, PassKit returns a payment token to your app.
The payment token contains all the information necessary to complete a payment transaction. This includes the amount charged for the order, the account number specific to the device, and a cryptogram that can be used only once.
This data is encrypted with the merchant’s public key and can only be decrypted with the merchant’s private key by either the merchant or the payment processor, on behalf of the merchant, via the SDK.
Your app must make it clear when it acts as an intermediary party, in particular when the app decrypts the payment token and passes it to the merchant over the wire to process the payment with its specific processor.
Figure 15-1 illustrates a typical payment flow. Your app will first check if the device is compatible with and set up for Apple Pay. If Apple Pay is physically supported (the device has a secure element), your app will show the “Set up Apple Pay” and offer the user the ability to set up a payment method that can be used with Apple Pay.

Figure 15-1. Typical payment workflow
If all conditions are met, your app will display the Apple Pay button. The order is not finalized yet, as the user still should have the ability to change his billing and shipping information. This happens in the next step, after the user taps Apple Pay and it displays the payment.
Once the user finalizes the order information, they can use Touch ID to submit the order. For the payment to be authorized, the order information relevant to finalizing the financial transaction has to be packaged and sent to the payment processor. For that, the app uses the PassKit API to get a payment token from the secure element.
With all this gathered information, your app calls the appropriate APIs in the payment processor SDK, and attempts to finalize the payment. Of course, that means there is still a chance that things are not going to go as planned, and the payment processor will reject the payment (card invalid, expired, fraud attempt, etc.).
If the transaction was successful, your app can then display the order confirmation and set in motion the process of delivery of the order payload, which can be shipping, e-delivery, plug-in installation, feature activation—whatever is the nature of the product purchased.
Taking a closer look at the final part of the transaction, before the payment request is sent to the merchant system, we can see the role of the payment authorization view controller in this process. We are at the point where the order amount is known, and that includes all taxes and shipping costs. The user has used Touch ID to authorize the payment.
Apple Pay sends the payment request to the secure element, a specialized chip on your device. The secure element adds the payment data to the customer information and encrypts it in form of a payment token.
The secure element sends the prepared payment token to the Apple’s payment servers, where the token is encrypted yet again, this time with your merchant identifier certificate. Other than encrypting the content, the Apple servers do not store or alter the payment information in any way.
The re-encrypted token is returned to your app for processing. This is convenient, as you never need to package the merchant identifier in your app, so nobody can snoop in your memory and extract that information from your app.
To accept payments, Apple provides the PKPaymentAuthorizationViewController class. This class allows us to create a prompt for the user to authorize a payment request. After the user authorizes the payment request for the transaction, the delegate is called with a payment token used to authorize payment for the transaction.
Figure 15-2 shows this interaction.

Figure 15-2. The payment authorization view controller
Your app can now use the SDK offered by the merchant system to wrap up the last leg of the process. If you have an existing payment infrastructure, you can send the encrypted payment token to your servers, where it can be decrypted and the payment can be processed.
Transaction Types Supported by the Payment Processor
For a payment processor SDK to be able to support Apple Pay, it has to be able to handle a specific set of e-commerce transactions that give an app the ability to cover all scenarios of a transaction:
- Authorization
- Capture
- Partial shipment
- Recurring billing
- Order refund
- Transaction chargeback
Authorization: This scenario allows the app to put a hold on a specific amount on the customer’s account and reserve the funds needed to cover the total amount of the order. This is usually done when the processing of the order is greatly simplified if the processor can work with the confidence that the funds could be retrieved when the order is finalized.
Take, for example, the case of e-delivery of content that needs to be processed before delivery, like watermarking a PDF or preparing personalized content. If the app can verify that the payment method chosen is valid and the account has the funds needed to cover the order amount, it can trigger the content processing, while the user is waiting. Some of this processing could fail for a variety of reasons, and thus the order could not be completed. In this case no funds have changed hands, and the authorization can be released, along with showing the proper error message to the user.
Capture: After a successful authorization, or when no authorization of funds is needed, Capture is actually triggering the funds transfer right away.
Capture can fail in one of many ways: the payment can be invalid, expired, or lacking funds; the card can be flagged as stolen or the location of the transaction can trigger a stolen card alert; and so on. These checks are made by the merchant system or by the entities used by the merchant system to validate the payment method, the signed name on the card, or the billing or shipping address.
Recurring: This scenario allows the app to handle repeating payments for services, by setting up a recurring payment plan.
Refund: If an order is returned or a service is disputed, this allows the app to return the money to the customer’s account.
Chargeback: This is provided to give the app the ability to handle fraudulent or disputed transactions.
Example: using Authorize.Net as the Payment Processor
When using Authorize.Net as your payment processor, there are two ways to process an Apple Pay transaction.
The API method: The merchant server receives the order request from the app and passes it along to Authorize.Net. You would use the API method when you need to extract and centralize the payment data on your server before sending the request to Authorize.Net. Your server will then format the transaction as an XML or NVP request to the AIM API. The encrypted transaction data is base64 encoded and contains a format descriptor. Authorize.Net processes the request and sends the response back to your server. Your server then replies to your app with the order confirmation data or with the error it received from Authorize.Net.
The SDK method: The Authorize.Net SDK handles signing the transaction and the interaction with Authorize.Net. You have to read the Authorize.Net SDK Developer Reference to see the steps required to wire this in the application:
http://www.authorize.net/content/dam/authorize/documents/ApplePay_sdk.pdf
For the time being, Authorize.Net only offers an Objective-C SDK. This is true for most other payment processors (Stripe is in the same boat), as Swift is a new language that still shows changes in syntax and API methods from version to version, and it would be a hassle for Authorize.Net to maintain code in a moving target.
The SDK only supports the first two types of transactions: Authorization and Capture and Authorization Only. For all other subsequent transactions (Capture, Refund, Void) your app will have to use the regular payment APIs. Note that if you use Authorization Only, you still need to complete the capture to receive the funds from the transaction.
The reason the subsequent transactions are not directly supported by the SDK is that they are not relevant to the main process of Apple Pay.
Also important to mention is that testing your code using the sandboxed Authorize.Net environment should be done connected to the Apple developer system and not to the Apple production systems.
In Figure 15-3 we can see the two methods compared.

Figure 15-3. API vs. SDK for Authorize.Net transactions
Configuring your Environment for Apple Pay
In the section “Apple Pay Prerequisites,” we showed the steps required to configure Apple Pay.
- Set up an account with a payment processor or gateway
- Register a merchant identifier
- Submit a certificate signing request
- Include an Apple Pay entitlement in your app
Let’s take a closer look at what needs to be done, once you know which payment processor you will use.
To set up the merchant identifier and the certificate signing request go to the Member Center on your account page in the Apple Developer site and open the “Certificates, Identifiers & Profiles” as shown in Figure 15-4.

Figure 15-4. Setting up Certificates, Identifiers & Profiles
Register a Merchant Identifier
Select Identifiers, then Merchant IDs. Use the “+” in the upper right corner to create a new entry. Enter a descriptive name for your merchant account (e.g., “Credit card payments”), and a unique identifier in the requested format: the identifier starts with “merchant” then follows a dot-separated format (e.g., merchant.com.example.authorizenet).
The form will ask you to confirm your configuration and then will allow you to create the entry. When working with a payment provider, you will need to provide them the merchant identifier to complete your certificate generation.
Our sample entry shows the following:
Name: Credit card payments using Authorize.Net
Identifier: merchant.com.example.authorizenet
Let’s say we also want to support Stripe in our app, or we create a second app that supports Stripe, so we try to add another merchant identifier:
Name:         Credit card payments using Stripe
Identifier:  merchant.com.example.stripe
When we try to add the Stripe entry, the page shows us the following error:
A Merchant ID with Identifier ’merchant.com.example.stripe’ is not available. Please enter a different string.
What the Apple Developer page did not tell us is that this identifier is global. If somebody else registered it before, it will not be available. The identifier is case-insensitive, so if you alter capitalization it will not work either. You have to try until you get one to actually work, for example:
Name:         Credit card payments using Stripe
Identifier:  merchant.com.iot.stripe
Submit a Certificate Signing Request
Clicking again on “Merchant IDs”, we will get the list of registered merchant identifiers where we can see our new entry. Select the entry and click Edit.
To create a CSR for this entry, click “Create Certificate.”
You now have the choice to obtain and submit a properly formatted CSR from your payment provider.
For Authorize.Net: the instructions for signing up for Apple Pay already show that you need the merchant ID from the Identifier field, which is what we just created in the previous step.
You can login to the merchant interface on your Authorize.Net account, click Account in the main toolbar, and then select Digital Payment Solutions from the left menu. You can now click the “Sign Up” in the Apple Pay section. You will need the merchant ID you generated on the Apple member page.
To generate a CSR file, click Apple Pay on the left menu, enter your merchant ID in the Apple Merchant ID field, and click the “Generate Apple CSR” button.
For Stripe: go to the account Apple Pay section:
https://dashboard.stripe.com/account/apple_pay
This section will not appear by default in your account view, if you never set up Stripe with Apple Pay before, so following the link will enable that option in the account view. Click “Create a new certificate”, which should download a CSR file named stripe.certSigningRequest.
Adding the Merchant CSR to your Apple Account
With the obtained CSR file, you can now go back to the Apple Developer Center, “Certificates, Identifiers & Profiles” page:
https://developer.apple.com/account/ios/identifiers/merchant/merchantList.action
In the iOS Merchant ID Settings page, click “Create Certificate” and follow the instructions to submit the CSR that you created on the Merchant page.
If you see a warning in Keychain Access that the certificate was signed by an unknown authority or that it has an invalid issuer, make sure you have the WWDR intermediate certificates—G2 and the Apple Root CA—G2 installed in your keychain. You can download them fromapple.com/certificateauthority.
Once the CSR was uploaded to the Apple page, a new certificate will be generated and offered for download. You can now download the certificate file (the file is apple_pay.cer).
For Stripe, go back to the Stripe guided menu and upload the certificate. When all is completed, it will appear as in Figure 15-5.

Figure 15-5. Apple Pay certificate created on Stripe
Include an Apple Pay Entitlement in your app
To enable Apple Pay for your app in Xcode, open the Capabilities pane. Select the switch in the Apple Pay row, and then select the merchant IDs you want the app to use. Figure 15-6 illustrates this process.

Figure 15-6. Enabling Apple Pay support in the app
Install Prerequisites for Working with a Payment Processor SDK
As mentioned earlier, you would be hard pressed to find a payment processor that supports Swift natively. Until that happens, you will have to embed the Objective-C version of the SDK in your code.
Install the Payment Processor SDK
You can install the SDK manually into your project, which is bit more work; the easiest way is to install a dependency manager that will allow us to install the SDK on our Mac, such as Cocoapods or Carthage.
The easiest way is to use Cocoapods.
sudo gem install cocoapods
pod init ApplePay.xcodeproj
The first command is run with root privileges to install Cocoapods, then as the regular user, the second command will create a file called Podfile. Use a text editor or vim to edit the Podfile file and add Authorize.Net support.
target ’ApplePay’ do
pod ’authorizenet-sdk’
end
If you are configuring for Stripe support, the target will look like
target ’ApplePay’ do
pod Stripe’
end
Now you can install the SDK in your project by typing “pod install” in your terminal window (Listing 15-1):
Follow the suggestion of the installer: close your Xcode project and open instead the ApplePay.xcworkspace project.
Verify now that support for Objective-C embedding is enabled: in your project settings, go to the “Build Settings” tab, and make sure -ObjC is present under “Other Linker Flags.” You can see this in the project in Figure 15-7.

Figure 15-7. The project after installing the SDK
For Stripe you also need to add the string STRIPE_ENABLE_APPLEPAY to the preprocessor macros in the build settings of your project, as shown in Figure 15-8. The entry needs to be added to both debug and release entries in the preprocessor macros.

Figure 15-8. Adding a Preprocessor Macro entry for Stripe
The Objective-C to Swift Bridging Header
To be able to use the SDK in our Swift code, we need to create a bridging header that allows us to use Objective-C code from within our Swift code. As mentioned before, most payment processors offer SDKs in Objective-C, and it will be a while until they will start offering a Swift version. This will be true of most SDKs you will embed in an app, so writing bridging headers will be a popular pastime of the Swift warrior.
In the Xcode menu, click File ![]() New
New ![]() File
File ![]() iOS
iOS ![]() Source
Source ![]() Header File, then click “Next”; name the file “bridge” and click Create. You can see this in Figure 15-9.
Header File, then click “Next”; name the file “bridge” and click Create. You can see this in Figure 15-9.

Figure 15-9. Creating the header file
In the bridge.h type the following import statement at the top of the file (Authorize.Net):
#import <authorizenet-sdk/AuthNet.h>
If you are configuring your app to use Stripe as a payment processor, you will use instead
#import <Stripe/Stripe.h>
Select the Project folder and navigate to Build Settings, search for “Swift Compiler.”Verify that the “Install Objective-C Compatibility Header” is set to “Yes.” Edit the Objective-C generated interface header name entries for Debug and Release and set their value to the bridge.h, the header file.
The Main Storyboard
For a simple storyboard we only define the field where we can specify the order amount, the Pay button, and a text area that will be used by our logger library to show the ongoing activity. Figure 15-10 illustrates.
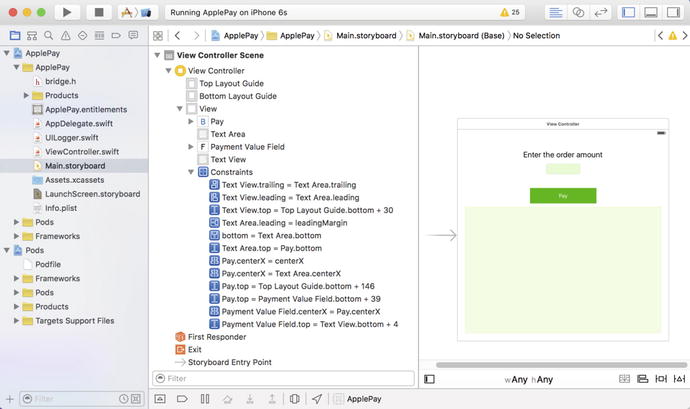
Figure 15-10. The main storyboard
The logger library
The logger library was assigned a variable in the view controller that will keep an instance of the logger around with the proper target assigned —in our case we use a text area field for the activity logging.
We will use the same logger library as in Chapter 12. The logger library has just a couple of functions that will allow us to track the API activity. These functions will interact with the textArea field we set up in the view controller. Just as in the view controller, the textArea field is declared optional, as it will be initialized in the init() function. Listing 15-2 shows the entire code of the UILogger.swift file.
We can see the view controller scene with the minimum set of requirements wired in Figure 15-11. We see the mappings for paymentValueField and textArea, as well as the payWithApplePay button wiring to the default action.

Figure 15-11. The view controller scene
Implementing Apple Pay payments with Stripe
To keep things simple, we will continue implementing an example with Stripe—all other payment processors will have different ways of approaching this, given that some might have an SDK, and the SDK is usually in Objective-C. Further down the road when the payment processors warm up to a stable version of Swift, they might even offer a pure Swift implementation of their SDK.
Your application needs to be able to communicate with your Stripe account and use the publishable key that was generated when you created your account. You generated two sets of keys: a test key and a live key. For now, we will set up the test key and initialize the SDK instance in the AppDelegate.swift file didFinishLaunchingWithOptions() function. This will make sure this value will be set for the lifecycle of the app. Listing 15-3 shows the relevant code from AppDelegate.swift.
We know by now that Apple Pay is only available on devices that have the secure element chip. On devices that do not have this, we can still use the pre-build form component from the Stripe SDK (STPPaymentCardTextField), or even create our own credit card form. The recommended method is to use the Apple Pay framework and only fall back to the Stripe form component should Apple Pay not be available for our device.
If Apple Pay does not fully work in a simulator, you will have to use a device to debug your app, or use the ApplePayStubs library from the Stripe SDK. See the Stripe instructions on how to configure ApplePayStubs at https://stripe.com/docs/mobile/ios.
This is a very simple application that uses only one view for everything, so our view controller will have to be a delegate for both PassKit and the Stripe SDK. When you implement multiple views, you will have to assign the correct delegate to your views.
The class shows the delegate assignments as mentioned earlier. Then we defined the payment networks that we decide to support in our apps. This is sometimes a requirement for certain merchants that can only use Visa/MC but do not want to use Amex because of the higher rates, or whatever other reason.
The pay button is assigned to the payButton variable that needs to be of UIButton type. The textArea field is used by our logger library. The paymentValueField is a simple text field we created to allow us to change the amount being charged for the order.
The paymentTextField is of STPPaymentCardTextField type. This field, as well as the functions prefixed with “payment,” is used by the Stripe SDK.
We can see the header of the view controller in Listing 15-4:
There is a bit of work we need to do in the viewDidLoad() function, to initialize our logger and the paymentTextField, as well as enable or disable the pay button depending on the app having the ability to use the specified payment networks. Listing 15-5 shows the code for the viewDidLoad() function from the ViewController.swift.
The pay button can also be enabled/disabled when the payment user changes the information. Once the user gets the Apple Pay pop-up, he can switch the card to a different card, select a different shipping address, and so on. Some of these changes might invalidate our ability to pay with Apple Pay and our restrictive list of payment networks, which is why we need to update the pay button. Listing 15-6 shows the code for the paymentCardTextFieldDidChange() function, which is located in the ViewController.swift file.
Finally, we need another helper method that would handle how the view controller for the pop-up is dismissed once the payment cycle is completed. You can see this in Listing 15-7.
We saw in the view controller scene that the pay button’s “Touch Up Inside” action was wired to the function payWithApplePay(). To keep things simple, we only log the error condition when the amount was not a valid number. If the amount is valid, we call the applePay() function. Listing 15-8 shows the code for the payWithApplePay() function in the ViewController.swift file.
The applePay() method prepares a request using the shopping cart item that we conveniently created here with the label “New Charge”. The request is assigned the ApplePayMerchantID that we set up previously and the SupportedPaymentNetworks that define which cards we accept. The request also is set to work for US transactions effected in US dollars.
Once the request is prepared, we test with the canSubmitPaymentRequest() function from the Stripe SDK. This will fail if Apple Pay is not available, or a default credit card was not set up. We can choose in case of error to default to Stripe’s PaymentKit Form. We leave this part of implementation to you, concentrating instead on completing the Apple Pay transaction, when we can. Listing 15-9 shows the code for the applePay() function.
The PKPaymentAuthorizationViewController will call the paymentAuthorizationViewController() function in our code, which was created to comply with the SDK’s interface. This method creates a token with the payment information; you can now send this token to your server, to be able to charge the card. Listing 15-10 shows the code for the paymentAuthorizationViewController() located in the ViewController.swift file.
Testing our app
Let’s give our app a first try. Bring up the simulator, and enter a valid amount, then click the Pay button. You will see an output similar to the one in Figure 15-12. Now the user can change the card being used. There is no shipping or billing information, because we did not configure any of that information yet, so the most basic thing is the ability to change the card. The simulator has three demo cards set up, a VISA, a MasterCard, and an Amex card. The simulator will naturally not show Touch ID, but will show “Pay with Passcode” instead.

Figure 15-12. First test of the app
To verify that we get a valid token, we can set a breakpoint in the view controller and walk through, as shown in Figure 15-13.
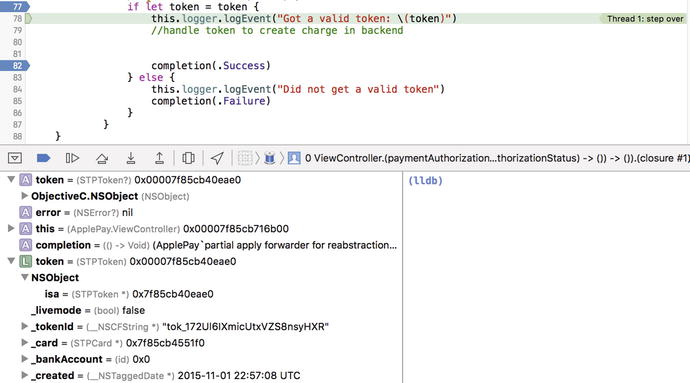
Figure 15-13. Debugging a Stripe payment
If the transaction was successful, once the transaction reached completion (.Success), the pop-up window will show a confirmation screen for a couple of seconds, then go back to our app. Figure 15-14 shows the confirmation screen.

Figure 15-14. The Apple Pay confirmation screen
To charge the card, you have to build a server-side application that takes the generated payment token and submits a charge request to Stripe. This is necessary since you will be using your Stripe secret key to finalize the payment, and it would not be wise to expose that in your application code. Furthermore, your payment workflow needs to centralize all placed orders, to allow accounting to manage the orders submitted from mobile devices.
Every payment processor has a decent amount of sample code available along with server-side SDKs that simplify your development. For Stripe, the tutorials for charging a card are located at https://stripe.com/docs/tutorials/charges.
Our application is essentially contained in the ViewController.swift file. Listing 15-11 shows the full code for this file.
Summary
In this chapter we looked at the rather complex landscape of Apple Pay. You learned how to set up your developer account to be able to use Apple Pay, and then how to set up a certificate to work with a payment processor. After this, you set up a very basic application that shows how these pieces fit together. You will still need to create your back-end application that will process the payment, schedule repeat payments, or process refunds.