
Building Your First Internet of Things App
Ahmed Bakir
To help introduce you to the style of this book, your first project will be a very simple application that demonstrates several of the steps you will take when building an Internet of Things application: creating a project, including hardware-specific frameworks, retrieving data, and displaying it. For your first project, you will create an application that logs the user’s location using his phone’s GPS chip and displays it on a map. This app could be used to help him find his car if he has the tendency to forget where it is (like a certain author). Figure 1-1 shows the mock-up, indicating the major user interface (UI) components and the flow of the application. The application you will create will follow the guideline set by this mock-up closely.

Figure 1-1. Mock-up for the CarFinder application
CarFinder has a tab-driven UI. The first tab displays a list of locations the user has saved, with timestamps, and a button for adding new locations. The second tab displays these saved locations on a map. You will work through the CarFinder project taking the following steps:
- Set up the project (and its dependencies).
- Build the UI for the application.
- Request permission to use the GPS hardware on the user’s device.
- Access the user’s location information.
- Consume and visualize the user’s location information.
A working Xcode project for this application, including the complete source code, is available in the Source Code/Download area of the Apress web site at www.apress.com. All of the source code for the book is packaged in a single zip file; the CarFinder project is in the Ch1 folder. Let’s get started.
Setting up the Project
The focus of the CarFinder application is to quickly save and retrieve location information. A tab bar is a common UI element in iOS that displays a series of buttons at the bottom of the screen. Clicking any of these buttons allows you to quickly switch between screens. An example of a tab bar is in the built-in iOS Music application, which allows you to quickly switch search filters (e.g., Album, Artist, and Title) by clicking buttons in the tab bar, as shown in Figure 1-2.

Figure 1-2. Example of a tab bar in the iOS Music application
The tab bar controller is also helpful to developers for two reasons: you do not need to do any programming to connect the tab bar buttons to a screen (you can set up the layout and all connections using Interface Builder’s point-and-click tools.)
To implement the CarFinder application, open Xcode and create a new project using the Tabbed Application template, as shown in Figure 1-3.

Figure 1-3. Selecting the template for a Tabbed Application
Next, you will be asked to name your project and select a programming language for the project, as shown in Figure 1-4. Although you can mix Swift and Objective-C in modern Xcode projects, the programming language setting pre-populates your project with common build settings for your language (such as modules for Swift and pre-compiled headers for Objective-C). All the projects in this book are written in Swift, so use the Swift setting.

Figure 1-4. Selecting a programming language for your project
You will also find a Devices setting on this screen, which allows you to specify whether you want your app to run on iPhone only, iPad only, or both (Universal). This project focuses on accessing GPS hardware which is available on both devices, so you can leave the template set to Universal.
Note You can change the Devices setting at any time by clicking on your app’s Project file (the top file in the Project Hierarchy.) The Devices drop-down will be available there too.
The CoreLocation and MapKit frameworks in Cocoa Touch enable the core features of this application—retrieving location information and displaying it on a map. A framework is a pre-compiled library that allows you to add a group of related functions to your application without being at risk of breaking the code or its dependencies. Practically, it does not make sense to include every available framework in a sample project, so you need to manually add the ones you want. As shown in Figure 1-5, to add frameworks to your project, select your project file in the Project Navigator (the left-most pane of Xcode) and scroll to the bottom of the General Project Settings page, where you will find a section entitled Linked Frameworks and Libraries. Clicking the Plus button will bring up a pop-up window with a scrollable list of all the frameworks installed on your Mac.
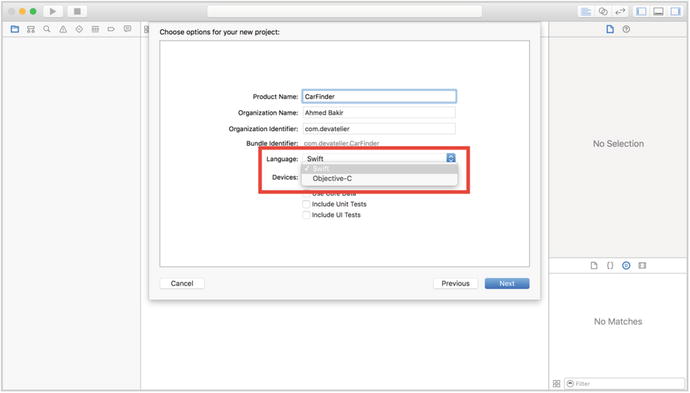
Figure 1-5. Adding frameworks to a project
To complete the operation, select the CoreLocation and MapKit frameworks and press the Add button. Frameworks will appear in the Linked Frameworks and Libraries section once you have successfully included them in your project, as shown in Figure 1-6.

Figure 1-6. Project with the CoreLocation and MapKit frameworks included
Note Every iOS project includes UIKit and Foundation by default. UIKit powers the core user interface controls and Foundation implements core high-level programming features like strings and arrays.
Building the User Interface
Now that you know the project is all set to compile correctly, you need to lay out the UI in Interface Builder and create source code to define its properties and behavior in your project. The default storyboard for a Tabbed Application is a container view controller that connects to two blank view controllers, as shown in Figure 1-7. You can access your storyboard from the Main.storyboard file. For the CarFinder application, you will want to replace the first view controller with a table view controller and add a map view to the second view controller (MapKit maps are provided as views intended to be embedded in view controllers).
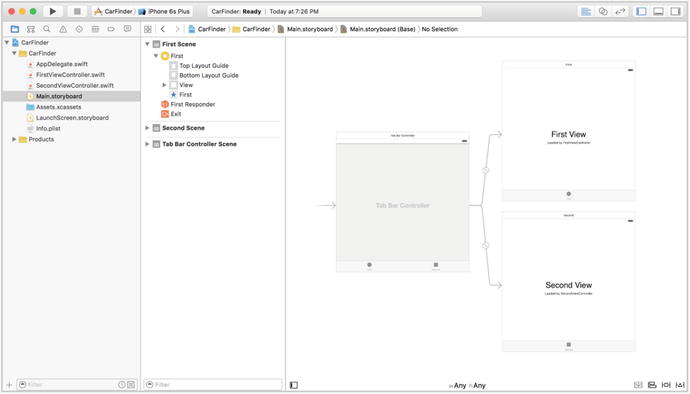
Figure 1-7. Default storyboard for a Tabbed Application
Creating the Table View Controller
To replace the first view controller with a table view controller, click it in Interface Builder. Your selection will be confirmed by a blue border around the view controller, as well as highlighting in the view hierarchy pane, as shown in Figure 1-8.

Figure 1-8. Selecting a view controller
Next, press the Delete key to delete it. Your storyboard should now look like the example in Figure 1-9.
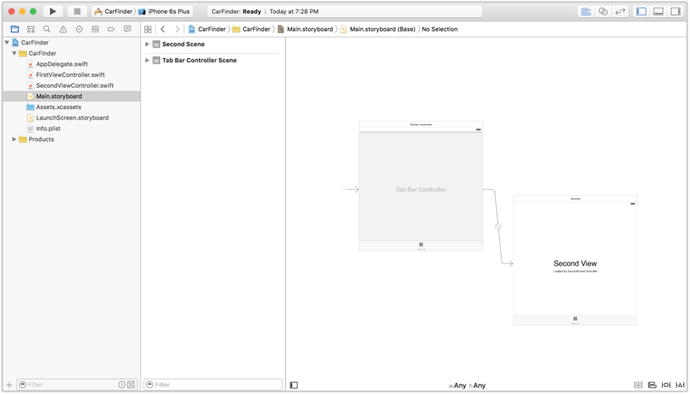
Figure 1-9. Storyboard, minus first view
To add the table, drag a table view controller from Interface Builder’s Object Library (the bottom right pane) and drop it onto your storyboard. Your result should look like the storyboard in Figure 1-10.

Figure 1-10. Adding a table view controller to your storyboard
To connect the table view controller to your parent view controller (the container), perform a control-drag (hold down the mouse while pressing the Control key) from the parent view controller to the table view controller. As shown in Figure 1-11, a blue arrow will appear indicating the connection.

Figure 1-11. Connecting storyboard elements
Releasing your Control-Click will bring up a pop-up menu, shown in Figure 1-12, allowing you to specify the relationship between the two view controllers. Select the “view controllers” relationship; this is the relationship type required for a tab bar.

Figure 1-12. View controller segue pop-up menu
At this point, your storyboard should look almost identical to the original (Figure 1-8), except with a table view controller replacing the original, plain view controller. Unfortunately, Interface Builder needs a little bit of help to learn that you have replaced the original view controller—you need to tell it what class “owns” the new view controller. Previously, the plain view controller was owned by the FirstViewController class, a subclass of UIViewController. Your table view controller needs to subclass UITableViewController, so navigate over to FirstViewController.swift in the Project Navigator and modify the class signature to subclass UITableViewController.
class FirstViewController: UITableViewController {
}
The first view controller will also need to include the CoreLocation framework to retrieve the user’s location, so make sure to add an import statement before your class definition, as shown in Listing 1-1.
Connecting to a Table View Controller
Now that the class is correctly defined, you can connect it to a table view controller in the storyboard. To make this connection, select the table view controller in your storyboard file and navigate over to the Identity Inspector (the third tab in Xcode’s right pane). As shown in Figure 1-13, the Custom Class menu will include the FirstViewController class. Select this to make the connection.
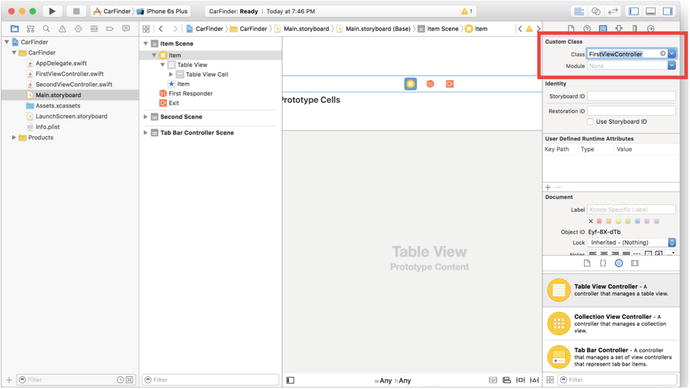
Figure 1-13. Connecting a table view controller to a class in your project
Note Make sure to also select your project name under the Module menu; Swift uses modules to group code in projects, similar to a namespace in C++ or C#. Manually selecting this option prevents the risk of future compilation issues when your project becomes more complex.
To complete this screen, you need to perform two more steps: create an Add button to the screen and select a template for each cell in the table view.
Table-driven iOS apps prefer to put an action button (such as Add) in a navigation bar at the top of the table. This makes for a consistent experience across multiple levels of detail (the left button is used for navigation while the right is used for actions). By default, a table view controller, does not come with a navigation bar; to add one, you will need to embed the view controller in a navigation view controller. Fortunately, Xcode makes this effortless. To embed any view controller in a navigation view controller, select the target view controller and then navigate to Xcode’s Editor menu. From there, select Embed In > Navigation Controller, as shown in Figure 1-14.
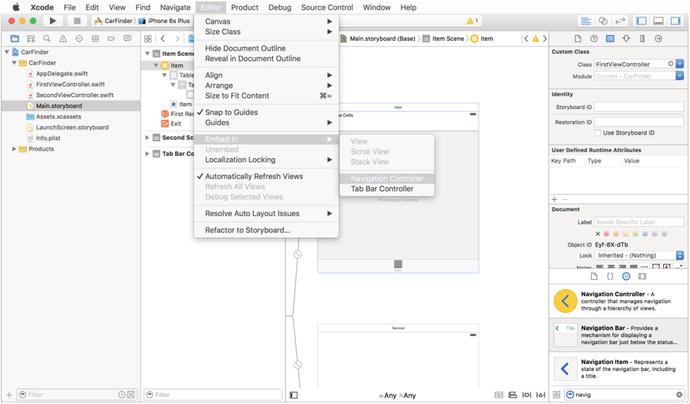
Figure 1-14. Xcode menu for adding a navigation view controller
Your storyboard should now look like the one in Figure 1-15; your tab bar controller connects to a navigation view controller, which contains your table view controller.

Figure 1-15. Storyboard with a table view controller embedded in a navigation controller
Creating an Add Button
To create an Add button, select a Bar Button Item from the Object Library and drag it onto your table view controller’s navigation bar, as shown in Figure 1-16. Rename this button Add Location by double-clicking its title (the default title is “Item”).

Figure 1-16. Adding a button to your table view controller’s navigation bar
To make the button do something, you need to connect it to a “selector,” or handler method. Interface Builder will scan your view controller’s owner class for a list of methods that are marked as “actions”; these are indicated by adding the @IBAction compiler directive to the front of the method signature.
First, you need to make a stub or placeholder function that you can use to connect the code to Interface Builder. Modify the definition for the FirstViewController class (in FirstViewController.swift) to add an Interface Builder-compatible addLocation() function as shown in Listing 1-2.
Next, switch back to Interface Builder and select the FirstViewController scene again (the one that represents the table view controller). Click the Connections Inspector button in the top right, as shown in Figure 1-17.
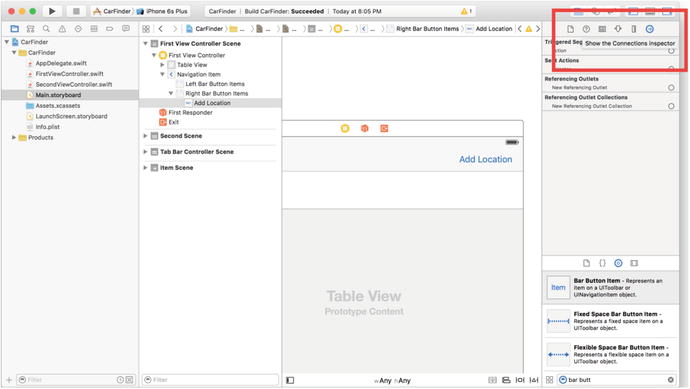
Figure 1-17. Selecting the Connection Inspector
To connect the Add button to your selector, make sure Main.storyboard is your current document and click the Assistant Editor button in the upper right section of Xcode, as shown in Figure 1-17.
The Connection Inspector is indicated by an arrow in a circle. When you click it, the right pane of Interface Builder shows a list of connections, representing actions for a UI element (such as the function that should be called when it is pressed) and its corresponding object in the code. These connections are what tie your code to Interface Builder. For this example, you need to connect the function that should be called when you press the Add button.
To connect the Add button to the addLocation() function, click the radio button next to selector in the Connections Inspector pane. A selector in Swift is a reference to a function. As shown in Figure 1-18, drag a line from the radio button onto the table view controller. As happens when you select a segue, a pop-up will appear allowing you to choose the function you want to connect as the selector action.

Figure 1-18. Connecting a button to an action in Interface Builder
To verify that the connection was made successfully, check the Connection Inspector after choosing the addLocation() method. Add Location should now appear in a bubble next to selector, as shown in Figure 1-19.
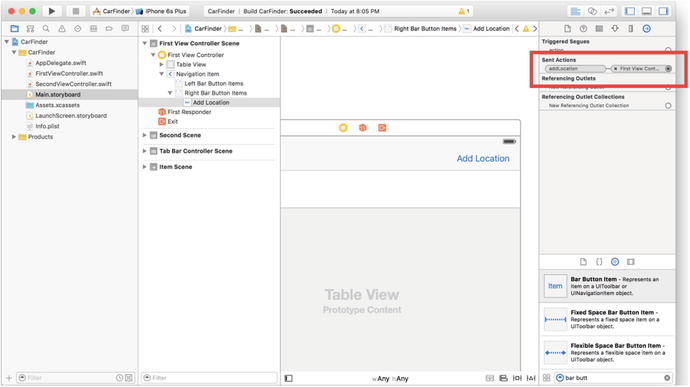
Figure 1-19. Verifying a selector connection
Selecting a Template
You do not need to define a custom class for the table view cells; you can use the “Subtitle” template. To change the cell type, click it in Interface Builder and navigate over to the Attributes Inspector tab in the right pane (the fourth icon from the left). As shown in Figure 1-20, select the identifier text view to enable text entry. The reuse identifier for the location cells is LocationCell. In your initialization code for the table, you will need this identifier to look up your cells in memory, since they are generated at runtime.

Figure 1-20. Using an identifier to name a cell
Note Reuse identifiers are case sensitive. Be careful to use the same capitalization in Interface Builder and your code.
Creating the Map View Controller
Compared to setting up the table view controller, the map screen is relatively straightforward. For this screen, you will display a map with pins indicating saved locations. You will generate the pins at runtime later in this exercise, but for now, to set up the UI, you need to add a map as the main view of the screen. Apple’s MKMapView class (MapKit view) abstracts the work of connecting to Apple’s Maps service, handling common gestures (such as pinch-to-zoom) and displaying user location. As the developer, it is your responsibility to add it to a view, set its configuration parameter (such as initial position and satellite or classic view), and provide it with data (pin) points in the form of “annotations,” represented by the classes that implement the MKAnnotation protocol.
To add a map view to the second tab’s view controller, begin by switching back to Interface Builder. Click each of the existing labels on the second view controller and hit the Delete key to delete them. Next, find the “MapKit View” object in the Object Library and drag it onto the second view controller. At this point, the layout for the second view controller should look like the one in Figure 1-21.

Figure 1-21. Second view controller with misplaced Map View
The wireframes indicate that the map should fill the entire screen. Unless you have perfect luck, the map will not be positioned dead center in the view or fit the edges perfectly. To fix this, use Interface Builder’s Pin tool to set the auto-layout constraints for the map (the icon at the bottom right of the main screen, to the left of the triangle icon). Auto-layout is a convenient feature of storyboards that allows you to set rules for how an element should scale across different screen sizes, reducing your burden of implementing this logic in your code. As shown in Figure 1-22, in the pop-up that appears after clicking the Pin tool while the Map View is selected, uncheck the Constrain to margins check box and set all of the neighbor constraints (the ones around the box) to 0.

Figure 1-22. Pinning constraints for a UI element
The storyboard still needs a little help to fully configure the constraints. To complete the process, select “Update Frames” from the Resolve Auto Layout Issues menu (the triangle icon, to the right of the Pin menu), as shown in Figure 1-23.

Figure 1-23. Resolving auto-layout conflicts
Having added the element to the storyboard, you need to add it to your class. As shown in Listing 1-3, include the MapKit framework in the Second View Controller class (SecondViewController.swift) and add the Map View as a property.
We will cover the semantics of this declaration more in Chapter 2, but for now, it is important to note the following:
- The @IBOutlet compiler directive makes the property available to Interface Builder.
- The property is defined as an inherently strong pointer (var) because you will need to modify its values later.
- All properties that are tied to a storyboard element need to be defined as optional. The design pattern for user interface elements in Swift is to treat them as nonexistent rather than being a “nil” value if they are not tied to a storyboard element.
Next, you need to revisit Connections Inspector in Interface Builder to make the connection between the storyboard and the code. Follow the same steps you used for the Add button to select the button and navigate over to Connections Inspector (the last tab in Interface Builder’s right pane). To connect a property of a class to a storyboard, you need to set the Referencing Outlet connection. As shown in Figure 1-24, to complete the connection, drag a line from the New Referencing Outlet radio button to the Map View (the origin point of the line). Select the mapView property from the pop-up that appears.

Figure 1-24. Connecting the Map View to the storyboard
As with the Add button, verify that the connection was successful by making sure the bubble next to Referencing Outlet is filled in with mapView.
If you build and run the app on your device or the simulator, you’ll see that your UI is now nearly complete with a working map in the second view and an empty list in the first view (which now says Item).
Requesting Location Permission
Before moving into how to access the user’s location, we need to address a theme that comes up commonly in developing any hardware-connected iOS app: device permissions. You may remember, a few years back, that Apple received bad press for secretly logging users’ locations. Apple’s argument was that this data was intended to help improve the accuracy of its mapping service; however, the backlash was so great over privacy concerns and the risks of that data being abused by hackers that Apple responded by disabling the feature and implementing a system-wide API for requesting permission to access sensitive user information and hardware (such as health data, location, and the camera).
Apple, and the authors, suggest an “adaptive” strategy for requesting device permissions. Namely, prompt the user the first time you need to use a sensitive resource (in order to unlock access to it within your app) and have mechanisms in place to “adapt” to the loss of that resource. For instance, if a user does not allow your app to access his location, display a prompt that allows him to manually specify an address or place for the app, or to disable the location-dependent feature altogether.
The first step you need to follow to enable this property is to add the Maps capability to your application. This is what informs the user that you need to access his location—when he or she downloads and first installs your application. To enable this capability, select your project file from the Project Navigator (Xcode’s left pane) and click the Capabilities tab, as shown in Figure 1-25. To enable maps, click the switch to set it to on.

Figure 1-25. Setting Maps capability
Next, you need to set the message that will appear when the user is asked for location permission. To create this string, you need to add a key to your app’s Info.plist file. While your project is still selected in the Project Navigator, click the Info tab. This will bring up your app’s settings as a list of key-value pairs, as shown in Figure 1-26.
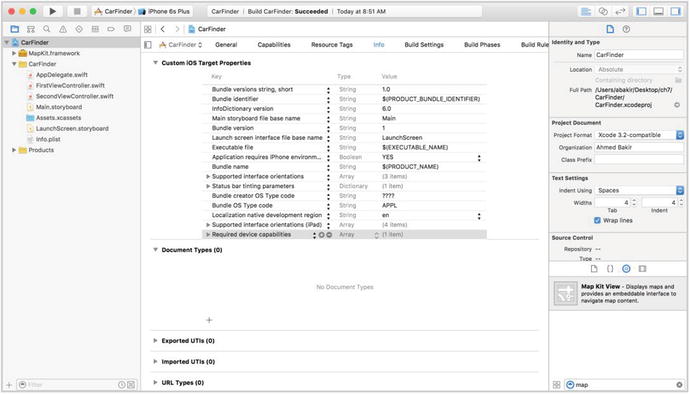
Figure 1-26. Info.plist file for the CarFinder project
The section labeled “Custom iOS Target Properties” contains a list of required app properties, many of them added by default by Xcode. Hover over the last property and you’ll see a plus and minus sign appear. Click the plus sign to add a new property. As shown in Figure 1-27, a new field will appear in the list, as well as a drop-down menu to select common keys.

Figure 1-27. Interface for adding a new key-value pair
In the key text field, type in NSLocationWhenInUseUsageDescription for the key name. The type should be string. In the value text field, type in “This app uses location information.”
Next, you need to make more code changes, so switch back to the FirstViewController.swift file.
Add CLLocationManagerDelegate to your class declaration so we can enable location updates. Then add locationManager and current location as class variables, as shown in Listing 1-4.
Conveniently, Apple provides a class called CLLocationManager, which can poll the operating system for your device’s authorization status, bring up an authorization prompt, and enable/disable location polling. The CLLocationManager class has a method called authorizationStatus(), which will return an enum value representing the authorization status of your application. It is best to check this value when any location-dependent screen in your application appears. iOS suppresses repeated requests; the prompt will not appear again until the user uninstalls your app. For the CarFinder application, this is the First View Controller table view. Trigger the authorization check in the viewDidAppear() method of the FirstViewController.swift file, which fires every time the view controller is active.
You always want to check for at least three status levels in your code: Authorized, Not Determined, and Denied. As shown in Listing 1-5, use the Authorized state to begin polling for location. For the Denied state, we show an alert view, indicating that the application needs location permission. Finally, we use the Not Determined state and default case of the switch statement to prompt the user to authorize the app.
In our example, you will notice that the call to check status, authorizationStatus(), takes place on the CLLocationManager class, while the call to perform operations such as startUpdatingLocation() takes place on an instance. authorizationStatus() does not depend on an object; it simply queries the system, so it is defined as a class (public) method, whereas operations are defined as private methods since they can only be performed if an object is instantiated. If the authorization state has been determined to be denied, show an alert message via the UIAlertController class.
Note We request the “in-use” permission for the CarFinder app because we only need to request the user’s location while the app is active.
Having set ourselves as the delegate, we also need to add its required methods which include the locationManager call with didUpdateLocations so our location data is fresh when we are ready to store it.
Accessing the User’s Location
Having prompted the user for the location permission, you are now ready to begin retrieving and logging his location data. For the CarFinder application, you will initiate this action when the user presses the Add button in the first view controller’s toolbar. When you take this action, you will save the user’s latitude and longitude, as well as a timestamp indicating when the action happened. The table view in the first view controller should refresh at this time to indicate that a new record has been added. If the user disabled location permission, you should provide some dummy data, such as the latitude and longitude of your favorite coffee shop.
It can take some time to find the precise coordinates of a phone once you start using location services. That’s why we start location services when the app starts and update a class variable each time it changes. This variable is used only when we need it (i.e., when we want to save our location).
Now that you have the location and timestamp data for the user’s location, you need to save it somewhere that can be shared between the first and second view controllers. It needs to be a generic object that can be accessed or modified by either. To solve this problem, we suggest creating a singleton object, which our sample calls DataManager. A singleton is an instance of a class that is lazy-loaded (initialized the first time it is accessed). Singletons are commonly used in hardware “manager” classes, where you want to control all operations through a single object and have abstracted these operations to be independent of any class that is using them.
Create a new class by choosing File ![]() New
New ![]() File from the Xcode menu bar. It’s a Swift file and we’ll name it DataManager.swift.
File from the Xcode menu bar. It’s a Swift file and we’ll name it DataManager.swift.
Listing 1-6 provides the class definition for the DataManager class. When other classes access the sharedInstance property, the class will be lazy-loaded. The static keyword ensures that if it has already been initialized, the existing object will be returned; the _let_ keyword ensures that the instance will be thread-safe. Remember to include the CoreLocation framework to ensure symbols resolve properly.
The DataManager‘s main role is to manage a list of CLLocation objects. To accomplish this, we use an array of CLLocation objects as a strong property of the class (the default allocation the using the var keyword is strong). You do not need to define getter or setter methods, as arrays in Swift are mutable by default.
Having defined the DataManager class, you can now use it in the FirstViewController class. As shown in Listing 1-7, after retrieving the user’s current location, expand the addLocation() function to append the value in the locations array that is managed by the DataManager singleton. If the user did not authorize the app to use GPS permissions, create a new record using a hard-coded set of coordinates.
Note This example saves locations in memory; they will not persist between multiple sessions. To persist data, we suggest using Core Data or saving your data to a plaintext file.
Displaying the User’s Location
Having defined a method for retrieving the user’s location and managing saved responses, you are ready to display the data. It is best to start with the table view in the first view controller.
Populating the Table View
To populate a table view controller, you need to specify a data source and implement the methods specified the UITableViewDelegate protocol, which is included by default with the UITableViewController class. For the data source, you will use the locations array from the DataManager singleton.
The methods you will need to implement for the UITableViewDelegate protocol are as follows:
- numberOfSectionsInTableView(_:)
- tableView(_:numberOfRowsInSection:)
- tableView(_:cellForRowAtIndexPath:)
All these functions need to be implemented in in the FirstViewController class (FirstViewController.swift).
The UITableView class uses a two-dimensional grid represented by the indexPath to represent the positions of elements in the table. For a one-dimensional array, the number of sections is defined as 1. Implement the numberOfSectionsInTableView(_:) method as shown in Listing 1-8
Similarly, the number of rows in a one-dimensional array is the number of elements. As shown in Listing 1-9, return the count property of the entries array.
Now you need to use the data from the entries array to populate your table view cells. In the tableView(_:cellForRowAtIndexPath:) method, retrieve the location entry that corresponds with the row that is being operated upon, and then tie it to a cell by looking it up in memory via its reuse identifier, the label we defined on the storyboard earlier. Listing 1-10 describes this process. Since we are using the Subtitle cell style, we can directly access the textLabel and detailLabel properties on the table view cell.
As a final step to tie up the table view, you should refresh the table once a new item has been added. To refresh a table view at any time, call the reloadData() method after updating your data source, as shown in Listing 1-11.
Note Core Data has a delegate method that reduces your need to manually refresh a database-based table view. For simple arrays and data structures, it is easiest to refresh the table manually.
Populating the Map
Once again, compared to the table view, the map is relatively straightforward to populate with data. Following the example of the table view, we need to retrieve saved locations from the DataManager singleton when the view appears. To plot data on the map, we need to create pin drops, represented by the MKPointAnnotation class, which implements the MKAnnotation protocol. In your SecondViewController class (SecondViewController.swift), implement the viewDidAppear(_:) method as shown in Listing 1-12.
While map views are extremely customizable and meant to handle a lot of user interactions, the MKMapView class is designed to be loaded once from an array of annotations. As shown previously, remember to clear the existing annotation array before loading your new one. This also helps the user interface, as the viewDidAppear(_:) is called every time the user switches tabs.
Finally, to make the map fit to the area surrounding the user’s pin drops, you need to call the regionThatFits(_:) method. As shown in Listing 1-13, modify the viewDidAppear() method to include this logic. Use the first valid annotation as the basis for your calculation.
Now that you have fully implemented the CarFinder project, the result should look as shown Figure 1-28, complete with a fully functional location table, Add button, and location map.

Figure 1-28. Completed CarFinder application
Summary
To help introduce you to the style of the projects in this book, we described a simple app to access a user’s location based on his phone’s GPS reading and to display it on a table and map view. This exercise reviewed the basics of setting up a project, creating a user interface, requesting device permissions, and digesting location data. Several of the projects in this book will require you to implement “adaptive” strategies around device permissions, due to their sensitive nature. You will also revisit maps later, when you learn about how to use iBeacons, which are Bluetooth-based proximity sensors that allow iOS devices to do cool things like send you notifications when you walk by the Apple Store.