
In this section, we will walk through the steps for creating a simple service that is used to drive your Create robot. You can use this same service to control any robot with a two-wheel differential drive system and at least one contact sensor. To use this same service when operating a different robot, you need to change only the manifest file you load with the service.
The service created in this chapter is based on code included in Robotics Tutorials 1 and 4. Additionally, the service will alert the user, using a Windows dialog box, that a bumper has been pressed. The text in this chapter will cover, in great detail, all the steps required to build this type of generic service. If you do not wish to create a Visual Studio project yourself, you can look at the C# code provided on the book’s companion Web site.
Note
If you have not yet read Chapter 2, you should do so now. Chapter 2 explains many of the fundamentals regarding a service that will now be put into practice.
The BasicDrive service assumes that you want to drive a single robot. It includes five buttons: four represent each direction the robot can move, and one makes the robot stop. The service also subscribes to the bumper sensor, and, whenever you press the bumper, the Utility service is called upon to send a message to a Windows alert dialog box.
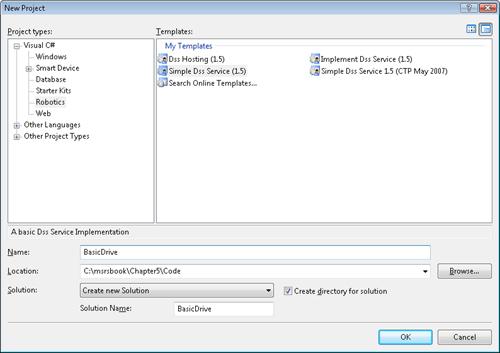
To begin, you need to create a new DSS service using the Visual Studio template installed with MSRS. To do this, open Visual Studio 2005 and create a new project named BasicDrive using the Simple Dss Service (1.5) template (see Figure 5-2).
Tip
When you create a new project, Visual Studio asks you to specify the project location. By default, Visual Studio points to a location within DocumentsVisual Studio 2005Projects. To run the BasicDrive service, you execute the DssNode program as an external program and load two manifest files. One of these manifest files is for the Create robot, and this file resides within the MSRS application directory. For the application to locate this file properly, you need to save your BasicDrive project to a location within the MSRS application directory, such as the following: ...samplesBasicDrive. (If you installed MSRS to the default application directory, you will find this directory in the path C:Microsoft Robotics Studio (1.5)samples.)
The interface for this project is a Windows form that includes controls you use to drive your robot. By default, a Windows form is not included with the project created using the Simple Dss Service template. To begin, you need to add a new Windows form to the BasicDrive service project by right-clicking the project in Solution Explorer and selecting Add and then Windows Form. Name the new form DriveDialog and use either a .cs or .vb file extension. Click Add. Change the size of the form by right-clicking on the design surface of the form and selecting Properties. Make the following change to the form properties (the property values are the same regardless of whether you are creating a Visual Basic or C# project): Size= 202,161.
You can then add five buttons to the design surface by dragging the controls from the Toolbox. After you add the buttons to the form, you can change their properties by right-clicking each control and selecting Properties. Make the following changes to the button controls (the following property values also position the controls properly):
Button 1. Name=btnRight
Font Name=Marlett, Font Size=9.75pt, Font Unit=Point, Font Bold=True, Font GdiCharSet=2, Font GdiVerticalFont=False, Font Italic=False, Font Strikeout=False, Font Underline=False
Location=117,50
Size=35,23
Text=4
Button 2. Name=btnLeft
Font properties=same values used for Button 1
Location=36,50
Size=35,23
Text=3
Button 3. Name=btnForward
Font properties=same values used for Button 1
Location=77,20
Size=35,23
Text=5
Button 4. Name=btnBackwards
Font properties=same values used for Button 1
Location=77,80
Size=35,23
Text=6
Button 5. Name=btnStop
Font properties=same values used for Button 1
Location=77,50
Size=35,23
Text=1
After you add all the controls and set the values for the properties, the form should resemble Figure 5-3. The next step is to modify the forms constructor so that it can accept messages sent from the service. You do this by right-clicking on the form design surface and clicking View Code. Replace the class definition for the form with the following code:
public partial class DriveDialog : Form
{
      BasicDriveOperations _mainPort;

      public DriveDialog(BasicDriveOperations mainPort)
      {
          _mainPort = mainPort;

          InitializeComponent();
      }
}
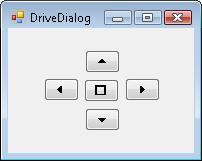
Figure 5-3. The DriveDialog represents a simple service that you can use to drive a single robot using the button controls. It also initiates a Windows dialog box whenever a bumper is pressed.
In the previous code snippet, we declared an instance of the BasicDriveOperations class, and we created a new variable named _mainPort. We then added this variable as a parameter to the constructor for the DriveDialog form. Doing this allows messages to be passed from the Windows form to the service through the main port.
Before we can add the code that executes when a user clicks one of the buttons, we need to add supporting code to the service project. We will do this in the section titled Add Code to the Implementation Class, later in this chapter.
When you create a DSS service using the built-in template, contract and implementation class files are automatically created for you. For this service, the contract class file is named BasicDriveTypes.cs. This is where you place type declarations for the state variables used by this service. It is also where you define what DSS operations are allowed for this service.
If you are following along with the book and have created your own BasicDrive project, then you will notice a class named Contract, which contains a variable named Identifier. This variable was added to the project automatically when you created it using the template. The value for this variable represents the service contract for this service. The service contract contains the information that other DSS services need to communicate with your service, and, by default, it is assigned a unique name that includes the month and year that you created the service. For example, the following identifier was assigned to the BasicDrive service because it was created in September 2007:
public const String Identifier = "http://schemas.tempuri.org/2007/09/basicdrive.html";
The state represents the service at the time it is requested, and state variables are containers for the individual pieces of information that make up the state. For this service, we will have a single state variable that indicates whether the motor has been enabled. To add this state variable, append the following code to the public class named BasicDriveState (this class definition was created automatically by the Visual Studio template and is included in the BasicDriveTypes class file):
/// <summary>
/// Indicates if the Motor is running.
/// </summary>
[DataMember]
public bool MotorRunning
{
  get { return _motorRunning; }
  set { _motorRunning = value; }
}
The value of the state variable changes as the user presses buttons on the Windows Form. Notice that the public declaration is preceded by a DataMember attribute. All public fields or properties that represent the service state must include the DataMember attribute. This ensures that the variable is included with the proxy version of the service assembly. Without this attribute, the public field is not available to the service. This means that, if you use a Web browser to get the state for a service, the Web browser returns only public state variables marked with the DataMember attribute.
Each service is defined by the data that it consumes or exposes. A service is also defined by the operations it can perform. Service operations are responsible for performing specific actions, such as getting or replacing the service state. They can also be used to perform actions specific to a service. For example, the BasicDrive service needs an operation capable of issuing a request to move the robot in a certain direction. The service operations required for the BasicDrive service include the following:
DsspDefaultLookup. Defines a handler for a Lookup message, which is used to return the service context
DsspDefaultDrop. Allows the service to support the drop message
Get. Used to return the current state for the service
Move. Used to move the robot in a certain direction
Replace. Replaces the value of all state variables associated with the service
Each new service operation must be associated with a class definition. This is what determines how the code associated with the operation is implemented. It defines the data for your class. MSRS includes default interfaces for the DsspDefaultLookup and DsspDefaultDrop operations, so you do not need to add code to support them. Additionally, code to support the Get operation is included with the Visual Studio template.
You need to add code that supports the Move and Replace operations. The code to represent the Move and Replace operations is shown as follows (you should add this code block beneath the public class named Get):
[DataContract]
public enum MoveType
{
    Stop,
    Left,
    Right,
    Forward,
    Backward
}

[DataContract]
public class MoveRequest
{
    [DataMember]
    public MoveType Direction;
    public MoveRequest()
    {
    }

    public MoveRequest(MoveType direction)
    {
        this.Direction = direction;
    }
}


public class Move : Submit<MoveRequest,
    PortSet<DefaultSubmitResponseType, Fault>>
{
    public Move()
    {
    }

    public Move(MoveRequest body)
        : base(body)
    {
    }
}
public class Replace : Replace<BasicDriveState,
     PortSet<DefaultReplaceResponseType, Fault>>
{
     public Replace()
     {
     }

     public Replace(BasicDriveState body) : base(body)
     {
     }
}
In the preceding code block, the class named Move derives from the generic type Submit. The Submit method, which is part of the DSS Service model, handles messages and accepts two parameters: one for the message body and one for the message response. In this case, the output for the public method named MoveRequest represents the body of the message. If the Move operation is successful, the response can be passed back using the default Submit response type. Otherwise, a fault message can be passed back.
Note
The interfaces defined in the DriveDialogTypes class file are just structure definitions. They do not include the code that executes when an operation is performed. You will add that code in the section titled Add Code to the Implementation Class, later in this chapter.
The MoveRequest is defined in the class named MoveRequest. The class definition is preceded by the DataContract attribute, which is necessary for the request to be used by an operation. The request includes a variable named Direction. This variable is preceded by the DataMember attribute, which is necessary for the variable to be exposed to the service. The Direction variable is used to store the direction in which the robot should move. The value for this variable can be one of the values specified in the MoveType enumeration.
Tip
If you are building your own service by stepping through the code, then you should stop and do a project build before continuing on to the next section. You can build the project by clicking File and then Save All. Next, click Build and then Build Solution. Ensure that the status bar in the bottom left corner indicates that the build is successful. If it is not, go back now and determine where the error occurred.
The PortSet includes a list of DSS operations that can be performed by the service. By default, the Visual Studio template includes three operations: DsspDefaultLookup, DsspDefaultDrop, and Get. This is found in the public class declaration named BasicDriveOperations. To build the BasicDrive service, you need to locate the code for the BasicDrive main operations port and modify the class declaration to include two new operations (Move and Replace) as follows:
[ServicePort]
public class BasicDriveOperations : PortSet<DsspDefaultLookup,
                            DsspDefaultDrop,
                            Get,
                            Move,
                            Replace>
{In this project, the implementation class is named BasicDrive.cs. The implementation class is where the majority of your service code will reside. It contains the code that reads incoming data from sensors and sends commands to operate the robot’s motors.
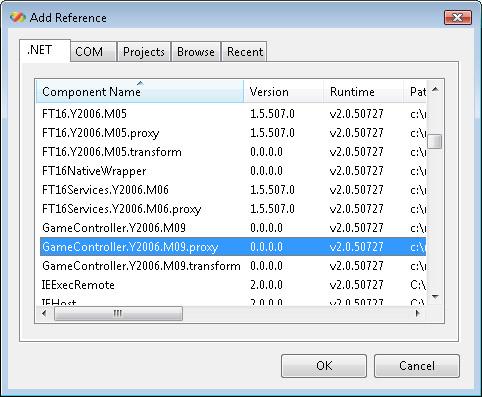
The first thing to do is include references to assemblies needed by this project. To do this, right-click the References folder in Solution Explorer and click Add Reference. From the Add Reference dialog box (see Figure 5-4), scroll through the components listed in the .NET tab and locate the following (select each assembly while holding down the Ctrl key and click OK to add):
Ccr.Adapters.Winforms. This assembly allows your Windows forms application to run under Concurrency and Coordination Runtime (CCR). This is necessary because the form will need to be launched from our BasicDrive service.
RoboticsCommon.Proxy. This assembly, which is included with MSRS, allows you to access a variety of namespaces used to control a robot. In this chapter, we add a reference to the Microsoft.Robotics.Services.Drive.Proxy namespace. This gives you access to drive operations used to operate a two-wheel differential drive system. It also includes the Microsoft.Robotics.Services.ContactSensor.Proxy namespace, which allows you to receive feedback from a contact sensor.
Utility.Y2006.M08.Proxy. This assembly provides access to several supporting functions, such as launching a Windows dialog box, performing math functions, generating sounds from your desktop, and launching a URL. In this chapter, we utilize the Microsoft.Robotics.Services.Sample.Dialog.Proxy to launch an Alert dialog box whenever the bumper is pressed.
Tip
After you add the references to your project, you can view a list of available namespaces and functions using the Object Browser. This is one way of learning what you can do with the assemblies included with MSRS. To get to the Object Browser, click View, and then click Object Browser from the menu. Alternatively, you can use the DssInfo command-line tool that was presented in Chapter 2.
For each reference you added, you need to modify the Copy Local and Specific Version properties for that reference. You should be able to access the properties for each reference in the bottom right pane. (If necessary, right-click on a reference and choose Properties to display the Properties dialog box for that reference.) Set both properties to a value of False. This ensures that copies of the assemblies are not copied to the local code directory. This helps to prevent any errors that might occur if the reference is later changed.
After you add the references, you need to add namespace references to the top of the BasicDrive.cs class file. The statements, as follows, should appear before the namespace declaration:
using Microsoft.Ccr.Adapters.WinForms;
using drive = Microsoft.Robotics.Services.Drive.Proxy;
using bumper = Microsoft.Robotics.Services.ContactSensor.Proxy;
using dialog = Microsoft.Robotics.Services.Sample.Dialog.Proxy;
Note
It is not necessary to include an alias with your namespace declarations. The benefit to using the prefix is that you do not have to reference the full namespace in your code, thus making the code easier to read.
In addition to the namespace references listed previously, you need to add a namespace reference for the W3C.Soap namespace. This is a member of the DssBase assembly, and it is used by the BasicDrive service to access the Fault object. Add the following code below the other namespace references:
using W3C.Soap;
Tip
When you created the service using the Visual Studio template, it added attributes for the display name and service description in the BasicDrive class file. The attributes appear in the code as follows:
[DisplayName("BasicDrive")]
[Description("The BasicDrive Service")]
The text within these attributes is displayed in Control Panel when the service is published to the local service directory. By default, the Display Name is the name of the project, and the Description also includes this name. It is a good idea to add more useful text to the description. There is no significant limit to the number of characters this attribute can contain.
You can also add the description to all classes marked with the DataContract attribute and properties marked with the DataMember attribute. The description appears in the information listed by the DssInfo command-line utility and also in the tool tips displayed in VPL.
A partner is the mechanism that allows one service to use the data from another service. The services are bound together through their service contracts. Partnerships provide a way to link services together. This is a great way to reuse code, and MSRS provides several assemblies containing functions you can use in your service. The Robotics.Common.Proxy assembly contains several namespaces that you can use to operate your robot. This can include everything from managing sensors to driving the robot. By referencing the Microsoft.Robotics.Services.Drive.Proxy namespace using the drive prefix, you will be able to easily reference the drive functions included within this namespace. To add the partnership, add the following code directly below the declaration for the main port:
[Partner("Drive", Contract = drive.Contract.Identifier, CreationPolicy =
PartnerCreationPolicy.UseExisting)]
private drive.DriveOperations _drivePort = new drive.DriveOperations();
private drive.DriveOperations _driveNotify = new drive.DriveOperations();
In the previous code snippet, private variables were created to reference two ports, named _drivePort and _driveNotify. Commands to move or turn the robot can be sent to the port named _drivePort. The _driveNotify port is used to receive notifications from the drive service. The notifications are similar to events, and, for the drive service, they are used to determine when the motor is enabled.
You need to establish a partnership with the Generic Contact Sensors service. This partnership declaration is similar to the one created for the drive service. You also need to define two ports, where one port is the bumper port, and the other receives notifications whenever a bumper is pressed. The code for this declaration is shown as follows (you should include it below the other Partner declaration):
[Partner("bumper", Contract = bumper.Contract.Identifier,
     CreationPolicy = PartnerCreationPolicy.UseExisting)]
private bumper.ContactSensorArrayOperations _bumperPort = new
     bumper.ContactSensorArrayOperations();
private bumper.ContactSensorArrayOperations _bumperNotificationPort = new
     bumper.ContactSensorArrayOperations();
Tip
Each supported robot provides a service to access the contact sensors for that robot. If you are building a service intended to work only with a specific robot, it is best to use the contact sensor service for that robot because it includes additional functionality not available with the generic contact service.
The final partnership to establish is one with the Simple Dialog service, which is a member of the Utility.Y2006.M08.Proxy assembly. This partnership allows you to send a message to a Windows alert dialog box. For the BasicDrive service, an alert dialog box is initiated every time the robot’s bumper is pressed. The code for this declaration is shown as follows:
[Partner("SimpleDialog", Contract = dialog.Contract.Identifier, CreationPolicy =
PartnerCreationPolicy.UsePartnerListEntry)]
dialog.DialogOperations _simpleDialogPort = new dialog.DialogOperations();When you create a service using the MSRS template for Visual Studio, a method named Start is created automatically. This method is called when the service starts, and it is where you add initialization code specific to your service. For the BasicDrive service, you need to replace the code in the existing Start method with the following:
protected override void Start()
{
   //Initialize the state
   state.MotorRunning = false;

   // Used to publish the service to the local service directory
// The Start method will also activate DSSP operation handlers that
// are used to listen on the main port for requests and call
// the appropriate handlers
base.Start();

// Invoke the Windows Dialog using a delegate which acts as a pointer
   //  to the Windows form.
   WinFormsServicePort.Post(
       new RunForm(
          delegate()
          {
              return new DriveDialog(
               ServiceForwarder<BasicDriveOperations>(ServiceInfo.Service)
              );
          }
       )
    );

   //Register the message handlers with the main interleave
   Activate(Arbiter.Interleave(
     new TeardownReceiverGroup
     (
        Arbiter.Receive<DsspDefaultDrop>(false, _mainPort, DropHandler)
     ),
     new ExclusiveReceiverGroup
     (
        Arbiter.ReceiveWithIterator<Replace>(true, _mainPort,
           ReplaceHandler),
        Arbiter.ReceiveWithIterator<Move>(true, _mainPort, MoveHandler)
      ),
      new ConcurrentReceiverGroup
      (
        Arbiter.Receive<drive.Update>(true, _driveNotify,
          NotifyDriveUpdate),
        Arbiter.ReceiveWithIterator<Get>(true, _mainPort, GetHandler),
        Arbiter.Receive<bumper.Update>(true, _bumperNotificationPort,
          SensorHandler)
       )
   ));

// Request that a notification is sent to the _driveNotify port whenever
// an update occurs since this means the motor is enabled or disabled
_drivePort.Subscribe(_driveNotify);
  // Subscribe to the generic contact sensors service so we
  // will be notified each time a bumper sensor is pressed
  _bumperPort.Subscribe(_bumperNotificationPort);

}
The first thing the Start method does is initialize any state variables by assigning them a value. For this service, the only state variable is named MotorRunning, and we always initially set the value to False.
The Start method should already include a call to another Start method, which is part of the Decentralized Software Services Protocol (DSSP) service base. This method is called when the service initialization is complete, and it is responsible for activating DSSP operation handlers. The DSSP operation handler listens on the main port and calls the appropriate message handlers whenever a DSS operation is posted to that port. It also publishes the service to the local service directory so that it appears in the Control Panel page for MSRS. You only need to keep the code "base.Start();" to allow this to happen.
The next statement is a call to the Post method, which is part of the WinForms service. This is where you invoke the Windows form associated with this service. The Windows form, which we created in an earlier step, is the interface for operating the robot. In this code, the ServiceForwarder method is used to pass a strongly typed PortSet to the Windows form. This is what allows the Windows form to communicate with the BasicDrive service.
Message handlers are registered with the main interleave. The interleave assigns incoming tasks from these handlers to an internal queue. It then manages the execution of these tasks according to what group they were assigned. If the handlers are assigned to the concurrent group, they run at the same time. If the handlers are assigned to the exclusive group, the tasks within those handlers wait for all other tasks to complete first. For the BasicDrive service, the handlers associated with the Replace, Move, and Drive Update operations are assigned to the exclusive group. This is because these handlers involve changing the service state. The remaining handlers, associated with the Get and Bumper Update operations, are assigned to the concurrent group.
You need to create two subscriptions for this service. The first subscription is for the drive service, and the code in the Start method specifies that a notification should be sent to the drive notify port every time an update occurs. In this case, the Arbiter class, which is part of the CCR, is used to create the subscription. By using the Arbiter class, a thread does not have to wait until a notification is received before continuing to the next line of code. Specifically, the Receive routine is used to initiate a single item receiver. This means that the receiver waits for a single message before calling the handler. The first parameter indicates whether the receiver continues listening for requests.
The other subscription is for the generic contact sensors service. This subscription also uses the Receive routine to initiate a single item receiver. In this case, the update is for the contact sensor, and this is used to tell us when the bumper is pressed or released.
Each service operation listed in the contract class has a message handler included in the BasicDrive.cs class file. The code within the message handler is executed whenever the associated operation is called. The Move operation, which was defined in the section Add New Service Operations earlier in this chapter, is called upon whenever the user wants to move the robot in any direction. It uses the Direction property, which is part of the incoming message body, to determine in which direction it should move. For example, the following code, which you should add to the implementation class, is what the message handler named MoveHandler should look like:
public virtual IEnumerator<ITask> MoveHandler(Move move)
{
     // Check to see if the motor is already running. It is not,
     // then we need to call the EnableMotor function
     if (!_state.MotorRunning)
     {
         yield return EnableMotor();
        _state.MotorRunning = true;
     }

     // Initialize the drive request that will be used to send
     // a request to the robot through the main port
     drive.SetDrivePowerRequest request = new drive.SetDrivePowerRequest();

     string errorMessage = "";
     //Determine which direction the robot should move toward
     switch (move.Body.Direction)
     {
          case MoveType.Backward:
             //Sending the same negative values causes it to
             //move backwards
             request.LeftWheelPower = -0.5;
             request.RightWheelPower = -0.5;
             errorMessage = "Failed to move the robot backwards";
             break;
          case MoveType.Forward:
             //Sending the same positive value causes it to
             //move forwards
             request.LeftWheelPower = 0.5;
             request.RightWheelPower = 0.5;
             errorMessage = "Failed to move the robot forwards";
             break;

          case MoveType.Left:
             // differing power values which cause the robot to turn in
             // one direction or the other
             request.LeftWheelPower = 0;
             request.RightWheelPower = 0.5;
             errorMessage = "Failed to turn the robot to the left";
             break;
          case MoveType.Right:
             // alternating power values which cause the robot to turn in
             // one direction or the other
             request.LeftWheelPower = 0.5;
             request.RightWheelPower = 0;
             errorMessage = "Failed to turn the robot to the right";
             break;
          case MoveType.Stop:
             // sending no power causes the robot to stop
             request.LeftWheelPower = 0;
             request.RightWheelPower = 0;
             errorMessage = "Failed to stop the robot";
             break;
       }
The MoveHandler method checks to see if the state variable named MotorRunning is set with a value of True. If it is set with any other value, this means the motor is disabled, and it needs to be enabled before continuing. To allow for this, you need to add a function named EnableMotor. This function, which is shown below, uses other functions from the Microsoft.Robotics.Services.Drive.Proxy namespace to enable the motor:
private Choice EnableMotor()
{

    // This is where we send the request to the port, but we use the
    // Arbiter.Choice function to do this so that we either enable the
    // drive and return a response, or we return a failure and log the
    // resulting error message
    return Arbiter.Choice(
        _drivePort.EnableDrive(true),
        delegate(DefaultUpdateResponseType response) { },
        delegate(Fault fault)
        {
            LogError(null, "Failed to enable motor", fault);
        }
    );
}
The EnableMotor method sends an update message to the drive service requesting that the motor is enabled. The body for this message is the method call to _drivePort.EnableDrive(). The EnableDrive function sends the actual message, and it is called inside an Arbiter.Choice function. The Arbiter class is part of the CCR. It provides several helper functions that allow you to coordinate asynchronous services. One of these functions is named Choice, and it guarantees that only one choice executes. Even if the service fails to respond and returns both a success and failure, only the first return message will be processed. In the EnableMotor function, Arbiter.Choice is used to send the enable motor request to the _drivePort. This ensures that either the motor is enabled or an error is logged.
After the motors have been enabled, the next step in MoveHandler is to determine in which direction the robot needs to move. You do this by using a switch statement to inspect the Direction property. The Direction property is passed to the MoveHandler through the message body. It should contain one of the values defined in the MoveType enumeration (Forward, Backward, Right, Left, or Stop).
A drive power request must be created to move or stop the robot. A two-wheel differential drive system works by sending alternating power levels to the motors driving each wheel; in this case, there are two motors and two wheels. You can use the SetDrivePowerRequest class to create the request for adjusting these power levels. The class uses two properties, LeftWheelPower and RightWheelPower, which indicate power settings for each wheel.
Each power level property can accept a double value anywhere from –1.0 to 1.0. Positive values are used for driving forward and negative values for driving backward. To drive forward, you need to assign any value between 0 and 1 to both the right and left wheels. If you want the robot to turn left or right, then the value assigned to the left and right wheels must differ. For example, to turn left, you could assign a value of 0 to the left wheel and a value of 0.5 to the right wheel. If the values assigned to each motor are reversed, then the robot spins on the center of its wheelbase. For example, you would not want to use values of -0.5 and 0.5 for the left and right wheels.
The final task for the MoveHandler is to send the request to the drive port. Just like we did for the EnableMotors function, we use the Arbiter.Choice function. The request is sent to the drive port, and, if a failure occurs, the error is logged.
In addition to the handlers associated with each DSS operation specified in the PortSet, you need to add message handlers for the subscriptions that we created in the Start method. The BasicDrive service initiates two subscriptions: one to receive notifications when the motor is enabled and the other receives notifications when a bumper is pressed. The name of the handler method for the drive service is NotifyDriveUpdate. This method is responsible for updating the value of the MotorEnabled state variable. It does this by sending a new Replace request to the main port. You will need to add code for this method, which is seen as follows:
private void NotifyDriveUpdate(drive.Update update)
{
     BasicDriveState state = new BasicDriveState();
     state.MotorEnabled = update.Body.IsEnabled;

      _mainPort.Post(new Replace(state));
}
You also need to add code below the other handler methods, for the handler method named SensorHandler. This method is called every time the bumper state is updated. The SensorHandler, which is shown as follows, creates an alert request and sends it to the simple dialog port whenever the notification indicates that a button was pressed:
private void SensorHandler(bumper.Update notification)
{
    if (notification.Body.Pressed)
    {
         dialog.AlertRequest request = new dialog.AlertRequest();
         request.Message = @"The bumper was pressed";
         _simpleDialogPort.Alert(request);

    }
}After you have added all the supporting code, you can return to the Windows form and add code for the click events. A click event occurs each time a user clicks one of the buttons on the Windows form, and this is where we link the form to the service. The code in the click event posts an applicable DSS operation to the main port.
To add the code, right-click the DriveDialog form in Solution Explorer, and then click View Code. Add the following code below the form constructor:
private void btnRight_Click(object sender, EventArgs e)
{
     mainPort.Post(new Move(new MoveRequest(MoveType.Right)));
}

private void btnForwards_Click(object sender, EventArgs e)
{
     _mainPort.Post(new Move(new MoveRequest(MoveType.Forward)));
}

private void btnLeft_Click(object sender, EventArgs e)
{
     _mainPort.Post(new Move(new MoveRequest(MoveType.Left)));
}

private void btnBackwards_Click(object sender, EventArgs e)
{
     _mainPort.Post(new Move(new MoveRequest(MoveType.Backward)));
}

private void btnStop_Click(object sender, EventArgs e)
{
     _mainPort.Post(new Move(new MoveRequest(MoveType.Stop)));
}
The last thing to add is a clean-up method for handling when the form is closed. In this case, we want to send a request that drops the BasicDrive service. The code for this method, which you can add below the other click events, is as follows:
protected override void OnClosed(EventArgs e)
{
    _mainPort.Post(new DsspDefaultDrop(DropRequestType.Instance));
    base.OnClosed(e);
}
Note
If you are building your own service by stepping through the code, then you should stop and do a project build before continuing on to the next section. You can build the project by first clicking File and then Save All. Next, click Build and then Build Solution. Ensure that the status bar in the bottom left corner indicates that the build was successful. If it was not, go back now and determine where the error(s) occurred.
If you tried to run the BasicDrive service now, you would receive a message in the command window stating that the partner enumeration failed and the service would not start. This is because the BasicDrive service uses partners that must be coordinated to work properly. When you declare a new partner, you use an attribute named CreationPolicy to specify how the service should be started. You can set the CreationPolicy attribute with one of the following values:
CreateAlways. Always creates a new instance of the service.
UseExisting. Uses an existing instance of the service from the local directory.
UseExistingOrCreate. First checks to see if the service is running on the local directory. If it is not, it attempts to create it.
UsePartnerListEntry. References the PartnerListEntry attribute included in the manifest file. This can be used to specify contracts for one or more associated services.
When you have a service that partners with other services, such as the BasicDrive service, there needs to be some method of coordinating how the runtime starts these services to avoid conflicts. The easiest way to do this is through the use of a manifest file. You use the manifest file to specify a list of services associated with the base service. Even though this file is XML-based and, thus, can be modified with a text editor, it is best that you use the DSS Manifest Editor tool instead.
The DSS Manifest Editor tool (see Figure 5-5) allows you to build a manifest by dragging and dropping services onto a design surface. To resolve the potential problem with coordinating the BasicDrive service, you need to open the Microsoft DSS Manifest Editor, which is located in the MSRS menu folder. This opens a new manifest file, and, from here, you can locate the BasicDrive service in the left-hand window. Drag an instance of the BasicDrive service onto the design surface, and it should list the Drive, bumper, and SimpleDialog services beneath it. There should be a red error icon next to the SimpleDialog service, which indicates that you have to specify a service for this partnership.
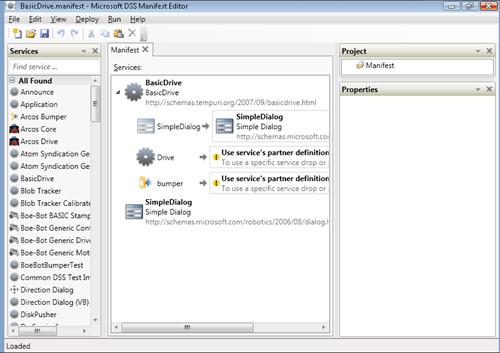
To resolve the red error listed in the Manifest Editor, you need to scroll through the list of services until you find the SimpleDialog service. Drag an instance of this onto the area where the red error icon appears. The final result should appear as it does in Figure 5-5.
Save a copy of the manifest file by clicking File and then Save As. From the Save As dialog box, locate the directory where the BasicDrive service is stored (this should be within the MSRS installation directory). There should be a manifest file named BasicDrive.manifest within this directory. Select this file and click Save. Click Yes if asked to replace the existing file.
The BasicDrive service was designed to work with any robot that has a two-wheel differential drive system and at least one contact sensor. However, you still have to indicate which robot will use the service. You do this by loading a manifest file specific to the robot you wish to use. In this chapter, we are working with the Create by iRobot.
The manifest file that is used to access the Create’s drive system and contact sensors is named iRobot.DriveBumper.manifest.xml. This file is included with the MSRS installation, and it is located in the samplesconfig folder. To load this additional manifest, you need to modify the project properties for the BasicDrive service. You accomplish this by clicking Project and then BasicDrive Properties. Click the Debug tab (see Figure 5-6) and locate the text box named Command Line Arguments. Append the following to the end of this line:
-m:"samplesconfigiRobot.DriveBumper.manifest.xml"
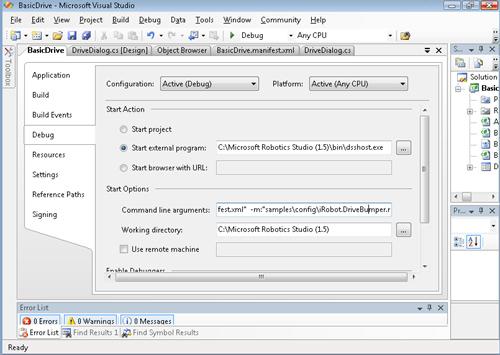
Figure 5-6. You can specify that additional manifest files are loaded when the service is started by appending manifest lines to the command-line arguments within project properties.
After you make the project properties change, you can save your project and rebuild the solution by clicking Build and then Build Solution.