In this section, we will walk through the steps for creating a simple service named Wander, which is used to move the LEGO NXT around a room. Even though we will use generic services to operate the motors and contact sensors, we will include a reference to the LEGO NXT service. By including the LEGO service, we will be able to use the buttons on the LEGO brick to start moving the robot forward and also to stop the robot, if necessary. The downside to doing this is it will make the service specific to the LEGO NXT and not applicable to other types of robots. This is the tradeoff to consider when designing services that use other non-generic services.
LEGO brick
This represents the brains for the robot, and it is where the programmable chip for your NXT resides. This brick-shaped object includes ports for attaching the sensors and servo motors included with your NXT. It also includes four buttons that you can use to control the robot.
To begin you need to create a new Decentralized Software Services (DSS) service using the Visual Studio template installed with MSRS. To do this, open Visual Studio 2005 and create a new project named Wander using the Simple Dss Service (1.5) template. Doing so creates a new project that contains two source files: WanderTypes.cs, which contains classes that define the operations and state of the service, and Wander.cs, which is the implementation class.
Tip
When creating a new project, you will be asked to specify the project location. By default, Visual Studio points to a location within documentsVisual Studio 2005Projects. To run the Wander service, you need to execute the DssNode program as an external program and load two manifest files. One of these manifest files will be for the LEGO NXT robot, and this file resides within the MSRS application directory. For the application to locate this file properly, you need to save your Wander project to a location within the MSRS application directory. Instead of using the default path assigned, use the following path: C:Microsoft Robotics Studio (1.5)samplesWanderWanderVersion1. C:Microsoft Robotics Studio (1.5) is the default location where MSRS is installed. If you chose to install MSRS to a different location, then your path should reflect this.
The WanderState class is where you place declarations for the state variables used by your service. This class is located in the WanderTypes.cs file. You need to add code that declares the only state variable used by this service. The RobotStatus state variable will hold a string value that indicates what operation the robot is performing. For example, when the robot is driving forward, the state variable will contain a string that indicates the robot is driving. The code for this declaration is as follows:
// Add this code to create state variables that will indicate
// what the robot is currently doing
private string _robotStatus;

[DataMember]
public string RobotStatus
{
    get { return _robotStatus; }
    set { _robotStatus = value; }
}
The WanderTypes.cs file is also where you add interface code for any new service operations. You may recall from the last chapter that certain operations are implemented for you automatically when you create a new service using the Visual Studio template. For the Wander service, we need to add only one operation: Replace. We use this operation to replace the value of the only state variable used by the Wander service. To add the Replace operation, you first need to modify the existing PortSet. Locate the declaration for the main operations port in the WanderTypes class and change the class definition to look like the following:
[ServicePort()]
public class WanderOperations : PortSet<DsspDefaultLookup,
        DsspDefaultDrop,
        Get,
        Replace>
{
}
You also need to add the interface definition for the replace operation below the PortSet. The code for the replace operation is as follows:
// Replace the existing state
public class Replace : Replace<WanderState, PortSet<DefaultReplaceResponseType, Fault>>
{
}In this project, the implementation class is named Wander.cs. The implementation class is where the majority of your service code resides. It contains the code that reads incoming data from the touch and sonar sensors and sends commands to operate the robot’s motors.
In October 2007, the MSRS team released an update to the samples for MSRS that included a new set of services for the LEGO NXT. These services are known as version 2, and they work in parallel with the existing NXT services. This means that services written to work with the earlier version of the NXT services continue to work even if you install the new version 2 services.
The Wander services in this chapter are written to work with the new LEGO NXT services. To get these services, you must download them from the MSRS Web site (http://www.microsoft.com/downloads) and search the words "samples update robotics." If you used the original NXT services, you will find working with the new LEGO NXT services much easier.
Note
Before downloading and installing the new LEGO NXT services, close all instances of Visual Studio 2005.
Note
After you download and install the services, you need to ensure that your LEGO NXT is running the correct version of firmware. Do not assume that a recently purchased NXT has the latest firmware. Refer to the installation instructions included with the update, which, by default, are installed in the following location: C:Microsoft Robotics Studio (1.5)samplesSamplesUpdatePackage.htm. If you try to download the firmware to the NXT using the Bluetooth connection, it will not be able to locate the device.
Before you begin adding code to the implementation class, you will need to add references to the project. To do this, right-click the References folder in Solution Explorer and click Add Reference. From the Add Reference dialog box, scroll through the components listed in the .NET tab and locate the following (after you are done adding the references, Solution Explorer should appear similar to Figure 6-2):
Nxtbrick.y2007.m07.proxy. This assembly provides access to the supported functions specific to the LEGO NXT. This includes control over the robot’s sensors and motors. For the Wander service, you need to reference the ButtonsOperations class in order to subscribe to the buttons on the LEGO brick.
NxtCommon.Y2007.M07. This assembly (which, in this case, is NOT the proxy) contains reusable LEGO NXT data contracts and methods.
Robotics.Common.Proxy. This assembly, which is included with MSRS, allows you to access a variety of namespaces used to control a robot. In this chapter, we will add a reference to the Microsoft.Robotics.Services.Drive.Proxy namespace. This gives you access to drive operations used to operate a two-wheel differential drive system.

Figure 6-2. To create the Wander service, you need to add references to the nxtbrick.y2007.m07.proxy, NxtCommon.Y2007.M07, and Robotics.Common.Proxy assemblies.
After you add the references, you need to add code for namespace declarations. The following code can be added to the top of the Wander.cs file:
using W3C.Soap; //Gives us access to the Fault object
using drive = Microsoft.Robotics.Services.Drive.Proxy;

// Add references to the LEGO services
using lego = Microsoft.Robotics.Services.Sample.Lego.Nxt.Buttons.Proxy;
using bumper = Microsoft.Robotics.Services.Sample.Lego.Nxt.TouchSensor.Proxy;
Just like the BasicDrive service from the last chapter, the Wander service uses the generic drive service, which is part of the Robotics.Common.Proxy assembly. To use this service, you must first declare a partnership using the Partner attribute. You also need to add partnerships that point to the ButtonOperations class and TouchSensorOperations class. You should place the code to add these partnerships and declare the notification ports associated with them below the declaration for the main port, as follows:
// Partner: NxtTouchSensor,
[Partner("NxtTouchSensor", Contract = bumper.Contract.Identifier,
          CreationPolicy = PartnerCreationPolicy.UsePartnerListEntry)]
bumper.TouchSensorOperations _nxtTouchSensorPort =
           new bumper.TouchSensorOperations();
bumper.TouchSensorOperations _nxtTouchSensorNotify =
           new bumper.TouchSensorOperations();

// Add a partner to the NXT drive service
[Partner("NxtDrive", Contract = drive.Contract.Identifier,
          CreationPolicy = PartnerCreationPolicy.UseExisting)]
private drive.DriveOperations _drivePort = new drive.DriveOperations();

// Add partner for the LEGO NXT buttons to start the forward movement
[Partner("buttons", Contract = lego.Contract.Identifier,
          CreationPolicy = PartnerCreationPolicy.UseExisting)]
private lego.ButtonOperations _legoPort = new lego.ButtonOperations();
private lego.ButtonOperations _legoNotifyPort =
new lego.ButtonOperations();When you create a service using the Visual Studio template, a method named Start is created automatically. This method is called when the service starts, and it is where you add initialization code specific to your service. For the Wander service, you need to replace the code in the existing Start method with the following:
protected override void Start()
{
    //Check to see if the state already exists.
    //If not, then we will initialize it
    if (_state == null)
    {
       _state = new WanderState();
       _state.RobotStatus = "Waiting for command";
    }

    base.Start();

    // Define our Notification handlers using the CCR Interleave primitive
    Activate(
      Arbiter.Interleave(
        new TeardownReceiverGroup(),
        new ExclusiveReceiverGroup(),
        new ConcurrentReceiverGroup(
            Arbiter.Receive<bumper.TouchSensorUpdate>(true,
              _nxtTouchSensorNotify, TouchSensorHandler),
            Arbiter.Receive<lego.ButtonsUpdate>(true,
               _legoNotifyPort, LegoHandler)
               )
            )
         );

    // Subscribe to the notification ports. This tells us whether
    // the bumper has been pressed or the button on the LEGO brick
    // was pressed
    nxtTouchSensorPort.Subscribe(_nxtTouchSensorNotify);
    legoPort.Subscribe(_legoNotifyPort);
}
private void TouchSensorHandler(bumper.TouchSensorUpdate notification){}
private void LegoHandler(lego.ButtonsUpdate notification) {}
Note
This code block also contains method stubs to represent the message handlers. For now the body of these handlers is empty; we cover what code goes in these handlers in the next section.
In the preceding code, we use a Concurrency and Coordination Runtime (CCR) primitive known as the Interleave. The Interleave arbiter allows us to group multiple notification handlers according to how they should be executed. In this case, we are assigning all calls to the same group, which is known as the ConcurrentReceiverGroup. This group specifies that the code within it will run in parallel with each other. One thing to keep in mind is that the ConcurrentReceiverGroup does not have precedence over code that runs with an Update or Stop operation. Alternatively, if we would have used the ExclusiveReceiverGroup, then the code is guaranteed to run while no other handler is running. Code specified in the TeardownReceiverGroup executes only one time, and no other messages are processed.
After the notification handlers are declared, we need to subscribe to the notification ports defined in our partnership declarations. For the Wander service, we will receive notifications from ports associated with the generic drive, generic contact sensors, and LEGO services.
Now it is time to complete the message handlers that were referenced in the Start() method. The first handler to complete is the LegoHandler. This handler is called every time the LEGO brick encounters a change. For the Wander service, we will use the left and right buttons on the LEGO brick (see Figure 6-3). Pressing the left button will instruct the robot to move forward, and pressing the right button will instruct the robot to stop.

Figure 6-3. Close-up of the LEGO NXT brick. This shows the left and right buttons, which are used to trigger behavior in the sample code provided with this chapter.
The code for the LegoHandler is as follows:
private void LegoHandler(lego.ButtonsUpdate notification)
{
      // If the left button was pressed, move the robot forward
      if (notification.Body.PressedLeft)
      {
         SpawnIterator<double, double>(0.75, 0.75, DriveRobot);
         LogInfo("left button was pressed");
         return;
      }
      // If the right button was pressed, stop the robot
      else if (notification.Body.PressedRight)
      {
          SpawnIterator<double, double>(0, 0, DriveRobot);
          LogInfo("right button was pressed");
          return;
      }
}
private IEnumerator<ITask>DriveRobot(double leftWheelPower, double
                rightWheelPower)
{
    yield return;
}
Note
This code block contains a method stub that represents the DriveRobot function. We cover the body for this function later in the section.
LegoHandler receives a notification message from the ButtonsUpdate class, which is part of ButtonOperations. The ButtonsUpdate class indicates any change to the state of the LEGO brick, and it includes members to represent each of the LEGO buttons (Left, Right, Cancel, and Enter). We simply need to check the value for the PressedLeft property. If it is set with a value of True, then we know the left button on the brick has been pressed, and we can instruct the robot to start moving forward. If the PressedRight property is set with a value of True, then we know the right button was pressed, and we want to tell the robot to stop.
The LegoButtons handler uses a function named DriveRobot to give the robot instructions. SpawnIterator is a CCR function that allows you to invoke an iterator-based message handler asynchronously. This means that the code executed within the DriveRobot function is managed by the CCR, and completing its execution does not slow anything else down. The DriveRobot function, which you see below, accepts two input parameters; one that specifies the amount of power for the left wheel and one that specifies the amount of power for the right wheel. You need to insert the code for the DriveRobot function. We added the method stub for this function in an earlier step.
private IEnumerator<ITask>DriveRobot(double leftWheelPower, double
                rightWheelPower)
{

    // Create a request that will start driving the robot based
    // on the left and right power settings submitted
    drive.SetDrivePowerRequest driveRequest = new
               drive.SetDrivePowerRequest();
    driveRequest.LeftWheelPower = (double)leftWheelPower;
    driveRequest.RightWheelPower = (double)rightWheelPower;

    // Send the request to the main port
    yield return Arbiter.Choice(
         _drivePort.SetDrivePower(driveRequest),
         delegate(DefaultUpdateResponseType response) { },
         delegate(Fault fault)
         {
            LogError(null, "Unable to drive robot", fault);
         }
     );
     //Update the robot status
     state.RobotStatus = "Robot is driving";
}
The DriveRobot function creates a request named SetDrivePowerRequest. This special request type is used whenever there is a need to set the drive power using the generic drive service. The SetDrivePowerRequest lets you specify the power setting for both the left and right wheels.
The LeftWheelPower and RightWheelPower properties can be set with values ranging from –1.0 to 1.0. This value indicates the percentage of power that is applied to the motors that power each wheel. If you use the same positive value for each wheel, then the robot moves forward. Alternatively, if you use the same negative values for each wheel, then the robot moves backward. You can also use alternating values, which cause the robot to turn in a particular direction.
After the request is created, you can send it to the drive port using the Arbiter.Choice method. If the request returns an error, the following message is written to the log: "Unable to drive robot."
The last handler to add code for is the one that is triggered by an update to the NXT touch sensor. The code that should be inserted into the TouchSensorHandler is as follows:
private void TouchSensorHandler(bumper.TouchSensorUpdate notification)
{
     //See if the touch sensor has been pressed
     if (notification.Body.TouchSensorOn)
     {
         SpawnIterator(ReverseAndTurn);
         LogInfo("touch sensor bumper was pressed");
     }
}
The TouchSensorOn property returns a Boolean value, which indicates whether the touch sensor has been triggered. After you determine that the sensor was pressed, you can invoke the ReverseAndTurn method using SpawnIterator. The code for this method, which you should insert below the TouchSensorHandler method, is as follows:
private IEnumerator<ITask> ReverseAndTurn()
{

     // First request that the robot reverse
     SpawnIterator<double, double>(5, -.50, DriveRobotSetDistance);

     // Wait for 1/2 second or 500 milliseconds to prevent
     // the drive commands from interfering with each other
     yield return Arbiter.Receive(false, TimeoutPort(500),
        delegate(DateTime t) { });

     // Turn to the right
     SpawnIterator<double, double>(90, 0.50, TurnRobot);

     // Wait for 1/2 second or 500 milliseconds to prevent
     // the drive commands from interfering with each other
     yield return Arbiter.Receive(false, TimeoutPort(500),
       delegate(DateTime t) { });

     // Go forward again
     SpawnIterator<double, double>(0.75, 0.75, DriveRobot);

     // terminate the iteration
     yield break;
}
private IEnumerator<ITask> DriveRobotSetDistance(double distance,
       double power) {}
private IEnumerator<ITask> TurnRobot(double angle, double power){}
Note
This code block contains method stubs that represent the DriveRobotSetDistance and TurnRobot functions. The body for these functions are covered later in the section.
ReverseAndTurn is called whenever the robot hits an obstacle, so it follows that the code would initiate a request to back up and turn the robot away from the obstacle. This is done by invoking a series of calls to drive functions used to perform specific tasks. For example, the DriveRobotSetDistance function can be used to reverse the robot for a set distance. It does this by using the DriveDistanceRequest and DriveDistance functions, which are provided with the generic drive service. The code for the DriveRobotSetDistance function is shown as follows (you need to add code for the function only because we created the function stub in an earlier step):
private IEnumerator<ITask> DriveRobotSetDistance(double distance,
        double power)
{

    // Create a request to drive a specific distance
    drive.DriveDistanceRequest distanceRequest = new
          drive.DriveDistanceRequest();
    // millimeters to meters
    distanceRequest.Distance = (double)distance / 1000.0;
    distanceRequest.Power = (double)power;

    // Send the request to the drive port
    yield return Arbiter.Choice(
       _drivePort.DriveDistance(distanceRequest),
        delegate(DefaultUpdateResponseType response) { },
        delegate(Fault fault)
       {
         LogError(null, "Unable to drive robot specified distance", fault);
       }
    );

    //Update the robot status
    state.RobotStatus = "Robot is driving a set distance";

}
By using this method, we can ensure that the robot reverses its direction for a specific distance. The alternative is to call the DriveMotor function using reverse power levels and then use a timer to stop that movement after so many milliseconds elapses. This is a less precise method than the DriveRobotSetDistance function, so it is therefore less preferable.
We still use a timer to control how often drive commands are sent to the robot. This ensures that the robot is not bombarded with multiple commands, which might cause it to throw an error. The TimeoutPort, which is part of the CCR base, can be used to pause execution for a specified time span. The time span, which is in milliseconds, specifies the amount of time that must pass before a timeout occurs and a value is returned. The fact that we use the yield keyword means that the processing should wait until the timeout has occurred.
A turn to the right is initiated by a call to the TurnRobot function. The TurnRobot function utilizes the RotateDegreesRequest and the RotateDegrees functions, which are provided with the generic drive service. The RotateDegrees function allows you to specify an angle in which the robot must turn. The code for the TurnRobot function is shown as follows (you need to add code for the function only because we created the function stub in an earlier step):
private IEnumerator<ITask> TurnRobot(double angle, double power)
{

     // Create request to drive robot according to a degree of rotation
     drive.RotateDegreesRequest turnRequest =
          new drive.RotateDegreesRequest();
     turnRequest.Degrees = (double)angle;
     turnRequest.Power = (double)power;

     // Send the request to the drive port
     yield return Arbiter.Choice(
     drivePort.RotateDegrees(turnRequest),
        delegate(DefaultUpdateResponseType response) { },
        delegate(Fault fault)
        {
            LogError(null, "Unable to turn the robot", fault);
        }
      );

      //Update the robot status
      state.RobotStatus = "Robot is turning";
}
The alternative to calling the TurnRobot function is to use the DriveMotor function to send a positive power level to the left wheel motor, while also sending a zero power level to the right motor. This would cause the left wheel to spin and the right wheel to stay still. This method is less precise than the method used in TurnRobot and, thus, less preferable. After calling the TurnRobot function, we also use a yield return to the TimeoutPort, which causes a delay of 500 milliseconds.
As with the service in the last chapter, you need to make changes to the Wander manifest before you can run version 1. Even though you can edit the XML-based manifest file, which is named Wander.manifest.xml, using a text-based editor such as Windows Notepad, it is best to use the DSS Manifest Editor provided with MSRS. You can also use this editor to adjust configuration settings for the service.
Before you can change the manifest, you need to successfully compile the service because this generates assemblies used by the Manifest Editor. To do this, select Build, and then click Build Solution. Ensure that the status in the bottom-left status bar shows that the build succeeded.
When you open the DSS Manifest Editor, you see a list of services on the left. Scroll through this list until you locate the Wander service. This is created when you compiled your project successfully. Drag an instance of the Wander service onto the design surface. This shows three icons, which represent each service defined as a partner. The Manifest Editor shows an arrow next to the icon and a box, which declares that the manifest will use the service’s partner definition (see Figure 6-4).
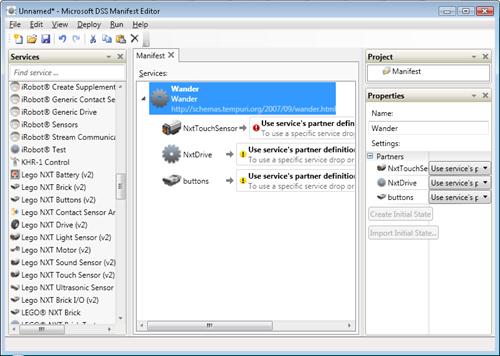
Figure 6-4. The first step in building the manifest for the Wander service is to drag an instance of the Wander service onto the design surface.
To help our service run more efficiently, we can associate the partners with a specific LEGO-based service. We do this by dragging an instance of the hardware-specific service onto the box in the design area. For example, we can drag an instance of the LEGO NXT Drive (v2) service onto the box next to the partner named NxtDrive. Additionally, we can drag an instance of the LEGO Touch Sensor (v2) onto the NxtTouchSensor and the LEGO NXT Buttons (v2) onto the buttons. After it’s completed, the manifest should resemble Figure 6-5.

You can also use the Manifest Editor to configure your services. To do this, select the service, click Edit, and then click Set Configuration. This displays properties in the right-hand pane. From here you click Create Initial State, and additional state properties appear in the pane. Each service has different state properties exposed, and not all of the properties need to be configured (see Figure 6-6).

Figure 6-6. The Properties pane in the DSS Manifest Editor allows you to configure service state for the Wander service.
Table 6-1 lists the state properties that you need to configure for the Wander service.
Table 6-1. Configuration Properties for the Wander Service
Partner Service | State Property | Value |
|---|---|---|
NxtTouchSensor | Brick | Select NxtBrick |
Name | Sensor1 | |
SensorPort | Sensor1 | |
NxtDrive | Brick | Select NxtBrick |
DistanceBetweenWheels | 0.122 | |
LeftWheel/MotorPort | MotorC | |
LeftWheel/WheelDiameter | 0.055 | |
RightWheel/MotorPort | MotorB | |
RightWheel/WheelDiameter | 0.055 | |
NxtButtons | Brick | Select NxtBrick |
Brick | Configuration/SerialPort | Number of the Outgoing Port assignment for your Bluetooth connection |
The final step is to save a copy of the manifest. If you click File and Save As, you are prompted to select a file path. Browse to the location where the Wander service is located and select the Wander.manifest file. Select yes when asked whether you want to replace the existing file.
The final step is to ensure that the services for the LEGO NXT are loaded with the Wander service. This is done by including a LEGO manifest file when calling the DssHost program. You may recall from Chapter 2, that the DssHost program is a command-line tool used to start a DSS node on a port. This is needed in order to run a service. When calling this command-line tool, you specify one or more manifest files that will be included in the startup.
When you create a service using the Visual Studio template, it automatically adds a call to the DssHost program as part of the project’s debug properties. You can see these properties by clicking Project and then selecting Wander Properties. The Debug tab displays Start options that include command-line arguments. By default, the manifest file for the Wander service is appended to the argument list. You also need to add a reference to a LEGO NXT manifest.
MSRS provides manifest files for supported robots in the samplesconfig folder for your local MSRS installation. There are several manifest files for the LEGO NXT. Which one is needed depends on the kinds of functions the LEGO NXT needs to perform. For the Wander service, we need to use the LEGO.NXT.MotorTouchSensor.manifest because we will be accessing services that control the motors and touch sensors. To add this manifest file, place your cursor at the end of the text inside the command-line arguments text box. Add a single space, and then add the following text:
-m:"samplesconfigLEGO.NXT.MotorTouchSensor.manifest.xml"
After you make these changes, you need to save the project by clicking File and then clicking Save All. You are now ready to run the Wander service and find out how your robot will perform.