MSRS offers several command-line tools (see Table 2-1) that can be used to interact with the Decentralized Software Services (DSS) runtime services. Prior to the MSRS 1.5 release, developers had to create a new service manually using the DssNewService command-line tool. MSRS now features a Visual Studio template (see Figure 2-2) that allows you to create a new service using Visual Studio 2005. (Though the procedures and programs in this book were tested in Visual Studio 2005, they will also work with Visual Studio 2008.)
Table 2-1. Command-Line Tools Used to Work with DSS
Name | Description |
|---|---|
DssHost | Used to start a DSS node on a port and run one or more services. |
DssNewService | Used to create a skeleton for a new service. This would include the Visual Studio solution and project files. This utility provides an alternative and programmatic way of creating projects. The other option is to use the Visual Studio template, included with MSRS, for creating new DSS services. |
DssInfo | Used to get information about a service such as all the services and contracts associated with an assembly. |
DssProxy | Used to generate proxies and transforms. A proxy is an assembly that exposes the contract information for a product. This utility is rarely called directly. Instead, it is used as part of the build process when creating a new service. |
DssProjectMigration | Used to migrate a project from a previous release version. This was particularly important in the early release days of MSRS when a new release was generated as often as once a month. |
DssDeploy | Used to package all the files that go with a service and create an executable that can be used for deployment. |
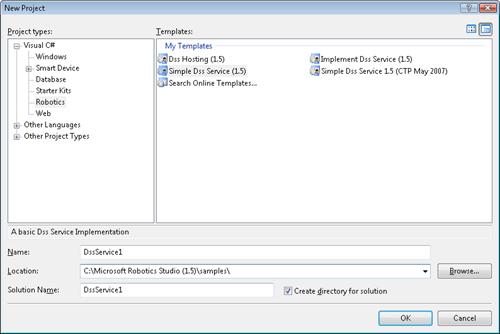
Figure 2-2. Included with MSRS is a Visual Studio template that creates the basic structure for a DSS service.
Before we examine the code to create a new service, let’s look at how services are started. The DssHost.exe command-line tool (listed in Table 2-1) is used to start a new DSS node on a port and run one or more services. In Chapter 1 you learned that DSS is one of the key technologies used by the MSRS runtime. A DSS node is the environment or context in which services will run, and it must be started on a port before any services can run on that node. The easiest way to start a DSS node is by clicking the Run DSS Node menu item under Microsoft Robotics Studio on the Windows Start menu.
Note
It may take a few minutes for the DssNode executable to run on your development machine. Depending on your operating system and what antivirus tools you are running, the first time you run DssNode on your computer, you may be asked to grant access to MSRS. For users running Windows Vista, there is the additional constraint that you have to use a registered port. Refer to the following MSDN document online for additional security configuration information: http://msdn2.microsoft.com/en-us/library/bb870571.aspx.
Warning
Do not close the command window that appears because this will cause the DSS node to stop, and you will not be able to access your services until you start the node again.
After executing DssNode, you will see a command window appear, and then your Internet browser will open and point to the following URL: http://localhost:50000.
The Internet browser should open to the System Services Web page for MSRS. From there you can click Control Panel on the left panel to see a list of services available on the machine (see Figure 2-3). To see a list of services that are running, click Service Directory on the left panel.

Alternatively, you could start a DSS node manually to listen for HTTP requests on port 50000 and SOAP requests on port 50001 by going to a command prompt, navigating to the bin subdirectory where your MSRS files were installed, and typing the following command:
Dsshost -p:50000 –t:50001Tip
The MSRS installation includes a Command Prompt link that opens a command prompt and then adds "bin" to the search PATH so you do not have to navigate to the bin folder yourself. From this command prompt, you can execute all the command-line tool utilities listed in Table 2-1.
This command will start a DSS node with no manifest or services loaded. Refer to Table 2-2 for a list of arguments that you can use with the DssHost executable.
Manifest
A manifest is an Extensible Markup Language (XML) file that includes a list of services to be started. This is typically used when starting a DSS node. The manifest is specified by passing the Uniform Resource Identifier (URI) or path as an argument for the DssHost executable.
Table 2-2. Parameter Listing for the DssHost Executable
Short Name | Description | |
|---|---|---|
/manifest | /m | URI or path that points to the initial manifest(s) to load. |
/dll | /d | URI or path that points to the initial DSS service DLL to load. |
/contract | /c | URI or path that points to the initial DSS contract to load. |
/port | /p | Integer value that contains the Transmission Control Protocol (TCP) port used to listen for Hypertext Transfer Protocol (HTTP) requests. 50000 is the port number typically used because this does not conflict with any known ports. |
/tcpport | /t | Integer value that contains the TCP port used to listen for SOAP requests. 50001 is the port number typically used because this does not conflict with any known ports and is a different port than the one used for HTTP requests. |
/hostname | /h | String value that contains the host name that identifies the host. |
/security | /s | URI or path that points to a security settings file. |
/verbosity | /v | Verbosity level. Can be Off|Error|Warning|Info|Verbose. Info is the default value. |
@file | @file | Name of a text file that contains a list of arguments. This is a good alternative to repeatedly typing in the same arguments. |
Contract
A contract contains information that other DSS services need in order to use the service. The contract is associated with an HTML file, but you cannot access this file directly. Instead, you can use the DssInfo command-line tool to view the contents of a contract. For more information about the contract, refer to the following URL: http://msdn2.microsoft.com/library/bb648746.
The MSRS Control Panel contains a list of all services available on the node. Even if you have never created a service, you will see several listed. Some of these are services used to run MSRS, some are used to run the supported hardware platforms, and some are generic services that can be used to support any hardware platform. Take the time to browse through this list of services and become familiar with the built-in services that MSRS provides.
To create a new service, open Visual Studio 2005, choose File, New, and then click Project. In the New Project dialog box (see Figure 2-2 ), expand the node for the language you prefer, select the Robotics node, and then select the Simple DSS Service (1.5) project template. In the Name text box, type a name for the new service (or use the default service name of DssService1 to make it easier to follow our examples), enter a location for the code files, and then click OK. This will create the solution and files you need to build a simple DSS service. These files include class files and an .xml manifest file.
Assuming you used the default name for the service, your class files will be named DssService1.cs and DssService1Types.cs. DssService1.cs is the implementation class, and this is where you will place the code that reads data from sensors and sends commands to your robot. DssService1Types.cs is the contract class, and this is where you will return information about the service such as the state. The contract class will also handle any requests to drop or create the service.
State
You can think of services as active documents that contain useful information. At any point, you can open these documents and see what information they contain. When you do this, you access the service’s state, which is a representation of the service at the time it is requested. For example, if you have a service that returns data from a sensor, then the state for that service would be the data read from the sensor at the time you requested the state.
Without adding any code, you can build the DssService project created with the Visual Studio template. By default, the state for a service is empty, which means that no information is returned when someone accesses that service. So far, the DssService project does not communicate with any devices, and it will not return any state.
If you wanted the DssService project to do something simple, then you could have it return the phrase "Hello World." In this case, the phrase "Hello World" is the service’s state, and this phrase is returned when someone accesses the service. To accomplish this, you would need to add the following code to the DssService1Types.cs file (inside the public class definition for the DssService1State class):
private string _outputmsg = "Hello World";
[DataMember]
public string OutputMsg
{
    get { return _outputmsg; }
    set { _outputmsg = value; }
}
The DataMember attribute indicates that the public properties that follow should be serialized as XML. Serialization is the process of representing a .NET object as a stream of bytes, such as a SOAP message. Alternatively, instantiating a .NET object from the data in a SOAP message is known as deserialization.
The class definition for DssService1State is marked with the DataContract attribute. This indicates that the objects within the DssService1State class should be included in the DSS proxy dll that will be generated for this service.
Tip
By default, the Visual Studio template available with MSRS will return the XML as a SOAP message. If you want to return the XML as HTTP and avoid the overhead of a SOAP message, you can add HttpGet to the PortSet. This will entail adding additional code to your service. For more information about how to do this, refer to the Service 1 tutorial available at http://msdn2.microsoft.com/library/bb905437.
To understand this better, let’s take a look at the SOAP response message for the "Hello World" DssService project. To see this for yourself, you will need to successfully build and run the DssService1 project by pressing F5. This will build the project and create an assembly in the MSRS bin directory. By default, the project properties for the Visual Studio template will also execute DssProxy to build a DSS proxy assembly. Finally, the debug properties for the project will execute DssHost to start the node and load the DSS service.
DSS proxy
A DSS proxy is an assembly used to represent a service. Other services will use this proxy to communicate with this service rather than communicate with the service directly. The proxy is generated when the service is compiled, and it contains stubs for all public interfaces.
After pressing F5 to build and start the service, leave the command window open, and use your Internet browser to go to the URL for this service (the URL should be http://localhost:50000/DssService1). The SOAP message that appears should look like the following:
<s:Envelope xmlns:s=http://www.w3.org/2003/05/soap-envelope
   xmlns:wsa=http://schemas.xmlsoap.org/ws/2004/08/addressing
   xmlns:d="http://schemas.microsoft.com/xw/2004/10/dssp.html">
<s:Header>
  <wsa:To>http://127.0.0.1:1153/</wsa:To>
  <wsa:Action>http://schemas.microsoft.com/xw/2004/10/dssp.html:GetResponse
  </wsa:Action>
  <d:Timestamp>
 <d:Value>2007-07-10T13:16:28.0938784-05:00</d:Value>
  </d:Timestamp>
  <wsa:RelatesTo>uuid:99cf78b1-dabf-4b7d-8c6b-14124cbfc023</wsa:RelatesTo>
  </s:Header>
<s:Body>
<DssService1State xmlns="http://schemas.tempuri.org/2007/07/dssservice1.html">
    <OutputMsg>Hello World</OutputMsg>
</DssService1State>
</s:Body>
</s:Envelope>
Note that the body of the SOAP message includes an element named DssService1State. The XML namespace associated with this element is the contract name for the service. The namespace is simply a unique string used to identify the contract. It happens to look like a valid URL, but it is not required to be a path to an actual file.
Tip
When creating your own robotics applications, especially if you plan on distributing them commercially, you need to change the prefix of the namespace to something other than schema.tempuri.org. This will ensure that the contract for your service is unique and does not conflict with any other services. To change the namespace, change the Identifier variable located in the contract class. (This is found in the DssService1Types.cs file.) The namespace for the contract should also be changed in the DssService1.manifest.xml file.