Now that you have built and successfully compiled the services for the ARobot, you can create a test service that consumes these services. The test service project can be added to the existing ARobot solution or created in a new solution. The code included on the book’s companion Web site uses both a test service embedded within the ARobot solution and a VPL project. The VPL project is named DriveARobotByWire, and it is located in a separate folder named DriveARobotByWire.
The test service project is named ARobotTest, and it resides within the ARobot folder. The test service is simple and is used to test both the bumper and drive services. To access these services, we need to add a reference to the ARobotServices.Y2007.M10.Proxy assembly. We can then add namespace references to the drive service using the following code:
using drive = Microsoft.Robotics.Services.ARobot.Drive.Proxy;
We need to add a partnership for the generic contact sensors service in order to access the contact sensor array operations. The generic contact sensors service is part of the Robotics.Common assembly, so we need to set a reference to the Robotics.Common.Proxy assembly. We also need to add the following namespace declaration:
using contactsensor = Microsoft.Robotics.Services.ContactSensor.Proxy;
Notifications received from the bumper service trigger a Windows alert dialog box. To access this functionality, we need to set a reference to the Utility.Y2006.M08.Proxy assembly and include the following namespace declaration:
using dialog = Microsoft.Robotics.Services.Sample.Dialog.Proxy;
Finally, we need to include a namespace declaration that references the subscription manager service that is part of DSS. This is done with the following code:
using submgr = Microsoft.Dss.Services.SubscriptionManager;
The test service needs to add partnerships that represent the subscription manager service, Windows dialog box operations, generic contact sensors, and ARobot drive services. You can add these with the following code:
[Partner("SubMgr", Contract = submgr.Contract.Identifier,
      CreationPolicy = PartnerCreationPolicy.CreateAlways)]
private submgr.SubscriptionManagerPort _subMgr = new
      submgr.SubscriptionManagerPort();

[Partner("SimpleDialog", Contract = dialog.Contract.Identifier,
      CreationPolicy = PartnerCreationPolicy.UsePartnerListEntry)]
dialog.DialogOperations _simpleDialogPort = new dialog.DialogOperations();

[Partner("ARobotGenericContactSensor",
   Contract = contactsensor.Contract.Identifier,
      CreationPolicy = PartnerCreationPolicy.UsePartnerListEntry)]
contactsensor.ContactSensorArrayOperations _aRobotGenericContactSensorPort
        = new contactsensor.ContactSensorArrayOperations();
contactsensor.ContactSensorArrayOperations
       _aRobotGenericContactSensorNotify = new
       contactsensor.ContactSensorArrayOperations();

[Partner("ARobotDrive", Contract = drive.Contract.Identifier,
      CreationPolicy = PartnerCreationPolicy.UseExistingOrCreate,
      Optional = false)]
private drive.DriveRobotOperations _drivePort = new
drive.DriveRobotOperations();The Start method for the test service subscribes to the generic contact sensors service. It also registers a message handler that is called whenever the ARobot’s whiskers are triggered. Finally, use the SpawnIterator method to invoke a method named MoveForwardAndStop. The code for the Start method looks like the following:
protected override void Start()
{
base.Start();

   //Subscribe to the generic contact sensors service for the ARobot
   //This will get us access to the whiskers
_aRobotGenericContactSensorPort.Subscribe(_aRobotGenericContactSensorNotify);

   base.MainPortInterleave.CombineWith(
       new Interleave(
          new ExclusiveReceiverGroup(
          ),
          new ConcurrentReceiverGroup(
             Arbiter.ReceiveWithIterator<contactsensor.Update>(true,
                  _aRobotGenericContactSensorNotify,
                  ARobotGenericContactSensorUpdateHandler)
          )
       )
     );

     SpawnIterator(MoveForwardAndStop);

}The contact sensors message handler is responsible for displaying the word "Ouch" in a Windows alert dialog box every time one of the ARobot’s whiskers are triggered. The code for this message handler is as follows:
IEnumerator<ITask> ARobotGenericContactSensorUpdateHandler(contactsensor.Update message)
{
   //Display the word "Ouch" in a dialog box every time whisker is touched
   dialog.AlertRequest ar = new dialog.AlertRequest();
   ar.Message = "Ouch";
   _simpleDialogPort.Alert(ar);
   yield break;
}
Additionally, you need to add code for the MoveForwardAndStop method. This method is called when the service is started, and it is responsible for moving the robot forward for one second and then stopping. This is done by sending a DriveRobot request using a distance of 0, a speed of 6, and a direction of "F" to move the robot forward. To stop the robot, a direction of "S" is used. The code for the MoveForwardAndStop method is as follows:
private IEnumerator<ITask> MoveForwardAndStop()
{
    //Send a command to drive forward for no specific distance
    _drivePort.DriveRobot(new drive.DriveRobotRequest(6, "F", 0));

    // Wait for 1 second
    yield return Arbiter.Receive(false, TimeoutPort(1000),
          delegate(DateTime t) { });

    //Now Stop
    _drivePort.DriveRobot(new drive.DriveRobotRequest(3, "S", 0));

}
After you have added the code, you can compile and run the test service. Make sure the ARobot is connected to your development machine with a serial connection and the ARobotControlForMSRS.bs2 program has been loaded onto the ARobot. The result of running the test service is that the ARobot moves forward for one second and then stops. If the whiskers are triggered, a Windows alert dialog box will appear with the word "Ouch."
Tip
If you have issues with starting a service or sending messages, try the following steps to resolve the problem:
Delete the contractdirectory.cache.xml file, which is located in the store folder for your local MSRS installation.
Make sure only one version of your assembly, proxy, and transform files is in the bin folder for the local MSRS installation.
Make sure you do not have multiple DLLs claiming to implement the same contract. This can happen if you change the assembly name for your service after you created the initial service.
Make sure the DLLs for your service appear in the bin folder for the local MSRS installation.
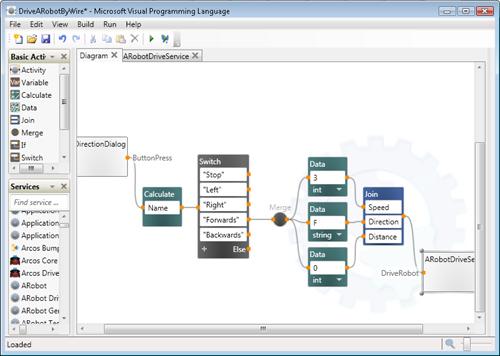
The VPL project is much simpler to write because it involves dragging objects onto a design surface and then setting properties related to those objects. The first step is to open VPL and drag an instance of the DirectionDialog service onto the design surface. You will use the direction dialog, which is a special service available through MSRS, to prompt the user for a direction. You then use a Calculate activity to interpret the name value entered into the direction dialog.
The Calculate activity captures only the name that is entered. A Switch activity, which functions like a big if...then statement, is needed to determine which direction the user selected. Because more than one data value needs to be passed on to the drive robot function, we need to use a merge activity to link the switch result to the three data variables. The data variables represent the speed, motor, and distance parameters. When moving the robot forward, these values will be 3, F, and 0, respectively.
The final block is an instance of the ARobotDriveService. A Join activity is used to assign the data variables to their respective variable names and then call the DriveRobot function from the ARobotDriveService. The final diagram should look similar to Figure 7-5.