
The security monitor service is responsible for receiving images from the attached Web camera and determining if motion has occurred within the image. This happens by taking snapshots every few milliseconds and comparing the binary output for these images. If the service determines that motion has occurred, it will send an e-mail to a predefined e-mail address.
Users will be able to monitor images captured by the service from a Control Panel Web page (see Figure 8-3). The Control Panel Web page also includes directional buttons that you can use to navigate the ARobot through a room. Additionally, the user can enable or disable e-mail notifications and enter an e-mail address in which movement notifications should be sent.
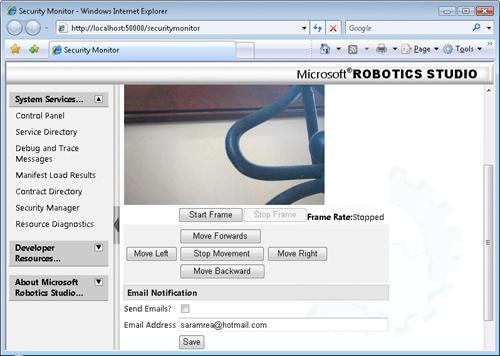
Figure 8-3. The Control Panel Web page allows the robot owner to remotely monitor and control the ARobot.
To build the security monitor service, you will need to create a new Decentralized Software Services (DSS) service using the Visual Studio template provided with MSRS. The service should be named SecurityMonitor, and it should be located in the samples folder, where the MSRS installation folders reside.
Note
This chapter will not list all the code necessary to build the Security Monitor service. For readers interested in using the service, it is included on the book’s companion Web site.
The security monitor service requires several state variables. You define these variables in the contract class, which you should name SecurityMonitorTypes.cs. You can define the state variables with the following code:
[DataContract()]
public class SecurityMonitorState
{
    [Description("Specifies width of frame displayed in Control Panel")]
    public const int ImageWidth = 320;

    [Description("Specifies height of frame displayed in Control Panel")]
    public const int ImageHeight = 240;

    [Description("Indicates refresh interval for webcam service (in ms).")]
    public const int RefreshInterval = 250;

    private Bitmap _image = new Bitmap(320, 240);
    public Bitmap Image
    {
        get { return _image; }
        set { _image = value; }
    }

    private Bitmap _motionImage = new Bitmap(320, 240);
    public Bitmap motionImage
    {
        get { return _motionImage; }
        set { _motionImage = value; }
    }


    [DataMember]
    [Description("Size of the image stored in state.")]
    public Size Size
    {
        get
        {
           if (_image != null)
           {
              return _image.Size;
           }
           return Size.Empty;
        }
        set { return; }
    }

    private DateTime _timeStamp;
    [DataMember]
    [Description("Time that the image was retrieved.")]
    public DateTime TimeStamp
    {
       get { return _timeStamp; }
       set { _timeStamp = value; }
    }

    private Boolean _sendEmail;
    [DataMember]
    [Description("Indicates whether we send emails sent to the address.")]
    public Boolean SendEmail
    {
       get { return _sendEmail; }
       set { _sendEmail = value; }
    }

    private String _emailAddress;
    [DataMember]
    [Description("Email address to send notifications to.")]
    public String EmailAddress
    {
       get { return _emailAddress; }
       set { _emailAddress = value; }
    }

    public ObjectResult CurObjectResult;

}You will need to modify the PortSet to include the HttpGet, HttpPost, HttpQuery, Replace, and NotifyMotionDetection operations. The Http operations will be used when we send and receive state variable values from the Control Panel Web page. The PortSet also includes operations used to drive the ARobot. The code for the security monitor main operations port should look like the following:
[ServicePort()]
public class SecurityMonitorOperations : PortSet<DsspDefaultLookup,
     DsspDefaultDrop,
     Get,
     HttpGet,
     HttpPost,
     HttpQuery,
     Replace,
     NotifyMotionDetection>
{
}Because the Http operations are already supported by MSRS, you do not need to add code to the SecurityMonitorTypes.cs file to accommodate the operations. Instead, you need to add a reference to the DSSP HTTP namespace. You can do so by adding the following code to the top of the file:
using Microsoft.Dss.Core.DsspHttp;
You need to add code to support the NotifyMotionDetection operation because this is a custom operation not provided with MSRS. Add the following code to support the new operation below the PortSet:
[DisplayName("NotifyMotionDetection")]
[Description("Indicates that a moving object has been detected.")]
public class NotifyMotionDetection : Update<ObjectResult,
      PortSet<DefaultUpdateResponseType, Fault>>
{
    public NotifyMotionDetection()
    {
    }
    public NotifyMotionDetection(ObjectResult body) : base(body)
    {
    }
}The implementation class will be named SecurityMonitor.cs, and this is where the code used to monitor and control your robot will reside. For the security monitor service, you will need to add references to the following four assemblies:
RoboticsCommon.Proxy. This assembly, which is included with MSRS, allows you to access a variety of namespaces used to control a robot. In this chapter, we will add a reference to the Microsoft.Robotics.Services.Webcam.Proxy namespace. This provides access to images captured by the attached Web camera.
System.Drawing. This assembly provides access to the System.Drawing and System.Drawing.Images namespaces. This provides access to functions and types that are used when processing the images captured by the Web camera.
System.Web. This assembly provides access to the System.Web and System.Web.Mail namespaces and are used when we send e-mail via Simple Mail Transfer Protocol (SMTP). It is also used when we reference the HTTP functions that stream images to the Control Panel Web page.
ARobotServices.Y2007.M10.Proxy. This assembly was created in Chapter 7 and is used to access the Microsoft.Robotics.Services.ARobot.Drive.Proxy namespace. This provides access to the ARobot by Arrick Robotics.
For the security monitor service, you need to add a partnership for the Webcam service and the ARobotServices service. This is how we access images from the attached Web camera and also drive the ARobot. The code for the partnership declaration should look like the following:
[Partner("Webcam", Contract = webcam.Contract.Identifier,
      CreationPolicy = PartnerCreationPolicy.UseExistingOrCreate)]
webcam.WebCamOperations _webCamPort = new webcam.WebCamOperations();

[Partner("ARobotDrive", Contract = drive.Contract.Identifier,
     CreationPolicy = PartnerCreationPolicy.UseExistingOrCreate,
     Optional = false)]
private drive.DriveRobotOperations _drivePort = new
     drive.DriveRobotOperations();
In addition to the partnership, you need to include declarations for additional ports, as well as the main port. The first port named _internalPort is used to post internal state variables. The port named _utilitiesPort is used to handle all HTTP requests and responses. The code used to declare these ports should look like the following:
//Used to post internal state
private SecurityMonitorOperations _internalPort = new
     SecurityMonitorOperations();

//Used to post our HTTP request responses
DsspHttpUtilitiesPort _utilitiesPort = new DsspHttpUtilitiesPort();The Start method is responsible for initializing state variables and registering the message handlers that the service uses. For this service, it is also responsible for creating an instance of the HTTP utilities port. This is the port where we send all HTTP requests and responses.
The last thing the Start method does is call the function GetFrame. This function is where we capture images from the Web camera. The code for the Start method (along with the associated method stubs) should look like the following:
protected override void Start()
{

      base.Start();

      //Initialize variables used when sending email notifications
      _state.EmailAddress = _toEmail;
      _state.SendEmail = false;

      //Initialize the Utility port used to post HTTP operations
      _utilitiesPort = DsspHttpUtilitiesService.Create(Environment);

      //Register our message handlers
      MainPortInterleave.CombineWith(
          Arbiter.Interleave(
             new TeardownReceiverGroup(),
             new ExclusiveReceiverGroup(
                Arbiter.Receive<NotifyMotionDetection>(true, _internalPort,
                    MotionDetectionHandler
                 ),
             new ConcurrentReceiverGroup(
)
        ));

        //Call the function which gets the image from the webcam
        Activate(Arbiter.ReceiveWithIterator(false, TimeoutPort(3000),
                    GetFrame));
}
public void MotionDetectionHandler(NotifyMotionDetection update){}
[ServiceHandler(ServiceHandlerBehavior.Exclusive)]
public void ReplaceHandler(Replace replace)
{
     _state = replace.Body;
     replace.ResponsePort.Post(DefaultReplaceResponseType.Instance);
}

[ServiceHandler(ServiceHandlerBehavior.Concurrent)]
public IEnumerator<ITask> HttpQueryHandler(HttpQuery query)
{
     return HttpHandler(query.Body.Context, query.ResponsePort);
}

[ServiceHandler(ServiceHandlerBehavior.Concurrent)]
public IEnumerator<ITask> HttpGetHandler(HttpGet get)
{
      return HttpHandler(get.Body.Context, get.ResponsePort);
}
IEnumerator<ITask> HttpHandler(HttpListenerContext context,
      PortSet<HttpResponseType, Fault> responsePort)
{
     yield break;
}
[ServiceHandler(ServiceHandlerBehavior.Exclusive)]
public IEnumerator<ITask> HttpPostHandler(HttpPost post)
{
     yield break;
}
public IEnumerator<ITask> GetFrame(DateTime timeout)
{
     yield break;
}
Note
This code block also contains method stubs to represent the message handlers. For now, the body of most of these handlers is empty, and we will cover what code goes in these handlers in the next section.
You might notice that some of the handlers (such as the Replace and Get handlers) do not use an iterator. This might be different from other sample code you have looked at. The general rule here is that you should use an iterator only when there is a need to perform a yield return.
In this service, we use the Web camera service provided with MSRS to retrieve images from the attached Web camera. The QueryFrame method, which is one of the Web camera operations, can be used to return the most recently captured image. After the image is retrieved, we scale it to fit the image size specified in our state variables. We then call the ProcessFrameHandler method, which is where the image processing takes place. The code for this method is covered in the next section.
If the ProcessFrameHandler method determines that movement has occurred, then a notification is triggered. Regardless of whether movement is detected, the image is saved to the state variable named Image. The last thing the GetFrame function does is reset the call to itself. The code for the GetFrame function (along with the associated functions) is shown as follows:
public IEnumerator<ITask> GetFrame(DateTime timeout)
{
     //Create first query request
     //The frame returned from this request will be used
     //for processing
     webcam.QueryFrameRequest processRequest = new
           webcam.QueryFrameRequest();
     processRequest.Format = Guid.Empty;
     webcam.QueryFrameResponse frame = null;
     Fault fault = null;

     //Get the most recently captured image so it can be processed
     yield return Arbiter.Choice(
        _webCamPort.QueryFrame(processRequest),
        delegate(webcam.QueryFrameResponse success)
        {
            frame = success;
        },
            delegate(Fault f)
        {
            fault = f;
        }
     );

     //Check to see if there was a problem
     if (fault != null)
     {
        LogError(LogGroups.Console, "Could not query webcam frame", fault);
        yield break;
     }

     //If we have a valid image frame then we need to process
     //it to see if there are any moving images
     if (frame != null && frame.Frame != null)
     {
         try
         {
            //Get the current frame
            byte[] _curFrame = frame.Frame;
            int curWidth = frame.Size.Width;
            int curHeight = frame.Size.Height;
            //Set the state variables
            _state.TimeStamp = frame.TimeStamp;
            _state.Size = frame.Size;

            //See if the image needs to be scaled
            //If this is not done then we can receive
            //an error when trying to process the image
            if (_curFrame.Length != _processFrame.Length)
            {
                bool success = Scale(3, _curFrame, new RectangleType(0, 0,
                  curWidth - 1, curHeight - 1), _processFrame, ImageWidth,
                  ImageHeight);
                if (success == false)
                {
                    LogError(LogGroups.Console, "Unable to scale image");
                    yield break;
                }
                else
                {
                    _curFrame = _processFrame;
                }
             }

             // This is where actual image processing methods are processed
             ProcessFrameHandler(_processFrame, _lastProcessingResult);

             //See if movement was detected ;if so, post a notification
             if (_lastProcessingResult.MotionFound && !_firstFrame)
             {
                 _state.motionImage = SaveImage(_curFrame, ImageWidth,
ImageHeight);
                 _internalPort.Post(new NotifyMotionDetection(new
                   ObjectResult(_lastProcessingResult)));
             }

             //See if this is the first frame since motion will be detected
             //on that one and we want to ignore that
             if (_firstFrame) _firstFrame = false;

             //Save the image to the Image state variable
             _state.Image = SaveImage(_curFrame, ImageWidth,
ImageHeight);

            //Reset the call for the function so it will be called
            //again according to time set for the Refresh Interval.
   //This is what creates the loop
            Activate(Arbiter.ReceiveWithIterator(false,
                     TimeoutPort(RefreshInterval), GetFrame));
         }
         catch (Exception e)
         {
             LogError(LogGroups.Console, "Excp in Image Processing", e);
         }

     }
     }
     public bool Scale(int pixelBytes, byte[] sourceImage, int srcWidth,
          int srcHeight, byte[] tarImage,
          int tarWidth, int tarHeight)
     {
          if (sourceImage == null ||
            tarImage == null ||
            tarImage.Length != tarWidth * tarHeight * 3)
          {
             return false;
          }

         using (Bitmap bmp = SaveImage(sourceImage, srcWidth, srcHeight))
         {
            using (Bitmap scaled = new Bitmap(bmp, tarWidth, tarHeight))
            {
               BitmapData locked = scaled.LockBits(
                   new Rectangle(0, 0, tarWidth, tarHeight),
                   ImageLockMode.ReadOnly,
                   PixelFormat.Format24bppRgb
               );

               Marshal.Copy(locked.Scan0, tarImage, 0, tarImage.Length);

               scaled.UnlockBits(locked);
            }
        }
            return true;
     }

public Bitmap SaveImage(byte[] curFrame, int width, int height)
{
     //Create a bitmap image variable
     //which will hold a bitmap
     //representation of the current frame
     Bitmap bmp = new Bitmap(
         width,
         height,
         PixelFormat.Format24bppRgb
     );

     // Use the LockBits function to lock the image
     //into memory
     BitmapData data = bmp.LockBits(
         new Rectangle(0, 0, width, height),
         ImageLockMode.ReadOnly,
         PixelFormat.Format24bppRgb
     );
     Marshal.Copy(curFrame, 0, data.Scan0, curFrame.Length);

     //Unlock the image from system memory and store it
     //in the bitmap image variable
     bmp.UnlockBits(data);

     //Pass back the bitmap image
     //which will be stored in a state variable
     return bmp;
}
public void ProcessFrameHandler(byte[] rgbValues, ImageProcessingResult
   result) {}
Tip
Keep in mind that modifying the state, such as when the image is saved to an image state variable, can cause a potential conflict. The conflict could occur when the Get or Replace function is executing. Even though the likelihood of this is low, it should still be considered when designing your own service.
The ProcessFrameHandler method is where we process each frame captured by the Web camera. The frame image is stored in a byte array and is represented through a series of binary values. Each binary value represents a single pixel. The size of the array is determined by the state variables that represent the image’s height and width. The code for the ProcessFrameHandler method, along with the DetectMotion function that it calls, are seen as follows:
byte[] _processFrame = new byte[ImageWidth * ImageHeight * 3];
byte[] _grayImg = new byte[ImageWidth * ImageHeight];
byte[] _grayImgOld = new byte[ImageWidth * ImageHeight];
byte[] _motionImg = new byte[ImageWidth * ImageHeight];

public void ProcessFrameHandler(byte[] rgbValues, ImageProcessingResult
    result)
{
    if (rgbValues == null) return;

    //Strip out the red, green, and blue colors and make the image gray
    for (int i = 0, j = 0; i < _grayImg.Length; i++, j += 3)
    {
       _grayImg[i] = (byte)(((int)rgbValues[j]
                 + (int)rgbValues[j + 1]
                 + (int)rgbValues[j + 2]) / 3);
    }

    //zero out the motion image array
    for (int i = 0; i < _motionImg.Length; i++)
    {
       _motionImg[i] = 0;
    }

    // calculate frame difference by computing the
    //difference between the current image and the
    //last captured image
    for (int i = 0; i < ImageWidth * ImageHeight; i++)
    {
       _motionImg[i] = (byte)Math.Abs(_grayImg[i] - _grayImgOld[i]);
    }

    //see if there is motion by calling the DetectMotion function
    bool motionFound = DetectMotion(_motionImg, 40, 250, result);

    //Copy the current image to the _grayImgOld array so it
    //can be compared to the next frame captured
    _grayImg.CopyTo(_grayImgOld, 0);
}

static bool DetectMotion(byte[] image, byte diffThresh, int sizeThresh,
     ImageProcessingResult result)
{
      int i, x, y;

      //Compare the values in the motion image against
      //the allowed difference threshhold value of 40
      int sumX = 0;
      int sumY = 0;
      int pixelCount = 0;
      for (i = 0; i < ImageWidth * ImageHeight; i++)
      {
          if (image[i] > diffThresh)
          {
              image[i] = 255;
              sumX += i % ImageWidth;
              sumY += i / ImageWidth;
              pixelCount++;
          }
          else
          {
              image[i] = 0;
          }
      }


      //See if the number of pixel differences
      //exceeds the size threshhold value of 250
      //which indicates that motion was detected
      if (pixelCount > sizeThresh)
      {
           result.MotionFound = true;
           result.XMotion = (sumX / pixelCount);
           result.YMotion = (sumY / pixelCount);
           result.MotionSize = pixelCount;
      }
      else
           result.MotionFound = false;

      //Pass back the result
      return result.MotionFound;
}
The first thing the ProcessFrameHandler method does is strip out the red, green, and blue colors to create a monochrome or gray image. The gray image is much smaller in size and, therefore, quicker to process. The monochrome image is stored in a byte array variable named grayImg.
To determine if motion has occurred, we need to compare the binary values in the grayImg array to values in another array named grayImgOld. The grayImgOld array will hold binary values from the last frame captured. The observant reader should note that the first time ProcessFrameHandler is called, the values stored in grayImgOld will be zero. This is because we do not copy values into this array until the end of the ProcessFrameHandler method. Therefore, the first time this method is called, it detects motion, even though it has not really occurred.
To prevent the GetFrame function from triggering an invalid notification, we use a variable named _firstFrame. This variable is initialized with a value of true. The code that immediately follows the call to ProcessFrameHandler checks to see if motion was found. It also checks to see if the _firstFrame variable is false. Only when the variable is false will the motion notification be triggered. After the first frame is processed, the variable is set with a value of false, thus allowing normal motion checking to occur.
Motion is detected when the difference between the current frame and the last frame exceeds a threshold value. For our service, the allowed threshold difference is a binary value of 40. The DetectMotion function accepts as an input parameter the array named _motionImg. This array was populated in the ProcessFrameHandler method, and it contains the calculated difference between the current frame and the last frame. DetectMotion is responsible for looping through the _motionImg array and counting the number of times that the difference exceeds the value of 40. If the number of pixels that exceeded the threshold is greater than 250, then we determine that motion has occurred.
When the service detects motion, it triggers an e-mail notification by posting data to the internal port for the NotifyMotionDetection operation. This is done in the GetFrame method after the ProcessFrameHandler method is called. A copy of the image is also saved to a state variable named MotionImage. The portion of code where this occurs is shown as follows:
//See if movement was detected ;if so, post a notification
if (_lastProcessingResult.MotionFound && !_firstFrame)
{
    if (_state.motionImage != null)
    {
        _state.motionImage.Dispose();
    }
    _state.motionImage = new Bitmap(_state.Image);
     _internalPort.Post(new NotifyMotionDetection(new
        ObjectResult(_lastProcessingResult)));
}
The observant reader might wonder why we are saving the image twice because we also save a copy of the image in a state variable named Image. The reason two copies of the image are saved is because the Image state variable is overwritten the next time the GetFrame method is called. We also dispose of the original motion image when it is no longer needed.
After the data is posted to the internal port, it triggers the message handler named MotionDetectionHandler to fire. This handler is responsible for sending an e-mail to the address specified in the state variable named EmailAddress. It only does this if the state variable named SendEmail is set with a value of true. The code for the MotionDetectionHandler method is shown as follows:
public void MotionDetectionHandler(NotifyMotionDetection update)
{
     _state.CurObjectResult = update.Body;

     //First see if we should send notifications
     if (_state.SendEmail)
     {
         try
         {
             //If the email notification is enabled, send an
             //email to the appropriate parties
             StringBuilder sb = new StringBuilder();
             sb.Append("Motion was detected by your at-home Security ");
             sb.Append("Monitor robot. Go to the link below to see");
             sb.Append("what the motion image looked like.<br>");
             sb.Append("<a target=_blank href=");
 sb.Append(_publicURL + ">Motion Image</a>");

             string subject = "Motion Detected";
             MailMessage message = new MailMessage();
             message.From = _fromEmail;
             message.To = _state.EmailAddress;
             message.Subject = subject;
             message.Body = sb.ToString();
             message.BodyFormat = MailFormat.Html;
             SmtpMail.SmtpServer = _hostName;
             SmtpMail.Send(message);

         }
         catch (Exception e)
         {
             LogError(LogGroups.Console, "Exception in sending email notification", e);
         }
         finally
         {
             //Turn off the email notifications so that we do not
             //keep receiving emails. The end user will have to
             //re-enable the emails from Control Panel after they
             //have viewed the image
             _state.SendEmail = false;
         }
    }

    //Post the response
    update.ResponsePort.Post(DefaultUpdateResponseType.Instance);
}
For the MotionDetectionHandler to successfully send an e-mail, SMTP must be enabled and running on the machine that is operating the service. For the security monitor service, this is the laptop machine that is located on top of the ARobot.
Note
By default, the SMTP service is not installed on nonserver machines such as Windows XP or Windows Vista. You will need to refer to the documentation for your operating system to determine how to install and configure SMTP. After it’s installed, SMTP can be accessed through Control Panel and Services.
To display the state variables in a Web browser, we use an Extensible Stylesheet Language Transformation (XSLT) file. Using an XSLT file allows you to programmatically control how the state is displayed in a Web browser. It is preferable to display the state in a Web browser because the Web page can be accessed remotely. For example, a robot owner can access the service Web page from his or her office, even though the robot is located at home.
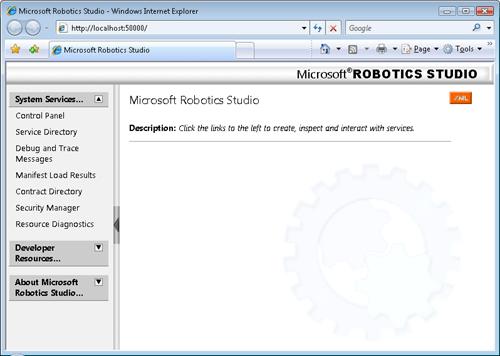
MSRS includes a DSS XSLT template that you can use to give your service a consistent look and feel. This means that the HTML rendered by the XSLT file will be surrounded by the same interface shell used to access the MSRS Web interface (see Figure 8-4).
To use the template, you first need to add a reference to the transform URL. This is done at the top of the XSLT file. For example, the following code should appear in the file named ControlPanel.xslt:
<?xml version="1.0" encoding="UTF-8" ?>
<xsl:stylesheet version="1.0"
  xmlns:xsl="http://www.w3.org/1999/XSL/Transform"
  xmlns:wc="http://schemas.tempuri.org/2007/11/securitymonitor.html">
In this code, we assign the xsl prefix to the transform URL. This means that every time we need to use transform operatives, they will include the xsl prefix. We also include a reference to the security monitor service by including the service contract URL. In this case, we use the wc prefix. This means that every time we need to reference state variables in the security monitor service, we will include the wc prefix.
The next thing to do is import the master page used by the DSS template. This is done with the following line of code:
<xsl:import
  href="/resources/dss/Microsoft.Dss.Runtime.Home.MasterPage.xslt" />
By importing the master page, we do not have to include HTML tags such as <head> and <body>. Instead we will use code such as the following to override the master page parameters:
<xsl:template match="/">
   <xsl:call-template name="MasterPage">
     <xsl:with-param name="serviceName">
       Security Monitor
     </xsl:with-param>
     <xsl:with-param name="description">
       Control Panel
     </xsl:with-param>
     <xsl:with-param name="head">
The next portion of the XSLT file will contain JavaScript. The JavaScript is used to manipulate values passed back in the service state. It is also used to respond to Web page events such as loading the page or button clicks.
The remainder of the XSLT file contains the HTML and XSL operations that will be used to render the control panel Web page. A <form> tag is included because we will post back the results to the security monitor service. The remainder of the XSLT file will look like the following:
<xsl:template match="/wc:SecurityMonitorState">

   <form id="oForm" action="" method="post">
      <table border="0">
         <tr class="odd">
           <th colspan="2">
              Camera
           </th>
         </tr>
         <tr class="even">
           <td colspan="2" align="left">
             <img id="TargetImg" name="TargetImg"
                 src="/securitymonitor/jpeg"
                 alt="Camera Image"
                 onload="onImageLoad()"
                 onerror="onImageError()">
                <xsl:attribute name="width">
                  <xsl:value-of select="wc:Size/wc:Width"/>
                </xsl:attribute>
                <xsl:attribute name="height">
                  <xsl:value-of select="wc:Size/wc:Height"/>
                </xsl:attribute>
             </img>
           </td>
         </tr>
         <tr class="even">
           <td></td>
           <td>
             <button id="btnStart" name="btnStart" onclick="startFeed()">
                 Start</button>
             <button id="btnStop" name="btnStop" onclick="stopFeed()"
                   disabled="disabled">
                 Stop</button>
             Frame Rate
             <span id="spanFrameRate">Stopped</span>
           </td>
         </tr>
         <tr class="odd">
           <td colspan="2">
              <table>
                <tr>
                  <td></td>
                  <td>
                    <button id="btnForward" name="btnForward"
                        onclick="moveForward()">
                      Move Forwards
                    </button>
                  </td>
                  <td></td>
                </tr>
                <tr>
                  <td>
                    <button id="btnLeft" name="btnLeft"
onclick="moveLeft()">
                      Move Left
                    </button>
                  </td>
                  <td>
                    <button id="btnStop" name="btnStop"
onclick="stopMovement()">
                      Stop Movement
                    </button>
                  </td>
                  <td>
                    <button id="btnRight" name="btnRight"
onclick="moveRight()">
                      Move Right
                    </button>
                  </td>
                </tr>
                <tr>
                  <td></td>
                  <td>
                    <button id="btnBackward" name="btnBackward"
onclick="moveBackward()">
                      Move Backward
                    </button>
                  </td>
                  <td></td>
                </tr>
              </table>
            </td>
          </tr>
         <tr class="even">
           <th colspan="2">
             Email Notification
           </th>
         </tr>
         <tr>
           <td>
             Send Emails?
           </td>
           <xsl:if test="wc:SendEmail = 'true'">
             <td>
               <input type="checkbox"
                    class="storeuserData"
                    checked="checked"
                    name="sendEmail" />
             </td>
           </xsl:if>
           <xsl:if test="wc:SendEmail = 'false'">
             <td>
               <input type="checkbox"
                      class="storeuserData"
                      name="sendEmail" />
             </td>
           </xsl:if>
         </tr>
         <tr>
           <td>
              Email Address
           </td>
           <td>
             <input type="Text"
                    class="storeuserData"
                    name="emailAddress"
                    size="50"/>
             <xsl:attribute name="value">
               <xsl:value-of select="wc:EmailAddress"/>
             </xsl:attribute>
           </td>
         </tr>
         <tr class="even">
           <td></td>
           <td>
             <input type="submit" name="Save" Value="Save"
                onclick="saveEmail()"/>
           </td>
         </tr>
       </table>
     </form>

</xsl:template>
Each of the buttons on the Control Panel Web page is associated with a click event. The click event refers to the name of a JavaScript function, which is included at the top of the XSLT file. For example, when the user clicks the Left button, the moveLeft function (shown below) is called:
function moveLeft()
{
   saveInput();
}
The moveLeft function performs one action: it calls the saveInput function, which is shown as follows:
function saveInput()
{
   if (fLoaded)
   {
       var oPersist = document.all(sPersistObject);
       oPersist.setAttribute("sInterval", oPersist.value);
       oPersist.setAttribute("sRunning", feedRunning);
       oPersist.save(sStore);
   }
}
The saveInput function in turn triggers a postback and causes the HttpPostHandler to execute. The code for the HttpPostHandler reads the form data, and, based on the data posted, it moves the robot in the appropriate direction. The code for the HttpPostHandler is shown as follows:
[ServiceHandler(ServiceHandlerBehavior.Exclusive)]
public IEnumerator<ITask> HttpPostHandler(HttpPost post)
{
     Fault fault = null;
     NameValueCollection collection = null;

     //Read the data on the Web page form
     ReadFormData readForm = new ReadFormData(post.Body.Context);
    _utilitiesPort.Post(readForm);

     // Get the data on the Web page and store it in a collection variable
     yield return Arbiter.Choice(
         readForm.ResultPort,
        delegate(NameValueCollection col)
        {
           collection = col;
        },
        delegate(Exception e)
        {
           fault = Fault.FromException(e);
           LogError(null, "Error processing form data", fault);
        }
      );

     //Check for an error
     if (fault != null)
     {
         post.ResponsePort.Post(fault);
         yield break;
     }
     if (!string.IsNullOrEmpty(collection["Forward"]))
     {
         //Send a command to drive forward for no specific distance
        _drivePort.DriveRobot(new drive.DriveRobotRequest(6, "F", 0));
     }

     if (!string.IsNullOrEmpty(collection["Backward"]))
     {
         //Send a command to drive backward for no specific distance
        _drivePort.DriveRobot(new drive.DriveRobotRequest(6, "B", 0));
     }

     if (!string.IsNullOrEmpty(collection["Left"]))
     {
         //Send a command to drive Left for no specific distance
        _drivePort.DriveRobot(new drive.DriveRobotRequest(6, "L", 0));
     }

     if (!string.IsNullOrEmpty(collection["Right"]))
     {
         //Send a command to drive Right for no specific distance
        _drivePort.DriveRobot(new drive.DriveRobotRequest(6, "R", 0));
     }

     if (!string.IsNullOrEmpty(collection["Stop"]))
     {
         //Send a command to stop
        _drivePort.DriveRobot(new drive.DriveRobotRequest(6, "S", 0));
     }

     //Check for an error again
     if (fault != null)
     {
         post.ResponsePort.Post(fault);
         yield break;
     }

     //Return response saying everything was ok
     post.ResponsePort.Post(new HttpResponseType(HttpStatusCode.OK, _
          state, _transform));
     yield break;
}You can create the manifest file for the security monitor service by using the DSS Manifest Editor. Before you can do so, you must successfully compile the security monitor service because this creates the assemblies needed by the Manifest Editor.
Tip
When you open the DSS Manifest Editor, it caches a copy of each service assembly. If you make a change to your service that involves a partner service, you need to exit and re-enter the Manifest Editor before the change will be recognized.
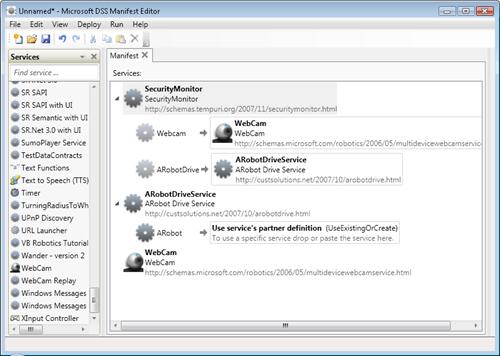
To begin, open the Manifest Editor and drag an instance of the SecurityMonitor service onto the design workspace. You then need to drag an instance of the WebCam service onto the node named Webcam and an instance of the ARobotDriveService service onto the node named ARobotDrive. When complete, the manifest should look like Figure 8-5.
You can then save the complete manifest to the code directory for the security monitor service. At this point, you are ready to run the service and obtain observations from the Web camera.