In Chapter 3, “Tooling Up,” we introduced the tools we will need for developing Android and iOS applications (apps). We introduced small projects to get some Assembly Language code running on such devices. In this chapter, we will look at how Assembly Language is more realistically incorporated into a smartphone or tablet app. We will first develop an app in Android, programming in Kotlin to demonstrate incorporating some Assembly Language, and then we will do the same thing using Swift for iOS.
The app will be simple; it will allow you to enter some text and convert that text to upper-case when you tap a button. This demonstrates a complete app where the calculation is performed in Assembly Language. After introducing the programming languages, we’ll use Android Studio to create our first app.
About Kotlin, Swift, and Java
Kotlin, Swift, and Java are advanced object-oriented programming languages that provide a high level of abstraction and expressiveness for programmers to be more productive, especially on large projects. The downside is that the resulting code may not run as fast as you need. Google and Apple recognize this and provide all the mechanisms to include C and Assembly Language modules in Android or iOS projects.
Creating an Android App
In this section, we let Android Studio do as much of the work as possible. It’s a powerful tool, so we’ll take advantage of it. In Chapter 3, “Tooling Up,” we used the fact that Android is based on Linux, to find the standard GNU tools in the Android SDK and built an Android application exactly like we built any other Linux application. However, Android is designed to run apps, rather than regular Linux programs.
All behave in a similar manner
Are easy to deploy from the Google Play store
Provide a good user experience
Most Android applications are written in either the Java or Kotlin programming languages. Both languages compile to a machine-independent format that is then run on a virtual machine runtime. This places them somewhere between fully compiled and fully interpreted languages. The benefit is to get some performance gain from being compiled while remaining machine independent, since they can run anywhere that the runtime is ported.
In Chapter 9, “Interacting with C and Python,” we learned how to call our Assembly Language routines and how it is simple to do if we follow the ARM function calling conventions. Java and Kotlin take a different approach to interacting with C and Assembly Language code; they want to make the C or Assembly Language code look like Java or Kotlin routines to the Java or Kotlin programmer. They require that a wrapper layer is created to translate between the Java or Kotlin and the C or Assembly Language worlds. In this chapter, we learn how to create such a wrapper for our shared library, so it can be used by Java or Kotlin programs.
Previously, we used the standard make tool to build our programs. Android Studio uses the Gradle build system to build the Kotlin and Java components, as well as to package the whole thing into an Android app package. However, CMake builds the C and Assembly Language portions of the project. These are both open source build systems, and like make, they define rules and dependencies to perform the build. We won’t go into the details of these systems, but will point out where we need to add our code, so it will be built correctly.
To demonstrate all of this, we will build a simple Android app where you enter text, and when you tap a button, the text will be displayed in upper-case. The user interface (UI) will be defined in XML and controlled by a Kotlin program, but the work of converting to upper-case will be handled by the trusty routine we developed in Chapter 6, “Functions and the Stack.” So, without further ado, let’s power up Android Studio.
Create the Project
- 1.
Run Android Studio.
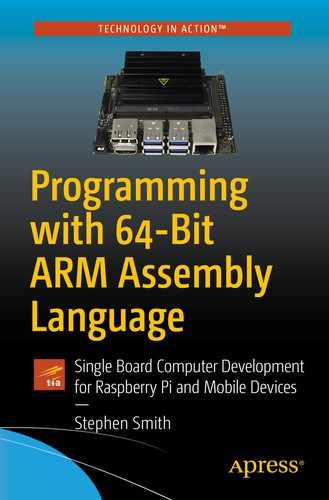
- 2.From the “New Project” dialog box, choose the project type as “Native C++” as shown in Figure 10-1.
 Figure 10-1
Select a “Native C++” project type
- 3.On the next dialog box, choose our project name, in our case “ToUpper”; keep the language as Kotlin and select “API21: Android 5.0 (Lollipop)” as the minimum API level. I chose this API level since it is the first one with 64-bit support. You may need to choose a different version depending on your requirements, as shown in Figure 10-2.
 Figure 10-2
Second screen in the new project wizard
- 4.
Click the “Next” button and accept the defaults on the third screen by clicking “Finish.” This creates an Android application with the main code generated in Kotlin and a single view as the UI. The project contains a C++ file which returns a hard-coded string to display in the UI. We can now build and run our app to ensure everything is installed and working correctly. Figure 10-3 shows the important files that were created.

Some of the files created by the wizard
Now we can start our app by creating our UI either by writing XML or using the Android Studio screen design tool.
XML Screen Definition

The UI in the screen design tool
The XML screen definition activity_main.xml for our app
An EditText control with id enterText, where you type the text to be converted to upper-case
A ViewText control with id convertedText to display the converted string
A Button with id convert and onClick convertMessage to trigger the conversion
Next, we look at the Kotlin part of the app.
Kotlin Main Program
Kotlin main program MainActivity.kt of our app
The new project wizard created a simple C++ shared object called native-lib and included the System.loadLibrary code to load it for us. We will add our Assembly Language code to this native-lib.
In the activity_main.xml file, we set the onClick event for the button to convertMessage. This connects the button to the convertMessage function in our main Kotlin file. This convertMessage function gets the text from the EditText control with id enterText, calls toupperJNI which is the wrapper function for our Assembly Language upper-case routine, and then places the result in the TextView with id convertedText.
Next, we’ll look at the C++ wrapper code.
The C++ Wrapper
C++ wrapper code in native-lib.cpp
Whenever JNI calls a native routine, the first two arguments are standard and give us access to C++ objects where we can call other functions or get relevant data. The third argument is our string we want converted. This is passed to us as a Java/Kotlin Unicode string. We use the GetStringUTFChars member of the env variable to convert it to a standard C ASCII string. Then we use NewStringUTF to convert our result to a Java/Kotlin string to return. The call to mytoupper should be familiar from Chapter 9, “Interacting with C and Python.” The “C” after the extern is important as it tells the compiler this is a straight C function with no C++ namespace decoration added. If you leave the “C” out, you will get a Function not found error from the linker.
That’s all the code we need, although we still need to add our code from Chapter 6, “Functions and the Stack,” to the project and make some changes to complete the build.
Building the Project
- 1.
Right-click the cpp folder and choose New File.
- 2.
We enter the name as upper.s to create a new empty file.
- 3.
Cut and paste our code from the upper.s file in Chapter 9, “Interacting with C and Python,” into this file and save it.
Now if we build, we will get a different set of error messages. To fix these, we need to make some changes to the CMake file.
By default, Assembly Language code isn’t allowed, so we must change a configuration setting to allow Assembly Language code. Android supports other processors than 64-bit ARM, so we need to tell the system that we want to build for this. By default, it builds for 32-bit ARM and this produces a lot of errors from the Assembler.
near the top after the cmake_minimum_required line. This allows the use of Assembly Language in the project.
to the defaultConfig section. If you have Assembly Language code for other processors, then you can specify which are which and allow more builds. For our purposes, we’ll restrict ourselves to 64-bit ARM.
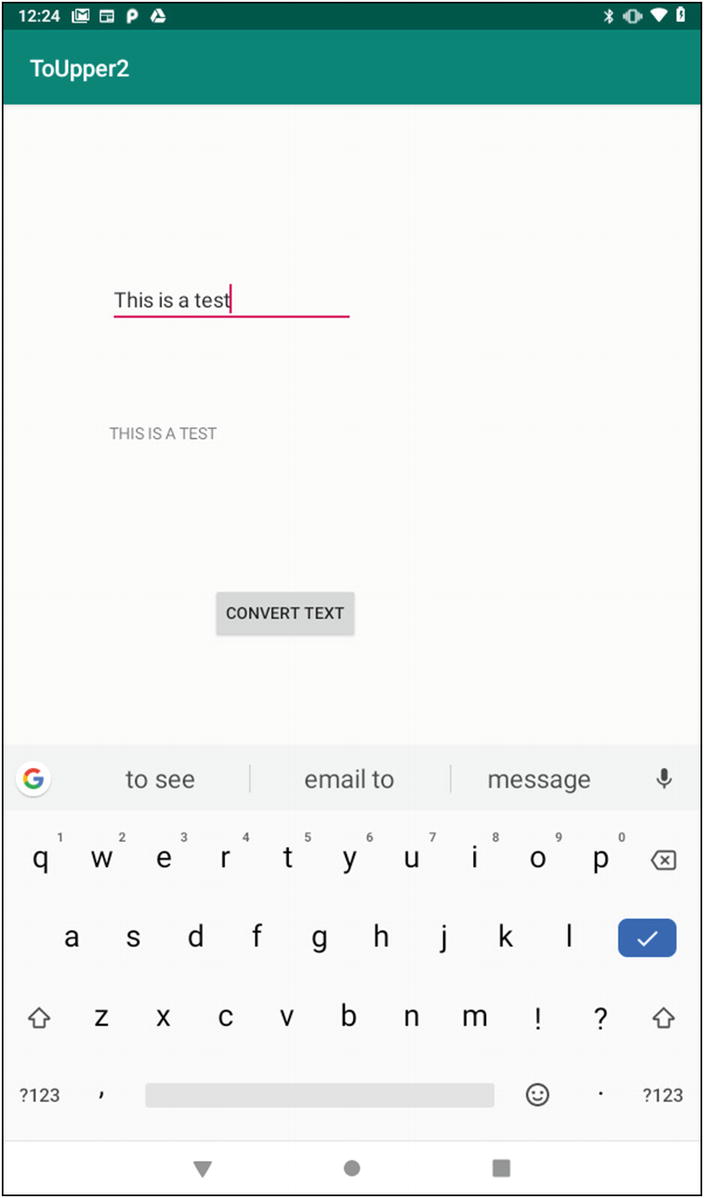
The Android app in action
That takes care of one of the major cell phone platforms; now let’s look at the other and develop the same app in Swift for iOS.
Creating an iOS App
For our iOS app, we’ll use Apple’s new Swift programming language. If we used the older Objective-C, calling our Assembly Language routine would be as shown in Chapter 9, “Interacting with C and Python,” since Objective-C is an object-oriented extension of C. Calling our Assembly Language routine from Swift is simpler than the Android case, since the tools in XCode generate the necessary “glue” code for us, so we don’t need to write our own like we did with JNI for Android.
XCode has its own build system, but fortunately we don’t need to worry about the details, as the build rules will be added correctly when we add our files to the IDE.
This tutorial focuses on adding Assembly Language code to a simple Swift app.
It is assumed the reader has some familiarity with creating a storyboard and connecting it to Swift code. This is easy in XCode, once you are familiar with how you connect UI elements to Swift code by holding down the Control key and dragging from one to the other.
Creating apps with XCode is fun, so let’s dive in.
Create the Project
- 1.
Select that you want to “Create a new XCode project” from the introductory screen.
- 2.
Select “Single View App” for iOS and click Next.
- 3.
Name the product “ToUpper”, choose the programming language as Swift and the user interface as “Storyboard,” and click Next.
- 4.
Select where you want the project files saved and click Create.
This gives us an empty project.
- 5.
Go to the “Signing & Capabilities” tab on the first screen and select the Team. You need this so that the app can be signed and run on a device.
Now that we have our project created, we’ll develop the UI screen.
Adding Elements to the Main Storyboard
- 1.
Click the Main Storyboard in the file explorer.
- 2.
Add a Text Field, a Button, and a Label control, laying them out as indicated in Figure 10-6 (you add controls by clicking the + button in the upper right of the XCode window).

Layout and matching Swift code for the app
Next, we connect our UI elements to some Swift code.
Adding Swift Code
- 1.
Create the definitions and names of the controls. We do this by creating Outlets. Control drag each control to the top of the ViewController code to create the outlet definitions. Name the outlets enterText, convertBtn, and convertedText. Now we can access our three controls from Swift code.
- 2.
Create a function to be called when the convertBtn is tapped. We do this by creating an Action. We do this by control dragging the button from the storyboard to below the constructor in the ViewController; call this action doConversion.
With this done, we can write our code to call our Assembly Language function. Listing 10-4 is the complete Swift code for the ViewController.
We only wrote the three lines of code inside the doConversion action function. The rest of the code was generated for us by XCode.
Swift source code for the ViewController
defines a buffer to place the resulting converted string in. CChar is Swift’s type to match normal C or Assembly Language ASCII strings. This syntax creates a buffer that is 255 characters long for us.
converts our output string to Unicode to display on our UI.
Adding our Assembly Language Routine
- 1.
Add a new file to the project. Choose the type as “Assembly File” and the name as upper.s (you need to scroll down to the Other category to find this).
- 2.
Cut and paste the code from Listing 10-4 into this file. You need to change the function name to _mytoupper. Many C compilers add an underscore character before each local function name.

The Assembly Language code added to the project
At this point, if we compile, we will get errors that mytoupper is undefined. We need to build a bridge between Swift and our code.
Creating the Bridge
C Header file definition of mytoupper
XCode and Swift have a tool that can read this file and then know how to create the correct code, when it compiles the Swift code to call it. However, we need to perform one more trick before this is connected.
Now, our routine will be callable from Swift.
Building and Running the Project

The app running on an iPhone 8
Tips for Optimizing Apps
- 1.
Write the app in the normal high-level language for that app’s development such as Kotlin or Swift.
- 2.
Identify parts of the programs that don’t provide adequate performance. Leave alone anything that already provides good performance.
- 3.
Try to rework the high-level code. Usually, using a better algorithm is all that’s needed, for instance, using a binary search rather than a linear search.
- 4.
If the problem can’t be addressed in the high-level language, rewrite the crucial part in C and call that.
- 5.
Again, rework the algorithm in C, but if that fails, consider Assembly Language.
- 6.
When you write it in Assembly Language, consider the ARM processor’s coprocessors. The NEON coprocessor can be especially helpful, and we will examine that in Chapter 13, “Neon Coprocessor.”
You want as much as your program as possible in the high-level language, as this is more portable across devices and more maintainable as you move from version to version.
Summary
This chapter was a quick taste of mobile app development to show how Assembly Language code can be incorporated into an app running on either Google’s Android or Apple’s iOS. All Apple mobile devices run 64-bit ARM processors these days, so our Assembly modules will run on any modern Apple iPhone or iPad. However, the Android world is a little bit more diverse with a few 32-bit ARM devices and a few Intel-based devices out there.
We wrote a Kotlin-based Android app to convert text to upper-case where we performed the upper-case conversion in Assembly Language. We then did the same thing in Swift to create an iOS app. We also looked at a strategy for optimizing applications, where we want to include as small amount of Assembly Language code as possible.
In the next chapter, we return to math and examine the ARM processor’s multiply, divide, and multiply with accumulate instructions.
Exercises
- 1.
Create an app in Android Studio to convert text to lower-case. Write it first entirely in Kotlin to get everything to work. Next, incorporate a lower-case routine written in C. Finally, swap out the C routine for a version written in Assembly Language.
- 2.
Create an app in XCode to convert text to lower-case. Write it first entirely in Swift to get everything to work. Next, incorporate a lower-case routine written in C. Finally, swap out the C routine for a version written in Assembly Language.