The ARM processor was originally developed by Acorn Computers in Great Britain, who wanted to build a successor to the BBC Microcomputer used for educational purposes. The BBC Microcomputer used the 6502 processor, which was a simple processor with a simple instruction set. The problem was there was no successor to the 6502. The engineers working on the Acorn computer weren’t happy with the microprocessors available at the time, since they were much more complicated than the 6502, and they didn’t want to make just another IBM PC clone. They took the bold move to design their own and founded Advanced RISC Machines Ltd. to do it. They developed the Acorn computer and tried to position it as the successor to the BBC Microcomputer. The idea was to use reduced instruction set computer (RISC) technology as opposed to complex instruction set computer (CISC) as championed by Intel and Motorola. We will talk at length about what these terms mean later.
Developing silicon chips is costly, and without high volumes, manufacturing them is expensive. The ARM processor probably wouldn’t have gone anywhere except that Apple came calling. They were looking for a processor for a new device under development—the iPod. The key selling point for Apple was that as the ARM processor was RISC, it used less silicon than CISC processors and as a result used far less power. This meant it was possible to build a device that ran for a long time on a single battery charge.
The Surprise Birth of the 64-Bit ARM
The early iPhones and Android phones were all based on 32-bit ARM processors. At that time, even though most server and desktop operating systems moved to 64 bits, it was believed that there was no need in the mobile world for 64 bits. Then in 2013, Apple shocked the ARM world by introducing the 64-bit capable A7 chip and started the migration of all iOS programs to 64 bits. The performance gains astonished everyone and caught all their competitors flat footed. Now, all newer ARM processors support 64-bit processing, and all the major ARM operating systems have moved to 64 bits.
Two benefits of ARM 64-bit programming are that ARM cleaned up their instruction set and simplified Assembly Language programming. They also adapted the code, so that it will run more efficiently on modern processors with larger execution pipelines. There are still a lot of details and complexities to master, but if you have experience in 32-bit ARM, you will find 64-bit programming simpler and more consistent.
However, there is still a need for 32-bit processing, for instance, Raspbian, the default operating system for the Raspberry Pi, is 32 bits, along with several real-time and embedded systems. If you have 1GB of memory or less, 32 bits is better, but once you have more than 1GB of RAM, then the benefits of 64-bit programming become hard to ignore.
Unlike Intel, ARM doesn’t manufacture chips; it just licenses the designs for others to optimize and manufacture. With Apple onboard, suddenly there was a lot of interest in ARM, and several big manufacturers started producing chips. With the advent of smartphones, the ARM chip really took off and now is used in pretty much every phone and tablet. ARM processors power some Chromebooks and even Microsoft’s Surface Pro X.
The ARM processor is the number one processor in the computer market. Each year the ARM processors powering the leading-edge phones become more and more powerful. We are starting to see ARM-based servers used in datacenters, including Amazon’s AWS. There are several ARM-based laptops and desktop computers in the works.
What You Will Learn
You will learn Assembly Language programming for the ARM running in 64-bit mode. Everything you will learn is directly applicable to all ARM devices running in 64-bit mode. Learning Assembly Language for one processor gives you the tools to learn it for another processor, perhaps, the forthcoming RISC-V, a new open source RISC processor that originated from Berkeley University. The RISC-V architecture promises high functionality and speed for less power and cost than an equivalent ARM processor.
In all devices, the ARM processor isn’t just a CPU; it’s a system on a chip. This means that most of the computer is all on one chip. When a company is designing a device, they can select various modular components to include on their chip. Typically, this contains an ARM processor with multiple cores, meaning that it can process instructions for multiple programs running at once. It likely contains several coprocessors for things like floating-point calculations, a graphics processing unit (GPU), and specialized multimedia support. There are extensions available for cryptography, advanced virtualization, and security monitoring.
Why Use Assembly
Most programmers write in a high-level programming language like Python, C#, Java, JavaScript, Go, Julia, Scratch, Ruby, Swift, or C. These highly productive languages are used to write major programs from the Linux operating system to web sites like Facebook, to productivity software like LibreOffice. If you learn to be a good programmer in a couple of these, you can find a well-paying interesting job and write some great programs. If you create a program in one of these languages, you can easily get it working on numerous operating systems on multiple hardware architectures. You never have to learn the details of all the bits and bytes, and these can remain safely under the covers.
- 1.
To write more efficient code: Even if you don’t write Assembly Language code, knowing how the computer works internally allows you to write more streamlined code. You can make your data structures easier to access and write code in a style that allows the compiler to generate more effective code. You can make better use of computer resources, like coprocessors, and use the given computer to its fullest potential.
- 2.
To write your own operating system: The core of the operating system that initializes the CPU and handles hardware security and multithreading/multitasking requires Assembly code.
- 3.
To create a new programming language: If it is a compiled language, then you need to generate the Assembly code to execute. The quality and speed of your language is largely dependent on the quality and speed of the Assembly Language code it generates.
- 4.
To make your computer run faster: The best way to make Linux faster is to improve the GNU C compiler. If you improve the ARM 64-bit Assembly code produced by GNU C, then every program compiled by GCC benefits.
- 5.
To interface your computer to a hardware device: When interfacing your computer through USB or GPIO ports, the speed of data transfer is highly sensitive as to how fast your program can process the data. Perhaps, there are a lot of bit level manipulations that are easier to program in Assembly.
- 6.
To do faster machine learning or three-dimensional (3D) graphics programming: Both applications rely on fast matrix mathematics. If you can make this faster with Assembly and/or using the coprocessors, then you can make your AI-based robot or video game that much better.
- 7.
To boost performance: Most large programs have components written in different languages. If your program is 99% C++, the other 1% could be Assembly, perhaps giving your program a performance boost or some other competitive advantage.
- 8.
To manage single board computer competitors to the Raspberry Pi: These boards have some Assembly Language code to manage peripherals included with the board. This code is usually called a BIOS (basic input/output system).
- 9.
To look for security vulnerabilities in a program or piece of hardware: Look at the Assembly code to do this; otherwise you may not know what is really going on and hence where holes might exist.
- 10.
To look for Easter eggs in programs: These are hidden messages, images, or inside jokes that programmers hide in their programs. They are usually triggered by finding a secret keyboard combination to pop them up. Finding them requires reverse engineering the program and reading Assembly Language.
Tools You Need
A text editor
Some optional specialty programs
Raspberry Pi 4 or NVidia Jetson Nano
The Raspberry Pi 4 with 4GB of RAM is an excellent computer to run 64-bit Linux. If you use a Raspberry Pi 4, then you need to download and install a 64-bit version of Linux. These are available from Kali, Ubuntu, Gentoo, Manjaro, and others. I find Kali Linux works very well and will be using it to test all the programs in this book. You can find the Kali Linux downloads here: www.offensive-security.com/kali-linux-arm-images/. Although you can run 64-bit Linux on a Raspberry Pi 3 or a Raspberry Pi 4 with 1GB of RAM, I find these slow and bog down if you run too many programs. I wouldn’t recommend these, but you can use them in a pinch.
The NVidia Jetson Nano uses 64-bit Ubuntu Linux. This is an excellent platform for learning ARM 64-bit Assembly Language. The Jetson Nano also has 128 CUDA graphics processing cores that you can play with.
GNU Compiler Collection (GCC) that we will use to build our Assembly Language programs. We will use GCC for compiling C programs in later chapters.
GNU Make to build our programs.
GNU Debugger (GDB) to find and solve problems in our programs.
Text Editor
You will need a text editor to create the source program files. Any text editor can be used. Linux usually includes several by default, both command line and via the GUI. Usually, you learn Assembly Language after you’ve already mastered a high-level language like C or Java. So, chances are you already have a favorite editor and can continue to use it.
Specialty Programs
The Android SDK
Apple’s XCode IDE
A better code analysis tool, like Ghidra, which we will discuss in Chapter 15, “Reading and Understanding Code”
All of these are either open source or free, but there may be some restrictions on where you can install them.
Now we will switch gears to how computers represent numbers. We always hear that computers only deal in zeros and ones; now we’ll look at how they put them together to represent larger numbers.
Computers and Numbers
There is nothing special about using 10 as our base, and a fun exercise in math class is to do arithmetic using other bases. In fact, the Mayan culture used base 20, perhaps because we have 20 digits: ten fingers and ten toes.
This is extremely efficient for computers, but we are using four digits for the decimal number 11 rather than two digits. The big disadvantage for humans is that writing, or even keyboarding, binary numbers is tiring.
Computers are incredibly structured, with their numbers being the same size in storage used. When designing computers, it doesn’t make sense to have different sized numbers, so a few common sizes have taken hold and become standard.

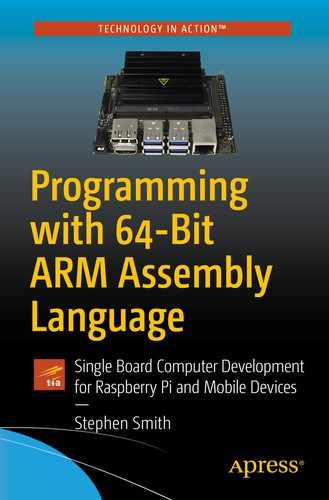
Representing hexadecimal digits
We call a 32-bit quantity a word and it is represented by 4 bytes. You might see a string like B6 A4 44 04 as a representation of 32 bits of memory, or one word of memory, or the contents of one register. Even though we are running 64 bits, the ARM reference documentation refers to a word as 32 bits, a halfword is 16 bits, and a doubleword is 64 bits. We will see this terminology throughout this book and the ARM documentation.
If this is confusing or scary, don’t worry. The tools will do all the conversions for you. It’s just a matter of understanding what is presented to you on screen. Also, if you need to specify an exact binary number, usually you do so in hexadecimal, although all the tools accept all the formats.
The Gnome calculator
This is how we represent computer memory. There is a bit more complexity in how signed integers are represented and how arithmetic works. We’ll cover this in Chapter 2, “Loading and Adding.”
In the Assembler we represent hexadecimal numbers (hex for short) with a 0x in front, so 0x1B is how to specify the hex number 1B.
ARM Assembly Instructions
In this section, we introduce some basic architectural elements of the ARM processor and start to look at the form of its machine code instructions. The ARM is what is called a RISC computer, which theoretically will make learning Assembly easier. There are fewer instructions and each one is simple, so the processor can execute each instruction quickly.
Interacting with other programming languages
Accessing hardware devices
Instructions for the floating-point processor
Instructions for the NEON processor
In technical computer topics, there are often chicken and egg problems in presenting the material. The purpose of this section is to introduce all the terms and ideas we will use later. Hopefully, this introduces all the terms, so they are familiar when we cover them in full detail.
CPU Registers
In all computers, data is not operated in the computer’s memory; instead it’s loaded into a CPU register, then the data processing or arithmetic operation is performed in the registers. The registers are part of the CPU circuitry allowing instant access, whereas memory is a separate component and there is a transfer time for the CPU to access it.
- 1.
Instructions that either load memory into registers or instructions that store data from registers into memory
- 2.
Instructions that perform arithmetical or logical operations between two registers
- 1.
Load one into one register and the other into another register.
- 2.
Perform the add operation putting the result into a third register.
- 3.
Copy the answer from the results register into memory.
As you can see, it takes quite a few instructions to perform simple operations.
X0–X30: These 31 registers are general purpose; you can use them for anything you like, though some have standard agreed-upon usage that we will cover later.
SP, XZR: The stack pointer or zero register depending on the context.
X30, LR: The link register. If you call a function, this register will be used to hold the return address. As this is a common operation, you should avoid using this register for other things.
PC: The program counter. The memory address of the currently executing instruction.
We don’t always need the full 64 bits of data in a register. Often 32 bits is fine. All the X registers can be operated on as 32-bit registers by referring to them as W0–W30 and WZR. When we do this, the instruction will use the lower 32 bits of the register and set the upper 32 bits to zero. Using 32 bits saves memory, since you only use 4 bytes rather than 8 bytes for each quantity saved. Most loop counters and other common variables used in programming easily fit in 4 bytes, so this is made easy by the processor.
There are a large set of registers for the coprocessors, but we’ll cover these when we get to programming these coprocessors in Chapter 12, “Floating-Point Operations,” and Chapter 13, “Neon Coprocessor.”
ARM Instruction Format
Each ARM binary instruction is 32 bits long. Fitting all the information for an instruction into 32 bits is quite an accomplishment requiring using every bit to tell the processor what to do. There are quite a few instruction formats, and it can be helpful to know how the bits for each instruction are packed into 32 bits. Since there are 32 registers (the 31 general-purpose registers plus the stack pointer (SP)/zero register (XZR)), it takes 5 bits to specify a register. Thus, if you need three registers, then 15 bits is taken up specifying these.
Having small fixed length instructions allows the ARM processor to load multiple instructions quickly. It doesn’t need to start decoding an instruction to know how long it is and hence where the next instruction starts. This is a key feature to allowing processing parallelism and efficiency.
Each instruction that takes registers can either use the 32-bit W version or the 64-bit Z version. To specify which is the case, the high bit of each instruction specifies how we are viewing the registers.
All the registers in a single instruction need to be the same—you can’t mix W and Z registers.

Instruction format for data processing instructions
Bits: If this bit is zero, then any registers are interpreted as the 32-bit W version. If this bit is one, then they are the full 64-bit X version of the register.
Opcode: Which instruction are we performing, like ADD or MUL.
Shift: These two bits specify shifting operations that could be applied to the data.
Set condition code: This is a single bit indicating if this instruction should update any condition flags. If we don’t want the result of this instruction to affect following branch instructions, we would set it to 0.
Rm, Rn: Operand registers to use as input.
Rd (destination register): Where to put the result of whatever this instruction does.
Imm6: An immediate operand which is usually a small bit of data that you can specify directly in the instruction. So, if you want to add 1 to a register, you could have this as 1, rather than putting 1 in another register and adding the two registers. These are usually the bits left over after everything else is specified.
When things are running well, each instruction executes in one clock cycle. An instruction in isolation takes three clock cycles, namely, one to load the instruction from memory, one to decode the instruction, and then one to execute the instruction. The ARM is smart and works on three instructions at a time, each at a different step in the process, called the instruction pipeline. If you have a linear block of instructions, they all execute on average taking one clock cycle.
In modern ARM processors, the execution pipeline is much more sophisticated and can be working on more than three instructions at a time. Some instructions like integer division take longer, and if the following instructions don’t rely on the result, then these instructions can execute in parallel to the division process. Other instructions might stall, for instance, when waiting for memory to be loaded, again the process can perform other instructions that don’t depend on the result while the memory controller fetches the memory—this is called out-of-order execution.
Computer Memory
Programs are loaded from the computer’s disk drive device into memory and executed. The memory holds the program, along with any data or variables associated with it. This memory isn’t as fast as the CPU registers, but it’s much faster than accessing data stored on an SSD drive or CF card.
Memory addresses are specified using 64 bits.
The CPU registers are each 64 bits wide and perform 64-bit integer arithmetic.
Instructions are 32 bits in size. The intent is to keep these as small as possible, so the ARM processor can execute them quickly and efficiently. This is true when the ARM processor runs in either 32-bit or 64-bit mode.
If we want to load a register from a known 64-bit memory address, for example, a variable we will use in a computation, how do we do this? The instruction is only 32 bits in size, and we’ve already used 8 bits for the opcode. We need 5 bits to specify one register, so we have left 19 bits for the memory address (14 bits if we needed to list two registers).
This is a problem that we’ll come back to several times, since there are multiple ways to address it. In a CISC computer, this isn’t a problem since instructions are typically quite large and variable in length.
You can load from memory by using a register to specify the address to load. This is called indirect memory access. But all we’ve done is move the problem, since we don’t have a way to put the value into that register (in a single instruction).
You could load several registers, each with part of the address, then shift the parts around, and then add them together. This is a lot of instructions to load an address, which seems rather inefficient.
The quick way to load memory that isn’t too far away from the program counter (PC) register is to use the load instruction via the PC, since it allows a 12-bit offset from the register. This looks like you can efficiently access memory within 4096 words of the PC. Yuck, how would you write such code? This is where the GNU Assembler comes in. It lets you specify the location symbolically and will figure out the offset for you.
In Chapter 2, “Loading and Adding,” we will look at the immediate operand in more detail. We will cover many more ways to specify memory addresses in future chapters, like asking Linux to give us a block of memory, returning the address in a register for us. For now, using the PC with an offset meets our needs.
About the GCC Assembler
The label: part is optional and only required if you want the instruction to be the target of a branch instruction.
ADD for addition
LDR for load a register
B for branch
There are quite a few different formats for the operands. We will cover those as we cover the instructions that use them.
Hello World
The Hello World program
This is our first look at a complete Assembly Language program, so there are a few things to talk about. But, first, let’s compile and run this program.
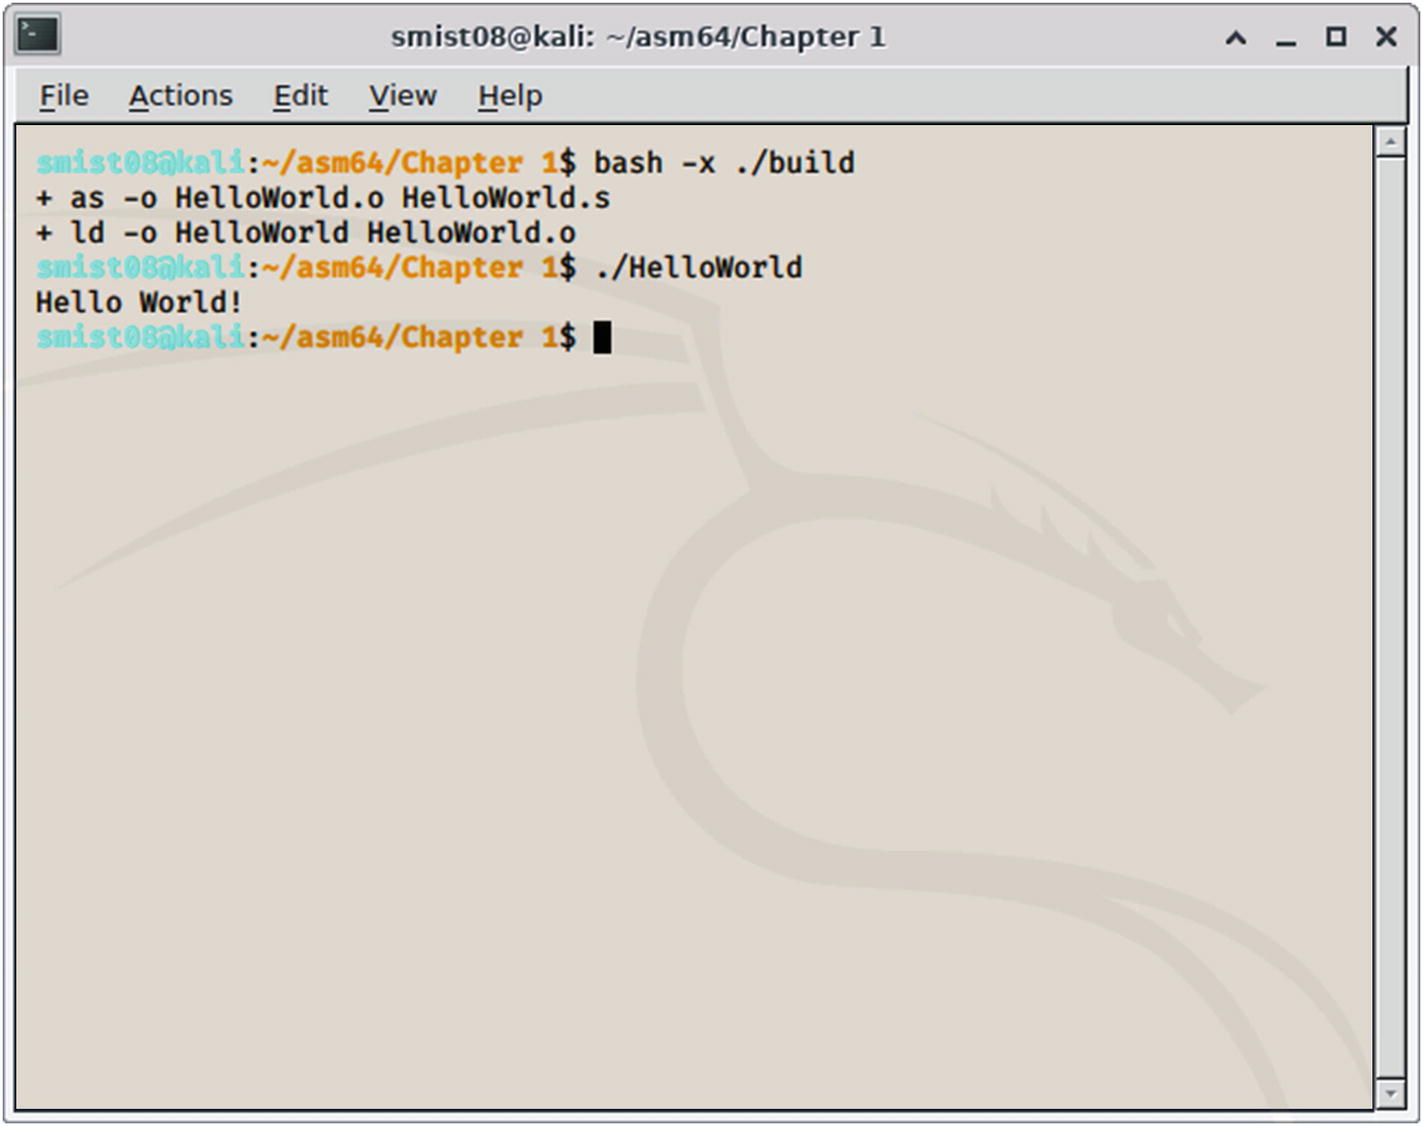
Building and executing HelloWorld
Notice how small these files are. The executable is only 1104 bytes, about 1 kilobyte. This is because there is no runtime, or any other libraries required to run this program; it is entirely complete in itself. If you want to create very small executables, Assembly Language programming is the way to go.
Optional statement label
Opcode
Operands
Comment
These are all separated by tabs, so they line up nicely.
Yay, our first working Assembly Language program. Now, let’s talk about all the parts.
About Comments
Whenever you see double slashes //, then everything after the “//” is a comment. That means it is there for documentation and is discarded by the GNU Assembler when it processes the file.
Assembly Language is cryptic, so it’s important to document what you are doing. Otherwise, you will return to the program after a couple of weeks and have no idea what the program does.
Each section of the program has a comment stating what it does and then each line of the program has a comment at the end stating what it does. Everything between a /∗ and ∗/ is also a comment and will be ignored.
This is the same as comments in C/C++ code. This allows us to share some tools between C and Assembly Language.
Where to Start
We need to define this as a global symbol, so that the linker (the ld command in our build file) has access to it. The Assembler marks the statement containing _start as the program entry point; then the linker can find it because it has been defined as a global variable. All our programs will contain this somewhere.
Our program can consist of multiple .s files, but only one file can contain _start.
Assembly Instructions
- 1.
MOV, which moves data into a register. In this case we use an immediate operand, which starts with the “#” sign. So “MOV X2, #13” means move the number 13 into X2. In this case, the 13 is part of the instruction and not stored somewhere else in memory. In the source file, the operands can be upper- or lower-case. I tend to prefer lower-case in my program listings.
- 2.
“LDR X1, =helloworld” statement that loads register X1 with the address of the string we want to print.
- 3.
SVC 0 command that executes software interrupt number 0. This branches to the interrupt handler in the Linux kernel, which interprets the parameters we’ve set in various registers and does the actual work.
Data
In this we have a label “helloworld” followed by an .ascii statement, then the string we want to print.
The .ascii statement tells the Assembler just to put our string in the data section; then we can access it via the label as we do in the LDR statement. We’ll talk later about how text is represented as numbers, the encoding scheme here being called ASCII.
The last “ ” character is how we represent a new line. If we don’t include this, you must press return to see the text in the terminal window.
Calling Linux
- 1.
stdout (output to the screen)
- 2.
stdin (input from the keyboard)
- 3.
stderr (also output to the screen)
The Linux shell will redirect these when you use >, <, and | in your commands. For any Linux system call, you put the parameters in registers X0–X7 depending on how many parameters are needed. Then a return code is placed in X0 (we should check this to see if an error occurred, but we are bad and don’t do any error checking). Each system call is specified by putting its function number in X8.
The reason we do a software interrupt rather than a branch or subroutine call is so we can call Linux without needing to know where this routine is in memory. This is rather clever and means we don’t need to change any addresses in our program as Linux is updated and its routines move around in memory. The software interrupt has another benefit of providing a standard mechanism to switch privilege levels. We’ll discuss Linux system calls later in Chapter 7, “Linux Operating System Services.”
Reverse Engineering Our Program
Disassembly of Hello World
The top part of the output shows the raw data in the file including our eight instructions, then our string to print in the .data section. The second part is a disassembly of the executable .text section.

Binary representation of the first MOV instruction
The first bit is 1, meaning use the 64-bit version of the registers, in this case X0 rather than W0.
The third bit is 0, which means that this instruction doesn’t set any flags that would affect conditional instructions.
The second bit combined with the fourth to ninth bits make up the opcode for this MOV instruction. This is move wide immediate, meaning it contains a 16-bit immediate value.
The next 2 bits of 0 indicate there is no shift operation involved.
The next 16 bits are the immediate value which is 1.
The last 5 bits are the register to load. These are 0 since we are loading register X0.
This is the Assembler helping you with the ARM processor’s obscure mechanism of addressing memory. It lets you specify a symbolic address, namely, “helloworld,” and translate that into an offset from the program counter. Here the disassembler is trying to be helpful to indicate which memory address will be loaded, rather than the exact Assembly code. The details are a bit more complicated, and we’ll cover them in detail in Chapter 5, “Thanks for the Memories.”
You might notice that the raw instructions in the top part of the output have their bytes reversed, compared to those listed in the disassembly listing. This is because we are using a little-endian encoding, which we will cover in the next chapter.
Summary
In this chapter, we introduced the ARM processor and Assembly Language programming along with why we want to use Assembly. We covered the tools we will be using. We also saw how computers represent positive integers.
We then looked at in more detail how the ARM CPU represents Assembly instructions along with the registers it contains for processing data. We introduced both the computer’s memory and the GNU Assembler that will assist us in writing our Assembly Language programs.
Finally, we created a simple complete program to print “Hello World!” in our terminal window.
In Chapter 2, “Loading and Adding,” we will look at loading data into the CPU registers and performing basic addition. We’ll see how negative numbers are represented and learn new techniques for manipulating binary bits.
Exercises
- 1.
Convert the decimal number 1234 to both binary and hexadecimal.
- 2.
Download the source code for this book from the GitHub site and compile the HelloWorld program on your ARM system.
- 3.
Change the string in HelloWorld, but remember to change the length loaded into X2.
- 4.
In the HelloWorld program, change the return code loaded into X0 before the second SVC call and see what happens.
- 5.
Since HelloWorld is a standard Linux program using standard Linux conventions, you can use it with other shell commands. Try redirecting the output to a file with “./HelloWorld > myfile.txt” and piping the output to another Linux command such as “./HelloWorld | grep -I wor”.
- 6.
Estimate how many Assembly Language commands are in a 32K executable. The Linux kernel is about 5.1MB in size. If the Linux kernel was written in Assembly Language, how many instructions would that be?