What if I tell you that you can build a web app, connect to a device that supports Bluetooth Low Energy, and have control over it from your web application? What if a user’s login credentials are kept in the browsers safely, and when users access the website, they are automatically signed in? What if a login to a web application needs a device connected via USB to authenticate a user? What if I can access share options on a native platform via a JavaScript API within our browser? I know what you might be thinking now; but even though these all sounded like dreams 10 years ago, today most of them are achievable or at least close to becoming realities.
For the past decade, much of the web has evolved significantly. New web APIs allow developers to connect web applications to hardware via Bluetooth and USB. Online payment has never been easier than it is today. Single sign-on and password-less solutions have brought a much better user experience with minimal effort. Developing a cross-platform via the same API across all devices and operating systems was very difficult whereas, today, it’s such a pleasant way to develop and build a web application – especially Progressive Web Apps (PWAs) since a lot of new APIs have been standardized that provide a high-level JavaScript API in our browsers to gain access to underlying low-level APIs of the platform.
In this chapter, I have chosen a few new technologies and APIs to explore and integrate with PWA note apps such as Credential Management, Payment Request, Geolocation, Media Streams, Web Bluetooth, and Web USB. I will ensure that the fundamentals of these APIs will be covered. However, you may need to develop additional ones for your applications based on your needs and requirements.
Additionally, I would suggest keeping an eye on Web Share, Web VR/AR, Background fetch, Accessibility improvement, Web Assembly, and many more new standards that are either under development or under consideration and will empower the web, especially by building a PWA.
Credential Management
The Credential management API is a Promised-based standard browser API that facilitates seamless sign-ins across devices by providing an interface between the website and the browser. This API allows the user to sign in with one tab via an account chooser and helps to store credentials in the browsers by which can be synced across devices. This helps that user who has signed in to one browser already – he or she can then stay logged in to all other devices as well if they use the same browser.
This API not only works with native-browser password management, but it can also provide information about credentials from a federated identity provider. What it means is this: any entity that a website trusts to correctly authenticate a user and provide an API for that purpose can be a provider in this API to store the credential and retrieve it if necessary. For example, Google Account, GitHub, Twitter, Facebook, or OpenID Connect are examples of a federated identity provider framework.
Keep in mind that this API will only work when the origin is secure; in other words, similar to PWA, your website must run on HTTPS.
Let’s start implementing in an Angular project and see how it works.
- 1.
A feature detection when service is initialized to ensure this API is available.
if (window.PasswordCredential || window.FederatedCredential) {}
- 2.store method :
- A)
Accepts username and password, and therefore we can create a password credential where it’ll be ready to store in credentials. PasswordCredential constructor accepts both HTMLFormElement and an object of essential fields. If you want to pass in the HTMLFormElement, make sure your form contains at least an ID and Password as well as CSRF token. In the method, the call constructor with ID, which is a username and password. name and iconURL, are names of the user that is signing in and the user’s avatar image, respectively and optionally. Keep in mind that we run this code if the feature is available; otherwise we let the user work with the application normally.
Since we are building a PWA, it is always important to provide an alternative for those users whose browser of choice doesn’t support features that are being used.
- B)
If you are going to use third-party login, you must call FederatedCredential constructor with an id as well as provider endpoint.
- C)
Credentials API is available on navigator, the store function is Promised-based and by calling that, we can save user credentials in the browser.
- D)
Finally, we show a message to the user in order to inform them that we store their password in the browser.
- A)
- 3.
get method :
After feature detection is checked, we call get on navigation.credentials by passing in the configuration such as password, mediation. Mediation defines how we want to tell the browser to show the account chooser to user, which has three values: optional, required, and silent. When mediation is optional, the user is explicitly shown an account chooser to sign in after a navigator.credentials.preventSilentAccess() was called. This is normally to ensure automatic sign-in doesn’t happen after the user chooses to sign out or unregister.
Once navigator.credentials.get() resolves, it returns either an undefined or a credential object. To determine whether it is a PasswordCredential or a FederatedCredential, simply look at the type property of the object, which will be either password or federated. If the type is federated, the provider property is a string that represents the identity provider.
- 4.
preventSilentAccess method :
We call preventSilentAccess() on navigator.credentials. This will ensure the auto sign-in will not happen until next time the user enables auto sign-in. To resume auto sign-in, a user can choose to intentionally sign in by choosing the account they wish to sign in with, from the account chooser. Then the user is always signed back in until they explicitly sign out.
To continue with UserContainerComponent, we will first inject this service, then will define my autoSignIn method and will call that on ngOnInit. On both the signup and login methods, we will call the store method from the credential service to save and update the user credential.
Note
Clone https://github.com/mhadaily/awesome-apress-pwa.git and go to Chapter 12, 01-credential-management-api folder to find all sample codes.

Autocomplete attribute allows browser to show appropriate username and password for the website
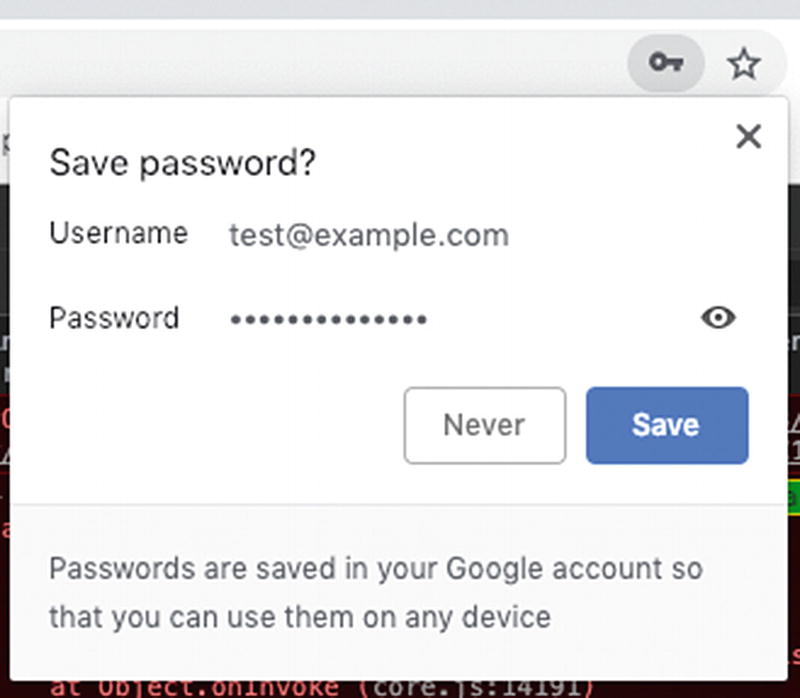
Credential prompt when web app wants to save credential in the browser
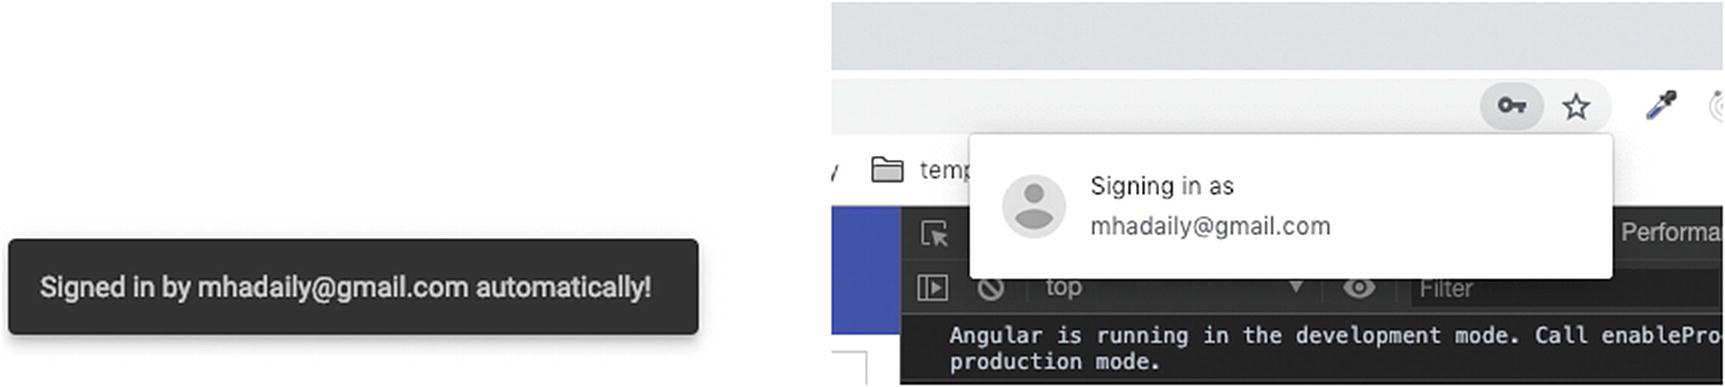
The website snackbar message and a message from browser itself after automatic sign-in occurs
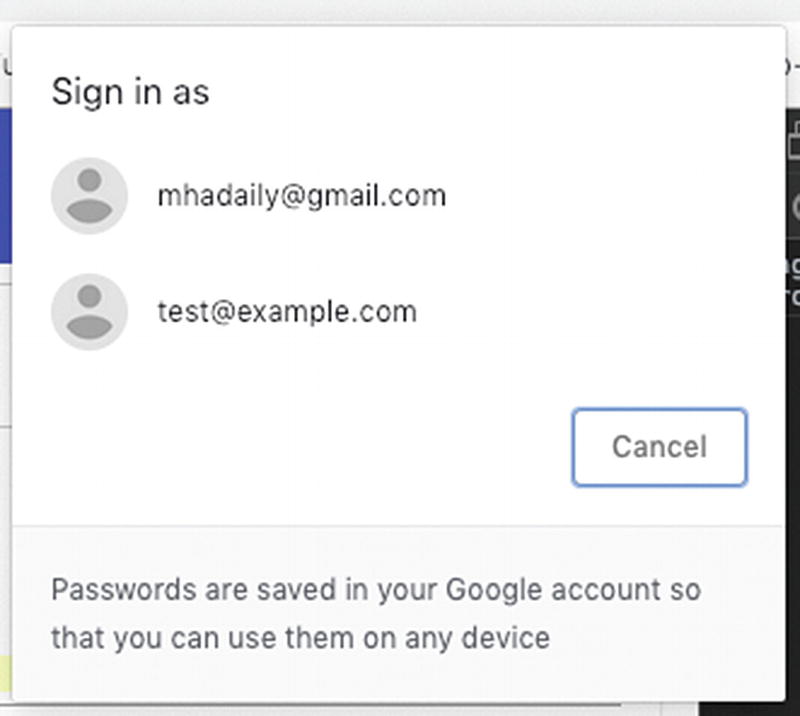
The account chooser if mediation is optional or required
Browsers Support
By the time of writing this book, Chrome on Desktop and for Android, Android browser, Opera for desktop and mobile, and Samsung internet browser support this API; and it currently under consideration for Firefox. MS Edge is moving to a Chromium platform and this API should be covered soon.
Payment Request
There is a high probability that all of us reading this book have made a payment on the web – at least once. So we all know that how time consuming, and boring it is to fill out the checkout forms, especially if it has more than one step.
The payment request standard API is developed by W3C to ensure the online payment system for both consumers and merchants remains consistent and smooth with minimal effort. This is not a new way of payment; rather, it’s a way that aims to make the checkout process easier.
With this API, consumers always see a native platform UI when they want to select payment details such as shipping address, credit card, contact details, etc. Imagine that once you save all of the information in your browsers, you can simply just reuse them in every single checkout page where this API is supported. How pleasant an experience it will be: ignore the filling out of lots of fields in a checkout form, credit card information, and more. Instead we will be seeing saved information consistently with a familiar native UI. Just a few clicks or tabs to select, and it’s done!
Another advantage of this API is to accept different payment methods from a variety of handlers to the web with relatively easy integration: for example, Apple Pay, Samsung Pay, Google Pay.
Long story short, I am going to add a donation button in the PWA note app.
- 1.As always, a feature detection for progressive enhancement.if (window.PaymentRequest) {this.isWebPaymentSupported = true;} else {this.isWebPaymentSupported = false;}
- 2.For each payment, you need to construct a PaymentRequest that accepts three arguments.new PaymentRequest(this.supportedPaymentMethods,this.paymentDetails,this.requestPaymentOptions);
- 3.Define supportedPaymentMethods , which is an array of all supported payment methods. In the code example, I have just defined a basic card; however, in this chapter’s sample codes, you will find more methods such as Apple Pay, Google Pay, and Samsung Pay. You are not also limited to them; you can implement any favorite methods such as PayPal, Stripe, and more that support this API.private supportedPaymentMethods = [{// support credit card paymentsupportedMethods: 'basic-card',data: {// you can add more such as discover, JCB and etc.supportedNetworks: ['visa', 'mastercard', 'amex'],supportedTypes: ['credit', 'debit']}},]Each object in this array has supportedMethods and data property that is specific for the method itself. To have a better understanding, I’ll provide an Apple Pay object as an example, too:{supportedMethods: 'https://apple.com/apple-pay',data: {version: 3,merchantIdentifier: 'merchant.com.example',merchantCapabilities: ['supports3DS', 'supportsCredit', 'supportsDebit'],supportedNetworks: ['amex', 'discover', 'masterCard', 'visa'],countryCode: 'US'}},
- 4.In Define paymentDetails , for instance, in my example, I have a fixed donation number; however, you may have a cart page with different products and other details that need to be added to payment details accordingly.private paymentDetails: any = {total: {label: 'Total Donation',amount: { currency: 'USD', value: 4.99 }},displayItems: [{label: 'What I recieve',amount: { currency: 'USD', value: 4.49 }},{label: 'Tax',amount: { currency: 'USD', value: 0.5 }}]};
There are two main properties: total indicates total amount; and displayItems, which is an array that shows cart items.
- 5.Define requestPaymentOptions is optional; however, you may find it very useful for different purposes – for instance, if a shipping address is required or email must be provided.private requestPaymentOptions = {requestPayerName: true,requestPayerPhone: false,requestPayerEmail: true,requestShipping: false,shippingType: 'shipping'};
In this example, we ask the payer to provide an email and name only.
- 6.Last but not least, we show call show method on requestPayment in order to display the payment native prompt page.async show(): Promise<any> {const canMakePayment = await this.canMakePaymentPromise;if (canMakePayment) {try {const response = await this.requestPayment.show();const status = await this.processResponseWithBackend(response);response.complete(status.success);return status.response;} catch (e) {return false;}}}
There is another Promised-based method on requestPayment called canMakePayment(), which is essentially a helper to determine if the user has a supported payment method to make this payment before show() gets called. It may not be in all user agents; therefore, we need to feature detect.
Then we call show() , once the user is done, and Promise will get resolved with the user’s selection details including contact information, credit card, shipping, and more. Now it’s time to validate and process the payment with the back end.
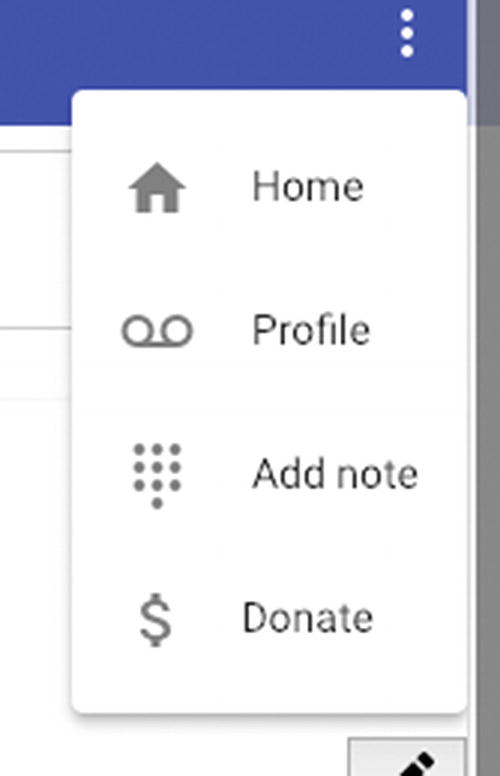
Donate button where it triggers payment native UI

Payment native UI, Chrome, Mac

Apple pay in Safari, Chrome, and Samsung internet browser display native payment UI
Note
Clone https://github.com/mhadaily/awesome-apress-pwa.git and go to Chapter 13, 02-request-payment-api folder to find all sample codes.
Browsers Support
By the time of writing this book, almost all major browsers support this API either in production or a nightly build for both desktop and mobile, although they may also support them partially.
Video and Audio Capturing
The Media Streams is an API related to WebRTC, which provides support for streaming audio and video data. This API has been around for a while. New Promised-based getUserMedia() is a method that ask for user permission for microphone and camera; and, thus, you will get access to the live stream.
In this section, we will add a new feature to “add note” page, where users can save an interactive video with audio to their notes.
Note, we will not send this video to a server in this example, but the implementation will be ready to communicate to the back end in order to save the video and audio if needed.

Browser asks for permission for camera and microphone
Once permission is granted, Promise gets resolved and the stream will be accessible (see Figure 12-9). When user clicks on tab “start recording” button, MediaRecorder constructor gets called with the live stream data and the options that gave already been defined.
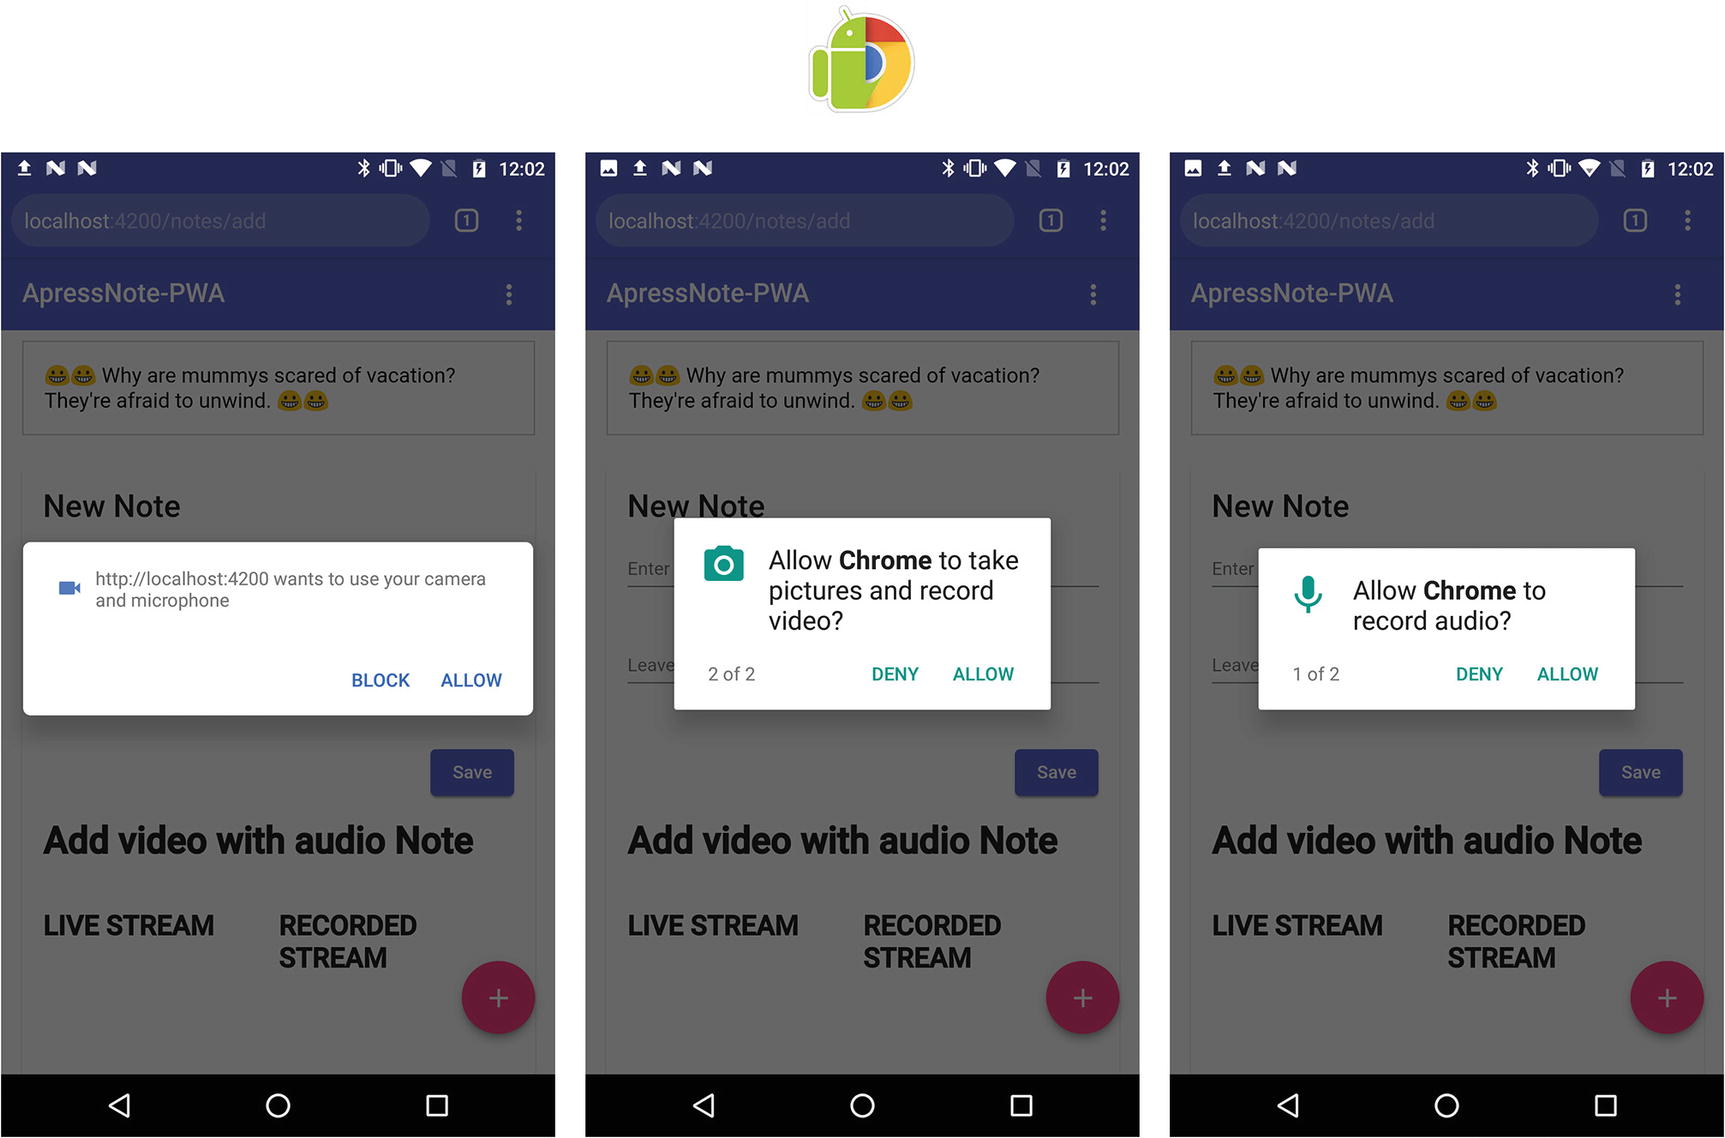
Ask for permission for getting access to video and audio on Android mobile
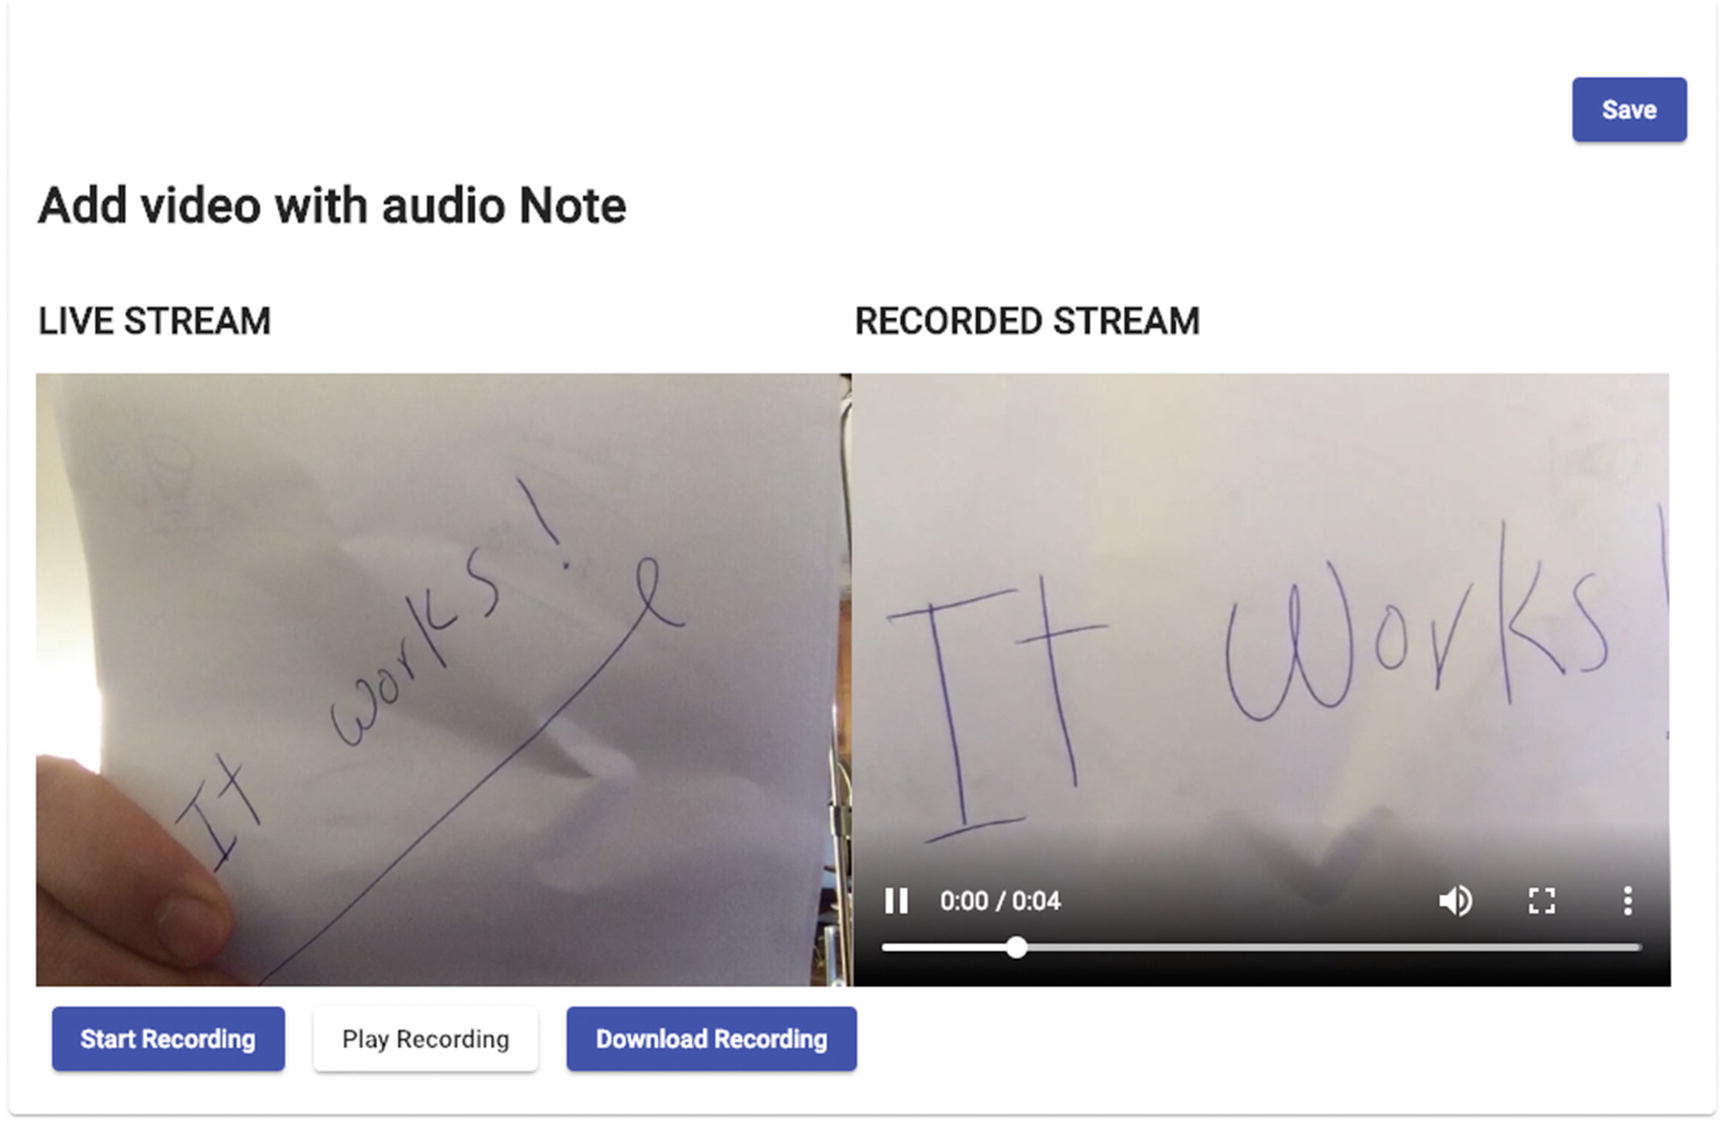
Live stream and recorded playback
By the tab or click on “Download“ button, we will create a Blob from an array of recordedBlob and then will create a URL and assign to <a> tag thatI have defined in the template with display: none and then call click() to force browser opening download modal for user in order to ask them where this file must be saved on their system.
Note
Clone https://github.com/mhadaily/awesome-apress-pwa.git and go to Chapter 12, 03-camera-and-microphone-api folder to find all sample codes.
Browsers Support
At the time of writing this book, Opera, Chrome, and Firefox on desktop; and Chrome and Samsung internet on Android support most of the standard specs. Microsoft Edge also has this API under consideration. It also works on Safari 12 / iOS 12. I believe the API’s future is bright.
Geolocation
The Geolocation API provides the user’s location coordination and exposes it to the web application. The browser will ask for permission for privacy reasons. This Promised-based API has been around for a long time. You might even work with it already.
- 1.
As usual, a feature detection to ensure geolocation is available.
- 2.
Define getCurrentPosition() , I am going to convert geolocation.getCurrentPosition() callbacks into an observable.
- 3.
Define watchPosition() , we do the same with geolocation.watchPosition() and turn its callbacks into an observable.
- 4.
We have already defined my Position interface by which geolocation methods provide.
What I’d like to do is to add user coordination to each note to keep the location as it saves. Thus, we can later show the user’s note’s coordination or exact address using a third-party map provider like Google Map. Since we are saving all coordination data, we will be able to convert this coordination to a meaningful address using third-party map providers in the back end or even in the front end based on application needs.
At the moment, to keep in simple and short, let’s just display the current latitude and longitude to the user.

Browser asks for location permission

Geolocation permission dialog on Android; once it’s resolved, coordination is displayed
Note
Clone https://github.com/mhadaily/awesome-apress-pwa.git and go to Chapter 12, 04-geolocation-api folder to find all sample codes.
Browsers Support
All major browsers support this API, which globally covers over 93 percent of the market according to the caniuse.com website.1
Web Bluetooth
This Promised-based API is a new technology that opens a new era for Internet of Things through the web. It allows a web application to get connected to Bluetooth Low Energy (BLE) devices.
Imagine developing a PWA where we are able to get access to Bluetooth and get control over devices such as smart home appliances, health accessories, ONLY with web API consistency across all browsers in different platforms.
Keep in mind that this API is still being developed and API may slightly change in the future. I recommend the following implementation status documentation on GitHub.2
Before we continue, I would suggest studying the basic knowledge of how Bluetooth Low Energy (BLE) and the Generic Attribute Profile (GATT)3 work.
- 1.
Installed BLE Peripheral Simulator app
- 2.
Select Battery Service to advertise
- 3.
Keep the screen on and put the battery level to 73
Let’s get started.
- 1.
Detect if bluetooth is available.
- 2.
Call requestDevice() with proper configuration where we ask browser to filter and show us what we are interested in. There is potentially an option to ask for checking all devices; however, it’s not recommended regarding battery health.
To make the service simple, we have statically defined GATT service name and characteristic.
- 3.
Try to connect to device once prompt modal appears.
- 4.
Call getPrimaryService() to retrieve battery service.
- 5.
By calling getCharacteristic(), we will ask for battery_level.
- 6.
Once characteristic was resolved, we will read the value.
It seems a bit complex and confusing even though this a very simple device and the documentation is clear. The more you work with these types of devices and technologies, the better you will become at figuring it all out.
Note
Clone https://github.com/mhadaily/awesome-apress-pwa.git and go to Chapter 12, 05-web-bluetooth-api folder to find all sample codes.

Web Bluetooth API: pair a device and read a characteristic and display a message once all Promises are resolved
We have reviewed the basics of Web Bluetooth and hope that it excites you enough to get started with this awesome web technology.
Find the documentation on GitHub https://github.com/manekinekko/angular-web-bluetooth .
Browsers Support
Browsers that support this API, at the time of writing this book, are Chrome Desktop for both Windows and Mac as well as Android, Samsung internet, and Opera. I hope in the future, especially when you are reading this section, there will be more browsers supporting Web Bluetooth API.
Web USB
This Promised-based API provides a safe way to expose USB devices to the web via browsers using JavaScript high-level APIs. This is still a relatively new API and may change over time, implementation is limited, and bugs are reported.
Web USB API by default needs HTTPS, and similar to Web Bluetooth it must be called via a user gesture such as a touch or mouse click. Devices similar to a keyboard and mouse are not accessible to this API.
I believe Web USB opens a new window where it brings a lot of opportunities for academic purposes, students, manufacturers, and developers. Imagine this instead of an online developer tool that can access to a USB board directly or manufacturers who need to write native drivers; instead they will be able to develop a cross-platform JavaScript SDK. Think of a hardware support center who can access directly through their website to my device and diagnose or debug. We can count more and more case studies; however, I should mention that this technology is still growing and, if not right now, will be a mind-blowing feature for the web in the coming future. Truly, the web is amazing; isn’t it?
Enough talking, let’s get started and explorer the API. To keep it simple and give you an idea how Web USB works, we going to connect my “Transcend Pen drive,” and once it’s connected, I will just show a message where it displays hardware information including “serial number.”
- 1.
Feature detection to ensure “usb” is available.
- 2.
Define requestDevice method , it calls navigator.usb.requestDevice(). I needed to explicitly filter my USB device by vendorID. I didn’t magically come up with vendor hexadecimal number; what I did was to search and find my device name ‘Transcend’ in this list http://www.linux-usb.org/usb.ids.
- 3.
Define getDevices method , and it calls navigator.usb.getDevices(); once resolved, it will return a list of devices that are connected to the origin.

A device in the list based on the filter options when requestDevice() gets called. Once paired, based on logic, a message appears that shows device information such as serial number, device name, manufacturer, USB version, etc. Once device is connected, it’s ready to transfer data in and out.
Once the pair is completed successfully, the device is ready to be opened and data can be transferred in and out.
This information is specific to each device. However, the methods are an API in the browser.
Interrupt transfers:
Control transfers:
Bulk transfers:
Isochronous transfers:
Used for continuous and periodic data, such as an audio or video stream by calling isochronousTransferIn(endpointNumber, packetLengths) and isochronousTransferOut(endpointNumber, data, packetLengths)
Debugging USB in Chrome is easier with the internal page chrome://device-log where you can see all USB device-related events in one single place.
Note
Clone https://github.com/mhadaily/awesome-apress-pwa.git and go to Chapter 12, 06-web-usb-api folder to find all sample codes.
Browsers Support
Browsers that support this API, at the time of writing this book, are Chrome For desktop and Android as well as Opera. While the API is evolving and being developed rapidly, I hope we soon see better support in the browsers.
Summary
In this chapter, we have just explored six web APIs. Although they are not an essential part of a PWA, they help to build an app that is even closer to native apps.
As I wrote in the chapter’s introduction, these are not the only new APIs that are coming to web. There are many others that are either under development or consideration to be developed soon.
I am very excited about the future of web development as I can see how it will open endless opportunities in front of us to build and ship a much better web application.