© Majid Hajian 2019
Majid HajianProgressive Web Apps with Angularhttps://doi.org/10.1007/978-1-4842-4448-7_3

3. Completing an Angular App

Majid Hajian1 
(1)
Oslo, Norway
 

Up to this point, we have reviewed fundamentals and requirements and set up prerequisites in order to host, store data, and run functions in the cloud. It may sound a bit boring to you, but as we continue to each chapter, it gets more exciting because we will gradually build a real PWA together by adding more features.

Now, it’s time to step into the real world and create an app that works. In this chapter, we are going to implement logics to yield an app that saves personal notes in Firebase. This app will have user authentication functionalities and let a user save, edit, and delete notes in their personal account. We will create UIs and routes, respectively, for each of these functionalities.

Furthermore, there are two goals behind this chapter. First, you will see how we can start an app from scratch and understand how we proceed to convert it to a PWA as we continue to the next chapters. Secondly, you will see how we are going to convert an existing app to a PWA. So, what are we waiting for? Let’s get started.

Implementing Our UI

First, we need to create an app that looks good. What we select for our UI must at least contain the following characteristics: modern, fast, consistent, versatile, flexible, mobile first, responsive, and user friendly. Angular Material1 is one of the best, which perfectly fits in Angular and helps us to rapidly develop our app while it looks nice and fulfills our needs.

Installing and Setting Up Angular Material, CDK, and Animations

Angular CLI 6+ provides a new command ng add in order to update an Angular project with correct dependencies, perform configuration changes, and execute initialization code, if any.

Installing @angular/material Automatically with Angular CLI

We can now use this command to install @angular/material :
ng add @angular/material
You should see the following messages:
> ng add @angular/material
Installing packages for tooling via npm.
npm WARN @angular/[email protected] requires a peer of @angular/[email protected] but none is installed. You must install peer depen
dencies yourself.
+ @angular/[email protected]
added 2 packages from 1 contributor and audited 24256 packages in 7.228s
found 12 vulnerabilities (9 low, 3 high)
  run `npm audit fix` to fix them, or `npm audit` for details
Installed packages for tooling via npm.
UPDATE package.json (1445 bytes)
UPDATE angular.json (3942 bytes)
UPDATE src/app/app.module.ts (907 bytes)
UPDATE src/index.html (477 bytes)
UPDATE src/styles.scss (165 bytes)
added 1 package and audited 24258 packages in 7.297s

Awesome – Angular cli has taken care of all configurations for us. However, for a better understanding of how it works in detail, I will also continue to add Angular material to my project manually, as described below.

Installing @angular/material Manually

You can use either NPM or YARN to install packages, so use whichever is most appropriate for your project. I will continue with npm.
npm install --save @angular/material @angular/cdk @angular/animations
To enable animation support once packages are installed, BrowserAnimationsModule should be this:
imported into our application.
import { BrowserModule } from '@angular/platform-browser';
import { NgModule } from '@angular/core';
import { AngularFireModule } from 'angularfire2';
import { AngularFirestoreModule } from 'angularfire2/firestore';
import { AngularFireAuthModule } from 'angularfire2/auth';
import { AppRoutingModule } from './app-routing.module';
import { AppComponent } from './app.component';
import { environment } from '../environments/environment';
import { BrowserAnimationsModule } from '@angular/platform-browser/animations';
@NgModule({
  declarations: [
    AppComponent
  ],
  imports: [
    BrowserModule,
    AppRoutingModule,
    AngularFireModule.initializeApp(environment.firebase),
    AngularFirestoreModule, // needed for database features
    AngularFireAuthModule,  // needed for auth features,
    BrowserAnimationsModule,
  ],
  providers: [],
  bootstrap: [AppComponent]
})
export class AppModule { }

To enable animation support once packages are installed, BrowserAnimationsModule should be imported.

Fonts and icons help our app look nicer and feel better. Therefore, we will add Roboto and Material Icons fonts into our application. To include them, modify index.html, and add the following links between <head></head>:
<link href="https://fonts.googleapis.com/icon?family=Material+Icons" rel="stylesheet">
<link href="https://fonts.googleapis.com/css?family=Roboto:300,400,500" rel="stylesheet">
Finally, we need to include a theme. There are prebuilt themes in the @angular/material library, which at the time I am writing this book, are the following:
  • deeppurple-amber.css

  • indigo-pink.css

  • pink-bluegrey.css

  • purple-green.css

Open angular.json, and add one of the theme CSS files to architect ➤ build ➤ styles, so it looks like the following configuration:
"architect": {
        "build": {
          "builder": "@angular-devkit/build-angular:browser",
          "options": {
            "outputPath": "dist",
            "index": "src/index.html",
            "main": "src/main.ts",
            "polyfills": "src/polyfills.ts",
            "tsConfig": "src/tsconfig.app.json",
            "assets": [
              "src/favicon.ico",
              "src/assets"
            ],
            "styles": [
              {
                "input": "node_modules/@angular/material/prebuilt-themes/indigo-pink.css"
              },
              "src/styles.scss"
            ],
            "scripts": []
          },

Great – we have added what we need for our UI; now let’s create a basic skeleton for our app.

Creating a Core Module / Shared Module

One of the common ways in Angular to benefit from lazy loading and code splitting is to modularize an application while it still keeps its components-based approach. It means that we will encapsulate as many components as make sense into one module and will reuse this module by importing into other modules. To start, we will generate SharedModule to import into all other modules and expose all common components and modules that will be reused across our app and CoreModule , which will only be imported once in our root module, AppModule, and contains all providers that are singletons and will initialize as soon as the application starts.

Run the following commands to generate a core module.
ng generate module modules/core
> ng g m modules/core
CREATE src/app/modules/core/core.module.spec.ts (259 bytes)
CREATE src/app/modules/core/core.module.ts (188 bytes)
Angular CLI generates CoreModule located in the modules folder. Let’s do this command one more time to generate SharedModule located in the modules folder:
ng generate module modules/shared
> ng g m modules/shared
CREATE src/app/modules/shared/shared.module.spec.ts (275 bytes)
CREATE src/app/modules/shared/shared.module.ts (190 bytes)
To make sure that CoreModule will not be imported multiple times, we can create a guard for this module. Simply add the following code to your module:
export class CoreModule {
  constructor(@Optional() @SkipSelf() parentModule: CoreModule) {
    if (parentModule) {
      throw new Error(`CoreModule has already been loaded. Import Core modules in the AppModule only.`);
    }
  }
}
So, our core module looks like the following:
import { NgModule, Optional, SkipSelf } from '@angular/core';
import { CommonModule } from '@angular/common';
@NgModule({
  imports: [
    CommonModule,
  ],
  providers: []
})
export class CoreModule {
  constructor(@Optional() @SkipSelf() parentModule: CoreModule) {
    if (parentModule) {
      throw new Error(`CoreModule has already been loaded. Import Core modules in the AppModule only.`);
    }
  }
}

Let’s import CoreModule into AppModule. Now we are ready to start creating our first shared components.

Header, Footer, and Body Components

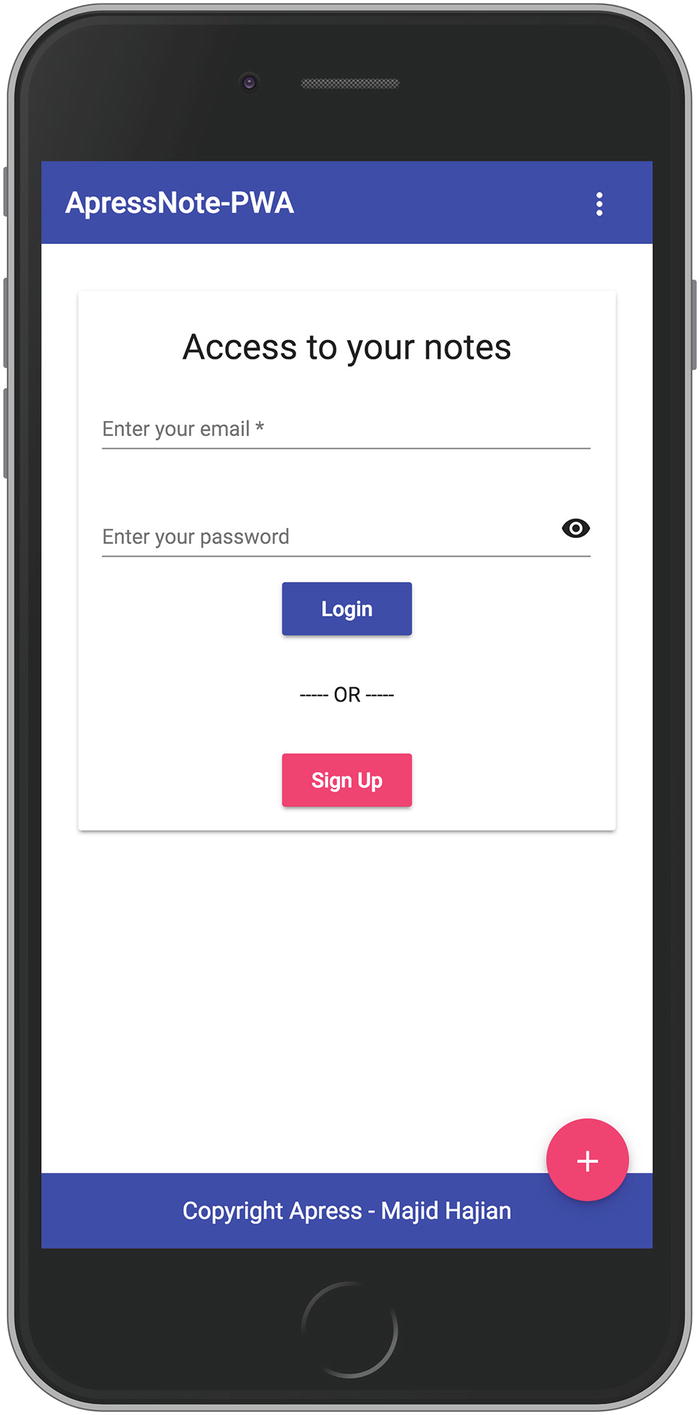
In this section, we are going to create our first application – a main application layout – based on the simple sketch that is shown in Figure 3-1.
../images/470914_1_En_3_Chapter/470914_1_En_3_Fig1_HTML.png
Figure 3-1

Initial app sketch

We will continue developing while we have this sketch in mind. To begin, let’s create a module named LayoutModule that contains a footer, header, and menu components and then import this module into AppModule to reuse header/footer in the app.component.ts file.
ng g m modules/layout
import LayoutModule into AppModule:
...imports: [
    CoreModule,
    LayoutModule,...
By running the following command, footer and header components are generated, respectively.
ng generate component modules/layout/header
ng generate component modules/layout/footer

We have already created SharedModule; however, we need some changes in this module. First, what we imported as share modules or share components should be exported, too. Angular Material is a modular package; with that said, we should import modules that are needed for our UI. Then, I will add as many modules from Angular Material as we need in this application. It will be possible to add or remove modules and components later.

Lastly, our SharedModule looks like the code below:
const SHARED_MODULES = [
  CommonModule,
  MatToolbarModule,
  MatCardModule,
  MatIconModule,
  MatButtonModule,
  MatDividerModule,
  MatBadgeModule,
  MatFormFieldModule,
  MatInputModule,
  MatSnackBarModule,
  MatProgressBarModule,
  MatProgressSpinnerModule,
  MatMenuModule,
  ReactiveFormsModule,
  FormsModule,
  RouterModule
];
const SHARED_COMPONENTS = [];
@NgModule({
  imports: [ ...SHARED_MODULES2  ],
  declarations: [ ...SHARED_COMPONENTS ],
  exports: [ ...SHARED_MODULES,    ...SHARED_COMPONENTS  ],
})
export class SharedModule { }

After importing SharedModule into LayoutModule, we are able to design our header/footer based on material components that are required.

Following is the Header component:
// header.component.html
<mat-toolbar color="primary">
  <span>ApressNote-PWA</span>
  <span class="space-between"></span>
  <button mat-icon-button [mat-menu-trigger-for]="menu">
    <mat-icon>more_vert</mat-icon>
  </button>
</mat-toolbar>
<mat-menu x-position="before" #menu="matMenu">
  <button mat-menu-item>Home</button>
  <button mat-menu-item>Profile</button>
  <button mat-menu-item>Add Note</button>
</mat-menu>
// header.component.scss
.space-between {
    flex:1;
}
// header.component.ts
import { Component, OnInit } from '@angular/core';
@Component({
  selector: 'app-header',
  templateUrl: './header.component.html',
  styleUrls: ['./header.component.scss']
})
export class HeaderComponent { }
Following is the Footer component:
// footer.component.html
<footer>
  <div class="copyright">Copyright Apress - Majid Hajian</div>
</footer>
<div class="addNote">
  <button mat-fab>
    <mat-icon>add circle</mat-icon>
  </button>
</div>
// footer.component.scss
footer{
    background: #3f51b5;
    color: #fff;
    display: flex;
    box-sizing: border-box;
    padding: 1rem;
    flex-direction: column;
    align-items: center;
    white-space: nowrap;
}
.copyright {
    text-align: center;
}
.addNote {
 position: fixed;
 bottom: 2rem;
 right: 1rem;
 color: #fff;
}
// footer.component.ts
import { Component, OnInit } from '@angular/core';
@Component({
  selector: 'app-footer',
  templateUrl: './footer.component.html',
  styleUrls: ['./footer.component.scss']
})
export class FooterComponent { }
Now add a few custom CSS lines in style.scss file to adjust our layout:
html, body { height: 100%; }
body { margin: 0; font-family: 'Roboto', sans-serif; }
.appress-pwa-note {
    display: flex;
    flex-direction: column;
    align-content: space-between;
    height: 100%;
}
.main{
    display: flex;
    flex:1;
}
mat-card {
 max-width: 80%;
 margin: 2em auto;
 text-align: center;
}
mat-toolbar-row {
 justify-content: space-between;
}
Lastly, add the footer, header, and necessary changes to app.component.ts:
import { Component } from '@angular/core';
@Component({
  selector: 'app-root',
  template: `
  <div class="appress-pwa-note">
    <app-header></app-header>
    <div class="main">
      <router-outlet></router-outlet>
    </div>
    <app-footer></app-footer>
  </div>
  `,
})
export class AppComponent { }

So far, so good – the initial skeleton based on the sketch is now ready as shown in Figure 3-2.

Let move on and create different pages and routes.

../images/470914_1_En_3_Chapter/470914_1_En_3_Fig2_HTML.jpg
Figure 3-2

Initial application shell

Login / Profile Page

We need to create pages so that my users can register, log in, and see their profiles. To begin, we create UserModule, including routing:
ng generate module modules/user --routing
As we are going to lazy load this module, we need at least one path and one component. To generate a component, continue running the following command:
ng generate component modules/user/userContainer --flat
flag --flat ignores creating a new folder for this component.
Once the component is generated, we should add it to UserModule declarations and then define our path in UserModuleRouting  – path /user could be lazy loaded in AppRoutingModule accordingly.
// UserModuleRouting
import { NgModule } from '@angular/core';
import { Routes, RouterModule } from '@angular/router';
import { UserContainerComponent } from './user-container.component';
const routes: Routes = [
  {
    path: '',
    component: UserContainerComponent
  }
];
@NgModule({
  imports: [RouterModule.forChild(routes)],
  exports: [RouterModule]
})
export class UserRoutingModule { }
//AppModuleRouting
import { NgModule } from '@angular/core';
import { Routes, RouterModule } from '@angular/router';
const routes: Routes = [
  {
    path: 'user',
    loadChildren: './modules/user/user.module#UserModule',
  }
];
@NgModule({
  imports: [RouterModule.forRoot(routes)],
  exports: [RouterModule]
})
export class AppRoutingModule { }

Adding Login, Signup, and Profile UI and Functionalities

Before we continue to add login/signup functionalities, we must activate Sign-in providers in Firebase. Hence, go to your project Firebase console, find Authentication under the develop group on the left menu list, and then move the current tab to Sign-in methods. To keep it simple, we will use Email/Password providers; however, you should be able to add more providers as you wish (see Figure 3-3).
../images/470914_1_En_3_Chapter/470914_1_En_3_Fig3_HTML.jpg
Figure 3-3

Enable Email/Password authentication

Let’s move on and create an Angular service that handles all Firebase authentication methods. Continue by running the following command:
ng generate service modules/core/firebaseAuthService

We need to write several methods, checking the user login state and doing log in, sign up, and log out.

Take your time and look at Listing 3-1 where we implement FirebaseAuthService in order to invoke necessary methods from AngularFireAuth service and share the state across the app. The service methods are self-explanatory.
export class AuthService {
  // expose all data
  public authErrorMessages$ = new Subject<string>();
  public isLoading$ = new BehaviorSubject<boolean>(true);
  public user$ = new Subject<User>();
  constructor(private afAuth: AngularFireAuth) {
    this.isLoggedIn().subscribe();
  }
  private isLoggedIn() {
    return this.afAuth.authState.pipe(
      first(),
      tap(user => {
        this.isLoading$.next(false);
        if (user) {
          const { email, uid } = user;
          this.user$.next({ email, uid });
        }
      })
    );
  }
  public signUpFirebase({ email, password }) {
    this.isLoading$.next(true);
    this.handleErrorOrSuccess(() => {
      return this.afAuth.auth.createUserWithEmailAndPassword(email, password);
    });
  }
  public loginFirebase({ email, password }) {
    this.isLoading$.next(true);
    this.handleErrorOrSuccess(() => {
      return this.afAuth.auth.signInWithEmailAndPassword(email, password);
    });
  }
  public logOutFirebase() {
    this.isLoading$.next(true);
    this.afAuth.auth
      .signOut()
      .then(() => {
        this.isLoading$.next(false);
        this.user$.next(null);
      })
      .catch(e => {
        console.error(e);
        this.isLoading$.next(false);
        this.authErrorMessages$.next("Something is wrong when signing out!");
      });
  }
  private handleErrorOrSuccess(
    cb: () => Promise<firebase.auth.UserCredential>
  ) {
    cb()
      .then(data => this.authenticateUser(data))
      .catch(e => this.handleSignUpLoginError(e));
  }
  private authenticateUser(UserCredential) {
    const {
      user: { email, uid }
    } = UserCredential;
    this.isLoading$.next(false);
    this.user$.next({ email, uid });
  }
  private handleSignUpLoginError(error: { code: string; message: string }) {
    this.isLoading$.next(false);
    const errorMessage = error.message;
    this.authErrorMessages$.next(errorMessage);
  }
}
Listing 3-1

App/modules/core/auth.service.ts

Lastly, the application should provide a UI to log in and sign up as well as user information. Going back to our userContainerComponent , we will implement UI and methods respectively. Listings 3-2 through 3-4 show our TypeScript, HTML, and CSS.
export class UserContainerComponent implements OnInit {
  public errorMessages$ = this.afAuthService.authErrorMessages$;
  public user$ = this.afAuthService.user$;
  public isLoading$ = this.afAuthService.isLoading$;
  public loginForm: FormGroup;
  public hide = true;
  constructor(
    private fb: FormBuilder,
    private afAuthService: FirebaseAuthService
  ) {}
  ngOnInit() {
    this.createLoginForm();
  }
  private createLoginForm() {
    this.loginForm = this.fb.group({
      email: ["", [Validators.required, Validators.email]],
      password: ["", [Validators.required]]
    });
  }
  public signUp() {
    this.checkFormValidity(() => {
      this.afAuthService.signUpFirebase(this.loginForm.value);
    });
  }
  public login() {
    this.checkFormValidity(() => {
      this.afAuthService.loginFirebase(this.loginForm.value);
    });
  }
  private checkFormValidity(cb) {
    if (this.loginForm.valid) {
      cb();
    } else {
      this.errorMessages$.next("Please enter correct Email and Password value");
    }
  }
  public logOut() {
    this.afAuthService.logOutFirebase();
  }
  public getErrorMessage(controlName: string, errorName: string): string {
    const control = this.loginForm.get(controlName);
    return control.hasError("required")
      ? "You must enter a value"
      : control.hasError(errorName)
        ? `Not a valid ${errorName}`
        : "";
  }
}
Listing 3-2

User-container.component.ts

<mat-card *ngIf="user$ | async as user">
  <mat-card-title>
    Hello {{user.email}}
  </mat-card-title>
  <mat-card-subtitle>
    ID: {{user.uid}}
  </mat-card-subtitle>
  <mat-card-content>
    <button mat-raised-button color="secondary" (click)="logOut()">Logout</button>
  </mat-card-content>
</mat-card>
<mat-card *ngIf="!(user$ | async)">
  <mat-card-title>
    Access to your notes
  </mat-card-title>
  <mat-card-subtitle class="error" *ngIf="errorMessages$ | async as errorMessage">
    {{ errorMessage }}
  </mat-card-subtitle>
  <mat-card-content>
    <div class="login-container" [formGroup]="loginForm">
      <mat-form-field>
        <input matInput placeholder="Enter your email" formControlName="email" required>
        <mat-error *ngIf="loginForm.get('email').invalid">{{getErrorMessage('email', 'email')}}</mat-error>
      </mat-form-field>
      <br>
      <mat-form-field>
        <input matInput placeholder="Enter your password" [type]="hide ? 'password' : 'text'" formControlName="password">
        <mat-icon matSuffix (click)="hide = !hide">{{hide ? 'visibility' : 'visibility_off'}}</mat-icon>
        <mat-error *ngIf="loginForm.get('password').invalid">{{getErrorMessage('password')}}</mat-error>
      </mat-form-field>
    </div>
    <button mat-raised-button color="primary" (click)="login()">Login</button>
  </mat-card-content>
  <mat-card-content><br>----- OR -----<br><br></mat-card-content>
  <mat-card-content>
    <button mat-raised-button color="accent" (click)="signUp()">Sign Up</button>
  </mat-card-content>
  <mat-card-footer>
    <mat-progress-bar *ngIf="isLoading$ | async" mode="indeterminate"></mat-progress-bar>
  </mat-card-footer>
</mat-card>
Listing 3-3

User-container.component.html

.login-container {
  display: flex;
  flex-direction: column;
  > * {
    width: 100%;
  }
}
Listing 3-4

User-container.component.scss

Figure 3-4 shows the result of what we have done up to this point.
../images/470914_1_En_3_Chapter/470914_1_En_3_Fig4_HTML.jpg
Figure 3-4

Login, Signup, and Profile UI in the app

Although what we need to proceed has been achieved, you are not limited and can continue adding more and more Firebase features such as forgot password link, password-less login, and other providers for log in.

Firebase CRUD3 Operations for Note Module

In the following section, we are going to work on different views and methods in order to list, add, delete, and update notes in our application; let’s do it step by step.

Set Up Firestore Database

First things first: a quick start to show how to set up our Firestore database .
  1. 1.

    Open your browser and go to Firebase project console.

     
  2. 2.

    In the Database section, click the Get Started or Create database button for Cloud Firestore.

     
  3. 3.

    Select Locked mode for your Cloud Firestore Security Rules.4

     
  4. 4.

    Click Enable as shown in Figure 3-5.

     
../images/470914_1_En_3_Chapter/470914_1_En_3_Fig5_HTML.jpg
Figure 3-5

Select locked mode when creating a new database in Firebase

Below is the Database schema 5 that we aim to create in order to store our users and their notes.
----- users // this is a collection
      ------- [USER IDs] // this is a document
             ------ notes // this is a collection
                    ----- [NOTE DOCUMENT]
                    ----- [NOTE DOCUMENT]
                    ----- [NOTE DOCUMENT]
       ------- [USER IDs] // this is a document
             ------ notes // this is a collection
                    ----- [NOTE DOCUMENT]
                    ----- [NOTE DOCUMENT]
                    ----- [NOTE DOCUMENT]
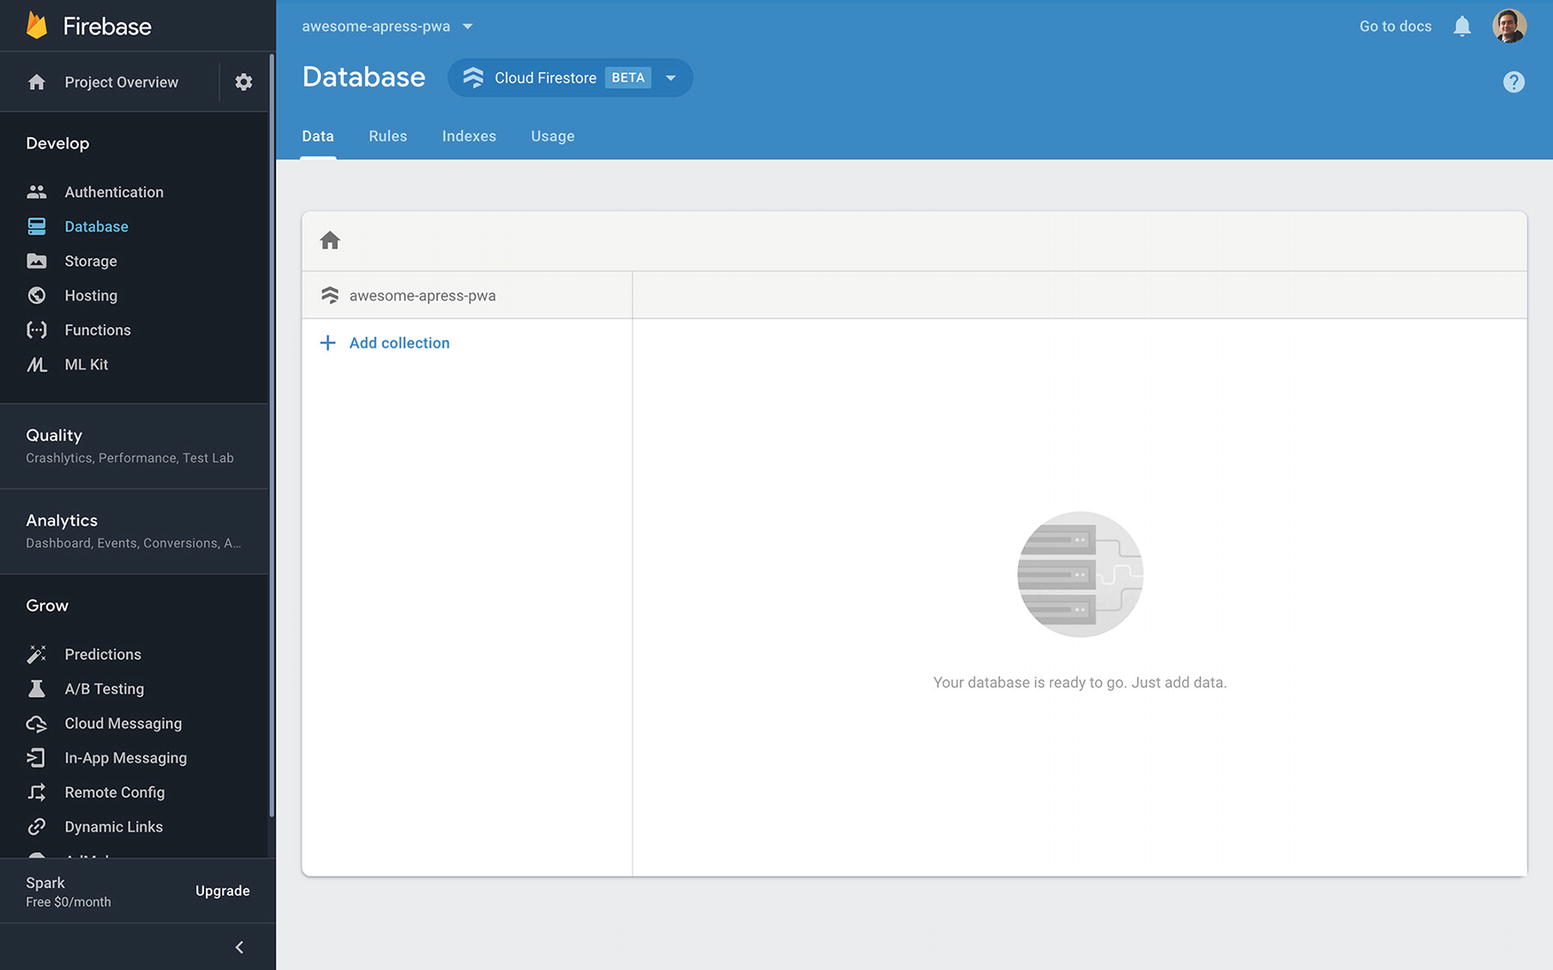
It is possible to create collections and documents in Firestore manually; but we will do it programmatically later by implementing proper logics in our application (see Figure 3-6).
../images/470914_1_En_3_Chapter/470914_1_En_3_Fig6_HTML.jpg
Figure 3-6

Firestore view once it is enabled

The last step is to set Firestore rules to require a user unique id (uid) in request in order to give sufficient permission to do create/read/update/delete actions. Click on the Rules tab and copy and paste the following rules (see Figure 3-7).
service cloud.firestore {
  match /databases/{database}/documents {
    // Make sure the uid of the requesting user matches name of the user
    // document. The wildcard expression {userId} makes the userId variable
    // available in rules.
    match /users/{userId} {
      allow read, update, delete: if request.auth.uid == userId;
      allow create: if request.auth.uid != null;
      // make sure user can do all action for notes collection if userID is matched
        match /notes/{document=**} {
          allow create, read, update, delete: if request.auth.uid == userId;
        }
    }
  }
}
../images/470914_1_En_3_Chapter/470914_1_En_3_Fig7_HTML.jpg
Figure 3-7

Firestore rules

List, Add, and Detail Note Views

The next step, once the Firestore setup is done, is to create our components in order to show a list of notes, add a note, and detail the note view along with their relevant functionalities.

To begin, generate a notes module, including routing, by running the following command:
ng generate module modules/notes --routing
Let’s take a look at NotesRoutingModule:
const routes: Routes = [
  {
    path: "",
    component: NotesListComponent
  },
  {
    path: "add",
    component: NotesAddComponent
  },
  {
    path: ":id",
    component: NoteDetailsComponent
  }
];
@NgModule({
  imports: [RouterModule.forChild(routes)],
  exports: [RouterModule]
})
export class NotesRoutingModule {}
As you see, three paths have been defined; therefore we should generate related components by running each command separately:
ng generate component modules/notes/notesList
ng generate component modules/notes/notesAdd
ng generate component modules/notes/noteDetails
Finally, lazy load NotesModule by adding NotesRoutingModule into the AppRoutingModule:
const routes: Routes = [
  {
    path: "",
    redirectTo: "/notes",
    pathMatch: "full"
  },
  {
    path: "user",
    loadChildren: "./modules/user/user.module#UserModule",
  },
  {
    path: "notes",
    loadChildren: "./modules/notes/notes.module#NotesModule"
  }
];
@NgModule({
  imports: [RouterModule.forRoot(routes)],
  exports: [RouterModule]
})
export class AppRoutingModule {}
Authentication Service

The authentication service is used to log in, log out, and sign up and check if the user has already been authenticated for the application. The credentials were sent to Firebase by calling proper methods on the AngularFire Auth service to perform each function accordingly.

AuthService is required to be injected6 in order to handle the authentication layer in our app:
ng generate service modules/core/auth
The following code shows the logic for AuthService:
// auth.service.ts
interface User {
  uid: string;
  email: string;
}
@Injectable({
  providedIn: "root"
})
export class AuthService {
  public authErrorMessages$ = new BehaviorSubject<string>(null);
  public isLoading$ = new BehaviorSubject<boolean>(true);
  public user$ = new BehaviorSubject<User>(null);
  private authState = null;
  constructor(private afAuth: AngularFireAuth) {
    this.isLoggedIn().subscribe(user => (this.authState = user));
  }
  get authenticated(): boolean {
    return this.authState !== null;
  }
  get id(): string {
    return this.authenticated ? this.authState.uid : "";
  }
  private isLoggedIn(): Observable<User | null> {
    return this.afAuth.authState.pipe(
      map(user => {
        if (user) {
          const { email, uid } = user;
          this.user$.next({ email, uid });
          return { email, uid };
        }
        return null;
      }),
      tap(() => this.isLoading$.next(false))
    );
  }
  public getCurrentUserUid(): string {
    return this.afAuth.auth.currentUser.uid;
  }
  public signUpFirebase({ email, password }) {
    this.isLoading$.next(true);
    this.handleErrorOrSuccess(() => {
      return this.afAuth.auth.createUserWithEmailAndPassword(email, password);
    });
  }
  public loginFirebase({ email, password }) {
    this.isLoading$.next(true);
    this.handleErrorOrSuccess(() => {
      return this.afAuth.auth.signInWithEmailAndPassword(email, password);
    });
  }
  public logOutFirebase() {
    this.isLoading$.next(true);
    return this.afAuth.auth.signOut();
  }
  private handleErrorOrSuccess(
    cb: () => Promise<firebase.auth.UserCredential>
  ) {
    cb()
      .then(data => this.authenticateUser(data))
      .catch(e => this.handleSignUpLoginError(e));
  }
  private authenticateUser(UserCredential) {
    const {
      user: { email, uid }
    } = UserCredential;
    this.isLoading$.next(false);
  }
  private handleSignUpLoginError(error: { code: string; message: string }) {
    this.isLoading$.next(false);
    const errorMessage = error.message;
    this.authErrorMessages$.next(errorMessage);
  }
}
Data Service

This service contains a standard set of CRUD methods (Create, read, update and delete). Functionalities such as fetching all notes; add, update and delete; and fetch detail note by calling proper methods or requesting from proper APIs. In fact, it acts as an interface between the Angular application and the back-end APIs.

To generate DataService, run the command below:
ng generate service modules/core/data
The following code shows the logic for DataService:
// data.service.ts
interface Note {
  id: string;
  title: string;
  content: string;
}
@Injectable({
  providedIn: "root"
})
export class DataService {
  protected readonly USERS_COLLECTION = "users";
  protected readonly NOTES_COLLECTION = "notes";
  public isLoading$ = new BehaviorSubject<boolean>(true);
  get timestamp() {
    return new Date().getTime();
  }
  constructor(private afDb: AngularFirestore, private auth: AuthService) {}
  getUserNotesCollection() {
    return this.afDb.collection(
      this.USERS_COLLECTION + "/" + this.auth.id + "/" + this.NOTES_COLLECTION,
      ref => ref.orderBy("updated_at", "desc")
    );
  }
  addNote(data): Promise<DocumentReference> {
    return this.getUserNotesCollection().add({
      ...data,
      created_at: this.timestamp,
      updated_at: this.timestamp
    });
  }
  editNote(id, data): Promise<void> {
    return this.getUserNotesCollection()
      .doc(id)
      .update({
        ...data,
        updated_at: this.timestamp
      });
  }
  deleteNote(id): Promise<void> {
    return this.getUserNotesCollection()
      .doc(id)
      .delete();
  }
  getNote(id): Observable<any> {
    return this.getUserNotesCollection()
      .doc(id)
      .snapshotChanges()
      .pipe(
        map(snapshot => {
          const data = snapshot.payload.data() as Note;
          const id = snapshot.payload.id;
          return { id, ...data };
        }),
        catchError(e => throwError(e))
      );
  }
  getNotes(): Observable<any> {
    return this.getUserNotesCollection()
      .snapshotChanges()
      .pipe(
        map(snapshot =>
          snapshot.map(a => {
            //Get document data
            const data = a.payload.doc.data() as Note;
            //Get document id
            const id = a.payload.doc.id;
            //Use spread operator to add the id to the document data
            return { id, ...data };
          })
        ),
        tap(notes => {
          this.isLoading$.next(false);
        }),
        catchError(e => throwError(e))
      );
  }
}
Authentication Guard

Since this application requires a user to be authenticated before performing any action, we should make sure that all routes are protected by a guard.

AuthGuard helps to protect access to authentication routes. Since we need to put this guard on a lazy load module, CanLoad should be implemented.
Ng generate guard modules/notes/auth
The following code shows the logic for AuthGuard:
// auth.guard.ts
@Injectable()
export class AuthGuard implements CanLoad {
  constructor(private auth: AuthService, private router: Router) {}
  canLoad(): Observable<boolean> {
    if (!this.auth.authenticated) {
      this.router.navigate(["/user"]);
      return of(false);
    }
    return of(true);
  }
}
We should provide AuthGuard in our AppRoutingModule. It’s important to remember to add this guard into providers.
  {
    path: "notes",
    loadChildren: "./modules/notes/notes.module#NotesModule",
    canLoad: [AuthGuard]
  }
@NgModule({
  imports: [RouterModule.forRoot(routes)],
  providers: [AuthGuard],
  exports: [RouterModule]
})
NoteList, NoteAdd, and NoteDetail Components
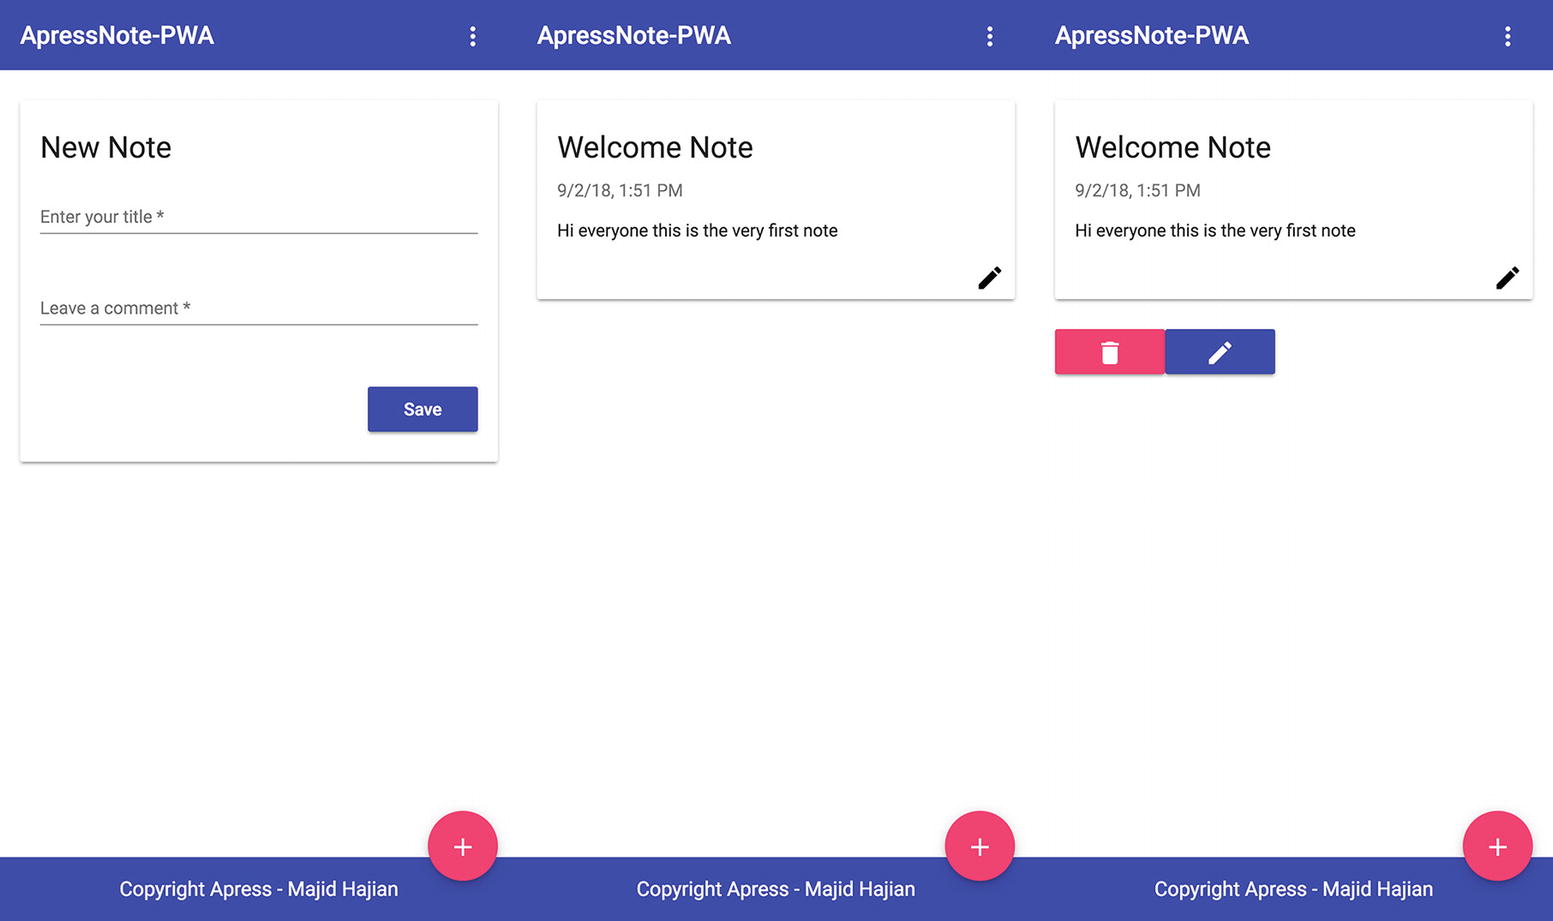
We have prepared all the service layers and routing that are needed in the application. The rest of the application is to just implement proper UI and components logics for NotesList, NoteAdd, and NoteDetail components (Listings 3-5 through 3-13). Since it’s easy, I would like you to just take a look at the components, and at the end, Figure 3-8 will demonstrate the result.
export class NotesListComponent implements OnInit {
  notes$: Observable<Note[]>;
  isDbLoading$;
  constructor(private db: DataService) {}
  ngOnInit() {
    this.notes$ = this.db.getNotes();
    this.isDbLoading$ = this.db.isLoading$;
  }
}
Listing 3-5

// Notes-list.component.ts

<div *ngIf="notes$ | async as notes; else notFound">
  <app-note-card *ngFor="let note of notes" [note]="note" [loading]="isDbLoading$ | async" [routerLink]="['/notes', note.id]">
  </app-note-card>
</div>
<ng-template #notFound>
  <mat-card>
    <mat-card-title>
      Either you have no notes
    </mat-card-title>
  </mat-card>
</ng-template>
Listing 3-6

// Notes-list.component.html

@Component({
  selector: "app-note-card",
  templateUrl: "./note-card.component.html",
  styleUrls: ["./note-card.component.scss"]
})
export class NoteCardComponent {
  @Input()
  note;
  @Input()
  loading;
  @Input()
  edit = true;
}
Listing 3-7

// Notes-card.component.ts

<mat-card>
  <mat-card-title>{{ note.title }}</mat-card-title>
  <mat-card-subtitle>{{ note.created_at | date:"short" }}</mat-card-subtitle>
  <mat-card-content>{{ note.content }}</mat-card-content>
  <mat-card-footer class="text-right">
    <button color="primary" *ngIf="edit"><mat-icon>edit</mat-icon></button>
    <mat-progress-bar *ngIf="loading" mode="indeterminate"></mat-progress-bar>
  </mat-card-footer>
</mat-card>
Listing 3-8

// Notes-card.component.html

export class NotesAddComponent {
  public userID;
  public errorMessages$ = new Subject();
  constructor(
    private router: Router,
    private data: DataService,
    private snackBar: SnackBarService
  ) {}
  onSaveNote(values) {
    this.data
      .addNote(values)
      .then(doc => {
        this.router.navigate(["/notes"]);
        this.snackBar.open(`Note ${doc.id} has been succeffully saved`);
      })
      .catch(e => {
        this.errorMessages$.next("something is wrong when adding to DB");
      });
  }
  onSendError(message) {
    this.errorMessages$.next(message);
  }
}
Listing 3-9

// Notes-add.component.ts

<mat-card>
  <mat-card-title>New Note</mat-card-title>
  <mat-card-subtitle class="error" *ngIf="errorMessages$ | async as errorMessage">
    {{ errorMessage }}
  </mat-card-subtitle>
  <mat-card-content>
    <app-note-form (saveNote)="onSaveNote($event)" (sendError)="onSendError($event)"></app-note-form>
  </mat-card-content>
</mat-card>
Listing 3-10

// Notes-add.component.html

export class NoteFormComponent implements OnInit {
  noteForm: FormGroup;
  @Input()
  note;
  @Output()
  saveNote = new EventEmitter();
  @Output()
  sendError = new EventEmitter();
  constructor(private fb: FormBuilder) {}
  ngOnInit() {
    this.createForm();
    if (this.note) {
      this.noteForm.patchValue(this.note);
    }
  }
  createForm() {
    this.noteForm = this.fb.group({
      title: ["", Validators.required],
      content: ["", Validators.required]
    });
  }
  addNote() {
    if (this.noteForm.valid) {
      this.saveNote.emit(this.noteForm.value);
    } else {
      this.sendError.emit("please fill all fields");
    }
  }
}
Listing 3-11

// Notes-form.component.ts

<div class="note-container" [formGroup]="noteForm">
  <mat-form-field>
    <input matInput placeholder="Enter your title" formControlName="title" required>
  </mat-form-field>
  <br>
  <mat-form-field>
    <textarea matInput placeholder="Leave a comment" formControlName="content" required cdkTextareaAutosize></textarea>
  </mat-form-field>
</div>
<br>
<br>
<div class="text-right">
  <button mat-raised-button color="primary" (click)="addNote()">Save</button>
</div>
Listing 3-12

// Notes-form.component.html

export class NoteDetailsComponent implements OnInit {
  public errorMessages$ = new Subject();
  public note$;
  public isEdit;
  private id;
  constructor(
    private data: DataService,
    private route: ActivatedRoute,
    private snackBar: SnackBarService,
    private router: Router
  ) {}
  ngOnInit() {
    const id = this.route.snapshot.paramMap.get("id");
    this.id = id;
    this.note$ = this.data.getNote(id);
  }
  delete() {
    if (confirm("Are you sure?")) {
      this.data
        .deleteNote(this.id)
        .then(() => {
          this.router.navigate(["/notes"]);
          this.snackBar.open(`${this.id} successfully was deleted`);
        })
        .catch(e => {
          this.snackBar.open("Unable to delete this note");
        });
    }
  }
  edit() {
    this.isEdit = !this.isEdit;
  }
  saveNote(values) {
    this.data
      .editNote(this.id, values)
      .then(() => {
        this.snackBar.open("Successfully done");
        this.edit();
      })
      .catch(e => {
        this.snackBar.open("Unable to edit this note");
        this.edit();
      });
  }
  sendError(message) {
    this.errorMessages$.next(message);
  }
}
Listing 3-13

// Notes-details.component.ts

<div *ngIf="note$ | async as note; else spinner">
    <mat-card *ngIf="isEdit">
        <mat-card-subtitle class="error" *ngIf="errorMessages$ | async as errorMessage">
            {{ errorMessage }}
        </mat-card-subtitle>
        <mat-card-content>
            <app-note-form [note]="note" (saveNote)="saveNote($event)" (sendError)="sendError($event)"></app-note-form>
        </mat-card-content>
    </mat-card>
    <app-note-card *ngIf="!isEdit" [note]="note" [loading]="isDbLoading$ | async"></app-note-card>
    <button mat-raised-button color="accent" (click)="delete()"><mat-icon>delete</mat-icon></button>
    <button mat-raised-button color="primary" (click)="edit()"><mat-icon>edit</mat-icon></button>
</div>
<ng-template #spinner>
    <mat-spinner></mat-spinner>
</ng-template>
Listing 3-14

// Notes-details.component.html

../images/470914_1_En_3_Chapter/470914_1_En_3_Fig8_HTML.jpg
Figure 3-8

Add note, details, and notes list view

Note

If you are comfortable, check out the final code. You will find it in github.com/mhadaily/chapter03/03-note-list-add-edit-update-delete/. Clone the project and navigate to the folder. Then run the following commands:

npm install // to install dependencies

npm start // to run development server

npm run deploy // to deploy to firebase

Summary

The first three chapters’ goal was to reveal PWA fundamentals; tools; and creating an app, step by step, together. It may sound unrelated to PWA; however, as we continue in this book, chapter by chapter, section by section, we will try to make our app progressively better to finally have a great PWA with Angular.

Beginning with the next chapter, we will dive into implementing offline capabilities, caches, push notifications, new modern browsers’ APIs, and more just to create a native-like app for better user experiences on the mobile and web. While this was not possible just a few years ago, these days it’s widely supported in major browsers.

..................Content has been hidden....................

You can't read the all page of ebook, please click here login for view all page.
Reset
3.134.90.44