
Up to this point, the application that we built has no PWA characteristics. From this chapter on, we are going to gradually add PWA features and dive into them in depth. Angular provides a module called service-worker to handle caching strategies and push notifications out of the box. Angular Service Worker is highly configurable and can satisfy Angular app requirements. However, before we start implementing this module, we should have a basic understanding of Service Worker.
This chapter begins with Service Worker fundamentals and cache APIs as it’s crucial to know what’s going on behind the scenes when we code with Angular Service Worker. Then, Angular CLI will help us to scaffold and turn our project to PWA by using @angular/pwa schematics.
Although, the focus is on CLI v6, each modification will be broken down in order to give us a better picture of what needs to be done if it is implemented manually, for instance, in Angular version 5 or even lower.
Service Workers: The Brain of PWAs
Your brain is the center of decision making and has full control of your body. Server workers resemble our brain. At their core, they are worker scripts written in JavaScript, enabled with a few lines of code in modern browsers and runs in the background. Once activated, developers are able to intercept network requests, handle push notifications, manage caches, and perform many different tasks.
You may ask, what if it’s not supported?1
If it is not implemented in a user’s browser, it simply falls back, and the website will function normally. The beautify of PWA is, by its definition, that anyone – regardless of browser and operating system of choice – should be able to surf the website and get the best user experience. This description refers to a phrase known as “perfect progressive enhancement.”
Understanding Service Worker
In order to understand Service Worker, think of yourself sitting in the center of your brain. You are provided with different tools to gain control of your body. You see everything, and you can make any decision. It’s up to you either let your body do what it does normally or redirect the decision to a different direction. You may even stop the brain from functioning completely. This is what you can do with network requests in Service Worker; it acts similar to a proxy between a website and server. The ability to totally take over a network request makes Service Worker extremely powerful and allows you to react and respond!
Runs in different threads from the main JavaScript that empowers your app. Figure 4-1 illustrates how Service Worker sits on a different thread and intercepts a network request.
Runs in its own global context.
Designed to be fully asynchronous; therefore, it doesn’t have access to things such as synchronous XHR and LocalStorage.
Runs in worker context – thus, it doesn’t have access to DOM.
Runs HTTPS-Only in production, in addition to Localhost for development.
Runs in 1:1 scope, meaning there can be only one Service Worker per scope.
Can be terminated any time.

Service Worker can run in different threads and intercept requests
Service Workers are event driven. As a consequence, it is easier than you think to get started with them once the basics of the events are understood. Simply pick and choose which event you want to tap into, and you are good to go. Let’s take a look at primary events in Service Workers.
The Service Worker Life Cycle
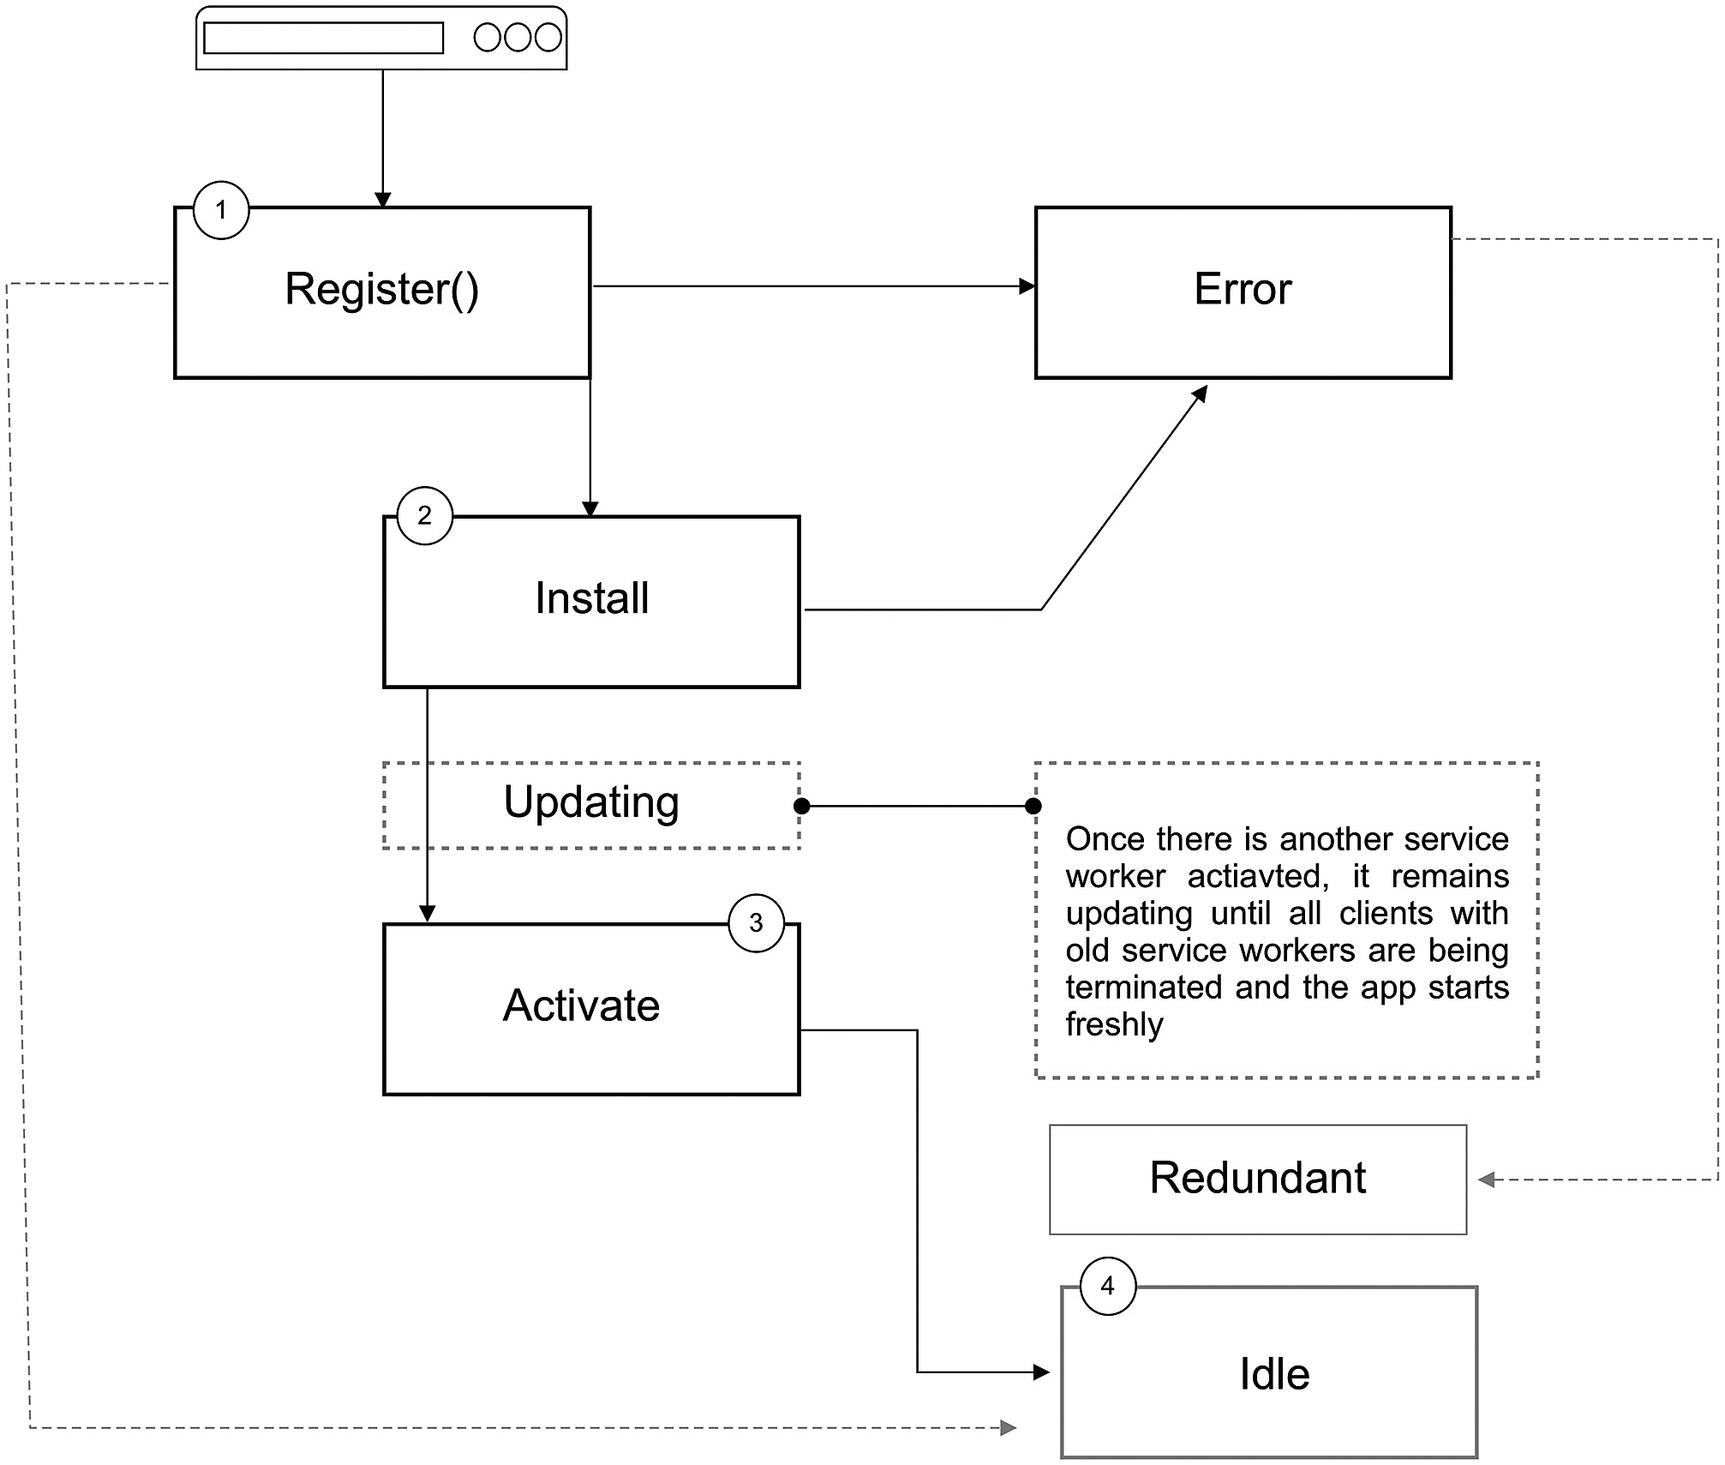
Service Worker in its life cycle has different stages. Take your time and look at Figure 4-2, which demonstrates how the Service Worker life cycle takes place in four steps. Imagine that your website is going to be served by a Service Worker:
Step 1, when the user navigates to the website, by calling the register() function , the browser detects the Service Worker JavaScript file; therefore, it downloads, parses, and the execution phase begins. The Register function retunes a Promise2 in which in case of error, the registration gets rejected and the Service Worker registration process stops.
Step 2, however, if registration goes well and gets resolved, the Service Worker state turns into installed. Therefore, an install event fires where it is the best place to precache all of the static assets. Keep in mind that an install event happens only the first time after registration.
Server worker life cycle
Note
Scope is used to specify the subset of your content that you want the server worker to control and can be defined either by the optional parameter scope in second argument in register() function or by default where the server worker JavaScript file is located. For instance, if the server worker file is in the root of the application, it has control over all pages. However, /sw-test/ specifies only access to all pages under this origin. Figure 4-3 demonstrates how the scope works.
Step 4, once install and activate events are completed with no errors, Service Worker will be effective. However, if it fails during installation, activation, or is replaced by a new one, it remains redundant and does not affect the app.

Service worker scope demonstration
As mentioned, a website without Service Worker won’t handle any requests; however, as soon as it’s installed and activated, it can control every single request under its own scope. Hence, to kick the logic off in Service Worker after the first installation and activation, the website needs to be refreshed, or we should navigate to another page.
Last but not least, it may happen that we want to alter a registered and activated Service Worker. If there is byte-size change in the registered file, the browser considers it, and all the steps, as mentioned above, will happen again. However, since we already had a Service Worker activated, the process is slightly different. This time, Service Worker will not get activated immediately; therefore, the logic in Service Worker does not execute. It remains waiting until all tabs and clients that have old Service Worker running are terminated. In other words, all the tabs that have the website open must be closed and reopened again. As we are developers and know ninja tricks, we can simply skip waiting from DevTools, or if we want, we can do it programmatically in Service Worker logic, too. We will review this in detail, shortly, in this chapter.
Service Worker Functional Events
Fetch: happens every time the browser requests static assets or dynamic content; for instance, request for an image, video, CSS, JS, HTML, and even an ajax request.
Push: happens when web app receives a push notification.
Sync: Lets you defer actions until the user has stable connectivity. This is useful to ensure that whatever the user wants to send is actually sent. This API also allows servers to push periodic updates to the app so the app can update when it’s next online.
Chrome DevTools
No developer feels comfortable without an appropriate debugging tool. Among all browsers, at the time of writing this book, Chrome DevTools is the best choice to debug Service Workers. Let’s catch a glimpse Chrome DevTools and see what options it provides to assist us in making debugging easier and enhancing PWAs even better.

Audits panel in Chrome where we run auditing tests on web pages
Manifest: where we can debug Web App Manifest .4
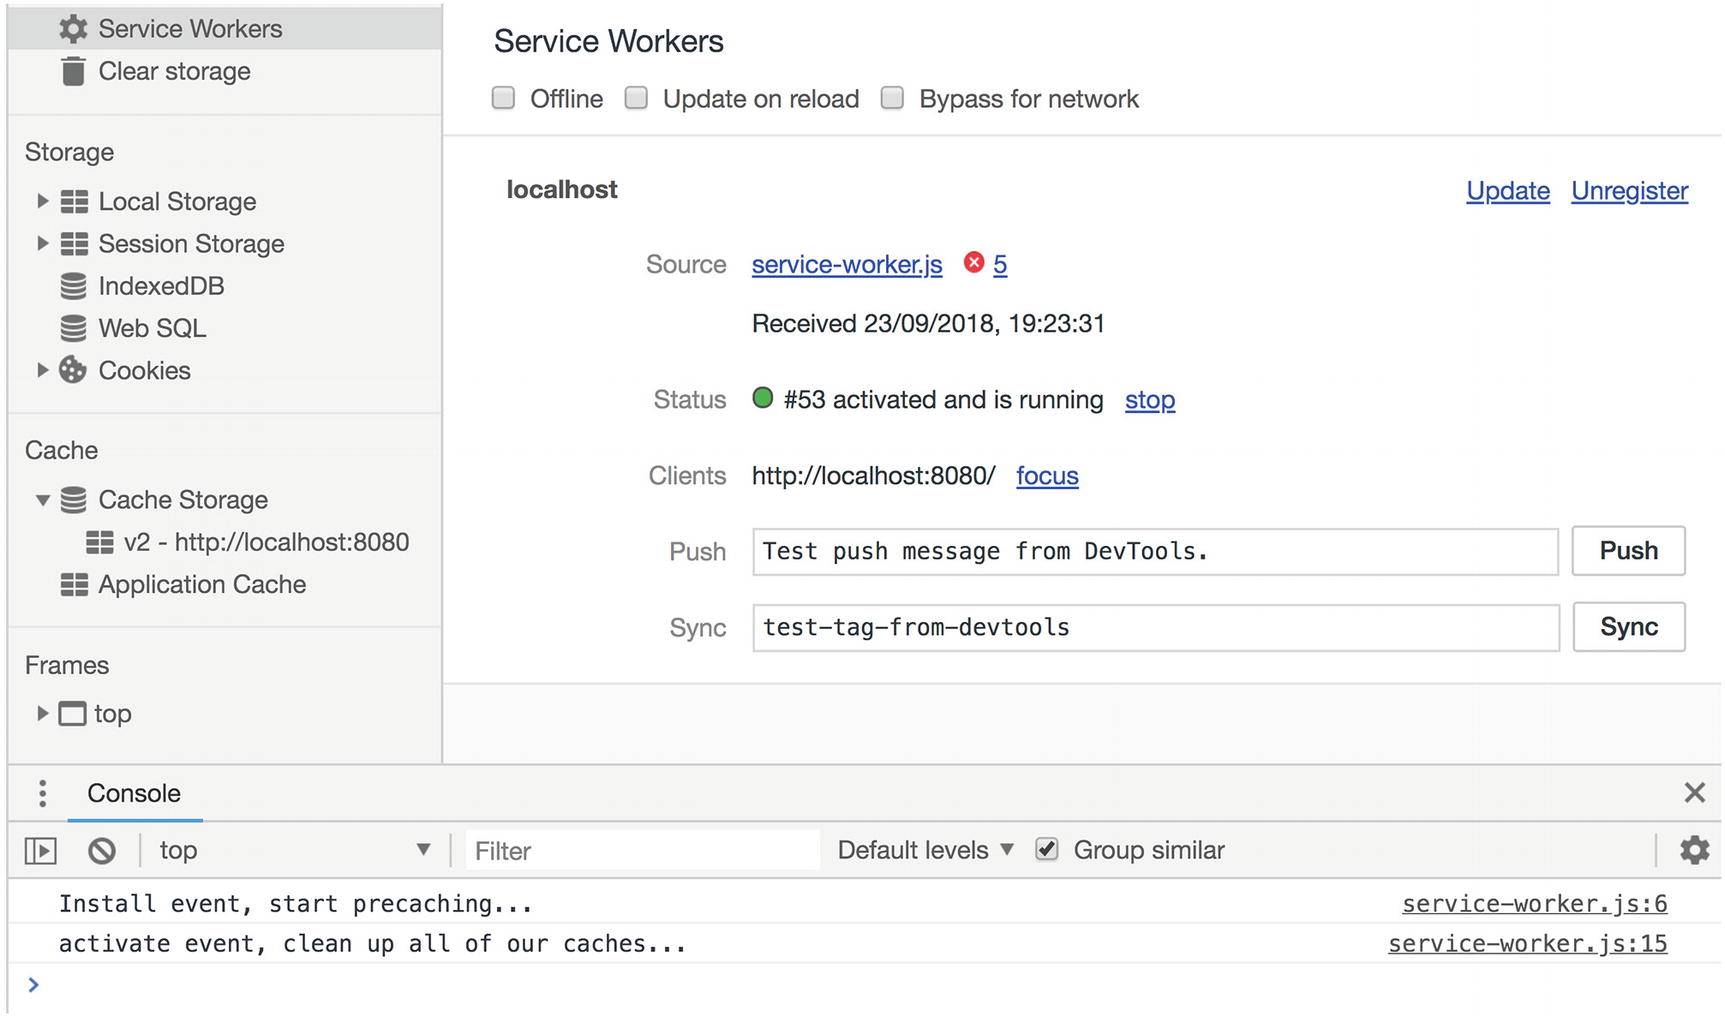
- Service Workers: where we debug Service Worker and have many options such as update Service Worker, remove, skip waiting, and different options to work with the network (Figure 4-5).
Offline: simulate a no-internet-access in browser.
Update on reload: where it downloads Service Worker every time a page is reloaded, and therefore all life-cycle events, including install and activate, happen on reload. This is incredibly useful for debugging.
Bypass for network: Will force the browser to ignore any active Service Worker and fetch resources from the network. This is extremely useful for situations where you want to work on CSS or JavaScript and not have to worry about the Service Worker accidentally caching and returning old files.
Clear storage: where we can delete all caches.
LocalStorage, Session Storage, Indexed DB, Web SQL, and cookies are all different type of storages you may be familiar with. Indexed DB will be in our main focus in this book since it’s asynchronous and Service Worker has access to it.
Cache Storage: it’s a new cache API in browsers, key-value base, and capable of storing requests and responding. We open this cache to store most of our assets and dynamic content. This cache is extremely powerful and is available in both application and Service Worker.

Service Workers option under Application panel in Chrome DevTools
I know that you are impatient to start coding and see sample codes, so let’s get started.
Service Worker Example Code
Progressive enhancement is meant to allow all users to load our web pages whether they are using the oldest or latest versions of browsers. Consequently, we should always check for features that may not be available in different browsers. Code above has started by a feature-checking statement if ('serviceWorker' in navigator) {}. Once availability is ensured, the register method has been called register('/service-worker.js') by passing the Service Worker path. This method has a second argument that is optional to pass extra options to the method: for instance, defining scope. Since, there is no second argument in the register method, scope is supposed to be the default; and in this case it is the root where the Service Worker file is located. then and catch return the registration or error object when the register promised is resolved or rejected respectively.
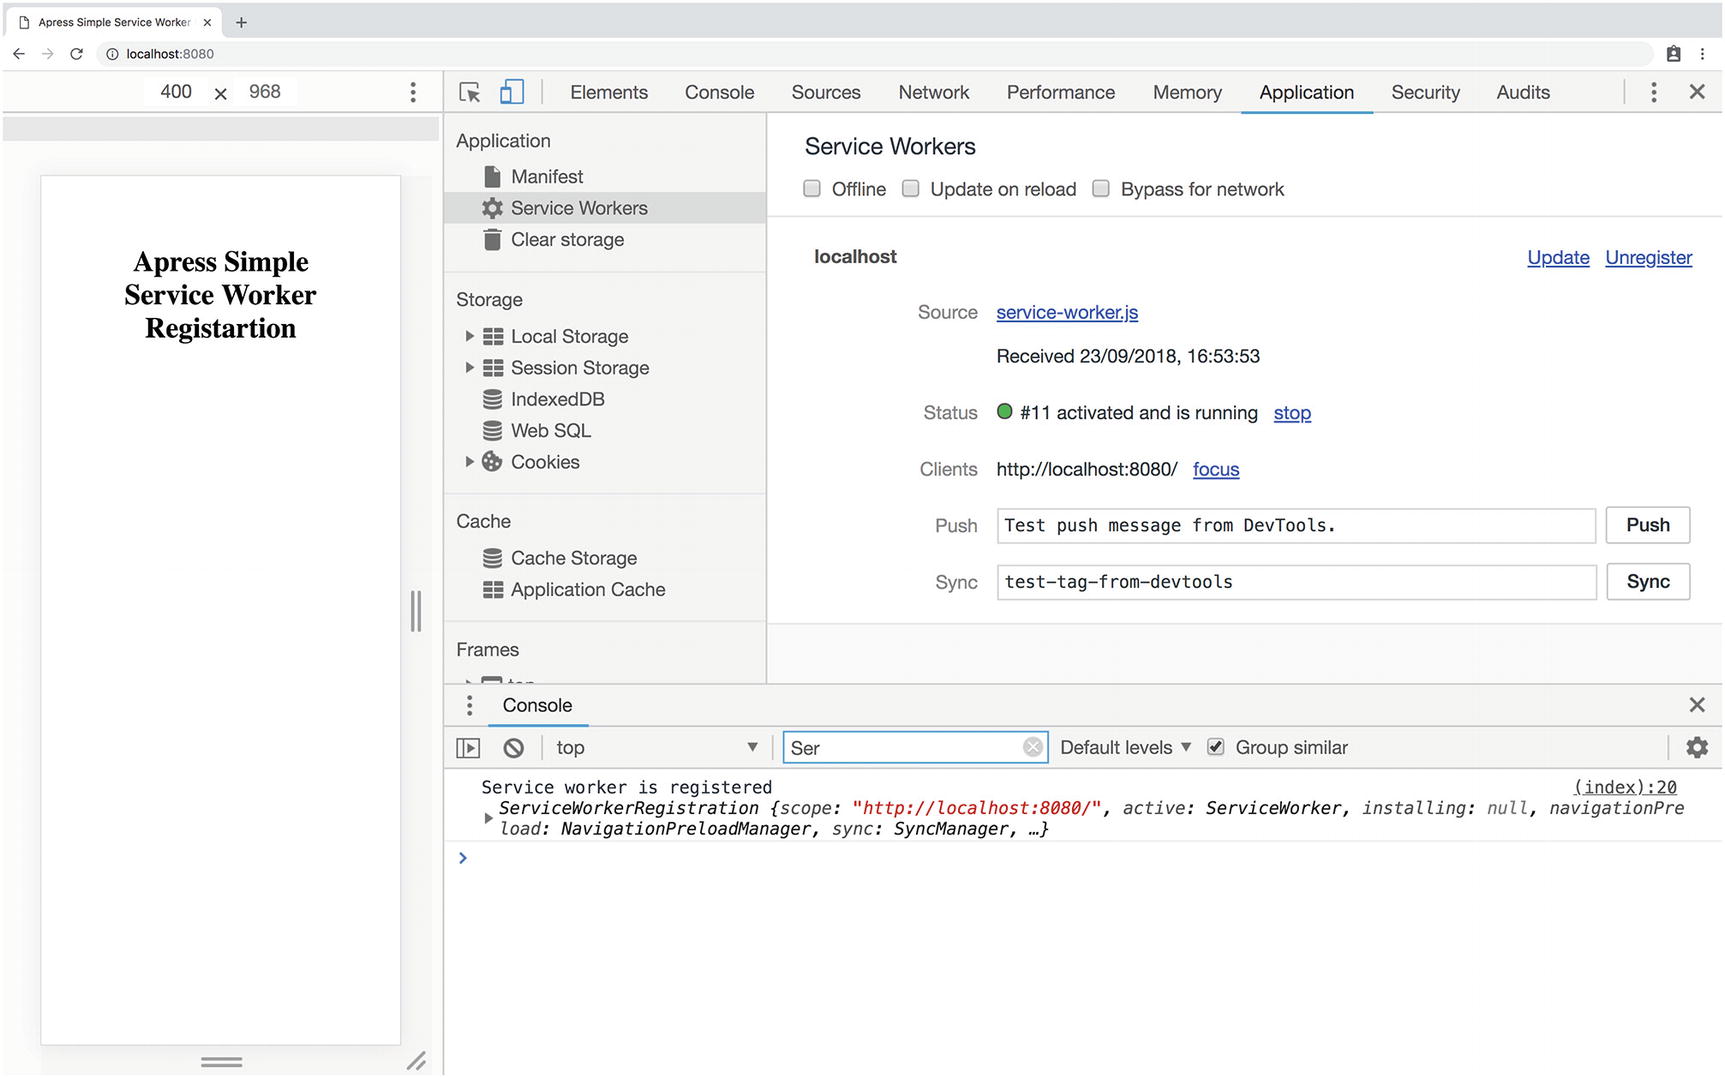
You will be able to see logs when you open devTools in console panel (see Figure 4-6).
Note
You can pull down www.github.com/mhadaily/awesome-apress-pwa/chapter04/01-simple-service-worker . Run npm install and then run npm start. It runs a web server on port 8080. You can navigate to localhost:8080. If you copy and paste code from the book to your project, you need a web server to run your code.

Service worker life cycle when it’s registered for the first time. As you see, install and activate events happen.
Once Service Worker is activated, second reload doesn’t fire install and activate event anymore
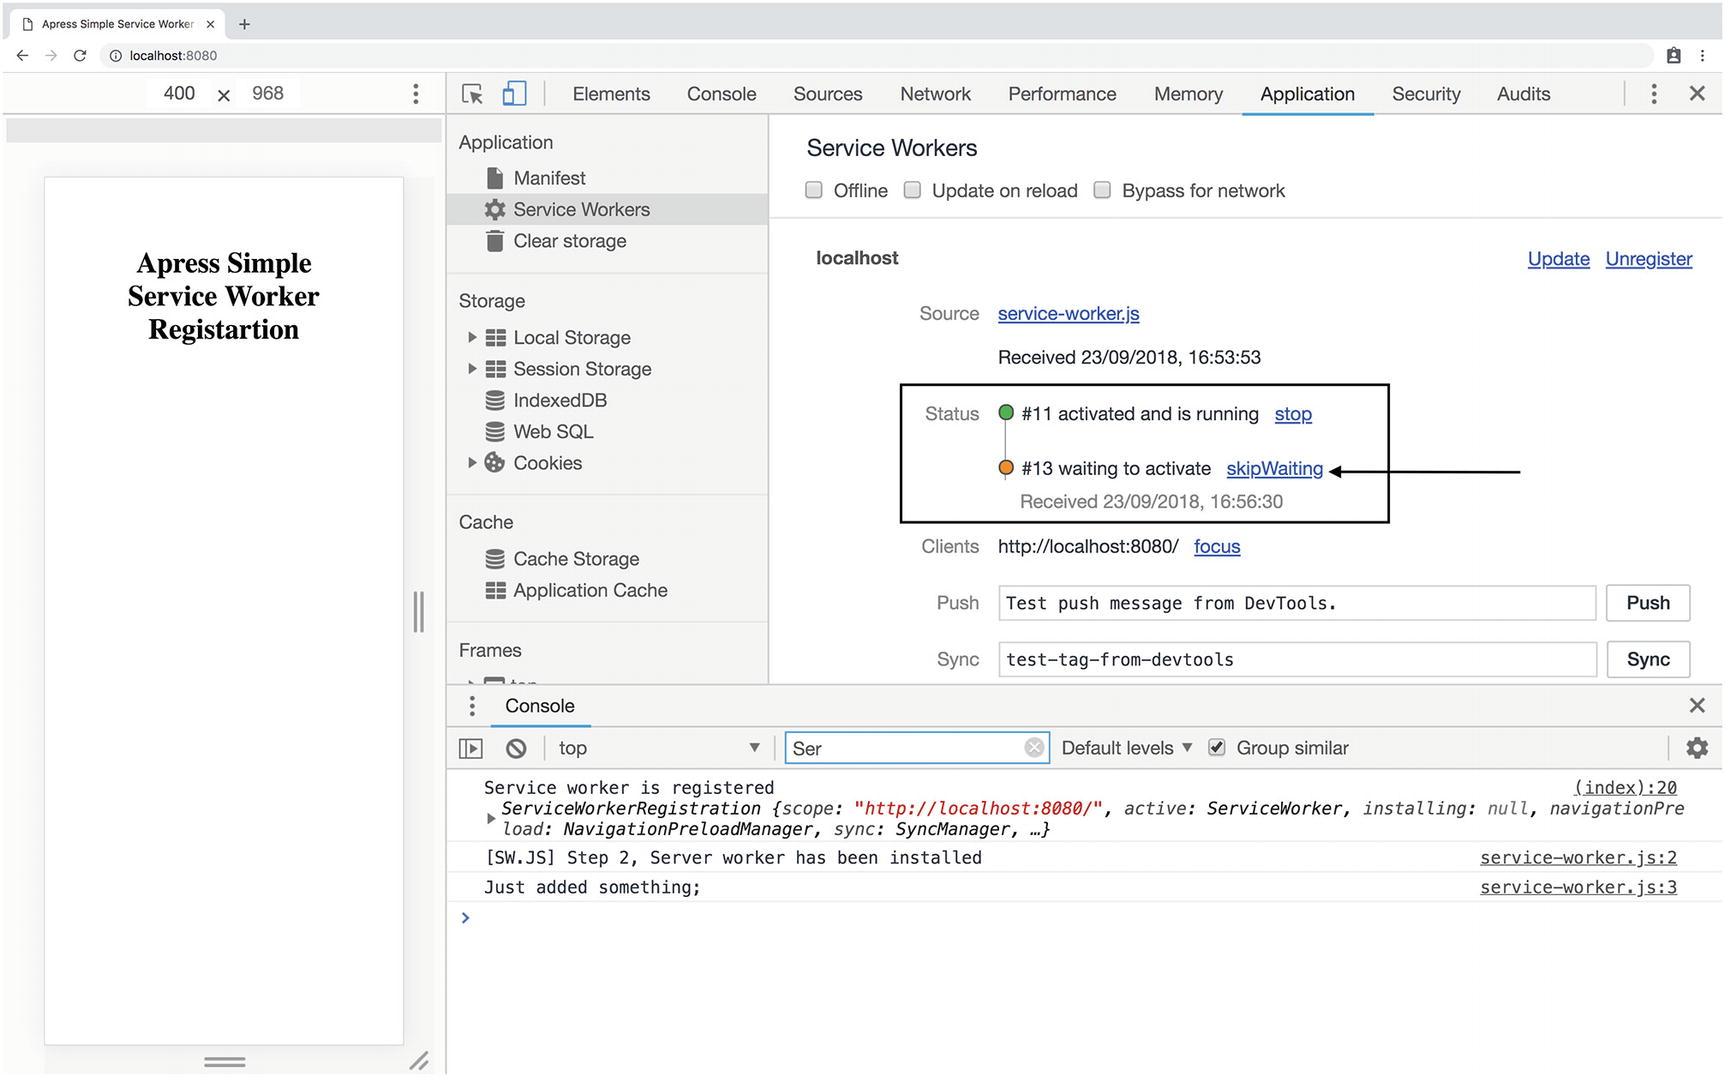
In DevTools, you can click SkipWaiting to activate new Service Worker
So far, we have discovered how Service Worker and its life cycle work. Now it’s time to unfold Cache API capability and see it in action in the next section.
Cache API
Connectivity independence is a top-notch PWAs trait that makes them phenomenal. Cache API is a new caching storage in browsers where we can store a request as key and a response as value. In this section, we are going to have a quick glimpse of Cache API in order to understand how offline features work under the hood.
Precache Static Assets
Let’s break down the code. First, we have defined a cache storage name, which is specified as a version name. Secondly, this app requires that some of its static assets, in order to run without having an internet connection, must be listed in an array.
As soon as the install event in Service Worker fires, regardless of what the result of logic in callback is, it is closed. So, we need a mechanism to tell Service Worker to stand still until actions are resolved. Hence, waitUntil() is a method that tells browsers to remain in the same event until the promise or promises that are going to be passed into the method are resolved.
delete(cacheName): delete whole cache name and returns Boolean.
has(cacheName): find cache name and returns Boolean.
keys(): retrieve all caches name and returns array of strings.
match(request): matches a request, if any.
open(cacheName): it opens a cache storage to add request/response.
All cache APIs are Promised Based.
Once a cache opens, we can add all of our assets either one by one or as an array.
add(request): add a request, and you can add a name as string.
addAll(requests): add array of requests or arrays of strings.
delete(request): deletes request or name string and returns a Boolean.
keys(): retrieve all caches names and returns array of strings.
match(request): matches a request, if any.
matchAll(requests): matches array of requests, if any.
put(request, response): modifies an existing request with new response.

Two versions of caches are available in install event since new Service Worker is not activated yet
Once new Service Worker is activated, all previous oudated caches are deleted
Having reviewed the Service Worker and cache API, I am impatiently looking forward to starting off the Angular Service Worker module.
Angular Service Worker Module
Conceptually, Angular Service Worker is similar to a forward cache or a CDN edge installed in the end user’s web browsers, which satisfies requests made by an Angular app for resources or data from a local cache without needing to wait for the network. Like any cache, it has rules for how content is expired and updated.
Before adding anything to the project, let’s analyze our application using Lighthouse in the Audit panel.
Navigate to awesome-apress-pwa.firebaseapp.com5 or your Firebase URL where you have already deployed the application.
Note
You can pull down www.github.com/mhadaily/awesome-apress-pwa/chapter04/03-analyze-using-lighthouse . Run npm install and then run npm run serve:prod. It runs a production app on a web server. You can navigate to localhost:4200. You may need to also deploy this code to Firebase in order to evaluate your app before adding a Service Worker.
Next, open developer tools6 in Chrome and click on the Audit panel. Our main target group is mobile users. So, preferably select emulation on Mobile and uncheck all check boxes expect Progress Web App7 and select Simulated Fast 3G, 4x CPU slowdown in throttling8 option to make sure our test environment is similar to average real mobile user devices. Ensure clear storage is also selected as focused visitors are those who load the web for the first time.
Press run audits and wait until Lighthouse generates a report. Result indicates a 54/1009 score; that’s because we have some audits passed. Six failures are mainly related to Service Workers, Progressive Enhancement, and Web App Manifest as shown in Figure 4-11.
Note
If you run auditing on localhost, keep in mind that since you are not running your app with HTTPS, you may see a lower score.

Initial result before adding any new optimization to the project
Support for Service Worker in Angular
As you have seen, different icons sizes, ngsw-config.json, manifest.json, and ngsw-worker.js12 have been added to the project while angular.json, app.module.ts, index.html, and package.json have been modified.
- 1.
package.json: Angular Service Worker "@angular/service-worker" has been added to list of dependencies, and by the time of writing this book, version 6.1.0 has been installed. It may upgrade or add a new version by the time you read this book.
- 2.
ngsw-config.json: added to root of project, and it contains a Service Worker configuration. In this chapter we will take a look at it and walk through the basics, and in the next chapter we will dive into it and add more advanced configurations along with tips and tricks.
{"index": "/index.html","assetGroups": [{"name": "app","installMode": "prefetch","resources": {"files": ["/favicon.ico","/index.html","/*.css","/*.js"]}}, {"name": "assets","installMode": "lazy","updateMode": "prefetch","resources": {"files": ["/assets/**"]}}]}
- 3.
manifest.json: added to /src/ folder in the project. it contains a configuration to make the app installable. In Chapter 6, manifest.json will be reviewed in depth.
{"name": "lovely-offline","short_name": "lovely-offline","theme_color": "#1976d2","background_color": "#fafafa","display": "standalone","scope": "/","start_url": "/","icons": [{"src": "assets/icons/icon-72x72.png","sizes": "72x72","type": "image/png"},{"src": "assets/icons/icon-96x96.png","sizes": "96x96","type": "image/png"},{"src": "assets/icons/icon-128x128.png","sizes": "128x128","type": "image/png"},{"src": "assets/icons/icon-144x144.png","sizes": "144x144","type": "image/png"},{"src": "assets/icons/icon-152x152.png","sizes": "152x152","type": "image/png"},{"src": "assets/icons/icon-192x192.png","sizes": "192x192","type": "image/png"},{"src": "assets/icons/icon-384x384.png","sizes": "384x384","type": "image/png"},{"src": "assets/icons/icon-512x512.png","sizes": "512x512","type": "image/png"}]}
- 4.
Different icons: added in src/assets/icons/ and have been reused in manifest.json. We will come back to these icons in Chapter 6.
- 5.
Angular.json: as you know, this file contains all Angular CLI configurations. Since manifest.json needs to be exposed in a public/build folder, it must be added to an assets array in in the architect configurations where it’s applicable. See the following snippet, for example:
"architect": {"build": {"builder": "@angular-devkit/build-angular:browser","options": {..."assets": ["src/favicon.ico","src/assets","src/manifest.json"],"styles": [..."src/styles.scss"],"scripts": []},...There will be one more change here. serviceWorker has been added to the production configuration to inform Angular CLI that this feature is enabled. Let take a look at the configuration’s snippet:"configurations": {"production": {"fileReplacements": [{"replace": "src/environments/environment.ts","with": "src/environments/environment.prod.ts"}],"optimization": true,"outputHashing": "all","sourceMap": false,"extractCss": true,"namedChunks": false,"aot": true,"extractLicenses": true,"vendorChunk": false,"buildOptimizer": true,"serviceWorker": true}}
- 6.
Index.html: after adding manifest.json to the project, it needs to be exposed by rel=manifest in the head of index.html to let the browser know that this file is the project’s manifest configuration file. Theme color meta tells the browser what color to tint UI elements such as the address bar.
<link rel="manifest" href="manifest.json"><meta name="theme-color" content="#1976d2">
- 7.
app.module.ts: is our main app module that has been modified to import ServiceWorkerModule in order to add Service Worker capabilities and features to the project. This module registers ngsw-worker.js Service Worker JavaScript file, which has been written and maintained by the Angular team and will be added after a prod build to the root of project. It has a second argument to ensure that this registration is enabled only when the app is ready to be built for production and doesn’t interrupt the development environment.
ServiceWorkerModule.register("ngsw-worker.js", {enabled: environment.production})Service Worker in Angular can also be registered in two other options:
Adding registration script in index.html, please refer to the previous section where we register a simple Service Worker. Remember to register ngsw-worker.js. I don’t recommend this option; rather, use the next option if necessary.
Using the same registration code in main.ts after bootstrapModule() is resolved,
// main.tsplatformBrowserDynamic().bootstrapModule(AppModule).then(() => {if ('serviceWorker' in navigator && environment.production) {window.addEventListener('load', () => {navigator.serviceWorker.register('/ngsw-worker.js') ;});}}).catch(err => console.log(err));
Note
ServiceWorkerModule.register() has scope option in addition to enable.
- 1.
If you are running Angular 5 in production, there is still a chance to add Angular Service Worker module to your application. Simply go back to each step and try to add or modify all the changes one by one. Run npm install to make sure @angular/service-worker is successfully installed and that you are good to go!
- 2.
You may need only ServiceWorker module alone and not the rest of features: for instance, manifest.json.
It seems every piece is in place and ready to build for production. In the next section, we are going to check out the dist folder and explore new additions.
ngsw-config.json Anatomy
Angular Server Worker has been designed and programmed for large applications in mind; thus, it’s highly configurable.
Note
VersionedFiles is depreciated and as of v6, `versionedFiles` and `files` options have the same behaviors. Use `files` instead.
- 1.
name: defines group name and will be part of Cache API storage name.
- 2.installMode: determines how cache strategies should behave for group’s resources when they are cached or fetched. It has two options:
- a.
prefetch: means all the resources are downloaded and should immediately be cached on install event; this is similar to precache assets that we have seen earlier in this chapter. This mode is being used for caching assets that applications require for bootstrapping like app-shell to make the application be fully capable offline.
- b.
lazy: means each resource is cached individually in runtime when it’s requested.
- a.
- 3.resouces: the explicit list of resources to cache. There are two ways to set up them: files or urls. VersionedFiles as mentioned are depreciated and have the same behavior as files.
- a.
files: contains a list of globs matched against files in the root (in this case). * stands for file names which have been defined with appropriate file name extensions. For example, *.js means all JavaScript files and / means they are located in the root. In short, /*.js indicates all JavaScript files located in the root of the project.
- b.
urls: contains a list of external URLs (either relative, absolute paths, or on different origins) that should be cached: for example, Google Fonts. URLs cannot be hashed, so by changes in configuration, they will be updated. In default configurations, there are no URLs, but we will need it to add our external resources in the next chapter.
- a.
Note
Files will have content hashed included in ngsw.json file’s hashTable13 node. It helps to have an accurate version. Keep in mind that file paths are mapped into the URL space of the application, starting with the base href.
Clearly, it tries to precache essential files that are required to run the Angular application even when there is no network.
- 1.
installMode: please refer to object one description.
- 2.updateMode: determines how each cached asset should behave when application has a new version and is downloaded; similar to installMode, it has two options:
- a.
prefetch: means each asset should be refreshed on every new app version (if needed). Angular creates hashTable to compare hashes, and if there is a new change, the asset will be downloaded. URLS in caches, in this manner, will always be refreshed (with an If-Modified-Since14 request).
- b.
lazy: performs similar to above flow however, when resource is requested. This mode works only if installMode is also lazy.
- a.
- 3.resources: please refer to object one description.
- a.
files: ** stands for everything. In this case, /assets/** means all files under assets files including images, icons, etc.
- a.
Note
Default value for installMode and updateMode is prefetch in ngsw.js
I believe in the saying that says “understand, don’t imitate.” Evaluating each object should help us to be more capable of writing our own rule based on what we need in our application. The fundamentals are the same; however, you may need more advanced setups such as writing rules for external resources and navigation URLs, which will, be discussed in the next chapter.
Build Project with Angular Service Worker
ngsw-worker is registered as the Service Worker logic file, and ngsw.json is being created based on ngsw-config.json. All the configurations and resources are generated in ngsw.json manifest, which is automatically fetched by written logic in ngsw-worker and an add, update, or delete cache based on URLs, files, and strategies that have been defined in this file. It contains a hashTable according to build-hash and Angular Service Worker. Check this hash to update resources that are in dist folder if there are any changes.
If you open ngsw manifest file, static assets and JavaScript files after the build have been added magically. Eventually, Angular CLI will match all of our files and add them to ngsw, as we need a full path of each file. ngsw.json also informs Angular to fetch these resources into the cache and keep them updated accordingly. It’s worth mentioning that even though this file has been designed for Angular Service Worker, it’s a pretty readable file for us as developers.
Navigate to localhost:4200 and open your Chrome DevTools. Open the application panel and check for Service Workers. Figure 4-12 clearly shows that ngsw-worker.js has been successfully installed and how different caches in Cache Storage were created.
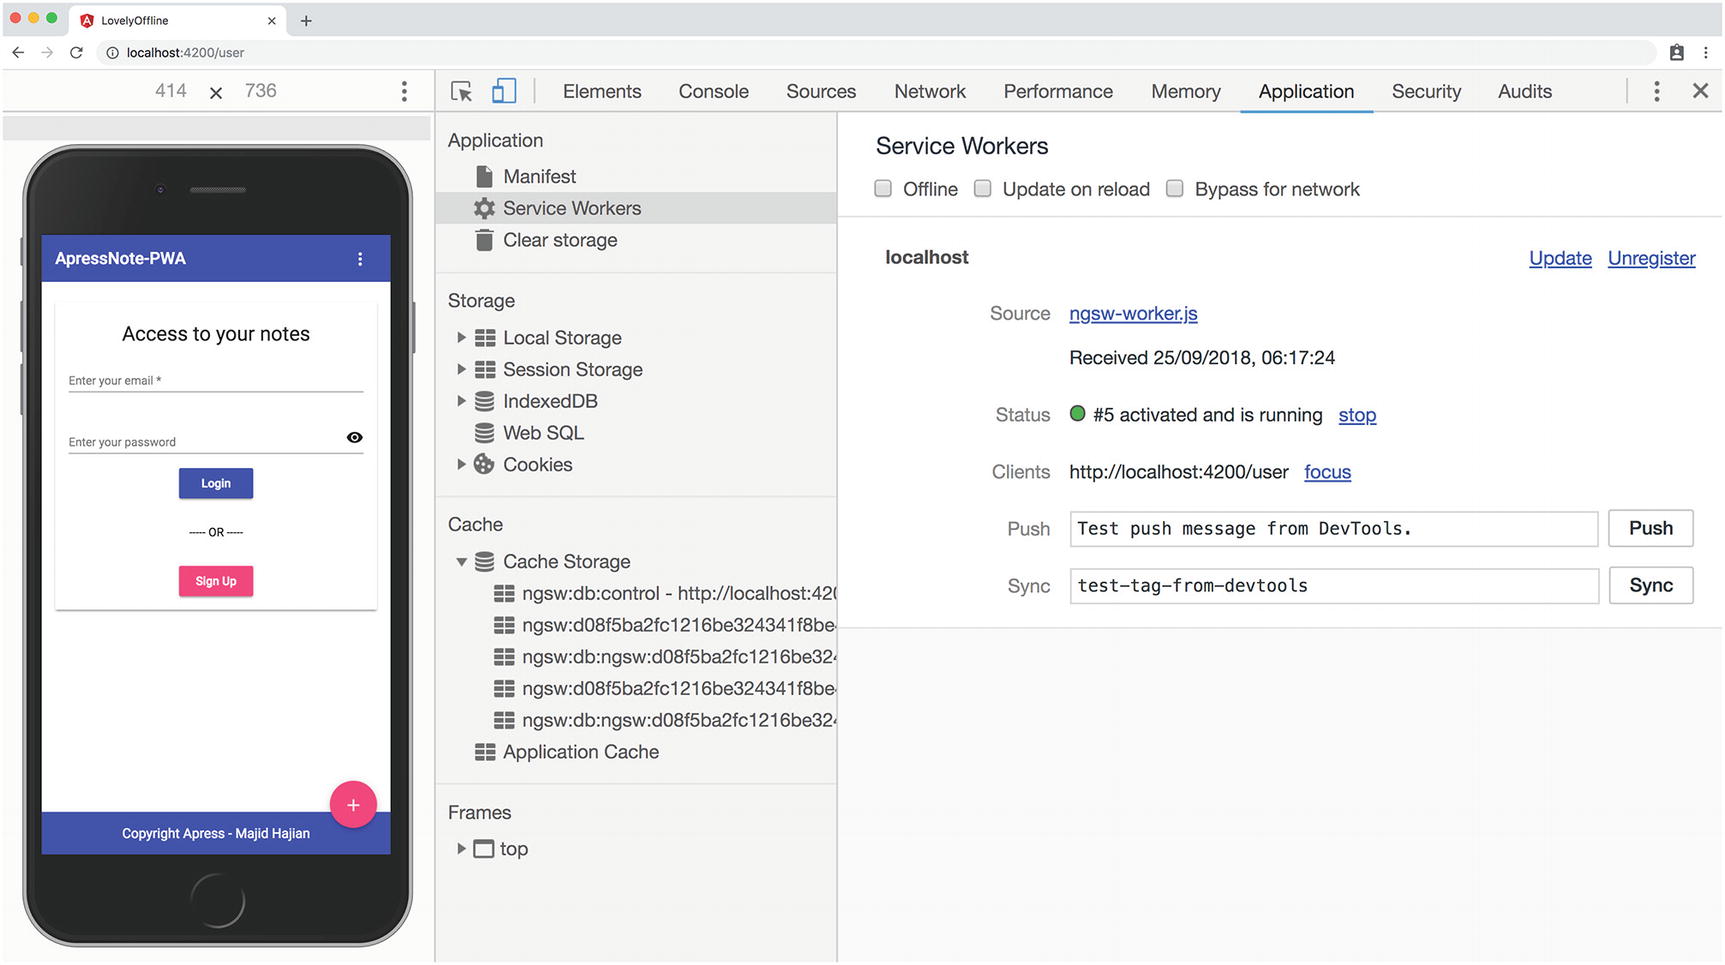
ngsw-worker.js has been installed and resouces have been added to Cache storage
Once deployment is done, open audit panel in Chrome DevTools and press run audits (see Figure 4-13). Remember, we should keep all the same settings as we did earlier in this chapter.
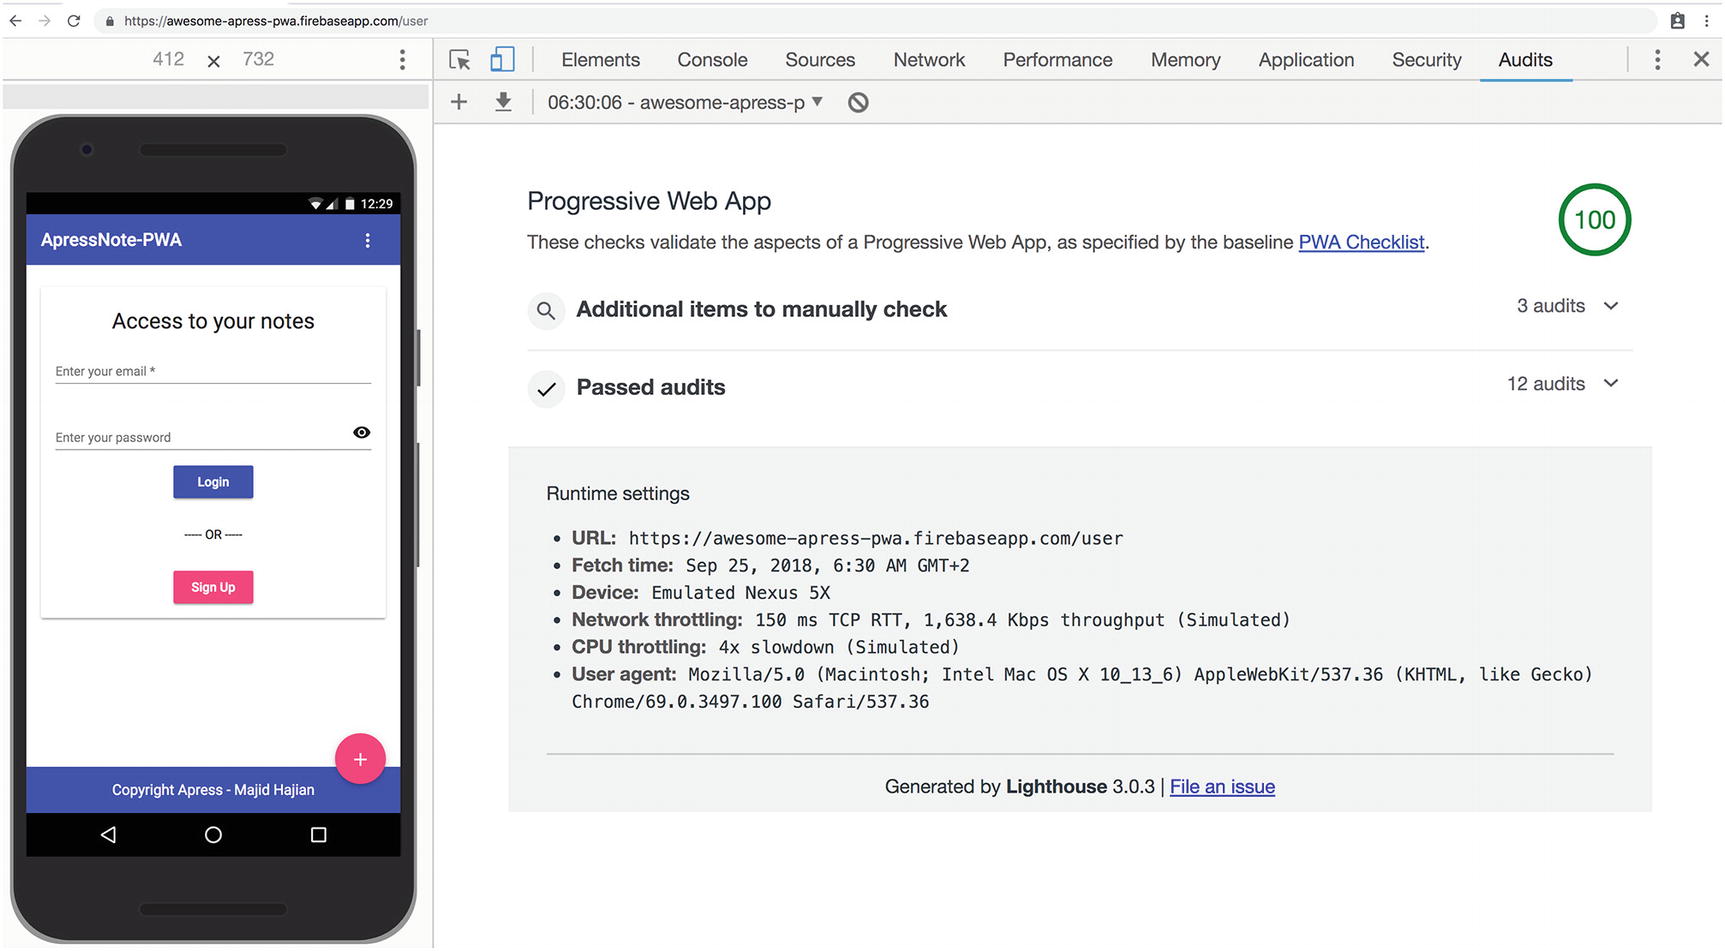
Score 100 after setting up Angular for PWA schematics by ng CLI
Note
Chapters 13 and 14 are dedicated to building a PWA with Workbox, which is a tool to create our service worker and cache strategies. The goal is to have 100% PWA coverage for all Angular apps regardless of their version. So, do not worry if your Angular version does not have an Angular Service Worker module or the Angular Service Worker does not meet your essential requirements. You’ll be covered soon.
Summary
The Angular team aims to make PWA features as easy as possible. As you have seen, it was a trivial process to set up those features in the Angular project. In this chapter, we have seen how we turned our Angular application into a PWA using Angular CLI not only with pwa schematic but also with defined steps to reproduce manually while default configurations have been explained.
Although the app got a score of 100, it does not mean we have accomplished all of what we need to run our application for any circumstances. So, bear with me while we dive deeply into more configurations, settings, and advanced techniques in order to meet all production-ready app requirements.
With that said, I encourage you to proceed to the next chapter.