
5. Program Structure and Control Flow
This chapter covers the details of program structure and control flow. Topics include conditionals, iteration, exceptions, and context managers.
Program Structure and Execution
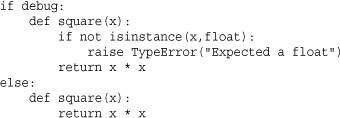
Python programs are structured as a sequence of statements. All language features, including variable assignment, function definitions, classes, and module imports, are statements that have equal status with all other statements. In fact, there are no “special” statements, and every statement can be placed anywhere in a program. For example, this code defines two different versions of a function:
When loading source files, the interpreter always executes every statement in order until there are no more statements to execute. This execution model applies both to files you simply run as the main program and to library files that are loaded via import.
Conditional Execution
The if, else, and elif statements control conditional code execution. The general format of a conditional statement is as follows:
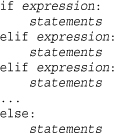
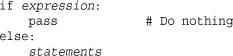
If no action is to be taken, you can omit both the else and elif clauses of a conditional. Use the pass statement if no statements exist for a particular clause:
Loops and Iteration
You implement loops using the for and while statements. Here’s an example:
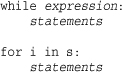
The while statement executes statements until the associated expression evaluates to false. The for statement iterates over all the elements of s until no more elements are available. The for statement works with any object that supports iteration. This obviously includes the built-in sequence types such as lists, tuples, and strings, but also any object that implements the iterator protocol.
An object, s, supports iteration if it can be used with the following code, which mirrors the implementation of the for statement:
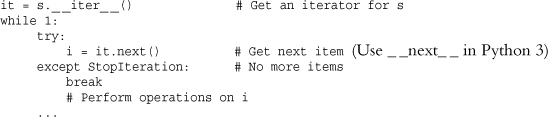
In the statement for i in s, the variable i is known as the iteration variable. On each iteration of the loop, it receives a new value from s. The scope of the iteration variable is not private to the for statement. If a previously defined variable has the same name, that value will be overwritten. Moreover, the iteration variable retains the last value after the loop has completed.
If the elements used in iteration are sequences of identical size, you can unpack their values into individual iteration variables using a statement such as the following:
![]()
In this example, s must contain or produce sequences, each with three elements. On each iteration, the contents of the variables x, y, and z are assigned the items of the corresponding sequence. Although it is most common to see this used when s is a sequence of tuples, unpacking works if the items in s are any kind of sequence including lists, generators, and strings.
When looping, it is sometimes useful to keep track of a numerical index in addition to the data values. Here’s an example:

Python provides a built-in function, enumerate(), that can be used to simplify this code:
![]()
enumerate(s) creates an iterator that simply returns a sequence of tuples (0, s[0]), (1, s[1]), (2, s[2]), and so on.
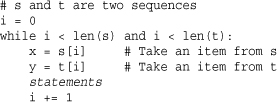
Another common looping problem concerns iterating in parallel over two or more sequences—for example, writing a loop where you want to take items from different sequences on each iteration as follows:
This code can be simplified using the zip() function. For example:
![]()
zip(s,t) combines sequences s and t into a sequence of tuples (s[0],t[0]), (s[1],t[1]), (s[2], t[2]), and so forth, stopping with the shortest of the sequences s and t should they be of unequal length. One caution with zip() is that in Python 2, it fully consumes both s and t, creating a list of tuples. For generators and sequences containing a large amount of data, this may not be what you want. The function itertools.izip() achieves the same effect as zip() but generates the zipped values one at a time rather than creating a large list of tuples. In Python 3, the zip() function also generates values in this manner.
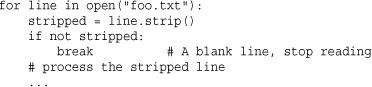
To break out of a loop, use the break statement. For example, this code reads lines of text from a file until an empty line of text is encountered:
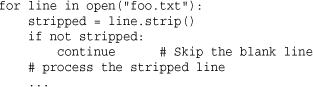
To jump to the next iteration of a loop (skipping the remainder of the loop body), use the continue statement. This statement tends to be used less often but is sometimes useful when the process of reversing a test and indenting another level would make the program too deeply nested or unnecessarily complicated. As an example, the following loop skips all of the blank lines in a file:
The break and continue statements apply only to the innermost loop being executed. If it’s necessary to break out of a deeply nested loop structure, you can use an exception. Python doesn’t provide a “goto” statement.
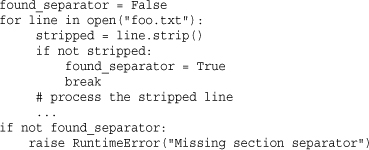
You can also attach the else statement to loop constructs, as in the following example:
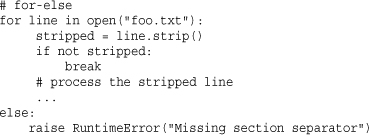
The else clause of a loop executes only if the loop runs to completion. This either occurs immediately (if the loop wouldn’t execute at all) or after the last iteration. On the other hand, if the loop is terminated early using the break statement, the else clause is skipped.
The primary use case for the looping else clause is in code that iterates over data but which needs to set or check some kind of flag or condition if the loop breaks prematurely. For example, if you didn’t use else, the previous code might have to be rewritten with a flag variable as follows:
Exceptions
Exceptions indicate errors and break out of the normal control flow of a program. An exception is raised using the raise statement. The general format of the raise statement is raise Exception([value]), where Exception is the exception type and value is an optional value giving specific details about the exception. Here’s an example:
raise RuntimeError("Unrecoverable Error")
If the raise statement is used by itself, the last exception generated is raised again (although this works only while handling a previously raised exception).
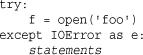
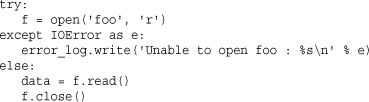
To catch an exception, use the try and except statements, as shown here:
When an exception occurs, the interpreter stops executing statements in the try block and looks for an except clause that matches the exception that has occurred. If one is found, control is passed to the first statement in the except clause. After the except clause is executed, control continues with the first statement that appears after the try-except block. Otherwise, the exception is propagated up to the block of code in which the try statement appeared. This code may itself be enclosed in a try-except that can handle the exception. If an exception works its way up to the top level of a program without being caught, the interpreter aborts with an error message. If desired, uncaught exceptions can also be passed to a user-defined function, sys.excepthook(), as described in Chapter 13, “Python Runtime Services.”
The optional as var modifier to the except statement supplies the name of a variable in which an instance of the exception type supplied to the raise statement is placed if an exception occurs. Exception handlers can examine this value to find out more about the cause of the exception. For example, you can use isinstance() to check the exception type. One caution on the syntax: In previous versions of Python, the except statement was written as except ExcType, var where the exception type and variable were separated by a comma (,). In Python 2.6, this syntax still works, but it is deprecated. In new code, use the as var syntax because it is required in Python 3.
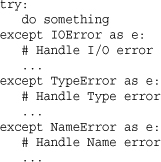
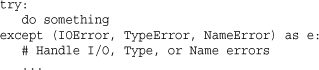
Multiple exception-handling blocks are specified using multiple except clauses, as in the following example:
A single handler can catch multiple exception types like this:
To ignore an exception, use the pass statement as follows:

To catch all exceptions except those related to program exit, use Exception like this:

When catching all exceptions, you should take care to report accurate error information to the user. For example, in the previous code, an error message and the associated exception value is being logged. If you don’t include any information about the exception value, it can make it very difficult to debug code that is failing for reasons that you don’t expect.
All exceptions can be caught using except with no exception type as follows:

Correct use of this form of except is a lot trickier than it looks and should probably be avoided. For instance, this code would also catch keyboard interrupts and requests for program exit—things that you may not want to catch.
The try statement also supports an else clause, which must follow the last except clause. This code is executed if the code in the try block doesn’t raise an exception. Here’s an example:
The finally statement defines a cleanup action for code contained in a try block. Here’s an example:
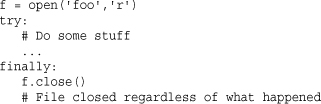
The finally clause isn’t used to catch errors. Rather, it’s used to provide code that must always be executed, regardless of whether an error occurs. If no exception is raised, the code in the finally clause is executed immediately after the code in the try block. If an exception occurs, control is first passed to the first statement of the finally clause. After this code has executed, the exception is re-raised to be caught by another exception handler.
Built-in Exceptions
Python defines the built-in exceptions listed in Table 5.1.
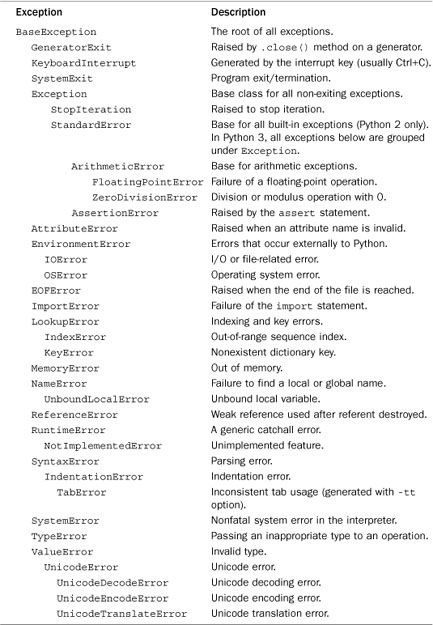
Exceptions are organized into a hierarchy as shown in the table. All the exceptions in a particular group can be caught by specifying the group name in an except clause. Here’s an example:

or

At the top of the exception hierarchy, the exceptions are grouped according to whether or not the exceptions are related to program exit. For example, the SystemExit and KeyboardInterrupt exceptions are not grouped under Exception because programs that want to catch all program-related errors usually don’t want to also capture program termination by accident.
Defining New Exceptions
All the built-in exceptions are defined in terms of classes. To create a new exception, create a new class definition that inherits from Exception, such as the following:
class NetworkError(Exception): pass
To use your new exception, use it with the raise statement as follows:
raise NetworkError("Cannot find host.")
When raising an exception, the optional values supplied with the raise statement are used as the arguments to the exception’s class constructor. Most of the time, this is simply a string indicating some kind of error message. However, user-defined exceptions can be written to take one or more exception values as shown in this example:
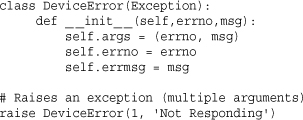
When you create a custom exception class that redefines _ _init_ _(), it is important to assign a tuple containing the arguments to _ _init_ _() to the attribute self.args as shown. This attribute is used when printing exception traceback messages. If you leave it undefined, users won’t be able to see any useful information about the exception when an error occurs.
Exceptions can be organized into a hierarchy using inheritance. For instance, the NetworkError exception defined earlier could serve as a base class for a variety of more specific errors. Here’s an example:
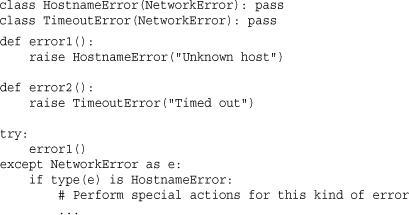
In this case, the except NetworkError statement catches any exception derived from NetworkError. To find the specific type of error that was raised, examine the type of the execution value with type(). Alternatively, the sys.exc_info() function can be used to retrieve information about the last raised exception.
Context Managers and the with Statement
Proper management of system resources such as files, locks, and connections is often a tricky problem when combined with exceptions. For example, a raised exception can cause control flow to bypass statements responsible for releasing critical resources such as a lock.
The with statement allows a series of statements to execute inside a runtime context that is controlled by an object that serves as a context manager. Here is an example:
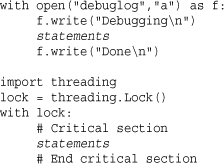
In the first example, the with statement automatically causes the opened file to be closed when control-flow leaves the block of statements that follows. In the second example, the with statement automatically acquires and releases a lock when control enters and leaves the block of statements that follows.
The with obj statement allows the object obj to manage what happens when control-flow enters and exits the associated block of statements that follows. When the with obj statement executes, it executes the method obj._ _enter_ _() to signal that a new context is being entered. When control flow leaves the context, the method obj._ _exit_ _(type,value,traceback) executes. If no exception has been raised, the three arguments to _ _exit_ _() are all set to None. Otherwise, they contain the type, value, and traceback associated with the exception that has caused control-flow to leave the context. The _ _exit_ _() method returns True or False to indicate whether the raised exception was handled or not (if False is returned, any exceptions raised are propagated out of the context).
The with obj statement accepts an optional as var specifier. If given, the value returned by obj._ _enter_ _() is placed into var. It is important to emphasize that obj is not necessarily the value assigned to var.
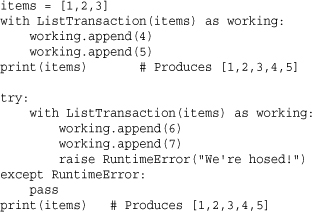
The with statement only works with objects that support the context management protocol (the _ _enter_ _() and _ _exit_ _() methods). User-defined classes can implement these methods to define their own customized context-management. Here is a simple example:
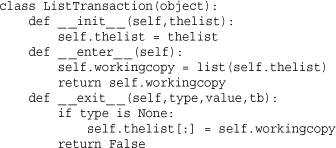
This class allows one to make a sequence of modifications to an existing list. However, the modifications only take effect if no exceptions occur. Otherwise, the original list is left unmodified. For example:
The contextlib module allows custom context managers to be more easily implemented by placing a wrapper around a generator function. Here is an example:
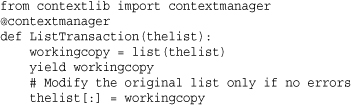
In this example, the value passed to yield is used as the return value from _ _enter_ _(). When the _ _exit_ _() method gets invoked, execution resumes after the yield. If an exception gets raised in the context, it shows up as an exception in the generator function. If desired, an exception could be caught, but in this case, exceptions will simply propagate out of the generator to be handled elsewhere.
Assertions and _ _debug_ _
The assert statement can introduce debugging code into a program. The general form of assert is
assert test [, msg]
where test is an expression that should evaluate to True or False. If test evaluates to False, assert raises an AssertionError exception with the optional message msg supplied to the assert statement. Here’s an example:
![]()
The assert statement should not be used for code that must be executed to make the program correct because it won’t be executed if Python is run in optimized mode (specified with the -O option to the interpreter). In particular, it’s an error to use assert to check user input. Instead, assert statements are used to check things that should always be true; if one is violated, it represents a bug in the program, not an error by the user.
For example, if the function write_data(), shown previously, were intended for use by an end user, the assert statement should be replaced by a conventional if statement and the desired error-handling.
In addition to assert, Python provides the built-in read-only variable _ _debug_ _, which is set to True unless the interpreter is running in optimized mode (specified with the -O option). Programs can examine this variable as needed—possibly running extra error-checking procedures if set. The underlying implementation of the _ _debug_ _ variable is optimized in the interpreter so that the extra control-flow logic of the if statement itself is not actually included. If Python is running in its normal mode, the statements under the if _ _debug_ _ statement are just inlined into the program without the if statement itself. In optimized mode, the if _ _debug_ _ statement and all associated statements are completely removed from the program.
The use of assert and _ _debug_ _ allow for efficient dual-mode development of a program. For example, in debug mode, you can liberally instrument your code with assertions and debug checks to verify correct operation. In optimized mode, all of these extra checks get stripped, resulting in no extra performance penalty.