
1. A Tutorial Introduction
This chapter provides a quick introduction to Python. The goal is to illustrate most of Python’s essential features without getting too bogged down in special rules or details. To do this, the chapter briefly covers basic concepts such as variables, expressions, control flow, functions, generators, classes, and input/output. This chapter is not intended to provide comprehensive coverage. However, experienced programmers should be able to extrapolate from the material in this chapter to create more advanced programs. Beginners are encouraged to try a few examples to get a feel for the language. If you are new to Python and using Python 3, you might want to follow this chapter using Python 2.6 instead. Virtually all the major concepts apply to both versions, but there are a small number of critical syntax changes in Python 3—mostly related to printing and I/O—that might break many of the examples shown in this section. Please refer to Appendix A, “Python 3,” for further details.
Running Python
Python programs are executed by an interpreter. Usually, the interpreter is started by simply typing python into a command shell. However, there are many different implementations of the interpreter and Python development environments (for example, Jython, IronPython, IDLE, ActivePython, Wing IDE, pydev, etc.), so you should consult the documentation for startup details. When the interpreter starts, a prompt appears at which you can start typing programs into a simple read-evaluation loop. For example, in the following output, the interpreter displays its copyright message and presents the user with the >>> prompt, at which the user types the familiar “Hello World” command:

Note
If you try the preceding example and it fails with a SyntaxError, you are probably using Python 3. If this is the case, you can continue to follow along with this chapter, but be aware that the print statement turned into a function in Python 3. Simply add parentheses around the items to be printed in the examples that follow. For instance:
![]()
Putting parentheses around the item to be printed also works in Python 2 as long as you are printing just a single item. However, it’s not a syntax that you commonly see in existing Python code. In later chapters, this syntax is sometimes used in examples in which the primary focus is a feature not directly related to printing, but where the example is supposed to work with both Python 2 and 3.
Python’s interactive mode is one of its most useful features. In the interactive shell, you can type any valid statement or sequence of statements and immediately view the results. Many people, including the author, even use interactive Python as their desktop calculator. For example:
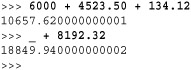
When you use Python interactively, the special variable _ holds the result of the last operation. This can be useful if you want to save or use the result of the last operation in subsequent statements. However, it’s important to stress that this variable is only defined when working interactively.
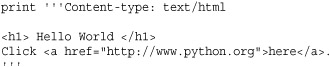
If you want to create a program that you can run repeatedly, put statements in a file such as the following:
![]()
Python source files are ordinary text files and normally have a .py suffix. The # character denotes a comment that extends to the end of the line.
To execute the helloworld.py file, you provide the filename to the interpreter as follows:
![]()
On Windows, Python programs can be started by double-clicking a .py file or typing the name of the program into the Run command on the Windows Start menu. This launches the interpreter and runs the program in a console window. However, be aware that the console window will disappear immediately after the program completes its execution (often before you can read its output). For debugging, it is better to run the program within a Python development tool such as IDLE.
On UNIX, you can use #! on the first line of the program, like this:
![]()
The interpreter runs statements until it reaches the end of the input file. If it’s running interactively, you can exit the interpreter by typing the EOF (end of file) character or by selecting Exit from pull-down menu of a Python IDE. On UNIX, EOF is Ctrl+D; on Windows, it’s Ctrl+Z. A program can request to exit by raising the SystemExit exception.
>>> raise SystemExit
Variables and Arithmetic Expressions
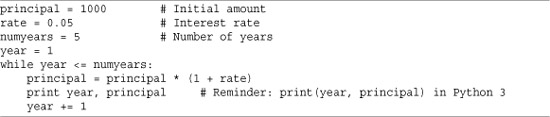
The program in Listing 1.1 shows the use of variables and expressions by performing a simple compound-interest calculation.
Listing 1.1 Simple Compound-Interest Calculation
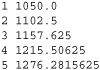
The output of this program is the following table:
Python is a dynamically typed language where variable names are bound to different values, possibly of varying types, during program execution. The assignment operator simply creates an association between a name and a value. Although each value has an associated type such as an integer or string, variable names are untyped and can be made to refer to any type of data during execution. This is different from C, for example, in which a name represents a fixed type, size, and location in memory into which a value is stored. The dynamic behavior of Python can be seen in Listing 1.1 with the principal variable. Initially, it’s assigned to an integer value. However, later in the program it’s reassigned as follows:
principal = principal * (1 + rate)
This statement evaluates the expression and reassociates the name principal with the result. Although the original value of principal was an integer 1000, the new value is now a floating-point number (rate is defined as a float, so the value of the above expression is also a float). Thus, the apparent “type” of principal dynamically changes from an integer to a float in the middle of the program. However, to be precise, it’s not the type of principal that has changed, but rather the value to which the principal name refers.
A newline terminates each statement. However, you can use a semicolon to separate statements on the same line, as shown here:
principal = 1000; rate = 0.05; numyears = 5;
The while statement tests the conditional expression that immediately follows. If the tested statement is true, the body of the while statement executes. The condition is then retested and the body executed again until the condition becomes false. Because the body of the loop is denoted by indentation, the three statements following while in Listing 1.1 execute on each iteration. Python doesn’t specify the amount of required indentation, as long as it’s consistent within a block. However, it is most common (and generally recommended) to use four spaces per indentation level.
One problem with the program in Listing 1.1 is that the output isn’t very pretty. To make it better, you could right-align the columns and limit the precision of principal to two digits. There are several ways to achieve this formatting. The most widely used approach is to use the string formatting operator (%) like this:
![]()
Now the output of the program looks like this:

Format strings contain ordinary text and special formatting-character sequences such as "%d", "%s", and "%f". These sequences specify the formatting of a particular type of data such as an integer, string, or floating-point number, respectively. The special-character sequences can also contain modifiers that specify a width and precision. For example, "%3d" formats an integer right-aligned in a column of width 3, and "%0.2f" formats a floating-point number so that only two digits appear after the decimal point. The behavior of format strings is almost identical to the C printf() function and is described in detail in Chapter 4, “Operators and Expressions.”
A more modern approach to string formatting is to format each part individually using the format() function. For example:
![]()
format() uses format specifiers that are similar to those used with the traditional string formatting operator (%). For example, "3d" formats an integer right-aligned in a column of width 3, and "0.2f" formats a float-point number to have two digits of accuracy. Strings also have a format() method that can be used to format many values at once. For example:
![]()
In this example, the number before the colon in "{0:3d}" and "{1:0.2f}" refers to the associated argument passed to the format() method and the part after the colon is the format specifier.
Conditionals
The if and else statements can perform simple tests. Here’s an example:
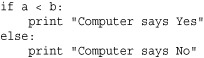
The bodies of the if and else clauses are denoted by indentation. The else clause is optional.
To create an empty clause, use the pass statement, as follows:

You can form Boolean expressions by using the or, and, and not keywords:
![]()
Note
Writing complex test cases commonly results in statements that involve an annoyingly long line of code. To improve readability, you can continue any statement to the next line by using a backslash () at the end of a line as shown. If you do this, the normal indentation rules don’t apply to the next line, so you are free to format the continued lines as you wish.
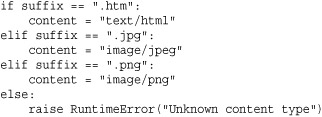
Python does not have a special switch or case statement for testing values. To handle multiple-test cases, use the elif statement, like this:
To denote truth values, use the Boolean values True and False. Here’s an example:
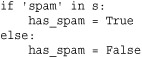
All relational operators such as < and > return True or False as results. The in operator used in this example is commonly used to check whether a value is contained inside of another object such as a string, list, or dictionary. It also returns True or False, so the preceding example could be shortened to this:
has_spam = 'spam' in s
File Input and Output
The following program opens a file and reads its contents line by line:
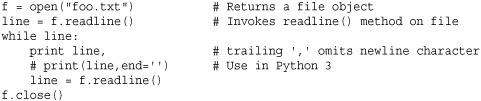
The open() function returns a new file object. By invoking methods on this object, you can perform various file operations. The readline() method reads a single line of input, including the terminating newline. The empty string is returned at the end of the file.
In the example, the program is simply looping over all the lines in the file foo.txt. Whenever a program loops over a collection of data like this (for instance input lines, numbers, strings, etc.), it is commonly known as iteration. Because iteration is such a common operation, Python provides a dedicated statement, for, that is used to iterate over items. For instance, the same program can be written much more succinctly as follows:
![]()
To make the output of a program go to a file, you can supply a file to the print statement using >>, as shown in the following example:
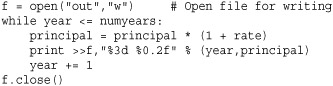
The >> syntax only works in Python 2. If you are using Python 3, change the print statement to the following:
print("%3d %0.2f" % (year,principal),file=f)
In addition, file objects support a write() method that can be used to write raw data. For example, the print statement in the previous example could have been written this way:
f.write("%3d %0.2f " % (year,principal))
Although these examples have worked with files, the same techniques apply to the standard output and input streams of the interpreter. For example, if you wanted to read user input interactively, you can read from the file sys.stdin. If you want to write data to the screen, you can write to sys.stdout, which is the same file used to output data produced by the print statement. For example:
![]()
In Python 2, this code can also be shortened to the following:
name = raw_input("Enter your name :")
In Python 3, the raw_input() function is called input(), but it works in exactly the same manner.
Strings
To create string literals, enclose them in single, double, or triple quotes as follows:
![]()
The same type of quote used to start a string must be used to terminate it. Triple-quoted strings capture all the text that appears prior to the terminating triple quote, as opposed to single- and double-quoted strings, which must be specified on one logical line. Triple-quoted strings are useful when the contents of a string literal span multiple lines of text such as the following:
Strings are stored as sequences of characters indexed by integers, starting at zero. To extract a single character, use the indexing operator s[i] like this:
![]()
To extract a substring, use the slicing operator s[i:j]. This extracts all characters from s whose index k is in the range i <= k < j. If either index is omitted, the beginning or end of the string is assumed, respectively:
![]()
Strings are concatenated with the plus (+) operator:
g = a + " This is a test"
Python never implicitly interprets the contents of a string as numerical data (i.e., as in other languages such as Perl or PHP). For example, + always concatenates strings:
![]()
To perform mathematical calculations, strings first have to be converted into a numeric value using a function such as int() or float(). For example:
z = int(x) + int(y) # z = 79 (Integer +)
Non-string values can be converted into a string representation by using the str(), repr(), or format() function. Here’s an example:
![]()
Although str() and repr() both create strings, their output is usually slightly different. str() produces the output that you get when you use the print statement, whereas repr() creates a string that you type into a program to exactly represent the value of an object. For example:
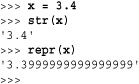
The inexact representation of 3.4 in the previous example is not a bug in Python. It is an artifact of double-precision floating-point numbers, which by their design can not exactly represent base-10 decimals on the underlying computer hardware.
The format() function is used to convert a value to a string with a specific formatting applied. For example:
![]()
Lists
Lists are sequences of arbitrary objects. You create a list by enclosing values in square brackets, as follows:
names = [ "Dave", "Mark", "Ann", "Phil" ]
Lists are indexed by integers, starting with zero. Use the indexing operator to access and modify individual items of the list:
![]()
To append new items to the end of a list, use the append() method:
names.append("Paula")
To insert an item into the middle of a list, use the insert() method:
names.insert(2, "Thomas")
You can extract or reassign a portion of a list by using the slicing operator:

Use the plus (+) operator to concatenate lists:
a = [1,2,3] + [4,5] # Result is [1,2,3,4,5]
An empty list is created in one of two ways:
![]()
Lists can contain any kind of Python object, including other lists, as in the following example:
a = [1,"Dave",3.14, ["Mark", 7, 9, [100,101]], 10]
Items contained in nested lists are accessed by applying more than one indexing operation, as follows:
![]()
The program in Listing 1.2 illustrates a few more advanced features of lists by reading a list of numbers from a file specified on the command line and outputting the minimum and maximum values.
Listing 1.2 Advanced List Features
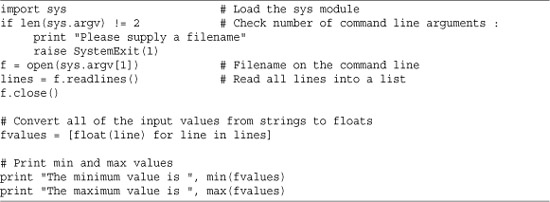
The first line of this program uses the import statement to load the sys module from the Python library. This module is being loaded in order to obtain command-line arguments.
The open() function uses a filename that has been supplied as a command-line option and placed in the list sys.argv. The readlines() method reads all the input lines into a list of strings.
The expression [float(line) for line in lines] constructs a new list by looping over all the strings in the list lines and applying the function float() to each element. This particularly powerful method of constructing a list is known as a list comprehension. Because the lines in a file can also be read using a for loop, the program can be shortened by converting values using a single statement like this:
fvalues = [float(line) for line in open(sys.argv[1])]
After the input lines have been converted into a list of floating-point numbers, the built-in min() and max() functions compute the minimum and maximum values.
Tuples
To create simple data structures, you can pack a collection of values together into a single object using a tuple. You create a tuple by enclosing a group of values in parentheses like this:
![]()
Python often recognizes that a tuple is intended even if the parentheses are missing:
![]()
For completeness, 0- and 1-element tuples can be defined, but have special syntax:
![]()
The values in a tuple can be extracted by numerical index just like a list. However, it is more common to unpack tuples into a set of variables like this:
![]()
Although tuples support most of the same operations as lists (such as indexing, slicing, and concatenation), the contents of a tuple cannot be modified after creation (that is, you cannot replace, delete, or append new elements to an existing tuple). This reflects the fact that a tuple is best viewed as a single object consisting of several parts, not as a collection of distinct objects to which you might insert or remove items.
Because there is so much overlap between tuples and lists, some programmers are inclined to ignore tuples altogether and simply use lists because they seem to be more flexible. Although this works, it wastes memory if your program is going to create a large number of small lists (that is, each containing fewer than a dozen items). This is because lists slightly overallocate memory to optimize the performance of operations that add new items. Because tuples are immutable, they use a more compact representation where there is no extra space.
Tuples and lists are often used together to represent data. For example, this program shows how you might read a file consisting of different columns of data separated by commas:
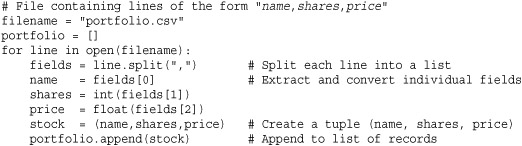
The split() method of strings splits a string into a list of fields separated by the given delimiter character. The resulting portfolio data structure created by this program looks like a two-dimension array of rows and columns. Each row is represented by a tuple and can be accessed as follows:
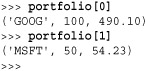
Individual items of data can be accessed like this:
Here’s an easy way to loop over all of the records and expand fields into a set of variables:
![]()
Sets
A set is used to contain an unordered collection of objects. To create a set, use the set() function and supply a sequence of items such as follows:
![]()
Unlike lists and tuples, sets are unordered and cannot be indexed by numbers. Moreover, the elements of a set are never duplicated. For example, if you inspect the value of t from the preceding code, you get the following:
![]()
Notice that only one 'l' appears.
Sets support a standard collection of operations, including union, intersection, difference, and symmetric difference. Here’s an example:

New items can be added to a set using add() or update():
![]()
An item can be removed using remove():
t.remove('H')
Dictionaries
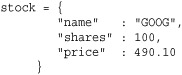
A dictionary is an associative array or hash table that contains objects indexed by keys. You create a dictionary by enclosing the values in curly braces ({ }), like this:
To access members of a dictionary, use the key-indexing operator as follows:
![]()
Inserting or modifying objects works like this:
![]()
Although strings are the most common type of key, you can use many other Python objects, including numbers and tuples. Some objects, including lists and dictionaries, cannot be used as keys because their contents can change.
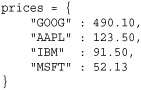
A dictionary is a useful way to define an object that consists of named fields as shown previously. However, dictionaries are also used as a container for performing fast lookups on unordered data. For example, here’s a dictionary of stock prices:
An empty dictionary is created in one of two ways:
![]()
Dictionary membership is tested with the in operator, as in the following example:
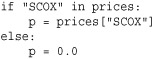
This particular sequence of steps can also be performed more compactly as follows:
p = prices.get("SCOX",0.0)
To obtain a list of dictionary keys, convert a dictionary to a list:
syms = list(prices) # syms = ["AAPL", "MSFT", "IBM", "GOOG"]
Use the del statement to remove an element of a dictionary:
del prices["MSFT"]
Dictionaries are probably the most finely tuned data type in the Python interpreter. So, if you are merely trying to store and work with data in your program, you are almost always better off using a dictionary than trying to come up with some kind of custom data structure on your own.
Iteration and Looping
The most widely used looping construct is the for statement, which is used to iterate over a collection of items. Iteration is one of Python’s richest features. However, the most common form of iteration is to simply loop over all the members of a sequence such as a string, list, or tuple. Here’s an example:
![]()
In this example, the variable n will be assigned successive items from the list [1,2,3,4,...,9] on each iteration. Because looping over ranges of integers is quite common, the following shortcut is often used for that purpose:
![]()
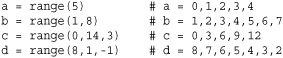
The range(i,j [,stride]) function creates an object that represents a range of integers with values i to j-1. If the starting value is omitted, it’s taken to be zero. An optional stride can also be given as a third argument. Here’s an example:
One caution with range() is that in Python 2, the value it creates is a fully populated list with all of the integer values. For extremely large ranges, this can inadvertently consume all available memory. Therefore, in older Python code, you will see programmers using an alternative function xrange(). For example:
![]()
The object created by xrange() computes the values it represents on demand when lookups are requested. For this reason, it is the preferred way to represent extremely large ranges of integer values. In Python 3, the xrange() function has been renamed to range() and the functionality of the old range() function has been removed.
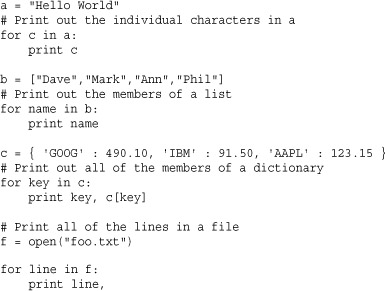
The for statement is not limited to sequences of integers and can be used to iterate over many kinds of objects including strings, lists, dictionaries, and files. Here’s an example:
The for loop is one of Python’s most powerful language features because you can create custom iterator objects and generator functions that supply it with sequences of values. More details about iterators and generators can be found later in this chapter and in Chapter 6, “Functions and Functional Programming.”
Functions
You use the def statement to create a function, as shown in the following example:

To invoke a function, simply use the name of the function followed by its arguments enclosed in parentheses, such as result = remainder(37,15). You can use a tuple to return multiple values from a function, as shown here:

When returning multiple values in a tuple, you can easily unpack the result into separate variables like this:
quotient, remainder = divide(1456,33)
To assign a default value to a function parameter, use assignment:
![]()
When default values are given in a function definition, they can be omitted from subsequent function calls. When omitted, the argument will simply take on the default value. Here’s an example:
connect('www.python.org', 80)
You also can invoke functions by using keyword arguments and supplying the arguments in arbitrary order. However, this requires you to know the names of the arguments in the function definition. Here’s an example:
connect(port=80,hostname="www.python.org")
When variables are created or assigned inside a function, their scope is local. That is, the variable is only defined inside the body of the function and is destroyed when the function returns. To modify the value of a global variable from inside a function, use the global statement as follows:

Generators
Instead of returning a single value, a function can generate an entire sequence of results if it uses the yield statement. For example:
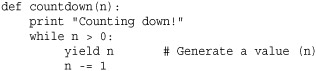
Any function that uses yield is known as a generator. Calling a generator function creates an object that produces a sequence of results through successive calls to a next() method (or _ _next_ _() in Python 3). For example:
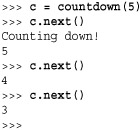
The next() call makes a generator function run until it reaches the next yield statement. At this point, the value passed to yield is returned by next(), and the function suspends execution. The function resumes execution on the statement following yield when next() is called again. This process continues until the function returns.
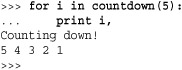
Normally you would not manually call next() as shown. Instead, you hook it up to a for loop like this:
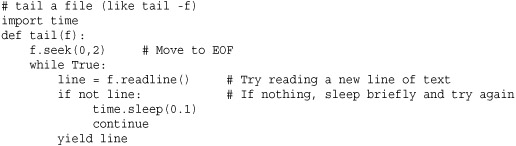
Generators are an extremely powerful way of writing programs based on processing pipelines, streams, or data flow. For example, the following generator function mimics the behavior of the UNIX tail -f command that’s commonly used to monitor log files:
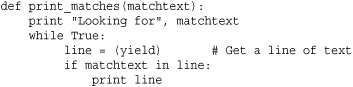
Here’s a generator that looks for a specific substring in a sequence of lines:
![]()
Here’s an example of hooking both of these generators together to create a simple processing pipeline:

A subtle aspect of generators is that they are often mixed together with other iterable objects such as lists or files. Specifically, when you write a statement such as for item in s, s could represent a list of items, the lines of a file, the result of a generator function, or any number of other objects that support iteration. The fact that you can just plug different objects in for s can be a powerful tool for creating extensible programs.
Coroutines
Normally, functions operate on a single set of input arguments. However, a function can also be written to operate as a task that processes a sequence of inputs sent to it. This type of function is known as a coroutine and is created by using the yield statement as an expression (yield) as shown in this example:
To use this function, you first call it, advance it to the first (yield), and then start sending data to it using send(). For example:
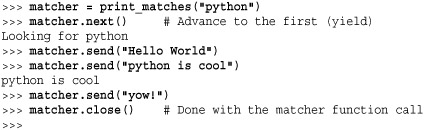
A coroutine is suspended until a value is sent to it using send(). When this happens, that value is returned by the (yield) expression inside the coroutine and is processed by the statements that follow. Processing continues until the next (yield) expression is encountered—at which point the function suspends. This continues until the coroutine function returns or close() is called on it as shown in the previous example.
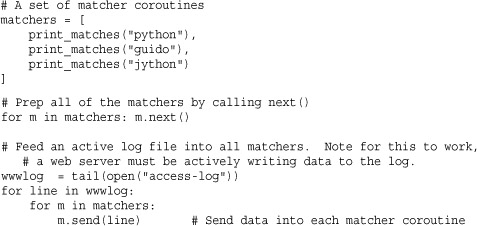
Coroutines are useful when writing concurrent programs based on producer-consumer problems where one part of a program is producing data to be consumed by another part of the program. In this model, a coroutine represents a consumer of data. Here is an example of using generators and coroutines together:
Further details about coroutines can be found in Chapter 6.
Objects and Classes
All values used in a program are objects. An object consists of internal data and methods that perform various kinds of operations involving that data. You have already used objects and methods when working with the built-in types such as strings and lists. For example:
![]()
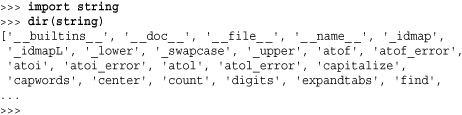
The dir() function lists the methods available on an object and is a useful tool for interactive experimentation. For example:

When inspecting objects, you will see familiar methods such as append() and insert() listed. However, you will also see special methods that always begin and end with a double underscore. These methods implement various language operations. For example, the _ _add_ _() method implements the + operator:
![]()
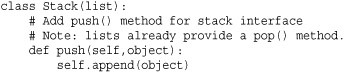
The class statement is used to define new types of objects and for object-oriented programming. For example, the following class defines a simple stack with push(), pop(), and length() operations:
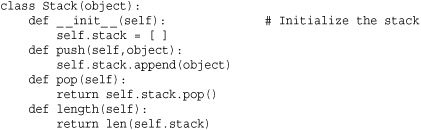
In the first line of the class definition, the statement class Stack(object) declares Stack to be an object. The use of parentheses is how Python specifies inheritance—in this case, Stack inherits from object, which is the root of all Python types. Inside the class definition, methods are defined using the def statement. The first argument in each method always refers to the object itself. By convention, self is the name used for this argument. All operations involving the attributes of an object must explicitly refer to the self variable. Methods with leading and trailing double underscores are special methods. For example, _ _init_ _ is used to initialize an object after it’s created.
To use a class, write code such as the following:
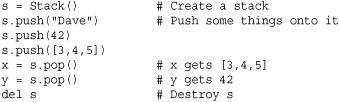
In this example, an entirely new object was created to implement the stack. However, a stack is almost identical to the built-in list object. Therefore, an alternative approach would be to inherit from list and add an extra method:
Normally, all of the methods defined within a class apply only to instances of that class (that is, the objects that are created). However, different kinds of methods can be defined such as static methods familiar to C++ and Java programmers. For example:

In this case, @staticmethod declares the method that follows to be a static method. @staticmethod is an example of using an a decorator, a topic that is discussed further in Chapter 6.
Exceptions
If an error occurs in your program, an exception is raised and a traceback message such as the following appears:
![]()
The traceback message indicates the type of error that occurred, along with its location. Normally, errors cause a program to terminate. However, you can catch and handle exceptions using try and except statements, like this:
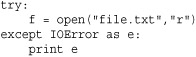
If an IOError occurs, details concerning the cause of the error are placed in e and control passes to the code in the except block. If some other kind of exception is raised, it’s passed to the enclosing code block (if any). If no errors occur, the code in the except block is ignored. When an exception is handled, program execution resumes with the statement that immediately follows the last except block. The program does not return to the location where the exception occurred.
The raise statement is used to signal an exception. When raising an exception, you can use one of the built-in exceptions, like this:
raise RuntimeError("Computer says no")
Or you can create your own exceptions, as described in the section “Defining New Exceptions” in Chapter 5, “Program Structure and Control Flow.”
Proper management of system resources such as locks, files, and network connections is often a tricky problem when combined with exception handling. To simplify such programming, you can use the with statement with certain kinds of objects. Here is an example of writing code that uses a mutex lock:
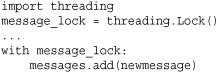
In this example, the message_lock object is automatically acquired when the with statement executes. When execution leaves the context of the with block, the lock is automatically released. This management takes place regardless of what happens inside the with block. For example, if an exception occurs, the lock is released when control leaves the context of the block.
The with statement is normally only compatible with objects related to system resources or the execution environment such as files, connections, and locks. However, user-defined objects can define their own custom processing. This is covered in more detail in the “Context Management Protocol” section of Chapter 3, “Types and Objects.”
Modules
As your programs grow in size, you will want to break them into multiple files for easier maintenance. To do this, Python allows you to put definitions in a file and use them as a module that can be imported into other programs and scripts. To create a module, put the relevant statements and definitions into a file that has the same name as the module. (Note that the file must have a .py suffix.) Here’s an example:

To use your module in other programs, you can use the import statement:
![]()
The import statement creates a new namespace and executes all the statements in the associated .py file within that namespace. To access the contents of the namespace after import, simply use the name of the module as a prefix, as in div.divide() in the preceding example.
If you want to import a module using a different name, supply the import statement with an optional as qualifier, as follows:
![]()
To import specific definitions into the current namespace, use the from statement:
![]()
To load all of a module’s contents into the current namespace, you can also use the following:
from div import *
As with objects, the dir() function lists the contents of a module and is a useful tool for interactive experimentation:
Getting Help
When working with Python, you have several sources of quickly available information. First, when Python is running in interactive mode, you can use the help() command to get information about built-in modules and other aspects of Python. Simply type help() by itself for general information or help('modulename') for information about a specific module. The help() command can also be used to return information about specific functions if you supply a function name.
Most Python functions have documentation strings that describe their usage. To print the doc string, simply print the _ _doc_ _ attribute. Here’s an example:

Last, but not least, most Python installations also include the command pydoc, which can be used to return documentation about Python modules. Simply type pydoc topic at a system command prompt.