![]()
Introduction and Environment Set Up
Data science libraries exist in various programming languages. However, you will be using Python programming language for data science and machine learning since Python is flexible, easy to learn, and offers the most advanced data science and machine learning libraries. Furthermore, Python has a huge data science community where you can take help from whenever you want.
In this chapter, you will see how to set up the Python environment needed to run various data science and machine learning libraries. The chapter also contains a crash Python course for absolute beginners in Python. Finally, the different data science and machine learning libraries that we are going to study in this book have been discussed. The chapter ends with a simple exercise.
1.1. Difference between Data Science and Machine Learning
Data science and machine learning are terms that are often interchangeably used. However, the two terms are different. Data science is a subject area of that uses scientific approaches and mathematical techniques such as statistics to draw out meaning and insights from data. According to Dr. Thomas Miller from Northwestern University, data science is “a combination of information technology, modeling and business management.”
Machine learning, on the other hand, is an approach that consists of mathematical algorithms that enable computers to make decisions without being explicitly performed. Rather, machine learning algorithms learn from data, and then based on the insights from the dataset, make decisions without human input.
In this book, you will learn both Data Science and Machine Learning. In the first five chapters, you will study the concepts required to store, analyze, and visualize the datasets. From the 6th chapter onwards, different types of machine learning concepts are explained.
1.2. Steps in Learning Data Science and Machine Learning
1.Know What Data Science and Machine Learning Is All About
Before you delve deep into developing data science and machine learning applications, you have to know what the field of data science and machine learning is, what you can do with that, and what are some of the best tools and libraries that you can use. The first chapter of the book answers these questions.
2.Learn a Programming Language
If you wish to be a data science and machine learning expert, you have to learn programming. There is no working around this fact. Though there are several cloud-based machine learning platforms like Amazon Sage Maker and Azure ML Studio where you can create data science applications without writing a single line of code. However, to get fine-grained control over your applications, you will need to learn programming.
And though you can program natural language applications in any programming language, I would recommend that you learn Python programming language. Python is one of the most routinely used libraries for data science and machine learning with myriads of basic and advanced data science and ML libraries. In addition, many data science applications are based on deep learning and machine learning techniques. Again, Python is the language that provides easy to use libraries for deep learning and machine learning. In short, learn Python. Chapter 2 contains a crash course for absolute beginners in Python.
3.Start with the Basics
Start with very basic data science applications. I would rather recommend that you should not start developing data science applications right away. Start with basic mathematical and numerical operations like computing dot products and matrix multiplication, etc. Chapter 3 of this book explains how to use the NumPy library for basic data science and machine learning tasks. You should also know how to import data into your application and how to visualize it. Chapters 4 and 5 of this book explain the task of data analysis and visualization. After that, you should know how to visualize and preprocess data.
4.Learn Machine Learning and Deep Learning Algorithms
Data Science, machine learning, and deep learning go hand in hand. Therefore, you have to learn machine learning and deep learning algorithms. Among machine learning, start with the supervised learning techniques. Supervised machine learning algorithms are chiefly divided into two types, i.e., regression and classification. Chapter 6 of this book explains regression algorithms, while chapter 7 explains classification algorithms. Chapter 8 explains unsupervised machine learning, while chapter 9 briefly reviews deep learning techniques. Finally, the 10th Chapter explains how to reduce feature (dimensions) set to improve the performance of machine learning applications.
5.Develop Data Science Applications
Once you are familiar with basic machine learning and deep learning algorithms, you are good to go for developing data science applications. Data science applications can be of different types, i.e., predicting house prices, recognizing images, classifying text, etc. Being a beginner, you should try to develop versatile data science applications, and later, when you find your area of interest, e.g., natural language processing or image recognition, delve deep into that. It is important to mention that this book provides a very generic introduction to data science, and you will see applications of data science to structured data, textual data, and image data. However, this book is not dedicated to any specific data science field.
6.Deploying Data Science Applications
To put a data science or machine learning application into production so that anyone can use it, you need to deploy it to production. There are several ways to deploy data science applications. You can use dedicated servers containing REST APIs that can be used to call various functionalities in your data science application. To deploy such applications, you need to learn Python Flask, Docker, or similar web technology. In addition to that, you can also deploy your applications using Amazon Web Services or any other cloud-based deployment platform.
To be an expert data science and machine learning practitioner, you need to perform the aforementioned 6 steps in an iterative manner. The more you practice, the better you will get at NLP.
1.3. Environment Setup
1.3.1. Windows Setup
The time has come to install Python on Windows using an IDE. In fact, we will use Anaconda throughout this book right from installing Python to writing multi-threaded codes in the coming lectures. Now, let us get going with the installation.
This section explains how you can download and install Anaconda on Windows.
Follow these steps to download and install Anaconda.
1.Open the following URL in your browser: https://www.anaconda.com/distribution/
2.The browser will take you to the following webpage. Select the latest version of Python (3.7 at the time of writing this book). Now, click the Download button to download the executable file. Depending upon the speed of your internet, the file will download within 2–3 minutes.

3.Run the executable file after the download is complete. You will most likely find the download file in your download folder. The name of the file should be similar to “Anaconda3-5.1.0-Windows-x86_64.” The installation wizard will open when you run the file, as shown in the following figure. Click the Next button.

4.Now, click I Agree on the License Agreement dialog, as shown in the following screenshot.

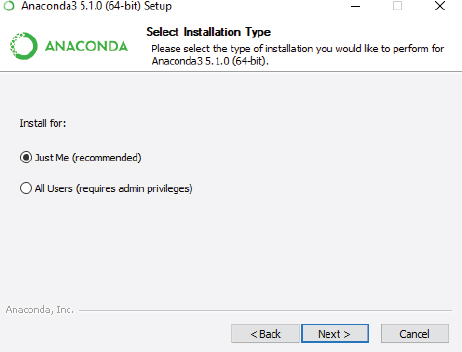
5.Check the Just Me radio button from the Select Installation Type dialogue box. Click the Next button to continue.
6.Now, the Choose Install Location dialog will be displayed. Change the directory if you want, but the default is preferred. The installation folder should at least have 3 GB of free space for Anaconda. Click the Next button.

7.Go for the second option, Register Anaconda as my default Python 3.7 in the Advanced Installation Options dialogue box. Click the Install button to start the installation, which can take some time to complete.

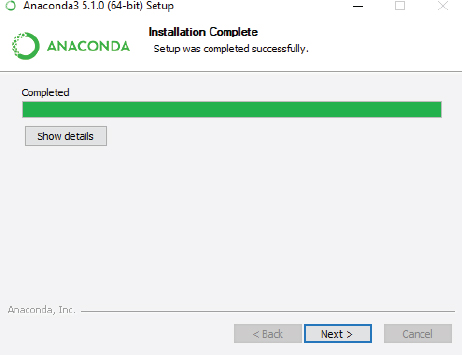
8.Click Next once the installation is complete.
9.Click Skip on the Microsoft Visual Studio Code Installation dialog box.

10.You have successfully installed Anaconda on your Windows. Excellent job. The next step is to uncheck both checkboxes on the dialog box. Now, click on the Finish button.

1.3.2. Mac Setup
Anaconda’s installation process is almost the same for Mac. It may differ graphically, but you will follow the same steps you followed for Windows. The only difference is that you have to download the executable file, which is compatible with the Mac operating system.
This section explains how you can download and install Anaconda on Mac.
Follow these steps to download and install Anaconda.
1.Open the following URL in your browser:
https://www.anaconda.com/distribution/
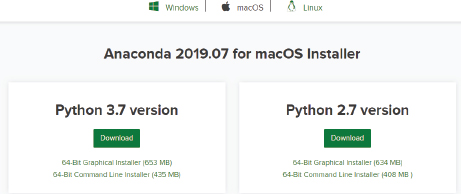
2.The browser will take you to the following webpage. Select the latest version of Python for Mac (3.7 at the time of writing this book). Now, click the Download button to download the executable file. Depending upon the speed of your internet, the file will download within 2–3 minutes.
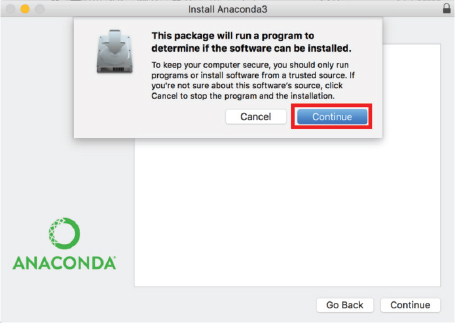
3.Run the executable file after the download is complete. You will most likely find the download file in your download folder. The name of the file should be similar to “Anaconda3-5.1.0-Windows-x86_64.” The installation wizard will open when you run the file, as shown in the following figure. Click the Continue button.
4.Now click Continue on the Welcome to Anaconda 3 Installer window, as shown in the following screenshot.

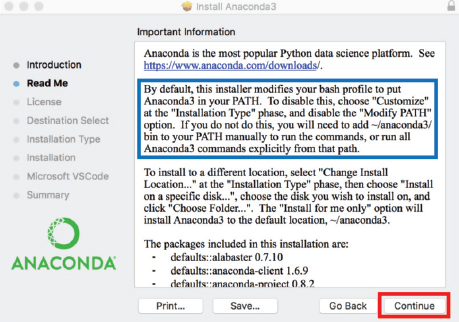
5.The Important Information dialog will pop up. Simply click Continue to go with the default version that is Anaconda 3.
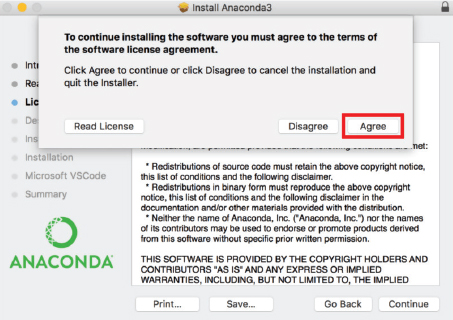
6.Click Continue on the Software License Agreement Dialog.

7.It is mandatory to read the license agreement and click the Agree button before you can click the Continue button again.
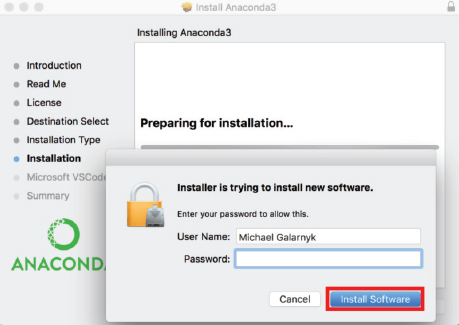
8.Simply click Install on the next window that appears.

The system will prompt you to give your password. Use the same password you use to login to your Mac computer. Now, click on Install Software.
9.Click Continue on the next window. You also have the option to install Microsoft VSCode at this point.

The next screen will display the message that the installation has completed successfully. Click on the Close button to close the installer.

There you have it. You have successfully installed Anaconda on your Mac computer. Now, you can write Python code in Jupyter and Spyder the same way you wrote it in Windows.
1.3.3. Linux Setup
We have used Python’s graphical installers for installation on Windows and Mac. However, we will use the command line to install Python on Ubuntu or Linux. Linux is also more resource-friendly, and the installation of software is particularly easy as well.
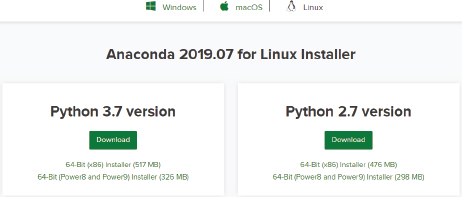
Follow these steps to install Anaconda on Linux (Ubuntu distribution).
1.Go to the following link to copy the installer bash script from the latest available version:
https://www.anaconda.com/distribution/
2.The second step is to download the installer bash script. Log into your Linux computer and open your terminal. Now, go to /temp directory and download the bash you downloaded from Anaconda’s home page using curl.
$ cd / tmp
$ curl –o https://repo.anaconda.com.archive/Anaconda3-5.2.0-Linux-x86_64.sh
3.You should also use the cryptographic hash verification through SHA-256 checksum to verify the integrity of the installer.
$ sha256sum Anaconda3-5.2.0-Linux-x86_64.sh
You will get the following output.
09f53738b0cd3bb96f5b1bac488e5528df9906be2480fe61df40e0e0d19e3d48 Anaconda3-5.2.0-Linux-x86_64.sh
4.The fourth step is to run the Anaconda Script as shown in the following figure.
$ bash Anaconda3-5.2.0-Linux-x86_64.sh
The command line will produce the following output. You will be asked to review the license agreement. Keep on pressing Enter until you reach the end.
Output
Welcome to Anaconda3 5.2.0
In order to continue the installation process, please review the license agreement.
Please, press Enter to continue
>>>
…
Do you approve the license terms? [yes|No]
Type Yes when you get to the bottom of the License Agreement.
5.The installer will ask you to choose the installation location after you agree to the license agreement.
Simply press Enter to choose the default location. You can also specify a different location if you want.
Output
Anaconda3 will now be installed on this location: /home/tola/anaconda3
- Press ENTER to confirm the location
- Press CTRL-C to abort the installation
- Or specify a different location below
[/home/tola/anaconda3] >>>
The installation will proceed once you press Enter. Once again, you have to be patient as the installation process takes some time to complete.
6.You will receive the following result when the installation is complete. If you wish to use conda command, type Yes.
Output
…
Installation finished.
Do you wish the installer to prepend Anaconda3 install location to path in your /home/tola/.bashrc? [yes|no]
[no]>>>
At this point, you will also have the option to download the Visual Studio Code. Type yes or no to install or decline, respectively.
7.Use the following command to activate your brand-new installation of Anaconda3.
$ source `/.bashrc
8.You can also test the installation using the conda command.
$ conda list
Congratulations. You have successfully installed Anaconda on your Linux system.
1.3.4. Using Google Colab Cloud Environment
In addition to local Python environments such as Anaconda, you can run deep learning applications on Google Colab as well, which is Google’s platform for deep learning with GPU support. All the codes in this book have been run using Google Colab. Therefore, I would suggest that you use Google Colab, too.
To run deep learning applications via Google Colab, all you need is a Google/Gmail account. Once you have a Google/ Gmail account, you can simply go to:
https://colab.research.google.com/
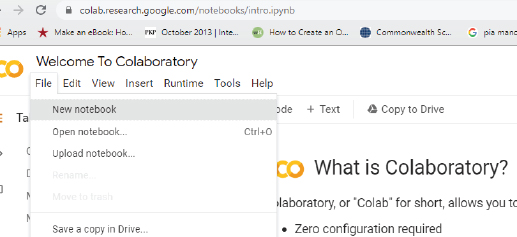
Next, click on File -> New notebook, as shown in the following screenshot:
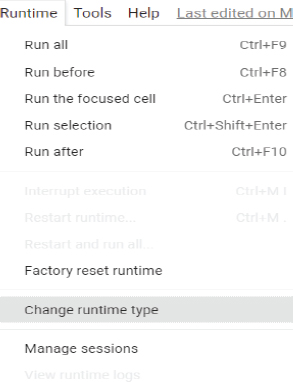
Next, to run your code using GPU, from the top menu, select Runtime -> Change runtime type, as shown in the following screenshot:
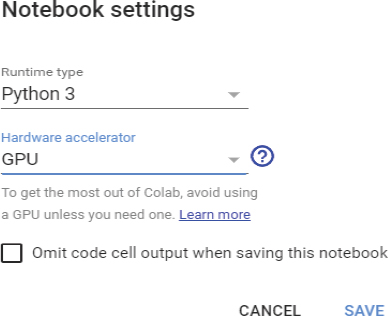
You should see the following window. Here, from the dropdown list, select GPU, and click the Save button.
To make sure you are running the latest version of TensorFlow, execute the following script in the Google Colab notebook cell. The following script will update your TensorFlow version.
pip install --upgrade tensorflow
To check if you are really running TensorFlow version > 2.0, execute the following script.
1. import tensorflow as tf
2. print(tf.__version__)
With Google Cloud, you can import the datasets from your Google drive. Execute the following script. And click on the link that appears as shown below:

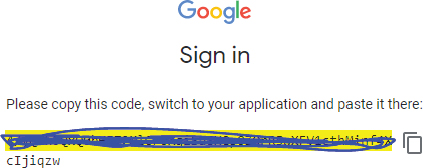
You will be prompted to allow Google Colab to access your Google drive. Click the Allow button, as shown below:

You will see a link appear, as shown in the following image (the link has been blinded here).
Copy the link and paste it in the empty field in the Google Colab cell, as shown below:

This way, you can import datasets from your Google drive to your Google Colab environment.
In the next chapter, you will see how to write your first program in Python, along with other Python programming concepts.