![]()
Python Crash Course
If you are familiar with the basic concepts of the Python programming language, you can skip this chapter. For those who are absolute beginners to Python, this section provides a very brief overview of some of the most basic concepts of Python. Python is a very vast programming language, and this section is by no means a substitute for a complete Python book. However, if you want to see how various operations and commands are executed in Python, you are welcome to follow along the rest of this section.
2.1. Writing Your First Program
You have already installed Python on your computer and established a unique environment in the form of Anaconda. Now, it is time to write your first program, that is the Hello World!
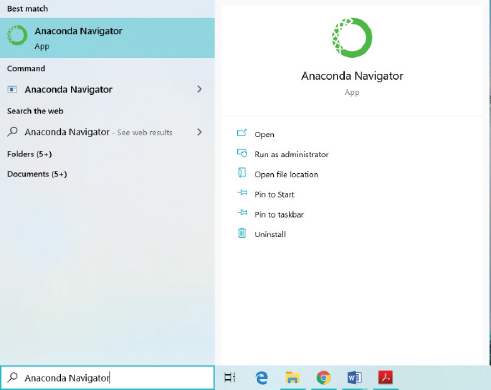
In order to write a program in Anaconda, you have to launch Anaconda Navigator. Search Anaconda Navigator in your Windows Search Box. Now, click on the Anaconda Navigator application icon, as shown in the following figure.
Once you click on the application, the Anaconda’s Dashboard will open. The dashboard offers you a myriad of tools to write your code. We will use Jupyter Notebook, the most popular of these tools, to write and explain the code throughout this book.
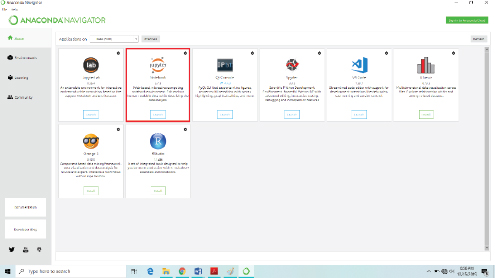
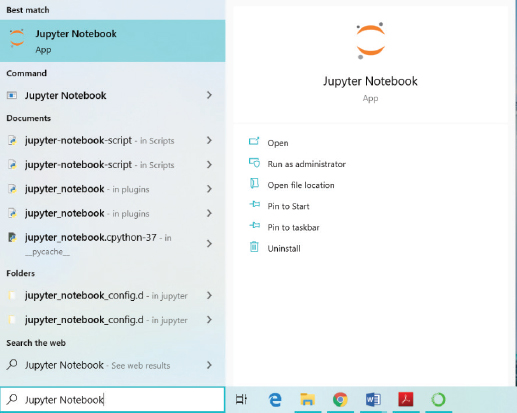
The Jupyter Notebook is available at second from the top of the dashboard. You can use Jupyter Notebook even if you don’t have access to the internet, as it runs right in your default browser. Another method to open Jupyter Notebook is to type Jupyter Notebook in the Windows search bar. Subsequently, click on the Jupyter Notebook application. The application will open in a new tab on your browser.
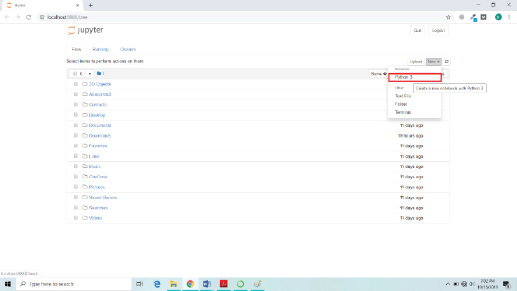
The top right corner of Jupyter Notebook’s own dashboard houses a New button, which you have to click to open a new document. A dropdown containing several options will appear. Click on Python 3.
A new Python notebook will appear for you to write your programs. It looks as follows:
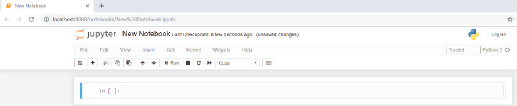
Jupyter Notebook consists of cells, as evident from the above image, making its layout very simple and straightforward. You will write your code inside these cells. Let us write our first ever Python program in Jupyter Notebook.
Script 1:

The above script basically prints a string value in the output using the print() method. The print() method is used to print on the console, any string passed to it. If you see the following output, you have successfully run your first Python program.
Output:
Welcome to Data Visualization with Python
Let’s now explore some of the other important Python concepts starting with Variables and Data Types.
| Requirements – Anaconda, Jupyter, and Matplotlib |
•Every script in this book has been executed via Jupyter Notebook. Therefore, you should have Jupyter Notebook installed. |
•It goes without saying that we will be using the Matplotlib library. |
•The Numpy and Pandas libraries should also be installed before this chapter. |
| Hands-on Time – Source Codes |
| All IPython notebooks for the source code of all the scripts in this chapter can be found in the Source Codes/Chapter 2 folder in the GitHub repository. I would suggest that you write all the code in this chapter yourself and see if you can get the same output as mentioned in this chapter. |
2.2. Python Variables and Data Types
Data types in a programming language refer to the type of data that the language is capable of processing. The following are the major data types supported by Python:
a.Strings
b.Integers
c.Floating Point Numbers
d.Booleans
e.Lists
f.Tuples
g.Dictionaries
A variable is an alias for the memory address where actual data is stored. The data or the values stored at a memory address can be accessed and updated via the variable name. Unlike other programming languages like C++, Java, and C#, Python is loosely typed, which means that you don’t have to define the data type while creating a variable. Rather, the type of data is evaluated at runtime.
The following example demonstrates how to create different data types and how to store them in their corresponding variables. The script also prints the type of the variables via the type() function.
Script 2:
1. # A string Variable
2. first_name = “Joseph”
3. print(type(first_name))
4.
5. # An Integer Variable
6. age = 20
7. print(type(age))
8.
9. # A floating point variable
10. weight = 70.35
11. print(type(weight))
12.
13. # A floating point variable
14. married = False
15. print(type(married))
16.
17. #List
18. cars = [“Honda”, “Toyota”, “Suzuki”]
19. print(type(cars))
20.
21. #Tuples
22. days = (“Sunday”, “Monday”, “Tuesday”, “Wednesday”, “Thursday”, “Friday”, “Saturday”)
23. print(type(days))
24.
25. #Dictionaries
26. days2 = {1:“Sunday”, 2:“Monday”, 3:“Tuesday”, 4:“Wednesday”, 5:“Thursday”, 6:“Friday”, 7:“Saturday”}
27. print(type(days2))
Output:
<class ‘str’>
<class ‘int’>
<class ‘float’>
<class ‘bool’>
<class ‘list’>
<class ‘tuple’>
<class ‘dict’>
2.3. Python Operators
Python programming language contains the following types of operators:
a.Arithmetic Operators
b.Logical Operators
c.Comparison Operators
d.Assignment Operators
e.Membership Operators
Let’s briefly review each of these types of operators.
§ Arithmetic Operators
Arithmetic operators are used to perform arithmetic operations in Python. The following table sums up the arithmetic operators supported by Python. Suppose X = 20, and Y = 10.
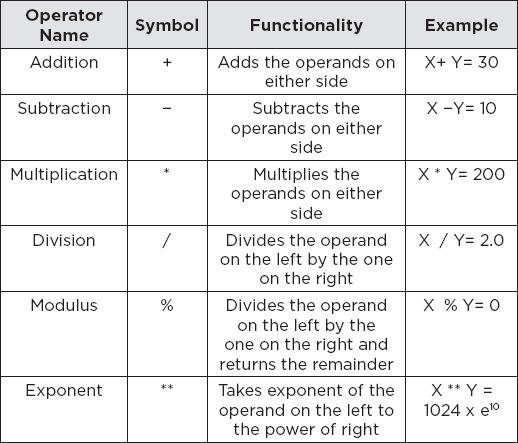
Here is an example of arithmetic operators with output:
Script 3:
1. X = 20
2. Y = 10
3. print(X + Y)
4. print(X – Y)
5. print(X * Y)
6. print(X / Y)
7. print(X ** Y)
Output:
30
10
200
2.0
10240000000000
§ Logical Operators
Logical operators are used to perform logical AND, OR, and NOT operations in Python. The following table summarizes the logical operators. Here, X is True, and Y is False.

Here is an example that explains the usage of Python logical operators.
Script 4:
1. X = True
2. Y = False
3. print(X and Y)
4. print(X or Y)
5. print(not(X and Y))
Output:
1. False
2. True
3. True
§ Comparison Operators
Comparison operators, as the name suggests, are used to compare two or more than two operands. Depending upon the relation between the operands, comparison operators return Boolean values. The following table summarizes comparison operators in Python. Here, X is 20, and Y is 35.
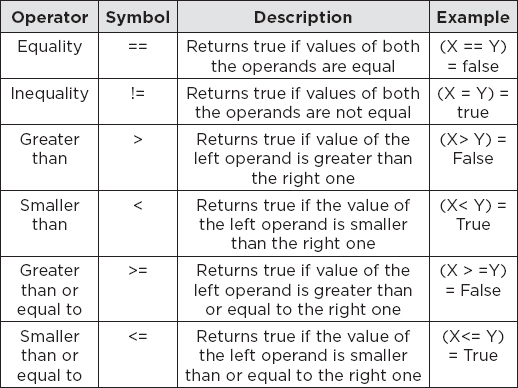
The comparison operators have been demonstrated in action in the following example:
Script 5
1. X = 20
2. Y = 35
3.
4. print(X == Y)
5. print(X != Y)
6. print(X > Y)
7. print(X < Y)
8. print(X >= Y)
9. print(X <= Y)
Output:
False
True
False
True
False
True
§ Assignment Operators
Assignment operators are used to assign values to variables. The following table summarizes the assignment operators. Here, X is 20, and Y is equal to 10.
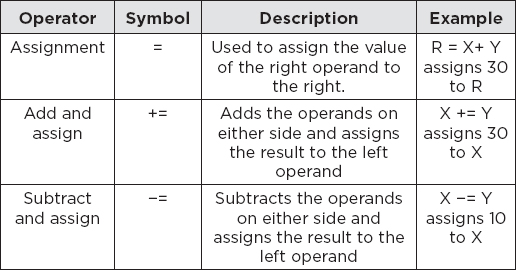
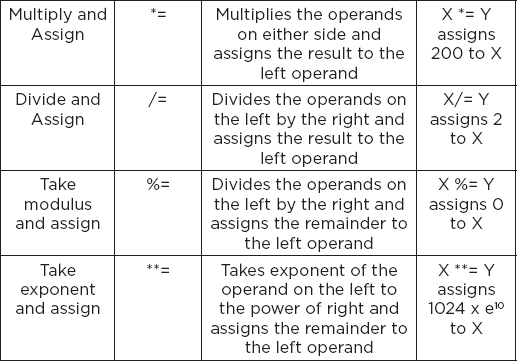
Take a look at script 6 to see Python assignment operators in action.
Script 6:
1. X = 20; Y = 10
2. R = X + Y
3. print(R)
4.
5. X = 20;
6. Y = 10
7. X += Y
8. print(X)
9.
10. X = 20;
11. Y = 10
12. X -= Y
13. print(X)
14.
15. X = 20;
16. Y = 10
17. X *= Y
18. print(X)
19.
20. X = 20;
21. Y = 10
22. X /= Y
23. print(X)
24.
25. X = 20;
26. Y = 10
27. X %= Y
28. print(X)
29.
30. X = 20;
31. Y = 10
32. X **= Y
33. print(X)
Output:
30
30
10
200
2.0
0
10240000000000
§ Membership Operators
Membership operators are used to find if an item is a member of a collection of items or not. There are two types of membership operators: the in operator and the not in operator. The following script shows the in operator in action.
Script 7:
1. days = (“Sunday”, “Monday”, “Tuesday”, “Wednesday”, “Thursday”, “Friday”, “Saturday”)
2. print(’Sunday’ in days)
Output:
True
And here is an example of the not in operator.
Script 8:
1. days = (“Sunday”, “Monday”, “Tuesday”, “Wednesday”, “Thursday”, “Friday”, “Saturday”)
2. print(‘Xunday’ not in days)
Output:
True
2.4. Conditional Statements
Conditional statements in Python are used to implement conditional logic in Python. Conditional statements help you decide whether to execute a certain code block or not. There are three main types of conditional statements in Python:
a.If statement
b.If-else statement
c.If-elif statement
§ IF Statement
If you have to check for a single condition and you do not concern about the alternate condition, you can use the if statement. For instance, if you want to check if 10 is greater than 5 and based on that you want to print a statement, you can use the if statement. The condition evaluated by the if statement returns a Boolean value. If the condition evaluated by the if statement is true, the code block that follows the if statement executes. It is important to mention that in Python, a new code block starts at a new line with on tab indented from the left when compared with the outer block.
Here, in the following example, the condition 10 > 5 is evaluated, which returns true. Hence, the code block that follows the if statement executes, and a message is printed on the console.
Script 9:
1. # The if statement
2.
3. if 10 > 5:
4. print(“Ten is greater than 10”)
Output:
Ten is greater than 10
§ IF-Else Statement
The If-else statement comes handy when you want to execute an alternate piece of code in case the condition for the if statement returns false. For instance, in the following example, the condition 5 < 10 will return false. Hence, the code block that follows the else statement will execute.
Script 10:
1. # if-else statement
2.
3. if 5 > 10:
4.![]() print(“5 is greater than 10”)
print(“5 is greater than 10”)
5. else:
6.![]() print(“10 is greater than 5”)
print(“10 is greater than 5”)
Output:
10 is greater than 5
§ IF-Elif Statement
The if-elif statement comes handy when you have to evaluate multiple conditions. For instance, in the following example, we first check if 5 > 10, which evaluates to false. Next, an elif statement evaluates the condition 8 < 4, which also returns false. Hence, the code block that follows the last else statement executes.
Script 11:
1. #if-elif and else
2.
3. if 5 > 10:
4.![]() print(“5 is greater than 10”)
print(“5 is greater than 10”)
5. elif 8 < 4:
6. ![]() print(“8 is smaller than 4”)
print(“8 is smaller than 4”)
7. else:
8. ![]() print(“5 is not greater than 10 and 8 is not smaller than 4”)
print(“5 is not greater than 10 and 8 is not smaller than 4”)
Output:
5 is not greater than 10 and 8 is not smaller than 4
2.5. Iteration Statements
Iteration statements, also known as loops, are used to iteratively execute a certain piece of code. There are two main types of iteration statements in Python:
a.For loop
b.While Loop
§ For Loop
The for loop is used to iteratively execute a piece of code for a certain number of times. You should typically use for loop when you know the exact number of iterations or repetitions for which you want to run your code. A for loop iterates over a collection of items. In the following example, we create a collection of five integers using the range() method. Next, a for loop iterates five times and prints each integer in the collection.
Script 12:
1. items = range(5)
2. for item in items:
3. print(item)
Output:
0
l
2
3
4
§ While Loop
The while loop keeps executing a certain piece of code unless the evaluation condition becomes false. For instance, the while loop in the following script keeps executing unless the variable c becomes greater than 10.
Script 13:
1. c = 0
2. while c < 10:
3.![]() print(c)
print(c)
4. ![]() c = c +1
c = c +1
Output:
0
1
2
3
4
5
6
7
8
9
2.6. Functions
In any programming language, functions are used to implement the piece of code that is required to be executed numerous times at different locations in the code. In such cases, instead of writing long pieces of codes again and again, you can simply define a function that contains the piece of code, and then you can call the function wherever you want in the code.
To create a function in Python, the def keyword is used, followed by the name of the function and opening and closing parenthesis.
Once a function is defined, you have to call it in order to execute the code inside a function body. To call a function, you simply have to specify the name of the function, followed by opening and closing parenthesis. In the following script, we create a function named myfunc, which prints a simple statement on the console using the print() method.
Script 14:
1. def myfunc():
2.![]() print(“This is a simple function”)
print(“This is a simple function”)
3.
4. ### function call
5. myfuncQ
Output:
This is a simple function
You can also pass values to a function. The values are passed inside the parenthesis of the function call. However, you must specify the parameter name in the function definition, too. In the following script, we define a function named myfuncparam(). The function accepts one parameter, i.e., num. The value passed in the parenthesis of the function call will be stored in this num variable and will be printed by the print()method inside the myfuncparam() method.
Script 15:
1. def myfuncparam(num):
2. ![]() print(“This is a function with parameter value: “+num)
print(“This is a function with parameter value: “+num)
3.
4. ### function call
5. myfuncparam(“Parameter 1”)
Output:
This is a function with parameter value: Parameter 1
Finally, a function can also return values to the function call. To do so, you simply have to use the return keyword, followed by the value that you want to return. In the following script, the myreturnfunc() function returns a string value to the calling function.
Script 16:
1. def myreturnfunc():
2.![]() return “This function returns a value”
return “This function returns a value”
3.
4. val = myreturnfunc()
5. print(val)
Output:
This function returns a value
2.7. Objects and Classes
Python supports object-oriented programming (OOP). In OOP, any entity that can perform some function and have some attributes is implemented in the form of an object.
For instance, a car can be implemented as an object since a car has some attributes such as price, color, model, and can perform some functions such as drive car, change gear, stop car, etc.
Similarly, a fruit can also be implemented as an object since a fruit has a price, name, and you can eat a fruit, grow a fruit, and perform functions with a fruit.
To create an object, you first have to define a class. For instance, in the following example, a class Fruit has been defined. The class has two attributes, name and price, and one method, eat_fruit(). Next, we create an object f of class Fruit and then call the eat_fruit() method from the f object. We also access the name and price attributes of the f object and print them on the console.
Script 17:
1. class Fruit:
2.
3.![]() name = “apple”
name = “apple”
4.![]() price = 10
price = 10
5.
6.![]() def eat_fruit(self):
def eat_fruit(self):
7.![]()
![]() print(“Fruit has been eaten”)
print(“Fruit has been eaten”)
8.
9.
10. f = Fruit()
11. f.eat_fruit()
12. print(f.name)
13. print(f.price)
Output:
Fruit has been eaten
apple
10
A class in Python can have a special method called a constructor. The name of the constructor method in Python is __init__(). The constructor is called whenever an object of a class is created. Look at the following example to see the constructor in action.
Script 18:
1. class Fruit:
2.
3.![]() name = “apple”
name = “apple”
4.![]() price = 10
price = 10
5.
6.![]() def __init__(self, fruit_name, fruit_price):
def __init__(self, fruit_name, fruit_price):
7.![]()
![]() Fruit.name = fruit_name
Fruit.name = fruit_name
8.![]()
![]() Fruit.price = fruit_price
Fruit.price = fruit_price
9.
10.![]() def eat_fruit(self):
def eat_fruit(self):
11.![]()
![]() print(“Fruit has been eaten”)
print(“Fruit has been eaten”)
12.
13.
14. f = Fruit(“Orange”, 15)
15. f.eat_fruit()
16. print(f.name)
17. print(f.price)
Output:
Fruit has been eaten
Orange
15
| Further Readings - Python [1] |
| To study more about Python, please check Python 3 Official Documentation. Get used to searching and reading this documentation. It is a great resource of knowledge. |
2.8. Data Science and Machine Learning Libraries
Owing to the growing importance of data science and machine learning techniques, several Python libraries have been developed. Some of these libraries have been briefly reviewed in this section.
2.8.1. NumPy
NumPy is one of the most commonly used libraries for numeric and scientific computing. NumPy is extremely fast and contains support for multiple mathematical domains such as linear algebra, geometry, etc. It is extremely important to learn NumPy in case you plan to make a career in data science and data preparation.
To know more about NumPy, check this link:
2.8.2. Matplotlib
Matplotlib is the de facto standard for static data visualization in Python, which is the first step in data science and machine learning. Being the oldest data visualization library in Python, Matplotlib is the most widely used data visualization library. Matplotlib was developed to resemble MATLAB, which is one of the most widely used programming languages in academia.
While Matplotlib graphs are easy to plot, the look and feel of the Matplotlib plots have a distinct feel of the 1990s. Many wrappers libraries like Pandas and Seaborn have been developed on top of Matplotlib. These libraries allow users to plot much cleaner and sophisticated graphs.
To study more about Matplotlib, check this link:
2.8.3. Seaborn
Seaborn library is built on top of the Matplotlib library and contains all the plotting capabilities of Matplotlib. However, with Seaborn, you can plot much more pleasing and aesthetic graphs with the help of Seaborn default styles and color palettes.
To study more about Seaborn, check this link:
2.8.4. Pandas
Pandas library, like Seaborn, is based on the Matplotlib library and offers utilities that can be used to plot different types of static plots in a single line of codes. With Pandas, you can import data in various formats such as CSV (Comma Separated View) and TSV (Tab Separated View) and can plot a variety of data visualizations via these data sources.
To know more about Seaborn, check this link:
2.8.5. Scikit Learn
Scikit Learn, also called sklearn, is an extremely useful library for data science and machine learning in Python. Sklearn contains many built-in modules that can be used to perform data preparation tasks such as feature engineering, feature scaling, outlier detection, discretization, etc. You will be using Sklearn a lot in this book. Therefore, it can be a good idea to study sklearn before you start coding using this book.
To study more about Scikit Learn, check this link:
https://scikit-learn.org/stable/
2.8.6. TensorFlow
TensorFlow is one of the most frequently used libraries for deep learning. TensorFlow has been developed by Google and offers an easy to use API for the development of various deep learning models. TensorFlow is consistently being updated, and at the time of writing of this book, TensorFlow 2 is the latest major release of TensorFlow. With TensorFlow, you can not only easily develop deep learning applications but also deploy them with ease owing to the deployment functionalities of TensorFlow.
To study more about TensorFlow, check this link:
2.8.7. Keras
Keras is a high-level TensorFlow library that implements complex TensorFlow functionalities under the hood. If you are a newbie to deep learning, Keras is the one deep learning library that you should start for developing deep learning library. As a matter of fact, Keras has been adopted as the official deep learning library for TensorFlow 2.0, and now all the TensorFlow applications use Keras abstractions for training deep learning models.
To study more about Keras, check this link:
| Hands-on Time – Exercise |
| Now, it is your turn. Follow the instructions in the exercises below to check your understanding of the advanced data visualization with Matplotlib. The answers to these exercises are provided after chapter 10 in this book. |
Exercise 2.1
Question 1
Which iteration should be used when you want to repeatedly execute a code for a specific number of times?
A.For Loop
B.While Loop
C.Both A and B
D.None of the above
Question 2
What is the maximum number of values that a function can return in Python?
A.Single Value
B.Double Value
C.More than two values
D.None
Question 3
Which of the following membership operators are supported by Python?
A.In
B.Out
C.Not In
D.Both A and C
Exercise 2.2
Print the table of integer 9 using a while loop: