Chapter 4
Utilizing Accounts and Categories
In This Chapter:
• Reviewing account and transaction types
• Working with bank accounts
• Adding new accounts
• Working with the Account List window
• Establishing categories and subcategories
• Working with the Category List window
• Organizing categories into groups
• Using tags
Now that you have added your first account in Quicken, you have an idea of its power and capabilities. This chapter discusses setting up other accounts and some ideas on using your accounts to make your financial life easier.
 Setting Up Other Banking Accounts
After you have created your primary checking account, you can create additional new accounts with the plus button that appears at the top of your Account Bar, as seen here. No matter what type of account you create, Quicken steps you through the creation process, prompting you to enter information about the account, such as its name and balance. In this section, you’ll learn how to use the Add Account dialog to set up new accounts.
![]()
Reviewing Account and Transaction Types
Many of the transactions you track with Quicken will involve one or more of its bank, credit card, and cash accounts. Here’s a closer look at each account type, along with some transaction examples. As you read about these accounts, imagine how they might apply to your financial situation.
Bank Accounts
Quicken offers two types of accounts that you can use to track the money you have in a bank:
• Checking accounts, which are usually the first type of account you create in Quicken.
• Savings accounts are for your savings. These accounts normally don’t have as much activity as checking accounts. You can use a Quicken savings account to track the balance in a certificate of deposit (CD), vacation savings plan, or similar savings account.

Some financial institutions consider CDs to be investment accounts, so you may not be able to download interest as you would with a regular savings account.
Both of these account types have the following types of transactions:
• Payments Funds going out of your account.
• Deposits Funds put into your account.
• Transfers Movement of funds from one account to another.
Credit Card Accounts
Credit card accounts track money you owe, not money you own. Some credit cards, such as MasterCard, Visa, American Express, and Discover, can be used in many locations. Other credit cards, such as Macy’s or Shell, can be used only in certain stores. They all have one thing in common: if there’s a balance, it’s usually because you owe the credit card company money.
Credit card account transactions can also be broken down into four categories:
• Charge Charges result when you use your credit card to buy something or the credit card company charges a fee for services.
• Credit The opposite of a charge is a credit. Think of it as a negative charge; don’t confuse it with a payment. An example is when you return an item to a store where you bought it and receive credit on your Visa card.
• Payments Amounts you send to a credit card company to reduce your balance, such as paying the balance on your American Express card or $150 of the $227 balance on your Visa card, as the rest of the balance is not yet due.
• Transfers An example of a transfer can be points or cash from your credit card rewards account to your credit card when you redeem your rewards.
Cash Accounts
From within Quicken, you can also use a cash account to track your cash expenditures. For example, you might create an account called My Wallet or Spending Money and use it to keep track of the cash you have on hand. Cash accounts are like bank accounts, but there’s no bank. The money is in your wallet, your pocket, or the Mason jar on your dresser.
Cash accounts have three types of transactions:
• Receive When you receive cash, you increase the amount of cash you have on hand, such as receiving a $20 bill in a birthday card.
• Spend When you spend cash, you reduce your cash balance.
• Transfer When you withdraw cash for spending money from a bank or credit card account using an ATM.
Working with Bank Accounts
In earlier chapters, you learned how to add new accounts. Here are a few additional things to keep in mind when creating Quicken accounts:
• Ensure that each account has a name that clearly identifies it. For example, if you have two checking accounts, don’t name them “Checking 1” and “Checking 2.” Instead, include the bank name (such as “USA Bank Checking”) or account purpose (such as “Joint Checking”) in the account name. Using familiar names can keep you from accidentally entering a transaction in the wrong account register. Remember, the name of the currently selected account register displays on the title bar of the Quicken window, is highlighted in the Account Bar, and displays at the top of each register, as seen in Figure 4-1. In addition, at any time you can change an account’s name in the General tab of the Account Details dialog.
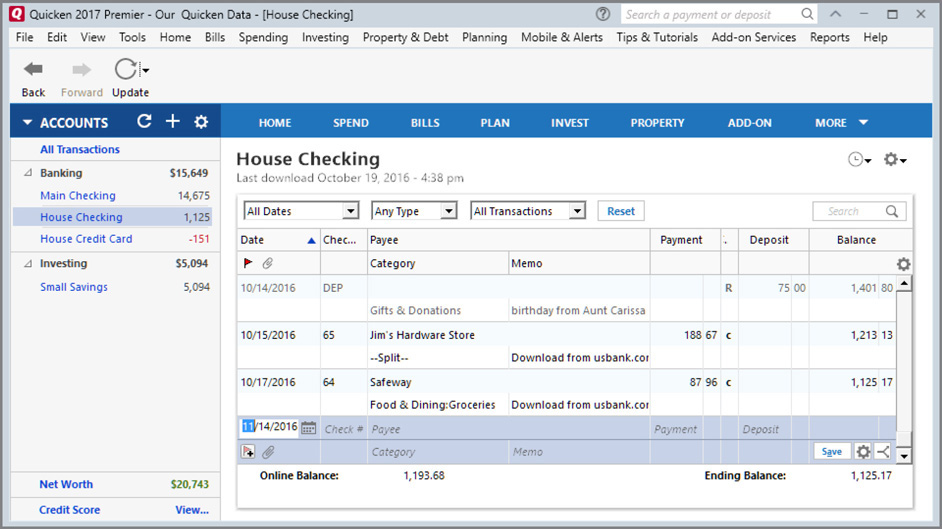
Figure 4-1 • Your Quicken window displays the name of your currently selected account in several ways.
• If you create an account for which you both download and manually enter transactions, be careful not to enter transactions that have already cleared the bank.
Some Quicken users choose to manually enter transactions as reminders. See Chapter 7 for more information.
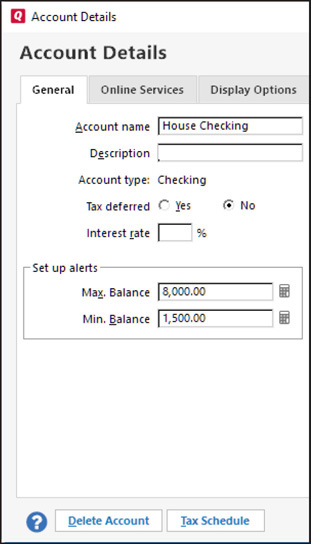
• Entering your credit limit for a credit card account enables Quicken to alert you when you get close to (or exceed) your limit. If a credit card account doesn’t have a credit limit—for example, a store charge card—you may want to enter your own personal spending limit. This makes it possible to take advantage of Quicken’s alerts feature to prevent overspending in that account. You can enter either the preset credit limit or your personal spending limit in the General tab | Set Up Alerts section of the Account Details dialog, as seen here. In checking and savings accounts, you can enter either (or both) a minimum or maximum balance for Quicken to track in the same area.
• Using a cash account to track every penny you spend, from the cup of coffee you buy at work in the morning to the half-gallon of milk you pick up on your way home that evening, isn’t for everyone. You may prefer to track only items that might be income tax related, such as donations or large purchases, and record the rest as miscellaneous expenses.
Adding Other Account Information
As you work with your accounts, there may be other information you want to include, such as interest rate changes on a money market account. To enter the new information:
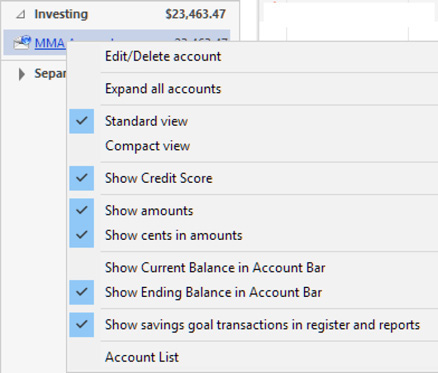
• From the Account Bar, right-click the name of the account you want to edit. From the context menu, shown here, select Edit/Delete Account to open the Account Details dialog.
• Enter or change the account information on the left side of the General tab. The dialog has different fields depending on the type of account. All account types allow you to change their account name and description. In addition, checking and savings accounts let you change the following:
• Whether the account is tax deferred (before indicating an account is tax deferred, check with your tax professional)
• Interest rate
• Maximum and minimum balances for which you can be alerted
In credit card accounts, you can change the following:
• Interest rate
• Credit limit
Investing accounts let you change the following:
• Whether the account is tax deferred
• An option to show the cash in some types of investment accounts in a checking account
Chapter 9 has more information about investing accounts.
For all account types, the information on the right side of the dialog is similar, depending on the account type. You can modify the information only if the account is not set up for online services. Once the account is set up for online services, you may not change the financial institution name, account and routing numbers, or customer ID. (However, if you deactivate an account you have enabled for online access, you can edit the fields.) You see the following, as shown in the illustration.
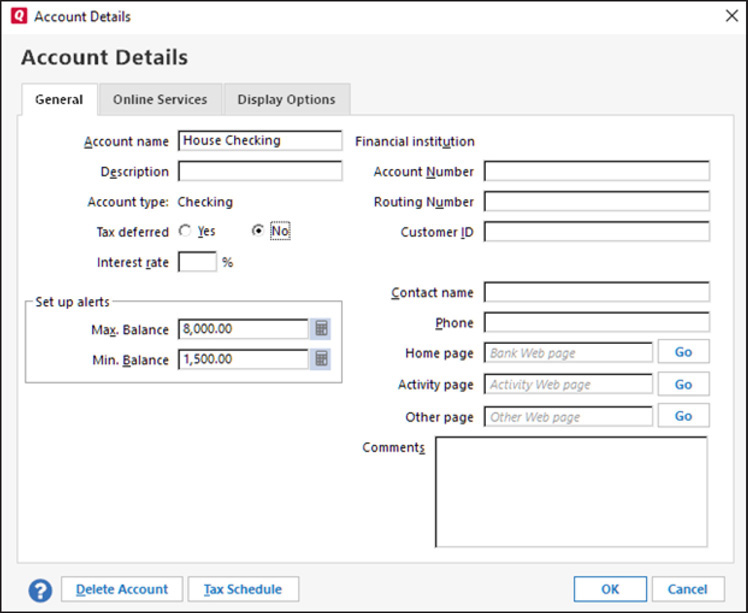
• The financial institution
• The account and bank routing numbers
• Your customer ID, if applicable to this type of account
You can always change
• A contact name or the phone number at the financial institution
• The financial institution’s web page, including the banking activity pages
• Any other comments you have about the account
Before you set up an account for online services, there are two tabs in the Account Details dialog. After that, there are three. From all three, you can access the Delete Account dialog and change the Tax Schedule information. Use the appropriate tab to make these changes:
• Use the General tab to make changes to the account name and other fields in that tab.
• Use the Online Services tab to activate or deactivate online services, including online payment services, if they are available through your financial institution.
• Use the Display Options tab to tell Quicken how to display this account, as shown in Table 4-1, later in this chapter.
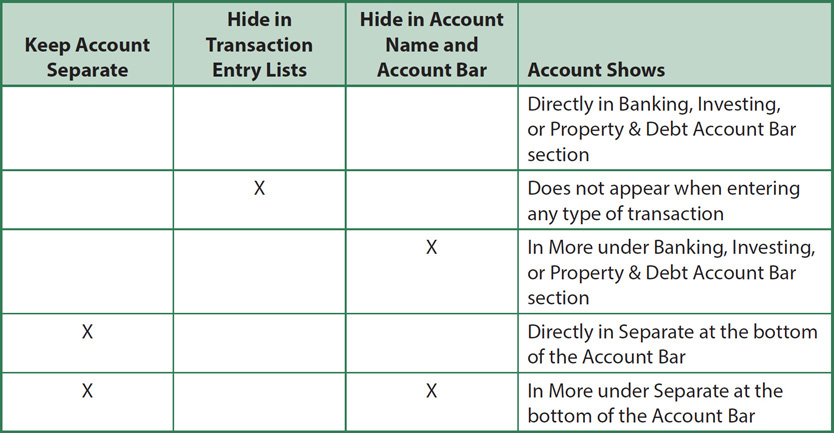
Table 4-1 • Account Display Options
When you have made all of your changes, click OK to close the Account Details dialog.
Adding New Accounts
Quicken calls its default method of adding accounts “Simple Setup.” This process begins by opening the Add Account dialog. You can open this dialog in several ways, as listed here:
1. Click the plus icon at the top of the Account Bar.
2. Choose Tools | Add Account.
3. Press CTRL-A to open the Account List. Click the Add Account button at the bottom-right corner of the window.
You can also open the Account List by choosing Tools | Account List.
The Add Account dialog begins by asking what type of account you want to create. From there its options change, depending on the account type and whether you want to set it up for available online account services.
Creating a Spending and Saving Account
This section covers how to enter spending and saving accounts, such as Checking, Credit Card, Savings, and Cash accounts. You learn how to work with Investing and Retirement accounts in Chapter 9 and Property & Assets as well as Loans & Debt accounts in Chapter 10.
Using one of the methods discussed earlier, open the Add Account dialog. Then select the type of account you want to create. If you choose Checking, Credit Card, or Savings, the Add <type of account> Account dialog screen opens, as seen next. You’ll notice that the dialog is similar to the screen you saw when you entered your primary account. The only difference is that instead of Add Primary Checking Account, it says Add <type of account>.
If your bank is not included on this list, typing the first few letters will open a list of banks that either start with those letters or include those letters as part of the bank’s name, as shown next.
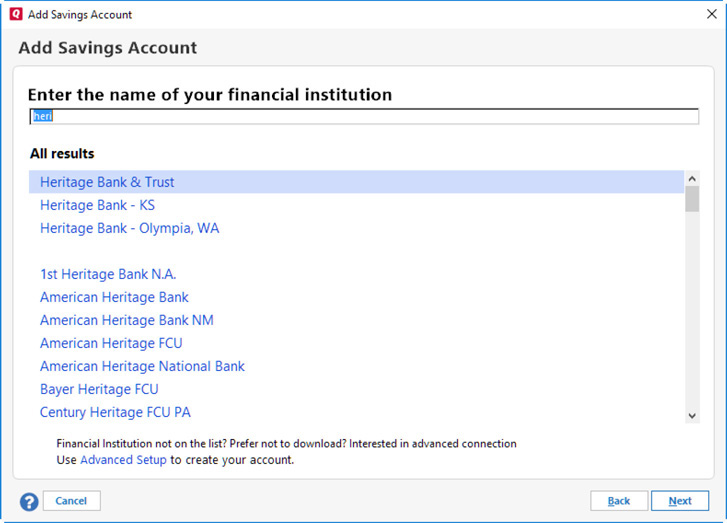
Choose a bank from the list or enter the first few letters of your bank or credit union’s name. A second list appears. For many of us, our bank’s name will be on the list. Click the name of your bank and click Next. If your bank’s name is not on the list, you can still create an account and enter your transactions manually. Click Advanced Setup at the bottom of the window. (See “Using Advanced Setup to Create a Manual-Entry Account” later in this chapter.) When you click Next, you may see a message “Getting information about <your bank name>.”
Enter the user ID and password provided by your bank in the appropriate fields and click Connect. A spinning circle appears along with “Looking for your accounts at <bank>” and then “Adding your accounts at <bank>.” These messages indicate Quicken is receiving information from your financial institution. If this is the first time you have logged on today, you may be prompted for your Intuit ID.
Depending on your financial institution, you may be prompted for additional information as you connect to the website. To ensure you type the correct information, you can select the Show Characters check box.
After the information is downloaded, the Account Added window appears with the name of your account. Click Add Another Account or click Finish to close the window. There is also a check box to enable you to select this new account to synchronize with the Quicken Mobile app.
Depending on your financial institution, you may see how many days of transactions are available to download and how many were downloaded in this session.
Using Downloaded Accounts
If your user name and password connect to more than one account at a specific financial institution, all of the accounts may be downloaded when you connect. If you have already created accounts in Quicken, you will see a dialog from which you can perform an action for each of the downloaded accounts:
• Add Use Add to create a new Quicken account with this information. You may rename the account to something more useful to you.
• Link The Link option is used to identify a current Quicken account and combine the information in the download with that account. Make sure you have chosen the correct account.
EXPERIENCED USERS RECOMMEND
If you find after the fact that you have linked accounts incorrectly, you can still correct it later. See how to deactivate and reactivate online accounts in Chapter 6.
• Ignore If you choose to ignore this downloadable account, the information will not be downloaded into Quicken.
Review each choice before you continue to ensure you have connected the correct Quicken account with each downloaded account. After you have made your choices, click Next. You’ll see the Account Added screen listing only the accounts you set as Add or Link. Click Finish to close the Account Added dialog.
You may have noticed one of Quicken’s features. As you opened the Add Account dialog, the Quicken window from which you started dims. This feature ensures you will never be confused about which dialog or window you’re working with. You can adjust or even turn off the dimming. Click Edit | Preferences | Startup | Quicken Colors | Dim Disabled Windows.
Using Advanced Setup to Create a Manual-Entry Account
As mentioned earlier, if you prefer to enter transactions manually, you can use the Advanced Setup option. This option also allows you to select the downloading method. To access Advanced Setup, from the Add <type of account> dialog, click Advanced Setup at the bottom of the dialog. Select I Want To Enter My Transactions Manually, and click Next.
Enter both a nickname for this account and how you will use this account and press Next again. Enter the statement date of your last statement and the balance shown on that statement and press Next. The Account Added screen appears with the name you selected. Note that you can choose to sync this account to the Quicken Mobile app. Also, from this screen you can select either Add Another Account or Finish, as seen in the following illustration.

Working with the Account List Window
You can view a list of all of your accounts at any time. Choose Tools | Account List or press CTRL-A. The Account List window appears (see Figure 4-2). This window displays a list of all accounts organized by type. If you want to see just one set of accounts—for example, your Banking accounts—click the name in the column to the left of the list. However, if you have entered only one type of account, such as banking accounts, there will be no other column at the left side of the Account List window.
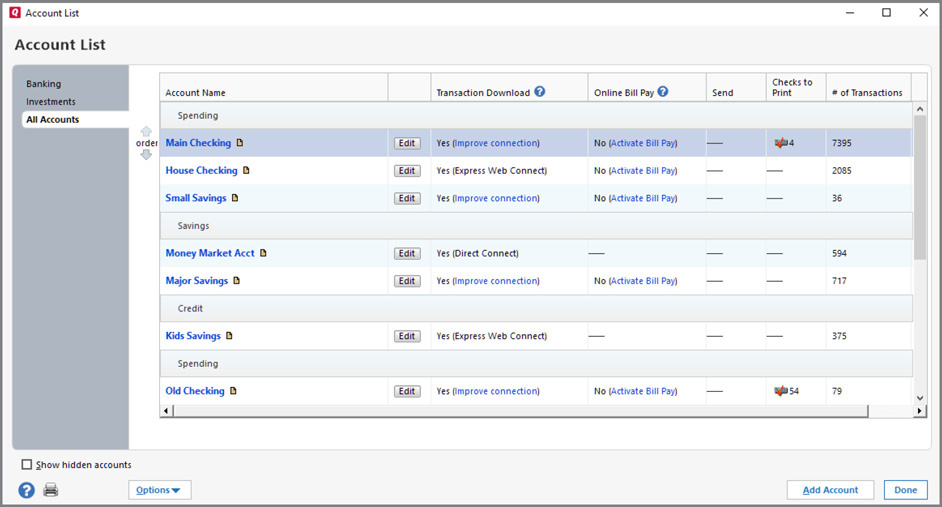
Figure 4-2 • The Account List displays information about all of your accounts.
Viewing Account Information
By default, Quicken displays each account in the Account List window (refer to Figure 4-2) by the account name (grouped by account type), along with columns for transaction download settings and the current balance. If you have told Quicken to hide any of your accounts in either the Account Bar or the Account List, you can opt to display them in the list by clicking the Show Hidden Accounts check box at the bottom-left corner of the list. This option does not appear unless you have opted to hide any of your accounts.
Add informational columns to the Account List by choosing commands from the Options button at the bottom-left corner of the Account List window. Just select a command on the menu to toggle the display of information on or off. This makes it possible for you to customize the appearance of the list and the information shown. See “Working with Accounts” later in this chapter for more information.
Select an account on the Account List, and click Edit to open the Account Details dialog, as seen earlier in this chapter. Here you can change the name of an account, enter additional account information, tell Quicken how to display the account, and modify the account’s online services. Move between the tabs by clicking the tab with which you want to work:
• General Tab The General tab displays basic information about the account that you can view or edit. From this dialog, you can enter information such as the interest rate you receive on this account and the account number, and you can create a link to the bank’s home page. There are a number of options, of which only the account name is required. Not all of the options mentioned here will be available for all types of accounts:
• Account Name By default, this is the name you (or the bank) entered when creating the account. You can change it here if you choose.
• Description Add any information to further identify this account in this field.
• Account Type This field cannot be changed. It is the type of account you established when you first created the account.
• Tax Deferred Click Yes to tell Quicken this is a tax-deferred account; click No if it is not.
• Interest Rate Enter the rate of interest, if any, for this account.
• Set Up Alerts Use this section to ask Quicken to alert you if this account reaches a maximum or minimum balance. See Chapter 7 for more information about setting alerts.
• Financial Institution If you have activated online services for this account, the name in this field cannot be changed. If you have set this account to enter transactions manually, you may enter or change the name of your financial institution in this field. In accounts set up for online services, you may see the Account and Routing Number fields filled in as well.
• Customer ID/Contact Name/Phone While the Customer ID field appears only for accounts that have been activated for download, the Contact Name and Phone fields always appear.
• Home/Activity/Other Page Use these fields to enter the website(s) for your bank. Use the Go button to connect to these websites using your Internet connection.
• Comments Use this field for any additional information about this account.
On the bottom of the Account Details dialog are several other option buttons. From here you may access Quicken Help by clicking the question mark, delete this account, or assign income tax information for this account. However, the Tax Schedule button does not appear if you have turned off the Planning tab in View | Tabs To Show.
When you first create an account, you tell Quicken what “type” it is—that is, Checking, Savings, Cash, and so on. For downloaded accounts, Quicken decides the account type based on the information from your bank. Once this type of account is set, you cannot change it. For example, if you create a money market account as a “checking” type account, you cannot change it to a “savings” account.
The Delete Account button opens the Delete Account dialog. If you really want to delete an account, you must confirm the removal through this dialog. Quicken purposely does not make this process easy. You must type yes into the dialog and click OK to delete the account. If you have scheduled bills or deposits for this account, they must be removed before you can delete it. See Chapter 7 for more information about scheduling transactions. Remember that when you delete an account, you permanently remove all of its transactions from your Quicken data file. To get the account out of sight without actually deleting it and its data, consider hiding it instead, as shown in Table 4-1. The display options in Quicken 2017 are quite different from those in Quicken 2012 or earlier versions, so if you are upgrading, review them carefully. If you are upgrading from Quicken 2013, 2014, 2015, or 2016, you will not see a difference.
• Tax Schedule Information If the account has income tax implications and you have turned on the Planning tab, click the Tax Schedule button to use the optional Tax Schedule Information dialog. As always, if you have any questions about the tax status of an account, check with your tax professional.
• Online Services Tab The Online Services tab, seen in Figure 4-3, allows you to modify the settings in each account for your institution’s online services. You can change the connection method, and if your financial institution offers the ability to use Quicken’s One Step Update or Online Bill Pay, you can set those options here. You can also set up Quicken Bill Pay through this dialog. And, as seen here, click the Automatic Entry link to tell Quicken how to handle transactions for this account. (See Chapter 6 for more information about the online services offered by many financial institutions.)

Figure 4-3 • Use the Online Services tab in the Account Details dialog box to tell Quicken how to communicate with your financial institution.
• Display Options Tab Use this tab to tell Quicken how you want to display this account, as seen next. You may keep the account separate, hide it in the transaction entry list, or hide the account name in both the Account Bar and in the Account List, as seen in Table 4-1. You may also tell Quicken to close the account entirely, which sets the balance of the account to zero and stops any downloads you’ve set up.
• Keep This Account Separate When this check box is selected, Quicken prevents the account from being displayed in lists, menus, and reports. This choice removes the account from view in its regular location on the Account Bar. The account is available in the Separate account section of the Account Bar, which includes the balances of all accounts you have marked with this display choice. Its balance is included in this Separate accounts section, as well as the Net Worth total at the bottom of the Account Bar. If you have also chosen to hide the account in the Account Bar, its balance will show in the Separate section of the Account Bar, grouped with More Accounts. Some Quicken users choose to separate accounts that are not used every day for the sake of convenience.
Many Quicken users do not mark any of their accounts as Separate, choosing instead to include all of their accounts in the appropriate section. One use for this designation might be a Savings Goal. See Chapter 13 for more information on Savings Goals.
• Hide In Transaction Entry Lists The selection makes the account unavailable when you are entering transactions in any part of Quicken. This is most often done for convenience sake when users have several accounts and the hidden account is one they seldom use.
• Hide Account Name In Account Bar And Account List Although the account remains visible in other lists and menus where it would normally appear, it no longer appears in its normal location (i.e., Banking, Investment, Property & Debt) in the Account Bar. Instead, it is grouped in that section as a part of “More Accounts.” Its balance is still included in the Net Worth total in the Account Bar.
• Close Account This option closes the account entirely. Its balance is set to zero, and you will not be able to download transactions into a closed account. This is a permanent action. If you have set it up for online services, you must contact the bank to close the account on their end as well.
EXPERIENCED USERS RECOMMEND
In Figure 4-3, you may notice a link stating “Automatic Entry is Off.” When you select this link, the following dialog appears. From this dialog, you can tell Quicken to automatically enter all downloaded transactions into this account’s register, or instruct the program to never add your transactions automatically, as you want to review each individual transaction.
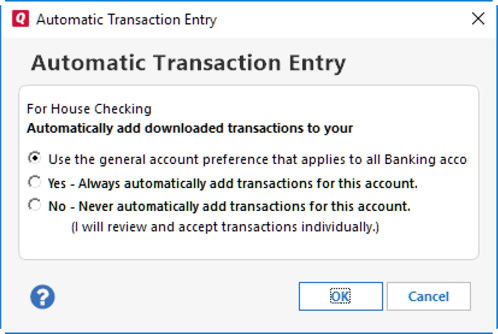
Your other option in this dialog is to use the general setting you set in Quicken Preferences. As discussed in detail in Appendix B, you can set Quicken Preferences from the menu bar. Select Edit | Preferences and, in this case, Register | Downloaded Transactions | After Downloading Transactions.
Many Quicken users choose to review each downloaded transaction to ensure the transaction is categorized and entered in the way they intended. Learn more about Categories later in this chapter.
Account Intent
The Account Intent section seen in the Display Options tab lets you tell Quicken how you plan on using this account. For example, you might have a savings account that you actually are using as an additional retirement account. (However, you might want to check with your financial advisor to see if this is a wise use of your money.) To let Quicken know how you intend this account to be used, choose a value from the drop-down lists. These choices determine the section in which the account will display in both the Account Bar and other lists and reports. Once you have made all of your modifications for this account, click OK to close the Account Details dialog and return to the Account List.
Working with Accounts
You can use options in the Account List window to reorganize accounts so they appear where you want them in the Account Bar:
• Changing the Order of Accounts By default, accounts are shown in alphabetical order in your Account List until you first move an account. As you first add accounts, they automatically sort themselves alphabetically. If you later decide to change the order and then add more accounts, the newly added accounts are inserted at the bottom of the section. To change the order in which accounts appear in the Account List window and Account Bar, select an account by clicking the line in which the name appears. Note that you must click somewhere on the account’s line other than the name of the account or the Edit button. When you click the account name, the account’s register opens. Clicking the Edit button opens the Account Details dialog. To move the account within its group, click the up or down Order button arrow to change the account’s position. You can move an account to any position within its group. If you have only one account per account type, you do not see the Order button.
The order in which your accounts are shown in the Account List is how the accounts display in the Account Bar as well.
• Viewing Your Accounts Each time you open the Account List, you can reset it to display only the group you choose on the left side of the Account List window.
• Show Hidden Accounts Click the Show Hidden Accounts check box at the lower-left corner of your Account List window to display accounts you have marked as hidden. To hide them from the Account List, clear the check box. The Show Hidden Accounts option is also available in many areas throughout Quicken, and the settings you’ve set in the Display Options tab of the Account Details dialog determine how each account is “hidden.”
• Help Icon Clicking the small question mark at the lower-left corner of the Account List opens Quicken Help to the section on managing your accounts.
• Printing the Account List Click the Printer icon at the bottom of the Account List window to print your list. The Print dialog appears. Click Preview to see how your list will appear. Click Close to close the preview window. Click Print to print the list. See “Using the Account List Options” next to learn more about printing details in your list.
To set options or make changes to the display status of your accounts, click Tools | Manage Hidden Accounts. A useful dialog, as seen next, is displayed. From here you can select how each account is to be displayed within Quicken. If you have many accounts, consider using this dialog rather than using the Account Details dialog in each account.

Using the Account List Options
The Options menu offers you several ways to display the accounts in your Account List:
• Include Additional Info When Printing When you choose this option, each time you print the Account List, it will include all of the options you’ve chosen in the Options menu. Unfortunately, you need to reset this option each time you open the Account List, as the selection disappears once you close the Account List.
• Show Net Worth In Account Bar The Net Worth number that displays in the Account Bar is the sum of the current balances of all of your entered transactions on each of your nonhidden accounts. This option tells Quicken to display that sum labeled as Net Worth in the Account Bar.
• Show Ending Balance In Account Bar As mentioned earlier, the Net Worth balance on the Account Bar is the sum of today’s balance of each of your nonhidden accounts. The Ending Balance takes into account the bills or deposits you have entered for future dates.
• Show Payments To Send/Checks To Print/Number Of Transactions/Description/Financial Institution These options create new columns in the Account List that display the selected information. If you have chosen to include the additional information when printing, these columns will appear on your printed Account List report.
• Show Current/Ending Balance This is similar to Show Net Worth/Ending Balance In Account Bar, but it refers to the Account List. You may display both the Current and Ending Balances in the Account List.
• Show Transaction Download Status/Show Online Bill Pay Status These options appear if you have activated any of your accounts for online services.
• Show Last Reconcile Date Choosing to display this column in the Account List shows the last time an account was reconciled with the bank’s records. Bank and credit card reconciliation procedures are discussed in Chapter 8.
• Show Last Download Time Choosing to display this column in the Account List shows the date and time from the last time the transactions were downloaded into an account.
You may only choose one option at a time in the Options menu. Each time you make a selection, the menu closes and you must reopen it to make another selection.
• Add Account On the bottom-right corner of the Account List is the Add Account button. Choose this button to open the Add Account dialog.
• Done When you have made all of your adjustments and are through with the Account List, click Done to close the dialog.
Categories
When you first create a data file, Quicken automatically creates dozens of commonly used categories. Although these categories might completely meet your needs, at times you may want to add, remove, or modify a category to fine-tune Quicken for your use.
Establishing Categories and Subcategories
Quicken starts with two category types. Income includes, but is not limited to, receipts such as your salary, commissions, interest income, dividend income, child support, gifts received, and tips. The other type is Expense, some examples of which are insurance, groceries, rent, interest expense, bank fees, finance charges, charitable donations, and clothing.
A subcategory is a subset or part of a category. It must be the same type of category as its parent category. For example, you may use the Auto category to track expenses to operate your car. Within that category, however, you might use one of the subcategories to record specific expenses, such as auto insurance, fuel, and repairs. Subcategories make it easy to keep income and expenses organized into manageable categories, while providing the transaction detail you might want or need.
Working with the Category List Window
You can view a list of all of your categories at any time. Choose Tools | Category List, or press CTRL-SHIFT-C. The Category List window appears as seen in Figure 4-4. Depending on which edition of Quicken you are using, the category groups may be different.
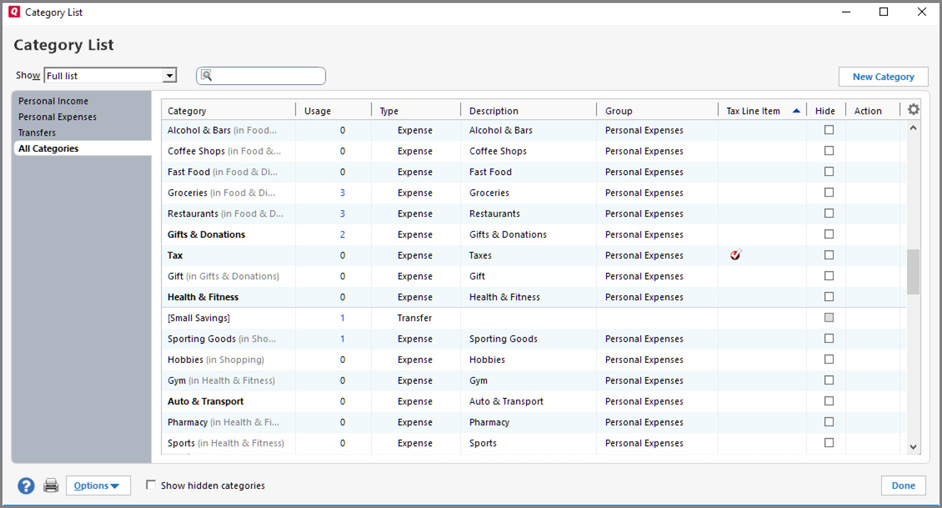
Figure 4-4 • The Category List shows the categories in your Quicken data file with which you can classify your transactions.
In this section, you’ll learn how to use the Category List window to display, add, modify, delete, and perform other tasks with categories.
If you have added an Investment account, you may notice a group of categories with an underscore before their name. These are special categories used by Quicken for such transactions as computing realized gains on investing accounts. They do not exist until you create your first investment account and are then hidden.
You can also choose commands to determine what information appears with the category names in the Category List window. Click the gear icon seen at the right of the Action column to open a list from which you can choose what columns to display.
Creating a New Category
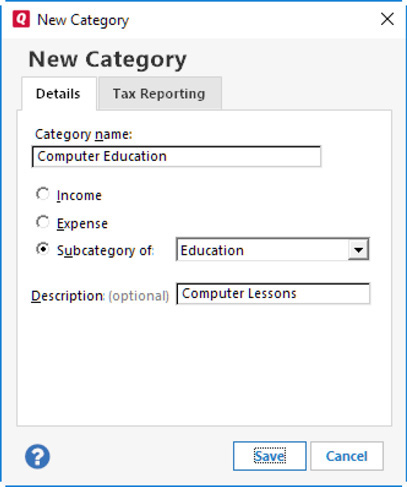
To create a new category, click the New Category button at the upper right of the Category List window to open the New Category dialog. Enter information about the category, as seen in this example, and click OK. You won’t be able to switch to the Tax Reporting tab in the New Category dialog until you have entered a category name in the Details tab. The following is a quick summary of the kind of information you should provide for each category:
• Category Information Basic category information, entered in the Details tab, includes the category name, which is required, and the description and the main category if this is a subcategory. You have the option of entering additional information in the Description field.
If you are familiar with charts of accounts as used by many accounting folks, you can even use numbers in your Category name—for example, 61000–Auto Expense.
• Tax Reporting You can use the Tax Reporting options to specify whether a category is tax related and, if so, what tax form and even the tax line item on which it appears. This can be a real time-saver at tax time by enabling you to organize your income and expenditures as they appear on tax forms. You learn more about using Quicken at tax time in Chapter 14. You are not required to enter anything in this area.
When you have set a tax line item and tax form for your categories, Quicken displays a small red circle with a check by each transaction. The tax information symbol shows only for tax-related transactions, not for all transactions.
Click Save to close the New Category dialog and return to the Category List.
Adding Multiple Categories at Once
Quicken makes it easy to add multiple related categories at the same time. Click the Options button at the bottom of the Category List window and choose Manage Categories to open the Manage Categories dialog, shown here.
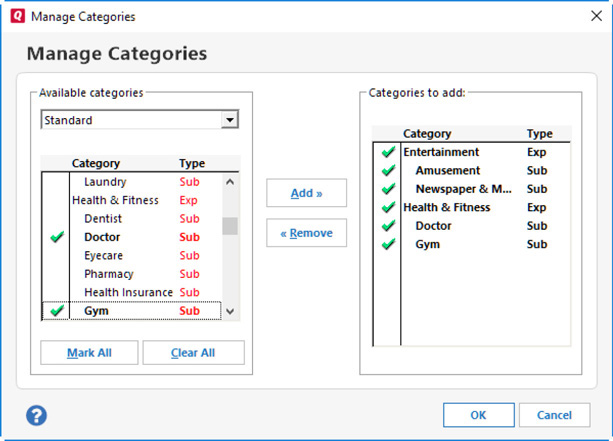
Select an option from the Available Categories drop-down list at the top of the dialog. In the Category list on the left, click to add a green check mark beside each category you want to add. When you click Add, the selected categories appear in the Categories To Add list. Click OK to add the categories and close the dialog.
Organizing Categories into Groups
Budgets in Quicken (see Chapter 13 to learn more about creating budgets) are based on transactions recorded for categories and subcategories. (That’s why it’s important to categorize all your transactions—and not to the Miscellaneous category!) Quicken also enables you to organize categories by customizable category groups.
Some Quicken users see category groups as an annoyance when working with budgets, as each group displays in the Everything Else total, which clutters the Budget display.
Choose Tools | Category List to display the window or press SHIFT-CTRL-C. If the Group column does not appear in your list, choose the Category Action gear icon at the far right of your Category List, click the Group check box, and then click Done.
By default, Quicken assigns nearly every category to either the Personal Income or Personal Expense group. Your bank and investment accounts have no groups assigned. See “Assigning a Group to a Category,” later in this chapter, to learn how to assign a group.
EXPERIENCED USERS RECOMMEND
The Default Groups
By default, Quicken includes three category groups that it assigns to the categories it creates when you first set up your Quicken data file:
• Personal Income is for earned income, such as your salary, and miscellaneous income items, such as interest, dividends, and gifts received.
• Personal Expenses are all of your personal expenses, items you pay for and record in your account registers.
• Transfers are for transfers between existing accounts. You may not see this available until you have added several accounts to your Quicken file.
Creating a New Custom Category Group
Earlier versions of Quicken offered the use of custom groups. While today Quicken, Inc., recommends using tags, as discussed later in this chapter, custom category groups are still available.
To create a new custom category group, open the Category List by clicking Tools | Category List and at the bottom of the dialog, select Options | Assign Category Groups to open a dialog. If this is the first group you are creating, the Assign Category Groups dialog displays a message that you have not created any custom groups.
Click the New Custom Groups button (or if you have already added a custom group, click the Add/Rename Custom Groups button) to open the Custom Category Groups dialog. When it appears, click New to open the New Custom Group dialog. Type the name of your custom group and click Save. Click Done to close the New Custom Groups dialog and return to the Assign Category Groups dialog.
To add categories to your new group, select a category from the list on the left side of the dialog and click Add. The categories will appear on the right side of the dialog in the Assign It To A Custom Category Group column. Continue through the list of categories until you have finished selecting the categories you want to include in this group.
On some device screens, the font for the currently assigned category groups in the pane on the left makes the currently assigned category groups difficult to see.
You can add more than one item at a time by choosing the first item in a group of categories in the left column, holding down your SHIFT key, and choosing several categories in a row. You can select categories from several locations in the list on the left side as well. To do this, hold down your CTRL key and while continuing to hold it down, click the items you want. If you have to scroll, keep holding down the CTRL key until you have selected (clicked) all the categories you want to include. Then, release the CTRL key and click the Add button. All of your selected items will appear in the right column.
Should you want to include categories you have hidden, click the Show Hidden Categories check box.
If you want to remove a category, select it from the list in the right column and click Remove. It will once again appear in the left column.
After you have completed your choices for this custom group, click Done to close the Assign Category Groups dialog and return to the Category List.
Assigning a Group to a Category
You can assign a new or existing category to a standard or a custom category group. To assign a custom group to a new category, in the Category List window, click New Category to create a new category. The New Category dialog appears. Enter the category name and whether it is an income, an expense item, or a subcategory of an existing category. Click the arrow next to the Group box to display the drop-down list and choose a group from the list. Click OK to save your new category and its category group assignment.
You can also assign a standard group to a category.
1. Right-click the category you want to assign. Select Edit. The New Category dialog appears.
2. Select one of the three radio buttons: Income, Expense, or Subcategory.
3. Clear any information in the Group field by putting your cursor in the field and pressing delete on your keyboard.
4. Click Save to close the dialog and return to the Category List.
5. Click Done to close the Category List.
If you have not yet created any custom category groups, you will not see the Group field in the New Category dialog. Return to the Category List, click Options | Assign Category Groups, and create at least one custom category group.
To add a group to an existing category, right-click the category, and click Edit to open the New Category dialog. Click the arrow next to the Group box to display the Group drop-down list. If the category is one of the default Quicken categories, the Personal Expenses group may appear in the Group box, although it is not an option in the group list. Simply click the group to which you want this category assigned, and click OK. The custom group is now assigned to this existing category.
Modifying the Custom Category Group List
You can modify or delete custom category group names. From the Category List, click Options | Assign Category Groups, and click Add/Rename Custom Groups. The Custom Category Groups dialog appears. Select a group name, and click Rename to rename an existing group. To delete a custom category group, select the group name and click Delete.
After you have made your changes, click Done to return to the Assign Category Groups dialog. Click Done one more time to close the Assign Category Groups dialog and return to the Category List. Click Done once more to close the Category List.
Editing, Deleting, and Merging Categories
You use the Category List window to edit, delete, or merge categories. Select the name of the category with which you want to work. The Action options arrow displays in the Action column on the right side of the window. You will not be able to make changes to the items on the Category List enclosed in square brackets ([ ]). These items are transfer “categories” used when you transfer money to and from the indicated account.
Before making any changes, back up your Quicken data file. That way, if you don’t like the changes you’ve made, you can quickly go back to the file’s state before you made the changes. See Appendix A for information on backing up Quicken data files.
• Edit Click a category to display the Action arrow. Click the arrow to see several options. Edit displays the New Category dialog (shown earlier) for the selected category. You can use this to make just about any change to a category. You can even “promote” a subcategory to a category by clearing the Subcategory Of: field.
• Merge With Another Category This button allows you to merge transactions using the currently selected category with transactions using another category. This, in effect, recategorizes all of the transactions for the selected category. Clicking Merge With Another Category displays the Merge Category dialog. Choose the category to which you want to merge from the drop-down list. If you want to delete the category you selected, turn on the check box—this makes the dialog work the same way as the Delete Category dialog. Click OK to perform the merge. One thing to keep in mind: if the category you selected is not used in any transactions, you do not see an option to merge the category. You can simply edit or delete it.
• Hide Clicking this option hides the category. It performs the same function as clicking the Hide check box.
• New Subcategory Click this option to open the New Category dialog to create a subcategory.
• Category Report Category Report is very handy for getting a quick report showing a summary listing payees and the number of times each payee/category combination has been used in your transactions. You can then choose to get a full report showing all transactions for the selected category.
• Delete When you choose to eliminate a category, first ensure you have a current backup. Then, select the category to display the Action arrow in the Action column. (You may have to make your window wider to see the Action column.) Choosing Delete displays different dialogs, depending on the category that is selected. Quicken begins by warning you that the category and any subcategories beneath it will be deleted. Then:
• If you selected a category without transactions, when you click OK, the category is deleted.
• If you selected a category or subcategory with transactions, a warning message appears that this category has been used in transactions or has subcategories. If you choose to delete the category, the Delete Category dialog appears. You can use this dialog to replace the category with another category throughout your data file. Choose another category from the drop-down list, and click OK. If you click OK without choosing a replacement category, any transactions that referenced the category you deleted will be marked as uncategorized. If the category you deleted has subcategories, this dialog appears for each subcategory that has transactions, and you cannot cancel the action. If you have made an error deleting a category, you must create the old category again and recategorize all of the uncategorized transactions. If the category happens to be only used in future-dated transactions, the deletion will act like the category is unused and just delete the category.
Categories used only in future dated transactions are still treated like an unused category and can be deleted without the user being informed that they are deleting a category that is actually used. Although this does not happen often, users can be left with uncategorized transactions.
Tags
A tag is an optional identifier used to specify what a transaction applies to. For example, if you want to keep track of all the money you spent for your last vacation, no matter the category, you can create a tag named Vacation. Then each expense you incur, whether categorized as Clothing, Auto Maintenance, Dining Out, or whatever, can be “tagged” as part of that Vacation tag. Because Quicken can produce reports based on categories, tags, or both, tags offer an additional dimension for tracking and reporting information.
Using Tags
Using tags is completely optional. It’s your decision. Quicken maintains a list of all the tags you create. You can display the Tag List window by choosing Tools | Tag List, or by pressing CTRL-L. An example of a Tag List with a couple of tags is shown here.

Creating a New Tag
Click the New button in the Tag List window. The New Tag dialog appears. Use it to enter information about the tag.
Only one piece of information is necessary: the tag name. You may want to make it short so it’s easy to remember and enter. The description can be used to provide additional information on the tag’s use. The copy number enables you to associate tags with different but similar activities. For example, if you have two separate businesses for which you report activity on two Schedule Cs, you can assign Copy 1 to one business’s tags and Copy 2 to the other business’s tags.
When you click Save, the tag is added to the list. You can create as many tags as you like.
Working with the Tag List Window
You can use buttons that appear beside a selected tag in the Tag List window, as shown earlier, to work with the tag list or a selected tag:
• Report Click in the space to the left of each tag in the list to generate a report showing all transactions tagged with the selected tag.
• Edit The Edit button enables you to modify the currently selected tag name or other information.
• Delete This button enables you to delete the currently selected tag. When you delete a tag, the tag name is removed from all transactions in which it appeared, but the transaction remains properly categorized.
You can easily toggle the Tag display off and on in your register.
1. Open the account register. Click the small gear icon found at the top of the scroll bar below the Action gear icon. You can also click the Action gear icon | Register Columns to open the same list.
2. From the drop-down list, check or clear the Tag check box.
When you are finished working with Quicken, close the program by clicking the red X on the title bar or choosing File | Exit.
Remember always to back up your Quicken data file. See how to do it in Appendix A.
