Chapter 8
Banking and Reconciling
In This Chapter:
• Starting a reconciliation
• Comparing transactions to a paper statement
• Identifying reconciled items
• Finishing up
• Reconciling credit card accounts
• Printing a reconciliation report
• Undoing reconciled transactions
Once you have set up your banking and credit card accounts, it is important that you reconcile your Quicken information to that shown by your financial institution. Often, the task of reconciling or manually balancing your bank account each month is not your favorite chore. However, you may open your bank statement each month and, using the paper form and a calculator, total all the checks and deposits. There’s a lot of adding when it comes to totaling the outstanding checks and deposits, and the longer you wait to do the job, the more adding you’ll need to do. And for some reason, it hardly ever comes out right the first time you try. Maybe you’ve even failed so many times that you’ve given up.
In the first part of this chapter, you will learn why it is important to reconcile your bank statements and how you can do it, quickly and easily, with Quicken Personal Finance Software.
 Reconciling Bank Accounts
Reconciling an account refers to the process of comparing transactions in your account register to transactions on the account statement sent to you by your bank. Transactions that match are simply checked off. You’ll need to account for transactions that appear only in one place, such as in your account register or the bank’s account statement.
In this section, you’ll review the basics of reconciling a bank account with Quicken: comparing transactions, making adjustments, and finishing up.
Starting a Reconciliation
You may either reconcile your bank statement with the traditional paper statement sent by your bank or reconcile your account online. We’ll begin with the paper statement with which you may already be familiar.
Open the account register for the account you want to reconcile. Click the Action gear icon at the top far right of the register to open the menu seen here. Choose Reconcile. What happens next depends on whether the account is enabled for online access.


You can also open this menu by pressing CTRL-SHIFT-N or start reconciling at once by pressing CTRL-R.
Quicken does not supply a reconciliation form for cash accounts. However, you can update the balance, which marks the cash transactions with an “R” to indicate they have been reconciled.
Accounts Without Online Account Access
If the account is not enabled for online access, the Reconcile Details dialog appears. It gathers basic statement information prior to reconciling the account. Enter information from your bank statement in the appropriate boxes. (Enter service charge and interest earned information only if you have not already entered it in the account register.) Then click OK to continue. For the rest of the process, see “Comparing Transactions to a Paper Statement” later in this chapter.
Reconciling Accounts with Online Account Access
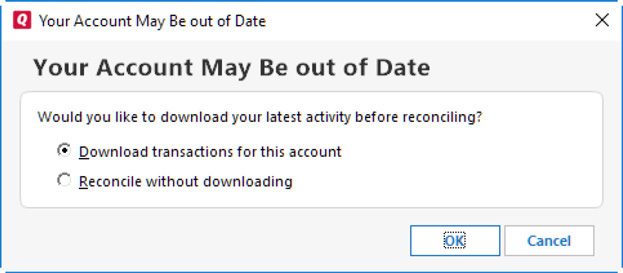
When you choose Reconcile for an account enabled for Online Account Access, Quicken begins by displaying a message that your account may be out of date, as seen here. If your account is not up to date, take the time to go online and update your account. Downloading is the only way you can be sure that all transactions recorded by the bank are included in your account register, unless you enter everything by hand. Choose Download Transactions For This Account, and click OK to download this account’s latest transactions. You will also see a warning if you have unaccepted transactions.
EXPERIENCED USERS RECOMMEND
Downloading Transactions The One Step Update Settings dialog appears. Enter your password for this account, and click Update Now. If you have gone online with Quicken before and you store your passwords in the Password Vault, you may see the prompt to enter/create your Intuit ID at this step.
If your bank requires additional information, enter that information. You have the option to show the characters of the additional information to ensure you are typing correctly. After your update is complete and you have accepted the downloaded transactions, the One Step Update Summary dialog box displays. Click Close to close it and return to the account’s register. If you have downloaded transactions, you will see a dialog stating you have unaccepted transactions. Quicken asks if you want to review them or continue reconciling without reviewing or accepting the transactions. You may not see the prompt asking if you want to review unaccepted transactions, however, until you manually restart the reconciliation.
EXPERIENCED USERS RECOMMEND
Depending on your Preferences settings, you may not see the One Step Update Summary unless there are errors during your download. Also, unless you have told Quicken to automatically enter your downloaded transactions into your banking account register, you will have to accept and match your downloaded transactions. See Appendix B for additional information on setting your Preferences in Quicken.
Reconciling Without Downloading If you have opted not to update your online account, click Reconcile Without Downloading to continue with the reconciliation, and click OK. Click Cancel if you want to stop the reconciliation process entirely. After you are up to date, or if you have chosen not to update at this time, Quicken displays the Reconcile <account name> dialog, shown next. If you have downloaded transactions, you will have to restart the Reconcile dialog.

This dialog offers two options for reconciling the account:
• Use Paper Statement helps you reconcile the information in your Quicken account register to your bank statement. It is a traditional account reconciliation, and it works just like the account reconciliation you perform for an account without Online Account Access. If you select this option, enter the bank statement ending date and ending balance in the appropriate boxes, as shown in the illustration. The opening balance is the sum of all of the transactions in the register with “R” in the Clr column.
• Use Online Balance enables you to reconcile the account to the balance that was last downloaded for the account. When you select this option, you don’t have to enter anything in the boxes. The first option, Always Use Online Banking For This Account. Don’t Ask Me Again, sets the account to permanently use the online balance when reconciling. Selecting the Auto Reconcile Downloaded Transactions check box tells Quicken to reconcile the account to your financial institution’s online balance automatically each time you download and accept transactions. With this Auto Reconcile feature enabled, you never have to reconcile the account again. However, you must trust the bank to make no mistakes.
After selecting your option in this dialog, click OK to continue.
The fact that the “opening balance” is the sum of all of the register transactions that have been marked with an “R” can cause Quicken users some aggravation. If there are any changed transactions in the register, you may have to re-reconcile in order to obtain the correct beginning balance. Also, when using the Quicken Mobile app, some users report missing or dropped transactions, which can also cause an opening balance error.
EXPERIENCED USERS RECOMMEND
Comparing Transactions to a Paper Statement
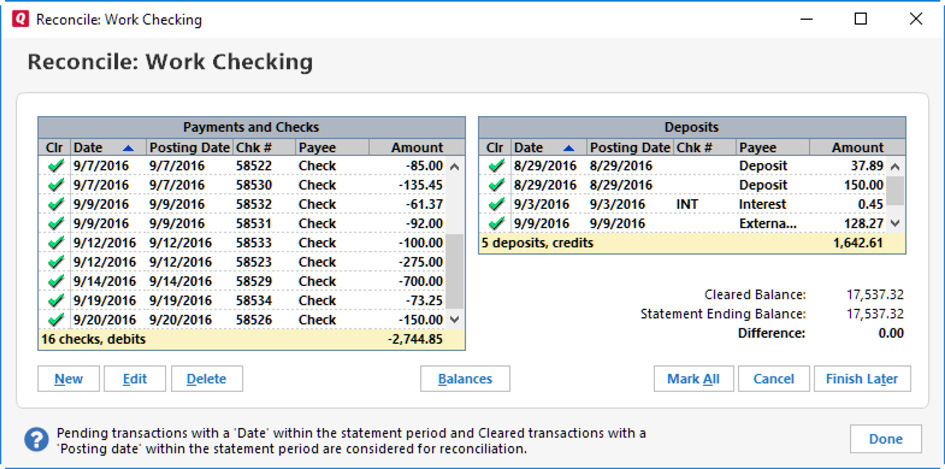
The next step in reconciling the account is to compare transactions that have cleared on the statement with transactions in your account register. For this, Quicken displays the Reconcile window, shown next, which displays the posting date and all payments, checks, and deposits that fall within the statement period for the account you are reconciling.
For accounts with downloaded transactions, the transaction’s date for consideration for inclusion in the Reconcile dialog is the downloaded posting date, which is not necessarily the same as the transaction date shown in the account register.
Understanding the Buttons
Quicken 2017 displays all of your button bar choices at the bottom of the Reconcile window, as seen in the previous illustration. While by default the Reconcile window entries sort in ascending order with the most recent date at the bottom, you can sort the entries in either ascending or descending order by clicking the heading in each section. For example, to sort by check number, click Chk #. To reverse the order by which the column sorts, click the heading name a second time. Clicking any column heading re-sorts the columns in both the Deposits and the Payments and Checks sections. Credit card accounts use Charges and Payments as labels and do not have a Chk# column. Use each button as follows:
• Click New to switch to the account register window for the account you are reconciling so you can enter a new transaction. To return to your reconciliation, click the Reconcile:<name of account> button at the bottom-left corner of the check.
• Select a transaction and click Edit to switch to the account register window so you can modify that selected transaction.
Selecting the transaction “toggles” the check mark. A better practice is to right-click the transaction you want to edit and select Edit from the context menu that appears. In that way, your “Clr” status is preserved.
• Click Delete to remove a selected transaction. A prompt appears asking if you want to delete the transaction. Click Yes to remove the transaction from the account register.
• The Balances button displays the Online Balance in the account or the Reconcile Paper Statement dialog (which is similar to the top half of the Reconcile Online Account dialog shown earlier) so you can check or change entries there.
• The Mark All button is a toggle between Clear All and Mark All that either eliminates the green check marks beside a marked item or marks all of the items in the Reconcile window as cleared by the bank.
• Click Cancel to leave the reconciliation. Quicken asks if you want to save your work.
• The Finish Later button saves your work, closes the Reconcile window, and returns you to the account register. The difference between Cancel and Finish Later is that Finish Later remembers your reconcile settings, such as statement date and reconcile balance, while Cancel does not.
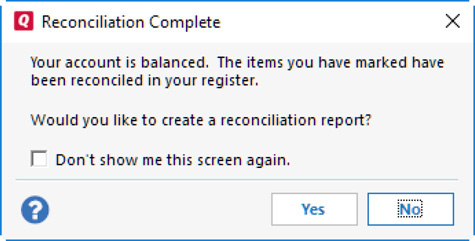
To open the Quicken Help window when reconciling your accounts, click the question mark at the bottom-left corner of the Reconcile window. Click Done to close the Reconcile window and display the Reconciliation Complete dialog box.
Reconciling to a Bank Statement
While you’re checking off transactions in Quicken and on your bank statement, look for differences between them. Here are some of the differences you might encounter:
• An item that appears on the bank statement but not in your account register may be an item that you did not enter. You may have omitted the transaction for a number of reasons. Perhaps it was a bank adjustment that you didn’t see. Or maybe you simply forgot to enter a check. To enter an omitted transaction, click the New button in the Reconcile dialog to switch to the register window. Enter the transaction in the register, click Enter, and click either the Reconcile:<account name> button at the bottom-left corner of the register or the Return To Reconcile button at the upper-right corner of your register to continue the reconciliation. Then click to place a check mark in the Clr column beside the item to mark it as cleared.
EXPERIENCED USERS RECOMMEND
• An item that has a different date or amount in your register than that shown on the bank statement may be due to an error, either yours or the bank’s. If the error is yours, you can edit the transaction by double-clicking it in the Reconcile window. This displays the account register window with the transaction selected. Edit the transaction and click the Save button. Then click the Reconcile:<account name> button at the bottom-left corner of the register or the Return To Reconcile button at the upper-right corner of the register to continue the reconciliation.
• If the amount of an error is small, many people simply adjust their register to reflect what is shown by the bank, especially if the check has been written by hand. The check-reading machinery at the bank has sometimes mistaken the number 7 on my handwritten checks for a number 1, for example. If the mistake occurs in the cents section, it may not be a problem. Otherwise, you may want to contact the bank to fix the issue.
EXPERIENCED USERS RECOMMEND
A hidden field, Downloaded Posting Date, controls which transactions are presented in the Reconcile window for accounts with downloaded transactions. You can have this field display in your register by selecting the Action gear icon | Register Columns. In the menu that appears, check Downloaded Posting Date, and a new column appears on your register to the right of the Date column, as shown next. This is handy information if transactions you expect to appear in the current reconciliation do not appear—the date the bank posted the transaction may be outside the date range of your reconciliation. Notice on the same menu there are other fields you can show in your register as well, such as Downloaded Payee and Downloaded Memo. While these may not have any effect on your reconciliation, the fields may make categorizing these downloads easier. After you have made your choices, click Done to close the menu.

• Items that appear in your account register but not on the bank statement are items that have not yet cleared the bank. These are usually transactions prepared just before the bank’s closing date, but they can be older. Do not check them off. Chances are you’ll check them off the next time you reconcile. If, during a bank reconciliation, you discover any uncleared items that are older than two or three months, you should investigate why they have not cleared the bank. You may discover that a check (or worse yet, a deposit) was lost in transit.
Reconciling to an Online Balance
If you’ve recently downloaded and accepted transactions for the account, reconciling to an online balance shouldn’t take much time. Items you’ve already reviewed and accepted will be checked off. Some more recent transactions may not be checked off because they haven’t yet cleared your bank. Your job is to look for older transactions that appear in your Quicken account register that aren’t checked off. These could represent stale payments that may have been lost in transit to the payee or errors (or duplications) you made when manually entering information into your Quicken account register. Follow up on all transactions more than 60 days old to see why they haven’t been included with your downloaded transactions.
EXPERIENCED USERS RECOMMEND
Identifying Reconciled Items
When you download your transactions during the month, Quicken marks the Clr column with a “c” because the transaction has been posted at the bank. This does not mean it has been formally reconciled. Once you have finished the reconciliation, whether reconciling to a paper statement or using the online balance as your accepted balance, Quicken will mark each of the transactions in the Clr column with a capital “R,” meaning the transaction has been reconciled.
You can change a “c” to an “R” or clear the Clr column entirely. Click in the column to bring up the menu, as shown in the illustration. Be careful about changing a reconciled item unless you are making corrections. Quicken uses the Clr column in an account register to identify items that either have cleared the bank or have been reconciled.

If you want to change a transaction’s cleared status, choose from the following:
• Uncleared indicates that the transaction has not yet been cleared by the bank.
• Cleared indicates that the bank has cleared the item, but the item has not yet been reconciled.
• Reconciled shows that the item has been reconciled. To make it even more obvious that a transaction has been reconciled, reconciled transactions appear in gray print rather than black if you have set that preference. For more information about Preferences, see Appendix B.
• Reconcile (CTRL-R) begins the reconcile process as discussed earlier in this chapter.
You can toggle the gray color of reconciled transactions to black by clicking Edit | Preferences | Register | Register Appearance and unchecking Gray Reconciled Transactions, which is selected by default.
If you change back to using your paper statements after using online reconciliations, Quicken warns you the change may cause a problem. This is because your paper statement may not contain all of the items you have marked as cleared when reconciling online.
Finishing Up
When you reconcile a bank account with Quicken, your goal is to make the difference between the cleared balance and the statement ending balance zero. You can monitor this progress at the bottom of the Reconcile window, as seen earlier.
When the Difference Is Zero
If you correctly checked off all bank statement items and the difference is zero, you’ve successfully reconciled the account and you can click the Done button.
If You Can’t Get the Difference to Zero
Sometimes, try as you might, you just can’t get the difference to zero. Here are a few last things to check before you give up:
• Make sure all the amounts you checked off in your account register are the same as the amounts on the bank statement. Keep in mind that if you made a transposition error—for example, 87.91 instead of 87.19—the difference between the two amounts will be evenly divisible by 9. In this case, 87.91 minus 87.19 is .72—a number evenly divisible by 9.
• Make sure you included any bank charges or earned interest, no matter how small the interest.
• Make sure the ending date and balance you entered are the same as those on the bank statement.
• Check to see if any of the deposits were entered as checks or checks as deposits.
• Verify that none of the transactions were entered twice.
• Watch for penny differences. Occasionally, the bank will see an 8 as a 3 or a 4 as a 1.
• Ensure that the opening balance shown in the Reconcile Details dialog matches your statement’s opening balance. If there is a difference, you may have deleted or changed a previously reconciled transaction.
If you checked and rechecked all these things and still can’t get the difference to zero, click Done. Quicken displays a message indicating the amount of the difference and offers to make an adjustment to your account register for the amount. Click Adjust to accept the adjustment. The amount of the adjustment will be recorded without a category. If you want to continue trying to find the difference, click Cancel to return to the Reconcile window.
Be careful of old checks you have written that may suddenly clear. A good example of this is a check you wrote as a donation to a local charity. It may sit in someone’s desk for several months before that person notices it and puts it into the bank. Each bank has their own policy on “stale-dated” checks, meaning that only checks within a certain period are honored. However, checks can slip through with dates as old as last year!
Other Reconciliation Tasks and Features
Quicken offers a number of other reconciliation features that you might find useful. Here’s a quick look at them.
Reconciling Credit Card Accounts
You can reconcile a credit card account the same way you reconcile a bank account. If you try to enter all credit card transactions as you make them throughout the month, it’s a good idea to use the reconciliation feature to compare your entries to the credit card statement, just to make sure you didn’t miss any. If you simply enter all credit card transactions when you get your statement, reconciling to the statement really isn’t necessary.
However, if you are going by what is on your credit card statement, you’re counting on your financial institution to be correct. If you just enter in the transactions from your credit card statement, you may miss fraudulent charges or mistakes made by your financial institution.
When you access your credit card accounts online, you can quickly download or manually record your credit card transactions into your Quicken credit card account register. You can also use the Quicken Mobile app to enter your credit card charges as you make them!
Many Quicken users go online frequently to view both their bank account and credit card balances to ensure there are no fraudulent or unidentified charges.
Reconcile a Credit Card Without Online Access
Choose the account you want to reconcile from the Account Bar to open that account’s register. Press CTRL-R to begin the reconciliation. When you reconcile an account for which you have not enabled Online Account Access, Quicken displays the Reconcile dialog as shown next.

As you can see, Quicken asks for the total charges, including cash advances, you made during the billing period, as well as any payments or credits that have been made on the account. You can find this information on your paper credit card statement. Enter the new statement ending date, any finance charges, and the date they were assessed. Note the red asterisks by the required fields. You must enter a number or date in these fields, even if the number is zero. Click OK to move to the Reconcile window, which looks and works almost exactly like the Reconcile window that was shown earlier.
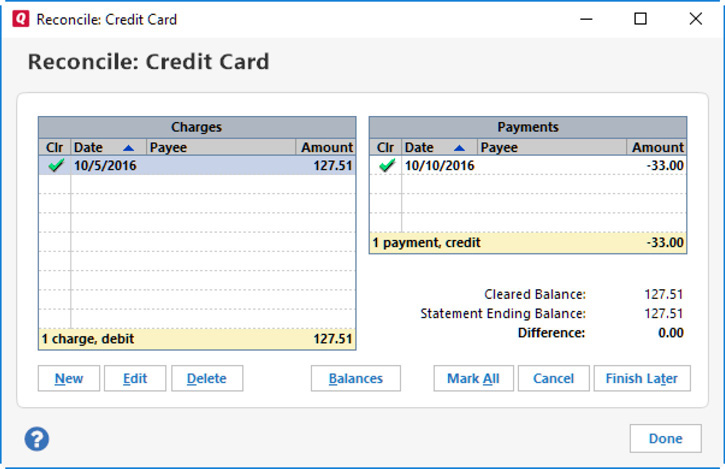
As shown in the illustration, as you click each cleared transaction, a small green check mark appears. Click Mark All to mark every transaction shown in the Reconcile window as cleared. Click Done when the Difference field shows zero. A dialog appears asking if you want to make a payment on that credit card now, as seen here. If you choose to make a payment now, first select the account from which you want to make the payment from the Bank Account drop-down list.

• Printed Check opens the Write Checks dialog. Once all the information has been entered, simply click Record to add the print check instruction to the payment account register.
• Hand Written Check posts the check (without the check number) in the credit card register and opens the register from which that check was written so you can enter the check number of that handwritten check. Until you enter the check number and save the transaction, the check appears as a payment in the credit card register, but until you actually write and send the check, no payment is made.
• Online Payment (not shown) opens a message that online payments are not active for this account. Click OK to continue.
If you do not want to be reminded to make a payment after each reconciliation, click Don’t Show Me This Screen Again. Be very sure you don’t want to be reminded to make a payment after reconciling your credit card account. Once you’ve selected the Don’t Show Me This Screen Again check box, there is no way to undo this action.
Click Yes if you have chosen one of the payment options, or click No if you will be making the payment later. You are returned to the account register, where you will see each reconciled transaction displays an “R” in the Clr column.
Reconcile a Credit Card with Online Access Enabled
Open the register for the credit card account you want to reconcile. Click the Action gear icon | Reconcile. Quicken prompts you to either download any current transactions or proceed to the reconciliation process without downloading. See “Reconciling Accounts with Online Account Access” earlier in this chapter for more information. For this example, we are choosing to reconcile without downloading.
Click Reconcile Without Downloading, and click OK to proceed. The Reconcile Online Account window for the current account appears. Note this window’s similarity to the dialog for checking accounts. You may choose to reconcile to a paper statement, in which case you must enter a value (which can be zero) in each of the fields. If you accept the online balance method, note the “balance as of” date and recognize that the balance displayed is what the bank has cleared as of that date.
The manual account Reconcile dialog notes required fields with a red asterisk. Online-enabled accounts do not note the required fields in the Reconcile dialog.
If you have chosen to reconcile the account to your online balance, click Auto Reconcile Downloaded Transactions to change the “c” in the Clr column of your register to an “R.”
After you have completed the reconciliation, if there is a balance on the account, Quicken asks if you want to make a payment. If you choose to make a payment, select the bank account from the drop-down list and tell Quicken if you are going to print a check through Quicken or write the check or pay online. If your choice is to print or write a check, the Write Checks window displays. If you choose Online Payment or Printed Check, the Write Checks dialog also opens with an option to use Online Bill Pay if you have enabled that feature. However, if you select Hand Written Check, the Write Checks dialog does not appear. If you choose not to make a payment at this time, click No.
When your credit card balance is zero, a message box appears stating that there is no payment required, as you have an outstanding balance of zero. You will see a similar message if your credit card balance is a credit. Click OK to close the message box.
Adjusting Your Register
If you can’t successfully get the credit card reconciliation to balance, Quicken offers to make adjustments. If you simply cannot balance an account, use the Adjust Balance dialog to make your adjustments. Choose a date for the adjustment, and click Adjust to make the entry, which will show as a balance adjustment in your register as of the date you enter in this dialog.
Be careful about clicking any Don’t Show Me This Screen Again check boxes when reconciling credit card statements. You only get one chance to do this, and at some point, you may want to see the dialog. Resetting the Quicken Warnings preference does not reset the Don’t Show Me This Screen Again check box. To “reset” the warning, you have to create a new credit card account and move/copy all the transactions from the old account to the new account.
Streamline Your Reconciliations
To make the reconciliation process even easier, you can place a reconciliation tool on the Quicken Toolbar. To do so, from the Quicken menu bar, click View | Customize Toolbar. Scroll to Reconcile An Account, and click the Add button. This moves the Reconcile An Account button to the right side of the screen. You may move the Reconcile An Account button to another position with the Move Up or Move Down buttons in the Customize Toolbar dialog. Once you are satisfied with the location of the new button, click OK. The Reconcile An Account button appears on your Quicken Toolbar.
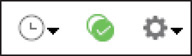
Still quicker is adding a reconcile button to the top of your register. Click the Action gear icon. From the menu, choose Customize Action Bar. In the Available Toolbar Buttons list, choose Reconcile and click Add. A reconcile icon appears pinned to the top of the register between the Reminders icon and the Action gear icon. Click Done to close the dialog. The reconcile icon is a small white check mark inside a green circle, as seen here.
Although you will see the new icon on the account action bar as soon as you click Add, the new icon is not saved to your account action bar until you click Done.
Printing a Reconciliation Report
After you have completed a bank account reconciliation, Quicken displays a dialog that offers to create a reconciliation report, as seen next. If you click Yes, the Reconciliation Report Setup dialog appears. Give the report a title if you wish, set the date at which the balance is to be shown, and tell Quicken to show either all of the transactions as of the bank balance date or just a summary of all the transactions and each transaction that has not yet cleared the bank. No such prompt appears for a credit card account.
You can create a reconciliation report for a credit card account by opening the account register and then using the menu to select Reports | Banking | Reconciliation.
Click OK to open the Print dialog shown next. You may choose to print the report on paper or to a PDF printer, as seen in the illustration. Saving your report as a .pdf file allows you to electronically store the report in a location you choose on your hard drive. You can print your report in either Portrait or Landscape orientation.
If your report is a long one, you can choose to print just one or two pages. In the Print Range section of the Print dialog, click Pages and enter the page number from which you wish to start in the From field and the page number with which you want to end in the To field.

When you have finished making your choices, click Print to print the report.
You can print a current reconciliation report at any time. Open the register for which you want the report, and from the Reports menu, click Banking | Reconciliation to open the Reconciliation Report Setup dialog. It is best to do this soon after reconciling the account to get the current reconciliation and transactions.
Because Quicken does not save copies of your reconciliations from previous months, if your reconciliation required an adjusting entry, it is a good idea to document it by creating a report, either as a digital .pdf or a paper copy. You can then file the paper report with your bank statement and canceled checks, or store the .pdf with an electronic copy of your statement and pictures of your processed checks. To ensure you have a copy, either print a hard copy or save your report as a .pdf through the Quicken PDF Printer.
Undoing Reconciled Transactions
At times, you may have to clear previously reconciled transactions or even undo an entire reconciliation. Be aware, this is not recommended! However, computers are not always consistent, banks occasionally merge and their records get skewed, a user will sometimes make a mistake, and so on. Before you make any changes to any reconciled transaction, do a backup of your data. See Appendix A for instructions on creating a backup.
To unclear a transaction you have inadvertently marked as reconciled:
1. Select the transaction and click in the Clr column.
2. Change the notation to Uncleared if it has not been downloaded or to Cleared if the transaction has cleared the bank.
If you need to clear several transactions in a row:
1. Click the first of the transactions, hold down your SHIFT key, and click the last transaction in the group.
2. Note that each selected transaction is highlighted. Right-click someplace within the highlighted area, and from the context menu that appears, click Reconcile and choose either Not Reconciled or Cleared:
• Quicken opens a prompt asking if you want to mark the currently selected transactions. Choose Yes to mark the selected transactions or No to cancel the change.
• Each transaction in the group now shows that it has not been cleared, assuming you chose Not Reconciled.
If the transactions you want to change are not in a row (listed one after the other), follow the procedure shown in step 1, but hold down your CTRL key and click each transaction you want to change. These transactions are selected, and you can continue. You can also choose to sort and/or filter and/or search the register to get the transactions of interest in a contiguous set.