Chapter 2
Starting with Quicken Basics
In This Chapter:
• Bookkeeping with Quicken
• Reviewing account types
• Exploring the Quicken window
• Understanding other Quicken features
• Finding help in Quicken
• Understanding data files and accounts
• Creating more accounts
Quicken is a complete personal finance software package and a useful tool for taking control of your finances. Quicken makes it easy to know what you have, how you are doing financially, and what you could do to strengthen your financial situation. If you have forgotten your high school bookkeeping class (or never took one), the following section describes some of the terminology you will encounter and how Quicken handles your financial transactions.
 How Financial Transactions Are Tracked
Quicken is based on the principles of double-entry bookkeeping. If this sounds a bit confusing at first, don’t worry. Once you enter (or download) the transaction into one of your accounts and indicate the categories, Quicken takes care of all the other details.
For example, if you transfer money from your checking account into your savings account, there are actually two entries: one entry that takes the funds out of your checking account, which decreases the total balance in that account, and the second that puts the funds into your savings account, which will increase the total in that savings account. To save you time, Quicken does this automatically by its use of categories. (Categories are discussed in detail in Chapter 4.)
Bookkeeping with Quicken
Each time you spend, charge, or receive money and enter the transaction into Quicken, it is recorded into one of the accounts you establish. This money transaction can be an Asset, a Liability, Income, or an Expense. These four “ledger” types are the backbone of any bookkeeping system. Each transaction has to fall into at least one of the ledger types.
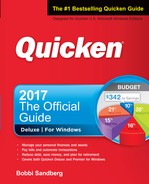
If you spend money—for example, when you go to the grocery store and write a check or use your checking account’s debit card—this “Expense” will show in Quicken as a payment (or reduction of your checking account) and an increase in your Grocery expense category. A deposit, such as the birthday money from Aunt Carissa, is shown by Quicken as “Income” when it increases the amount in your checking account and increases the Gift income category, as shown next.
You can have a transaction that uses more than one category in an account. For example, your telephone bill may include both telephone charges and Internet connection charges, as seen in the illustration. That transaction is an expense, with the check you write reducing the amount of money in your checking account and increasing both your Home Phone Expense and your Internet Expense categories as shown here. These are called “split” transactions, and you’ll learn more about them in Chapter 5.

Although the split transaction’s category shows as “Split,” you can see the individual categories by hovering your mouse pointer over the word “Split.”
Reviewing Account Types
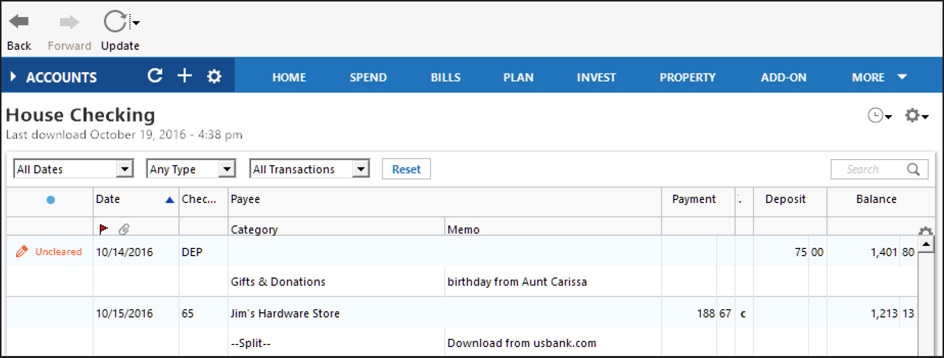
As you think about the four ledger types, each account you create in Quicken fits into one of the four. An account is a record of what you either own or owe. Quicken offers various kinds of accounts for different purposes. A link for each account you set up in Quicken appears in one of the sections of the Account Bar as discussed later in this chapter. You can choose to hide accounts from the Account Bar. Table 2-1 summarizes the accounts and how they are organized within Quicken.
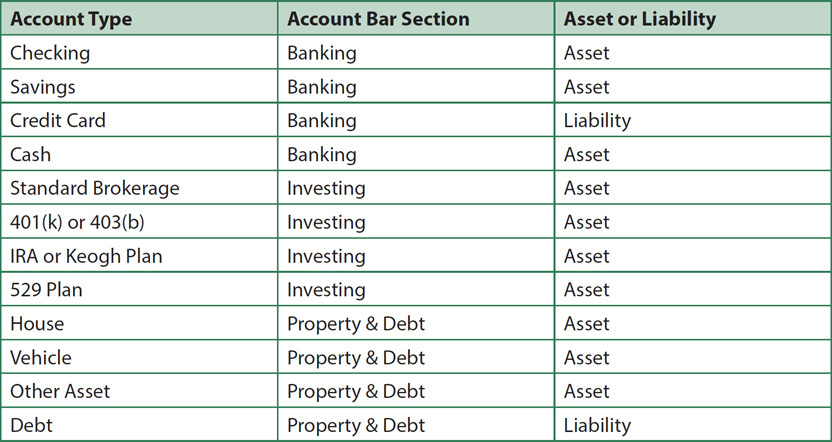
Table 2-1 • Overview of Quicken Account Types
• What You Own In bookkeeping jargon, what you own are assets. In Quicken, an asset is one type of account; several other types exist as well:
• Spending These accounts display in the Banking section of the Account Bar and are used primarily for expenditures. This section displays checking and cash accounts as well as your credit cards.
• Savings These also show in the Banking section of the Account Bar and are used to record the transactions in savings accounts.
• Investment Your investment accounts display in the Account Bar’s Investing section and are for tracking the stocks, bonds, and mutual funds in your portfolio that are not in retirement accounts.
• Retirement While also included in the Investing section, these accounts track investments in retirement accounts. Quicken distinguishes between different types of retirement accounts. One type includes individual retirement accounts (IRAs) or Keogh Plans, another covers 401(k) or 403(b) accounts, and most 529 Plans are included in this section.
• Asset Your asset accounts display in the Property & Debt section of the Account Bar. You use this type of account for tracking items that you own. Quicken distinguishes among three different types of asset accounts: House, Vehicle, and Other Asset.
• What You Owe The bookkeeping term for what you owe (your debts) is liabilities. Quicken offers two kinds of accounts for amounts you owe:
• Credit Card Credit cards will normally appear in the Banking section, and this is the best location for them. However, those cards that you have designated as Liability accounts display in the Property & Debt section. See Chapter 5 to learn how to show credit cards in the Property & Debt section of the Account Bar.
• Debt Debt (liability) accounts appear in the Property & Debt section. This section is for tracking loans, mortgages, and other liabilities. While it is possible to include credit cards in this section, most users opt to show their credit card accounts in the Banking section of the Account Bar.

If you are using either the Home & Business or Rental Property Manager edition of Quicken, you can also enter special business accounts such as Accounts Payable and Accounts Receivable.
Exploring the Quicken Window
The main Quicken window gives you access to most of Quicken’s features and your financial information. We’ll look at each section separately.
Account Bar
The Account Bar lists each of your Quicken accounts on the left side of the main Quicken window, as seen here. Click on the name of each account to see all the transactions for that account. At the top of the Account Bar is a link to the All Transactions register, which shows the transactions for all of your accounts in one register. The All Transactions register does not show your Investing accounts; however, it does show transactions from linked investment cash accounts.
There can be up to five sections to the Account Bar, depending on how you structure Quicken. The main three are Banking, Investing, and Property & Debt. If the Account Bar is not displayed, click the small right-pointing arrow at the left of the word “Accounts.”

If you can’t see all of the accounts in the Account Bar, use the scroll bar on the right side of the Account Bar to scroll through its contents. You can also click the downward or right-pointing arrow next to a section heading on the Account Bar to hide or display, respectively, the list of accounts beneath it.
By default, account balances, rounded to the nearest dollar, appear in the Account Bar; however, you can right-click anywhere in the Account Bar to open a context menu, shown next. Choose Show Amounts to display the amounts, and clear the check mark to hide amounts from view. (Hiding amounts makes the Account Bar narrower so more information appears in the window to the right.) This contextual menu offers additional options for the display of the Account Bar, such as displaying cents in the amounts. You can also change the width of the Account Bar by dragging its right border. All of these options are explained in the section “Account Bar Context Menu,” later in this chapter.
The account names in the Account Bar are links to that account’s register. Click on the link to open the register for that account. You can change the location of an account in the Account Bar from one section to another or to hide an account’s name from the Account Bar. For example, if you choose to designate a specific account as a savings or investment account:
1. Right-click on the account name and select Edit/Delete account.
2. In the Account Details dialog that appears, select Display Options.
3. In the Account Intent drop-down menu, select the account in which you want this account to appear, as shown next.
4. After you have made your selection, click OK to save your choice, and the account appears in your chosen section of the Account Bar.

In general, you can designate the section in which you want your account to appear, or you can choose to show all accounts in each section.
• The small downward arrow to the left of the word “Accounts” allows you to minimize the Account Bar to save room when working with other Quicken processes. When you click this arrow to minimize the Account Bar, it turns into a right-pointing arrow. Click that right-pointing arrow to open the Account Bar once again. In the same way, you can collapse and expand the Account Bar sections.
• The white curly arrow to the right of the word “Accounts” is a shortcut for updating your online accounts. See more about online accounts in Chapter 6.
• The plus sign opens the Add Account dialog.
• The small gear icon at the far right of the word “Accounts” opens the same context menu as shown earlier.
• Ending Balance is the total of all of the amounts currently displayed in the Account Bar. The total at the bottom of the Account Bar will be labeled “Ending Balance” if you have selected Show Ending Balance In Account Bar. If you have instead chosen Show Current Balance In Account Bar, the label will be Net Worth.
If you have chosen to not display amounts in the Account Bar from the Account Bar context menu, you will not see Ending Balance displayed in the Account Bar.
Account Bar Context Menu
As with many context menus in Quicken, the Account Bar context menu allows you to tailor this section to meet your needs.
• If you right-click a specific account, the context menu includes Edit/Delete Account. This link opens the Account Details dialog for the account you selected.
• If you right-click in a blank area of the Account Bar, the first item on the list is Account List, as seen next. This option opens a list of all of your accounts. You may also open this list with the shortcut keys CTRL-A.
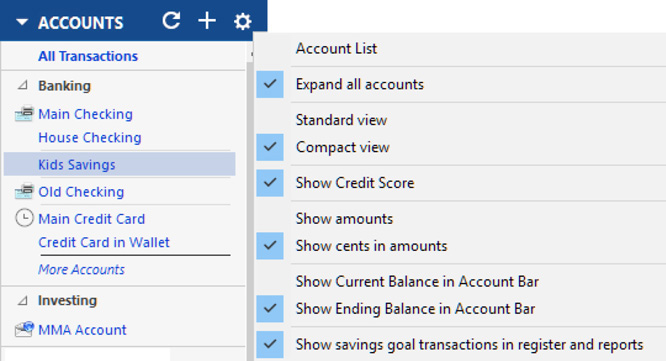
• Expand All Accounts tells Quicken to display all of the individual accounts in each separate section of the Account Bar.
• Standard View and its companion Compact View allow you to choose the way your accounts appear in the Account Bar. Compact View can save some room on your screen. The option for selecting the vertical spacing in the Account Bar is new for Quicken 2017.
• Show Credit Score tells Quicken to display the Credit Score button in the Account Bar.
• Show Amounts tells Quicken to display the balance of each account. If you choose not to display the balance amount, you do not see the Ending Balance total in the Account Bar.
• Show Cents In Amounts tells Quicken to include the cents rather than just the dollar amount of each account’s balance.
• Show Current/Ending Balance In Account Bar tells Quicken whether to display the balance as of today or include transactions you’ve entered for future dates in the balance.
• Show Savings Goals Transactions In Register And Reports appears only if you have established savings goals. Learn more about the Savings Goals feature in Chapter 13.
Click View | Account Bar to open a menu from which you can choose where the Account Bar physically appears in your Quicken window.
Tabs
Tabs, as seen in Figure 2-1, help you navigate through Quicken. Some tabs, such as the Spending and Investing tabs, provide information about your financial status, as well as links and buttons for accessing Quicken features. Other tabs have views, such as the Main View of the Home tab, that enable you to view and customize Quicken settings for your financial situation.

Figure 2-1 • Use Quicken’s tabs to navigate through the program.
A tab exists for each major area of Quicken:
• Home displays customizable views of your Quicken data. See Chapter 7 and Appendix B to learn more about how to work with and customize the Home tab views.
• Spending provides information about your income and expenditures for all accounts, only a single account of your choosing, for all dates, or for a custom date that you choose. You can use the drop-down lists to customize the information in both graphical and list formats, as explained in Chapter 7.
EXPERIENCED USERS RECOMMEND
You can choose to display spending for all accounts or a single account of your choosing, or with Custom, you can choose a selection of your accounts to display.
• Bills provides information about your upcoming bills and offers tools for working with bills and reminders, as discussed in Chapters 6 and 7.
• Planning gives you access to Quicken’s financial planners, as well as the assumptions you need to set up to use the planners effectively, as discussed in Chapter 12.
• Investing provides information about your investment and retirement accounts and any stocks or mutual funds you’ve asked Quicken to watch for you. See Chapters 9 and 11 for investing information.
• Property & Debt provides information about asset and debt accounts, including your home, car, related loans, and auto expenses, as discussed in Chapters 10, 11, and 12.
• Add-on Services offers links to additional Quicken services, such as Quicken Bill Pay and Quicken Online Backup.
If you have more tabs selected for display than the width of your Quicken window can show, several tab names are shortened. For example, Planning appears as “Plan” and Investing as “Invest,” as seen here.

• Mobile & Alerts helps you set up your Quicken ID to work with the Quicken Mobile app. See Chapter 3 for more details.
• Tips & Tutorials contains how-to guides and other helpful links.
The buttons in each tab indicate the current view or other options within each tab section. If there’s more than one button or a menu in either of these areas, you can click a button or choose a menu command to switch to another view or account.
Understanding Other Quicken Features
Quicken uses other windows to display information, depending on what you want to see or what task you are trying to perform:
• List Windows A list window shows a list of information about related things, such as accounts, categories, tags, or scheduled transactions. You can use a list window to perform tasks with items in the list.
• Report Windows Quicken’s report windows enable you to create reports about your financial matters. You have the option to change date ranges, create comparisons, and customize reports. You can also use options and buttons at the top of the window to work with, customize, and save reports. You learn about all of these in Chapter 15.
Quicken offers a number of ways to access its features and commands, including standard Microsoft Windows elements, such as menus and dialogs, and Quicken elements, such as the Toolbar, the Action gear icons, and links and buttons within Quicken windows.
• Menus Quicken has two ways to display menus. The recommended Standard display shows six items on the menu bar. If you choose Classic Menus, you may have an additional nine from which to choose, as shown here. You can choose commands from the menus as follows:

The Property & Debt menu appears only when you have entered a new account in either the Property & Assets or Loans & Debt sections.
• Click the menu name to display the menu. If necessary, click the name of the submenu you want, and then click the name of the command you want.
• Press the shortcut key combination for the menu command that you want. A command’s shortcut key, if it has one, shows to the right of the command name on the menu. See an extensive list of Quicken’s shortcut keys in Appendix A. If your Windows program is set up to have keyboard access keys underlined, you can press ALT to activate the menu bar and press the keyboard key for the underlined letter in the menu that you want to open. If necessary, press the key for the underlined letter in the submenu that you want to open, and then press the key for the underlined letter in the command that you want.
• Context Menus Context menus (which are sometimes referred to as shortcut or context-sensitive menus) can be displayed throughout Quicken. Point to the item for which you want to display a shortcut menu and click the right mouse button. The menu, which includes only those commands applicable to the item, appears at the mouse pointer.
• Dialogs Like other Windows applications, Quicken uses dialogs to communicate with you. Some dialogs display a simple message, while others include text boxes, option buttons, check boxes, and drop-down lists you can use to enter information.
• Toolbar The Quicken Toolbar is a row of buttons along the top of the Quicken window, just beneath the standard menu bar, that gives you access to other navigation techniques and features. The Quicken Toolbar appears by default, but can be turned off and customized. Learn how to customize it in Appendix B.
EXPERIENCED USERS RECOMMEND
• Back (an arrow pointing left) displays the previously opened window.
• Forward (an arrow pointing right) displays the window you were looking at before you clicked the Back button. This button is only available if you clicked the Back button to view a previously viewed window; otherwise, it is grayed out.
• One Step Update (the curling arrow pointing to the right) opens the One Step Update menu, so with your Internet connection you can update all of your online information at once.
• Customize Toolbar, which appears when you right-click in a blank area of the toolbar, allows you to make changes and additions to the Quicken Toolbar. Learn more about customizing the Toolbar in Appendix B.
• Filters Filters appear as a row of textual buttons and menus just above the contents of many Quicken windows. Most filter items, which vary from window to window, are drop-down lists. Click the downward-pointing arrows to access the list.
Quicken Title Bar
At the very top of your Quicken screen is the title bar, as seen earlier with the Classic menu displayed. The title bar displays the Quicken version with which you are working, the file that is currently open, and the tab that is currently selected. Toward the right side of this bar is a question mark, which opens Quicken Help as well as a Search box.
Search is a global search feature you can use to search for transactions entered into Quicken. Just enter the search criteria in the field, and press ENTER.
Finding Help in Quicken
In addition to the question mark icon in the title bar and in many Quicken windows and the Help button in some dialogs, Quicken includes an extensive Onscreen Help system to provide more information about using Quicken while you work. You can access most Help options from the Help menu.
Quicken’s Onscreen Help uses a familiar Windows Help interface. You can use it to browse or search Help topics or display Help information about a specific window. These days, any decent software program offers on-screen help. So what’s the big deal about Quicken’s? Quicken’s Onscreen Help is especially, well, helpful. It covers every program feature and provides step-by-step instructions for performing many tasks. Clickable links make it easy to jump right to a topic you want to learn more about. And as you’ll discover while using Quicken, Help is available throughout the program—not just in the Quicken Help windows. Each additional link on the Help menu is explained here:
• View Guidance This option opens one of the Quicken Qcards. See Chapter 1 for more information about View Guidance.
• Quicken Live Community The Quicken Live Community command uses your Internet connection to take you to Quicken’s online user-to-user forum, where you can ask questions, get answers, and share information with other Quicken users. Click links or use the search feature to get the information you need to make the most of Quicken.
• Quicken Support Clicking Quicken Support on the Help menu takes you to the Quicken, Inc., website. Select Support from the list at the top of the page or the Customer Support Team link.
• Sanitize Data File Copy This item is used to strip out or obfuscate personal and financial info from your data file in case you need to send your data file to Quicken, Inc., for troubleshooting.
• Screen Share This option, new in Quicken 2017, opens a screen, seen next, by which you can agree to let Quicken support personnel see your screen to help you when you contact Quicken, Inc.

• Check For Updates This option uses your Internet connection to verify that you are using the latest version of Quicken.
• Privacy Policy This option takes you to the Quicken Privacy statement. Quicken, Inc., takes the job of protecting your information very seriously. The policies and procedures the company uses to protect all of your information are displayed in this message. The statement explains what information is collected by Quicken, how that information is used, and how you can find out more about Quicken’s specific methods to ensure your information is safe at all times.
• Log Files This link contains other links to several files created in the “background” by Quicken. Should you ever need to contact Quicken Support, the helpful Quicken support person may ask you to refer to these files for troubleshooting. There are several types of log files, and should you ever need to send them, Quicken Support will designate which one is required.
• About Quicken This tells you which version of Quicken you are using. Also in the About Quicken message are copyright information and credits to the many people who have made the program possible. Additional technical information about your Quicken file and system resources can be displayed by holding down CTRL and clicking Help | About Quicken. You may be asked for this information when troubleshooting with Quicken Support.
EXPERIENCED USERS RECOMMEND
• Upgrading Quicken If your current Quicken version does not meet your needs, you can upgrade through Quicken Help. Click Help | Add nnnn, where nnnn is the name of the version you prefer. Using your Internet connection, these commands display a window that provides a bit more information about other features in Quicken. From this website, you can purchase either of these Quicken versions.
As You Begin
To use Quicken Personal Finance Software, you must set up your Quicken data file for your financial situation. This means creating accounts and entering starting balance information. When you first set up your Quicken Personal Finance Software data file, it includes a number of default categories. Don’t think you’re stuck with just those categories. You can add and remove categories at any time. The same goes for accounts—you can add them as you see fit. Modifying the accounts and categories in your Quicken data file is a great way to customize Quicken to meet your needs.
As discussed in Chapter 1, Quicken opens to the Home tab’s Main View, which appears once you have entered your primary bank account. As you start using Quicken, it’s a good idea to understand how Quicken’s data files and accounts work. You’ll also learn what documents to gather to help you set up your accounts properly.
Understanding Data Files and Accounts
All of the transactions you record with Quicken are stored in a data file on your hard disk. This file includes all the information that makes up your Quicken accounting system.
Data Files
Many new Quicken users confuse data files and their Quicken accounts. A data file holds all of the information about all of your Quicken accounts. Quicken accounts can be checking, savings, credit card, investing, property, and debt accounts. These accounts contain the transactions you enter, either manually or by downloading from your financial institution. You can have any number of accounts within a data file. Think of your data file as a large strongbox in which you store all of your financial transactions.
Although it’s possible to have more than one Quicken data file, it isn’t usually necessary. One file can hold all of your transactions. In fact, it’s difficult (if not downright impossible) to use more than one Quicken file to track a single account, such as a checking or credit card account. Splitting your financial records among multiple data files makes it impossible to generate reports that consolidate all of the information.
When would you want more than one data file? For example, you may need two data files if you use Quicken to organize both your own finances and the finances of a community group for which you are serving as treasurer. Each of these data files would have its own separate set of bank, credit, and asset accounts.
EXPERIENCED USERS RECOMMEND
Appendix A covers a number of data file management tasks, including creating additional data files and backing up your data files.
Accounts
An account is a record of what you either own or owe. For example, your checking account is a record of cash on deposit in the bank that is available for writing checks. A credit card account is a record of money you owe to the credit card company or bank for the purchases on your credit card. All transactions either increase or decrease the balance in one or more accounts. You create accounts within a Quicken data file so you can track the activity and balances in your bank, credit card, investment, and other accounts.
What You Need
To set up accounts manually, you should have balance information for the accounts that you want to monitor with Quicken. You can get this information from your most recent bank, investment, and credit card statements. It’s a good idea to gather these documents before you start the setup process so they’re on hand when you need them. To use the online banking services from your financial institutions, make sure you have your passwords and personal identification numbers (PINs).
If you plan to use Quicken to replace an existing accounting system—whether it’s paper based or prepared with a different computer program, you may find it helpful to have a list of account names you’ve used (called the “chart of accounts” by your accountant) or recent financial statements. This way, after you set up your Quicken accounts, you can replace the Quicken default name with your preferred names.
Accounts
To track your finances with Quicken, you first create at least one account. While many of your expenditures may come from your checking account, you probably have more than one account that Quicken can track for you. By setting up all of your accounts in Quicken, you can keep track of balances and activity to get a complete picture of your financial situation. You don’t have to add all of your accounts at once. You can start by tracking just the one or two accounts that you use most frequently and add accounts later.
Creating More Accounts
To begin using Quicken, you must tell the program what bank and credit cards you wish to track. Click the plus sign in the Accounts Bar to open the Add Account dialog as described in Chapter 1.
The Add Account dialog box appears, as seen in Figure 2-2. As described in Chapter 1, choose what type of account you want to add, choose the name of your bank from the displayed list, or type its name in the Enter The Name Of Your Financial Institution field. If your bank’s name does not appear on this first group of names, when you type the first letters of your bank’s name, a new list appears of those institutions that begin with the letters you typed.

Figure 2-2 • After creating their original account, Quicken users often add their savings account or credit card account next.
Click Next to continue. Depending on your financial institution, you may see a dialog displaying connection services available for that financial institution. If so, make your choice and click Next. In the dialog that appears, as seen in Figure 2-3, Quicken prompts you to enter your user name and password as provided by your bank. Notice that you can display the password items by selecting the word “Show.” (Should you want to save this password in the Quicken Password Vault, click Save This Password.) Click Connect to continue.
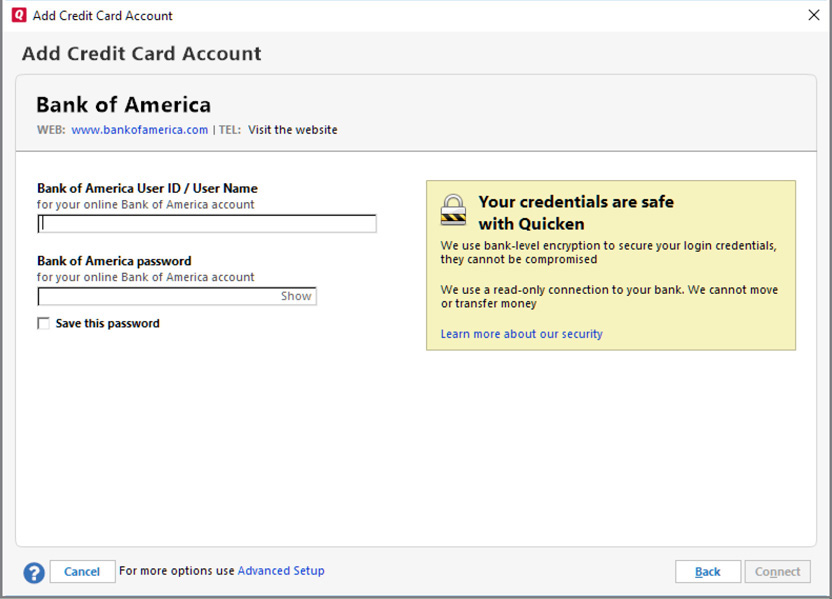
Figure 2-3 • Use the ID and password provided by your financial institution when adding a new account.
As you enter your user ID and password, Quicken warns you if your CAPS LOCK key is on.
The Quicken Update Status message appears as Quicken connects to your financial institution. If there are additional passwords or security phrases required by your bank, you are prompted to enter them. Do so and click OK or Next, depending on the prompt. You may be prompted to enter your Quicken ID here.
If you have more than one account that uses the user ID and password you entered, all of the accounts may be downloaded. If you have not yet set up any accounts in Quicken, each account will be called by the account name shown on your bank’s records. You may change the name to something more descriptive if you choose. If you have already entered some accounts, Quicken prompts you to add, link, or ignore each of the downloaded accounts. After changing the account name(s) and selecting Add | Link | Ignore, click Next.
Use the Advanced Setup link at the bottom of the window if you do not want to download your information or if your bank offers more than one type of downloading service. See Chapter 6 for more information.
After the download is complete, your account (or accounts if you have more than one at that bank) shows in your Account Bar. Click Finish to return to the Home tab’s Main View. Each downloaded account appears in the Account Bar with the nickname you entered. You may change the account names if you choose.