Chapter 6
Connecting Online
In This Chapter:
• Understanding Transaction Download
• Introducing Online Payment and Quicken Bill Pay
• Setting up Online Account Services
• Checking Online Account Services status
• Using the Online Center window
• Downloading transactions
• Making online payments
Life can be hectic sometimes, too hectic to keep track of your bank accounts, pay bills before they’re overdue, and buy stamps to mail those bills. Quicken Personal Finance Software’s Online Account Services enable you to do most (if not all) of your banking from the comfort of your own home so banking can be a lot less of a chore. You can use these features separately or together:
• Transaction Download enables you to download bank and credit card account activity and transfer money online between accounts.
• Online Payment enables you to pay bills online without manually writing or mailing a check. (Quicken Bill Pay offers the features of Online Payment, even if your bank does not support it.)

Just a reminder: Quicken does not handle the characters &, <, or > as part of a password. In addition, each financial institution designates both the password length and its allowable (and disallowable) characters.
 Online Account Services
Here’s a closer look at Quicken’s Online Account Services, including what the services are, how they work, and how you can expect to benefit from them.
Understanding Transaction Download
Quicken’s Transaction Download feature can perform several tasks, depending on your financial institution. Generally speaking, financial institutions support Transaction Download three ways. You can quickly determine which method is used for a specific account. Press CTRL-A to open your Account List. (You can do this from any screen within Quicken.) The type of connection for each account shows in the Transaction Download column of the list. If you do not see the Transaction Download column in your Account List, click the Options button at the bottom left of the Account List and choose Show Transaction Download Status. See Table 6-1 for the download features that are available for each method.
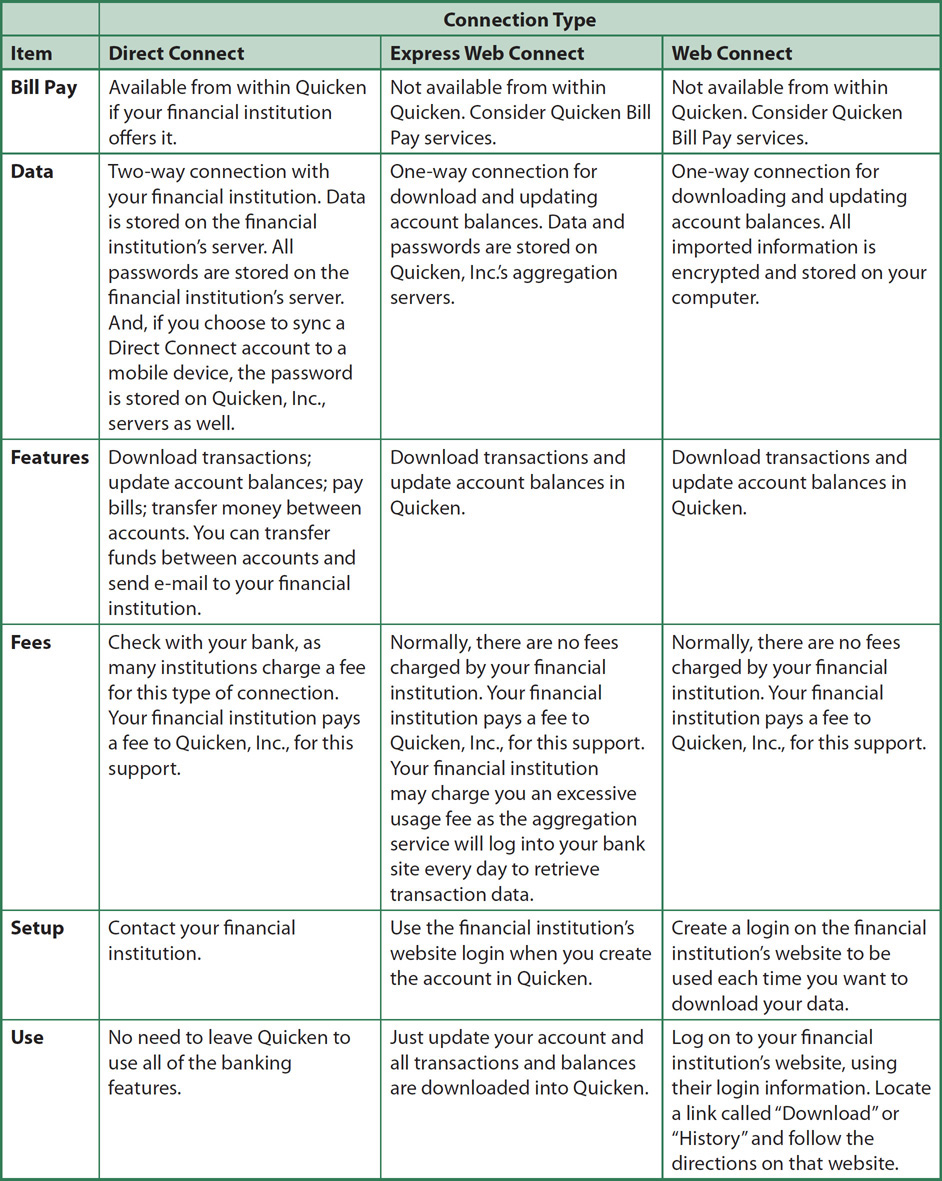
Table 6-1 • Connection Options for Downloaded Transactions
If you have more than one account that uses Web Connect, consider downloading one account at a time the first time you download, if your financial institution allows it. This way you won’t inadvertently import the wrong account’s information into your register.
One important feature of Web Connect is you may be able to download a greater range of transactions by date than you can with Direct Connect and Express Web Connect. This is especially useful when you first set up your accounts so you can get the longest transaction history possible. You can switch download methods if needed. For example, you might start out using Web Connect to get a more complete set of historical transactions, then switch to Direct Connect for its easier transaction downloading.
Introducing Online Payment and Quicken Bill Pay
Online Payment enables you to send a check to anyone without physically writing, printing, or mailing a check. You enter and store information about the payee within Quicken. You then create a transaction for the payee that includes the payment date and amount. You can enter the transaction weeks or months in advance if desired—the financial institution sends payment on the date you specify.
As explained in Chapter 7, you can also link some of your bills directly with a payee.
Explaining the Process
Suppose you use Quicken to send online payment instructions to pay your monthly bill at Jim’s Hardware Store. You’ve already set up Jim’s Hardware as a payee by entering the name, address, and phone number of his store, as well as your account number there. Quicken sends your payment instructions to your bank, which stores it in its computer with a bunch of other online payment instructions. When the payment date nears, the bank’s computer looks through its big database of payees that it can pay by wire transfer. It sees phone companies, credit card companies, and other banks. However, because Jim’s store is small, it’s probably not one of the wire transfer payees. In that case, the bank’s computer prepares a check using all the information you provided. It mails the check along with dozens of others due to be paid that day.
The date the money is actually withdrawn from your account to cover the payment varies depending on your bank. There are four possibilities: one to four days before the payment is processed for delivery, the day the payment is processed for delivery, the day the payment is delivered, or the day the paper check or electronic funds transfer clears your bank.
Check with your bank to find out when they withdraw the funds from your account for online payments. You can also search the Quicken Community to see the experiences other Quicken users have had with that financial institution. To access the Quicken Community, from the Quicken Toolbar, click Help | Quicken Live Community. (While the name is now the Quicken Community, the link still says “Quicken Live Community,” although the forum is not “live” and is not a “live chat” service.)
Online Service Costs
The cost of Quicken’s Online Account Services varies from bank to bank. However, usually Express Web Connect and Web Connect services are offered at no charge. Check with your bank to determine the exact fees. Also, ask about how to get the fees waived. Often, a sufficient balance or a combination of balance and auto-deposits will qualify you to have the online services fee waived.
Setting Up Online Account Services
To use the Online Account Services supported by Quicken, you must configure the appropriate Quicken accounts. If you did not set up your accounts for online services when you created the accounts, you will need to do so before you can download any transactions. You must first contact your financial institution and tell them you want online services.
To apply for online account services, normally all it takes is a phone call, although some banks and credit card companies allow you to apply online. The financial institution will usually supply you with some or all of the following:
• Password PIN (Personal Identification Number) You’ll enter this code into Quicken when you access your account online. This is a security feature, so don’t write down your PIN on a sticky note and attach it to your computer monitor. Many financial institutions send this information separately for additional security.
• User Name (Customer ID Number) Each bank uses a different numbering system.
• Bank Routing Number Although your bank might send routing number information, Quicken won’t need it. It knows what financial institution you’re using based on the information you provide when you create the account. That’s why it’s so important to choose the correct financial institution when you create each account. You may see the routing information received by Quicken in the Routing Number field in the General tab of the Account Details dialog.
• Account Number for Each Online Access–Enabled Account This tells your financial institution which account you want to work with. Quicken may not need this information. Depending on your financial institution, the account number may appear in the Account Number field of the General tab of the Account Details dialog.
Getting Started with Online Account Services
With customer ID and PIN in hand, you’re ready to set up your account (or accounts) for Online Account Services. You can verify this by following the instructions in the “Checking Online Account Services Status” section, later in this chapter.
Some companies, such as department stores, that offer online access on their web pages, may not have the capability of downloading your transactions into Quicken. Check with the company to determine if they have transaction download capability.
Setting Up for Direct Connect, Express Web Connect, and Quicken Bill Pay
If you entered some of your accounts manually when you first used Quicken, from the Account Bar, click the account you want to set up to open its register. Click the Action gear icon. From the menu, select Set Up Online as shown here. (If the account is already set up for online access, the Actions menu shows Update Now instead of Set Up Online.)
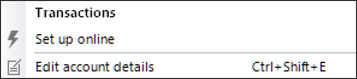
The Action gear icon is at the top right of your account registers. If you have customized an account to show Account Toolbar icons, there may be additional icons showing. The Action icon is farthest to the right. You can always use the keyboard shortcut CTRL-SHIFT-N to open the Actions menu.
When logging in to your financial institution, you may have to physically place the mouse cursor in the proper field each time. Quicken does not always place the cursor in the appropriate field.
Checking Online Account Services Status
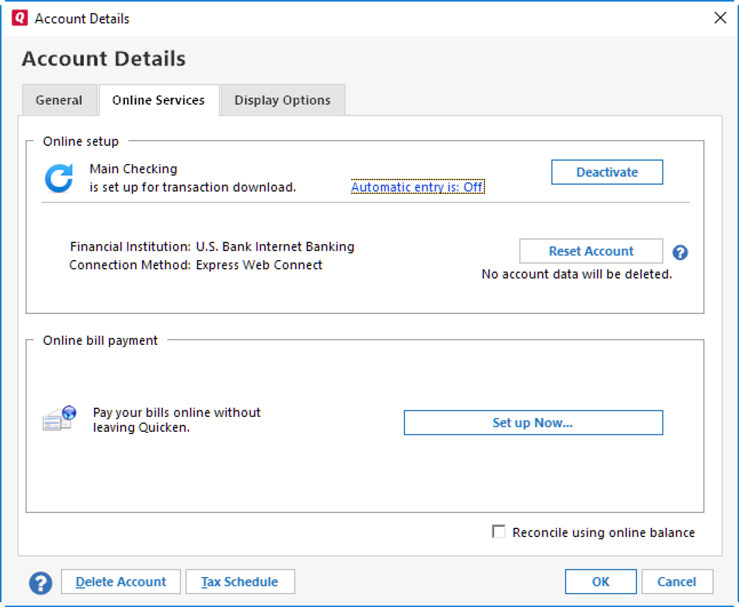
You can confirm that an account has been set up for Online Account Services and determine what kind of connection it uses. Right-click the account from the Account Bar and choose Edit/Delete Account. Then, click the Online Services tab to display the type of connection, as shown next. (If your bank offers another connection method, you may see a message with a link describing this.)
• Deactivate Use this button if you want to stop Direct Connect services for the account. However, you must still contact the bank to deactivate the connection on their side. To deactivate (or disable) an account from online services:
• Click Deactivate. (If you currently have unaccepted transactions, you must either accept the transactions or delete them before you can deactivate online services.) A message appears asking if you would like to deactivate the service. Click Yes to complete the deactivation.
• A connection message box briefly appears while the service is deactivated. Depending on the type of connection your financial institution offers, you may see a Remove Connection button. If so, click it.
If your financial institution has changed or if you have problems deactivating an old (or closed) account, try disconnecting your Internet connection before you deactivate.
• Reset Account can be used when a download problem has occurred. None of your data is deleted from Quicken; the account is reset to hopefully solve the issue. Click this button, enter your bank password, and the account’s online access is reset. You are prompted to choose the account with which downloaded transactions are connected. Make your choice and click OK.
During the Reset Account process, the Reset Account button is grayed out and inactive. Once the Reset Account process has completed, the Reset Account button will no longer be grayed out and a small green check mark will appear to the left of the button. If there are new transactions to be downloaded, they will be downloaded during the Account Reset process.
• Automatic Entry Is: On/Off This link opens the Automatic Transaction Entry dialog, shown next. From this dialog, you tell Quicken how to handle downloaded transactions for this specific account.

• Connection Method This link shows the current method by which you connect to your financial institution.
• Click OK to close the Account Details window and complete the process.
Be aware that some banks use different passwords for Direct Connect services than for Web Connect or Express Web Connect.
EXPERIENCED USERS RECOMMEND
The Online Center
While you can access online services from several of the various tabs, you can also use the Online Center to work with Quicken’s online features. This window gives you access to all the lists and commands you need to download transactions and, if you have Direct Connect, to create payments, transfer money, and exchange e-mail with your financial institution.
Using the Online Center Window
To open the Online Center window, choose Tools | Online Center. You will see the available tabs, such as Transactions, Payments, Transfer, and E-Mail, with one financial institution selected.
Depending on each account’s type, you may not see all the tabs for every account.
A number of buttons and menus enable you to work with the window’s contents:
• Delete removes a selected item. This button is not available in all tabs of the Online Center window.
• Payees (if you have set up online payments) displays the Online Payee List window, which is discussed later in this chapter in the section “Entering Online Payee Information.”
• Repeating (if you have set up online payments) displays the Repeating Online tab of the Bill And Income Reminders list window. Learn more about using this feature later in this chapter, in the section “Making Online Payments.”
• Contact Info displays the Contact Information dialog for the currently selected financial institution, if it is offered. You can use the information in the dialog to contact the bank or credit card company by phone, website, or e-mail. Not all financial institutions have these options.
• Print prints the transactions that appear in the Payments tab window. It will also print any e-mails you have in the E-mail tab. You may be able to print downloaded transactions that have not yet been accepted.
• Options displays a menu of commands for working with the current account or window.
Downloading Transactions
One of the main features of Online Account Services is the ability to download transactions from your financial institution into Quicken. There are several ways to start downloading your transactions after you have set up your online accounts:
• Use the Update/Send button of the Online Center window.
• Click the white right-curling arrow at the top of the Account Bar.
• Click the One Step Update button (a right-curling arrow) on the Quicken Toolbar.
• From an account’s register, click the Action gear icon at the top right of the register and choose Update Now from the menu that appears.
• From the Quicken menu, choose Tools | One Step Update.
Connecting to the Financial Institution with Direct Connect or Express Web Connect
If your financial institution supports Direct Connect or Express Web Connect, you can download all transactions from within Quicken.
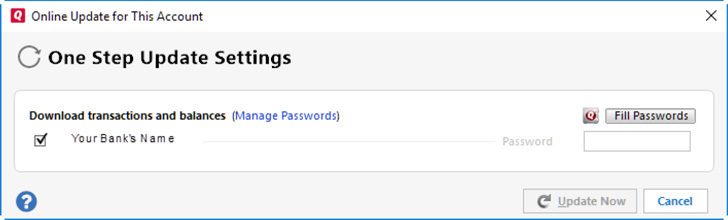
Using the Online Center window, choose the name of your bank or credit card company from the Financial Institution drop-down list. Click the Update/Send button. The One Step Update Settings dialog for that institution appears. Enter your password, and click Update Now.
Wait while Quicken connects to your bank. A status dialog may appear while Quicken collects your data. When Quicken has finished exchanging information, the status dialog disappears and the One Step Update Summary window takes its place. Continue following the instructions later in the chapter, in the section “Comparing Downloaded Transactions to Register Transactions.” Depending on your preference settings, you may only see the One Step Update Summary window if there is an error in the online session.
Downloading a Web Connect File
If your financial institution supports Web Connect but not Express Web Connect, you’ll log in to your financial institution’s website and manually download the statement information, just as you did when you first set up the account for Online Account Services. Even if your financial institution supports Express Web Connect, you can download using Web Connect if you wish. The availability of Express Web Connect does not preclude use of Web Connect.
However, if you have chosen Express Web Connect or Direct Connect as your download method for an account, to download via Web Connect, you will need to start from the financial institution’s website rather than from within Quicken.
Many Quicken users set up accounts in Quicken and decide later to activate online services for these accounts. The first time you download transactions into a Quicken file for which accounts have been set up, you are prompted to either add the downloaded transactions into a new account or link to an existing account.
If your link is to an incorrect account, the transactions download into that incorrect account. If you have not accepted the transactions, simply delete the downloaded transactions. Then, download the information into the correct account. If you have accepted the transactions and they are in the register of the wrong account, you can move them into the correct account. However, if you have linked the accounts, you have to deactivate the accounts to break the connection to the incorrect account.
It’s not so easy to delete transactions from the Downloaded Transactions tab. You must delete the downloaded transactions one at a time. If you have many transactions in the Downloaded Transactions tab, it may be easier to accept them all, sort your account by date/order entered, and then select all the downloaded transactions and either delete or move them to the correct account. Another alternative is to restore a recent backup from before you performed the transaction download.
If you have several months’ (or years’) worth of downloaded transactions, one way to solve this issue is by deactivating online services for both accounts, moving any transactions that are in the wrong account into the correct account, and then reactivating the online service for both accounts. See “Moving Transactions” later in this chapter. However, as always, before making any changes, back up your Quicken data, “just in case.”
In the Online Center window, choose the name of your bank or credit card company from the Financial Institution drop-down list. If necessary, click the Update/Send button to see the dialog shown next. Quicken connects to the Internet and displays your financial institution’s login page. Log in, navigate to the page where you can download statements, and download the statement or transactions you want. For a Web Connect account, choosing Update/Send from the Online Center will open your browser and display the financial institution’s login page, not shown in the illustration.
If necessary, switch back to Quicken. It should automatically import the transactions you downloaded into the correct account. If you have chosen to accept your downloaded transactions automatically, you will see a small blue ball icon at the left of each of the downloaded transactions in your account register. Transactions that have been matched to scheduled transactions have a calendar icon in the same location.
If Express Web Connect or Direct Connect is available for an account, you may see a dialog offering to upgrade your connection. You may see a prompt to handle your Web Connect transactions now or save the transactions for later processing. To set this, go to Edit | Preferences | Downloaded Transactions and make your selection.
Click the Close button in the One Step Update Summary window to dismiss it. Then, click that account’s name in the Account Bar to open the register for that account.
Unless you have chosen to turn on the Automatically Add To Banking Registers preference, your downloaded transactions will appear in the Downloaded Transactions tab at the bottom of the register window. From there, you can use the directions in the next section “Comparing Downloaded Transactions to Register Transactions.”
Keep in mind that the first time you connect via Direct Connect, the bank normally sends all transactions from the past 90 or more days. (Some banks send a full year of transactions!) After that, only new transactions (items that have not been downloaded) will be downloaded. For Web Connect downloads, you can often specify the transaction period when you set up the download.
Comparing Downloaded Transactions to Register Transactions
If you have opted to accept downloaded transactions manually, you will compare the downloaded transactions to the transactions already entered in your account register. This process enables you to review or identify transactions that may have been entered incorrectly by either you or the bank.
If you do not see the Downloaded Transactions tab at the bottom of your register, you may have minimized the window or you may have told Quicken to automatically add downloaded transactions to the banking registers. To allow the tab to display, click Edit | Preferences | Downloaded Transactions | Downloaded Transaction Preferences | After Downloading Transactions, and clear the Automatically Add To Banking Registers check box.
The bottom half of the account register window is the Downloaded Transactions tab (refer to Figure 6-1). It shows three ways to identify downloaded transactions:
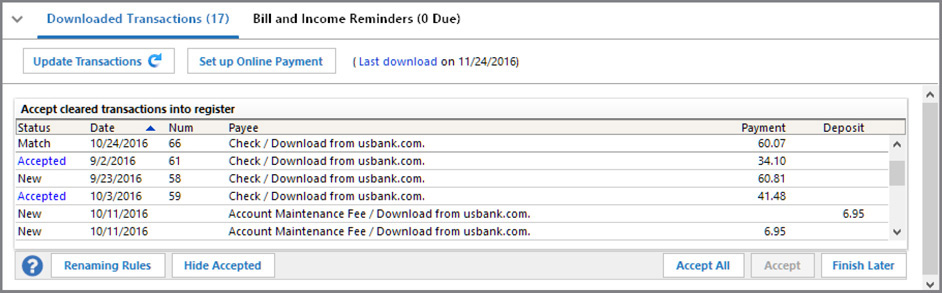
Figure 6-1 • Many Quicken users choose to review transactions before accepting them into the register.
• Match identifies transactions that match those in the register. This will happen if the transaction has already been entered in the Quicken register and matches the information in the downloaded transaction.
Especially the first time you are downloading transactions for an account, you will want to closely check the Match transactions to ensure the downloaded transaction is matched to the correct register transaction. Incorrect matches can make downloaded transactions seem to disappear and can cause your reconciliation to fail to balance. To check the match, click the Match transaction in the Downloaded Transactions tab. The corresponding transaction in the account register will be highlighted.
• New identifies transactions that are not in the register or that are in the register but are different from the downloaded transactions. Maybe you transposed a number or the date is different. You need to manually match these transactions so you do not get duplicates.
Be sure to check each New transaction carefully to ensure that you were the one who actually initiated the transaction and that the transaction is to the payee and in the amount you created. If you suspect any type of fraud, call your bank immediately.
• Accepted identifies matched transactions that you have accepted. When a downloaded transaction has been accepted, a small “c” appears in the Clr column of the account register to indicate that the item has cleared the bank but has not yet been reconciled.
When you select an item in the Accept Cleared Transactions list, the transactions below it shift down to make room for a blank line with an Accept button and an Edit menu. You can use these to work with the selected transaction.
• Accepting a Matched Transaction If a transaction matches one in the register, you can accept it by selecting it in the list at the bottom of the window and clicking the Accept button. If Quicken sees what appears to be a transaction that matches one in your register, a small, uncleared icon appears in the Status column at the left of your register, as seen here. The icon is a pencil and the icon label is “Uncleared.” Click the icon to match the register entry to a downloaded transaction. Even if there is not an apparent match, any time you see the uncleared icon, you can click it to get the Match To A Downloaded Transaction context menu item and, by clicking that menu item, get to the Manual Match window.

• Entering and Accepting a New Transaction To enter and accept a new transaction, select the transaction in the bottom half of the window. If the information on the transaction is complete and correct, click Accept. If you have entered the part of the transaction in the register (the top half of the window), fill in any missing details, including the payee, category, and memo. Then click Save in the top half of the window or Accept in the bottom half. Quicken marks it as Accepted and a small “c” appears in the Clr column of the register.
• Unmatching a Matched Transaction If a matched transaction really shouldn’t be matched, select it in the bottom half of the window and choose Unmatch from the Edit pop-up menu as seen here.

• Unmatch tells Quicken that it got the match wrong, but this command lets Quicken attempt to match it to another transaction. As a result, it may come up with another match. It’s your job to determine whether the new match is correct. If it can’t find a match, the status changes to New.
• Make New tells Quicken that the transaction shouldn’t match any existing transaction. The status changes to New, and Quicken can then treat it as a new transaction.
• Make All New tells Quicken to make all of the downloaded but not yet accepted transactions new so you can manually match them or enter them as a new transaction.
• Manually Matching a Transaction If a downloaded transaction identified as New should match one in the register, or if a single transaction corresponds to multiple transactions in your account register, you can manually match them up. In the bottom half of the window, select the transaction that you want to match manually, and click the Edit button. Click Match Manually to open the Manually Match Transactions dialog. Turn on the check box(es) for the transaction(s) you want to include in the match. When you click Accept, Quicken marks the transaction in the Clr column with a small “c.”
If the transaction included multiple register transactions, the entry Quicken creates includes each of the register transactions on a separate split line. You can click the Split button for the transaction to edit it as desired. See Chapter 5 to review working with split transactions.
If you see a transaction that displays as “New” but you’re sure you’ve entered it, check for small discrepancies, perhaps in the amount. You can either force a manual match or simply correct the item you’ve entered into your register and the item status will change to Match.
If you choose to have Quicken automatically add your downloaded transactions into your banking register, you can still manually match a transaction. Register transactions that have not been matched with a downloaded transaction have a small pencil icon near them. If you use a one-line register, this icon appears to the left of the date. Click the icon and choose Match To A Downloaded Transaction. You can use this matching method whether you auto-enter your downloaded transactions or manually review/accept your downloaded transactions.
EXPERIENCED USERS RECOMMEND
Deleting a New Transaction To delete any transaction, select it in the bottom half of the account register window, click Edit, and choose Delete from the Edit pop-up menu. A confirmation dialog appears; click Yes to remove the transaction from the list.
Sometimes matching issues can be resolved, especially when reconciling an account, by choosing to display the Downloaded Posting Date column in your register. Display this column (field) in your register by choosing the Action gear icon | Register Columns | Downloaded Posting Date. Since reconciliations are date-driven, the posting date may be after the cutoff date of the reconciliation. Click Done to close the Register Columns list and return to the register.
Moving Transactions If you have several accounts at the same bank and inadvertently accept transactions into the incorrect account, you can move either a single or multiple transactions. You can use this procedure to move transactions between accounts at different banks or to move transactions between accounts that are not online accounts.
To move a single transaction:
1. Right-click the transaction in the account register. Choose Move Transaction(s) from the context menu.
2. The Move Transaction(s) dialog box appears. Choose the account into which you want to move the transaction from the drop-down list, shown here.
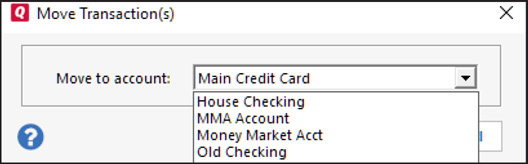
3. Click OK and Quicken returns you to the original register.
To move multiple transactions as a group in your register:
1. Click the first transaction in the register to highlight it.
2. Hold down your SHIFT key and, while still holding it, click the last transaction in the group. All of the transactions will be selected. Release the SHIFT key.
3. Right-click in the highlighted area, and from the context menu that appears, choose Move Transaction(s).
4. The Move Transaction(s) dialog box appears. Choose the account from the drop-down list into which you want to move the transactions.
5. Click OK to return to your original register.
To select multiple transactions that are scattered throughout your register:
1. Click the first transaction in the register to highlight it.
2. Hold down your CTRL key and, while still holding it, click each transaction you want to move. All of the selected transactions will be highlighted. Release the CTRL key.
3. Right-click in the highlighted area, and from the context menu, choose Move Transaction(s).
4. The Move Transaction(s) dialog box appears. Choose the account from the drop-down list into which you want to move the transactions.
5. Click OK. You are returned to the original account register.
You may be able to get all the transactions together in a contiguous group by sorting or filtering the account register.
In each case, the transactions are moved to the account you designate.
If you are moving reconciled transactions, you will see a prompt for each transaction you are moving, asking you if you are sure you want to move a reconciled transaction. This can be tedious if you are moving many transactions. You may want to use Copy Transaction(s) and Paste Transaction(s) instead, as this method will not show the prompt asking if you are sure about changing the reconciled transactions.
Accepting All Downloaded Transactions The Accept All button accepts all transactions into your account register. If you select this without reviewing them one by one, some transactions may not be properly categorized. Also, some transactions may be matched to the wrong transaction, making it appear as if the downloaded transaction disappeared. Most Quicken users don’t use Accept All without first examining each downloaded transaction to ensure it matched to the proper register transaction.
After you have reviewed all of your transactions and accepted, matched, or deleted the transactions, click Done to close the Downloaded Transactions tab. Choose Finish Later to close the dialog if you cannot complete the task at one sitting.
Renaming Downloaded Payees
One of the potentially annoying things about entering transactions by accepting downloaded activity information is the way your bank identifies payees. For example, one bank identifies the payee as “Shell Oil 12384658” instead of plain old “Shell Oil.” Fortunately, Quicken’s Renaming Rules feature can automatically rename bank-assigned payee names with names you prefer. You can also create and apply your own renaming rules. You do this with the Renaming Rules dialog, which allows you to control how Quicken deals with the differences between the payee names in your records and those of the bank’s.
To open this dialog, click the Renaming Rules button at the bottom of the Downloaded Transactions tab of the register window, or choose Tools | Renaming Rules. You can also select a payee in your register. Click the small downward arrow at the right of the Payee field, and select the Renaming Rules button. This process is available only if your account is enabled for transaction download.
The Renaming Rules dialog lists all the renaming rules you have already created, as well as the rules Quicken has created automatically. Click the Add A Rule link, or the white cross within the green circle icon next to the Add A Rule link, to add a new rule. Click the Do-Not-Rename Rules tab to add a payee to the Do Not Rename list. (You can add a rule from that tab as well; just click the Add A Rule link.)
If you want to delete a rule, simply select the rule, and click the icon with the small white line within the red circle. A confirmation message appears. Click OK in the confirmation dialog to remove the rule.
To modify a rule, select the payee to display three icons: a pencil, a green circle with a white plus sign, and a red circle with a white line, as shown here. Click the pencil icon to open the Edit Payee Name dialog. Use this dialog to change the selected payee name. Click OK to save your renaming rule edits and return to the Renaming Rules dialog.
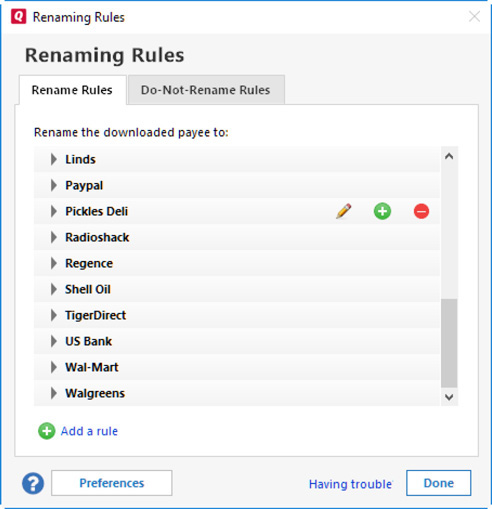
After you have made all of your changes, click Done to return to the register.
Be careful when renaming generally named downloaded transactions. For example, if we write a check to Car Repair By Royce in the amount of $202.26, our US Bank account downloads transactions as “CHECK Download from usbank.com.” If we use the Add A Renaming Rule dialog, all downloaded checks will be renamed as Car Repair By Royce! The best workaround for this is to enter checks in your register manually and then match those checks to the downloaded transactions.
When you are in the Renaming Rules dialog and select the Add A Rule link; it opens the Add A Renaming Rule dialog. Enter the name you want to see as the payee name in the Change Payee To box. Then, from the drop-down list, choose If Quicken Name Is or If Payee Contains and then enter the word (or words) that most likely will appear in the downloaded transaction. When you click OK in the dialog, you are returned to the Renaming Rules dialog and will see the new renaming rule added to the list.
EXPERIENCED USERS RECOMMEND
Making Online Payments
Paying your bills from within Quicken can save you both time and effort. If your bank supports Online Bill Pay, this may be the best choice for you. This section explains how to set up online payees, enter payment information for one-time and repeating payments, and work with payment instructions.
Entering Online Payee Information
To send payments from your account, your bank must know who each payee is and where they are located. To ensure that your account with the payee is credited properly, you must also provide account information. You do this by setting up online payees in the Online Center.
• From the Tools menu, click Online Center to open the Online Center dialog. Select Payees to open the Online Payee List. You can also choose Online Payee List from the Tools menu to open the list.
• The Financial Institution drop-down list shows the institutions for which you have enabled Online Bill Pay. If there is more than one, choose the institution that has the account from which you will be paying this payee. The payees you have added for the displayed institution will be listed, showing the payee name, the lead time for this payee, and the account number. Some financial institutions do not provide the lead time for online bill payments. There are several buttons at the bottom of the list, as discussed later.
If you have not yet set up Online Bill Pay, the Payees menu item will not be listed in the Online Center and the Online Payee List entry in the Tools menu will be disabled.
• New opens the Set Up Online Payee dialog.
• Enter the name of the online payee in the Name field and any description that might be needed in the optional Description field. Verify (or enter, if this is a new payee) the mailing address, account number, and phone number. If you skip over one of these required fields, Quicken will prompt you for the information.
• Click OK when you have completed entering the information. The Confirm Online Payee Information message appears displaying the information you just entered. Check the information in this box carefully. When you’re satisfied that the information is correct, click Accept. The new payee is added to the Online Payee List. If the information is not correct, click Cancel and you are returned to the Set Up Online Payee dialog.
The following items appear on the Online Payee List:
• Help (the small question mark) opens the paying bills online section of Quicken Help.
• Print (the printer icon) prints a list of online payees.
• Edit enables you to modify the information for the selected online payee. However, note that you cannot change the account number without deleting the payee and setting up a new payee.
• Use switches you back to the Payments tab of the Online Center window and inserts the selected payee into the payment form.
• Report displays a report of all payments made to the selected online payee.
• Delete removes the selected online payee. Deleting a payee simply deletes the payee’s information from the Online Payee List window. It does not change any transactions for a payee. You cannot delete a payee for which unsent payment instructions exist.
• Done closes the Online Payee List.
Entering Payment Instructions
To enter additional online payment instructions, click Tools | Online Center | Payments. Ensure you are using the correct financial institution if you have more than one set up for online payments. Fill in the fields in the middle of the window with the payment information on the following page.
• Processing Date is the date the bank should begin processing the payment. For some banks, this date is fixed based on the Delivery Date field and can’t be changed. When the Processing Date is fixed based on the Delivery Date, the Processing Date’s value will be grayed out.
• Delivery Date is the date you want the payee to receive payment. This should be before the date the bank creates and mails the check. The check may be received before the delivery date, depending on the mail (if the check is mailed). The date you enter, however, must be at least the same number of business days in advance as the lead time for the payee—often four business days. For some banks, the delivery date cannot be changed; instead, specify a processing date that allows enough time for the payment to be made on a timely basis.
• Payee is the online payee to receive payment. Quicken’s QuickFill feature fills in the payee’s name as you type it. If desired, you can choose it from the drop-down list of online payees. If you enter a payee that is not in the Online Payee List window, Quicken displays the Set Up Online Payee dialog so you can add the new payee’s information. This enables you to create online payees as you enter payment instructions.
• $ is the amount of the payment.
If you have set your Quicken Preferences to use the ENTER key when moving between fields, this process ignores your Preference setting and uses ENTER to enter the online payment.
• Category is the category for the transaction. You can enter a category, choose one from the drop-down list, or click the Split button to enter multiple categories.
• Memo, which is optional, is for entering a note about the transaction.
When you’ve finished entering information for the transaction, press ENTER. Depending on your financial institution, a message box may appear reminding you that you need to allow enough time for the payment to be processed by your financial institution. Click OK to continue or Cancel to return to the payment. Click the Don’t Show This Message Again check box to keep the message from appearing for future transactions.
The transaction appears in the list in the bottom half of the window with the words “Payment request ready to send” in the Status column beside it. You can repeat this process for as many payments as you want to make.
You can also enter an online payment instruction directly into the appropriate account register and choose Send Online Payment in the Check # column.
Sending Payment Instructions
Once your payment instructions have been completed, you must connect to your bank to send the instructions. In the Online Center window, click the Update/Send button. Quicken displays the One Step Update Settings dialog, which lists all of the payment instructions, including any repeating payment instructions. If you are prompted, enter your password and click the Update Now button.
Quicken connects to your bank’s server and sends your payment (or payment cancellation) instructions. When the process is complete, you see the One Step Update Summary window. Click Close. In the Payments tab of the Online Center window, the words “Scheduled for delivery on” followed by the payment date appear in the Status column beside the payment instructions that have been sent to your bank.
Canceling a Payment
Occasionally, you may change your mind about making a payment. Perhaps you find your spouse already sent a check or that you set up the payment for the wrong amount. For whatever reason, you can cancel an online payment that you have sent to your bank, as long as there’s enough time to cancel it before the payment is to be paid.
When you send a payment instruction to your bank, it waits in the bank’s computer. When the processing date (determined by the number of days in the payee’s lead time and the payment date) arrives, the bank makes the payment. Before the processing date, however, the payment instructions can be canceled. If you send a cancel payment instruction to the bank before the processing date, the bank removes the instruction from its computer without sending payment to the payee. Quicken won’t let you cancel a payment if the processing date has already passed. If you wait too long, the only way to cancel the payment is to call the bank directly and stop the check.
Keep in mind that canceling a payment instruction is not the same as stopping payment on a check. If you send the cancel payment instruction in time, the bank should not charge a fee for stopping the payment. In the Online Center window, click the Payments tab, select the payment that you want to cancel, and click the Cancel Payment button. Click Yes in the confirmation dialog that appears. Use the Update/Send button to send the cancel payment instruction. The Cancel Payment button changes to Don’t Cancel Pmt if you have a payment with the cancel payment instruction ready to send selected.
Transferring Money Between Accounts
Quicken makes it easy to record your transfers between accounts. If you have more than one account enabled for Online Bill Pay via Direct Connect at the same financial institution, you can even transfer money from one account to the other directly from within Quicken.
To record a transfer of funds that you make with a phone call or on the financial institution’s website:
1. From the Account Bar, select the account from which you want to transfer the funds.
2. Click the Action gear icon | Transfer Money or press CTRL-SHIFT-T to open the Transfer Money Within Quicken dialog as seen here.

3. Enter the transfer information—From Account (source account), To Account (destination account), and amount—in the fields in the middle of the window.
4. Click OK. The transaction will appear in both check registers.
5. If you do not have Direct Connect, be sure to call the bank or go to the website to actually send the instructions to transfer funds.
To create an online transfer, both accounts must be activated with Direct Connect and be at the same bank under the same customer identification number. Some financial institutions allow you to pay a credit card that is associated with the same identification number in this manner as well.
To create the online transfer:
1. In a new transaction line, click the Date field and enter today’s date. While you can schedule an online transfer for a future date, the transfer will show on the date you actually sent the transfer. Financial institutions process transfer instructions on the same day the request is received.
2. In the Check # field, click the downward arrow, and select Online Transfer from the list. It will appear in your Check # field as OXfr.
3. Enter a description, if you choose, in what is normally the Payee field.
4. In the Payment column, enter the amount of the transfer. Press TAB to move to the Category field. Choose the account to which you want to transfer the money from the drop-down list that appears.
5. Click Save to enter the transaction.
Use the One Step Update dialog to send the instructions to your financial institution. You may also use the Online Center to send an online transfer.
1. Click Tools | Online Center.
2. Select the appropriate financial institution from the drop-down list.
3. Click the Transfers tab.
4. In the Transfer Money From field, choose the account from which you want to transfer the funds from the drop-down list.
5. In the To field, choose the account where the money is going from the drop-down list. Enter the amount in the Amount field.
5. Press ENTER. The transfer is added to the list at the bottom of the Online Center window.
6. Click Update/Send to send the instructions to the bank.
Whether you use the Online Center method or the account register method, you must send the transfer instructions to the bank in order for the transaction to take place.
Unlike Online Bill Pay, there is no way to delete the unsent transfer instruction in the Online Center Transfers tab. However, you can delete the unsent transfer from the account register.
Transfer Detection
A Quicken feature scans your transactions as they are being downloaded to detect transfers between your accounts. When Quicken finds what looks like a matched pair of transfer transactions, it automatically creates the transfer in Quicken for you. The default in Quicken 2017 is this setting. To change this feature, from the Quicken menu bar, click Edit | Preferences | Register | Transfer Detection and clear the Automatically Create Transfers When Detected option. Even if you choose to keep this option, be cautious with this preference—it may detect matches that are not truly transfers. Consider including the option for Quicken to ask for confirmation first. To set this option, from the Quicken menu bar, click Edit | Preferences | Register | Transfer Detection and click the Confirm Possible Transfers Before Entering In Register option.
Exchanging E-mail with Your Financial Institution
You can use the E-mail tab of the Online Center window to exchange e-mail messages with financial institutions for which you have enabled Online Account Services via Direct Connect. Keep in mind that not all financial institutions support this feature. Also, remember that this communication is between you and your financial institution, not Quicken, Inc. (the makers of Quicken). It is intended primarily for exchanging information about your account, not technical support for using Quicken.
• Creating an E-mail Message In the E-mail tab of the Online Center window, click Create. When a Create dialog appears, use it to set general options for your e-mail message. If your message is about an online payment, choose the account from the Account drop-down list, and select the payment from the Payments list. Even if there is only one payment in the list, you must select it or the OK button remains disabled. When you click OK, a Message window appears. Use it to compose your e-mail message. Click OK again to save the message. The message appears in the bottom half of the E-mail tab of the Online Center window, ready to be sent to your financial institution.
If you currently have no online payments scheduled, the option E-mail About An Online Payment will be grayed out. If you elected to e-mail your financial institution regarding a payment, the window is titled Payment E-mail.
• Exchanging E-mail Messages In the Online Center window, click the Update/Send button. Quicken displays the Online Update window, which includes any e-mail messages you may have created that need to be sent. Enter your password and click the Update Now button. Then wait while Quicken establishes an Internet connection with your bank and exchanges e-mail.
• Reading an E-mail Message When your bank sends you an e-mail message, it appears in the E-mail tab of the Online Center window. To read the message, select it and click Read. The message appears in a message window. If desired, you can click the Print button to print the message for future reference. You can also click Delete to delete the e-mail once you no longer need it.
• Click Close to close the Online Center window.