Chapter 1
Meeting and Installing Quicken 2017
In This Chapter:
• Exploring Quicken’s uses
• Installing Quicken
• Starting Quicken
• Creating your first account
• Exploring the Quicken window
• Understanding online financial services
• Setting up One Step Update
• Meeting the Intuit Password
• Understanding the Password Vault
• Exiting Quicken
If you’re brand new to Quicken Personal Finance Software, get your relationship with Quicken off to a good start by properly installing it and learning a little more about how you can interact with it. Although the information provided in this section is especially useful to new Quicken users, some of it also applies to users who are upgrading. You’ll learn about data files, accounts, and some of the many other features included in this software.
 What Is Quicken?
On its face, Quicken is a computerized checkbook. It enables you to balance your accounts and organize, manage, and generate reports for your finances. However, as you explore Quicken, you’ll learn that it’s much more. It’s a complete personal finance software package—a tool for taking control of your finances. Quicken makes it easy to know what you have, how you are doing financially, and what you could do to strengthen your financial situation.
Exploring Quicken’s Uses
Although many use Quicken only to manage their bank and credit card accounts, Quicken can help you manage investment accounts and help you organize other data, such as the purchase price of your possessions and the outstanding balances on your loans. It can even store a copy of the warranty that came with your purchases. With Quicken’s online features, much of your data entry can be automated. Online banking enables you to keep track of bank account transactions and balances and to pay bills without writing checks or sticking on stamps.
With all financial information stored in Quicken’s data file, you can generate net worth reports to see where you stand today. You can also use a variety of financial planners to make financial decisions for the future. Quicken’s tax features, including export into TurboTax and the Deduction Finder, can make tax time easier on you and your bank accounts.
Quicken Editions
Quicken offers several editions of Quicken 2017 for Windows for managing personal finances: Starter, Deluxe, and Premier. The features in each edition are shown in Table 1-1.
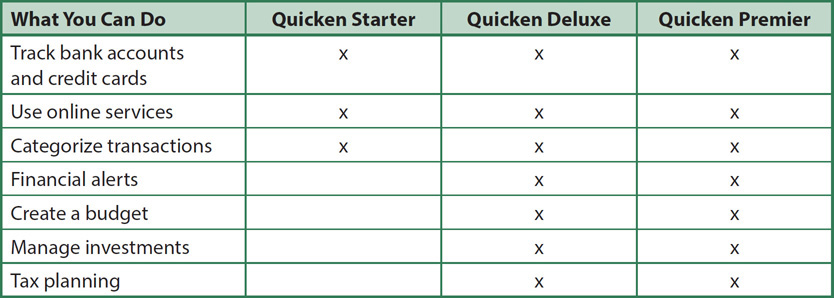
Table 1-1 • Quicken Edition Features
This book covers Quicken Deluxe and Premier editions for Windows. Although much of its information also applies to Quicken Starter, this book covers many features that are not included in the Starter edition and a handful not included in the Deluxe edition. If you’re a Quicken Starter or Deluxe user, consider upgrading to Quicken Premier so you can take advantage of the powerful features it has to offer. One more thing—Quicken offers two additional Quicken editions. If you’re a small-business owner, Quicken Home & Business can handle your personal and rudimentary business financial needs, including the business expenses you need to track for your tax return’s Schedule C. If you manage one or more rental properties, Quicken Rental Property Manager can handle transactions and other information for tenants, rental income, and related expenses that you need to track for your tax return’s Schedule E. As you can see, Quicken has you covered with a Quicken product for all facets of your financial life.
System Requirements
Quicken 2017 is designed to work with Windows Vista SP2, 7, 8, 8.1, and 10 and both 32- and 64-bit machines with at least a 1GHz processor. You’ll need a minimum of 1 gigabyte (GB) of random access memory (RAM) and a minimum of 450 megabytes (MB) of free space on your hard drive. Your monitor should have a minimum resolution of 1024×768. If you are installing from an optical disk, you’ll need a CD/DVD drive. You need Internet access for working online and receiving program updates. You also need a printer for printing reports and graphs.
If you choose to use the mobile app, as explained in Chapter 3, Quicken 2017 works with iPhones, iPod touch, and iPads that have iOS 8 or higher installed. Should you want to use the Quicken 2017 app with your Android mobile or tablet, you will need OS 4.0 or newer.
Getting Started
Ready to get started? This section explains how to install, register, and begin using Quicken 2017.
Installing Quicken
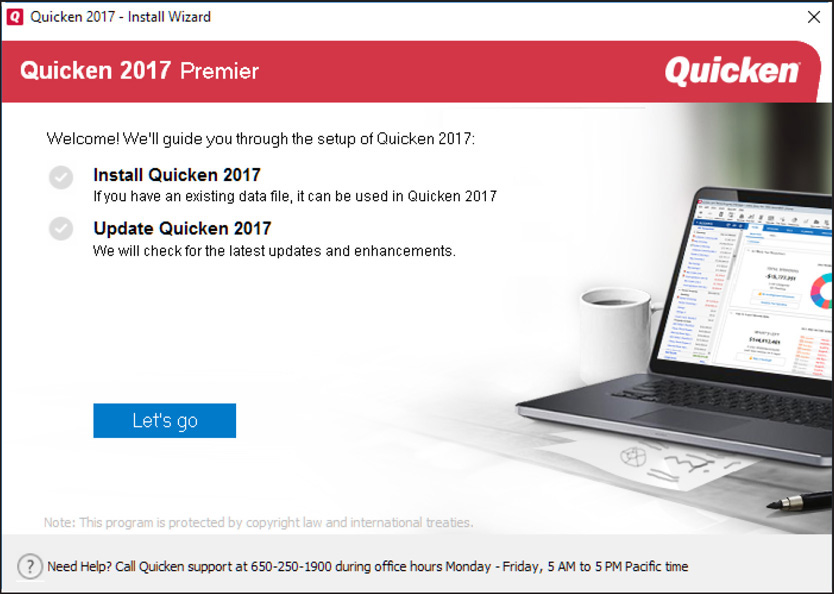
Quicken uses a standard Windows setup program that should be familiar to you if you’ve installed other Windows programs. Insert the Quicken 2017 disk into your optical drive or, if you have downloaded the program, double-click the downloaded .exe file. A dialog should appear, asking if you want to install the program to your hard drive. If so, click Yes to start the Quicken installer. If you have downloaded your program, simply locate the downloaded installation file and double-click to open it. Whether you have downloaded or are installing from a disk, you may see a message asking if you want to allow the following program to make changes to this computer. Click Yes to start the process.
The Install Wizard appears as seen next. The installer displays a series of steps Quicken will take to install your new program. Click Let’s Go to get started.
The license agreement appears, as seen in Figure 1-1. Select the I Agree To The Terms Of The License Agreement And Acknowledge Receipt Of The Quicken Privacy Statement option, and click Next to continue. (Unless you select this option, you will neither be able to click Next nor install the software.)

Figure 1-1 • The license agreement is the first installation option.
Take the time to click the Quicken Privacy Statement link to open and read this important document in a web browser window. Close the browser window when you’re finished to return to the installer. In the Ready To Install The Program screen, the installer displays a summary of what it will do. If this is a first-time Quicken installation, it will install Quicken 2017 along with any updates to the program. However, if you’re upgrading from a previous version, the installer will begin by uninstalling whatever version is currently installed. (Only one version of Quicken can be installed on your computer at a time.) Only the Quicken program files will be deleted; your data files will remain intact so you can use them with Quicken 2017.
If you want Quicken to be installed in other than the default location (C:Program Files(x86)Quicken), click the optional Select Your Installation Location link located at the lower left of the dialog. To keep the recommended default location, just click Install. Wait while the installer uninstalls the previous version of Quicken (if necessary), installs the Quicken 2017 program files, and downloads any updates to your hard disk.

For upgraders, the data file you most recently used in a previous version is converted to the Quicken 2017 format with a copy of the previous version’s data file placed in a folder called QxxFiles, where xx shows the version year.
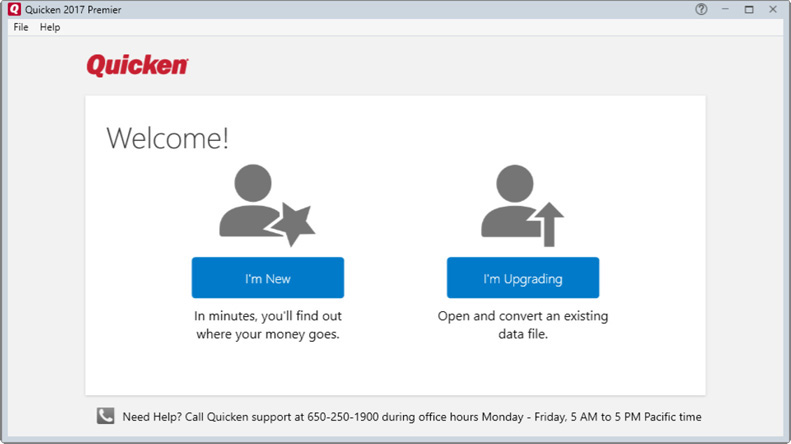
When Quicken is installed, you see a congratulatory message that the installation is complete, as shown next. To start Quicken immediately, select the Launch Quicken And Complete Registration check box. To use Quicken at another time, clear that check box.

In either case, select Done. If you have chosen the default option to launch Quicken and complete your registration, the Welcome screen appears as seen next. Click either the I’m New or the I’m Upgrading button to continue.
Installing Quicken as a New User
When you select the I’m New button, the Quicken 2017 Sign In screen appears as seen in Figure 1-2. If you have not used Quicken before, use the Create Account button to establish your Intuit ID, which allows you to download information from your financial institution, access your Quicken data on your mobile devices, pay your bills online from within Quicken, and receive e-mail and text alerts from Quicken. To learn more, see “Understanding the Intuit ID,” later in this chapter.

Figure 1-2 • Your first task is creating or entering your Intuit ID.
After you have completed creating your Intuit ID, click Next to continue. If you are installing Quicken for the first time, you are required to register with your name and other information. Complete the registration and click Next.
If you have used Quicken before on this computer, you are prompted to enter your Intuit ID and password. Click Next to continue.
The next setup screen appears, from which you can enter a decision about using Quicken’s mobile features. Should you choose not to use mobile access at this time (our choice here), you can access this feature later, as explained in Chapter 3. After you have made your choice, click Next to continue.
You are told your registration is successful, as shown in Figure 1-3. Information about all the new features in both Quicken 2017 desktop and mobile apps is provided. Click Add Account to continue to add your first account as seen in Figure 1-4.
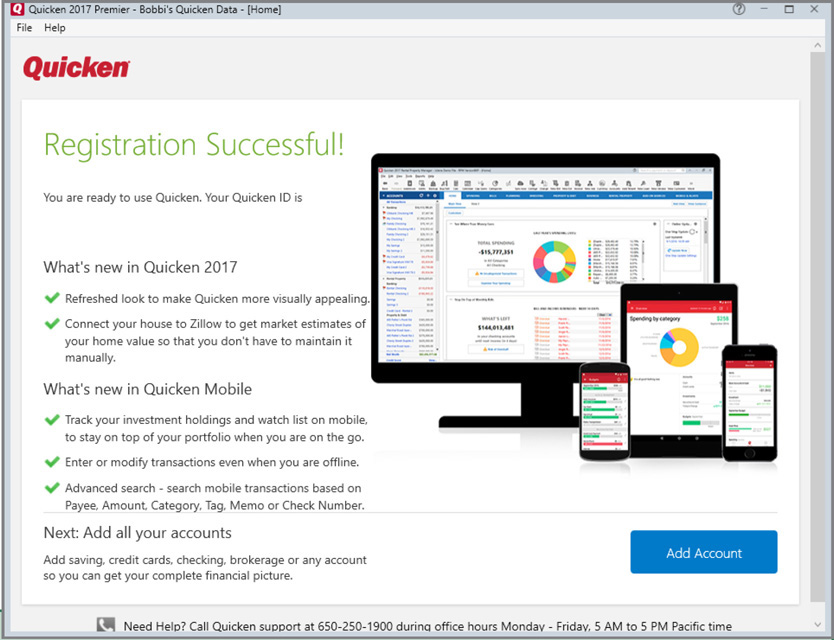
Figure 1-3 • Once you have completed your Intuit registration, you begin by creating your accounts.
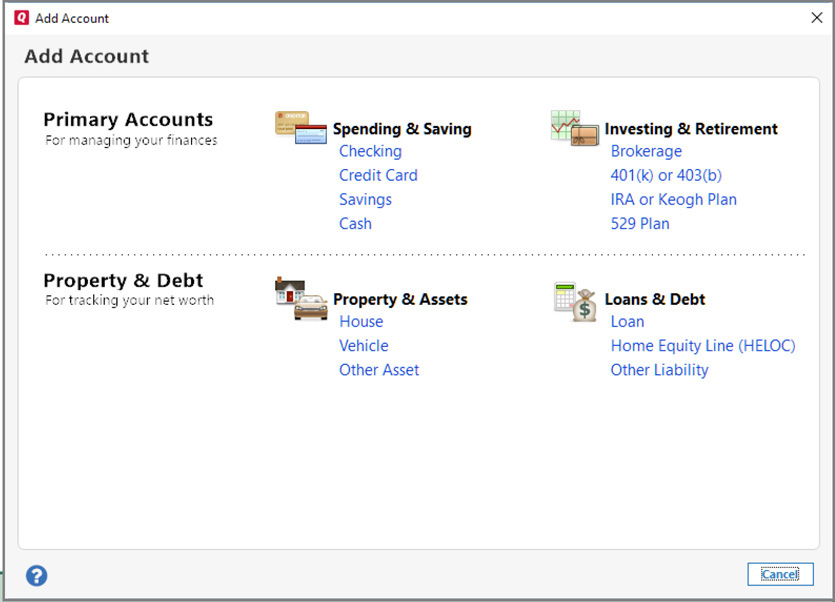
Figure 1-4 • You start by adding your first account in Quicken
If you try to close the registration screen before you have completed all of the fields, you will receive an error message. Click the Cancel button at the bottom right of the Add Account dialog to start again.
If you click Cancel, Quicken opens to the Main View screen of the Home tab in your newly created data file. This file is in your Documents folder in a Quicken subfolder. The opening screen includes information and buttons that help you finish setting up your Quicken data file, as seen in Figure 1-5. Chapter 2 offers detailed information on working with the Home tab.

Figure 1-5 • Your new Quicken file has buttons and tabs to help you get started.
Upgrading to Quicken 2017
When you update Quicken on a computer with any Quicken 2015 versions or earlier, the installation process converts your previous data for use with Quicken 2017. This process converts the data file named in the dialog to the Quicken 2017 format and saves the original file in C:UsersyournameDocumentsQuickenQxxFiles. The path for the saved copy of the original file varies depending on the previous version from which you are upgrading. Remember, only one version of Quicken can be installed on your computer at a time, and only the Quicken program files will be deleted. Your data files will remain intact so you can use them with Quicken 2017. Quicken 2016 files do not need to be converted to Quicken 2017.
Existing User Startup on a New Computer
If you have installed Quicken 2017 on a computer without earlier versions of Quicken and choose the I’m Upgrading option, Quicken asks for the location of your data so that you can import it to the new computer. Your earlier file can be restored from another computer on a home (or business) network, an external hard drive, a flash drive, DVD, CD, or Quicken’s online backup. This process converts the data file named in the dialog to the Quicken 2017 format and saves the original file in C:Users yournameDocumentsQuickenQxxFiles. The path for the saved copy of the original file may vary depending on the previous version from which you are upgrading.
Starting Quicken
You can start Quicken in several different ways. Here are some of the most common methods:
• Opening Quicken with the Desktop Shortcut or Windows Tile The Quicken installer places a Quicken 2017 shortcut icon on Windows 7 desktop. Double-click this shortcut to open Quicken. In Windows 8, 8.1, and 10, a tile appears with the other installed apps. Click the tile to open Quicken.
• Open Quicken from the Task Bar In Windows 7 use the Start button on the Windows task bar to start Quicken and other Quicken components. Choose Start | All Programs | Quicken 2017 | Quicken 2017 to start Quicken. In Windows 10, select Start | All Apps | Quicken 2017. Right-click Quicken 2017 and select either Pin To Start or Pin To Taskbar.
Creating Your First Account
To begin using Quicken, you must tell the program what bank accounts and credit cards you wish to track. During this process, Quicken will go online to download an up-to-date list of participating financial institutions.
The Add Account dialog box, shown earlier, will help you add your first account, which in most cases will be a checking account, as seen next. Choose the name of your bank from the displayed list, or type its name in the Enter The Name Of Your Financial Institution field. If your bank’s name does not appear on this first group of names, when you type the first four letters of your bank’s name, a new list appears with a list of those institutions that begin with the letters you typed.
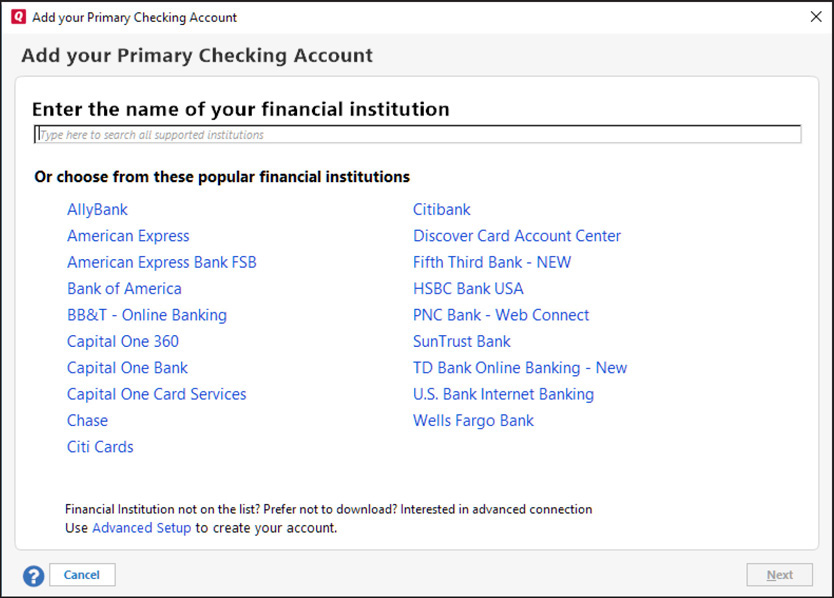
See the Advanced Setup link at the bottom of the window? Use this if your bank name does not appear on any list, if you do not want to download your information, or if your bank offers more than one type of downloading service.
Click Next to continue. In the dialog that appears, Quicken prompts you to enter your user name and password as provided by your bank. (Should you want to save this password in the Quicken Password Vault, click Save This Password. See “Setting Up the Password Vault for Upgraders” later in this chapter for more information.) Some banks require additional information. If so, enter the appropriate information and click Next. If you are not sure of your typing, select the Show Characters check box to see what you have keyed in. Click Connect to continue.
As you enter your user ID and password, Quicken will warn you if your CAPS LOCK key is on.
The Quicken Update Status message appears as Quicken connects to your financial institution. (If there are additional passwords or security phrases required by your bank, you are prompted to enter them. Do so and click OK or Next, depending on the prompt.) You may be prompted to enter your Intuit ID.
If you have more than one account that uses the user ID and password you entered, all of the accounts may be downloaded. If you have not yet set up any accounts in Quicken, each account will be called by the account name shown on your bank’s records. Each financial institution uses its own naming method. For example, Bank of America uses the account type plus the full account number as the account name.
You may change the name to something more descriptive if you choose. If you have already entered some accounts, Quicken prompts you to add, link, or ignore each of the downloaded accounts. After changing the account name(s) and selecting Add/Link/Ignore, click Next.
If you have not set up any accounts before, Quicken may not offer to Add/Link/Ignore the account(s) you are creating, nor will you be able to change the account names during the creation process. You go directly to the Accounts Added List. You can still change the account names once the account creation process has completed.
If you have enabled online services with your financial institution and want to sync your accounts for mobile access, select the Sync To Quicken Cloud For Mobile & Alerts check box(es) in the Accounts Added List. See more about mobile access in Chapter 3.
After the download is complete, your account (or accounts if you have more than one at that bank) shows on an Accounts Added List. Click Finish to return to the Home tab’s Main View. Each downloaded account appears in the Account Bar with the nickname you entered. You may change the account names if you choose. See Chapter 4 for more information about changing account names.
Your downloaded transactions appear in the account register. You will notice a small blue dot by each transaction in the first column of the register. Positioning your mouse over the word “New” shows an explanation of that transaction as recorded by your financial institution. You may choose to mark that you have reviewed each transaction separately or mark all transactions as having been reviewed.
You can tell Quicken not to download your transactions automatically. Learn how in Chapter 6.
Setting Up Other Banking Accounts
After you have created your primary checking account, you can add more accounts right away by selecting the Add Another Account button. You can create additional new accounts with the Add An Account button that appears at the bottom of your Account Bar. No matter what type of account you create, Quicken steps you through the creation process, prompting you to enter information about the account, such as its name and balance. See Chapter 4 to learn how to use the Add Account dialog to set up more accounts.
The Quicken Interface
Quicken 2017 has been updated to a clean, modern interface. This is designed to be intuitive and easy to use. If you are starting Quicken from scratch, after you have installed and created your Intuit ID, Quicken opens to the Quicken Home page shown earlier in Figure 1-5. This interface puts the information and tools you need to manage your finances right within mouse pointer reach. You never have to dig through multiple dialogs and menus to get to the commands you need most. You’ll see more about using this Home page in Chapter 2.
Exploring the Quicken Window
This section tells you about the components of the Quicken interface and explains how each feature can help you manage your financial life. The main Quicken window gives you access to most of Quicken’s features and your financial information. We’ll look at each section separately.
Account Bar
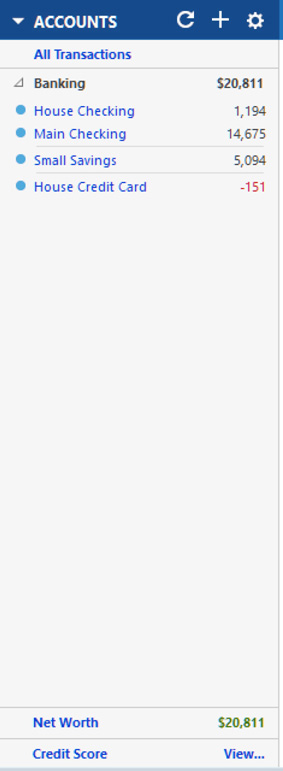
The Account Bar lists each of your Quicken accounts on the left side of the main Quicken window, as shown here. At the top of the Account Bar is a link to the All Transactions register, which shows the transactions for all of your accounts (with the exception of your Investing accounts) in one register. It even shows transactions from linked investment cash accounts.
If you can’t see all of your accounts in the Account Bar, use the scroll bar on the right side of the Account Bar to scroll through its contents. You can also click the downward or right-pointing arrow next to a section heading on the Account Bar to hide or display, respectively, the list of accounts beneath it.
By default, account balances, rounded to the nearest dollar, appear in the Account Bar; however, you can right-click anywhere in the Account Bar to open a context menu. Choose Show Amounts to display the amounts, and clear the check mark to hide amounts from view. (Hiding amounts makes the Account Bar narrower so more information appears in the window to the right.) This contextual menu offers additional options for the display of the Account Bar, such as displaying cents in the amounts. You can also change the width of the Account Bar by dragging its right border.
The Show Amounts box is a toggle. If the check box is on, clicking will turn the check box off. If the check box is off, clicking will turn it on. It also toggles the display of the amounts in the Account Bar on and off.
The account names in the Account Bar are links to that account’s register. You can customize the Account Bar as discussed in Chapter 2.
Tabs
Tabs, as shown in the following illustration, help you navigate through Quicken. Some tabs, such as the Spending and Bills tabs, provide information about your financial status, as well as links and buttons for accessing Quicken features. Other tabs have views, such as the Main View of the Home tab, that enable you to view and customize Quicken settings for your financial situation. Use the Show Tabs option from View in the Quicken menu to display your tabs. Some tabs are available only in the Home & Business or Rental Property Manager editions of Quicken. Learn about the tabs in Chapter 2.
![]()
Understanding Online Financial Services
If you’re interested in keeping track of your finances with the least amount of data entry, you should be considering Quicken’s online features such as Transaction Download and Online Payment. However, you can’t use them until you’ve set up an account with a participating financial institution and applied for the online account services you want to use. Learn more about online financial services in Chapter 6.
Accounts
To track your finances with Quicken, you must create at least one account. Although many of your expenditures may come from your checking account, you probably have more than one account that Quicken can track for you. By setting up all of your accounts in Quicken, you can keep track of balances and activity to get a complete picture of your financial situation. You don’t have to add all of your accounts at once. You can start by tracking just the one or two accounts that you use most frequently and add accounts later. As you’ve learned earlier in this chapter, you get started by entering your primary bank account.
In Quicken, a data file holds all of the information about all of your Quicken accounts. Quicken accounts can be checking, savings, credit card, investing, property, and debt accounts. When would you want more than one data file? For example, you may need two data files if you use Quicken to organize both your own finances and the finances of a community group for which you are serving as treasurer. Each of these data files would have its own separate set of bank, credit, and asset accounts.
Using One Step Update and the Password Vault
Many of Quicken’s online features use One Step Update to update information and download transactions from your financial institutions. However, that’s not all One Step Update can do. This feature makes it possible to handle many of your connection chores at once. When used in conjunction with the Password Vault feature, you can click a few buttons, enter a single password, and take a break while Quicken updates portfolio and account information for you. You can even schedule updates to occur automatically when Quicken isn’t running.
The idea behind One Step Update is to use one command to handle multiple online activities. This eliminates the need to use update commands in a variety of locations throughout Quicken. One command does it all.
Setting Up One Step Update
Choose Tools | One Step Update or click the Update button—the white right-curling arrow at the top of the Account Bar. A dialog appears asking for your Intuit ID and password. After you enter your Intuit ID and password, click Update Now to start the process. The One Step Update Settings dialog appears as seen in the next illustration.

• Download Transactions and Balances Listed in this area are the financial institutions with accounts for which you have enabled online access. These accounts can be both banking and investment accounts.
• Online Services You see this section if you have set up any online services. In it, you tell Quicken which items you want to update.
Click the Update Now button. You will see a One Step Update Progress dialog and, when the update is finished, the One Step Update Summary dialog appears.
If you use your Outlook calendar to “remind” you, make sure to run a One Step Update each time you make changes in the Bill And Reminders dialog. Otherwise, the changes you made in Quicken are not updated in Outlook. Conversely, if you make changes in Outlook, remember to make the same change in Quicken. One Step Update works from Quicken to Outlook, not from Outlook to Quicken.
Small green circles appear to the left of each successfully updated financial institution. You can click the link showing the number of accounts updated to get a pop-up showing the accounts. You can then click the account shown in the pop-up to open that account’s register, or click the Close button at the bottom of the window to dismiss the One Step Update Summary.
The One Step Update Summary dialog does not appear if you have previously told Quicken to display the summary only when there is an error.
Scheduling Updates
You can schedule updates to occur when you’re not using Quicken. Then, when you start Quicken, your data file is already updated with information from your financial institutions. To set up a schedule, choose Tools | Schedule Updates. The Schedule Updates dialog appears, as shown next. You can set options in each area of the dialog. When you have finished, click OK.
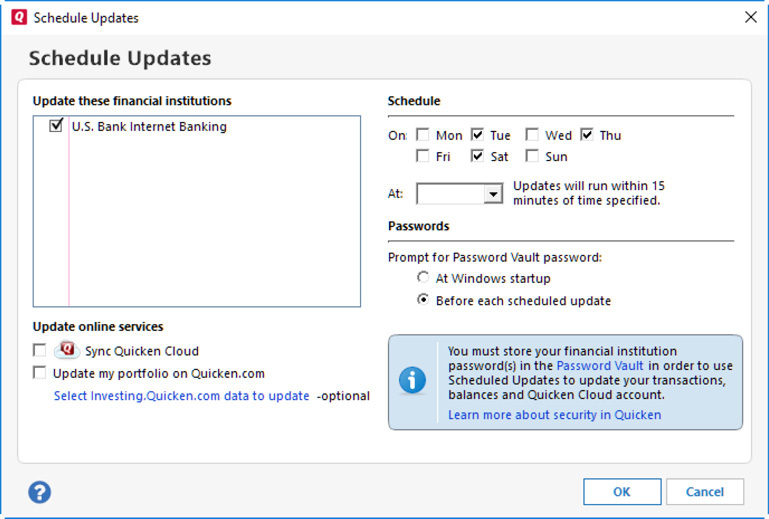
When scheduling an update, you may see a message about the Password Vault (see “Understanding the Password Vault” later in this chapter), which is created automatically when creating a new file. The Password Vault can be unlocked or reset by entering your Intuit ID. The default for the Password Vault is to use the Intuit ID, but you can change it to your own custom password.
These are each of the options:
• Update These Financial Institutions The update area lists all of the items in the One Step Update dialog discussed earlier in this chapter. Click to toggle check marks beside each item you want to include in the schedule.
• Schedule The Schedule area determines when the updates will occur. Select the check boxes for each day of the week you want the updates to occur, and then choose a time from the At drop-down list. Because your computer must be running for the updates to take place, set options for when you know your computer will be turned on. Updates will not occur, however, if Quicken is running; this ensures that the automated feature does not interrupt your work with Quicken.
• Passwords Security options enable you to indicate when your computer should prompt you for the Password Vault password. (The Password Vault feature must be set up and used in conjunction with scheduled updates.) You have two options:
• At Windows Startup Choosing this option displays the Password Vault Password dialog when you start Windows.
• Before Each Scheduled Update This option displays the Password Vault Password dialog just before each update.
• Update Online Services Choose the items you want to update.
Using the Schedule
Using the schedule is easy.
1. Exit Quicken, because a scheduled update will not occur when Quicken is running.
2. When you are prompted for the Password Vault password (which happens just before the update), enter the password. (If you have told Quicken to prompt you for the Password Vault password at Windows startup, your Password Vault password will already have been entered.)
3. Click Update. Quicken does the rest.
Changing the Schedule
To change the schedule, choose Tools | Schedule Updates to display the Schedule Updates dialog. Make changes in the dialog as desired to modify settings. To cancel scheduled updates, clear the check boxes beside each day of the week. When you’re finished making changes, click OK.
Do take the time to read the link about Quicken’s security features that is available in the Schedule Updates dialog.
Understanding the Intuit ID
You can associate the Intuit ID Password with your Password Vault and when synchronizing accounts using your mobile device.
This feature is in response to the concerns of Quicken users who have requested a simplified password recovery system. Because Quicken passwords become part of the encrypted data file in which the passwords were created, the passwords cannot be recovered; they must be removed. There is now an automated password recovery feature, where you answer questions about your data, like account balances or when a payment was made. If you answer enough of the questions correctly, your password is removed. Help refers to this feature as Remove Password. You can find the feature in the Enter Password dialog; the link is titled “Forgot password?”
Intuit Password for New Users
For new Quicken users, the Intuit ID is set as the password for the Password Vault (see “Understanding the Password Vault” next in this chapter), which is created automatically when creating a new file. The Password Vault can be unlocked or reset by entering your Intuit ID. Although the Password Vault password will initially be set to your Intuit ID password, you can choose your own Password Vault password.
Intuit Password for Upgrading Users
For those users who are upgrading from previous editions of Quicken, a Password Vault is created with the Intuit ID password as the password for those users whose previous edition did not include a Password Vault.
Understanding the Password Vault
Because some Quicken users find it a nuisance to have to type in each password each time they use the One Step Update feature, especially if they connect to more than one or two financial institutions, Quicken’s Password Vault feature enables you to store all your financial institution passwords in one central location. The passwords are initially protected with a single password in Quicken 2017: your Intuit ID password.
Setting Up the Password Vault for Upgraders
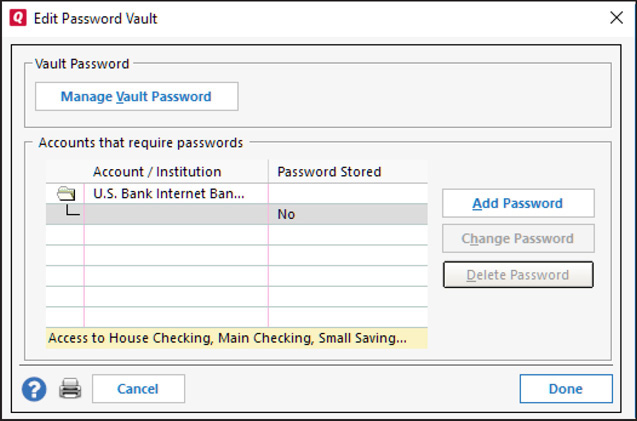
When you have upgraded to Quicken 2017, you can make changes by choosing Tools | Password Vault | Add Or Edit Passwords. The Edit Password Vault dialog, shown next, appears. Enter your Intuit ID password to continue.
1. Select Manage Vault Password to open the Manage Vault Password dialog, seen next.
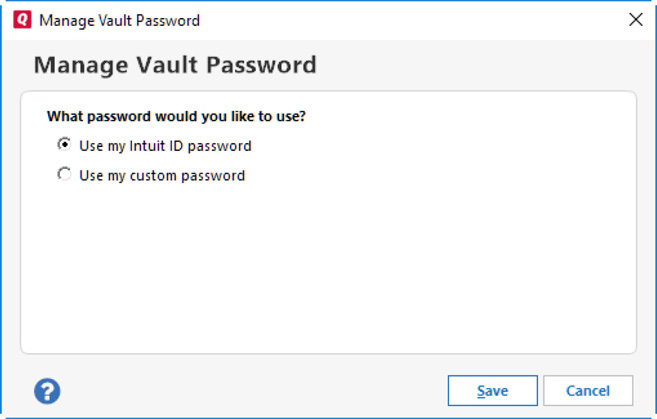
2. Select Use My Intuit ID Password or Use My Custom Password to continue.
3. Enter your Intuit ID password in the Existing Password field.
4. Enter your custom password in the Create New Password field.
5. Confirm your password by typing it again in the Confirm Password field.
6. Click Save to close the dialog and return to the Edit Password Vault dialog.
The accounts you have activated for online access are displayed. If you have stored a password, Yes appears in the Password Stored column. If you have not yet stored a password, the column will show No. To add a password:
1. Click the password line of the account for which you want to add a password.
2. Click Add Password.
3. Enter the appropriate password in the Password field.
4. Enter the password again in the Reenter Password field.
5. Click Add to close the dialog and return to the Edit Password Vault dialog.
You’ll enter each password twice because the characters you type do not appear on screen; this is a secure way of making sure you enter the same thing both times.
Enter as many passwords as you choose, and when all have been entered, click Done. When asked whether you want to enter additional passwords, click Yes to add more passwords or No to close the dialog. The Password Vault dialog closes.
Secure passwords traditionally have at least eight characters, combining both uppercase and lowercase letters, numbers, and symbols.
If you choose to print your passwords, do not leave the printed list in plain sight or affix it to your monitor.
The View Guidance Button
The View Guidance button at the top right of the screens in many (but not all) tabs opens a series of tips and suggestions called Quicken Qcards. Shown next is the introduction to these helpful hints found in the Main View of the Home tab. Click Next to see another hint in that tab’s snapshot. As you cycle through the tips, each tip opens in another part of the current tab’s view with an explanation of that section. Click the X at the upper right to close the Qcard.

Exiting Quicken
There are several ways by which you can exit your Quicken program. However, consider doing a backup before you close your program. When you choose File | Exit, you are asked if you want to back up the data file. Learn more about Quicken Backups in Appendix A.
• You can close Quicken by selecting File from the Quicken menu and clicking Exit.
• You can close Quicken by clicking the small X in the upper-right corner of the Quicken window.
