
We have worked with some MATLAB commands and we've understood that we can communicate with ROS from MATLAB. But the previous commands were executed in a MATLAB terminal by making MATLAB the ROS master. But what do we do when we need to communicate with a ROS network or a ROS-based robot? The method is simple.
Assuming your PC has MATLAB and the ROS PC/robot is connected to the same network. It can be connected either through LAN or Wi-Fi. If the PC and robot are connected to the same network, both should have identical IP addresses. The first step is to find each device's IP address.
If your MATLAB installation is in Windows, you can open Command Prompt window by simply searching for cmd in the search window; then, enter the ipconfig command. This will list the network adapters and their details:

Figure 6: Wi-Fi adapter details and its IP in a MATLAB system
Here you can see that the PC running MATLAB and the ROS system are connected through Wi-Fi, and the IP is marked. If you are using MATLAB from Linux, you can use the ifconfig command instead of ipconfig. You can also get the IP of the ROS-running PC, which could be a Linux PC, using the same command.

Figure 7: Wi-Fi adapter details and IP of ROS system
So in this case, the IP address of the MATLAB system is 192.168.1.101 and that of the ROS system is 192.168.1.102. Here is how the network looks like:
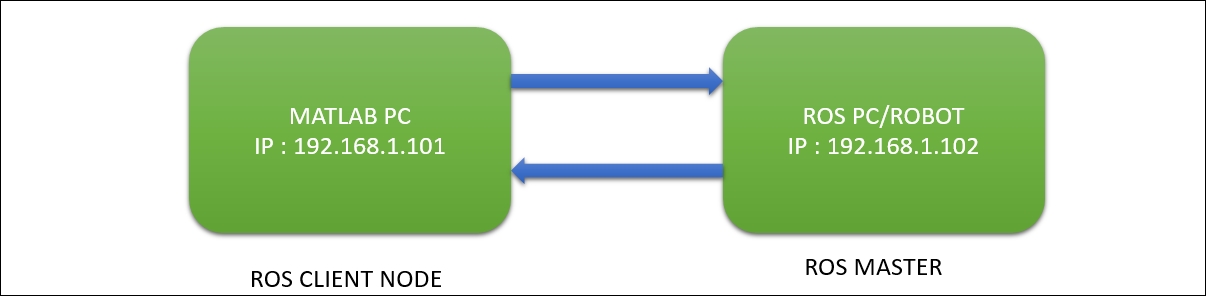
Figure 8: Connecting MATLAB to a ROS network
Connecting from MATLAB to the ROS network is pretty easy. First, we have to set the ROS_MASTER_URI variable, which is the IP of the ROS PC/robot where the ROS master is running. You have to mention the port along with the IP; the default port is 11311.
Before connecting to the ROS network, be sure that you run roscore on the ROS PC/robot. MATLAB can connect to the ROS network if there is a ROS master running on it.
The following command helps us connect to the ROS network:
>> setenv('ROS_MASTER_URI','http://192.168.1.102:11311')
>> rosinit

Figure 9: Connecting to ROS network
You can also do this using following command:
>> rosinit('192.168.1.102', 'NodeHost', '192.168.1.101')
Here, the first argument is the ROS network IP and next one is the IP of the host. If the connection is successful, we will get a message like in preceding screenshot.
After connecting to the network, run an example node on the ROS PC/robot. You can use following node for testing:
$ rosrun roscpp_tutorials talker
This node basically publishes string data (std_msgs/String) to the /chatter topic. You can see the node output from the following screenshot:

Figure 10: roscpp talker node
Now list the topics in MATLAB and see the magic!
>> rostopic list
You will see something like the following screenshot:
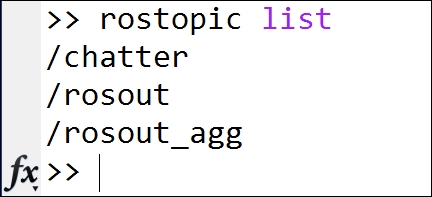
Figure 11: roscpp talker node
We can also publish values from MATLAB to ROS. Let's see how.
This will connect to the ROS network:
>>setenv('ROS_MASTER_URI','http://192.168.1.102:11311')
>> rosinit
This will create a handle for the ROS publisher. The publisher topic name is /talker and message type is std_msgs/String.
>> chatpub = rospublisher('/talker', 'std_msgs/String'),
This line will create a new message definition:
>> msg = rosmessage(chatpub);
Here, we are putting data into the message:
>> msg.Data = 'Hello, From Matlab';
Now let's send the message through the topic:
>> send(chatpub,msg);
With this command, we are latching the message to the topic:
>> latchpub = rospublisher('/talker', 'IsLatching', true);
After executing these commands in MATLAB, check the topic list from the ROS PC and echo it. You will get the same message, like this:

Figure 12: Listing rostopic from MATLAB on a ROS PC