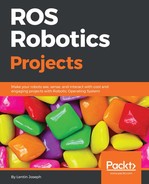
In this section, we will see how we can interface a robot's embedded controller with ROS. The embedded controller can send speed commands to the motors and obtain speed commands from robot controller nodes. The ROS robot controller nodes receive linear and angular Twist command from the ROS navigation stack. The Twist command will be subscribed to by the robot controller node and converted into equivalent motor velocity, that is Vl and Vr.
The robot controller nodes also receive encoder ticks from the embedded controller and calculate the distance traveled by each wheel. Let's take a look at the robot controller nodes.
The Chefbot robot controller nodes are placed in chefbot_bringup/scripts. You can check out each node; they're all written in Python.
launchpad_node.py: This is the ROS driver node for handling Launchpad boards. This node will receive serial data from Launchpad and also send data to the board. After running this node, we will get serial data from the board as topics, and we can send data to the board through topics too.SerialDataGateway.py: This Python module is used to handle serial receive or transmit data in a thread. Thelaunchpad_node.pynode uses this module to send or receive data to or from the board.Twist_to_motors.py: This node will subscribe toTwistmessages from the ROS navigation stack or teleop node and convert them into wheel target velocities.pid_velocity.py: This is a node that implements the PID controller, which subscribes to the wheel target velocity and converts it into equivalent motor velocity.diff_tf.py: This node basically subscribes to the encoder data and calculates the distance traversed by the robot. It then publishes as the odometry and transformation (TF) topic.
Here is the graph showing the communication between the nodes:
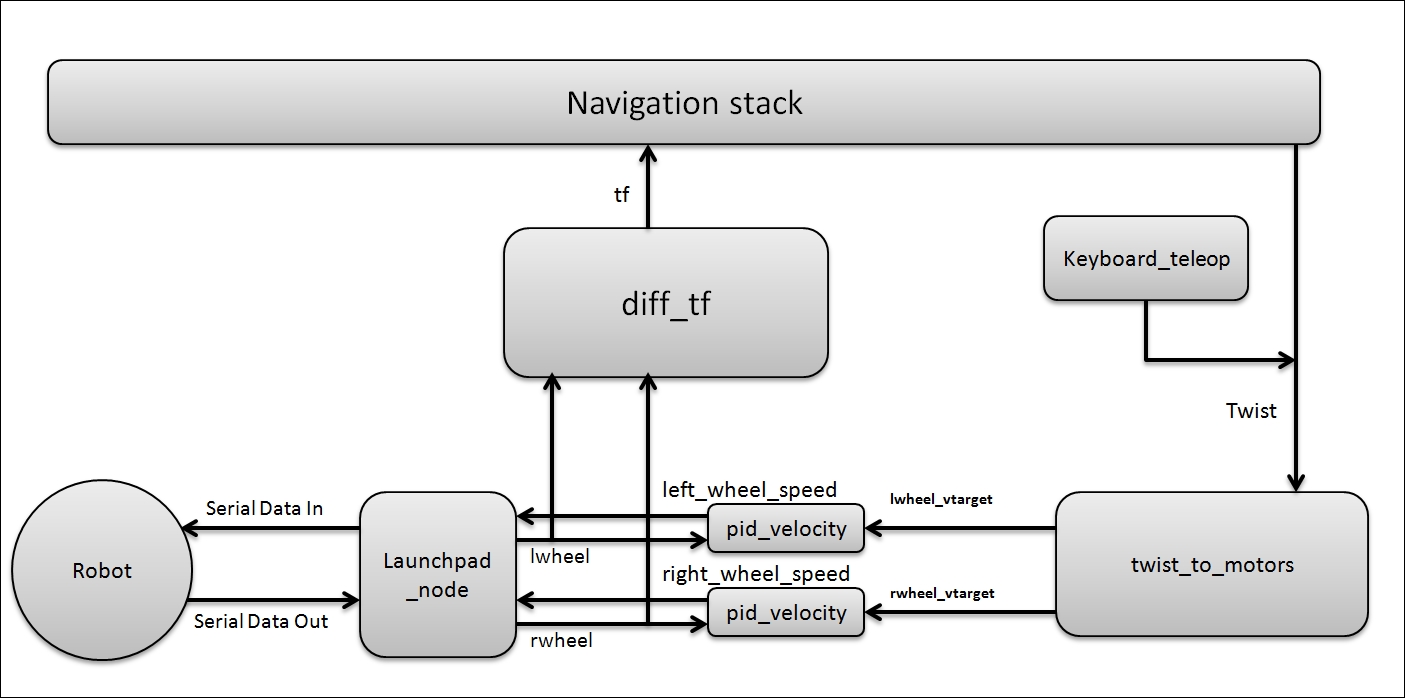
Figure 19: Communication among ROS driver nodes
Here is the list of ROS launch files that we need in order to work with the actual robot. All launch files are placed in the chefbot_bringup/launch folder:
robot_standalone.launch: This will launch the ROS driver nodes of Chefbot.model_robot.launch: This launch file loads the URDF file of Chefbot.view_robot.launch: This will display the robot model on Rviz.keyboard_teleop.launch: This will start the keyboard teleop node, which can drive the robot using a keyboard.3dsensor.launch: This will launch OpenNI to enable depth camera drivers. There may changes to this launch file according to the sensor.gmapping_demo.launch: This will launch thegmappingnodes, which will help us map the robot environment.amcl_demo.launch: This will launch the AMCL nodes, which help us localize the robot on the map.view_navigation.launch: This will visualize the map and robot, which helps us command the robot to move to the destination on the map.
Note
Orbbec Astra camera ROS driver: http://wiki.ros.org/astra_camera https://github.com/orbbec/ros_astra_camera
The following is the block diagram of the connection. Make sure that you are all set with connecting the devices. Make sure you have connected all sensors and the Launchpad board to your PC before running the driver.
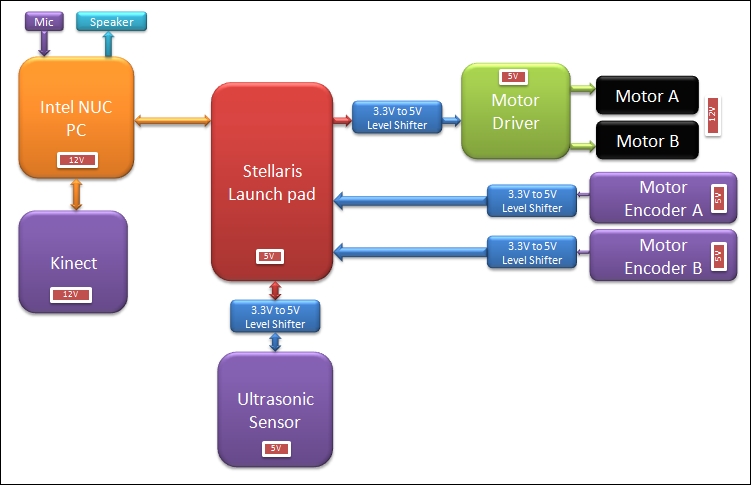
Figure 20: Block diagram of the Chefbot
If we want to launch all driver nodes of the robot, you can simply do it using the following command. Don't forget to change the serial port permission.
$ roslaunch chefbot_bringup robot_standalone.launch
If everything working fine, you will get the following ROS topics:

Figure 21: The Chefbot driver topics
You can also visualize the ROS computational graph using rqt_graph. Here is the visualization of rqt_graph, showing the communication between all nodes:
Figure 22: The computation graph view of Chefbot driver nodes