Chapter 6
Designing and Constructing a Coop
IN THIS CHAPTER
![]() Deciding whether to build, buy, or do some of both
Deciding whether to build, buy, or do some of both
![]() Finding your building supplies
Finding your building supplies
![]() Putting up fencing for an outdoor run
Putting up fencing for an outdoor run
Unless you were lucky enough to inherit a nice chicken coop when you bought your property, you need to consider creating some type of housing for your birds. In Chapter 5, we talk about the different types of housing options. This chapter goes a little deeper into the actual construction of a chicken coop.
Before you pick up a hammer or a catalog, you need to complete some specific tasks. The first order of business is to make absolutely certain that keeping chickens at your home is legal (see Chapter 1 for more info on consulting the law). You don’t want to put forth the time and effort to build a chicken coop only to be told to remove it.
It’s better to spend a lot of time planning than a lot of time fixing mistakes. A good plan makes for a good chance of success in your chicken-raising adventure.
If you’re even remotely handy with a hammer and nails, you can build a coop from the ground up. If you’re a total klutz and no one wants to see you with a saw in your hand, you can buy ready-made housing. Or you can combine a little building with a little buying to create a one-of-a-kind chicken Taj Mahal.
To Repurpose, to Build, or to Buy? That Is the Question
The challenge is obvious — your chickens need a home. Chicken housing need not be fancy or expensive, but it has to give your birds a place where they:
- Stay protected from predators.
- Can stay warm in the winter and cool in the summer.
- Can lay their eggs.
- Can prop up their feet and relax after a hard day of being chickens.
The housing also needs to allow you easy access to your birds. It should be easy to clean and sanitize, and it should also provide good ventilation for the health of your chickens. Chapter 5 discusses different styles of housing. Now you need to decide whether you want to build that housing, buy it, or use some combination of the two.
Checking on housing restrictions
Depending on your area, you may have restrictions on the size or location of your building. It’s better to find out your limitations first than deal with unpleasant consequences later. Common building restrictions include the distance a structure has to be from lot lines, from existing structures, and from the road. Restrictions also may govern the size and type of foundation a structure needs.
Make sure the official you talk to knows that the structure will be used to house animals. Different rules may apply for animal housing than for other types of structures. Building a shed on a sturdy skid frame might avoid higher property taxes and building codes, but make sure your community allows moveable structures before building this way.
Start by calling your city or township building department. If you can’t find a number, contact the city or township hall and ask who to call. Find out whether you need a permit to build, see what the local building restrictions are, and determine where you need to go to purchase any necessary permits. Get any necessary permits and display them as required.
 Many people think they can build over a weekend when city or county officials are out of their offices, and no one will ever notice. But if you get caught, you may have to move all the chickens out of the housing while you fix any problems, and you may have to pay a big fine. It’s not worth the hassle.
Making do with what you’ve got
Without a doubt, the easiest option for housing is combining prebuilt structures with a few of your own personal renovation touches. This method also saves money, in most cases. If you have a shed, garage, or barn that you can convert to an indoor shelter, you can purchase dog kennel panels to create an outside run. You can also use kennel panels on the inside of the structure to divide the chicken space from areas intended for other uses. Conversely, if you already have a large fenced area, you can buy a small shed and convert it to a shelter. Sheds of this type are generally available at most hardware and home improvement stores.
If you’re looking for something charming, children’s playhouses make good indoor shelters. And if you live in an area with few neighborhood rules and covenants, you can even consider turning an old box trailer or a horse trailer into a chicken shelter with the addition of an outside run.
A greenhouse frame can also work as a chicken shelter if you remove the clear plastic covering (which makes it too hot inside) and replace it with another, solid covering. A deer blind or an ice-fishing shanty can serve as a chicken shelter for a few birds. We knew a woman who turned a two-hole outhouse into a two-nest chicken coop that was actually quite charming. Use your imagination, but remember the neighbors and any restrictions your neighborhood may have.
Building from scratch
Building a coop is more expensive in most cases than refurbishing an existing structure. It also typically takes more time and more building skills. But it may be the only way to get the coop you need or want.
Only you know whether you have the skills and time to build a chicken coop. Chicken housing can be simple or elaborate, but you don’t need to be a master carpenter to create a coop — chickens are very forgiving about crooked walls and slanting floors. Just be sure to keep the needs of your chickens first and foremost as you plan and build.
You may be tempted to slap something together from some old wooden pallets and a roll of salvaged wire, and, admittedly, some people can do a good job with these types of basic materials. However, you probably want to build something that won’t make your neighbors unhappy and will hold up to years of use. It makes more sense to initially build the right kind of housing than to build something shoddy that you’ll need to replace in a couple years.
To build your own coop, at the very least, you should know how to hammer a nail, use a tape measure, and operate a power saw. Be sure to choose a simple design if your skills are few or rusty.
If you already have some building experience under your work belt, you can add more complex features to your coop, such as adjustable vents, manure pits, interior walls over the studs, insulation, exhaust fans, and heating systems. If you’ve done a lot of home renovation projects, these tasks should be simple for you.
With larger coops that require wiring and plumbing, you need to either have these skills already or learn them as you go. You may need to have your coop inspected by a building authority; in that case, hire out any tasks that you don’t feel competent to handle.
If you’re building a small coop or an A-frame, or if you’re converting a shed or barn into a coop, even if you’re a novice, you should be able to complete the project in a weekend if you already have all your supplies and you work diligently.
If you need help estimating the time you need for a coop project, take your plan to the local building supply store and tell them about your skills and the time you can devote to the project. They can probably guide you a bit about the timeline, but remember, this figure will be an estimate based on what you tell them. If you have an idea but no concrete plan, many larger building supply stores can help you draw up a plan and also make a supply list.
With some experience, a good work ethic, a little help from friends, and good weather, you can put together even an elaborate coop in a week. Most people need more time, however, because they work around their day job, their family, and weather interruptions. If you’ve done building or renovation projects in the past, you probably have an idea of how long your chosen project will take. Add a few extra days to your estimate, to be sure you’ll be done before you need to move in the chickens.
 Building housing takes time, so don’t wait until the chicks are straining the sides of the brooder or your spouse is on his or her way home from purchasing the birds to begin construction. Give yourself time to factor in design plan changes, trips to the hardware store, bad weather, or any other unexpected interruptions in plans.
Designing and building a chicken coop can be a great family project. Whereas one family member may be good at the design part, another may be good at the construction part. Chicken coop construction is also a good way to hone those latent carpentry skills.
We can’t cover everything about carpentry in a book about chickens, so we only touch on the basics here. You can get more information on building by reading home improvement books, checking out Building Chicken Coops For Dummies (Wiley), and perusing websites. You can find some good online information specifically on chicken coops at www.backyardchickens.com, www.thecozynest.com, and www.buildeazy.com/chicken_coop_1.html.
If you can afford it, you may be able to hire someone to build a coop for you. Then you can have all the fun of designing the coop while leaving all the work to someone else. Any good handyman can build a simple chicken coop. You may also want to ask a high school that has a building trades class whether the students would be interested in such a project.
Buying a chicken coop
As more people raise chickens on a small scale, more pre-fab (built) chicken housing has become available for purchase. Some of this housing is excellent, but some pre-built housing is too small and cramped for even two hens. Plus, the housing may be hard to clean or may have wire that’s too flimsy to keep out predators. Be sure to carefully evaluate any ready-made choices you’re considering.
Pre-fab coop requirements
If you decide to purchase housing, you’ll probably be looking at cages, either wire one or small shelter-and-run combined units. We discuss these options in Chapter 5. You can also purchase a shed for loose indoor housing or as a shelter for free-range chickens, but here we discuss cage-style housing.
Try to physically examine the housing you want to purchase. Consider the following:
- Does the location of the doors make it easy to feed and water the chickens or collect eggs? If you’re going to keep laying hens, or layers, you need either built-in nest boxes or room to place these boxes where you can easily access them. Be sure the feed and water dishes are located near a door that’s wide enough to allow you to insert and remove the dishes.
- Do chickens have a place to roost? Chickens like to have a roost, a place to perch off the floor. Some pre-built shelters have a slide-out pan or door under the roost. Because most of the manure in the shelter collects under the roost area, this feature is desirable.
- Is the flooring easy to clean? The absence of a floor can be a good option because it allows you to move the coop around on grass or set it on another surface to clean under it. Wire floors with trays under them to collect waste are another good option. Solid floors are the least desirable because cleaning them in small coops is often difficult. Even if floors are removable, they require more frequent care. Solid floors must be sturdy enough that they don’t sag under the weight of birds and bedding.
- If the floor is wire, does it feel smooth, and are the spaces small enough to prevent a chicken’s foot from slipping through? These considerations protect your chickens from injury.
- If predators such as dogs and other large animals are a problem, is the housing sturdy enough to protect the chickens? The mesh on housing needs to be sturdy wire, not plastic or chicken wire. Doors need good latches.
 If the housing you choose doesn’t have a slide-out pan or door under the roost to facilitate cleaning, you may want to install a pit under the roosting area. Alternatively, you can lay a flat board under the roost that you can remove and scrape to clean.
If the housing will be outside, make sure it’s suitable for the weather in your area. The shelter should always have a waterproof top. In cold areas, the shelter needs thick walls or some form of insulation.
It always helps to see what you’re buying in person so you can try opening doors, sliding out floors, and so on. If a friend or relative has purchased housing for chickens, take a close look at it to see whether something similar may be right for you. Looking at a catalog or website may not give you a good enough idea of what you are thinking of buying. Make sure you look at the description, too — it should tell you the dimensions, the weight, and what materials the coop is made from. If you have questions, call sellers and ask them.
Pre-fab shopping
If you want to buy housing, check out farm magazines, poultry supply catalogs, garden magazines, and online sources. If you live in a rural area, a farm store may carry poultry housing or have it available for special order. If it doesn’t, it may be able to refer you to a place that does. Don’t forget to check your local newspaper and online options such as Craigslist, Amazon, and eBay for bargains on new or used chicken housing. When buying a used coop, thoroughly clean and sanitize it before use. (It’s difficult to do this with wood structures.) Following are just a few of the online sources for housing:
www.mcmurrayhatchery.comA wide selection of poultry equipment, housing, and baby chicks. You can request a printed catalog by calling 800-456-3280.www.henspa.comPoultry housing and equipment.www.horizonstructures.com/storage-sheds-chicken-coop.aspPre-built housing. This company can also design and build your coop. You can get more information by calling 888-44-SHEDS (888-447-4337).www.strombergschickens.comA great resource for books, supplies, and equipment. Request a catalog by calling 800-720-1134.www.backyardchickens.comForums that advertise used housing.www.backyardfarming.comForums that advertise used housing.
Choosing the Right Location
After you’ve gotten all the information about building restrictions and applied for any necessary permits, it’s time to choose the spot where you want to place your chicken housing. If you have a small lot, you may have only one obvious choice. But if you have more room, the ideal spot is one with these characteristics:
- Close to the house: You want the chicken coop close to the house so that it’s easy to service and you can keep an eye out for predators or other unwanted visitors. However, if you have more than a few chickens, you want them far enough away from the house that you can’t smell them on warm, wet days.
Close to utilities: Running electricity to the chicken coop is a big plus. Doing chores in the dark is no fun, and lighting keeps chickens warm and more content throughout the winter months. Plus, you and your chickens will both be happier if the coop can be located near a water source, to make cleaning and watering less cumbersome.
If you can use the wall of another structure (such as a garage or barn) as part of the coop, you may have an easier time running water and electricity to the coop. You can save money and materials, too.
- Away from the neighbors: Even if keeping chickens is legal and your neighbors say they love these birds, it’s just not fair to put the birds under the neighbor’s bedroom window or in view of the pool. Including the neighbors in the decision about where to locate the coop may make them happier with your chicken-keeping project.
- In a well-drained spot: Chickens don’t like to get their feet wet, inside or out. Don’t put your chicken housing where the ground is low or where water drains toward the area. If the area is sometimes damp, you can add gravel to the runs; however, that doesn’t always work well because water can stand on top of or saturate the gravel spaces. Wet chicken manure doesn’t smell nice.
- Away from potential environmental issues: Try not to put chicken housing where manure from the coop will wash into lakes, ponds, streams, or other water. If you have a well, keep your chicken housing at least 50 feet from it, if that point isn’t regulated by law.
When your plan is finally on paper, go out to where you intend to place the coop and measure the spot. Make sure your design will actually fit in the space you have in mind for the coop. You may not think this step is necessary if you’re building a small, moveable chicken coop, but consider the smallest location to which you may need to move the coop — will it fit? Make sure you check overhead, too. If the coop is 8 feet high, will you need to cut any tree limbs or move any wires?
Combining Form and Function: The Basic Coop Blueprint
Chicken coops come in all shapes and sizes. In Chapter 5, we discuss many types of chicken coops and weigh the pros and cons of many coop styles. Before you begin building a coop, take a look at Chapter 5 — or at least check out the coop of a friend or neighbor.
Whether you’re doing this building project by yourself or someone is helping you, putting your plans on paper is always a good idea. When you write down ideas and dimensions, you can spot any mistakes in your planning and better judge how much lumber and other supplies you need. Erasing a line is easier than tearing down a wall, so take the time to draw out a plan.
Begin with the major planning issues. Grab a pen and a piece of paper, and make a list of all the things you need to have in your chicken housing. For example, include the amount of indoor and outdoor floor space needed per bird; lighting, heating, cooling, and ventilation appropriate for your area; and anything you must do to satisfy building codes, such as having a cement foundation on an indoor shelter.
Other items to think about are nest boxes for egg-laying and roosts for sleeping. These considerations are discussed fully later in the chapter, but be sure to factor them in when planning. You may also want to plan for a manure pit or a dropping board under the roosts (see the earlier section “Pre-fab coop requirements” for more on this).
Coop size and shape: Giving your birds some breathing room
You need to allow a minimum of 2 square feet of indoor shelter area per bird (actually, 3 to 4 feet is better), and you need 3 to 6 square feet of outdoor run area per bird. To compute the correct amount of indoor space, multiply the number of chickens you want to keep by 2 to get the minimum square footage of floor space: For example, 2 hens × 2 square feet = 4 square feet of indoor space. Your shelter could be 2 × 2 feet, which would be most practical, or 1 × 4 feet. If you had six hens, you would figure 6 × 2 = 12 square feet, so you’d need a 3-×4-foot or 2-×6-foot shelter.
Use the same basic formula for figuring outdoor square footage, but multiply the number of birds by either 3, 4, 5, or 6, depending on how much outdoor space you decide on for each bird.
Ventilation: Allowing fresh air to flow
Chicken shelter areas need good ventilation year round. Ventilation can be accomplished through windows, roof vents, exhaust fans, and other means. You may be able to salvage some of those components, like windows, doors, and even exhaust fans, from home remodeling projects or buy them used, to save money.
Good ventilation usually consists of some way for cooler air to enter near the floor, be warmed, and then exit near the top. If the coop is tall enough to walk in, you need high and low ventilation points. Screened vents are generally used at the bottom for incoming air, and space between rafters or at the roof peak allows air to exit. Windows that you can open increase ventilation in warm weather. Small coops you service from outside can use the entrance point for chickens as the bottom source of air and then use vents near the top of the shelter for stale air to exit.
The amount of ventilation a shelter needs depends on how many chickens are kept in what amount of space and the weather in your area. Exhaust fans speed the exchange of air if natural means aren’t enough to keep the air free of ammonia fumes and excess moisture, both of which are bad for chickens and for you. Exhaust fans are located near the top of a structure — and sometimes additional fans are used near the bottom — to pull cooler air inside.
We cover ventilation in more detail, including its importance in chicken health, in Chapter 5.
Roost and relaxation
Roosts are an important part of chicken coop furnishings. Because chickens are vulnerable when they sleep, they prefer to roost (perch) as high off the ground as they can when sleeping. The more “street-savvy” birds also pick a spot with overhead protection from the weather and owls. Roosts or perches can accommodate these needs. A roost is a pole or board suspended off the floor. Chickens like to roost in the same spot every night, so once they’re used to roosting in your chicken coop, they’ll head back home at nightfall, even if they’ve managed to escape that day or they’re allowed to roam.
Some of the heavy breeds, including the heavy broiler-type chickens, can’t get themselves very high off the floor. Broilers don’t need any roosts for their short life span, but you’ll want to accommodate other heavy breeds with low, wide roosts.
The chicken must have enough room to sit upright between the roost and the top of the shelter, even though most of the time it sits in a crouched position on the roost. A rooster likes to sit on the roost to crow, and he likes to be able to extend his head and neck a bit higher than normal. If your shelter is small, you may not have room for roosts, and your chickens then will have to sleep on the floor.
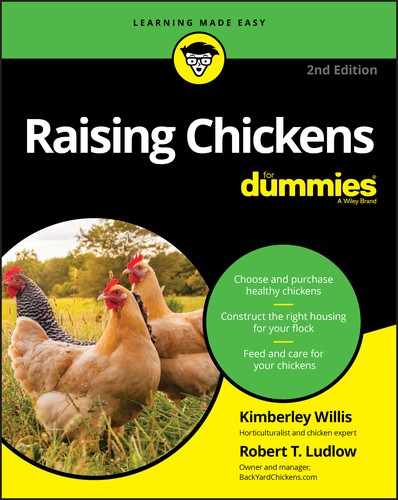
The area under a roost accumulates more droppings than any other place in the shelter. Some people like to put a pan or board to collect droppings under a roost, to make cleanup easier. Figure 6-1 shows an example.
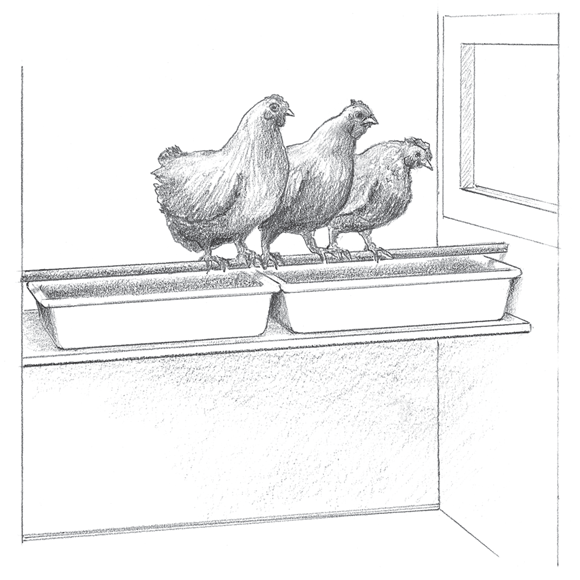
Illustration by Barbara Frake
FIGURE 6-1: Place dropping pans underneath a roost for easy manure cleanup.
Alternatively, you can place a manure pit or additional bedding under the roost to make cleaning the coop easier. If you plan to add a pit, make sure you can access it with tools for cleaning purposes.
Room to roost
You can look at roost size in two ways. Some people think the chicken should be able to span the roost with its toes and grasp the perch. A two-by-four on edge or a 2-inch-round wooden dowel is about right for full-size chickens. Bantam chickens, however, are more comfortable with a smaller-diameter roost.
Other people believe that the chicken prefers to sit flat-footed on the roost. If you subscribe to this theory, you may want to turn that two-by-four on its side or provide a 4- to 6-inch-wide board as a roost. This option may be a better one in cold climates because the belly feathers will help prevent frostbite by covering the toes while the bird sleeps.
The roost should provide about 1 foot of length for each bird. If you have six chickens, for example, you need 6 feet of roost length. If the coop isn’t wide enough for a single length of roost, you can place several roosts 2 feet or more apart. Whatever type of roost you provide needs to be strong enough to support the weight of the birds without sagging, and you’ll need to anchor it so that it doesn’t wobble as birds get on and off it.
Roost placement
If you can, place the roosts at least 2 feet off the floor. Even heavy hens should be able to fly up to roosts 3 feet off the floor. Lightweight hens and roosters can go even higher: 4 or 5 feet if you have enough space in the coop. You can use a step type of roost system, with each roost being a foot or so higher than the next in a staggered arrangement; see Figure 6-2 for an example of a stair-step roost. Don’t put one roost directly under another roost; the chickens on the lower levels will become coated with droppings from above. The highest-ranked birds in a flock generally take the highest roosts.
If you have more than one roost and they’re all on the same level, allow about 2 feet of space between them. To avoid contamination, don’t place roosts over feed and water dishes. If you have the space, don’t locate roosts over nest boxes, for the same reason. Be sure that nest boxes are covered if you have to place them under roosts. And you may not want to place roosts directly over areas where you walk to service the coop.
Put your roosts on hinges, or construct them so that they sit into grooves. That way, you can remove or lift them when you’re in the coop to clean or catch birds.
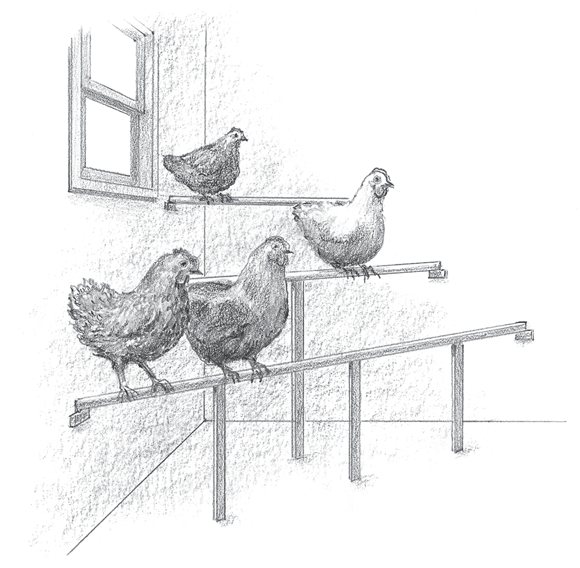
Illustration by Barbara Frake
FIGURE 6-2: A stair-step roost may be in a corner, as shown, or up against a wall.
Feathering their nests
Nest boxes are important if you’re keeping chickens for their eggs. They provide a safe and comfortable spot where layers can lay their eggs and where you can easily gather them. They’re also essential if you want your hens to hatch their own eggs.
Young pullets like to “play house” as their hormones begin to prepare them for laying. If the proper nest boxes are available, they will try them out: sitting in them, arranging nesting material, and practicing crooning lullabies. Dark, comfortable, secluded nest boxes attract them. Try to have nest boxes in place by the time pullets are 20 weeks old.
You may also want nest boxes for pet chickens and ones you keep for show, especially if you want to hatch your own eggs. Chickens will lay eggs without nest boxes (in fact, some birds will never lay their eggs in the nest box), but it’s far easier to collect eggs from a box than from the floor.
You don’t need nest boxes if you’re keeping meat birds. Chickens don’t need boxes to sleep in and prefer to roost instead. Meat birds are often too heavy to fly up to a roost, so they just sleep on the floor. Make sure they have some soft litter on the floor, and they’ll be happy.
One nest box for every two hens is ideal. You can use fewer boxes if space is limited, but one box for more than four hens leads to fighting and laying eggs outside the box. Hens do share or wait their turn to use nest boxes. You can have one box for each hen if you have the room, but you may find that some boxes aren’t used at all.
Size does matter
Chickens like nest boxes that are big enough to turn around in but not so large that they don’t feel comfy. Nest boxes that are roofed need to be tall enough for the hen to stand up. For average-size hens, a 12-inch-square nest box is the minimum size to use, but a 12-×-18-inch box or a 16-×-16-inch box is usually better. Boxes can be any configuration — 14 × 14 inches, 14 × 16 inches, and so on — they can even be round. Bantam hens can use smaller boxes, and extra-large breeds may need boxes at least 16 inches square.
Having boxes that are too big encourages several hens to go into the same box at the same time, which often causes egg breakage. Boxes should have a lower side in the front that encourages the hen to step into the box rather than jump in over a side. If more than one hen uses the box, hens may jump in over the top and break eggs. Sides can be anywhere from 6 inches high (if not roofed) to a foot or more high (if roofed).
Making it a suite
Hens enjoy company while laying, so don’t scatter the boxes around the coop. Place nest boxes in a sheltered area of the chicken coop, and try to keep them out of drafts. In cold-weather areas, keep nests in the warmest area of the coop, to make the hens more comfortable and keep eggs from freezing. Figure 6-3 shows a setup of four nest boxes.
If you have numerous nest boxes, place some on or near the floor and some higher. Coops often have nest boxes stacked above each other, up to about 4 feet off the ground. All nests that are more than a foot off the ground need a perch or board in front of them. Hens need a spot to fly up to and land on before entering the nest. However, it has been our experience that hens don’t use the highest nest boxes often, and heavier hens prefer low nests, so we keep nest boxes lower than 3 feet off the ground. Hens willingly accept floor boxes if you don’t have enough height in the shelter to raise boxes off the floor.
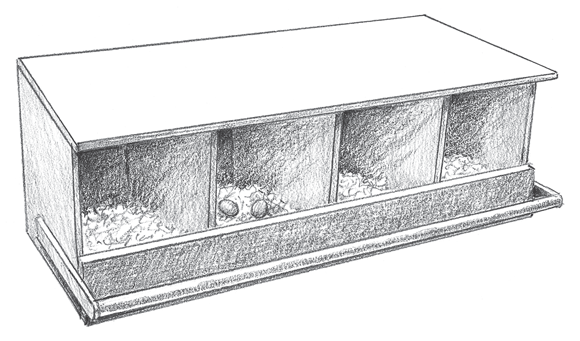
Illustration by Barbara Frake
FIGURE 6-3: Side-by-side nest boxes are easy to make.
To avoid a situation in which all the chickens prefer the same nest, make all the nests the same size and color, and provide them with the same degree of darkness (hens prefer nest boxes that are dimly lit and feel secluded). Even under these circumstances, however, hens often favor a certain nest box, and you can’t do much about it. The hens will line up to use that box and may even squabble over it.
Provide extra nests if you intend to let some of your hens sit on eggs to hatch them, because a nest will be out of commission when a hen is sitting.
Buying or repurposing items for nest boxes
Many commercial nest boxes are available on the market. The old standard is a set of metal boxes; some of the newer nest boxes are made of plastic resin materials. The boxes have round openings and come in various configurations — two nests, four nests, and so on. Some have attached backs; others are open-backed, and you attach them to a wall.
Plastic and metal are easier to clean and disinfect, but if you choose to make your own nest boxes, you may want to build them using wood or to repurpose common household items as nest boxes. A covered kitty litter box makes an ideal nest box. Deep plastic tubs with a hole cut in the front can sit on the ground or on shelves. Even sturdy cardboard boxes work in a pinch.
A free-standing nest box is like a covered kitty litter box. See Figure 6-4. It has a handle on top so you can pick it up and collect eggs without stooping. If you’re using cages or small pens to house chickens, you can remove these boxes when hens aren’t laying, to save room. Free-standing boxes also allow you to clean only the dirty nest boxes instead of having to clean a large unit.
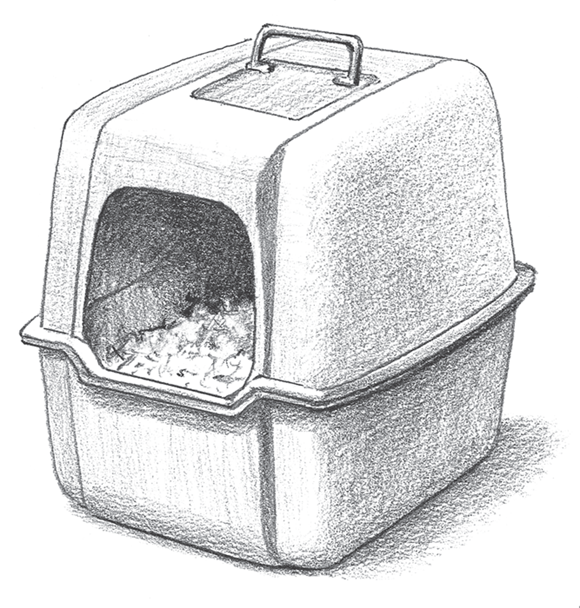
Illustration by Barbara Frake
FIGURE 6-4: A portable nest box is good for easily collecting eggs and moving between coops.
Wiring, Fixtures, and Other Important Amenities
The availability of electricity in any kind of coop is a big plus. With electrical power running to your housing, you can provide light, heat, and fans much easier than if the coop isn’t wired. Make sure you know how to safely install electricity, or hire someone for this part of the job. We cover the nuts and bolts (in a manner of speaking) in the following sections, but for detailed guidance, consult a registered electrician. Your building supply store may be able to help, but remember: Working with electricity can be a shocking experience.
Providing the hookups (electrical, that is)
Electric outlets and fixtures need to be out of the birds’ reach or enclosed in metal boxes or wire cages. This setup keeps curious chickens from being “fried” or starting a fire.
If you’re not familiar with electricity, it’s best to leave it to a capable soul who understands how to figure out the load requirements for heating and cooling devices.
Lighting up
Along with natural lighting from windows, you need to plan for artificial lighting from light fixtures. Having more than one light fixture allows you to vary the amount of light and avoid a blackout if a bulb burns out. You need at least two fixtures, one for the strong light source and one for the dim one. You may need more fixtures, depending on the size of the coop and the wattage of the bulbs you intend to use. The inside of the coop needs to be bright enough that you can easily read in the coop. This arrangement usually requires one 100-watt or equivalent bulb per 200 square feet. Your dim light should give you just enough light to see the hens in the roost area (a 15- to 25-watt bulb or equivalent), which is enough light for them at night.
For optimum light, locate fixtures near the coop ceiling. If the chickens can reach the light bulbs, cover them with wire mesh or plastic covers designed for light bulbs so they don’t get broken. Place a light switch near where you enter the coop, just inside or outside the door.
Chickens need 14 to16 hours of bright light and 8 to 10 hours of darkness or dim light to lay well year round. If you’re not worried about egg production, light the shelter area at least 10 hours a day so birds can eat and drink normally, unless the shelter has good natural light through windows. Meat birds need to have the shelter lighted 22 hours a day so they can eat enough to keep up with their fast growth. For more about the light needs of laying hens, see Chapter 15.
When chickens sleep, they really sleep. Total darkness makes chickens go into a kind of stupor. They’re an easy mark for predators at this point because they don’t defend themselves or try to escape. A dim light in the shelter lets them defend themselves a bit and helps them find their way back to a roost if they’re disturbed. It also prevents panicked flapping around and possible injury when strange noises wake them.
You don’t have to go broke lighting the coop. If the shelter has windows, you can probably reduce or even eliminate the light during daylight hours, depending on how many bright, sunny days you get in your area in the winter months. Make sure, however, that your lights are on in the early morning and late at night to extend the light cycle to 14 hours. If you aren’t able to turn lights off and on at regular times, you may want to put the lights on an inexpensive timer. You can also install a dusk-to-dawn switch on the dim light so it comes on when the coop darkens.
If you have a small pre-fab housing unit for two to four hens, a 100-watt light is too much. In those units, a 40-watt light is usually enough. If the hens in those units spend all their time in the outside run area except at night or when they’re laying, you may want to hang the light over the outside run. You’ll need a brighter light for that. The birds will still sense the natural nightfall and may retreat to the shelter, so lighting these small units, inside the shelter or out, may not be as effective as lighting larger shelters.
If electricity isn’t available at the site of your chicken housing, consider one of the new battery-powered lights or use solar lighting.
Most light fixtures handle a variety of bulb types. To save money and help the environment, consider using compact fluorescent or LED bulbs instead of old-style incandescent bulbs for overhead lighting. Incandescent bulbs are being phased out of production. Both compact fluorescent (CFL) and LED bulbs cost more to begin with than the old bulbs, but they save you money on your electric bill and last a lot longer. Studies in commercial chicken farms have determined that chickens prefer LED light over CFL lights because the CFL bulbs have a flicker that birds can detect. However, either type of light bulb is better than incandescent. You can buy LED lights made specifically for poultry housing at farm supply stores.
Baby, it’s cooold outside!
Chickens generally survive cold better than heat. Unless you live where winter regularly brings subzero temperatures for long periods of time heating a coop generally isn’t necessary. Adult chickens can survive below-freezing temperatures if they stay dry and out of the wind, but they may not lay as well during long periods of subzero temperatures.
Some people like to heat a coop because it’s more comfortable for the birds and for them when they’re caring for the flock. Chickens can suffer from frostbite, and they consume more feed to keep their bodies fueled if the coop isn’t heated. Heating the coop keeps the water from freezing so you don’t have to bring water to the birds several times a day. And some fancy breeds, such as the Serema, don’t do well in temperatures below freezing.
If you decide to heat the coop, you just need to keep it above freezing — 34 to 40 degrees Fahrenheit will do. Any more than that, and you may cause a moisture buildup that will impact the birds’ health. Any type of heater works to heat coops. If you’re unsure of what size heater to buy for the coop space you’re heating, ask a heating salesperson at a building supply store to help you. A heater with a thermostat is preferable to one without.
Heat lamps and electric heaters are safer than heaters that use a flame. These types don’t usually require special venting or chimneys. If the heat source has a flame, such as propane, natural gas, or wood heaters, make sure you follow the exact instructions for ventilation and chimney requirements. If you’re unsure, consult a professional — better safe than sorry. Install a carbon monoxide detector with heaters that use a flame. Electric heaters and heat lamps don’t require carbon monoxide detectors. Remember, birds are very sensitive to carbon monoxide poisoning.
Use any form of heat with great care. Make sure the ventilation is good, monitor temperatures to keep them from becoming too warm, and keep combustible materials (including birds!) far enough away from the heat source. Also make sure heat lamp bulbs won’t be splashed with water, which may cause them to explode.
Fighting the heat
Heat can be more harmful to chickens than cold, but most home flock owners don’t need to consider air-conditioning. Cooling the coop to below 85 degrees is desirable and can generally be accomplished by ventilation and fans. Heat stress can cause birds to slow their laying or result in soft-shelled eggs. Meat birds are prone to dying from heat stress, so if you can’t cool the coop, you may want to raise chickens for meat at cooler times of the year.
If your summers are very hot, plan for more space per chicken in your coop and maintain a good cross-flow of air. Consider installing exhaust fans in the upper part of the coop; they require an opening near the bottom of the coop from which to draw cooler air. You also can place window fans in coops. Be sure to frequently clean dust buildup off electric fans, and cover all fans with small mesh wire so birds aren’t injured.
Other ways to keep chickens cooler are to provide shade over the chicken coop, insulate the coop ceiling, and paint the roof with a reflective coating. Some people use sprinklers on the coop roof to provide evaporative cooling. Make sure cool water is always available to the birds, too.
Being Mindful of Materials
Building codes may restrict the types of materials you can use for building, so check first before you decide on what to use. You need materials for the framing and roofing. And then there’s the flooring. And fencing. And posts. And don’t forget the chickens! Oh, wait — that’s another chapter.
Building materials are usually sold in specific sizes, so try to draw your plan with those sizes in mind. For example, most wood panels are cut to 8 feet. So instead of planning a 7-foot-high wall, make it 8 feet high to avoid a lot of excess cutting and waste.
When you’ve completed your paper plan and you’ve ensured that your planned coop fits the site, start making your supply list. Count the number of two-by-fours, fence posts, rolls of wire, wood or metal panels, and so on that you’ll need by looking at your plan. Don’t forget to add nails, screws, or other fasteners to your list, as well as windows, vents, paint, and roofing material. You may also want to add building materials to build the nest boxes and roosts. Most people build those items at the same time they construct the coop.
It’s a good idea to do some comparison shopping to find the best prices on the materials you need. After doing a bit of price checking, you may want to alter your plans. If money is a factor, consider building a simple coop that you can add on to or modify as funds permit.
Getting to the bottom of flooring
Wood or cement flooring is preferable to dirt floors in shelters because those types of flooring prevent pests and predators and also make cleaning easier. Rubber and other types of roll-out, waterproof materials designed for barn floors make excellent coverings over cement and wood, if you can afford them. Materials such as roll vinyl made for human homes and metal sheeting may be easy to clean, but they can be slippery underfoot.
Dirt floors are acceptable for outdoor runs. Adding a layer of sand or fine gravel to the runs makes them more absorbent. In all but the biggest runs, the dirt floor will soon be hard packed.
Cages may have solid or wire floors, and slatted wood flooring is used occasionally. Wire flooring should be smooth and it needs to be strong enough to support the birds without sagging. It’s easy to keep birds clean with wire floors, but wire prevents some of the natural behaviors of chickens, such as scratching at the ground. Toes can get caught in wire floors, too, causing injuries.
You should be able to easily clean solid floors in cages and small shelters. These floors may be pull-out tray floors or else floors that drop down on a hinge so you can remove droppings and litter.
Constructing the frame
You don’t need top grades of framing materials and panels to build chicken housing, but you do need materials that are straight and sound enough to make your job relatively easy. Most chicken housing is built of some sort of wood because wood is probably the easiest building material to work with. You can also use lightweight aluminum panels like those used in pole barns. Plastic lumber works great for chicken coops, too, but it’s quite expensive.
In areas where hawks and owls are a big problem, or when you must keep chickens inside the run, you may need a roof for your outside run in addition to the roof on your shelter. First, decide whether you want to be able to walk upright in the outside run. Then plan how to support the roof. If you have a wide pen, you may need additional posts inside it to hold supports that keep roof material from sagging in the middle.
Treated lumber is fine to use when building chicken housing because the chickens rarely chew on it. For your shelter, use exterior grades of wood unless you intend to cover the wood walls with siding. Paint or stain the walls with exterior-grade products for further protection. If you’re unsure of what paint or stain is best, ask a building store salesperson for recommendations based on your area and what you can afford. Metal roofs don’t need any kind of finishing, but wood roofs need shingles or roll roofing to protect them.
Wrapping your head around fencing
The kind of wire you need for any fencing exposed to the outdoors depends on the predators in your area. You need fencing strong enough to keep out predators, with openings small enough to prevent the chickens from squeezing through.
Inexpensive chicken wire is almost synonymous with chickens, but we have to say that it has its limitations. Chicken wire has hexagonal openings in ½-inch, 1-inch, and 2-inch sizes. It comes in several gauges, with the smallest-numbered gauge being the strongest. It keeps chickens in, but it doesn’t keep out strong predators like dogs and coons. It rusts and becomes weaker after a few years, and it can be difficult to work with.
Many new types of nylon and plastic fencing are on the market. They can be good choices for chicken fencing if they’re strong enough because chickens don’t chew out of enclosures. But some predators may be able to chew their way in. Whereas the fine black nylon netting used to protect crops from birds and deer can work on the tops of pens to keep the escape artists home or protect them from hawks, we don’t recommend it for the sides of enclosures.
Electrified netting is now available for pastured poultry setups. It requires the use of special posts, often included in a kit with the netting. The netting isn’t very strong, but it keeps chickens in and predators out because they get an electrical shock if they touch it. It’s lightweight and fairly easy to move, but it does have limitations. Most setups use solar power to charge a battery to power the fence. Long stretches of gloomy weather can cause a failure, as can wet vegetation or other objects that touch the fence and ground it.
One of the most common mistakes new chicken owners make is to underestimate the strength and cunning of predators. Predators lurk even in cities, and most of them love chickens and eggs. Even a raccoon can pull apart chicken wire. Raccoons also learn to open doors and climb over fences. Big dogs make short work of flimsy wire; skunks and opossums work on it until it rips. We highly recommend using strong welded wire on outside runs.
Welded wire comes with all kinds of opening sizes and in varying heights. A 1-× 2-inch, 2-× 3-inch, or 2- × 4-inch mesh is fine for adult chickens. Four- or 5-foot-high fencing works for most breeds.
Ice and snow can build up on any kind of netting or wire that’s used on the top of an enclosure, causing the roof to sag or break if the load gets too heavy. You can stretch netting or wire tightly to keep ice or snow from clinging, but you may still need some roof supports.
Supporting fencing with posts
On the sides of the coop, chicken wire requires a top and bottom board to keep it stretched tightly; welded wire probably doesn’t need this. All wire needs posts, however, and metal posts you pound in the ground are preferable to wood posts. Wood posts rot and break over time. However, many people prefer the look of wood posts, and they’re easy to work with. Treated landscape timbers can make good posts but 4 × 4 treated fence posts will last longer.
In recent years, many people have taken to using PVC pipe (the kind designed for plumbing or electricity) to make supports for various types of chicken homes. This type of piping makes a lightweight, easy-to-move structure.
Some types of PVC piping become brittle in cold weather, and the types that don’t become brittle are much more expensive. For permanent, year-round use in cold weather areas, it’s better to use wood or metal frames and posts.
Place posts every 10 to 15 feet and at corners for outdoor runs. If the soil is sandy, you may need to use cement to keep the posts in place. You’ll need about half a bag of ready-mix, quick-set cement per post.