Chapter 13
Incubating Eggs and Hatching Chicks
IN THIS CHAPTER
![]() Understanding the incubation process
Understanding the incubation process
![]() Choosing your incubation method: Hens versus incubators
Choosing your incubation method: Hens versus incubators
![]() Tracking the development of a chick embryo
Tracking the development of a chick embryo
![]() Knowing what to expect from the hatching process
Knowing what to expect from the hatching process
Almost as soon as people get chickens, they want more. Some people start thinking about how much fun it sounds to let a mother hen raise some cute little chicks. Other people want to add interest to their chicken hobby by buying an incubator and hatching eggs for fun or profit.
In this chapter, we cover the two methods of incubation — natural incubation by hens and the use of an incubator. We also explain how chicks develop in the egg and fill you in on what to expect during the hatching process.
If bringing new chicks into the world is what you’re after, this chapter is the one for you!
 Plan for your baby chicks before you start incubating those eggs. You need either a space for a hen and her brood to be separated from the rest of the flock and protected, or a brooder to keep chicks warm and protected (see Chapter 14 for more on brooders). Before you get too far into the incubation process, read Chapter 14 for the full scoop on raising baby chicks so you know what to expect.
Making More Chicks: Incubation Basics
Incubation is the 21-day period from when a fertilized egg is laid to when a chick is big enough to survive outside the egg. Incubation is accomplished by the hen sitting on the eggs and brooding them (keeping them warm) or by some other source of heat that keeps eggs reliably warm, such as an incubator.
A long time ago, people figured out that some chickens were better moms than others, and they learned to use the best moms to hatch eggs from the not-so-good moms. This discovery allowed farmers to develop breeds of chicken that continually laid eggs — instead of stopping to sit on them after they laid ten or so, which was the norm.
When electric incubators were developed, chicken breeding got a real boost. They made it possible for farmers to multiply chickens rapidly by combining eggs from several hens in one place. Plus, they could raise eggs from any hen — even one that didn’t want to sit on her own eggs. Over the years, incubators have become quite reliable and easy to use. Today even home flock owners can afford to buy incubators and learn to use them.
So why do you want to hatch chicks? The vast majority of home flock owners who are thinking of hatching chicks are doing so because they want to, not because they have to. Baby chicks are available from a number of sources, including many mail-order catalogs, so if all you want are baby chicks, you can skip the hatching process and buy them. If you’re up for something a bit more challenging (and fun!), however, hatching your own eggs may be for you.
Some people hatch eggs because they can’t buy chicks of the breeds they want — some rare chicken breeds may be available only this way. Other people want to make their own hybrids — for example, to make a good meat bird that also does well free-range, or to produce a hen that lays extra-large, deep brown eggs. Still other people want to replace old layers with hens just like them. Truth be told, most home flock owners are thinking, “We have this beautiful rooster and some truly charming hens — wouldn’t they make some cute baby chicks?”
You may want to do your own hatching once, just to see how it’s done. Or you may want to show your kids or grandkids a bit of how nature operates. Just don’t be surprised if you get hooked on hatching!
Choosing Your Hatching Method
You can hatch eggs in two ways: You can let hens do it or you can use an incubator. In this section, we fill you in on the pros and cons of each method and help you choose the method that’s right for you.
Don’t believe those old wives’ tales of putting eggs in your bra (or your wife’s bra) to hatch them. Bras don’t make good incubators, nor do fanny packs. Humans aren’t meant to hatch eggs — human body temperature (98.6 degrees Fahrenheit) is much lower than the temperature of a hen (106 degrees). And whatever you do, don’t use the microwave, even on low!
Looking at the two methods: Hens versus incubators
Before you can choose the hatching method that’s right for you, you need to know a little bit about them. In this section, we explain each method.
Relying on mother hens
Nature has perfected hens to hatch eggs, and even the best incubator can’t match the hatching ability of a good hen. But an incubator can be a great help to chicken owners, especially when you don’t want your hens to take a vacation from laying so they can sit on eggs or when you have hens that don’t want to sit on eggs.
A hen normally lays about ten eggs before she starts incubating them. This collection is called a clutch and represents the number of eggs the hen can cover when setting on them. The first few days after eggs are laid, the hen doesn’t sit on the nest all the time, so the development of the first eggs doesn’t get too far ahead of the last and the chicks don’t hatch too far apart. After laying a certain number of eggs (it varies from one hen to the next), she then begins to sit tightly, leaving the nest for only a few minutes each day to eat and drink. She defends the nest fiercely.
During the hen’s incubation period, you merely need to protect her from the elements and predators and give her food and water. She does the rest. If you want to give the hen every advantage, though, isolate her from the rest of the flock in her own safe little area so that the other birds don’t disturb her or break eggs.
If you want to incubate eggs the natural way, pick hens from breeds that are more inclined to brood than others (see the section “Understanding why some hens brood and others don’t,” later in this chapter, for more on which breeds brood best). Keep a few of these hens around just to hatch eggs, if you want.
For more information on the hen method, see the section “Letting Mother Nature Do It: The Hen Method of Incubation,” later in this chapter.
The incubator method
Even the most advanced incubators require more attention than a hen that’s hatching eggs, but incubators still offer some advantages over hens:
- You can use an incubator at any time of year. Some hens lay eggs all year but won’t sit on them in any season but late spring or summer.
- You can use an incubator when you don’t have hens that are interested in sitting on eggs.
- Most incubators hold many more eggs than one hen can sit on.
- Incubators hatch chicks in a clean, protected environment.
- You can observe the hatching process, especially if you use an incubator with windows.
When you use incubators to hatch eggs, you store fertile eggs until you have the number you want to hatch (see the section “Taking care of fertile eggs before incubation,” later in this chapter). Then you place them in the incubator. You need to closely monitor the heat and humidity in the incubator, and if you don’t have an automatic egg turner in your model, you need to turn the eggs at least twice a day.
We go into more detail about the incubator process in the section “Going Artificial: The Incubator Method,” later in the chapter.
Determining which method is best for you
Deciding whether to let a hen incubate your eggs or use an incubator depends on several factors:
- Whether you have room for an incubator: Incubators need to be placed in a heated room for best results. If you don’t have room for an incubator in a heated place, going the hen route is your best bet.
The breed of your laying hen: If you have hens of a high-production layer breed, they’re not going to sit on their own eggs (check out Chapter 3 for breed information). The urge to do so has been bred out of them. If you have room for more hens, you can get a hen or two of a breed that’s known for sitting and put fertile eggs from the other hens under them (see the section “Understanding why some hens brood and others don’t,” later in this chapter, for more info). If you can’t have — or don’t want — more hens, you need an incubator.
If you have breeds of chickens that will sit on their own eggs, you can wait until they feel broody and let them raise a family. We discuss broody behavior in more detail later in this chapter.
Hens stop laying while they’re sitting on their eggs and while they’re caring for their chicks. So if you want to keep egg production high, or if you want to raise chicks at a time when the hens don’t feel broody, you need to use an incubator.
- Whether you want to see the hatching process: If you or the kids want to observe eggs hatching, use an incubator. You won’t be able to see much as a mother hen hatches chicks because they hatch beneath her, and too much disturbance will cause her great stress and may harm the chicks. You can, however, observe a mother hen caring for chicks and see their antics in a natural environment after the hatching is complete and she takes her babies into the world.
What time of year you want the eggs to hatch: Left to nature, most chicks hatch in late spring through summer, and hens may not begin laying again until the following spring. If early laying is important, use an incubator to hatch eggs early in the spring.
If you want chickens for meat, the time the hen picks to hatch the eggs may not be the best growing time for your climate. Of course, you can still eat the excess chickens from any type of hatching and rearing, but if you want consistent meat production at convenient times for you, use an incubator to hatch meat chicks.
If you want show birds to be at a certain age for a show, you may need an incubator to plan hatching at the best times.
If you want to sell chicks, it’s best to plan for them to hatch in spring and early summer, which can mean using an incubator to catch the highest demand period for chicks.
Sitting hens are great for the home flock owner who isn’t good at keeping track of things like turning eggs and who isn’t in any rush to have chicks at a certain time. Sitting hens are the green way to increase your flock, especially if you need only a few chicks at a time, because they don’t require any electricity to do their job.
Letting Mother Nature Do It: The Hen Method of Incubation
Some hens can lay and incubate eggs without your help. In fact, some may sneak off and surprise you with a cute little brood. But with a little help from you, a hen has a better chance at success.
After you get things going, though, step back and try not to interfere. Too much fussing by the human caretaker may cause a hen to abandon her nest.
Understanding why some hens brood and others don’t
Hormones affected by the lengthening daylight hours trigger the nesting instinct in hens. Hens have to be laying actively to get broody, so hens must also be in good health and must be receiving good nutrition. For about an hour before an egg is laid, and for 30 minutes afterward, a hen of any breed gets a bit broody, going to a nest and moving nesting material, sitting in it, and crooning. In some breeds at certain times of the year, the hormones that influence motherly behavior don’t go down after the egg is laid; instead, they intensify over a week or so until the hen is sitting firmly on a nest.
In certain breeds of chickens, man’s breeding practices have prompted them to produce fewer of the hormones that influence broody behavior. This selection process was done to keep them producing eggs because when a hen starts sitting on a clutch (group) of eggs, she stops laying. Table 13-1 shows some breeds of chickens, listed according to how often they get broody.
TABLE 13-1 Chicken Breeds and How Often They Sit
Breeds Unlikely to Sit (<10% Chance) |
Breeds That Might Sit (50% Chance) |
Breeds That Often Sit (>75% Chance) |
Any color Leghorn |
Australorp |
Ameraucana |
Hamburg |
Japanese |
Araucana |
Isa Brown and any sex-/color-linked production layer |
Maran |
Brahma |
Minorca |
New Hampshire |
Cochin |
Polish |
Old English Game |
Jersey Giant |
Rhode Island Red or White |
Plymouth Rocks |
Orpingtons |
White Rocks |
Wyandottes |
Silkies |
Note: This table doesn’t cover all breeds — just some of the common ones. Breed descriptions generally note whether the breed sits. See Chapter 3 for more breed descriptions.
In breeds that sit on their eggs, laying a certain number of eggs and having the right environmental conditions may trigger broody behavior. Still, even in these breeds, each hen is an individual, and some hens are better moms than others. Some people think hens that were naturally hatched and raised by their own mothers take better care of their nests. This trend has been proven true in other species, so it’s probably partly true in hens, too.
Hens of naturally sitting breeds seem to be influenced to some extent by the hens around them, and several hens may start sitting at one time. Several hens may actually sit on the same nest, although you want to discourage this behavior because it often results in broken eggs. Instead, have plenty of nests and enclose each hen as she settles down to sit firmly.
Encouraging your hens to brood
If you have a hen from a breed of chicken that’s known to sit on eggs, how do you encourage her to get started? Natural environmental conditions, such as long days and warm weather, seem to help. If you want a hen to sit in conditions other than these types, it helps to manipulate the light so that the length of the hen’s day gradually increases.
 Don’t encourage sitting in the coldest months of the year unless you can heat the coop to about 40 degrees Fahrenheit. Hens don’t sit tightly for the first several eggs, so those eggs may get chilled enough to die. Plus, extreme cold may keep even the later eggs from hatching.
Hens also like dark, comfortable nests with plenty of nesting material. Just getting in one of these nests makes some hens ready for a family. You may want to set up some of these nests away from regular egg collection nests so you can enclose the hen to protect her as she sits.
Some people keep hens for sitting in their own special housing, especially when the hens are a different breed from the hens producing most of the eggs. Active breeds sometimes pick on sitting hens, and hens and chicks need special protection from predators that a regular coop may not be able to offer.
Hens don’t need roosters to get the broody feeling. They’ll sit on infertile eggs — or even on junk or rocks. But some home flock owners notice that when a rooster is around, he may encourage a hen to sit on a nest, even occasionally standing guard for her. On the other hand, some roosters may harass sitting hens, especially if few other hens are around.
Adding eggs to the nest
You may want to give a hen eggs that she didn’t lay because the hen that laid them isn’t a broody hen. If so, you’ll be glad to know that most hens readily accept eggs from other hens. Either remove the eggs that the hen laid and replace them with the ones you want to hatch, or just give her a few new eggs to sit on and remove a few of hers.
The eggs you add need to be very close to the same stage of development as the ones the hen laid. Don’t give a large hen more than 10 to 12 eggs, and give a bantam breed no more than 6 to 8 large eggs or 10 to 12 of her size if you want optimal hatching (see Chapter 3 for what constitutes a bantam breed).
If you want to save eggs to hatch from another hen, start collecting the desired eggs about the time you notice the broody hen starting to lay. Keep the collected eggs in a place between 45 and 65 degrees Fahrenheit and place them with the small ends down. Don’t shake them or subject them to rough handling. Turning them by tilting them one way one day and then the other way the next day is a good idea. Don’t store eggs more than ten days; after that, the eggs may not hatch as well. (See the section “Taking care of fertile eggs before incubation,” later in this chapter, for more on how to properly store fertile eggs.)
If you’re buying eggs to set under a hen, don’t order them until you have a sitting hen. Even if it takes a few extra days for her to hatch the new eggs, you’re better off using fresh fertile eggs than you are storing fertile eggs for a long time.
You can delay a hen’s sitting by leaving just one or two eggs in the nest. Remove those eggs before adding the new ones. Hens will remain sitting a few days beyond the original hatch date, but if one or two chicks hatch more than two days before the rest, the hen will probably abandon the late eggs so she can lead the chicks to food and water.
You can either replace each egg the sitting hen lays with a fake egg or leave the eggs in the nest until you’re ready to remove all of them. You can buy plastic, wood, and ceramic eggs from poultry supply catalogs (we list some hatcheries that sell supplies in Chapter 4); you can often find fake eggs in craft supply stores as well. Try to use natural-colored fake eggs. Don’t use Styrofoam eggs. If you just remove the eggs without replacing them with fakes, the hen may not settle down to brood the eggs right away and may even abandon the nest. You want a hen to be sitting firmly on the nest before you give her eggs you bought or saved to hatch. She will sit firmly when she thinks the clutch is big enough, and an empty nest gives her the wrong signals.
When you’re ready to set the eggs, reach carefully under the hen and remove the eggs she has. She may peck at you, grumble, and slap you with her wings. Then, protecting the new eggs in your closed hand, slide them under her carefully. That’s all it should take.
Occasionally, a hen throws out a new egg. Sometimes she does so when the egg is a different color or size from hers. If it isn’t cracked, put it back in the nest.
Giving a sitting hen what she needs
Isolate a sitting hen from the rest of the flock, or at least from nonsitting flock members. Chickens that aren’t protected may be picked on or disturbed by other hens, disturbed by the rooster, or picked off by predators because they won’t move off the nest. Other hens may crowd into the nest with the sitting hen, adding more eggs than she can sit on or breaking eggs in a shoving match.
If you find a free-ranging hen sitting somewhere, try to protect her from the environment and surround her with some kind of small mesh fencing to protect her from predators. Put a board or tarp on top, and she’ll be fairly well protected. If you have a hen sitting inside, also try to protect her from other flock members and predators.
A hen doesn’t need a very big enclosure while sitting. She needs enough room to stand and stretch and flap her wings when she gets off the nest, and she needs room for small feed and water dishes. About 3 square feet for full-size hens and 2 square feet for bantams does the trick. You can make the enclosure with a circle of fencing with small openings that keeps chicks in, or you can use a cage with small wire openings.
Some hens don’t object to a careful move of the whole nest to a protected place, but it’s best to get the hen sitting in a place where she can be protected from the start of incubation.
If you need to move a hen, do it at dusk or at night. Try to slide something (such as a big cardboard box) under her and the eggs, and move the whole thing to the new spot.
Be careful: Wilder hens may fly off the nest as you move it and be hard to catch. The hen won’t know where you moved the eggs and won’t find them. Move slowly and quietly as you pick her up and confine her with the eggs.
By morning, a confined hen should’ve decided to stay put, but make sure she can’t get to the old area. Some hens may abandon the eggs and go sit where the nest once was. If you must move a hen quickly during the day, get a good nest area ready, move the eggs and the hen into it, try to darken the spot, and then leave — don’t fuss about her. Many hens will settle right down, but if yours doesn’t, you can’t do much about it.
Hens don’t carry eggs to a nest, although they may roll eggs a short distance back to a nest by reaching out from the nest with their beaks. If you see eggs out of the nest, mark them with a marker or pencil and put them back in the nest. If the marked egg turns up back outside the nest, the hen may be trying to discard it because she knows it’s no good, especially if no other eggs are out of the nest. Sometimes the hen is just clumsy. Other times, other chickens or predators may be disturbing the nest. If an egg comes out of the nest a third time, discard it.
If eggs crack or get dirty from manure or mud, don’t wash them. You can try to clean the egg with a soft, dry cloth, but washing it can cause bacteria to invade the shell. Don’t handle the hen’s eggs if you can avoid it. They will get chilled every time you remove them.
Make sure the hen always has food and water available. She won’t eat or drink very much — that’s normal; she isn’t active, and eating too much food creates the need to get off the nest more often. Place the food and water a little ways away from her so she has to get up to eat — getting up once in a while is good for her. Clean the pen area if it gets too dirty. Food, water, and a clean pen are all the care she needs.
Caring for a hen and chicks
Twenty-one days have passed, and the big day is at hand. If a hen has remained sitting firmly on the nest until now, you’ve got a very good chance that at least some of the eggs are going to hatch. Hens hear and respond to chicks peeping while the chicks are still in the shell. Now isn’t the time to disturb the hen frequently — you want her to stay on the nest until all the healthy eggs have hatched. So listen carefully and watch the hen for tiny heads popping out from under her, but don’t shoo her off the nest to look.
Hatching day
Chicks hatch under a hen. You’ll know it’s happening by some clues:
- Pieces of eggshell outside the nest
- Peeping sounds
- A tiny head sticking out from under the hen
The chicks hatch out over the course of 36 hours or so. The hen stays put until all the chicks are hatched and dry or until about 2 days after the first chick hatches.
The hen knows she must move then so that the hatched chicks can get food and water. If she’s in a small area, she may go back to the nest with the chicks, and some eggs may still continue to hatch if it’s warm and they didn’t get too chilled in the hen’s absence. It’s better, however, to have the eggs hatch as closely to each other as possible by setting the eggs all at the same time.
If you intend to collect the chicks and care for them in a brooder, collect them on the second or third day so that you don’t disturb the hen and any eggs that are continuing to hatch (see Chapter 14 for more on brooders).
For the first day or two, chicks spend a lot of time hiding under their mom. Keep the kids or other visitors quiet when they visit, and don’t allow them to pick up the hen or try to scare her away from the babies so they can see them. The chicks will be just as cute in a few days, but the mom will also be more relaxed and the chicks will be more active.
The early weeks
Baby chicks need food and water they can reach the moment the hen moves from the nest with them. Place chick starter feed in shallow pans and have a water container with a narrow opening nearby. You can leave a dish of the hen’s food with her, but don’t have any large open water dishes the chicks can drown in. The hen will show them how to eat and drink.
The chicks will hide under the hen if they feel scared or cold. The hen will fluff up her feathers to help cover them all. They don’t normally need supplemental heat other than the hen, but if the temperature is below freezing, a heat lamp suspended over one corner of the pen can be a real help. Also make sure there’s some bedding between the cold ground and the chicks.
Keeping the chicks in a dry area is the best you can do for them. If they get wet and chilled, even the hen may not be able to warm them enough, and they won’t do well. If the pen is outside on the ground, heavy dew in the morning can be a problem; mow short any vegetation that’s inside the pen.
We don’t believe in just letting hens roam the yard with their babies. Far too many dangers may lay in wait for the little ones — cats, kids, snakes, hawks, and even crows and blue jays pick off chicks. Roosters rarely hurt chicks, but other hens often do. The mother hen will try to protect them, but she can’t always do so.
If you’ve ever tried to catch baby chicks that are even a few days old, you know that catching them in a large area is difficult, so you’re better off keeping them in a smaller, more manageable area. A hen with chicks needs at least 6 square feet of space until the chicks are feathered; after the chicks are feathered, they may need more space. Several hens with their own chicks may share a large area, but some hens try to steal other hens’ chicks.
Make sure the chicks can’t get out of the fencing or shelter on their own. The mother hen can’t protect them if she can’t get to them. Don’t think you can keep chicks confined with a low barrier — they quickly learn to hop up and over. They’re also good at finding any small opening they can squeeze through.
Plans for transitioning teens
Chicks can be separated at any time from their mother, but your best bet is to wait until they’ve fully feathered out at about 4 to 6 weeks so they don’t need supplemental heat. If it’s really cold — say, below 30 degrees Fahrenheit — and you really want to separate them from the hen, they may need some heat until they’re 3 months old. You can put young chickens in their own pen, or you can take the mother hen out of the rearing pen and put her back with the flock.
When the chicks have all their feathers, you can let them out with their mom to free-range, if you keep your chickens this way. They’re still a little vulnerable at this stage, though, so be prepared to lose some chicks. If you have penned chickens and you want to introduce the mother hen and her fully feathered family to the flock, put them in the adult housing with the hen around the time the other birds are going to roost.
Keep an eye out the next day to see whether any young birds are getting picked on. If they’re wounded and bleeding, immediately separate them from the flock. As long as they’re not wounded, let them learn their place in the flock. Sometimes roosters don’t tolerate young cockerels (male chicks), so you may need to pen them separately.
For more information on raising chicks, see Chapter 14.
Going Artificial: The Incubator Method
You may opt for artificial incubation when a hen won’t sit on her own eggs, or you may just find an incubator easier. Incubators have come a long way since they were invented in 1843, and chicken producers have learned a lot about incubating eggs in the last 50 years or so.
With artificial incubation, you collect the eggs and put them into a container (the incubator) that keeps them warm and maintains the proper humidity until they hatch. If the incubator has windows, you can watch the hatching process.
Choosing an incubator
You can find incubators for almost all budgets, and you can even build your own incubator with some parts you can purchase. Poultry supply catalogs, farm stores, and pet stores carry incubators — deluxe models that are almost “set and forget,” as well as some cheaper models that require more careful attention from you. Many secondhand incubators are for sale in newspapers, in magazines, and online.
Before you buy an incubator, you need to consider the following factors:
- How often you’ll likely be using an incubator
- How many eggs you want to hatch at a time
- What type of poultry, if any, besides chickens you want to raise
- What your budget can afford
- How much you want to be involved in the project
If you or your kids want to see the eggs hatching, you want to get an incubator with an observation window.
If you think the egg incubation project will be a one-time experience or something you do maybe once a year, buy a cheaper incubator or a good secondhand one. You can always upgrade later. If you’re already deep in the chicken hobby and you think you’ll be hatching eggs frequently, buy a better incubator. If you want to hatch eggs of turkeys, ducks, or geese in addition to chicken eggs, make sure the model you buy can accommodate the bigger eggs.
Most incubators require electricity (although you can buy gas-powered ones) and are meant to be used in a heated room.
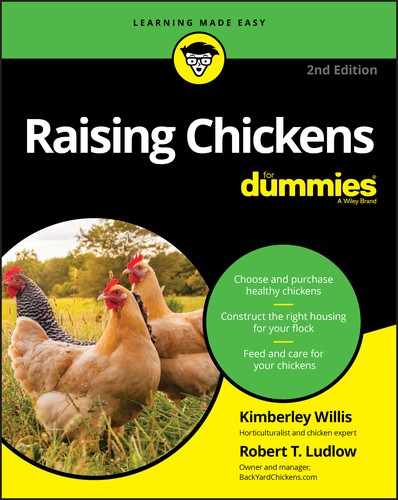
The following list describes the three main categories of incubators (Figure 13-1 gives you a couple examples):
Illustration by Barbara Frake
FIGURE 13-1: Types of incubators.
Still-air incubators: Still-air incubators are the cheapest models of incubators. They’re usually made of Styrofoam or plastic. They range from models that can hatch just 4 eggs to models that can hatch 36 or more eggs, depending on egg size. Many of these have clear tops or observation windows.
Air in these incubators moves through the incubator by cooler air being drawn in from the bottom and rising as it’s heated through some ventilation holes on the top of the incubator. Some models include fans to move air. Most models have a reservoir in the bottom that you add water to in order to provide humidity. Some models have automatic egg turners; otherwise, you need to turn the eggs by hand.
These incubators require careful attention daily, and you need to follow the instructions exactly. They can provide a good hatch if you pay attention to details.
Forced-air incubators: Forced-air incubators move heated air through the incubator with some kind of fan system. They’re more expensive than still-air incubators, but they generally provide for a better hatch because they eliminate the hot and cold spots that still-air incubators sometimes have.
Many forced-air models also come with automatic humidifiers and egg turners, and some deluxe models have warning buzzers and other bells and whistles. Some attention is still needed, but it’s less than the still-air models require. Some come with observation windows. They range in capacity from 12 to 50 or so eggs.
These models are probably the best type for most home chicken flock owners.
- Cabinet-style incubators: These incubators are large units with forced air, automatic humidifiers, and egg turners, and they have several shelves to accommodate eggs at different stages of hatching or of different sizes. They generally don’t have observation windows, and they cost you a considerable amount unless you find a good deal on a used model. These units are for the serious chicken hobbyist.
Automatic egg turners are standard in some incubator models but can be added to others. They work by tilting the eggs in a different direction every few hours — they don’t actually roll the eggs over. Automatic egg turners increase the number of eggs that hatch because the eggs are turned consistently and gently. They have to be turned off 3 days before the chicks hatch.
Accessorizing your incubator
You need to buy a few incubator accessories if the incubator itself doesn’t supply them. Some necessary accessories include the following:
Thermometer: The thermometer needs to be at a level near the top of the eggs. You can place your thermometer on a stand or hang it to achieve this level. Make sure the thermometer has measurements large enough to read from the observation window, if you have one. Position it in the center of the incubation space so that it doesn’t touch the eggs or the walls of the incubator.
Typically, when an incubator has a window, you read the thermometer remotely from outside the incubator because the minute you open the incubator, the temperature drops. Many remotely read thermometers are on the market — you place a probe or sensor in the incubator, and it transmits a reading to a device located outside the incubator. You can find such thermometers made specifically for incubators or for general household use.
The correct temperature is critical to success with incubation, and the thermometer must show each degree. Even a difference of 1 degree can affect hatching. Buy a good thermometer and handle and store it carefully.
Hygrometer: You can buy a hygrometer, which measures humidity, specifically for incubators or for household use. Many of the remote-style thermometers also measure humidity.
Humidity is crucial to a good hatch, so make sure you buy a good instrument. Many of the better incubators have built-in hygrometers, some of which actually automatically add water from a reserve tank to adjust humidity.
You may also want an egg candler, a light that helps you look inside an egg to see whether it’s developing. You can buy or make these instruments. (See the section “Looking Inside the Egg,” later in this chapter, for more on candling.)
Setting up and caring for your incubator
After you buy an incubator, carefully read the directions that come with it, and then save those directions so that if you decide to use the incubator again in a year or so, you have the directions to refresh your memory.
Your next step is to find a place to set your incubator. It needs to be located near an electrical outlet, and it’ll be there for a month (so you probably don’t want to put it in the middle of a high-traffic area). Choose a room that’s heated to at least 60 degrees Fahrenheit and away from windows, heating vents, and doors that may cause wide fluctuations in room temperature. Also select a place where it won’t get knocked off or jostled too often.
If you have children or pets, you may want to put the incubator where it’s out of sight and out of mind. Children are prone to opening the incubator too often, handling eggs, or fooling with controls. Pets can hear the chicks peeping in the shells in the last days of incubation and may damage the incubator trying to get to the eggs. They may also jostle controls while inspecting the incubator or, in the case of cats, sleep on top of it, blocking the vent holes.
Have the incubator set up and running for at least 24 hours before you add eggs, to make sure it’s working correctly.
Cleaning your incubator
Every time you use the incubator — even if it’s brand new — you need to clean it. Remove any debris and then wash the incubator with hot, soapy water and rinse. Make sure to wash and rinse the screens the eggs lay on and the egg-turning racks, too.
Consult your manual to see whether it’s safe to submerge any parts in water before doing so.
If it’s a nice, sunny day, letting the incubator spend a few hours open in the sun is a good way to kill germs and dry the incubator at the same time. Otherwise, dry the inside of the incubator with clean paper towels.
You can use a solution of one cup unscented household bleach to four cups of water to wash the incubator with. Then rinse it and allow it to dry before use. Don’t use other strong disinfectants or cleaning solutions on incubators. If any chemical residue remains, it can harm the embryonic chicks by passing through the porous eggshell.
Adjusting the temperature
Having the right temperature — the entire time of incubation — is one of the crucial steps of good incubation. For still-air incubators, the temperature needs to be 102 degrees Fahrenheit. In most other incubators, the temperature needs to be 100 degrees, but read your incubator’s instructions for information on the correct temperature.
Make sure the temperature is at the correct setting before you add eggs to your incubator.
The outside temperatures, how often the incubator is opened, and the stage of development the chicks are in can affect the temperature inside the incubator. If the incubator has a thermostat, as most do, it will likely maintain the correct inside temperature automatically, but still check the thermometer often and adjust the thermostat right away if the temperature is incorrect.
Unless it happens too often, a short period of cooling, as when turning eggs manually, doesn’t harm the chicks. Even a short period of time at temperatures above 104 degrees, however, can kill most or all of the chicks.
When chicks get near hatching, their bodies actually produce some heat, and this change may cause the temperature to rise in the incubator. Pay close attention and adjust the temperature, if necessary, close to hatching time. At hatching time, people often open the incubator frequently to check on the chicks. Doing so can chill them and may even cause them to die during hatching. If you have eggs in different stages of development in the incubator (more than 2 days apart), it’s helpful to have a second incubator so that you can move the eggs that are scheduled to hatch together.
Paying attention to humidity
Chicks require the right humidity to develop correctly in the egg and to be able to hatch. The humidity in the incubator needs to be about 55 percent until the last 2 days, when you need to bump it up to 65 to 70 percent.
You can usually increase humidity by adding water to some sort of reservoir. In still-air incubators, the reservoir is generally a pan under the screen the eggs sit on. Other types of incubators have different reservoir systems. When you add water to these reservoirs, make sure you heat the water to the incubator temperature first.
If water is dripping off the inside of the incubator or the eggs seem wet, the humidity is probably too high, which can kill your chicks. You need to increase the ventilation by opening additional vent holes or even cracking the lid for a short time — just keep track of the temperature to make sure it doesn’t drop while you’re doing so.
Making sure the incubator has adequate ventilation
Chicks require oxygen to breathe. They pull oxygen in through the pores of the egg before they hatch. All incubators must have some way for fresh air to enter the incubator and stale air to leave. Still-air incubators usually get their fresh air through small openings you can open or close; other incubators pull in air with a fan through a vent. As chicks grow, they require more oxygen, so you may need to increase ventilation. As chicks hatch and breathe air, ventilation is critical.
Determining whether the incubator is ventilated correctly is difficult. Read your incubator instructions carefully. They tell you how to adjust the ventilation, if necessary, based on experiences with that incubator. Unless the instructions direct you to do so, don’t cover any ventilation holes in the incubator. Most incubators require that you open additional vents near the hatching date. If instructions are missing, look for capped vents and open them on the 18th day of incubation. Adjust the temperature and humidity if opening vents causes them to fall too low. If your incubator has no capped vents, the incubator probably supplies enough ventilation.
Finding and storing fertile eggs
When you have the incubator ready, your next step is to get fertile eggs. Finding fertile eggs may take a little time if you don’t have your own hens and a rooster, so start looking well before you want to hatch eggs. Even if you have your own hens and a rooster, you may not be getting fertile eggs. (In Chapter 12, we talk about how eggs are fertilized and how to make sure your own chickens are laying fertile eggs.)
Fertile eggs are usually available in the spring and summer, but they may be hard to find at other times if you’re not producing your own.
Finding fertile eggs
Try to find a local source of fertile eggs, if you can. Sending eggs through the mail and getting a high percentage of them to hatch is difficult — the average rate of hatch under ideal conditions for fertile eggs sent by mail is only 50 to 60 percent. Normally, you don’t get any guarantees when fertile eggs are mailed to you because the seller can’t control the shipping temperatures and the way the eggs are handled in transit.
Here are some good places to get fertile eggs:
- Mail-order catalogs: Most catalogs that sell baby chicks also list eggs for sale. See Chapter 4 for a list of hatchery catalogs.
- Backyardchickens.com and other online chicken forums: These sites are good sources for breeders looking to sell fertile eggs.
- People who sell show stock and rare breeds: These people may also sell fertile eggs.
- Friends: If you have a friend who has both hens and roosters, he may be able to save fertile eggs for you.
- Local farmers: Some farmers sell free-range eggs at farm markets. If you have a market near you, ask the owner whether she can save you some eggs for hatching. Eggs that have been handled correctly — for the intended purpose of hatching — are more likely to hatch than eggs that have been washed and cooled for consumers to eat.
If you can’t find eggs nearby, call your county Extension office. You may find a 4-H poultry club that can help you, or the Extension educators may know where you can get eggs. A vocational high school that teaches agriculture may be able to help you as well.
If you’re saving your own eggs or you have the chance to pick and choose which eggs you want, choose the cleanest ones. You can brush off dirt with a dry cloth; some people even use fine sandpaper or fine steel wool. If eggs are heavily soiled, it’s best not to use them. Discard any cracked eggs and any eggs that have very thin shells or are oddly shaped; oddly shaped eggs seldom produce good chicks.
 Eggs you buy from the supermarket won’t hatch because those hens aren’t kept with roosters. Even the eggs labeled as organic are probably from hens without roosters. We’ve heard of eggs that were bought at farm markets from free-range hens hatching, but don’t count on hatching eggs that were meant for eating.
Taking care of fertile eggs before incubation
The most important point to remember about fertile eggs meant for hatching is that they’re living things — they must be handled gently and kept at the right temperature, or they’ll die. Don’t shake them or toss them around — if you do, you may kill the embryo.
Don’t wash fertile eggs intended for hatching! Washed eggs are far less likely to hatch than unwashed eggs, and the unhatched, washed eggs may also affect the hatching of eggs around them.
When you wash eggs, you remove the protective coating that the egg gets as it leaves the hen, and the egg’s pores often draw in bacteria. The warmth of incubation turns the contaminated egg into a factory for bacteria reproduction, often killing the embryo and spreading to nearby eggs.
The fertilized egg starts dividing to become an embryo as it travels down the oviduct on its journey out of the hen. When it’s laid and cools below her body temperature, it goes into a state of suspended growth until conditions are right again. Eggs being stored for hatching need to be stored at temperatures between 45 and 65 degrees Fahrenheit. If the egg temperature drops below 45 degrees for very long, the embryo will probably die; if it goes above 65 degrees, it may start to grow.
Growth at less than optimum temperatures makes weak chicks that seldom survive the whole incubation period and can cause deformities in the chicks that do survive. In cold or very warm weather, collect the eggs from your hens for hatching as soon after they’re laid as possible and then move them to the right conditions. If you’re collecting your own eggs, you may need to put them in a cool basement or even in the bottom vegetable drawer of your refrigerator to suspend growth.
Store eggs for hatching with the small end down. An egg carton is good for this purpose. You can store eggs for about a week without much drop in vitality, but after a week of storage, the percentage of eggs that will hatch drops sharply. After 2 weeks of storage, few eggs will hatch.
Eggs that you’re storing for incubation need to be rotated from side to side twice a day. Rotating keeps the early embryo from sticking to the shell in a bad position.
If you’re getting eggs from anywhere but your own hens, have your incubator set up and ready to put them in as soon as you receive them. If you’re collecting eggs from your hens, store eggs until you have about a week’s worth; then set up the incubator and put the eggs into the incubator all at once. Using a pencil or nontoxic marker, mark the eggs with the date you set them. If you’re going to be hand-turning the eggs, put an x on one side so you know which eggs you’ve turned.
It’s best not to have several different hatch dates in the same incubator unless you have a cabinet incubator with multiple shelves or drawers. Eggs at different stages of incubation require slightly different care.
Caring for eggs in the incubator
A mother hen seems to know instinctively what her eggs need. If it’s very hot, she gets off the eggs to let them cool a little; if it’s cold, she sits tightly. Her body provides the perfect humidity, and she fills it with water herself. When you take over the job of incubation, you can never be as good as a hen, but with careful attention to details, you can have a successful hatch from an incubator.
Turning eggs
Hens don’t actually turn their eggs with their beaks on a regular basis, as many people think. (They do occasionally rearrange them with their beaks, but it’s usually for their own comfort.) Instead, their comings and goings from the nest and their shifting of positions to get comfortable alter the position of the egg several times a day.
Some debate swirls about turning eggs, but most experts believe the position of eggs needs to be changed two or three times a day for the first 18 days of incubation. Automatic egg turners can do this for you, or you can do it yourself by rolling the eggs to a new position. The turning keeps the embryo from becoming attached to the outer membranes and the eggshell. If you’re turning the eggs yourself, do it quickly so you don’t chill the eggs too much.
If you have egg racks for turning eggs in your incubator, place the eggs in the racks with the small end down. If you’re using an incubator without racks, lay the eggs on their sides. Cluster them in the center of the incubator, if they have a lot of room.
Wash your hands before handling eggs. Oil or bacteria from your hands can cause hatching problems. Warm hands are much friendlier to eggs than cold ones. (How do you feel when someone touches you suddenly with cold hands?) And be sure to wash your hands again after touching the eggs. Eggs can have harmful bacteria on them, too.
On the 18th day, stop turning the eggs. If you’re using an automatic egg turner, be sure to turn it off. The chicks are getting in position to hatch, and they don’t have much room to move around anyway. If you change the position of the eggs at this point, the chicks have to reposition themselves for hatching, and doing so wastes valuable energy and may even make it impossible for them to hatch.
Hatching eggs
On the 18th day of incubation, you also need to increase the humidity in the incubator to 65 to 70 percent. You may want to increase the ventilation — refer to your incubator’s directions to see whether doing so is advised. Get your brooder set up and warmed on the 20th day so you can transfer the chicks to it (see Chapter 14 for more on brooders).
Eggs that you put in the incubator at the same time likely will hatch within 18 hours of each other (see the section “Knowing what to look for: Stages of embryonic growth,” later in this chapter, for more on embryo growth). Chicks struggle to get out of the egg, and it may take some time for a chick to fully hatch. If a chick requires help hatching, it usually isn’t a strong, healthy chick.
When chicks start hatching, people get excited, and they want to open the incubator and handle the chicks. Stop right there! Leave the chicks alone until they’re dry and fluffy. They’re fine in the incubator for a few hours while the others hatch. Remove the dry, fluffy ones every 6 hours and put them in the brooder. Every time you open the incubator, you lower the temperature and humidity and make it harder for the ones still hatching. If any eggs are left after 18 hours from the time the first chick hatched, you can leave them for another 24 hours, but after that, examine them for signs of hatching and throw out any that aren’t beginning to hatch.
Looking Inside the Egg
When you’re incubating eggs, you may want to know what’s going on inside them. If you’re new to incubation or you have children, you may want to open an egg every couple days and look inside. Doing so kills the embryo, of course, but it gives you a fascinating look at the miracle of a chick forming in just 21 short days — from a glob of cells to a baby chick that can run around and feed itself. If you decide to open eggs and look inside, we suggest opening them on the 3rd, 7th, 12th, and 16th days of incubation.
You may even want to set extra eggs so you have eggs to sacrifice for this little biology lesson. You may get some eggs that didn’t develop embryos, so set even a few more. For example, if you intend to open four eggs, you may want to start eight more eggs than you want to end up with.
If you don’t want to open eggs and sacrifice the chicks inside just for a biology lesson, you’ll be relieved to know that you can get a glimpse inside without opening an egg. In this section, we show you how.
Egg ultrasound: Candling an egg
Candling is a way to look inside an egg without opening it and killing the embryo. Candling involves shining a bright light on the egg in a darkened room and seeing a shadow inside. You can see the size of the air cell, veins in an egg with an embryo, and the dark mass that indicates the yolk and the embryo.
Candling works best with light-colored eggs, but you can candle brown eggs, too. If you do so quickly in a warm room, you won’t harm the developing chick. You can buy candlers from poultry supply places, but they’re also relatively easy to make (see Chapter 4 for a list of reliable poultry supply places).
To make a candler, follow these steps and refer to Figure 13-2:
Line a cardboard box with aluminum foil.
The aluminum foil makes the light stronger.
Place any good, strong source of light inside the box.
An LED flashlight or reading lamp works, as does a 60- to 75-watt incandescent light bulb.
- On one side of the box, make a ½-inch hole.
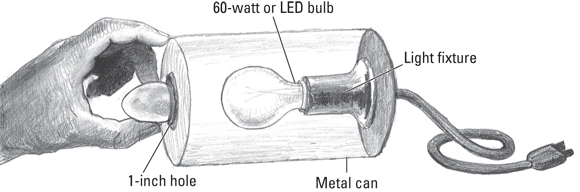
Illustration by Barbara Frake
FIGURE 13-2: Making an egg candler.
To candle an egg, follow these steps:
- Wash your hands.
- Turn off the lights in the room.
- Quickly remove an egg from the incubator and hold it outside the box against the hole in your candler box.
The beam of light will shine into the egg, allowing you to see shadows inside the egg. You’re looking for the size of the air cell, dark embryo masses, and blood veins inside the egg.
 Don’t keep the egg out of the incubator too long — no more than 5 minutes. Mark the egg before you put it back in the incubator so you know which eggs you’ve looked at. If you intend to candle a few eggs more than once, you may want to number or otherwise identify each egg. You can candle an egg as many times as you want, but the more you handle the egg, the less likely it is to hatch.
Knowing what to look for: Stages of embryonic growth
A tiny chick develops very quickly. Almost as soon as the sperm penetrates the female reproductive cell, called the blastodisk or true egg, which is a small white spot on the yolk, the cells begin dividing to produce a chick. (For more information on fertilization, see Chapter 12.) By the time the egg is laid 26 hours or so later, a ring of cells has already begun to form. If the egg is incubated by the hen or put in an incubator, cell growth rapidly continues. But most eggs cool and go into a state of suspended growth for at least a few days.
As a chick develops, the air space in the egg enlarges, and the egg actually loses weight. Looking at the egg’s air cell changes during candling is one way to see whether a chick is developing (see Figure 13-3).
After 24 hours of incubation at 100 to 102 degrees Fahrenheit, the chick’s head, eyes, digestive system, and backbone have begun to form. They’re still quite small — you need a magnifying glass to see these structures well, but rest assured that they’re there (see Figure 13-4).
After 44 hours of incubation, the heart begins beating. Two circulation systems begin to function — one in the embryo and one in the vitelline membrane, which surrounds the embryo and acts something like a placenta in mammals, absorbing food and oxygen from the egg white and transferring it to the chick.

Illustration by Barbara Frake
FIGURE 13-3: Air space changes in an egg during incubation; a fertilized egg looks like this during candling.

Illustration by Barbara Frake
FIGURE 13-4: The stages of embryonic growth.
By the end of the third day, the beak has begun to form, limb buds are present, and temporary “gills” appear on the embryo.
By the end of the fourth day, the embryo has begun flexing and moving and generally rotates 90 degrees to lie on its left side. All the internal organs have formed by the end of that day.
By the end of the fifth day, the reproductive system has formed and begins to differentiate into male or female, although you can’t tell the sex by looking at the embryo.
By the end of the seventh day, digits appear on the wings and feet that will make toes and wing sections.
By the end of the tenth day, the tracts where feathers will grow have formed, and the beak hardens.
By the end of the 14th day, the toenails have formed.
By the end of the 16th day, the embryo occupies much of the space inside the egg and has begun to use the egg yolk as a food supply because the egg white has been used up.
By the end of the 19th day, the yolk has been drawn up into the chick’s body in preparation to hatch.
Hello, World! Hatching Your Eggs
On the 18th day of incubation, a chick begins to prepare to hatch. Its head moves toward the large end of the egg, and the chick curls its feet up close to its head. The head gets tucked under the right wing.
You shouldn’t move the position of the egg because, if you do, the chick then has to orientate itself all over again, which weakens the chick.
Chicks can hatch from the wrong position in the egg, but it’s much harder, and many of them die trying. From the 18th day on, you may be able to hear peeps coming from the egg if you listen closely.
On the 20th day, the chick pierces the membrane around it, sticks its beak into the air space in the big end of the shell, and begins to breathe. As it uses the air up, on the 21st day, the chick uses its egg tooth (a hard area on the end of the beak) to break a hole in the eggshell, letting in outside air.
The chick chips away at the shell in a circular pattern, frequently stopping to rest. This process can take from 30 minutes to several hours. When the shell is completely cut around in a circle, that top circle pops off and the chick uses its legs to push off the back part of the shell. At this point, the chick is wet and tired, and it may lie there for an hour or more to rest and dry off before getting up and moving around.
Playing doctor: Helping a chick hatch
Sometimes people feel sorry for a chick that appears to be having trouble getting out of an egg. It may have pipped (made a tiny hole) and have its beak out, but it may seem unable to proceed any farther.
The temptation is great to help these chicks, but doing so can cause more harm than good. You can’t just pull off the shell. Hatching is a slow process even in ideal conditions — you have to be patient.
Generally, when eggs pip but then fail to hatch, the temperature, oxygen level, or humidity is too low. The temperature may drop because someone is constantly opening the incubator to check on the chicks’ progress. Poor ventilation may cause the chicks to become weak because of a lack of oxygen. And humidity can get too high and actually drown hatching chicks because they can’t breathe. These problems may be correctable and the chicks then will finish hatching. But even if conditions seem to be fine, many experienced chicken owners believe that chicks that can’t hatch on their own are doomed to either die anyway or live a weak, unhealthy life and so don’t help them. New chicken owners usually want to help the chicks and it doesn’t hurt to try. Just don’t be too upset if they don’t make it.
Sometimes the membrane has dried out too much around the chick, or the chick is in a bad position for hatching. If the pipped hole isn’t in the large end of the egg, the chick is in the wrong position. If you see no hole but you hear peeping inside, the chick also may be in the wrong position. If you see a hole in the right area but the chick can’t seem to finish hatching, the membranes may be dried out.
In these cases, helping — slowly and carefully — can save a healthy chick. Make sure the chick is still alive — it will move or peep if it is. If you’ve decided to try to help the chick, start by making a warm operating area with a padded, clean surface. Sterilize a small pair of nail scissors and a pair of tweezers with rubbing alcohol, or boil them for a few minutes. Have some clean, warm water nearby.
Under the shell is a thick membrane loaded with blood veins. The chick has already pierced the membrane in one spot if it has started to hatch. If you tear the membrane too early, it will bleed profusely and either weaken the chick or kill it.
With the scissors and tweezers, carefully pick little pieces of shell off the membrane, around the hole in the egg. Ideally, you work like the chick would, circling the large end of the egg and removing half the shell. Around the air cell, there may be no membrane, allowing you to remove shell pieces easily. If the chick has started a hole in the side or small end of the egg, the chick is in the wrong position, which is why it’s having difficulty hatching. You need to be even more careful in this case.
Be careful not to cut the chick. If you cut a vein in the membrane and it bleeds, stop at once and put the chick in the incubator. You can’t do anything to stop the bleeding. The bleeding will probably stop, but it weakens the chick. You can start again in an hour or so if the chick is still alive and not free.
If half the shell is removed and the head and neck are exposed, the chick should become active and wiggle out of the rest of the membrane and the egg. Moisten the membrane that’s left with a little warm water and place the chick, with some shell still attached, back in the incubator. It will probably just lay there for a while. If the chick isn’t up and walking within an hour or so, it’s probably too weak to survive.
Handling the bad hatch: When things go wrong
If eggs hatch early, either the temperature was too high in your incubator or you counted the days wrong. If the eggs hatch late, the incubator was a little cold or you counted the days wrong. If the eggs are hatching over a wide time span (more than 18 hours), your incubator may have had hot or cold spots, or you may have improperly stored the eggs before you put them in the incubator.
If many eggs don’t hatch by the 22nd day, pull some out and open them. If no embryo is inside, they probably weren’t fertile or they were stored too long or improperly. If embryos started forming and then died, the temperature or humidity of the incubator wasn’t right, the incubator didn’t have adequate ventilation, or the chicks died from bacterial contamination or a disease. Not turning the eggs enough or handling them roughly can also cause embryos to die.
If you open eggs and find some living embryos, put the unopened eggs back and give them some more time. If many eggs don’t seem to be hatching, always check a few eggs before you discard all of them.
If chicks hatch but they appear “sticky,” with egg goo on them, the humidity may have been too high, the temperature may have been slightly low, the ventilation at hatching may have been poor, or they may have an inherited condition that causes this symptom.
Malformed or crippled chicks can be caused by slightly high temperatures during incubation, disease, chemical contamination of the incubator, or failure to turn eggs enough during incubation. Bad legs can also be caused by hatching chicks on slippery surfaces.
If hatched chicks have large, bloody, or mushy naval areas when hatched, the incubator temperature may have been slightly low, the humidity may have been too high, or the chicks may have a disease called omphalitis, which is caused by bacteria invading the naval area. For this reason, chicks should hatch on a dry, clean surface.