Chapter 16
Raising and Butchering Meat Birds
IN THIS CHAPTER
![]() Caring for meat birds
Caring for meat birds
![]() Knowing when to butcher
Knowing when to butcher
![]() Deciding how to butcher your birds
Deciding how to butcher your birds
![]() Killing and cleaning a chicken
Killing and cleaning a chicken
Not everyone is interested in raising animals for meat. But if you’re interested in producing some of your own meat, raising meat chickens is a good way to start. Chickens are small and easy to handle — the average person who has a little space can successfully raise all the chickens he and his family want to eat in a year. You can be eating fried homegrown chicken 10 weeks after you get the chicks, or even sooner — so, unlike raising a steer or pigs, you can raise your own meat in less than 3 months and see whether you like it. Plus, chickens don’t require large, upfront outlays of cash and time.
Meat birds are managed a bit differently from chickens kept for other reasons, though. In this chapter, we give you the information you need to properly raise meat chickens. We also explain the process of butchering the chickens you’ve raised — whether you hire someone for the job or you decide to do it yourself.
Raising Meat Chickens
If you’re considering raising your own meat chickens, don’t expect to save a lot of money unless you regularly pay a premium price for organic, free-range chickens at the store. Most homeowners raising chickens for home use wind up paying as much per pound as they would buying chicken on sale at their local chain grocery store.
But saving money isn’t why you want to raise chickens. You want to raise your own chickens because you can control what they’re fed and how they’re treated. You want to take responsibility for the way some of your food is produced, and you want to feel that sense of pride that comes from knowing how to do it yourself.
Raising meat chickens isn’t easy, especially at first, but it isn’t so hard that you can’t master it. For most people, the hardest part of raising meat chickens is the butchering (which we cover later in this chapter), but the good news is that almost every area of the country has people who will do that job for you (for a fee). So if butchering is the only thing stopping you from raising your own meat chickens, don’t worry — you can get all the benefits of raising your own meat chickens without having to handle the butchering yourself.
 Before you start raising meat chickens, it’s a good idea to investigate places that will custom butcher your finished birds to see if this option makes cents, er, sense. See the section “Hiring Out the Butchering,” later in this chapter, for details on fees, transportation, and so on.
 You can raise chickens that taste just like the chickens you buy in the store, but if you intend to raise free-range or pastured meat chickens, expect to get used to a new flavor. These ways of raising chickens produce a meat that has more muscle or dark meat and a different flavor. For most people, it’s a better flavor, but it may take some getting used to.
Looking at the three main approaches to raising meat birds
You have three main approaches to consider when raising meat birds:
- Getting the meat fast and cheap: This approach means using Cornish cross chicks, confining them inside, and using commercial feed. You push them to gain weight as fast as possible, and your meat tastes like supermarket chicken.
- Raising chickens humanely but conventionally: This approach may mean using Cornish cross chicks or other breeds of chicks. You give the chicks commercial feed and confine them, but you also allow them some access to the outdoors and more time to grow before you butcher them.
- Raising organic, free-range, or pastured birds: This approach involves using chicks from breeds that are active foragers and feeding them only organically grown feeds or organic pasture plants. You also give the birds unrestricted access to the outdoors. The meat tastes different from supermarket chicken, but you may like it better.
You can use blends of these three outlooks, too. For example, you can confine birds and feed them an organic feed. You can use Cornish cross chicks on pasture, but they’ll take longer to grow, and you may lose more of them than if you use a more active breed.
After raising many batches of meat chickens in various ways, we’ve concluded that the most important factor when raising your own meat is that you have control over the environment in which the chickens are raised, what they’re fed, and how they’re harvested. Raise your chickens in a way that feels right to you.
Choosing the right chickens
When you’re choosing chickens for meat birds, choosing the correct breed to match the way you want to raise your meat is important. You can, of course, eat any chicken, any breed, any sex, any age. But for quality meat that’s economical to raise, certain breeds stand out. Sex can be important in some cases, too. We discuss those issues in this section.
Breed
The Cornish-White Rock hybrid, which is a cross between those two breeds, goes by various names in chick catalogs, such as Vantress, Hubbards, and simply Cornish X, which means it’s a hybrid. This breed produces meat the fastest, and it’s the closest to supermarket chicken. Some hatcheries advertise a dark-colored version of the Cornish-Rock hybrid, for people who prefer colored birds.
Most of the chicken consumed in the United States comes from Cornish-Rock hybrids. These chickens have been bred to grow quickly, utilize feed efficiently, and produce lots of breast meat. Commercial and home chicken producers both use these breeds. They’re not good birds for pasture raising, however, because they don’t gain weight well on pasture and aren’t active birds.
You can use any of the dual-purpose or heavy breeds that are fairly fast growing for meat: Plymouth Rocks of any color, Cornish of any color, Orpingtons, Faverolles, Wyandottes, Chanteclers, Hollands, and Delawares are good examples. These breeds are better for pasture raising and can also be raised in confinement. Recently, some hatcheries have been offering meat-type birds that are better suited to free-range or pasture conditions, such as Red Rangers, but these breeds aren’t easy to find in all locations. The very heavy breeds — like Brahmas and Jersey Giants — take a long time to mature.
Producing your own meat-type crosses isn’t too difficult to do, either. For example, you could have a flock of Buff Orpington hens laying eggs for you and keep a Plymouth Rock rooster with them. Of course, you’d need to incubate the eggs the hens produce to get your meat chicks (see Chapter 13 for more on incubation). For best results, cross two breeds that have good meat qualities.
Technically, you can eat any chicken, but you want to avoid certain breeds because they won’t give you much of a meal for your time and money. Breeds to avoid are any of the egg production breeds — such as Leghorns, Rhode Island Reds, Isa Brown, and Cherry Eggers — which have a light frame. Also avoid the small ornamental breeds.
 Also avoid the hatchery offerings termed “frypan special” or “fryer mix” or any other term for groups of male chicks from lightweight layer or ornamental breeds. You can eat these, and the chicks will be very cheap, but you’ll spend a lot of time and money raising these birds, with very little meat as a result.
Sex
If you’re going to raise the Cornish-White Rock hybrid chicks, we feel it’s fine to order “as hatched” or “straight run” (which means no sexing, just sending chicks as they’re grabbed) because both sexes make good meat birds, with little difference in maturation rate. If you’re ordering other breeds, you may want to order cockerels (males). They grow a little faster and larger than females, and they may be cheaper.
Two specialty types of meat chickens require that the sex be determined:
- Capons: Capons are castrated male chickens. Castration used to be a popular method of producing tender, fat chickens more quickly. If you want to go this route, you need to order male chicks — probably White Rocks or another heavy breed — and learn how to caponize them. Castrating a chicken requires invasive surgery because a chicken’s testicles are inside the body. We don’t believe there’s any advantage in caponizing cockerels over using a Cornish-Rock hybrid, as far as meat taste and texture go, and the process is a bit complicated and inhumane.
- Cornish Game hens: These birds are a gourmet menu offering. Cornish Game hens are young, small Cornish pullets (females). You also can use Cornish-Rock hybrid pullets, with no difference in taste.
Choosing the right time of year to raise chickens
You can raise meat birds at any time of the year, and you can usually find the Cornish-Rock hybrid broiler chicks available somewhere year round. Some other breeds, however, may be hard to find in late fall and winter. You can incubate chicks from your own flock any time you have fertile eggs.
Fertility goes down in most breeds in the fall and winter.
Your climate and your housing method are two factors to take into consideration when choosing a time to raise meat chickens. Cornish-Rock hybrids take about 8 to 10 weeks from the day you get the chicks to butchering day. (Other breeds need up to 20 weeks to mature.) They come out of a brooder at 4 to 5 weeks. (See Chapter 14 for information on raising chicks in a brooder.)
Traditionally, meat animals are slaughtered in the late fall when temperatures are low and few flies are present, and fall is a good time to plan your first butchering. Cold weather reduces the smell, fewer bugs are present, and you won’t have feathers stuck to your bare, sweaty skin. Plus, if the temperatures are comfortable, you won’t be as inclined to hurry through things.
Meat birds, especially the Cornish-Rock broilers, are very susceptible to heat stress. If you live where summers are hot and humid, you may want to raise them early or late in the year, when conditions are cooler.
If you’re going to raise free-range or pastured meat birds, it’s best to have them out of the brooder and ready for their pens when the weather is normally dry and mild in your area. Your pasture needs to be growing well then for pastured chickens; avoid muddy times of the year.
You can raise meat birds in a dry, enclosed area in the winter as long as ventilation is good. Cold won’t hurt them unless it’s really severe — near 0 degrees Fahrenheit — for long periods, but they’ll have to eat more feed to make each pound of meat than birds raised in milder weather, and your costs for lighting will also increase.
Consider your time also when planning your meat bird project. If you’re very busy at certain times of the year, you may want to schedule the project for when you have more time.
Deciding how many chickens to raise
If you’re a beginner with raising meat chickens, start with 10 to 25 meat chicks. That number is a good-size batch for the typical family. After you’ve raised and butchered a batch or two, evaluate how well your family liked the meat, how you liked the raising process, and how the butchering went before purchasing a larger batch (say, 100 meat chicks). It really doesn’t make sense to raise only three or four meat chickens — it’s just not efficient in terms of time and money.
For that small, trial batch of meat birds, you may want to share a hatchery order with a friend or order from a farm store that combines orders. Generally, a minimum order of 25 chicks is required for shipping. If you also want layers or fancy chickens, you can combine chicks from those breeds with meat chicks to meet the minimum.
How many meat chickens you want to raise in a year depends on how many your family wants to eat. If your family eats two chickens a week, then 100 chickens will be just about right for the year. Although you can raise 100 chickens in one large batch, you’re better off dividing them in several batches over the year. Here’s why:
- You’re putting all your eggs in one basket (so to speak). Although large batches provide some economy in time and in larger purchases of feed, bedding, and chicks, if something goes wrong (such as a predator getting into the pen), you lose a year’s supply of meat.
Meat chickens don’t hold well — you need to butcher them before they get too old. For most meat chickens, that means before 20 weeks if you like tender meat. You don’t want to keep a bunch of them in a pen and just go out each Sunday and kill one. People did that before they had freezers, but then, they expected to eat tougher, stronger meat, too.
If you do want to do this for some reason, don’t use the Cornish-Rock cross meat birds. The longer they live, the more likely they are to die suddenly from a heart attack — and it’s not from seeing you pick up the ax.
For a large batch of meat birds, you need a large housing unit, a large cash outlay, and a large freezer. The housing unit will stand empty for a long period of time each year. If you send the birds out to be butchered, you’ll need a larger supply of cash to get it done than with a small group. Plus, if you butcher all at once, you need a lot of freezer space. And as meat gets older, it loses some quality — even when packaged correctly for the freezer.
Smaller groups of meat birds need smaller quarters, and they put less of a strain on your freezer.
If you do your meat birds in batches, you can have one bunch going in the brooder as the time to butcher the first batch nears, or you can skip several months between batches, to give yourself a break.
Caring for meat chickens
Caring for meat birds is a bit different than caring for other types of chickens. Their nutritional requirements are different, so you want to separate your meat birds from the rest — at least after they leave the brooder. Plus, because the meat birds won’t be around forever, it doesn’t make sense to get them situated in a pecking order only to have that all change when they leave.
The big, slow Cornish-Rock broiler-type chicks often get picked on by more active chicks in a mixed situation, and that stress may even be enough to kill them. Even if you’re raising a traditional breed with the intent of eating the males and keeping the females for eggs, you want to separate them when you can tell the sex.
Males without hens fight less and spend more time eating. You can also feed them like other meat birds and grow them a little faster without growing the hens too fast.
Housing
Meat birds need about 2 square feet of floor space per bird. More space is nice for active breeds, but the Cornish-Rock broilers aren’t very active. They don’t need roosts or nest boxes. Because meat birds are here on a temporary basis, the housing can be temporary, too, but it must protect them from predators and weather. See Part 2 for housing ideas.
Wire floors are sometimes used for meat birds for cleanliness, but they can cause breast sores in the broiler-type birds. Use a deep litter to cushion these birds, and keep it clean and dry. Because meat birds are prone to leg problems anyway, don’t use slippery flooring like tile, paper, and metal.
Meat birds, particularly the Cornish-Rock broilers, benefit from having their housing lighted from 18 to 22 hours a day. The large birds need to eat frequently to keep their metabolism going, and chickens don’t eat in the dark. The most recent research, however, shows that they need a short dark period, from 6 to 2 hours, in which they won’t eat. This schedule gives the bird’s metabolism a break and helps prevent sudden death syndrome. In cold weather, birds require more food, so keep the dark period shorter. Using a timer on your lighting is the best way to achieve this.
Birds on pasture are subjected to natural daylight and darkness, which is one reason they grow a little slower. (Remember, chickens don’t eat in the dark.) When days are long, this fact may not make a big difference, but when you’re raising meat chickens on pasture in early spring and late fall, it can make a big difference in the time needed to get the size birds you want.
If you’re putting meat birds in movable pens on pasture, you must take great care not to crush or run over birds when moving the pens. The Cornish-Rock crosses often move very slowly.
Nutrition
From the time they start eating, meat chicks need a high-protein feed. The protein percentage should be 22 to 24 percent for the first 6 weeks and a minimum of 20 percent after that. Broiler feed is also high in energy (fat), and using it reduces the pounds of feed required per pound of gain, compared to other types of poultry feed. To feed your meat birds, you can purchase commercial meat bird, game bird, or broiler feed. (It goes by different names in different places.) Starter ration or broiler starter refers to the feed with the higher protein content, and grower or finisher ration refers to the feed with the slightly lower protein content.
If broiler-type birds don’t get enough protein, their legs and wings may become deformed, and they may become unable to walk. They will need to be disposed of then because they won’t eat well.
If your brooder houses meat birds as well as other types of birds, feed the higher-protein meat bird feed to all the chicks rather than use a lower-protein feed.
Some meat bird starter feed contains antibiotics. One bag of medicated feed is okay to start chicks, especially if they seem weak from shipping. After that time, you can change to unmedicated feed if the medication worries you. No residue will remain in the meat when the chickens are butchered. Some people prefer to keep their chicks on medicated feed throughout the growth period, and some new medicated broiler feeds allow this feed to be fed right up to butchering. But check the label to see if the medication used requires that you stop feeding it a few days before butchering; if it does, switch the meat birds to an unmedicated feed the last few days.
In some areas, vegetarian and organic feeds are available for purchase. If they’re not available where you live, you may be able to have feed specially made for you, although certified organic feed has to be ground under special conditions and from organic grain. Generally, to have your own feed blend mixed for you, you must order a fairly large amount, usually 1,000 pounds. This amount can be hard to transport, store, and use before it goes stale and loses nutrition. For more about chicken feed, read Chapter 8.
We prefer to feed our meat birds pellets, crumbles, or mash, because it blends all the ingredients and prevents birds from picking and choosing what they like and wasting the rest. Feeding whole grains and scraps isn’t a good idea for meat birds.
Pastured and free-range poultry
If you have a well-managed pasture (not just a grassy spot in the yard), the pasture can furnish a large part of your meat birds’ diet. The birds will probably need some high-protein feed on the side, but the amount of feed will be greatly reduced.
For help in determining what type of pasture grasses to grow in your area, consult with your local county Extension agent. You’ll need the proper machinery to plant this pasture and maintain it. In principle, you’re producing a crop on the pasture and your animals are harvesting it.
It may take a little longer to get pasture-raised birds to a good eating size. Also, because pasture-fed birds move around a lot more than confined ones, their carcasses have more dark muscle meat and less fatty breast meat. The skin of the birds may be a bit more yellow due to pigments in the grass.
Free-range meat chickens that are just given the run of your land with no particular care taken regarding the type of vegetation they eat will vary tremendously in how fast they grow and how tender they are when butchered. The more exercise the bird gets, the tougher the meat will be.
If you want a good rate of growth in free-range situations, you need to provide some broiler feed. We don’t really recommend free-range conditions for meat birds. Managed pasture is much better if you want birds raised on grass.
Chickens must be frequently moved to clean pastures. How often depends on the weather, the rate of vegetation growth, and the number of birds. Move them before they eat all the grass to the roots or the pen gets too dirty.
When moving pastured chickens, you must take care not to harm them or stress them too much. Keep water available at all times, and make sure the birds have a shady place to go when the sun is too hot.
Stress management
Stress affects how fast your meat birds grow and may even kill them. Stress can come from temperature, crowding, disease, predators, or too much noise and confusion in the immediate area. All birds eat less if stressed and, as a consequence, grow more slowly. Even the stress of butchering should be kept to a minimum: The meat tastes better if the animal isn’t subjected to a lot of stress just before death. The Cornish-Rock hybrid broiler birds may keel over dead if their stress levels get too high.
 Broiler-type birds are subject to sudden death syndrome. The chickens are usually found on their backs, feet in the air. You may also notice a convulsion just before death. This condition results from a combination of a genetic weakness, electrolyte imbalances, and heart arrhythmia, and it happens more likely when birds are stressed by heat or other factors. It is also more frequent in males.
Don’t eat any meat birds that you find dead. There’s always the chance that the bird died of disease, and a carcass that sits around — even for a short time — may be contaminated by flies and other insects.
Home chicken raisers should avoid using medication to treat the stress-related problems of meat birds. Instead, they should improve management techniques to minimize stress. Don’t use antibiotics as a preventive for diseases — use them only to treat any diseases that come up. One of the reasons for raising your own meat is to avoid meat contaminated with antibiotics.
If you need to medicate your meat birds for any reason — whether by injection, with medication in the water or feed, or any other method — make sure you read and follow the exact label directions on the product regarding how long you must wait before butchering the birds.
You don’t have to rely on medication to keep your meat birds free of stress. Here are some tips for raising stress-free meat birds naturally:
- Place your meat-bird pens in a place that’s out of the way of noisy, busy conditions. Chickens may seem to adjust to busy, noisy locations, but their bodies still feel stress, and that translates to less weight gain and more problems with illness and sudden death.
Provide your meat birds with a clean space, and keep the litter dry. Large, heavy meat birds like the Cornish-Rock cross are prone to developing sores or blisters on the breast from the amount of time they spend sitting. Even birds in clean conditions develop them, but wet litter makes them more common.
Usually the blisters are found after butchering; most of the time, you can cut out this area after butchering, and the bird will be safe to eat. But if breast blisters appear infected or raw areas get bigger than a quarter on live birds, you may want to destroy them; we don’t recommend eating these birds.
- Make sure your birds’ environment has a comfortable temperature. Heat is a big killer of heavy meat birds, so make sure your meat-bird area is well ventilated. You may need to run fans in really hot weather.
- Develop a feeding routine, and stick to it. Routines reduce stress because the birds know what to expect.
- Don’t let pets and kids scare the birds. They may literally scare them to death.
- Keep predators out of the pens. Predators, obviously, are another source of instant death.
Planning for D-Day
Butchering time is often the hardest part of raising any type of meat. If you go into the project with the firm resolve that you’re raising chickens for meat, it’s easier. The first time is the hardest; after that, it does get easier.
These days, people who eat meat rarely participate in the killing of the animal that produced it. Don’t feel bad if you’re conflicted about killing a living creature that has been in your care to provide food for yourself and your family. It’s an issue that we all must deal with in our own way.
You can make the butchering process a bit easier for everyone involved by taking a few simple steps:
- Raise chickens bred specifically for meat. All the birds are destined to die from the beginning — you don’t have to pick and choose who lives and who dies. Your purpose for raising the animals is for meat, and you’re committed to this goal from the time you buy the chicks.
- Keep in mind that broiler-type chickens are an end product — they aren’t meant to grow to adulthood. If you did spare their lives, they probably wouldn’t live very long anyway.
- Approach the day of the killing in a calm, orderly manner, with the proper planning and equipment. It’s a solemn, purposeful occasion, not a fun-filled day.
- Keep very young children or kids who’ve gotten emotionally attached to the chickens away on killing day, especially the first few times you butcher. After you’ve gotten some experience, you’re sure of what you’re doing, and you can butcher calmly and neatly, it’s okay to introduce older, interested children to the process so they, too, have a sense of what happens when meat is produced.
- If you have children or other sensitive people in the household, we don’t recommend teasing them about the fate of the birds at butchering time or when they’re about to consume the harvest. Make it clear from the beginning what the chickens’ purpose is. But never, ever make someone watch the butchering or cleaning of chickens if that person doesn’t want to.
Some people can never kill anything unless it’s a life-or-death situation. If you fall into this category, send your birds out to be butchered. Be understanding if anyone, including yourself, doesn’t want to eat the chickens the day of butchering. After a short freezer stay, the eating is easier.
Families with children or sensitive people may find it easier to hire out the butchering and have the chickens returned home in a plastic bag ready to freeze. It may be easier for you, too — and that’s okay.
Knowing when your birds are ready
A chicken can be eaten at any stage of its life, but most of us want at least a little meat on our chickens. If you’re raising broiler-type birds on a good commercial feed, you can expect at least some of them to be ready to butcher at 8 weeks, and others soon afterward. Pastured, free-range chickens and breeds other than the Cornish-Rock hybrid take longer to reach a decent size.
How large you like your chickens to be for eating is a personal choice. A meat-type bird usually dresses out about 2 pounds lighter than when it was alive, so a 6-pound live bird yields a 4-pound carcass. Other breeds usually dress out at somewhat less.
If you like tender, small fryers, butcher birds at about 4 pounds live weight. If you like larger birds for broiling and roasting, butcher around that 6-pound mark. In any group of meat birds, some will be bigger than others. Males usually grow a bit faster and larger.
You can butcher the biggest birds first, especially if you’re planning on butchering in batches anyway, and let the small ones grow, or you can butcher all at the same time and use them according to size.
Don’t wait too long to butcher. Broiler hybrids need to be butchered by 14 weeks, or their huge size will start causing health problems. Other types of chickens just get tougher as they get older. When roosters start crowing or hens begin laying, they’ve finished growing, for the most part and won’t get any bigger — just tougher.
Deciding whether to hire a butcher or do it yourself
When your birds are ready for butchering, the biggest decision is whether to do the butchering yourself. You’re not alone if you dread this part of the chicken-raising process. And don’t feel like you’ve failed in your job if you decide to hire someone to handle it for you —nothing is wrong with hiring a butcher. That’s the approach we take ourselves.
In this section, we explain some of the reasons you may want to hire a butcher. Then we walk you through what you need if you decide to do it yourself.
Don’t try to do the butchering yourself if you don’t have everything you need to do it right.
Why you may want to hire the job out
You may have many good reasons for hiring someone to butcher your meat birds. One of the main reasons is time: A skilled person can do the complete job — killing, plucking, and cleaning — in a very short time, whereas it may take you hours to do your first few meat birds.
A bird can be plucked by hand, but a machine does it faster and cleaner, and most professional butchers have plucking machines. You can buy or make them too, but if you’re doing only a few birds a year, it’s a big expense and one you’re not likely to want to incur.
As you may expect, butchering is messy and smelly. It creates a lot of disgusting waste that has to be disposed of — something some people have a hard time doing on a small piece of property. And if you live close to your neighbors, they may object to butchering.
We find it worth the small amount of money it costs per bird to have a professional kill and clean our meat birds for us. No mess, no fuss — and we still have good, wholesome meat that we raised ourselves.
What’s involved in doing it yourself
Many people want to experience the whole process of producing meat at least one or two times, from the chick to the chicken fryer. If you believe you can do it, you probably can, even though you may be a little clumsy and slow at first. If you’ve butchered game or other livestock, you probably have a good idea of what you’re getting into; if not, read the rest of this chapter.
In a few urban locations, butchering may be prohibited. If you’re an urban chicken-keeper who has managed to produce some meat birds, you may want to check your municipality’s laws.
To do your own butchering, you need the following:
- The proper location: To butcher your chickens at home, you need to have the right location — and that isn’t your kitchen! You may finish the cutting and packing inside, but you need to kill and clean your birds outside your home. (For more on choosing the proper location, see “Choosing the location,” later in this chapter.)
- Plenty of water: Having abundant, clean water available at your butchering site is important. You use the water for filling the tubs to scald birds, to wash birds as you clean them, to fill containers to chill birds, and to clean up after the butchering is done. If water is available at the site, you’ll be less tempted to reuse water when you shouldn’t and will clean the birds more thoroughly.
Someplace to dispose of the waste: Wastewater has blood, manure, and bits of feathers and other things in it. If it’s legal to run the discharge to a sewer, you could do that; some people route it into the septic tank, and if you’re butchering ten or fewer chickens, that would probably work. (Taking a lot of butchering waste puts a big strain on home septic systems.)
If you can’t route the waste into your septic tank, the wastewater needs to flow into the ground somewhere. You may want to have a screen at the end to catch larger pieces for burial.
Don’t direct the wastewater onto vegetable crops or into ponds, lakes, streams, or old wells. Doing so is generally illegal.
You’ll also have to dispose of solid waste, feathers, heads and feet, organs, and so on from cleaning the birds. Put a big, lined garbage can near your cleaning station, with a lid to discourage flies and wasps. If you have room on your property, bury this solid waste 3 feet deep as soon as possible. Remove it from plastic bags first. If you can’t bury it, you need to wrap it in several plastic bags for disposal at a landfill. Make sure it’s legal to do so first.
Don’t try to compost feathers and guts. It can be done, but it’s very smelly and attracts pest animals. Bury it in the garden, but don’t spread it on the soil surface. And don’t try to put it into the garbage disposer. You’ll only clog it — imagine explaining that to a repairman. Plus, this waste shouldn’t be anywhere near your kitchen sink, for health reasons.
- Time: Butchering your first chickens will take you quite a bit of time, but when you get the hang of it, it should take about 15 to 20 minutes to get each chicken freezer ready. Plan for a lot more time than you think you’ll need so you don’t feel rushed. Your first few chickens may take an hour each, so plan accordingly and start small.
Labor: Standing, bending, lifting (maybe heavy lifting to empty chilling or washing containers), and repetitive cutting are involved in chicken butchering, but the average person should be able to handle the labor. Because the average home butchering involves small numbers of chickens, you probably won’t have to worry about carpal tunnel from handling the knife, but people with limited hand function from arthritis or injury may need some help.
If you have difficulty standing for long periods of time, you may be able to adapt your cleaning station to a seated position.
Hiring Out the Butchering
If you’re unsure of how to butcher a chicken or you just don’t want to, you can have your meat and eat it, too. In most areas, someone has made a job out of butchering poultry for other people. Don’t be embarrassed or ashamed if you don’t want to do the butchering yourself.
You may want to watch someone do it just the first time. Some people may even let you help them and teach you how to do it right. Even if you never intend to do it yourself, you never know when you may need the skill someday.
Finding a butcher
To find a butcher, you can ask at feed stores or ask neighbors with chickens who they use. A 4-H poultry leader or your county Extension office may provide a name. In more urban locations, you may have to drive a bit farther to get the job done.
In some areas, you can hire someone to come to your home to butcher, as long as you have the right facilities. Amish, Mennonite, and some ethnic communities often have people willing to do this.
In some areas, chicken-keepers band together and fund mobile processing units, usually in a converted trailer. You make an appointment to rent the trailer for half a day or so. It’s furnished with hookups for electricity and water and has all the proper equipment needed for butchering and cleaning poultry. This option can be inexpensive or expensive, depending on how the unit is funded and who’s allowed to use it. Your local county Extension office is the place to ask whether such facilities are available.
Places that butcher large animals rarely handle chickens, but they probably can refer you to someone who does.
Although in some areas you can find processors that offer USDA-inspected butchering, most of these places aren’t USDA inspected. Facilities that are inspected rarely accept birds except from contracted growers. USDA inspection really isn’t necessary anyway if you’re raising chickens for your own meat; it’s important only if you want to sell meat. So don’t let the lack of inspection stop you from using a certain processor.
Knowing what to expect
If you want to hire out the butchering of your chickens, arrange to take a quick tour of the butchering facilities. They need to be clean, without piles of waste or blood-spattered walls, and you shouldn’t see hundreds of flies buzzing around. It shouldn’t smell too bad (although even the cleanest butchering facilities have some smell if they’ve been used recently). Ideally, the facilities will be located in an enclosed building with running water. The best places have these features:
- Cement floors
- Walls that are easily cleaned
- Stainless steel sinks and counters
- Good lighting
- Provisions for heating water to scald birds
- Plucking machines
- Vats to chill the birds in ice water
Talk to the processor and ask the following questions:
- Do you guarantee that I’ll get my own birds back? If so, what precautions does the facility have in place to ensure that you do get your own birds back?
- How will the birds be packaged when I come to get them? Some processors ask you to supply bags to take the chickens home in. Others put several chickens in bags they supply, and still others bag each chicken separately. Most processors return whole birds to you, unless you have arranged for them to be cut up.
- If I want the feet, necks, or other odd parts, can you accommodate me? Most processors give you the liver, heart, and gizzards along with the carcass, but if you want these delicacies, ask to make sure.
- What are your requirements for drop-off and pickup? In some cases, processors want the birds delivered the evening before butchering. They may want you to pick up the processed birds at a certain time the next day. Others ask that you bring the birds at an appointed time.
- What are the processing fees? The fees vary widely across the country and according to what services, such as packaging, the processor provides. If you have several processors in your area, you may want to compare prices against facilities, services, and convenience of scheduling.
If your religion requires the chickens to be butchered in a certain way, hire a processor of your faith, or at least someone who is very familiar with the religious restrictions.
Most poultry processors don’t freeze the birds before returning them to you the way most large-animal processors do. They may also require that you furnish your own bags for taking the birds home. Smaller operations may ask that you furnish a cooler or large tub to cool your cleaned birds in.
You’ll need secure carriers for transporting your chickens and possibly for them to spend the night in (some processors furnish cages or carriers to hold birds at their place). The birds will be sleeping, so they don’t need a lot of room, but in hot weather, don’t pack them too tightly in carriers. Don’t furnish feed or water; the processor wants the crop to be empty. Your cages may be messy the next day when you pick them up, so plan to protect the car, if needed.
Most processors require appointments, and certain times of the year they may be so busy that they can’t handle everyone’s requests, so plan ahead. Thanksgiving time is usually busy, as is the time just after your county fair.
Your processor should be able to have your chickens butchered, cleaned, and back to you in 24 hours or less. Usually they’re killed in the early morning while they’re still drowsy and processed soon afterward. They should be kept chilled in ice water or by some other means and protected from flies and other insects until you pick them up. Don’t expect the processor to store the birds too many hours unless you make prior arrangements.
The birds should look clean, with few or no pinfeathers remaining, and you should see no more than an occasional small tear in the skin. On rare occasions, your processor may warn you about something he noticed when cleaning the birds, such as tumors, abscesses, or signs of disease. The carcasses of those birds should be separated from the others, and you may be advised to discard those birds.
Some processors may give you other advice. For example, they may advise you to butcher sooner or later or give you other management tips. Listen to them — they’re generally trying to help you.
At home, you may want to rinse the birds well, pat them dry with clean paper towels, and package them for freezing. Most chicken processors don’t cut up the birds, although some will do it for an additional fee. You can cut them up or freeze them whole. We discuss packaging and storing meat later in this chapter.
Preparing to Do the Deed Yourself
If you’re ready to try the butchering yourself, you need to make sure that you have all the proper equipment and that you’re prepared in advance. Doing a little planning makes the butchering much more efficient.
Choosing the location
The ideal butchering spot is a small building with good lighting, electricity and water, and some kind of drainage for wastewater. A nice shed, garage, or barn is ideal for butchering, but you can also set up an outdoor butchering site. Look for a level, well-drained spot with drainage away from the site.
If you decide to do your butchering outdoors, make sure the site is beyond the view of neighbors or passersby, however tolerant they seem. You may want to put up a temporary privacy screen.
The butchering site may remain attractive to insects and stay a bit smelly for at least a short time, so it’s best not to use the kids’ playhouse, the back porch, or the garage where you plan to host a garage sale next week.
The butchering site can be far from the house, but the cleaning spot should be fairly close to the home so you’re close to the tools you’ll need for proper cleaning. When people become adept at the killing part, they generally prefer to keep the kill spot close to the cleaning area to save steps. Your method of killing will have some bearing on that decision (see “Looking at your options: Killing methods,” later in this chapter).
You need a water supply for the butchering process. This setup can be as simple as a garden hose run to the site with some sort of shut-off valve. If you can arrange some sort of sink structure big enough to hold a chicken, you’ll improve your butchering facilities tremendously. This sink will have to drain water somewhere besides on your feet. Having electricity available is a big bonus.
Gathering equipment and supplies
Some people may tell you that all you need to butcher is a knife — and, in an emergency situation, that’s probably true. You can do most of the work involving butchering a chicken with your hands and a knife. But just like any other endeavor, the right tools make the job easier, quicker, and safer.
You can purchase many of the tools we mention in farm stores, poultry supply places, or even regular retail stores. Sporting goods stores may also be a place to look for some of the tools. Don’t forget to look for used tools at garage sales, in your local paper, or on craigslist or other online sales sites. If you have any older farming relatives, they may have some butchering equipment to pass along.
Killing equipment
You can kill a chicken with your hands (see “Looking at your options: Killing methods,” later in this chapter), but most people prefer using a knife or an ax. You also need a way to keep that knife or ax sharp. If you use the ax method, you need a solid surface to lay the chicken’s head on that’s a comfortable distance off the ground for you. Many people find a large stump or use a sturdy stool or small table. You’ll be hitting it with the ax, so it must hold up to that.
You may opt to use killing cones (cone-shape metal or sometimes plastic holders with an open bottom; see Figure 16-1). The chicken is inserted head down either to kill it or after it’s killed to drain the blood (or for both reasons). The cone keeps the chicken from running around with its head cut off or splattering blood everywhere. The cones are nailed or hung somewhere off the ground. Most homeowners can make cones from thin sheet metal if they can’t find them to buy. It’s nice to have a couple sizes, to hold large and small chickens. You may want just a few or many, depending on the number of chickens you usually butcher at a time.
Instead of using cones, some people have a rack or a rafter with nails or hooks in it. The dead chicken’s legs are tied together with a piece of rope or wire, and it’s hung on a nail to bleed out. The rack or cones need to be at least 3 feet off the ground.
You need some sort of bucket under each chicken to catch the drained blood. Any kind of bucket will do, but blood may stain light-colored plastic.
Finally, you need a garbage can to hold waste.
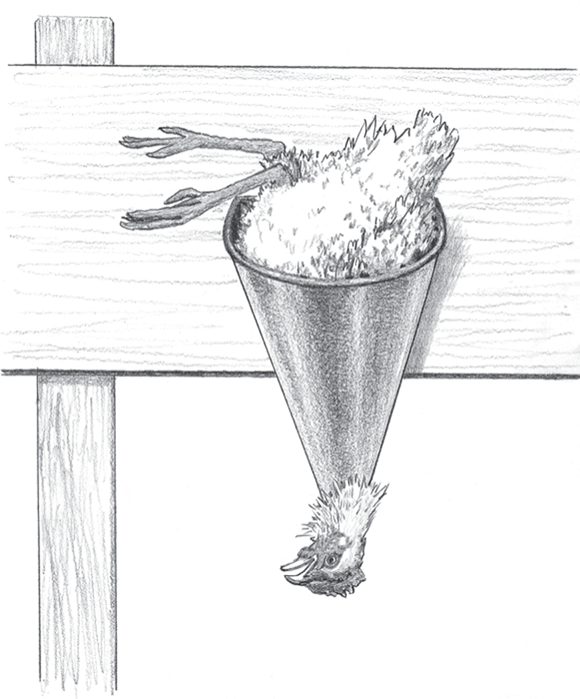
Illustration by Barbara Frake
FIGURE 16-1: Chicken in a killing cone.
Plucking equipment
Most home chicken butchers pluck their birds by hand, although plucking machines and plans for making them are available. In some areas, you can also rent plucking machines.
The most important tool a home butcher needs for plucking is scalding hot water and a way to keep it hot and clean. Even if you use a machine plucker, you need to scald the birds first.
You need a large metal container big enough to immerse a whole chicken held by its legs without having too much water overflowing. If you’re going to heat the water elsewhere and pour it in, you may want to use a plastic or wood container.
The most labor-intensive and dangerous way to bring out the scalding water is to heat it inside and carry it out to your big pot. Most people prefer some way of heating it on-site. You can use a propane grill, propane camp stove, or electric hot plate to heat water. A new method of heating water for butchering is to use one of the turkey fryers on the market.
Many people prefer to heat water in one container and pour it into the container used to dip the birds into. Others use just one unit, dumping the water in the heating unit when it’s dirty and adding new water. If you want continuous production, your heating element needs to be strong enough to heat the water to about 140 degrees Fahrenheit in the time it takes to clean one bird.
You need some sort of thermometer to monitor the heat. You can purchase a candy or deep fry thermometer in most large stores. One with a clip to hold it on the pot is ideal.
If your heating unit is propane, you need propane tanks and propane to run them. If your plucking machine or heating element is electric, you need access to electricity. A lot of water is involved in butchering, and water and electricity don’t mix, so make sure any extension cords or plug outlets are located where they won’t get wet.
Cooling and cleaning equipment
After you scald the chickens and pluck the feathers, you need a table to work on while cleaning the birds. Make sure the table is at a comfortable position for you to work. You can use a picnic table, a folding table, an old countertop, boards on sawhorses, or any other platform that works for you.
Here’s a list of all the equipment you need for cleaning your chickens:
A good knife: You need at least one good, sharp knife for cleaning: either a boning knife or a butcher knife. A boning knife with a 5-inch blade and a butcher knife with an 8-inch blade are common choices. You may want both, and a meat cleaver is also handy at times.
Sporting goods stores sell good knives for cleaning and butchering. Heft them and see what you like. A knife should fit your hands well. A strong, well-made knife is worth the additional cost.
- A knife sharpener: Dull knives cause accidents more often than sharp ones. A butcher’s steel is a piece of rounded metal that you hold in one hand and stroke the blade of your knife over to keep it sharp. It doesn’t sharpen a dull knife, but it helps keep an edge on a sharp one and should be used after butchering each bird.
An outside sink or container with a drain: After you clean the birds, you need to rinse them. Many people use an old kitchen sink or laundry tub. Some fit a drain in the bottom of a big plastic tub or half-barrel. The drain should connect to a pipe or hose that leads wastewater away from the person cleaning to a suitable discharge site. It should be at a comfortable working position for you.
Some people just use a garden hose and rinse the birds at their cleaning table. This process gets a bit messy underfoot after a while, unless you’re on a well-drained surface and you keep that hosed clean, too. Rubber boots may keep your feet dry and keep you from slipping.
- A container full of ice water: After the birds are cleaned and rinsed, they need to be cooled. You’ll need large containers of ice water for this. Clean plastic tubs, picnic coolers, or barrels will work. You’ll need very cold water — preferably ice water — in the containers. So either buy bags of ice or make ice in your freezer ahead of time and store it.
- Soap: Be sure to wash your hands frequently during the butchering process to avoid bacterial cross-contamination of the meat. Wash between butchering stages such as plucking and cleaning. Wash if you use the restroom and, of course, before you eat or smoke. And wash well when you finish the job.
- Plastic gloves: If you’re squeamish, you may prefer to wear gloves.
- A spray bottle with a mixture of one part unscented chlorine bleach and two parts water: Use the bottle to clean the table if it gets contaminated with feces from a punctured intestine or contents of the crop.
- Paper towels: Paper towels are handy, especially if you don’t like wiping blood on the back of your pants.
- A waterproof apron: You can get an apron at janitorial supply places, at some feed and sporting goods stores, or from a gardening supply catalog. Wear old clothes that you don’t mind getting stained, even with your apron.
Packaging/freezing supplies
Packaging supplies for chickens are generally plastic freezer bags. Some people are now using vacuum-sealed bags. If you want to, too, you’ll need a machine that does the vacuum sealing; they’re quite common now in small appliance stores. Size the bags according to how you want to store the chickens. A whole chicken generally needs at least a gallon-size bag, and more likely a 2-gallon bag. If you cut up the chickens before freezing, you can use smaller bags.
Buy a waterproof, permanent marker to write the date on each bag. If you cut up the chickens, you can use butcher’s paper, heavy brown or white plastic-coated paper, to wrap the pieces. You tie it with string or special tape that’s used to seal packages.
Following the Play-by-Play of Butchering Day
D-day has arrived. You have all the necessary equipment, your butchering station is set up, and you’re ready to begin. This section explains exactly what to do on butchering day.
Beginning with the kill
Most people are afraid that they’ll botch the killing, and the chicken will spring to life as they start to clean it. Trust us: It will never happen. And while we can’t say there’s no pain, the pain is brief. When you butcher at home, you have the chance to end the bird’s life in a calm and dignified way, unlike the chaotic mess of a commercial poultry processing plant.
Choosing the best time of day
We recommend that you kill your birds in the very early morning. Adjust inside lighting the night before so that it doesn’t come on until you get inside to gather the birds. You’ll be able to pick up sleeping chickens very easily. Gather them and kill them while they’re still in a drowsy stupor. Kill all the birds you’re going to butcher and have them hanging up to bleed out before daylight, if you can.
If the before-daylight kill isn’t practical for you, at least keep the catching simple by going out and catching the birds the night before, either picking them up in the pen after dark or catching them just before nightfall and confining them in carriers or cages. Put them in a comfortable, preferably dark place and don’t give them food or water overnight. Kill them as soon as you can in the morning.
Catching the birds the night before lets them and you calm down. If you have to chase birds all over, they’ll be very agitated, and you’ll be hot, tired, and maybe covered with mud and chicken poop. You’ll have lost time that you could have spent cleaning and packaging the birds. You may be very ready to kill the birds at that point, but it’s better not to do it in revenge. You’ll be calmer and less likely to rush things or make mistakes if the chasing and catching are followed by a good night’s sleep before the butchering.
Birds held in a confined, darkened area will be calm and easy to handle. Move slowly and talk calmly while removing each bird from the cage, and disturb the others as little as possible. Birds that are frightened will fight back and frantically try to escape. Research has shown that animals killed when they’re in a calm state actually bleed out and clean easier — and taste better, too. Providing a calm and relaxed environment is a humane way to do butchering.
Don’t feed your chickens the night before you butcher them. Unless it’s very hot, don’t give them water, either. Cleaning birds is much easier when their crops and intestines are empty.
Looking at your options: Killing methods
Killing methods are hotly debated among home meat producers. You have several good options for killing chickens, and everyone seems to have a method they prefer. Different cultures have different ways to kill chickens, too. Some religions have very strict rules that must be followed both for the killing and butchering of animals.
If you’re Jewish, Moslem, or Hindu, speak to a religious leader to find out how you should kill and butcher your chickens.
For the most part, the common methods of killing described here are equal in terms of the amount of pain or distress they cause to the bird. However, some methods may not appeal to you. It’s actually not too hard to physically kill a chicken, but it’s often very hard mentally for the first-time butcher. Either you become accustomed to it or you don’t. If it’s too hard for you, remember that you can find people who will do it for you.
Some methods you shouldn’t use under any circumstances:
- Using electrocution or a stun gun doesn’t work well and often doesn’t kill the bird.
- Using gas of various types contaminates the meat.
- Shooting a chicken is a senseless waste and hard to do humanely.
- Drowning is inhumane.
- Using power tools to cut off the head creates a tremendous mess, and these tools aren’t designed to cut through skin cleanly — they rip and shred instead.
USING AN AX AND A STUMP
You need a stout, sturdy stump or table. Put two large nails in it just far enough apart to hold a chicken’s head. Some people prefer to stretch a wire or heavy cord across the stump and slide the chicken’s head under it.
You also need a sharp ax. It doesn’t have to be a large, heavy ax, especially if you’re a small person. A meat cleaver or machete also works, as long as it’s sharp.
Here are the steps to take:
- Pick up the chicken by its hind legs and hold it upside down for a minute until it stops struggling.
- Pick up the ax in one hand while still holding the bird in the other (still upside down).
- Place the chicken on the stump quickly, with its head between the nails or under your wire.
- Pull back on the legs slightly with one hand, stretching out the neck.
With the ax in the other hand, strike the neck quickly and decisively just below the head.
You need to cut through the major artery, but you don’t need to completely cut off the head for the bird to die. Most people, however, remove the head.
In the past, people released the birds’ feet, and the birds jumped up and ran around with their heads cut off — yes, they can do that by nervous “memory” until they bleed out. Rest assured, the birds were dead and didn’t feel anything. But this is messy — you need an area where you don’t mind blood spattered everywhere, and the sight of a chicken running around this way is traumatic to many people.
Instead of letting the birds run around, we prefer to place them neck down in a killing cone (see “Killing equipment,” earlier in this chapter) to bleed out, with something under the bird to catch the blood. Or you can tie the legs together and hang them over a hook by the legs. They may twitch or flop their wings a bit, but they’re dead: It’s just residual nervous activity. This is much cleaner and less traumatic to the observer.
USING KILLING CONES AND LETTING THE BIRDS BLEED OUT
In this method, the bird is picked up by the hind legs and inserted into the cone with its head out the bottom.
Don’t leave the bird in the cone more than a few seconds before killing it, or it may escape, unless the cone is so deep it can’t get its feet over the edge.
You can either slit the neck with a knife or lop off the head with heavy shears:
- With a knife: Stretch the neck out and cut with your knife from the front of the neck toward the back, right below the head. The knife must be sharp, and you must use a firm, steady hand. Don’t stab; slice instead. You don’t have to cut the neck all the way through.
- With shears: Stretch the neck and quickly cut off the head with something like heavy pruning shears. You need tension on the neck to do this well.
If you don’t remove the head, the bird may experience some distress until it bleeds out, but it will quickly lose consciousness. You may want to tie the legs together if the bird’s head isn’t removed, unless the cone is deep enough to prevent the bird from getting its feet on the edge to push itself out. The sides of the cone prevent the bird from flopping around and keep it calm. When blood stops flowing, the bird has bled out. This process usually takes several minutes.
Some people insert something like an ice pick or large screwdriver into the chicken’s mouth, plunge it through the roof of the mouth into the brain, and twist it before cutting the bird’s throat. The object needs to go toward the back of the head, not straight up. This strategy is supposed to immediately cut off any pain or feeling the bird may have. If you do it right, it probably does, but if you botch it, you’re probably causing more pain than if you didn’t do it. We don’t recommend this practice.
OTHER METHODS
You may opt for one of these other killing methods:
- Killing with a stick: Put a thick stick like a broomstick on the ground, lift one end, and place the neck of a chicken on the ground under it. Hold on to the chicken’s feet. Now bring one foot down on the stick quickly, while pulling upward on the chicken’s feet quickly and firmly. This should break the chicken’s neck. Put it in the killing cone or hang it up by the feet, slit the throat, and let it bleed out.
Wringing the neck: You can hold the chicken’s feet in your left hand, letting the bird dangle upside down. Slide your right hand down the neck to just below the head, and grasp the neck firmly. Now jerk the head down and then sharply back up while twisting it at the same time. This method is generally referred to as “wringing the chicken’s neck.”
If you do this too hard, you’ll pull off the head, which doesn’t mean much but can upset some people.
In all the hand-killing methods, you still need to remove the head or slit the throat to let the bird bleed out.
Removing the feathers
You have to pluck the bird (remove its feathers) before you clean the bird. Do the plucking as soon after you kill the bird as possible. Immerse chickens in heated water to loosen the feathers from the skin before plucking.
For a person who kills only 1 to 25 birds at a time, hand-plucking is the easiest and cheapest method (and it’s the method we walk you through here). If you’re going to process more than that in one day, you may want to invest in a plucking machine. In most of these, the bird rotates around a series of rubber “fingers” in a drum. You can buy the machines in poultry supply catalogs, or if you’re willing to put it together yourself, you can buy parts and instructions for building a plucking machine.
In the following sections, we walk you through the procedure for removing a bird’s feathers.
Scalding
In a large container big enough to immerse a chicken, heat water or add heated water. The water should be about 140 degrees Fahrenheit. If the water is too cool, the feathers are hard to remove. If the water is too hot, the skin will start to cook, and it will tear as you pluck.
Holding the chicken by its feet, dip it in the water to cover all feathered areas. Slowly count to ten. Remove the bird and try pulling out the wing feathers: If they come out easily, begin plucking all the other feathers. If they don’t slide out easily, dip the bird again.
Change the water when it looks dirty or becomes cool. Scalding is quite smelly. Be careful not to drip the water on yourself, spill it, or get your fingers in the pot while dipping the bird.
Hand-plucking
You may need rubber gloves to handle the hot, wet bird. Grasp feathers and pull them out in the direction they were growing, working as quickly as you can. Try not to grab the skin. Keep plucking until you’ve removed all the feathers.
Some immature feathers, called pinfeathers, may be hard to remove. They look like a thick pin in the bird’s skin. Most broiler-type pinfeathers are white, although colored birds may have dark pinfeathers. Grasp them with your fingernails and pull them straight out, or if you don’t have fingernails, use tweezers or needle-nose pliers. You can also place a flat blade, like that of a butter knife, on one side of the pinfeather and put a finger on the other to pull it out.
Cleaning and inspecting the bird
Take your scalded, plucked bird to a clean table and lay it on its back. With the butcher knife or cleaver, chop off the bird’s feet at the first joint. You don’t go through bone; you go through the cartilage of the joint, separating the upper and lower leg bones. Discard the feet unless you like to cook them. If so, place them in a container for later skinning.
Checking out the flesh
How much flesh a chicken has and the size of its breast vary by breed and age. If you’re used to store-purchased chicken and you’re butchering a breed that’s not generally raised for meat, the breast of the bird may look small and skinny to you. This appearance is normal.
The drumsticks of birds raised on pasture may look darker and larger than those of Cornish-Rock broilers, which are what commercial chicken comes from. The legs of other meat breeds and nontraditional meat breeds may look longer also. This difference is also normal.
The age a bird was butchered and its feeding program determine how fleshed out it was. Some breeds of birds never achieve a lot of flesh on their bones. Cornish-Rock meat birds should be quite plump and heavy by 8 to 10 weeks; if not, something is wrong with your feeding and management. Most heavy breeds of traditional chickens finish growing at 20 to 25 weeks.
Examining the bird for signs of disease
When you’re butchering your birds, you should be examining the carcass for both signs of disease and signs that your management program is working well. Modern meat birds aren’t alive long before they’re butchered and thus have less chance to pick up a disease or develop other problems, but it doesn’t hurt to at least look over your carcasses and their organs carefully.
A healthy carcass has white or yellow skin. Chicken skin is normally loose and thin. The skin and fat of chickens raised free-range or pastured usually have a deeper yellow pigment. A healthy carcass may have bruises on the skin that can happen during the killing process, but a lot of bruises mean your birds aren’t being handled correctly.
Breast blisters on meat birds are fairly common. They look like a blister on the skin with clear fluid. They’re superficial blemishes and can be cut out, and the meat is safe to eat.
Silkie chickens aren’t often eaten by home chicken owners, but in some cultures, they’re a delicacy. Their skin is bluish black, no matter what color their feathers were.
Some conditions render a chicken unsafe to eat, so keep an especially careful eye out for the following:
- Abscesses are lumps filled with pus either outside or deep inside a body. Don’t eat birds that have abscesses. Abscesses can happen because of an injury or from disease, but either way, the carcass is unsafe to eat. If many birds have abscesses, something is wrong in your management — check your housing for rough objects and don’t crowd your birds.
- Tumors can be hard or soft and can be found anywhere on the body or on an organ. Some may contain fluid. Don’t eat birds that have tumors. Don’t mistake forming eggs for tumors, though. In older hens, some eggs may be forming in the oviduct, near the backbone of the bird. They can range in size from that of a marble to an almost fully formed egg. If you look inside the lump and you see egg yolk, it’s a developing egg. In some cultures, these are considered a delicacy and are saved to be eaten, but most people toss them out.
- The liver of a healthy chicken is reddish brown. If it’s very pale or mottled looking or it has white spots, the chicken was diseased. Most other chicken organs don’t have much to tell you.
- Open sores or wounds mean the chicken isn’t good to eat.
- An outpouring of straw-colored fluid when you open the tiny hole in the back of the bird to remove organs during butchering means that the body cavity filled with fluid because of a disease process. Don’t eat the bird.
- A butchered bird that was left for more than 1 hour at temperatures above 40 degrees Fahrenheit should be discarded.
- Any bird that was partially cooked from being scalded too long or at too high a temperature should either be completely cooked immediately or discarded.
Don’t eat chickens that died of unknown causes or that were killed by predators. Birds that looked or acted ill before butchering are also unsafe to eat.
Removing the head, neck, and oil gland
If the bird still has a head, you need to remove it. What you do with it depends on whether you eat chicken necks:
- If you like to eat necks: Carefully remove the crop and the esophagus and trachea tubes before detaching the neck. Chop off the head just below the beak. Try to slide your knife between the vertebrae instead of cutting through bone.
- If you throw out necks: You can just cut through the whole neck close to the body without the hassle of removing the head or fussing with the tubes and crop.
If you’re using the neck, slit the skin on the underside of the neck and then cut it off near the body. On the underside of the bared neck, you should see two tubes, like small straws. About halfway down the neck, you’ll see a small bulge if the crop still has food in it. Don’t squeeze or cut through the crop, if you can help it, or the food inside will contaminate the meat. If the crop isn’t full, it will be hard to see.
If crop contents get on the meat, take the carcass to the water source and thoroughly rinse it. Clean up the table with the bleach solution in the spray bottle and rinse before proceeding.
At the end of the neck near where the head once was, find the two small tubes. Cut between them and the rest of the neck at the top, and then pull carefully away from the rest of the neck as you slide your knife or finger down behind the tubes to break the connection all the way down the neck. The trachea is stiffer and has ridges. The esophagus, which the crop is attached to, is thinner and flexible: Make sure you follow down the esophagus to detach the crop from the neck flesh.
When you’ve detached the tubes and crop from the flesh all the way to the shoulder, cut them off as close to the body as you can and discard them. You can the leave the neck on or remove it and put it in a container to save. Don’t worry about the ends of the tubes poking through the neck hole; when you pull out the organs, these should pull out, too.
Now you need to deal with the oil gland. It’s a bright yellow spot on the back of the tail and the bottom of the spine. Lay the bird on its breast. Either remove the whole tail at the spine and discard it, or, starting from the spine, use your knife to slice under the oil gland, down and past the tail, and cut off the gland, leaving the tail on.
Removing the organs
Your bird should be minus head, neck, and oil gland now. Place it on its back on the table, butt end facing you. Pull up on the flesh and skin over the top of the vent, or butt. With a sharp knife, make a shallow slice across the back of the bird, just above the vent. Don’t make it too wide at this point, and don’t push too deeply — you want to cut through the skin and flesh to make a small hole to the body cavity. Hold the knife across the bird, not pointing down or poking into it.
When you have a small hole, put your fingers in it on both sides and gently pull apart the skin and flesh. If chicken poop comes out at this point because the bird wasn’t empty before you butchered it, or if at any time when you’re removing the intestines you break them and poop comes out, you must take the bird to the water source at once and thoroughly rinse it. Try to hold the bird downward while doing this so poop or contaminated water doesn’t run into the body cavity. This is why running water is better than a bucket of water to rinse with. Many people use a mild liquid soap to wash the carcass when this happens. You must rinse completely if you use soap.
Place the bird in a clean container while you use your bleach spray to clean off the table before continuing. This kind of mess quickly teaches you to starve your birds at least 12 hours before butchering.
Now that your hole has been widened, slide your whole hand, fingers out straight (yes, your whole hand will fit in all but Cornish Game–size hens), into the bird tight up along the backbone as far as you can, preferably to the neck. Slightly curl your hand and rake — don’t squeeze and pull — the organs back toward the rear. Most of the organs will come out in a big clump. They will be attached to the vent by the intestines. Move them to the side and carefully cut around the vent in a circle. Then discard the whole mess.
If you’re going to cut up the bird for cooking anyway, you can simplify organ removal by splitting the bird open. You can use a knife or a heavy-duty pair of scissors for this. Turn the bird on its breast and, starting at the rear, cut through the backbone all the way to the neck. You must have a steady hand and cut very shallowly — you don’t want to cut into the organ mass. Split the bird open with your hands and then remove the organs.
Some people save the heart, liver, and gizzard for eating. If you like them, separate them into a clean container or plastic bag. The liver has two lobes with a small, green, pointed sac between them. This organ is the gall bladder. If it breaks when you clean the bird, any meat it touches will be stained green and will have a bitter flavor. Before saving the liver to eat, carefully cut it out.
Gizzards you save should be slit open. They may have stones, grain pieces, or foreign objects in them to be removed. They also have a yellow lining that you should remove.
Put your hand back up inside the bird to remove what’s left. Usually the heart and lungs are still in there, sometimes with bits of other things. The lungs adhere to the ribcage very closely and can be hard to remove. You need to get a finger between them and the ribcage wall. If you like to eat the heart, save it in your clean container. Some people trim off the wing tips and remove fat under the skin near the large opening at this point.
Now take the carcass to your water source and rinse the inside cavity and the outside carcass thoroughly. Place your cleaned bird in cold water for chilling. The water should totally cover the bird so no parts are exposed to insects. Chicken should be chilled as soon as possible after butchering.
Some people believe that aging the bird a day or two in a moderately cold temperature, such as that of a refrigerator, before eating or freezing makes for more tender and flavorful meat. We don’t believe that young birds, especially the Cornish-Rock hybrid broilers, need this.
Packaging Home-Butchered Poultry
Whether you butchered your birds yourself or had someone do it for you, you need to properly package that good meat so that you can store it safely until you’re ready to eat it. The most popular way to store home-butchered poultry is by freezing it, with canning a distant second. In this section, packaging refers to birds that are going to be stored by freezing.
After you’ve cleaned your birds, you need to chill them to bring the body temperature down to as close to 40 degrees Fahrenheit as possible. When the birds are cool, you can begin to package them for storage. Packaging the chickens inside your home is fine, and it’s probably the easiest way to go. Some people do cut up the birds where they butcher them, and some even package them there, but most put on the finishing touches in the home.
Rinsing and checking the chicken
Whether you bring the birds in from your home-butchering site or back from a processor, you first need to give them another good rinsing and check them over. Before placing the chickens in your kitchen sink, scrub it out with a solution of one part bleach to three parts water; then rinse with hot, soapy water. Believe it or not, most kitchen sinks have as much bacteria as your toilet bowl. Also scrub and rinse any counters or tables you will be working at.
Use cool running water to rinse the inside cavity of the chickens as well as the outside. Check for remaining bits of organs and pinfeathers, and remove them. Place the birds on some clean paper towels and pat them dry with other clean towels, inside and out. It’s better to use disposable towels when working with meat and discard them after each use because cloth towels can spread bacteria.
If you have organs to store, such as the livers, wash them in cool water and drain. If the gizzards weren’t opened during butchering and you want to store them, slice them open, remove any foreign bodies inside, and remove the yellow liner inside the gizzard.
Cutting the chicken in a usable fashion
If you don’t eat the necks, backs, tails, wings, or other parts, why store them? If you just use them for soup or broth, store them separately. Cutting up chickens conserves space in the freezer and makes preparation for cooking easier. Of course, if you like the look of a whole roasted chicken, you may want to do minimal trimming, such as removing the neck and tail before storing.
Some people prefer to separate parts of the chicken with breasts in one package, legs in another, and so forth. Others cut up a chicken and store all the parts from one chicken in one package. How you like to cook your chicken dictates how you package the parts. You also need to consider the number of parts per package.
You need sharp butcher knives or boning knives for cutting chicken. Try to make your cuts so they separate parts between joints rather than sawing through bones. You have to cut some bones to separate breasts from the back. Put your parts in clean bowls or pans until you’re ready to package them. Most people use plastic freezer bags to package chicken for freezing. (For more tips on packaging home-butchered chicken, check out the extra article at www.dummies.com/extras/raisingchickens.)
Avoiding freezer overload
If you’re going to butcher many chickens at a time, you’ll probably need more than the freezer space that comes with your refrigerator. Chest and upright freezers work equally well. How many cubic feet you need depends on what you intend to store. Buy the most energy-efficient freezer you can afford. In the long run, it saves you money.
Home freezers aren’t meant for freezing huge quantities of meat at a time. Don’t start with an empty freezer, stuff it, and expect it to freeze your meat correctly. Chicken should be chilled to 40 degrees Fahrenheit or lower before you attempt to freeze it.
Turn on an empty freezer a day before you intend to use it. Check your owner’s guide for the recommended number of pounds to freeze at one time. If you try to freeze more than that, the meat may take a long time to reach the correct temperature. This delay gives bacteria a chance to grow, affects the quality of the meat, and, even worse, may burn out the freezer’s motor.
So what do you do if you have 100 pounds of chicken to freeze and the directions state a limit of 30 pounds? Put 30 pounds in the freezer and try to spread it out so most of the package surface is exposed. Keep the rest in your refrigerator or in ice chests with ice. When the first batch is frozen hard, which should be in 24 hours, then condense that and add a second batch. Continue until all the chicken is frozen (note, however, that you need to complete this process within 4 to 5 days).