Chapter 4
Using the Desktop Environment
In This Chapter
![]() Starting and navigating the desktop environment
Starting and navigating the desktop environment
![]() Using external storage devices in the desktop environment
Using external storage devices in the desktop environment
![]() Using File Manager and Image Viewer
Using File Manager and Image Viewer
![]() Browsing the web
Browsing the web
![]() Customizing your desktop
Customizing your desktop
![]() Logging out from LXDE
Logging out from LXDE
The quickest way to start playing with your Raspberry Pi is to use the more visual desktop environment, which is called LXDE (short for Lightweight X11 Desktop Environment). LXDE is part of the recommended Raspbian Linux distribution for the Raspberry Pi (see Chapter 3). LXDE is designed to be as efficient as possible in its use of memory and the processor. That makes it perfect for the Raspberry Pi, which is limited in both respects compared to many modern computers.
The desktop environment works in a similar way to the Windows or Mac OS operating systems, which let you use icons and the mouse to find and manage files and operate programs. That makes it relatively intuitive to navigate, and means you can easily find and try out some of the software that comes with your Linux distribution.
In this chapter, we talk you through using the desktop environment and introduce you to some of its programs.
Starting the Desktop Environment
When you switch on your Raspberry Pi, it usually takes you into the command line interface (see Chapter 5), which enables you to control your computer by typing in instructions for it. You might be asked to enter a password first (see Chapter 3), but when you get to the prompt (pi@raspberrypi ~ $), you should type in startx to enter the desktop environment. It takes a moment or two to start and the screen might go blank for a short time.
Navigating the Desktop Environment
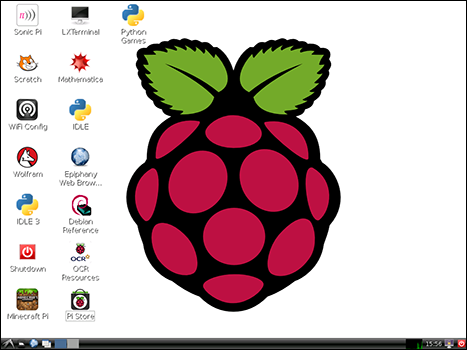
Figure 4-1 shows the LXDE desktop environment. The giant raspberry logo in the middle of the screen is just a wallpaper (a decorative background image on the screen), so don’t worry if you see a different image there.
The strip along the bottom of the screen is called the taskbar, and this is usually visible whatever program you’re using.
LXDE Foundation e.V.
Figure 4-1: The desktop environment, LXDE.
Using the icons on the desktop
Down the left of the screen you can find icons that provide rapid access to essential programs, including your web browser, programming tools, and some reference guides and tutorials. These programs are
- Sonic Pi: This is a programming language for creating music. See Chapter 14 for a guide to making your own tunes with it.
- Scratch: This is a simple programming language, approachable for people of all ages, which can be used to create games and animations. Chapters 9 and 10 introduce you to Scratch and show you how to make your own game.
- Wolfram: This is a programming language that aims to incorporate knowledge into it, so programmers can get results more quickly. You can find out more about it at www.wolfram.com/language/.
- Mathematica: Used for scientific and technical computing, Mathematica is based on Wolfram. See the bonus chapter online for more information on Mathematica. This book’s Introduction explains how to access the online materials on the companion website. There’s also a short introduction to Mathematica in Chapter 19.
- IDLE and IDLE 3: These programs are used for programming in the Python programming language. See Chapters 11 and 12 for advice on using these and getting started with Python.
- Minecraft Pi: The Raspberry Pi version of world-building game Minecraft, which you can program using Python, as you see in Chapter 13.
- WiFi Config: The WiFi Config tool is used to set up a wireless Internet connection. You use it together with a Wi-Fi dongle that you can plug in to a spare USB socket on your Raspberry Pi’s USB hub. You can buy a compatible Wi-Fi dongle from www.thepihut.com, among other places. See Chapter 3 for a guide to setting up Wi-Fi.
- Epiphany: This is a web browser. We cover it in greater depth later in this chapter.
- LXTerminal: This opens a window you can use to issue instructions through a command line (see Chapter 5) without leaving the desktop environment. This is handy if you want to do something quickly using the command line, but you don’t want to exit your desktop session to do it.
- OCR Resources: OCR is an exam board. Double-clicking this link takes you to its website, where it has published some teaching resources and recipes for simple electronics projects.
- Debian Reference: The Raspbian version of Linux is a Pi-specific version of the Debian distribution, so this icon gives you a guide to using Linux on your Pi. The documentation is stored on your SD card, but appears in a web browser like a website. To get started, double-click the icon and then click the HTML (Multi-Files) link at the top of the screen. You probably won’t need to use this resource often, but it’s good to know it’s there if you get stuck.
- Pi Store: This store is used to discover and download free and paid software for your Raspberry Pi. Click the Explore button to start searching the store. It includes only a fraction of the packages available to install from the shell (see Chapter 5), but the store makes it easier to discover and install tutorials, applications, and games. Chapter 19 includes a couple of recommendations from the store and tips on using it.
- Python games: These games, created by Al Sweigart, are demonstrations of Python, but they also provide entertainment. Games include Reversi, Four in a Row, a sliding puzzle game, and a snake game. You can choose any of 13 games to play from a simple menu.
- Shutdown: Double-clicking this icon shuts down your Raspberry Pi. It asks you to confirm before it shuts down. When you’ve finished using the Raspberry Pi, use this icon to switch it off. If you just want to exit LXDE and go back to the command line, use the power button on the right of the taskbar.
To start a program using one of the icons on the desktop, just double-click it as you would in Microsoft Windows or Mac OS.
 Note that it might take a moment for a program to open: The Raspberry Pi probably isn’t as powerful as the computers you are used to using, and so it can feel a bit less responsive.
Using the Programs menu
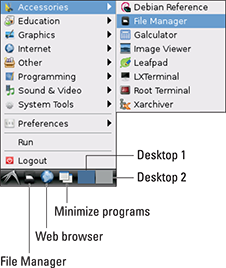
For all the other programs you might want to run, you use the Programs menu. At the bottom left of the screen is an icon that looks like a bird in flight. Click it and you’ll see the menu appear, similar to Figure 4-2.
The menu works in the same way as the Windows Start menu. As you move your mouse over the categories of programs, a submenu appears on the right, showing you the programs in that category. Click one of these once to start it.
 You can access the programs on your desktop through the Programs menu, but you can also access some additional programs in the menu too. Most of these are covered later in this chapter. You can also find Squeak, which is the programming language Scratch is built on, Xarchiver, which is used for creating and opening compressed collections of files, and VLC Media Player (see Chapter 8). If you right-click a program in the menu, you can add its icon to the desktop, so you can start it more quickly in future.
The bottom-left corner of the screen also includes some buttons (see Figure 4-2) that you can use to gain quick access to File Manager and the web browser.
LXDE Foundation e.V.
Figure 4-2: The Programs menu in the bottom left of your screen.
Using multiple desktops
LXDE enables you to use two desktops on your monitor, which is particularly helpful if you’re using a small screen. It means you can double the amount of space you have for using and arranging your programs. You can use two buttons at the bottom left of the screen to switch between the desktops (see Figure 4-2).
 Even if you have no plans to use multiple desktops, it’s worth knowing about them because it can make it look like your programs have disappeared with all your work if you click one of the buttons by accident. That’s never a good feeling!
The two desktops work independently of each other, so if you start a program on one desktop, you can’t see it when you switch to the other, but the program is still there. You can switch desktops to go back to it again.
You can move a program from one desktop to the other by clicking the icon in the top-left corner of its window, hovering over Send to Desktop in the menu that opens, and then choosing which desktop you would like it to go to. You can also send a program to all desktops this way, so you can see the program no matter which desktop you’re using. Another way to move a program to another desktop is to click the title bar at the top of its window, drag the window to the side of the screen, and hold it there (with the mouse button still held down) until the desktop switches.
You can run different programs in each desktop, but in practice, you shouldn’t run too many programs at the same time.
Resizing and closing your program windows
You’ll probably want to use more than one program in an LXDE session, so you need to know how to close programs when you’ve finished with them, and how to rearrange programs on the screen.
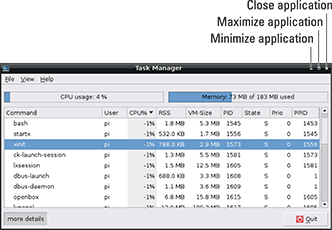
The program windows in LXDE have similar controls to Microsoft Windows that enable you to resize and close them. Figure 4-3 shows the Task Manager application, with these controls indicated:
- The X button in the top-right corner of the application’s window closes the application.
- The Maximize button is used to enlarge the application so it fills your screen. After you’ve used it, you can click the new button in its place to return the window to its original size, just like in Windows.
- The Minimize button hides your program from view but doesn’t stop it from running. You can get back to the program again by clicking its name on the taskbar at the bottom of the screen.
LXDE Task Manager written by Hong Jen Yee, Jan Dlabal, derived from Xfce4 Task Manager by Johannes Zellner
Figure 4-3: The Task Manager for LXDE.
If you want to get back to an empty desktop quickly, click the button on the taskbar to minimize all your programs (refer to Figure 4-2).
It’s easy to change the size of windows so you can see more than one at a time, for example. Move your mouse cursor to one of the edges until the mouse icon changes, and you can click and drag it inward or outward to reshape the window. You can also click and drag a corner to change the window’s height and width at the same time. To arrange the windows side by side, you can move them around by clicking and dragging the title bars at the top of them.
Using the Task Manager
If your Raspberry Pi doesn’t seem to be responding, it might just be very busy. At the bottom right of the taskbar is the CPU Usage Monitor, which tells you how heavily the Raspberry Pi’s processor is being used. It’s a bar chart that scrolls from right to left, so the right-most edge shows the latest information. A green bar that fills the height of the graph indicates that your Raspberry Pi is working flat out, so it might take a moment or two to respond to you, especially when starting programs. In our experience, the Raspberry Pi doesn’t crash often, but it can sometimes be overwhelmed to the extent that it looks like it has. It’s usually worth being patient.
You can see which programs are running on your Raspberry Pi by running the Task Manager (see Figure 4-3). You can find it in the Programs menu among your system tools, but you can also go straight to it by holding down the Ctrl and Alt keys and pressing Delete.
If you have a program that is not responding, you can stop it using the Task Manager. Right-click it in the task list and choose Term to terminate it. This sends a request to the program and gives it a chance to shut down safely, closing any files or other programs it uses. Alternatively, you can choose Kill. That terminates the program immediately, with the possible loss of data.
You should only use the Task Manager to close programs as a last resort. Most of the tasks you see in the Task Manager are system tasks, which need to be running for LXDE to work properly. Avoid closing programs you don’t recognize — that might crash LXDE and result in you losing data in any open applications.
Using External Storage Devices in the Desktop Environment
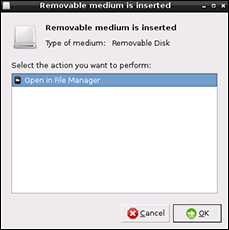
When you’re using the desktop environment, you can plug in external USB storage devices, such as external hard drives or USB keys (also known as flash drives), and the Raspberry Pi automatically recognizes them. Figure 4-4 shows you the window that appears when you connect a device. You can then view the device in File Manager to access its files.
Flipping ahead to Figure 4-5, the USB key is shown in the list of places on the left as 66 MB Filesystem. Click its name to see its files.
LXDE Foundation e.V.
Figure 4-4: Removable storage attached to your Raspberry Pi is automatically detected.
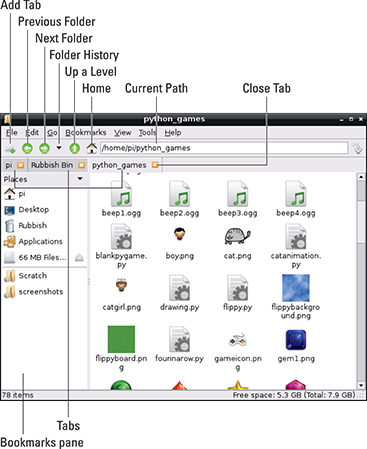
LXDE File Manager written by Hong Jen Yee
Figure 4-5: The LXDE File Manager on the Raspberry Pi.
Using File Manager
You can manage your files using the command line (see Chapter 5), but it’s often easier to do it in LXDE. File Manager (see Figure 4-5) is used to browse, copy, delete, rename, and otherwise manage the files on your Raspberry Pi or connected storage devices.
You start File Manager by clicking its button at the bottom left of the screen (indicated on Figure 4-2), or by using the Programs menu, where it is among the System Tools.
In Linux, people usually talk of storing files in directories, but LXDE uses the term folders instead, which is probably familiar to you from other computers you’ve used. A folder is just a way of grouping a collection of files or programs and giving that collection a name. You can put folders inside other folders too.
Navigating File Manager
On the right of File Manager, you can see the files (and any folders) that are inside the folder you’re currently looking at. Each file has an icon indicating what type of file it is, except for image files, which have a small representation of the picture itself. In Figure 4-5, you can see the different files that make up the Python games that come with your Raspberry Pi in your pi folder, including pictures of game characters and backgrounds, and sound effects that are shown with a musical note on the icon.
You can double-click a folder in this area to open it, and you can double-click a file to open it with the default program for that file type. An image file opens using the Image Viewer, for example, and a Scratch file opens in Scratch. If you want to choose which program to open a file in instead, you can right-click the file’s icon to bring up an option called Open With. Select it to bring up a menu of all the programs available on your Raspberry Pi, and then make your choice.
On the left is a list of your places, which are special types of folders. There are four main folders here:
- The pi folder is where you are expected to store most of your files, such as your documents and photos. It is the only place you have permission to write and edit files as an ordinary user. In the next chapter, we look at Linux and its directory structure in more detail, but for now, the key thing is to only try to store files and folders in your pi folder, or in any folder inside that.
- The Desktop folder shows you the programs and files that are on the desktop. If you’re always editing a document and you want it to be on the desktop for easy access, simply move it into the Desktop folder.
- The Rubbish Bin is used as a temporary place to put any folders or files you plan to remove. You can empty the Rubbish Bin, and delete any files or folders in it, by right-clicking on its name in File Manager. If you put something in the Rubbish Bin that you change your mind about, right-click its icon in the Rubbish Bin and choose to Restore it to where it was before. You can also cut or copy it, so you can paste it wherever you want (especially useful if you’ve forgotten where it used to be!). You can send files to the Rubbish Bin by right-clicking on them in File Manager or selecting them (see the section on “Copying and moving files and folders” later in this chapter) and then pressing the Delete key on your keyboard (usually marked Del or Delete, and not to be confused with the Backspace key).
- The Applications folder gives you access to the same programs as the Programs menu at the bottom of the screen.
You might also see other places here, depending on how your Raspberry Pi is set up. Figure 4-5 shows an entry beneath Applications for a 64MB USB key Sean plugged in.
If there are folders you use particularly often, you can bookmark them — an idea borrowed from web browsers, and from (in the dim distant past) print books before that. A bookmark makes it easy for you to go straight back to where you were. To add a bookmark to the folder you are viewing, click Bookmarks on the menu at the top of File Manager, and then choose Add to Bookmarks. Your bookmarks are shown in the Bookmarks pane, under your Places list. In Figure 4-5, you can see we’ve bookmarked the Scratch and screenshots folders. Click one of these bookmarks to go straight to its folder. To remove or rename a bookmark, right-click its entry in the Bookmarks pane and select the appropriate option from the menu that opens.
Across the top of File Manager is a menu bar, including File, Edit, Go, Bookmarks, View, Tools, and Help menus. Most of the options here you can also do in other ways with File Manager, as we show you, but if you get stuck, this menu is a good way to quickly get back on track.
Underneath the menu bar is an icon bar that includes a number of useful shortcuts. They’re indicated in Figure 4-5:
- Add Tab: Tabs are particularly useful if you’re carrying out work that involves more than one folder. You might want to quickly switch between the source and destination folders if you’re copying files, for example. The tab metaphor comes from paper filing cabinets, with cardboard tabs sticking out of the folders at the top so you can easily find the one you’re looking for. In web browsers today, it’s common to find tabs that you use to switch between different web pages open in the browser. It’s similar in File Manager. The tabs enable you to have two different folders open at the same time. You simply click the tabs to switch between them. Within each tab, you can use File Manager as usual, navigating between the different folders. In Figure 4-5, you can see we have three tabs open: the pi folder, the Rubbish Bin, and the python_games folder. To close a tab and its associated folder, click on the orange X icon in the tab (see Figure 4-5).
- Previous Folder: File Manager keeps a history of the folders you navigate through, and the Previous Folder button works a bit like a web browser’s Back button. It takes you back to the last folder you accessed in that tab. You can click it repeatedly to keep going back.
- Next Folder: After you’ve used the Previous Folder button, you can use the Next Folder button to go forward through your history again, taking you back to a folder you visited after the one you’re looking at now. If you click the Previous Folder button and then the Next Folder button, you’ll end up where you started.
- Folder History: Click the Folder History button to open a menu showing you a list of the folder in the history. You can go straight to one of them by clicking it. That saves you wearing out your clicking finger by repeatedly clicking the Previous Folder or Next Folder button!
- Up a Level: A folder might be inside another folder, known as a parent folder. Your Desktop folder is inside your pi folder, for example, so pi is the parent folder for Desktop. Click the Up a Level button to go to the parent folder. Pressing the Backspace key (usually used when typing to delete a single character to the left of the cursor) has the same effect as clicking this button.
- Home: This button takes you back to your pi folder so you have quick access to your work.
- Path: The path is a text description of the location of the folder you are looking at, including a list of the folders above it. Chapter 5 covers paths in depth, but if you know a path, you can type it in here, and then press the Enter key to go straight to it in File Manager.
Copying and moving files and folders
File Manager makes it easy to copy and move your files and folders, without the need for any text commands.
When you right-click on a file or folder in File Manager, a menu opens that enables you to rename the file, delete the file or folder (which sends it to the Rubbish Bin), and to cut or copy it.
If you cut a file, it is moved to wherever you choose to paste it. If you copy the file, a duplicate copy of it is placed where you paste it. You paste by going to the folder where you would like the file to be stored and then right-clicking on an empty space inside a folder and choosing Paste from the menu that appears. (If you copy or cut a file without pasting it, nothing happens to it.)
You can also drag files onto a folder’s icon to move them into it.
Selecting multiple files and folders
There are several ways to select more than one file at a time, so you can delete, copy, or move them all at the same time:
- The first way is to hold down the Ctrl key and click each of the files in turn to select them.
- You can also select a group of consecutive icons (read from left to right, top to bottom) by clicking the first icon, holding down the Shift key, and then clicking the last icon.
- Finally, you can click the mouse on the background of File Manager and hold the button down while you lasso the files you want to select.
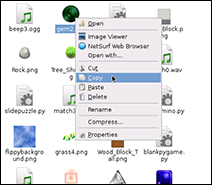
After you’ve selected a group of files, you can drag them all into a different folder by clicking one of the selected files and dragging it into the folder. You can also right-click on one of your selected files and choose to cut or copy the whole group, as shown in Figure 4-6. If you delete one of the selected files, they will all be moved to the Rubbish Bin.
LXDE File Manager written by Hong Jen Yee
Figure 4-6: Right-clicking a file in the File Manager brings up a menu of options.
LXDE supports some keyboard shortcuts that might be familiar to you from Microsoft Windows. You can use Ctrl+A to select all files and folders, Ctrl+C to copy, Ctrl+V to paste, and Ctrl+X to cut selected files and folders in LXDE. It’s worth remembering, however, that Ctrl+C is used to cancel an operation in the Linux command line (see Chapter 5), so the Copy shortcut isn’t universal on your Raspberry Pi the way it is in Windows.
If you’re selecting almost all the files, it’s probably easiest to use Ctrl+A to select all, and then hold down the Ctrl key and click to deselect the files you don’t want. There’s also an option on the Edit menu to invert your selection, so you can select the files you don’t want and then use this option to flip your choice so everything else is selected instead.
Creating new folders and blank files
Organizing your files in folders makes it easier to manage them. You can more easily see what files you have where, go straight to a file when you need it, and back up a group of files by copying the folder to an external storage device.
It’s easy to make a new folder. First go to the location where you would like your new folder to be stored. Typically, this will be in your pi folder, or one of its subfolders, such as your Desktop. Right-click a blank space in the right pane of File Manager and hover the mouse over Create New. Click Folder in the fly-out menu that appears and you’ll be prompted to enter a name and click OK to confirm. If you change your mind, click Cancel instead.
You can also click the File menu at the top left of File Manager, find Create New, and then click Folder.
Both options also enable you to create a blank file. If you want to practice creating folders and moving files around, you can create a few blank files so you can do this safely without worrying about moving anything you didn’t intend to.
Changing how files are displayed
When you right-click on an empty space in the right pane in File Manager, a menu opens with an option to change how the files there are sorted. You can sort files by name, modification time, size, or file type, in either ascending or reverse order.
You can change how files and folders are shown in File Manager, so you can strike a balance between how many you can see at once, and how easy they are to see. The View menu in the menu bar at the top of File Manager gives you the choice of four different ways to display the files and folders. By default, File Manager uses the icon view, which strikes a good balance between the number of files you can see at a time and how large each icon is. The thumbnail view is particularly useful in a folder of images because it enlarges the preview that takes the place of a generic icon for picture files. To see as many files as possible at once, use the Compact view, which lists the files and folders in columns with a small icon and the filename.
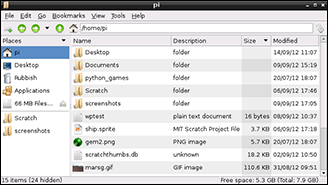
The detailed list view (see Figure 4-7) reveals more information about each file, showing a short description, its size, and when it was last modified. You can click the column headings to sort the view by the filename, description (which groups similar files), size, or modification date. If you click the column heading again, the sort order is reversed.
LXDE File Manager written by Hong Jen Yee
Figure 4-7: The detailed list view in File Manager.
Sometimes you might need to refresh the view of File Manager to reflect your latest changes. To do that, tap the F5 key on the keyboard or choose Reload Folder from the View menu.
The View menu also enables you to change the side pane in File Manager so it shows you the directory tree instead of the places. You’ll learn more about the directory tree in Chapter 5, but it’s worth knowing there’s an option to navigate using it in File Manager too.
Opening a folder as root or in the terminal
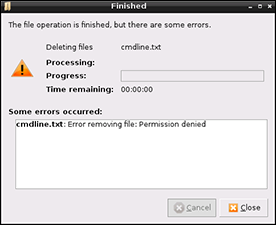
Linux has a rigorous permissions structure that governs who can access all its files, and whether they have permission to modify them or run them. It’s a good thing because it means it’s relatively difficult for you to do any real harm to your Raspberry Pi’s operating system accidentally. You’re free to use File Manager to explore all the files your operating system uses, but if you try to delete an essential file, you’ll be told you don’t have permission (see Figure 4-8).
If you want to explore your system, go to your pi folder, click the Up a Level button twice (see Figure 4-5), and then take a look in the folders there. Chapter 5 covers some of these in more depth.
LXDE Foundation e.V.
Figure 4-8: Whoops! Denied permission to delete a file from the Raspberry Pi’s boot folder.
If you find you need to do something you don’t have permission to do, you can brush away all the restrictions by opening the current folder as the root user, one of the options in the Tools menu. As a root user, you can do anything on the computer, including deleting things you shouldn’t, so it’s good practice to only use this option if you really need to. When you’ve finished working as the root user (also called the Super User in File Manager), close File Manager window to protect yourself against accidentally making further changes you shouldn’t.
The Tools menu also has an option to open the current folder in the terminal. This enables you to use Linux commands (see Chapter 5) to make changes to the folder. Often this is the quickest way to accomplish something, especially after you’ve mastered the finer points of Linux. While you’re using File Manager, you can also use the keyboard shortcut F4 to access the terminal.
Browsing the Web
When it comes to browsing the web on your Raspberry Pi, you really are spoiled for choice, with three browsers to choose from. Epiphany is the recommended browser for most websites, although it’s good to be aware of the others because they can be faster (albeit they achieve speed by stripping out some of the web page’s features). Open the Programs menu, and you’ll see the browsers in the Internet category:
- Dillo: This browser is fast, but web pages look different than intended on it because it can’t handle sophisticated layout instructions or JavaScript, the language used for creating interactive web pages. Several websites we tried were rendered as a single deep column because Dillo couldn’t understand where the header box, sidebars, the main page content, and the bottom box should go. You can switch off images in the Tools menu, which can greatly speed up downloads of complex pages. If you’re accessing mainly text information or have a particularly slow web connection, this browser might be a good choice, but you won’t benefit from much of the work website owners put into creating web page designs that are easy to use.
- Netsurf: This is capable of handling more sophisticated layouts than Dillo, but it also lacks support for JavaScript. Many websites look as they do on a PC or Mac browser, but any sites that require JavaScript won’t work (including Facebook). Netsurf offers a friendlier experience than Dillo for most websites.
- Epiphany: This browser has been optimized for the Raspberry Pi, including hardware decoding of video. Epiphany supports JavaScript, and is most able to re-create the richer experience you have with websites using other devices. This is the default browser on your Raspberry Pi. Sites like Facebook and Google Maps work, but might be noticeably slower than you’re used to.
At present, the Raspberry Pi does not support Flash. Flash is used for online games and videos, so often these won’t work on your Raspberry Pi. On the upside, Flash is also used for annoying blinking advertisements, so surfing the web with the Raspberry Pi might be more serene than you are used to!
Using Epiphany to browse the web
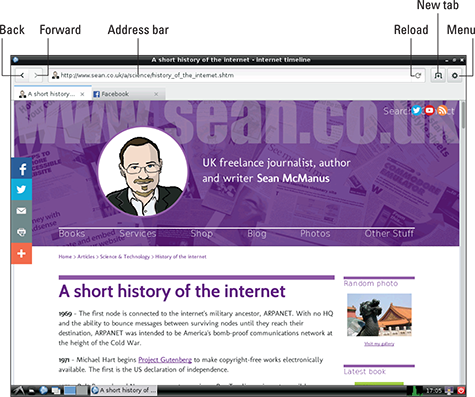
Figure 4-9 shows the Epiphany browser in use. Its layout is similar to other browsers you might have used in the past, with a thin toolbar at the top, and most of the screen given over to the web page you’re viewing. To get started with it, either run it from the Programs menu or double-click its icon on the desktop.
If you know the address of the website you want to visit, you can type it into the address bar (see Figure 4-9). When you start to type an address, a menu under the address bar suggests pages you’ve previously visited that might match what you want. Click one of these to go straight to it or carry on typing. When you’ve finished typing the address, press the Enter key.
You can scroll your page using the scrollbar on the right of the browser, or the scrollwheel on your mouse.
©2002–2004 Marco Pesenti Gritti; ©2003–2013 The Web Developers
Figure 4-9: The Epiphany browser.
When your mouse pointer is over a link, the pointer changes to a small hand. You can then click the left mouse button to follow that link to another web page. The browser keeps a list of the web pages you visit (called your history), so you can click the Back button (indicated in Figure 4-9) to retrace your steps and revisit the pages you browsed before the current one. The Forward button beside it takes you forward through your history again.
Some web pages update frequently with new information, so you can click the Reload button to download the current page again and see any updates since you first opened it. While a page is downloading, this button becomes a Stop button. Click it to halt the download.
Searching within web pages
To find a word or phrase within a web page, press Ctrl+F after the page has loaded. The Find bar opens at the top of the screen, with a box for you to type into. The first occurrence of the text you’re looking for is highlighted on the page in yellow, and you can press the Enter key or click the Down button in the Find bar to move to the next one. You can close the Find bar again by clicking the Close button (an X) on the far right of the Find bar.
Using tabbed browsing
Like many other browsers today, Epiphany uses tabs to enable you to switch between several websites you have open at the same time. Click the button in the top right (refer to Figure 4-9) to add a new tab, which opens to show your most visited websites. You can click to visit one of these or type an address in the address bar.
To switch to a page, just click its tab above the main web page area. In Figure 4-9, Facebook and Sean’s website are open, and we can click the tabs to flick between those pages instantly. To close a tab, click the Close button to the right of its name.
If you hold down the Ctrl key while you click a link, the link opens in a new tab.
Adding and using bookmarks
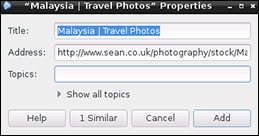
Bookmarks make it easy to revisit your favorite web pages. You can add a bookmark by going through the menu in the top right, or by using Ctrl+D.
The New Bookmark window looks like Figure 4-10. The default name for a bookmark is the web page’s title, but you can edit it, and choose a topic to file it under. You can click to show the existing topics, or type a new topic into the Topics box. When you browse your bookmarks, the topics are like folders, organizing your bookmarks. To add the bookmark, you click the Add button.
©2002–2004 Marco Pesenti Gritti; ©2003–2013 The Web Developers
Figure 4-10: Adding a bookmark in Epiphany.
To access your bookmarks while you’re browsing, click the menu in the top-right (its icon is indicated in Figure 4-9), and choose Bookmarks.
Protecting your privacy
As you know, your browser stores the history of web pages you visit. If you want to make a visit to a website without any traces being left in the browser, perhaps to plan your Christmas shopping without the risk of other family members coming across the websites you’ve visited, open a new incognito window first. You do this through the menu in the top right. When you close the private browsing window, your secret session stops.
When information has already been stored in the browser, you can delete it by viewing your Personal Data and History from the menu in the top right.
Using the Image Viewer
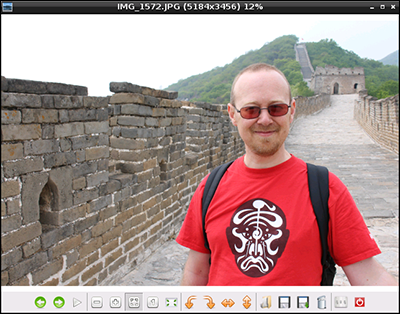
It’s easy to look at your digital photos and other images using LXDE. Among the accessories in the Programs menu is the Image Viewer. You can start it through the menu, or by right-clicking an image file.
The Image Viewer displays your picture, with a toolbar along the bottom underneath it, as you can see in Figure 4-11. From left to right, this is what the buttons do:
- Previous: Goes to the previous photo in the folder. Note that any unsaved changes (such as rotation) are lost. You can also use the left-arrow key on the keyboard.
- Next: Goes to the next photo in the folder. As with the Previous button, clicking this discards any unsaved changes you’ve made to the current photo. You can also use the right-arrow key on the keyboard.
- Start Slide show: Click this button to begin a slide show of all the photos in the folder. The interval between photos is set at five seconds, but you can change that in the preferences. You can also use the W key to start a slide show.
- Zoom Out: Click this to reduce the magnification of the image. The keyboard shortcut is the minus key.
- Zoom In: Increase the magnification of the image. Scrollbars appear if the image becomes too big to fit in the Image Viewer, and you can use these to see different parts of the picture. The keyboard shortcut is the + (plus sign) key, with no need to use Shift.
GPicView written by Hong Jen Yee
Figure 4-11: Sean in China, as seen through the Image Viewer.
- Fit Image to Window: This shrinks a large image to make it fit the Image Viewer snugly. If an image is smaller than the Image Viewer window, it won’t be blown up to fill it, though. This button (or its keyboard shortcut F) is a good way to recover if you get lost zooming in or out.
- Go to Original Size: This resets any zooming by showing the image at its full original size. This might be bigger than the Image Viewer window, in which case scrollbars appear to enable you to move around the image. The keyboard shortcut is G.
- Full Screen: The image fills the monitor, and you lose your Image Viewer controls. Right-click the image to open a menu with all the same options. To revert to using the Image Viewer in a window, chose Full Screen from the menu. You can also use the F11 key to switch the full screen view on and off.
- Rotate Left: This rotates the image 90 degrees counterclockwise. The keyboard shortcut is L.
- Rotate Right: This rotates the image 90 degrees clockwise. The keyboard shortcut is R.
- Flip Horizontally: This mirrors the image horizontally and can also be done with the H key.
- Flip Vertically: This turns the image upside down. The V key does the same.
- Open File: Click the folder icon to open a new image file. You can also drag and drop an image on the Image Viewer from a folder in File Manager. This doesn’t move the file, just opens it.
- Save File: This saves your image (including any rotations or mirroring you have done) and replaces the original image. You get a warning before it happens. Keyboard shortcut: S.
- Save File As: Use this button (or press the A key) to save your image with a new filename so it doesn’t overwrite your original image.
- Delete: Click the bin icon or use the Delete key to delete an image from your storage device. If you delete an image, it’s not sent to the Rubbish Bin: It’s deleted and cannot be recovered. You get one warning, but then it’s toast!
- Preferences: This is where you change the settings for Image Viewer, so you can customize it for your needs. You can turn off the warnings you get before overwriting or deleting an image, set Image Viewer to automatically save rotated images, change the background colors of Image Viewer, and change the slide show interval here. There’s also an option to rotate images by changing their orientation value in the EXIF tag, which changes some of the information stored with the image to say which way up the camera was, instead of actually rotating the image content itself. It’s okay to keep this selected, but this is where you disable it if you prefer.
- Exit Image Viewer: Click the far-right icon in Image Viewer to close it. Confusingly, the same icon design is used to exit the Image Viewer as is used to log out of LXDE itself and shut down the Raspberry Pi. It doesn’t matter if you click the wrong one because LXDE makes you confirm before it exits.
Using the Leafpad Text Editor
Among the accessories in the Programs menu is Leafpad, which is a simple text editor (see Figure 4-12). You can use it for writing and word processing, but it’s not ideal for creating print-ready documents. It’s most useful for editing documents intended to be read by computers, such as web pages and configuration files.
The menus are logically organized, and if you’ve ever used a text editor on another computer, you’ll find your way around in Leafpad easily.
The File menu is used to start new documents and open, save, and print files. There’s also an option to Quit here, although you can just close the Leafpad window.
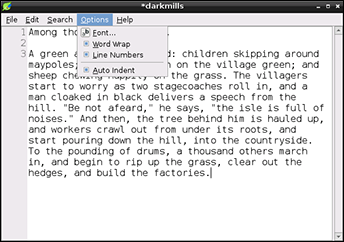
Leafpad written by Tarot Osuji with artwork by Lapo Calamandrei
Figure 4-12: The Leafpad text editor.
The Edit menu gives you tools for undoing and redoing your work, cutting, copying, pasting, and deleting, and selecting all your text. Leafpad uses Windows shortcuts too, so you can use Ctrl+C to copy, Ctrl+V to paste, Ctrl+X to cut, and Ctrl+A to select all the text.
The Search menu has options to find a particular word or phrase, jump to a particular line in the document, or replace a chosen word or phrase with an alternative. You can click the box to replace all in one go, or step through them individually. The search and replace features highlight all the occurrences in yellow, and the one that it’s currently focused on in blue. You can use the Search menu to move forward or backward through the list of results.
The Options menu (shown in Figure 4-12) has options to change the font (although the choices available are more limited than you’re probably used to), switch on Word Wrap (which means text goes on to a new line when it reaches the edge of the window, instead of a horizontal scrollbar appearing), and switch on Line Numbers (shown in the upper left in Figure 4-12). The auto indent feature means that any indentation used on one line is automatically applied to the next line when you press Enter.
Customizing Your Desktop
You can do quite a few things to stamp your identity on LXDE and make it easier to use. Just like other desktop computers you might have used, you can change the look and feel of it. To find the options for this, click Customise Look and Feel in the Preferences section of the Programs menu. You can choose the default font and pick from different colors and styles used for the content of windows in the Widget tab, including a style named Redmond for the location of Microsoft’s HQ, which might be a suitable look for Windows users suffering from homesickness on their Raspberry Pi. In the Colour tab, you can choose your own color scheme. The Icon Theme tab gives you a choice of different icon sets, and you can change the layout of toolbars in the Other tab.
To adjust the sensitivity of the keyboard and mouse, use the keyboard and mouse settings in the Programs menu. For left-handers, you can swap the left and right mouse buttons too.
Two other entries in the Programs menu are available to tailor your desktop environment. The Openbox Configuration Manager gives you control over the look of menus and title bars at the top of your windows, where new windows appear, and how many desktops you have.
The Preferred Applications settings let you choose your default web browser and e-mail program, which is opened when you click on links to web pages or e-mail addresses. There is no e-mail program in LXDE, but you can add one of your own choice. Claws Mail is an e-mail program that works on the Raspberry Pi. The Raspberry Pi isn’t the ideal machine for this kind of application. Usually, you’d run something like this in the background while you do other things, but with the Pi’s limited memory, it can be a bit slow even when it’s focused exclusively on these activities. E-mail is one of the most popular computer activities today, however, so if you’d like to try it on the Raspberry Pi, give Claws a go. You can install using the following command line instruction (see Chapter 5):
sudo apt-get install claws-mail
It appears among Other applications in the Programs menu.
The taskbar at the bottom of the screen can be customized by right-clicking it and then selecting Panel Settings. You can move it to the top or one of the sides of the screen, change its height and the size of icons, change its background picture and colors, and change the tools you have on there (Panel Applets). Not all of these are useful on the Raspberry Pi, but you can add a volume control, which is useful. If you would rather not see the taskbar, you can set it to hide (minimize) when you’re not using it by going to Advanced options.
Any settings you change in the Panel Preferences change immediately without you having a chance to save or confirm them. Don’t go too wild experimenting because you’ll have to manually reset everything again if you don’t like the results.
If you want to change your desktop wallpaper (the image behind the windows and icons), right-click the background and click Desktop Preferences. Click the filename of the wallpaper to choose a new one using a file browser that is a bit like File Manager. Click the pi icon in the Places list on the left to find your own photos to use as a background. You can set the wallpaper to be centered onscreen, repeated to cover it, or stretched to fill it.
Logging Out from LXDE
To log out from LXDE and get back to the command prompt, click the red power off icon in the bottom right of the screen, or open the Programs menu and click Logout. You are prompted to confirm you want to log out, and LXDE then closes and returns you to the command line prompt. When you’ve finished with the command line, issue a command to shut down, as described in Chapter 5.
If you have set up your Raspberry Pi to go straight into LXDE when you switch it on, it works a bit differently. When you log out, you are prompted to log on again. When you click the icon in the taskbar, you also see options to reboot (which means restart) or shut down your Raspberry Pi.
Remember that you don’t have to log out to use the Linux command line. You can double-click the LXTerminal icon on the desktop to open the terminal in a window, or use File Manager to find the folder you want to use and then choose to open the current folder in the terminal, using the Tools menu. When you are using File Manager, the F4 key on your keyboard also opens the terminal for you.
To switch off your Raspberry Pi without logging out, use the Shutdown icon on the desktop. After it’s shut down, you can disconnect the power. When you reconnect it, your Pi will start up again.