Chapter 11
Writing Programs in Python
In This Chapter
![]() Accepting user input and printing to the screen
Accepting user input and printing to the screen
![]() Using variables, strings, lists, and dictionaries
Using variables, strings, lists, and dictionaries
![]() Using for and while loops
Using for and while loops
![]() Using conditional statements for decision-making
Using conditional statements for decision-making
![]() Creating and using your own functions
Creating and using your own functions
In this chapter, we introduce you to Python, a powerful programming language that’s widely used commercially.
One of the best ways to learn programming is to study other people’s programs, so in this chapter, we talk you through two different programs. One is a simple calculator for multiplication tables. The other is an artificial intelligence simulation that enables you to chat with your Raspberry Pi.
You’ll probably find it easiest to learn if you try creating the examples with us, but you can also download the finished programs from the book’s website. For more information on accessing this book’s website, see the Introduction.
In a book of this size, it’s not possible to cover everything you can do with Python, but this chapter gets you started with your first programs. As you work through these examples, you’ll learn about some of the fundamental principles in Python and programming generally, and you’ll gain an understanding of how Python programs are put together.
You’ll be able to draw upon this knowledge when exploring the electronics programs in Part V of this book, and when creating an arcade game with Pygame in Chapter 13.
Some lines of code are too wide for the page. We use a curving arrow at the end of a line of code to indicate a line continues. When you see one, just carry on typing and ignore the indent on the next line.
Starting Python
The Raspberry Pi has two versions of Python installed on it: Python 2.7 and Python 3. Usually when software or programming languages are updated, the new version is compatible with the old version. Python 3 was intentionally designed not to be compatible, however, so programs written for Python 2.7 might not work with Python 3, and vice versa. In this book, we use Python 2.7, because it makes it easier to install some of the software required for the projects in Part V of the book. You can find out more about what’s different about Python 3 at http://docs.python.org/3.0/whatsnew/3.0.html.
Programmers often use something called an integrated development environment (IDE), which is a set of tools for creating and testing programs. The Python IDE is called IDLE, and there are two versions of it on your desktop: IDLE (which is for Python 2.7) and IDLE 3 (which is for Python 3). Double-click the IDLE icon to get started.
Entering Your First Python Commands
When you start IDLE, a window opens with text at the top that looks something like Figure 11-1.
This is the Python shell, and the three arrows are your prompt, which means Python is ready for you to enter a command. You can test this by entering the license() command, which shows you a history of Python before displaying the terms and conditions of using it. If you don’t want to get bogged down in legalese, abort by pressing q and then pressing Enter when prompted.
One of the most basic commands in any programming language is the one that tells the computer to put some text on the screen. In Python (and some other languages too), this command is print, and you use it like this:
>>> print "hello"
hello
>>>
Whatever you type in the quotes after the print command is “printed” on the screen, and Python then returns you to the prompt so you can enter another command.
 Like the Linux shell, Python is case-sensitive, which means it won’t work if you use capital letters where you shouldn’t. The command print must be entered in lowercase; otherwise, Python tells you you’ve made a syntax error, which means you’re using a command incorrectly. You can mess around with the word in quotes as much as you like, however: This is the text that you want to appear onscreen. Take a look at these examples:

Copyright © 2001–2012 Python Software Foundation; All Rights Reserved
Figure 11-1: The Python shell, just after it opens.
>>> PRINT "Hello Karen!"
SyntaxError: invalid syntax
>>> Print "Hello Karen!"
SyntaxError: invalid syntax
>>> print "Hello Karen!"
Hello Karen!
Using the Shell to Calculate Sums
You can also use the shell to carry out simple calculations. Table 11-1 shows you the different mathematical operators you can use in your sums. Just put the sum after the print command, like this:
>>> print 5 + 5
10
>>> print 9 - 4
5
>>> print 7 * 7
49
>>> print 10 / 2
5
Table 11-1 Mathematical Operators in Python
|
Operator |
Description |
|
+ |
Addition |
|
– |
Subtraction |
|
* |
Multiplication |
|
/ |
Division |
|
// |
Division, discarding any decimal portion |
|
% |
Modulo, which shows the remainder after a division |
 Note that you don’t use quotes around the sum in your print command. What would happen if you did? Python would put on the screen literally what you asked it to, like this:
>>> print "5 + 5"
5 + 5
There are a few surprises in how division is carried out in Python. If you cast your mind back to your mathematics lessons, you might remember that whole numbers, which have no decimal portion, are called integers. In Python 2.7, if you divide an integer by an integer, you get an integer as a result, which means the answer can be less accurate than you might expect from a computer. For example, what’s 7 divided by 2?
>>> print 7 / 2
3
Close, but not close enough. To force Python to give you an answer that would pass a teacher’s scrutiny, add a decimal portion to one of the values in your sum, like this:
>>> print 7 / 2.0
3.5
>>> print 7.0 / 2
3.5
If you want to force the rounding effect to remove any decimal portion from your answer, you can use the // (floor division) operator, like this:
>>> print 10.0 / 3
3.33333333333
>>> print 10.0 // 3
3.0
An operator you might not have come across before is modulo. It uses the % sign and tells you the remainder after a division. Here are some examples:
>>> print 10 % 3
1
>>> print 10 % 2
0
You can use that operator to tell whether one number is divisible by another (the modulo is 0 if so).
These sums are quite basic, but you can enter more advanced sums by stringing together numbers and operators. As in algebra, you use parentheses to surround the bits of the sum that belong together and should be carried out first. For example:
>>> print (10.0/3) * 2
6.66666666667
>>> print 10.0 / (3*2)
1.66666666667
 You can also do mathematics in the shell by just entering the sums without a print command, but it’s essential to use it when you’re creating programs, as you see shortly.
The spaces we’ve used around the mathematical operators are optional. They help with readability, and in that last example, help to show which parts of the sum belong together.
Creating the Times Tables Program
Now we’re going to show you how to make a program that generates multiplication tables. For example, if the user requests a multiplication table for the number 7, it outputs the sequence 7, 14, 21, and so on. The program is only a few lines long, but it teaches you how to create programs, how to use variables to store numbers, how to ask the user for information, and how to create sections of program that repeat (loops). You build on your understanding of the print command to do all this, and if you’ve read Chapters 10 and 11 on Scratch, some of the ideas should be familiar to you.
Creating and running your first Python program
The problem with entering instructions in the shell is that you have to enter them each time you want to use them. The commands are carried out straightaway, too, which limits the sophistication of the kinds of things you can do. You can solve these problems by creating a program, a set of repeatable instructions that you can save as a file and use again.
To create a program, you use script mode, which is a blank window when you open it, but otherwise looks like Figure 11-2. To open the script mode window, click the File menu at the top of the Python shell, and then click New Window.
When you enter commands in script mode, they’re not carried out straightaway. The window acts like a simple text editor, and enables you to enter your list of commands (or program), and gives you control over when those commands are carried out.
Enter the following commands in the script mode:
# simple times table program
print "This program calculates times tables"
print "It is from Raspberry Pi For Dummies"
The window should look like Figure 11-2. The two print commands should look familiar to you, but the first line is new. In Python, anything after a # (hash mark) is ignored by the computer. The hash mark indicates a comment, used to add notes to programs so you can understand them later. The very best programs are written in such a way that you can understand them easily anyway, but it’s a good idea to leave little messages to your future self (or other people) so you can quickly understand important aspects of the program. We’ve put a one-line summary at the start of the program here, so if we open it later, we can immediately see what it does.
To save your program, click the File menu at the top of the script mode window and choose Save. You use this same menu to reopen previously saved programs too.
The term used for starting a program is running it, so click the Run menu and then click Run Module to see your program in action. Alternatively, the keyboard shortcut to run the program is F5. When you run the program, Python switches back to the shell and you see those two lines of text printed out on the screen.
Congratulations! You’ve just written your first Python program!
Before you can run your program, you must save it. If you made changes since the last time it was saved, you are prompted to save the program when you try to run it. This overwrites the previous version of the program. On the File menu of the script mode window is an option to save a copy of the program or to save it using a different filename (Save As), which can be useful if you might want to revert to an earlier version.

Copyright © 2001–2012 Python Software Foundation; All Rights Reserved
Figure 11-2: The script mode window.
Using variables
The next step in our program is to ask the user which multiplication table he would like us to generate. We’ll store this number in a variable. As you learned when you were using Scratch, a variable is a way of storing a number or a piece of text so you can refer back to it later.
For example, you might have a variable that stores your bank balance. It might go up (ker-ching!) or it might go down (sadly, more often), but you can always refer to it as your bank balance. Variables are one of the basic building blocks of programming, and not just in Python.
Taking the example of a bank balance, you can create a variable in Python for your bank balance called balance by just giving it a value, like this:
balance = 500
You can vary the value later (which is why it’s called a variable), by just giving it a new value:
balance = 250
More often, you’ll want to do sums with the balance, such as taking some money off the total when money is withdrawn, or adding money to it when a deposit is received. To do that, you change the variable’s value to a number that’s calculated from its current value. Here’s an example:
balance = balance − 250
That takes the value of the balance variable, knocks 250 off it, and then puts the answer back into the variable balance. You can display the value of a variable onscreen using the print command with the variable name:
print balance
 Programmers often use a shorthand form when they’re adding numbers to or subtracting them from a variable. The shorthand is += for addition and -= for subtraction. Here’s an example:
balance = 500
balance += 20
print balance
If you run that tiny program, it prints 520 on the screen.
balance = 500
balance− = 70
print balance
That program subtracts 70 from the initial balance of 500, so it shows 430 onscreen. This shorthand is an elegant way and concise way to express the idea of changing a variable’s value, and you’ll see it used widely in Python.
Accepting user input
Before we go any further, we should clarify one piece of jargon: function. A function is a set of commands that do a particular job, and there are lots of them built in to Python. Later on, you’ll learn how to make your own too (see “Creating your own functions”). To use a function, enter its name, followed by parentheses. If you want to send it any information to work with, you put that inside the parentheses.
When our program runs, we want to ask the user which multiplication table she would like to generate, and then store that number in a variable which we’ll call tablenum. To do that, we set up the tablenum variable using a built-in function called input(), which asks the question, waits for the user to type something in, and then puts whatever is typed in into the variable.
Here’s how the input() function works:
tablenum = input("Which multiplication table shall→ I generate for you? ")
We’ve put a space after the question mark and before the quote mark closes the question because otherwise the cursor appears right next to the question mark. It looks much clearer and more professional with a space between the question and the user’s answer.
Add that line into your program and run it, and you’ll see that the program displays the question and then gives you a cursor and waits for you to enter your number. Enter any number to try it out. The program won’t do anything else yet, however, because you haven’t told it to do anything with the number you enter.
Printing words, variables, and numbers together
Start by printing a title for the multiplication table the user has requested. This requires something we haven’t had before: the capability to print text and variables in the same line of text. The print command can be used to print more than one thing in a line, if they’re separated by commas, so we can combine text and our variable tablenum, like this:
print " Here is your", tablenum, "times table:"
The first two characters here, , have a special meaning. They’re known as an escape code, and they’re used to start a new line. Here they create a bit of space between the question asking for input and the resulting heading.
Don’t forget that anything between the quotes is actually printed onscreen. If you put the variable name tablenum between quotes, you’ll see the word “tablenum” onscreen, instead of the number the user typed in.
Now you need to print a line for each entry in the times table, from 1 to 12. As you know, you can use variables in sums, and you can print sums, so you could display the times table like this:
print "1 times", tablenum, "is", tablenum
print "2 times", tablenum, "is", tablenum*2
print "3 times", tablenum, "is", tablenum*3
print "4 times", tablenum, "is", tablenum*4
It works, as you can see in Figure 11-3. But it’s not really a good solution. For each line of output, we’re entering a new line in the program and adding a new sum at the end of it. Even using the copy and paste in the script mode (in the Edit menu), we ran out of patience at line four. What if we wanted to create a times table that goes up to 50? Or 500? Or 5,000? Clearly, we need a more scalable solution.
Copyright © 2001–2012 Python Software Foundation; All Rights Reserved
Figure 11-3: The times table program, in development.
Using for loops to repeat
To save the slog of entering all those print commands, and to make our program more flexible, we can use a for loop. This enables you to repeat a section of program a set number of times, and to increase a variable each time the code repeats. That’s exactly what we need for our times table program: We want to display one line for each number from 1 to 12, showing the result of multiplying that number by the figure the user entered.
Here’s how the code looks that makes that happen:
for i in range(1, 13):
print i, "times", tablenum, "is", i*tablenum
This tiny program snippet introduces several new programming concepts. First, take a look at the range() function. This is used to create a list of numbers, and you give it a number to start at (1) and the end point (13). The end point is never included in the list, so we had to use a 13 to make our multiplication tables go up to 12.
You can use range() outside a for command too. Try the following in the shell:
>>> print range(5, 15)
[5, 6, 7, 8, 9, 10, 11, 12, 13, 14]
If you add a third number between the brackets (parentheses), it’s used to specify how big you want the gap to be between the numbers. We don’t need that here, but for completeness, this is how it works:
>>> print range(5, 15, 2)
[5, 7, 9, 11, 13]
Our range() function, then, creates a list of numbers from 1 to 12. The rest of the line it’s on sets up the start of the bit we want to repeat, and says that we should give the variable i the next value from our number list each time we repeat. The first time around, i has a value of 1, the first number in our list. The second time around, i has a value of 2, which is the second number in our list. This goes all the way up to the last repetition, when i has a value of 12.
We tell Python which commands should be repeated by indenting them. The print command we’ve used has four spaces before it, and in Python, these spaces are meaningful. Many languages let you space your programs out however you want, but in Python, the spacing is often part of how the computer understands your intentions. By enforcing the use of indentations like this, Python makes it easier to read programs because you can see which bits belong together at a glance. They’re all indented to the same depth.
We can repeat multiple commands by just indenting them all:
for i in range(1, 13):
print i, "times", tablenum, "is", i*tablenum
print "------------------"
print "Hope you found that useful!"
If you can’t get your loop to work, make sure you have remembered the colon at the end of the for line.
The previous snippet works its way through numbers 1 to 12 and prints the times table line for each one, followed by a line of dashes to space it out. When it’s finished all 12 lines, it prints “Hope you found that useful!” just once because that command isn’t indented with the others in the loop.
Pulling it all together, the final program looks like this:
# simple times table program
print "This program calculates times tables"
print "It is from Raspberry Pi For Dummies"
tablenum = input("
Which multiplication table shall I ![]() generate for you? ")
generate for you? ")
print "
Here is your", tablenum, "times table:
"
for i in range(1, 13):
print i, "times", tablenum, "is", i*tablenum
print "------------------"
print "
Hope you found that useful!"
Although indentations at the start of lines have special meaning, you can use blank lines to help lay out your program however you want. We’ve used some blank lines here to make it easier to see which bits of program go together. We’ve also added in some extra
escape codes in the print and input commands to put blank lines into the screen output.
Many people find they learn best from actually typing in programs, but you can download this program from the book’s website if you can’t get it working, or want to save time.
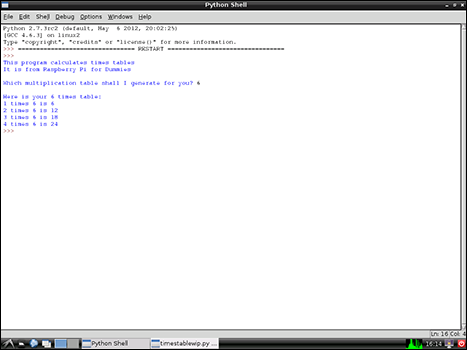
Figure 11-4 shows what the screen looks like when the program runs. If you want to experiment with the program, there are a few things you can try. How about making it go up to 20, or making it show only the odd lines in the times table (1, 3, 5)? You can make both those changes by playing with the range() function used in the loop. You can customize the screen output too, to provide more in-depth instructions, or to strip them out entirely. Perhaps you can use keyboard characters such as dashes and bars to put your multiplication table into a box.
Copyright © 2001–2012 Python Software Foundation; All Rights Reserved
Figure 11-4: The finished multiplication table. Now, what was 7 times 8 again?
Creating the Chatbot Program
Do you ever find yourself talking to your computer? Wouldn’t it be great if it could chat back? The next program enables you to have a conversation with your computer onscreen. Using a few tricks, we’ll make the program appear to be intelligent, and able to learn from what you type in. It’s not actual artificial intelligence, of course: That discipline of computer science is highly evolved, and this is a simple demo program. Chatbot can throw up some surprises, however, and you can expand its vocabulary to make it smarter. For a sneak preview of what it can do, see Figure 11-5 at the end of the chapter.
As you build this program, you’ll deepen your understanding of Python. In particular, you’ll learn about conditional statements, lists, dictionaries, and random choices.
The program works like this:
- It introduces itself and then invites the player to respond.
- The player types something in.
- If the player types in bye, the computer replies with a message to say thanks for chatting, and then finishes the program.
- The program has stock responses for certain words, so it checks whether it recognizes any of the words that the player has entered. If it does, it uses one of the appropriate stock responses. If more than one stock response applies, the computer chooses one at random.
- If none of the words are recognized, the program chooses a random phrase and replies with that. To stop the random phrases repeating, it replaces the phrase used with what the player typed in. Over time, the program learns from the player and starts to talk like her.
- The program keeps on chatting with the player until the player types in bye.
Now that you know the final goal, take your first steps toward it by setting up the random responses.
You can download the finished program from this book’s website. See the Introduction for more on accessing the website.
Introducing lists
There are several different ways you can organize information in Python, and one of the most fundamental is called a list. You came across a list already when we used the range() function to create a list of numbers for our for loop. You can also create your own lists.
The following code shows you how to create a list that has the name shoppinglist. You can enter this in the shell, or create a program so you can more easily edit and refine it. If you create a program, make sure you run it, so that the shopping list is set up.
shoppinglist = ["eggs",
"bacon",
"tomatoes",
"bread",
"tin of beans",
"milk"]
It’s similar to the way you create a variable. After the list name comes an equals sign, and then we have square brackets that contain the list. Each item in the list is separated by a comma. Because each item is a piece of text (known as a string in programming circles), we put quotes around it, so Python knows where it starts and ends.
Python doesn’t mind whether you use double quotes or single quotes around the strings in your list, but we recommend you use double quotes. That’s because strings often include apostrophes. If you’re using a single quote mark (the same symbol as an apostrophe) to close the string, Python thinks it’s reached the end of the string when it hits the apostrophe. If you do need to use an apostrophe inside a string that’s marked at each end with a single quote, put a (slash) before the apostrophe (for example, 'Mum's custard'). It’s easier to just use double quotes for your strings.
You can put all your list items on one line, but it’s easier to read if you put each item on a new line. Using IDLE, if you press Return at the end of a list item, it starts the next line indented to the same depth as the item above, so your list looks neat, as in the previous example. When you’re using IDLE, your program is color-coded too, so the black commas stand out against the green list items.
When you’re entering lists, pay particular attention to the commas. There should be one after every list item, except for the last one. This is another reason it’s a good idea to put list items on separate lines: It makes it easier to see at a glance if a comma is missing.
You can print a list to screen in the same way you print a variable to the screen. Try this in the shell:
>>> print shoppinglist
['eggs', 'bacon', 'tomatoes', 'bread', 'tin of beans', ![]() 'milk']
'milk']
Python uses single quotes around the strings in your list, irrespective of what kind of quotes you used to set it up. To find out how many items are in a list, use the len() function, like this:
>>> print len(shoppinglist)
6
What if you’ve forgotten something? You can easily add items to the end of the list using the append() function. Here’s an example:
>>> print shoppinglist
['eggs', 'bacon', 'tomatoes', 'bread', 'tin of beans', ![]() 'milk']
'milk']
>>> shoppinglist.append("fish")
>>> print shoppinglist
['eggs', 'bacon', 'tomatoes', 'bread', 'tin of beans', ![]() 'milk', 'fish']
'milk', 'fish']
Each item in the list has a number, starting at zero, which means the second item is number 1 and the third item is number 2 and so on. You can refer to a particular item by putting the item number (known as the item’s index) in square brackets:
>>> print shoppinglist[3]
bread
That gives us the fourth item in the list, remember, because the first item has the index 0. You can also change items in the list by using their index number. For example, if we wanted to change the fourth item from bread to a baguette, we would use
>>> shoppinglist[3] = "baguette"
For Chatbot, that’s everything you need to know about lists, but they’re an incredibly flexible way of organizing information and there’s much more you can do with them. Table 11-2 provides a cheat sheet for some of the other functions, if you want to experiment.
Table 11-2 Additional List Operations
|
Action |
Code to Use |
Notes |
|
Sorting a list |
shoppinglist.sort() |
Sorts alphabetically, or from low to high in number lists. |
|
Sorting a list in reverse order |
shoppinglist.sort |
Sorts in reverse alphabetical order, or from high to low in number lists. |
|
Deleting a list item |
del shoppinglist[2] |
Deletes the list item with the index number specified. List items after it move up the list, so no gap is left. |
|
Removing an item from the list |
if "eggs" in shoppinglist. |
Deletes the list item that matches the item given. Results in an error if the item isn't in the list, so use the if command to avoid this. |
For other projects you work on, it’s worth knowing that lists can include numbers as well as strings, and can even include a combination. For example, here’s a list of answers to quiz questions:
Myquizanswers = ["Isambard Kingdom Brunel", ![]() 1945, 2012, "Suffragettes",
1945, 2012, "Suffragettes", ![]() 7500, "Danny Boyle"]
7500, "Danny Boyle"]
A list can have any items in any order. Python doesn’t understand what the list contents mean or how they’re organized. To make sense of it, you need to write a program that interprets the list.
Using lists to make a random chat program
After you’ve mastered the list structure, you can create a simple chat program. For this first version, you take some input from the player, display a random response, and then replace that random response with whatever the player types in.
Here’s the program that does that. It introduces a few new ideas, but we talk you through them all shortly:
# Chatbot – random-only version
# Example program from Raspberry Pi For Dummies
import random
randomreplies = ["Oh really?",
"Are you sure about that?",
"Hmmmmm.",
"Interesting...",
"I'm not sure I agree with that...",
"Definitely!",
"Maybe!",
"So what are you saying, exactly?",
"Meaning what?",
"You're probably right.",
"Rubbish! Absolute nonsense!",
"Anyway, what are your plans for tomorrow?",
"I was just thinking exactly the same.",
"That seems to be a popular viewpoint.",
"A lot of people have been telling me that.",
"Wonderful!",
"That could be a bit embarrassing!",
"Do you really think so?",
"Indeed...",
"My point exactly!",
"Perhaps..."]
print "What's on your mind?"
playersays = raw_input("Talk to me: ")
replychosen = random.randint(1, len(randomreplies)) - 1
print randomreplies[replychosen]
randomreplies[replychosen] = playersays
The first two lines are comments, a quick reminder of what the program does.
Python has been designed to be easily extended, and so the next line, import random, tells Python you want to use the extension for generating random numbers. Extensions like this one are called modules, and you use several different modules as you play with the projects in this book. The modules provide pre-written functions you can reuse in your programs, so they simplify and accelerate your own programming. The random module includes functions for generating random numbers, and will be essential when you want to pick a random response for the computer to display.
The next part of the program creates a list called randomreplies, which contains statements the computer can say in response to whatever the player enters. You can personalize this by changing the responses, or adding more in. The more there are, the more effective the illusion of intelligence is, but for this demo, we’ve kept the list fairly short. It doesn’t matter what order the responses are in, but keep an eye on those commas at the end of each line.
After printing a short line that invites the player to share what’s on their mind with the computer, we request input from them. Instead of using the input() function, we use a function called raw_input(). That’s because we are asking the player to enter a string and not a number this time. In Python 2.7, you have to use raw_input() for strings. Whatever the player enters is stored in a variable called playersays.
The next line picks an index number for the random response. In order to understand how this works, it helps to break it down. First, you need to know how to generate random numbers. You give the random.randint() function two integer numbers to work with (or arguments). The two numbers specify how big you want your random number to be, with the first figure being the lowest possible value and the second figure being the highest possible number. For example, if you wanted to display a random number between 1 and 10, you would use
print random.randint(1, 10)
You can try this multiple times to check whether it works. Sometimes the numbers repeat, but that’s the nature of random numbers. It’s like rolling the dice in Monopoly. Sometimes you’re stuck in jail, but sometimes you throw doubles.
The range of numbers we want to use for our random number is the size of our randomreplies list. As you know, we can use the len() function to check what this is, so you can add things to your list or remove them without having to worry about updating this part of your program. In our random statement, we replace the second number with the length of the list:
print random.randint(1, len(randomreplies))
We don’t want to just print the result onscreen, however, so we store the number chosen in a variable called replychosen. There’s one final twist: Because list indexes start counting at 0, we need to subtract one from the random number. Otherwise, the program would never choose our first list item, and would try to choose one at the end of the list that isn’t there. Here’s the final command we use:
replychosen = random.randint(1, len(randomreplies)) - 1
The final two lines print the randomly selected list item, and then replace that list item with whatever the player entered:
print randomreplies[replychosen]
randomreplies[replychosen] = playersays
You can run the program to test it, but there’s one thing missing. At the moment, it just gives you one turn before finishing. To fix that, you need to learn about the while loop.
Adding a while loop
Previously, we used the for loop to repeat a piece of code a set number of times. For this program, we want to keep the conversation going until the player types in bye, so we need to use something called a while loop.
The section we want to repeat begins with the line that requests the player’s input, and finishes where the program currently ends, with the player’s entry going into the list of random replies.
To repeat this section, we add two lines at the top of the section, and then indent it, so that Python knows which commands to repeat:
playersays = ""
while playersays != "bye":
playersays = raw_input("Talk to me: ")
replychosen = random.randint(1, len(randomreplies)) - 1
print randomreplies[replychosen]
randomreplies[replychosen] = playersays
IDLE makes it easy to indent an existing chunk of your program: Click and drag the mouse to highlight it, and then click to open the Format menu at the top of the script mode window and click Indent Region. You can use the Dedent Region option to take indentation out of a highlighted section.
The while command tells Python to repeat the indented block below as long as the second half of the while command is true. The != operator means not equal to. In our program, the second half of the while command is playersays != "bye", which means the block below should keep repeating as long as the contents of the variable playersays are not equal to bye.
In order to use the playersays variable in the while command, you have to set it up first because it triggers an error if you try to use a variable that doesn’t exist yet in a while command. Immediately before the while command, you create the variable and give it a blank value, just to get the program past the while command and into the loop. Almost immediately it changes when the player types something in, but that doesn’t matter.
If you run the program now, you should find the conversation rambles on until you type in bye. Remember you can improve the quality of the experience by adding more random sayings in the program’s random replies list.
Using a loop to force a reply from the player
Another trick we can perform with the while loop is to make sure that the player doesn’t just press Enter without typing anything in, either accidentally or deliberately. That protects the extremely high quality of our random replies list (ahem!) by preventing empty entries from going into it. In more complex programs, a quality control check like this can be essential for preventing errors.
You can put loops inside loops, which is called nesting them. In this case, we’ll have a small loop that keeps asking for input until it gets it, running inside the bigger loop that repeats the whole process of the conversation until the player enters bye.
To check whether something is equal to something else, we use two equal signs (=) together. This can be confusing to new programmers, but a single equal sign is only used to assign a value to something, such as when you’re putting a value into a variable. When you want to compare the value of two things to see if they’re the same, you use two equal signs together. In English, we use the same word, but they’re completely different ideas when you think about it, and Python certainly considers them as being separate and unique concepts.
The code below puts a while loop around the input, so that it repeats as long as the playersays variable is empty. If the player doesn’t type anything in and just presses Enter, he is prompted to enter something again. And again, and again if necessary.
playersays = ""
while playersays != "bye":
playersays = ""
while playersays == "":
playersays = raw_input("Talk to me: ")
replychosen = random.randint(1, len(randomreplies)) - 1
print randomreplies[replychosen]
randomreplies[replychosen] = playersays
Notice how we indented the input command, so that Python knows what should be repeated while the playersays string is empty.
You might read this and wonder why we’ve set up playersays as an empty variable twice. The first time is necessary because the while command can’t reference a variable that doesn’t exist yet. The second time is a special case: If we don’t reset the value to nothing, the second time around the loop, playersays still contains what the player typed in the first time. The way a while loop works means that the block underneath, the input() function, isn’t run because playersays already has something in it. That code only runs if playersays is empty. This is a nice example of a logic error. The program works in that Python doesn’t complain or crash. The program chatters away to itself, however, not letting you get a word in, so it doesn’t work as intended.
Using dictionaries
Besides lists, there is another data structure that we’re going to use in our program, called a dictionary. To access an item in a list, you use an index number, which represents its position in the list. Dictionaries are different because to access an item, you use its key, which is a string or a number that uniquely identifies it. The idea is used a lot in computing. Your bank account number, for example, belongs to you and only you, so it’s a unique key for your data. Unlike with a list, you don’t need to know where that item is in the dictionary to be able to use it — you just need to know the key that identifies it.
Dictionaries use curly braces, and contain pairs of items, which are the keys and the values for those keys. If that sounds confusing, here’s an example that won’t seem too different from the paper dictionary on your bookshelf:
chatdictry = {"happy": "I'm happy today too!",
"sad": "Cheer up, mate!",
"raspberry": "Oh yum! I love raspberries!",
"computer": "Computers will take over the ![]() world! You're already talking to one",
world! You're already talking to one", ![]()
"music": "Have you heard the new Lana Del Rey ![]() album?",
album?",
"art": "But what is art really, anyway?",
"joke": "I only know this joke: How do you ![]() kill a circus? Go for the juggler.",
kill a circus? Go for the juggler.",
"python": "I hate snakes!",
"stupid": "Who are you calling stupid, jelly ![]() brain?",
brain?",
"weather": "I wonder if the sun will shine on ![]() Saturday?",
Saturday?",
"you": "Leave me out of this!",
"certain": "How can you be so confident?",
"talk": "You're all talk! Do something!",
"think": "You can overthink these things, ![]() though.",
though.",
"hello": "Why, hello to you too, buddy!",
"wearing": "I don't wear clothes. I don't even ![]() come with a case."}
come with a case."}
In this example, we’ve given the dictionary the name chatdictry, but you can call it anything. You can have more than one dictionary in your program too, if you give them different names.
In this dictionary, we look up a word to see what the reply to it should be. For example, if someone uses the word happy, the computer should reply “I’m happy too.” If we look up the word hello, we can see the computer’s response should be “Why, hello to you too, buddy!” Each dictionary entry is made up of the key and its value, separated by a colon, for example, the key happy and its value, which is the computer’s response to that word. The entries are separated from each other with a comma.
The punctuation here is quite fiddly, so take care. The strings have quotes around them, but the colon between the keys and their values must be outside the quotes. Each pair needs to end with a comma except the last one, and we’re using curly braces (usually found on the same key as the square brackets).
Dictionaries only work if every key is unique. You can’t have two entries in there for the word happy, for example; otherwise, Python wouldn’t know which one to choose.
Dictionaries only work one way around: You can’t use the value to look up the key. One way to remember this is to think of a real paper dictionary. It would be almost impossible to trace a particular definition back to a word because you wouldn’t know what page you could find the definition on. Finding definitions from the words is simple, though.
Here’s how you print a value from the dictionary:
>>> print chatdictry["hello"]
Why, hello to you too, buddy!
>>> print chatdictry["weather"]
I wonder if the sun will shine on Saturday?
If you try to use a key that doesn’t exist in the dictionary, you trigger an error. Later in this chapter (see “Creating the dictionary look-up function”), we show you how to test whether a key is in the dictionary.
In the real program, we’ve extended the vocabulary to cover some other words too, and this is where you can stamp your identity on the program most clearly. The words you put into the vocabulary, and the responses you give to go with them, are what really gives the chat character its intelligence and personality, so after you’ve got the demo working, it’s worth spending time refining the language here. When you try playing with the finished program, take a note of the kinds of words you type in, and the kinds of things you want to chat about, and use that understanding to shape your Chatbot’s vocabulary.
You can use the responses you give here to steer the conversation. We’ve included a joke for when players ask the computer to tell them one (as they inevitably do). Our full definition list also recognizes the word funny because that is reasonably likely to come up in the player’s response to the joke. (Possibly in the context of “not very,” but heigh-ho!)
Creating your own functions
One of the things you can do in Python, and many other programming languages, is parcel up a set of instructions into a function. A function can receive some information from the rest of the program (one or more arguments), work on it, and then send back a result. In our Chatbot program, we’ll use a function to look up whether any words entered are in the dictionary of known words and responses.
Before we can use a function, we have to define it, which we do using a def statement. To tell Python which instructions belong in the function, we indent them underneath the def statement. Here’s an example program to familiarize you with the idea of functions, and how we’ll be using it:
# Example of functions
def dictionarycheck(message):
print "I will look in the dictionary for", message
return "hello"
dictionarycheck("test message")
result = dictionarycheck("test message2")
print "Reply is:", result
We talk you through that program in a moment, but here’s a glimpse of what is shown onscreen when you run it:
I will look in the dictionary for test message
I will look in the dictionary for test message2
Reply is: hello
This is a short but powerful program because it tells you nearly everything you need to know about functions. As you can see, we defined our function at the start of the program, with this line:
def dictionarycheck(message):
This sets up a function with the name dictionarycheck(), but also sets it up to receive a piece of information from the rest of the program and to put it into the variable we’ve called message. The next line prints out a statement saying “I will look in the dictionary for” followed by the contents of the variable message. That means it prints out whatever information is sent to the function. The next line starting with return exits the function and sends a message back, which in our example is hello.
Functions are self-contained units so the variable message can’t be used by the rest of the program (it’s what’s known as a local variable). When you’re writing your own functions, you should give them a job to do, and then use return to send the result back to the rest of the program.
Functions aren’t run until you specifically tell the program to run them, so when Python sees the function definition, it just remembers it for when it needs it later. That time comes shortly afterward, when we issue the command:
dictionarycheck("test message")
This runs our dictionarycheck() function, and sends it the text “test message” to work with. When the function starts, Python puts “test message” into the function’s variable called message, and then prints the text onscreen that contains it. The text “hello” is sent back by the function, but we don’t have a way to pick up that message.
The next code snippet shows you how you can pick up information coming back from a function. Instead of just running the function, you set a variable to be equal to its output, like this:
result = dictionarycheck("test message2")
print "Reply is:", result
When the text “hello” is sent back by the function, it goes into the variable result, and the main program can then print it on the screen.
This simple example illustrates a few reasons why functions are a brilliant idea, and have become fundamental building blocks in many programming languages:
- Functions enable you to reuse parts of your program. For example, we’ve used our function to display two different messages here, just by sending the function a different argument each time. When you use more sophisticated programs, being able to reuse parts of your program makes your program shorter, simpler, and faster to write.
- Functions make understanding the program easier because they give a name and a structure to a set of instructions. Whenever someone sees dictionarycheck() in our program, she can make a good guess at what’s going on. So far, our programs haven’t been particularly complex, but as you work on bigger projects, you’ll find readability becomes increasingly important.
- It makes it easier to maintain and update your program. You can easily find which bits of the program to change, and all the changes you need to make will be in the same part of the program. If we think of a better way to do a dictionary look-up later, we can just modify the function, without disturbing the rest of the program.
- Functions make prototyping easier. That’s what we’ve done here: We’ve built an experimental program that takes some text and sends back a message. That’s what our finished dictionarycheck() function will do, except that this one just sends the same message back every time and the finished one will send different messages back depending on what the player said. We could build the rest of the program around this prototype to check it works, and then go back and finish the dictionarycheck() function.
Creating the dictionary look-up function
Now that we know how to create a function, we’re going to build a function that takes the player’s text and checks for any relevant responses. To do this, we’ll use what we’ve learned so far about dictionaries and functions, and we’ll add in some new ideas relating to loops, strings, and decision-making.
The function is only 12 lines long, but it’s quite sophisticated. It needs to take what the player entered, and check each word in it to see whether the dictionary has a response for that word. The player might use more than one word that’s in the dictionary. For example, if the player says “I love pop music,” the words love and music might both be in the dictionary. We’ll deal with that eventuality by showing one of the possible responses, chosen at random. Alternatively, the player might use no words the program recognizes, so we need to design our function to cope with that situation too.
Before we start to break it down, here’s the function in its entirety, so you can see how all the bits fit together:
def dictionarycheck(message):
message = message.lower()
playerwords = message.split()
smartreplies = []
for eachword in playerwords:
if eachword in chatdictry:
answer = chatdictry[eachword]
smartreplies.append(answer)
if smartreplies:
replychosen = random.randint ![]() (1, len(smartreplies)) - 1
(1, len(smartreplies)) - 1
return smartreplies[replychosen]
else:
return ""
The function definition is the same as we used in our example function previously. When we use it, we send it what the player has typed in, so this goes into the variable called message.
The next two lines introduce something new: string methods. These are like built-in functions that are attached to a string and transform it in some way. The lower() method converts a string into lowercase. This is important because if a player uses capital letters or mixed case, they won’t match the lowercase words we’ve used in our dictionary keys. As far as Python is concerned, hello and Hello aren’t the same thing. The split() method takes a string and splits it into a list of its constituent words. The first two lines in our function, then, turn the contents of the message variable into a lowercase version of itself, and then create a new list of the words the player entered, called playerwords.
We’re going to store possible replies to the player in a list called smartreplies, so we create that as an empty list.
The next step is to set up a loop that goes through the list of words that the player entered in turn. When we used a for loop previously, we worked our way through a sequence of numbers. This time, we’re going to work our way through a list of words. Each time around the loop, the variable eachword contains the next item from the list of words the player entered.
The next line introduces a new idea, the conditional statement, which starts with if. A conditional statement is used to enable the computer to make a decision about whether it should carry out certain instructions, and you’ll come across it in almost every program you write. Here, it’s being used to avoid the program stopping and reporting an error if we try to use a key that isn’t in the dictionary:
if eachword in chatdictry:
answer = chatdictry[eachword]
smartreplies.append(answer)
The eachword variable contains one of the words the player entered, so the if statement checks whether that word is in the dictionary and only carries out the next two instructions if they are. Notice how indenting is used here to show which commands belong together — in this case, which commands are controlled by the if statement. If the word is in the dictionary, the program looks it up and adds the resulting response to the smartreplies list, using append().
This process is repeated for every word the player entered, but that’s all that happens in the loop. The next line is not indented below the for statement, so it’s not controlled by it.
When we come out of the loop, we check whether the list smartreplies has anything in it, by using simply
if smartreplies:
In English, this means “if smartreplies has content in it.” The commands indented underneath are carried out only if some entries were added to the smartreplies list, which only happens if one or more of the words the player entered were found in our dictionary. In that event, we want to return one of the items in the smartreplies list to the main program, so we pick one at random from the list and use return to send it back to the main program and exit the function.
After that, we use the else command. In plain English, this means otherwise, and it’s joined to the if command. So if smartreplies has content in it, the commands are carried out to send back an appropriate reply, chosen at random. If none of the player’s words were found in the dictionary and so smartreplies is empty, the instructions indented underneath the else command are carried out instead. The function sends an empty message ("") back to the main program and exits the function.
Creating the main conversation loop
We previously created a version of Chatbot that could only provide random responses. Now we need to change the main conversation loop so it checks for words in the dictionary and shows an intelligent response if they’re found, and if not, shows a random response and replaces it with what the player entered. This final version brings together all the ideas we’ve explored as we’ve built this program.
After the command that accepts the player’s input, we put the following:
smartresponse = dictionarycheck(playersays)
if smartresponse:
print smartresponse
else:
replychosen = random.randint ![]() (1,len(randomreplies)) - 1
(1,len(randomreplies)) - 1
print randomreplies[replychosen]
randomreplies[replychosen] = playersays
This starts by using the dictionarycheck() function (or calling it, to use the jargon), sending it whatever the player typed in, and putting the response from the function into the variable smartresponse.
The next line checks whether smartresponse has any content in it (or is not empty), and if so, it prints it onscreen. After that, we use the else command. If smartresponse has content in it (or is not empty), it is printed onscreen. Otherwise, the instructions under the else command are used to show a random response from our list of random replies, and to replace it with what the player entered.
Final thoughts on Chatbot
That completes the Chatbot program. Along the way, you’ve learned how to use variables, lists, loops, random choices, dictionaries, conditional statements (if and else), and functions. You’ve learned how to take input from the user and print responses onscreen, and you’ve created the skeleton of a chat program you can flesh out with your own personality.
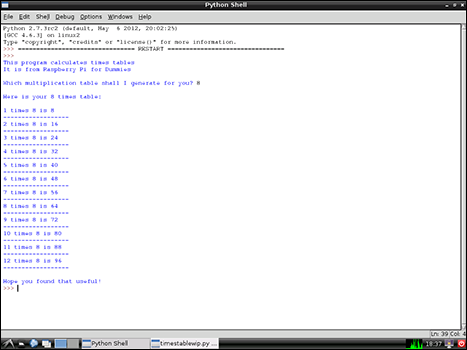
Figure 11-5 shows a sample run of the program. There are a few bits where the computer clearly hasn’t understood, but this can be improved by extending the vocabulary. As you expand the vocabulary in the dictionary and include more random replies in the list, you’ll find the program can often surprise you with its apparent intelligence. You’re never alone with a Raspberry Pi!
Copyright © 2001–2012 Python Software Foundation; All Rights Reserved
Figure 11-5: Having a conversation with Chatbot.
The final Chatbot program
For your reference, here’s a final listing of the Chatbot program, ready for you to customize with your own responses.
# Chatbot
# Example program from Raspberry Pi For Dummies
import random
# Following list is heavily abbreviated
# to save space in the book. Should be 20+ entries.
randomreplies = ["Oh really?",
"Are you sure about that?",
"Perhaps..."]
# Following dictionary is also heavily abbreviated
chatdictry = {"happy": "I'm happy today too!",
"sad": "Cheer up, mate!",
"computer": "Computers will take over the ![]() world! You're already talking to one"}
world! You're already talking to one"}
def dictionarycheck(message):
message = message.lower()
playerwords = message.split()
smartreplies = []
for eachword in playerwords:
if eachword in chatdictry:
answer = chatdictry[eachword]
smartreplies.append(answer)
if smartreplies:
replychosen = random.randint ![]() (1, len(smartreplies)) - 1
(1, len(smartreplies)) - 1
return smartreplies[replychosen]
else:
return ""
print "What would you like to talk about today?"
playersays = ""
while playersays != "bye":
playersays = ""
while playersays == "":
playersays = raw_input("Talk to me: ")
smartresponse = dictionarycheck(playersays)
if smartresponse:
print smartresponse
else:
replychosen = random.randint ![]() (1, len(randomreplies)) - 1
(1, len(randomreplies)) - 1
print randomreplies[replychosen]
randomreplies[replychosen] = playersays
print "Goodbye. Thanks for chatting today. Drop in again ![]() soon!"
soon!"