
Your first game is going to be a Flappy Bird clone. While this might seem like a complicated task, it really can be broken down to a few easy scripts.
What kind of a game is Flappy Bird? It is a game where your goal is to keep on pressing a button to make a bird rise as it is constantly falling while navigating its way through the pipes of varying heights that are coming at it.
It can be broken down as follows:
- Every button press makes the bird go up on the y axis
- Every second the button isn't pressed the bird goes down the y axis
- A pipe starts at the right end of the x axis and moves left toward the bird
- When the pipe reaches the far left corner without touching the bird, you earn a point and the pipe disappears
- If the bird touches the ground or the pipe, then the game is over
So, now we know we need a minimum of two sprites: a bird and a pipe.
What else will we need? We will need a background, a floor, some variables, and a few costumes.
Before we begin, let's create a new project for our Flappy Bird clone. To do so, click on the File menu and then click on New. A brand new Scratch project will appear.
Now that we know what we need, we can start by creating our variables:
- Click on the Variables button, and then click on Make a variable. It will ask you for a name, and display two options: For all sprites and For this sprite only. Ensure that you click on For all sprites.
- Our first variable will be named
score. Type this and click on OK. Thescorevariable will be used to keep track of how many walls you have passed. It will go up by one each time.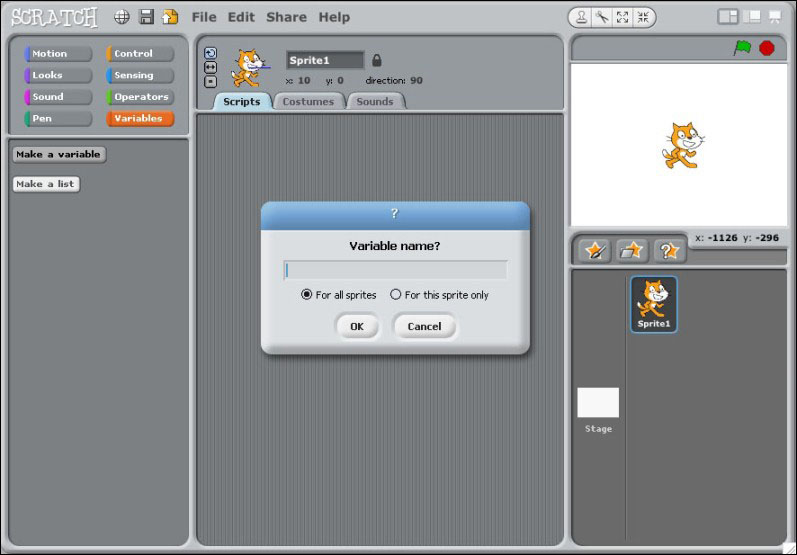
Now, make three more variables with the following names:
scroll: This will be used to keep track of where the floor is, since it will be movingtime: This will keep track of how many seconds have passed since you started the gamepipeX: This will keep track of where the pipe is across the screen
With our variables created, it is now time to create our game's backgrounds using the following steps:
- Click on Stage in the right column, and then click on Backgrounds.
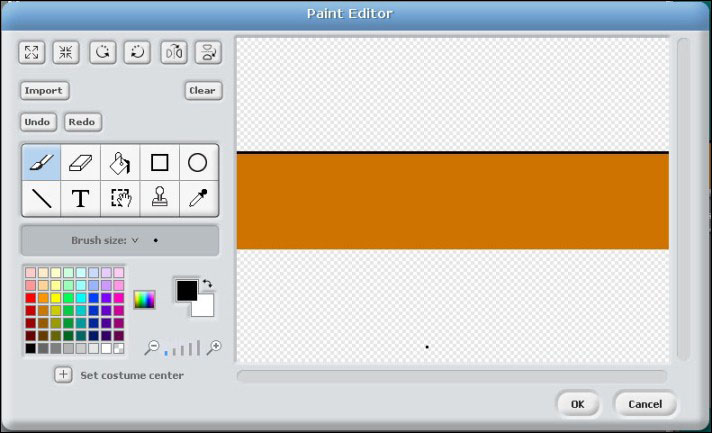
- Click on Edit. You will now be in Paint Editor.
- Click on a color, then the paint can (fill tool), and click anywhere on the white area. Then click on OK. You have now changed the background of your game.
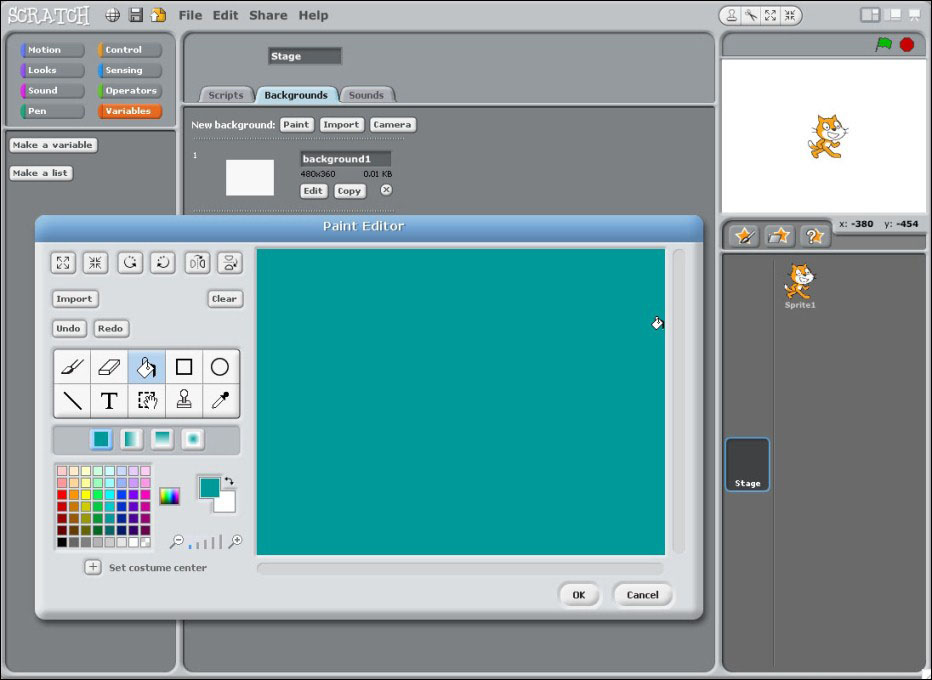
- Click on Copy three times, and then edit each background to be a different color.
- Now, click on Scripts. We will add the first scripts to our game.
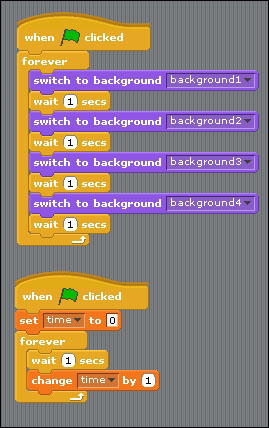
- When the green flag is clicked, it sets the background to the next background, waits for one second, and then sets it to the next. It will repeat this forever until the game is over.
- The second script also waits for the green flag to be clicked. It then sets the variable time to
0, and adds 1 to it every second using a forever block. The forever block repeats what's inside of it until the game is stopped.
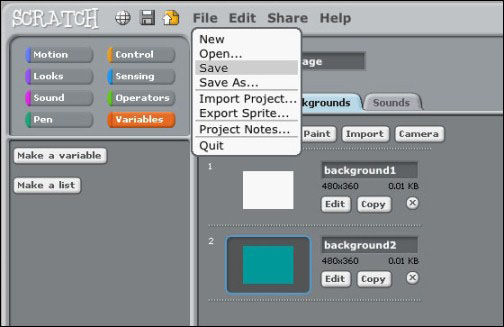
If you click on the green flag, you should see the background change. Now would be a good time to save your game as well. Click on File, then choose Save. Give your game a name and click on OK.
The floor of the game serves two purposes. The first, is to make it look like you are moving because the floor scrolls across the stage. The second, is to be an avoidable object. If you touch the floor, the game is over. Our floor is actually going to be two sprites.
Let's start with the first one:
- On the right-hand side of the window is an option to create a new sprite. You have three options: Paint new sprite, Choose new sprite from file, or Get a surprise sprite.
- Create a new sprite by clicking on the Paint new sprite button.
-
Now, use the line tool
 and draw a line all the way from the left to the right. Then fill it in with a color using the bucket tool
  .
.
- Click on OK. Name your sprite
Floor1by clicking on the name textbox in the middle column.
Now, let's create the scripts as follows:

The first floor sprite has three scripts:
- The first script sets the scroll variable to
0, and then until the game is over, it decreases by1. - The second script puts the floor into position. After setting the floor to be the front-most item, it sets the y position to
-180. This puts it at the bottom of the stage. It then sets the x position of the floor to the current value of the scroll variable. This will make it move.- You will initially drag the set x to 0 motion to the scripts column.
- You will then drag the variable scroll over the 0 to change it.
- The third script resets the scroll variable to
0if it reaches the end of the screen.
Press the green flag button to watch the floor scroll. It seems like there's a small problem though: the floor isn't long enough. It scrolls off the screen with nothing behind it until it reaches the end. Don't worry though. It's a simple fix!
- Right-click on Floor1 and then click on Duplicate.
- You should now have a complete copy of your floor sprite. You should rename it to
Floor2. Now, click on it and choose Scripts. We have to make a few adjustments. - Delete the first and third script from
Floor2. You can do this by clicking and dragging them to the first (leftmost) column. - Now, edit the remaining script to look like this:
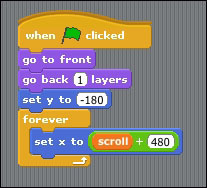
By setting x to scroll + 480, you will now have a second floor that follows the first floor and continually repeats.
You can add some color and some grass to the costume to add to the scrolling effect.
The pipes are relatively straightforward. It is one sprite, with three costumes, and one script to make it scroll across the screen.
- Click on Create new sprite and draw a pipe. Mine is just a long black rectangle going all the way from the bottom to the top of the editor.
- Use the rectangle tool to select a portion of the pipe and press Delete. You now have the area to fly through.

- Copy the costume two more times. This time refill in the hole and create a new one at a different spot in the pipe.
Now, let's make the pipe scripts!
The following steps explain the making of pipe scripts:
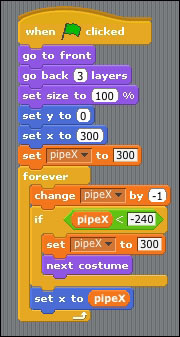
- When the green flag is clicked, move the pipe to the top of the layer, and then back three layers. This will make it appear behind the floor.
- The set size is a new command. This allows you to make the sprite bigger or smaller. Experiment with the size until you are happy with how it looks. You can also change this to affect the difficulty of the game. If you don't see the hole in the middle of the wall, it maybe because the size is set too high.
- Then, set y to
0, which puts the wall right in the middle of the screen, and x to300, which moves it off the screen to the right. - Set the pipeX variable to
300. We will use that variable later. - In our forever loop, subtract 1 from pipeX. Then check whether pipeX is less than
-240. This allows us to check where it is on the screen. If it is less than-240(which puts the pipe to the left of the screen), reset the position of the pipe to the far right, by setting pipeX back to300. Then, change the costume to the next one. - Finally, set the x position of the pipe to
pipeX. We now have a scrolling pipe!
Now, it's time to make our main character! This sprite is going to need two costumes: one with the wings up and one with the wings down. Luckily, Scratch already includes costumes, so you don't have to draw it yourself (but feel free to do so if you want!).
- If you haven't removed Scratchy yet, right-click on the Scratchy sprite icon in the right column, and select delete.
- Under the game stage, you'll see the Choose new sprite from file option. Click on that option.
- A pop up will be displayed showing a list of folders; choose the folder Animals.
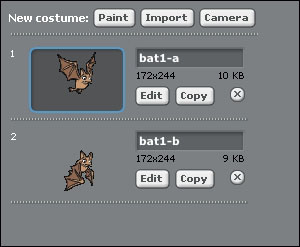
- For my example, I choose bat1-a as shown in the following screenshot:
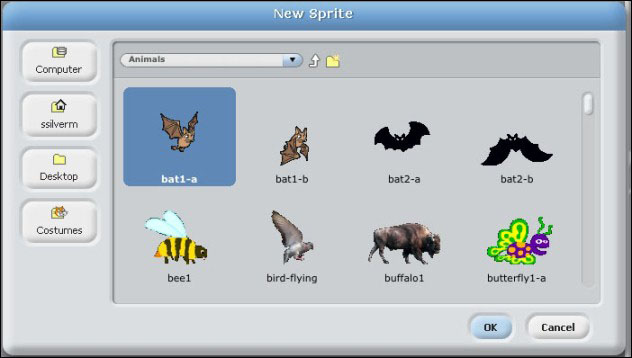
- Double-click on it, and you will see it appear on your stage and in the sprite panel. Select it, and then click on Costumes.
- Next, in New costume, select Import and choose bat1-b. Your sprite now has the costumes that it needs to look like it's flying.
- If you feel like drawing your own costume for your sprite, select Paint instead.
Now, let's work on the scripts for our bat!
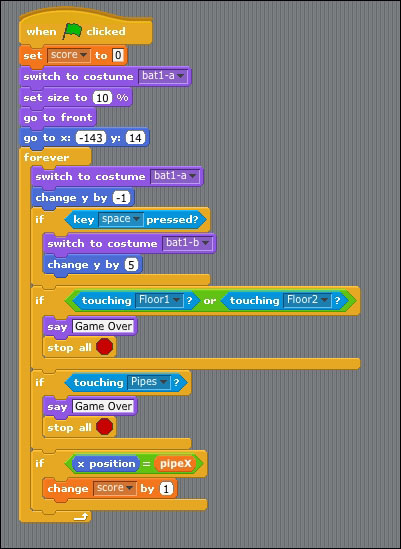
When the green flag is clicked, set the score variable to 0, switch to the costume with the bat wings up, set the size to be 10 percent of the original sprite size, go to the topmost layer, and then move to those x and y positions. Play around by changing the size of your bat and experimenting with the x and y positions. Changing these will affect the difficulty of your game.
Now, we enter our forever loop. Each time this loop occurs, we set the sprite to be the bat with wings up, and move it down by 1 on the stage. This next block introduces us to user input. It says that if the space key is pressed on your keyboard, then it should switch to the bat with wings down and move up the stage by 5. You can change the key to be anything on your keyboard. You can also change the 5 to increase or decrease the height at which the bat flies per button press.
The next two if blocks follow the same formula. If your bat sprite touches Floor1, Floor2, or the pipes, then Game Over will appear next to the sprite and the game will stop.
Finally, if the x position of the bat is equal to the value of pipeX, then you should change the score by 1, since it indicates that you have passed through one of the pipes successfully.
Now, try out your game!
Now that you have created your Flappy Bird clone, you should try to enhance and modify it. Here are some ideas:
- Add a multiplayer option
- Create a game over screen by making a new background and setting it to the screen that appears when you touch a pipe
- Make a scrolling background
- Try making the pipes scroll faster or appear at random times
When you are ready, we can move onto the next game.