
In this chapter, we will go through many of the types of gaming input devices that we can connect to our Raspberry Pi. From fightsticks (or joysticks), gamepads, console controllers, to building your own, there are all sorts of options available.
In this chapter, you will learn how to:
- Enable Bluetooth connectivity
- Set up Xbox and PlayStation controllers
- Use a USB encoder
- Use the GPIO pins to build your own controller
- Troubleshoot problem controllers
Before we begin, you will want to install the joystick package to your device. Type sudo apt-get –y install joystick at the command line and press Enter. The joystick package includes an application called jstest, which will help you identify and troubleshoot your controllers.
When a controller is connected and recognized by the Raspberry Pi, a new entry will be made in the /dev/input/ folder. This folder contains a list of all connected input devices. You should see files like event0, mouse0, and kb0 depending on what has been connected. When your controller is connected, you should see a new item called js0. The 0 at the end of the item indicates the order in which it was connected. You can have multiple items connected, and they will each get an increasing number.
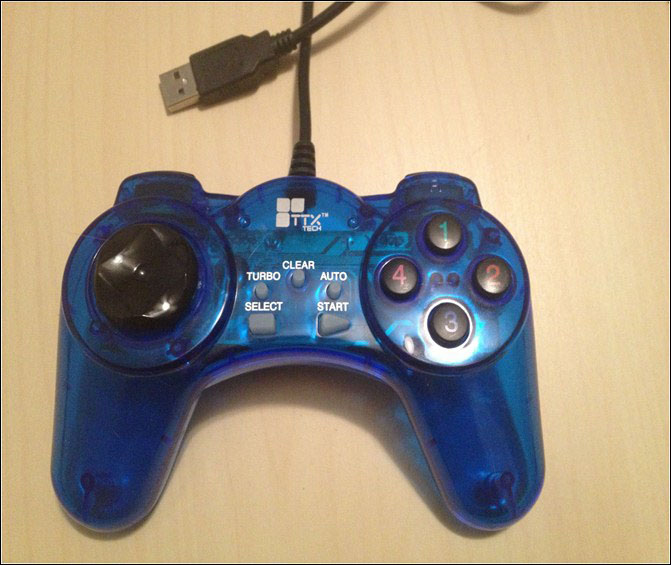
Gamepads are one of the simplest types of controllers for the Raspberry Pi. They can come in different shapes, sizes, and can have different combinations of buttons. These types of controllers are usually modeled after popular consoles, and made to look like NES, SNES, Genesis, or PlayStation gamepads. The major advantage of these is that they are compact, handheld, and very portable.
As long as the gamepad is connected via USB, it will be Plug and Play on the Raspberry Pi.
Arcade sticks, also known as fightsticks, are a very popular choice to connect to the Pi. Fightsticks come in hundreds of variations, and can be custom-built, custom-configured, upgraded, and modified. In all likelihood, you won't find two pro fightsticks that are 100 percent the same.
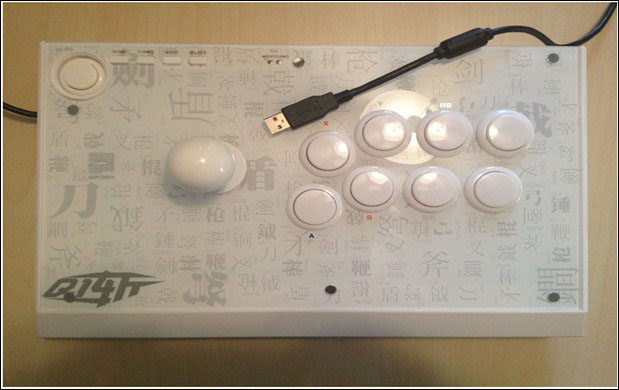
The reason behind this, is that each person has their own preference when it comes to buttons, joysticks, and encoders. Some people prefer the American style Happ buttons, while others swear by the Sanwa Japanese style buttons. There are those who prefer ball top joysticks while others use bat style joysticks.
The great part about this, is that the button sizes and joysticks are generally interchangeable. Buttons can be swapped around, and joysticks commonly use two different screw variations.
Just like gamepads, Arcade sticks connect easily to the USB port of a Raspberry Pi and should be just Plug and Play.
Xbox 360 controllers come in two varieties: wired and wireless. Wired Xbox 360 controllers are Plug and Play in the latest version of Raspbian.
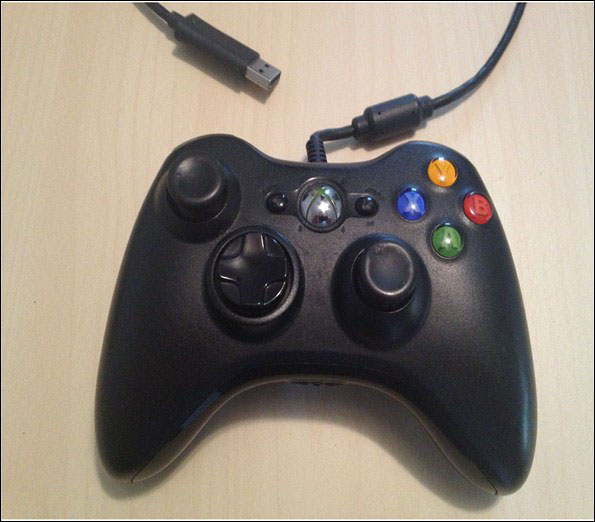
When you plug in your controller, the guide lights will blink on and off repeatedly. If you wish to have it function like an actual Xbox controller, where only the single-player guide light is activated, you will need to use a free open source program called xboxdrv. Xboxdrv allows you to customize buttons, activate a controller, and use the wireless USB adapter for Xbox 360 controllers. Follow the given steps to install xboxdrv:
- Type
sudo apt-get –y install xboxdrvon the command line and press Enter. - To test whether it works, plug in your Xbox controller, type
sudo xboxdrv --kernel-detach-driverand press Enter. - The lights on the controller should stop blinking and be replaced with one solid light.
- Pressing any button will cause your screen to list the current status of each button.
- Press Ctrl + C to close xboxdrv.

To use xboxdrv normally, type sudo xboxdrv --kernel-detach-driver --silent & and press Enter. This will activate xboxdrv, suppress the screen output whenever a button is pressed, and launch it in the background, so you can still use your Pi for other things. Just run through the following steps:
- To activate xboxdrv at login, type
nano ~/.profile. - Use the arrow keys to go to the end of the file.
- Type
sudo xboxdrv --kernel-detach-driver --silent &. - Press Ctrl + X and then press Y to save the file.
- Now, when you log in to your Pi, xboxdrv will automatically launch and set up your Xbox controller.
If you want to run multiple Xbox controllers on the same Pi, you will need to launch another instance of xboxdrv.
Sony DualShock 3 controllers are very neat. They can be connected to the Raspberry Pi via USB or Bluetooth, and have motion sensors that are read as different axes. The DualShock 3 is Plug and Play compatible with Raspbian, when using the USB cable.
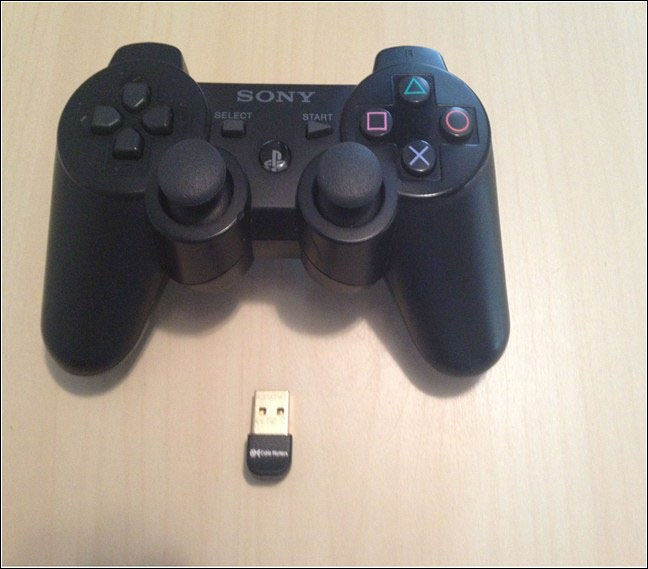
Simply hook up a Micro USB cable end to the controller, and a standard USB cable end to the Pi and you will be ready to go. The Pi will also charge the controller's internal battery. If you are using more than one controller, or you experience odd behavior, switch to a powered USB hub.
Setting it up for Bluetooth connectivity requires that you perform the following steps:
- First, ensure that you have a Raspberry Pi compatible Bluetooth dongle. Most inexpensive dongles will work, but a list of working products is available at http://elinux.org/RPi_USB_Bluetooth_adapters.
- Type
sudo apt-get -y install bluez-utils bluez-compat bluez-hcidump libusb-dev libbluetooth-dev. This install will take a few minutes. - After the install is finished, type
hciconfigand make sure your Bluetooth dongle is listed.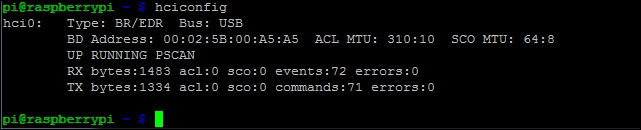
- Now, you will need to download, compile, and install sixad. Download sixad by typing
wget http://sourceforge.net/projects/qtsixa/files/QtSixA%201.5.1/QtSixA-1.5.1-src.tar.gz. If the page is unavailable here, it is also located at http://raspberrypigaming.com/files/QtSixA-1.5.1-src.tar.gz. - Now, type
tar zxfv QtSixA-1.5.1-src.tar.gzand press Enter. This will extract the contents. - Change to the newly created directory by typing
cd QtSixA-1.5.1-src/sixad. - Now, type
makeand press Enter. This will turn the source code into a computer program (compiling) and will take a few minutes. - Next, type
sudo make installand press Enter. This installs sixad into the proper locations, and allows you to run the program by typing sixad without being in a certain folder. - Now, type
sixad --startand press Enter. - When prompted to press the PS key on your controller, press it. You should see a message indicating a connection to your Dual Shock.

- Press Ctrl + C to exit. Your controller will still be paired.
To pair controllers at bootup, you will need to add the sixad program to your profile. Make use of the following steps:
- Type
nano ~/.profileat the command line. - Use the arrow keys to go to the end of the file.
- Type
sixad --start &. - Press Ctrl + X, then press Y to save the file.
- Now, when you log in to your Pi, sixad will automatically launch and ask to pair with your controller.
At the heart of every Arcade stick is a USB encoder. It takes the action of hitting a button and turns it into an input for your Raspberry Pi. Some encoders emulate a keyboard, while others act as an actual joystick. Using an encoder, you can very easily build your own customized controller.
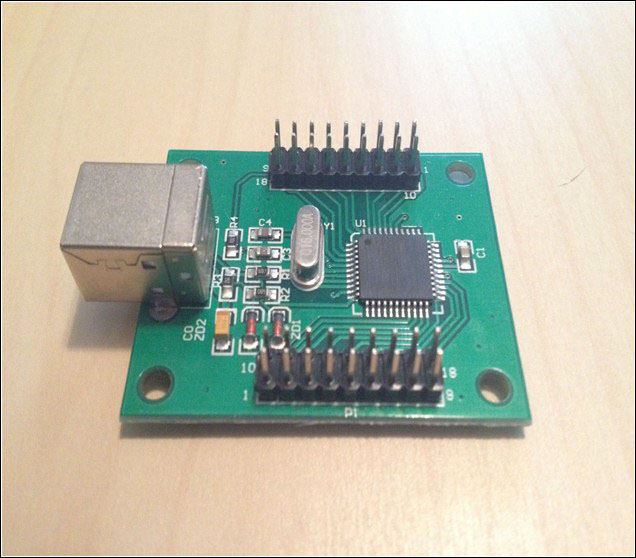
There are hundreds of different encoders out there, but the most common ones are called the No Delay, Zero Delay, and Xin Mo board. All of these boards act as a joystick, and are very simple to wire up.
This is an example of a No Delay USB joystick encoder board. The 8 buttons are wired up to the button pins on the bottom of the board. Each button has a common and ground pin. When the button is pushed down, the connection is completed, sending the signal to the board. The joystick uses the 4 slots at the top of the board for up, down, left, and right movements. The board can also accept joysticks that only use 5 pins. Those are common with ball top sticks. The board includes a USB cable that plugs into the pins on the far-left of the board.
The Raspberry Pi includes pins called GPIO that can be connected directly to a few buttons and a joystick, similar to the encoder boards we saw previously.
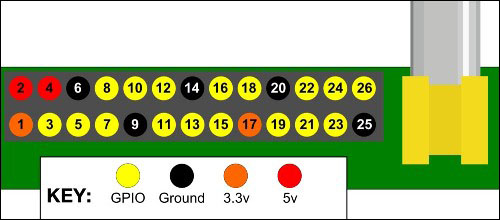
GPIO layout by raspberrypi.org
The preceding layout is of Model A and Model B. Model A+ and B+ include even more pins but are backwards compatible with the A and B pin layout. The pins we are interested in are the yellow and black-labeled pins. The other pins—1, 3, 4, and 17 are power pins. Because the buttons don't require power, we can safely ignore these. All of your buttons' ground wires should connect to a common ground pin. The other wires should individually be connected to an independent yellow GPIO pin.
While pin 8 and 10 look like proper GPIO pins, they are actually serial ports, so you should avoid using them.
Once you have connected the wires, you will need to install an application that will read from the GPIO pins and output a keyboard command.
Adafruit (http://www.adafruit.com/) has released a utility called Retrogame that does just this. It is a small C program that you can edit, then build, and run to read input from your GPIO.
By default, Retrogame has set the following controls to these pins:
|
Controls |
Pins |
|---|---|
|
Left |
2 |
|
Right |
3 |
|
Down |
4 |
|
Up |
17 |
|
Z |
27 |
|
X |
22 |
|
R |
23 |
|
Q |
18 |
To install Retrogame make use of the following steps:
- Download Retrogame by typing
git clone https://github.com/adafruit/Adafruit-Retrogame.gitand press Enter. - Change to the new directory by typing
cd Adafruit-Retrogame. If you need to make changes to the pin numbers or keys, typenano retrogame.cand scroll to around line 75. You will see a line saying start here. Edit the pin numbers andKEY_ commands, as instructed. - Build Retrogame by typing
make retrogameand press Enter. - When it has finished building, type
sudo ./retrogameto test your GPIO enabled buttons.
To run it at bootup, Adafruit recommends that you add it to your rc.local file, as follows:
- Type
sudo nano /etc/rc.localand press Enter. - Go to the very last line before
exit 0. Our entry needs to be made before this. - Type the path to your retrogame application, for example,
/home/pi/Adafruit-Retrogame/retrogame &. - Press Ctrl + X and then Y to save the file.
- You will now have to add a udev rule, so that other applications can see the new buttons. Udev is essentially a device manager. Setting up the rules will let other applications know how to use your device.
- Type
sudo nano /etc/udev/rules.d/10-retrogame.rulesand press Enter. - Then, type
SUBSYSTEM=="input", ATTRS{name}=="retrogame", ENV{ID_INPUT_KEYBOARD}="1" - Press Ctrl + X, then Y to save your new udev rules.
- Now, restart your Raspberry Pi, and your GPIO controller will be ready.