
In the last chapter, we studied the basics of single board computers and how to set up your Pi. We also learned to connect the Pi to the Internet. I hope all readers are quite comfortable with the basics now. With this accomplished, we will dig a bit deeper into some more basics. In this chapter, we will be studying a few important Linux commands which will be useful to us. We will also study how to connect to the Pi remotely.
Important and Useful Linux Commands
In this section, we will study a few important Linux commands which will be useful to all of us in understanding the hardware environment (the Pi) which will be used for supercomputing and parallel programming.
Getting Help with Linux Commands
We can use the man command or --help option to get more information on a command. For example, if we want to know more about the cat command usage, then we can issue the commands man cat or cat --help.
Network-related Commands
The following network-related commands are handy in understanding network infrastructure.
ifconfig
ifconfig is used to check network status. We can use ifconfig eth0 or ifconfig wlan0 to check the status of WiFi or ethernet respectively.
iwconfig
We can use iwconfig to check wireless network status. Its output is as follows:
wlan0 IEEE 802.11bg ESSID:"ASHWIN"Mode:Managed Frequency:2.412 GHz Access Point: A2:EC:80:FB:E2:66Bit Rate=6 Mb/s Tx-Power=20 dBmRetry short limit:7 RTS thr:off Fragment thr:offPower Management:offLink Quality=45/70 Signal level=-65 dBmRx invalid nwid:0 Rx invalid crypt:0 Rx invalid frag:0Tx excessive retries:24 Invalid misc:6 Missed beacon:0lo no wireless extensions.eth0 no wireless extensions.
iwlist wlan0 scan
iwlist wlan0 scan displays a list of all the available wireless networks.
ping
ping tests network connectivity between two devices. We have already seen its usage for checking Internet connectivity in the first chapter.
System Information Commands
These commands help us know more about the status of systems and hardware on the Pi.
CPU-related Information
We can use cat /proc/cpuinfo to see information about the CPU .
To check the other details (namely the operating speed of the CPU), the lscpu command is used. The output of lscpu is as follows:
Architecture: armv7lByte Order: Little EndianCPU(s): 4On-line CPU(s) list: 0-3Thread(s) per core: 1Core(s) per socket: 4Socket(s): 1Model name: ARMv7 Processor rev 5 (v7l)CPU max MHz: 900.0000CPU min MHz: 600.0000
Memory -related Information
We can use cat /proc/meminfo to get details about memory. We can also use the free command to see how much free memory is available as follows:
total used free shared buffers cachedMem: 996476 210612 785864 7208 15152 113668-/+ buffers/cache: 81792 914684Swap: 102396 0 102396
System and OS Version Information
uname -a provides information about the current system as follows:
Linux raspberrypi 4.4.11-v7+ #888 SMP Mon May 23 20:10:33 BST 2016 armv7l GNU/LinuxTo identify the Linux release, run the command cat /proc/version.
Partition-related Information
df -h displays microSD card partition related information in human-readable format as follows:
Filesystem Size Used Avail Use% Mounted on/dev/root 15G 3.6G 11G 26% /devtmpfs 483M 0 483M 0% /devtmpfs 487M 0 487M 0% /dev/shmtmpfs 487M 6.6M 480M 2% /runtmpfs 5.0M 4.0K 5.0M 1% /run/locktmpfs 487M 0 487M 0% /sys/fs/cgroup/dev/mmcblk0p1 63M 21M 43M 33% /boottmpfs 98M 0 98M 0% /run/user/1000
cat /proc/partitions provides partition block allocation information.
Other Useful Commands
hostname -I shows the IP address.
lsusb shows the list of all the USB devices connected to Pi.
vcgencmd measure_temp shows the temperature of the CPU.
vcgencmd get_mem arm && vcgencmd get_mem gpu shows the memory split between the CPU and GPU.
Enabling Pi for SSH from raspi-config
To connect to Pi remotely, we need to enable SSH server from raspi- config. Open LXTerminal and run the command sudo raspi-config.
In the main menu of raspi-config select Advanced Options. In the Advanced Options screen, choose A4 SSH, and the following screen (Figure 2-1) will appear.

Figure 2-1. Enabling the SSH server
Select Yes and the following message (Figure 2-2) will be displayed.

Figure 2-2. SSH server enable confirmation
Press the Enter key. Select Finish from the main menu of raspi-config and select Yes when prompted for reboot. Once the Pi reboots, we can access it remotely.
Connecting to the Raspberry Pi Remotely from Windows
It is possible to connect to the Pi remotely, provided that the computer we are using to connect to the Raspberry Pi is also in the same network (either physically or through VPN). We have to use various tools and utilities for that. In this chapter, we will learn to connect to the Pi remotely. We will also learn how to transfer files to and from the Pi. This is important when we want to use the Pi in headless mode (“headless” simply means we are using the Pi with no visual display attached to it). It is useful in scenarios where we do not have a display or simply do not want to spare one due to resource/space constraints. For example, when we make a cluster of Pis, we cannot spare a display for each Pi in the cluster. Headless mode is very useful in such cases. In this part of the chapter, we will explore multiple methods for remotely working with Pi.
Checking the Connectivity with Pi from Another Computer
It is essential that the computer which we are planning to connect to Pi must be in the same network. There should not be any proxy and firewall restrictions between the other computer and the Pi. The best example of this setup is the Pi and the other computer connected under the same router/network switch. To check the connectivity, we can use the ping utility.
Open cmd, the Windows command line, on your computer.
Turn on the Pi and write down its IP address. Use ifconfig command to find its IP address. Suppose it is 192.168.0.2 (It does not matter whether it is ethernet or WiFi).
In cmd, run ping 192.168.0.2 to check the connectivity.
We can use the same ping command on any computer with a Linux distribution or macOS if they are in the same network as Pi.
PuTTY
PuTTY is a free implementation of SSH and Telnet for Windows and Unix platforms, along with an xterm terminal emulator. It is written and maintained primarily by Simon Tatham. You can explore the PuTTY homepage ( www.chiark.greenend.org.uk/~sgtatham/putty/ ) for more information.
PuTTY is open-source software that is available with source code and is developed and supported by a team of volunteers.
Now let’s download and install PuTTY. PuTTY can be downloaded from its download page ( www.chiark.greenend.org.uk/~sgtatham/putty/latest.html ). Download the file PuTTY.exe. Once downloaded, place it in a directory of your choice and create a desktop shortcut (Figure 2-3) for your convenience.

Figure 2-3. PuTTY desktop shortcut
Double-click the putty shortcut and the PuTTY (Figure 2-4) window will open.

Figure 2-4. PuTTY Window
Type the IP address or the host name in the Host Name (or IP address) text box. Make sure SSH is selected as connection type. For future use, you may want to save the settings (I usually do this). Now, click the Open button. It opens a terminal-style window. It will ask you for the username and the password, which are pi and raspberry respectively. While logging in for the first time, it shows the following (Figure 2-5) message dialogue. Click Yes.
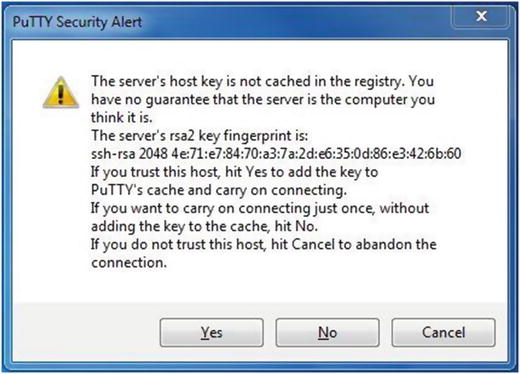
Figure 2-5. PuTTY security alert
Once we login, it will show a prompt (Figure 2-6) as follows.

Figure 2-6. PuTTY remote connection window
We can now remotely work with the Pi’s command prompt.
Accessing Raspberry Pi Desktop Remotely
Raspberry Pi desktop is LXDE (Lightweight X11 Desktop Environment ). We can access it from Windows computer remotely using an RDP (Remote Desktop Protocol ) client. For that, we need to install xrdp on Pi. Install it by running sudo apt-get install xrdp. Reboot the Pi after the installation.
We have to use Windows Remote Desktop Client to connect to the Pi now. The client can be found with the Search option in Windows. Click the Remote Desktop Client icon to open it.
In the dialog box below (Figure 2-7), click Options to expand it.

Figure 2-7. Remote Desktop Connection
It expands and shows various options (Figure 2-8). Enter the IP address of the Pi and pi as user name. Click the checkbox and the Save button to save the same configuration for future use.

Figure 2-8. Remote Desktop Connection options
When logging in, it will prompt for the password. Enter the password. If we are connecting to the Pi with a Windows computer for the very first time, then it will display the following dialog box (Figure 2-9). Select the checkbox so it will not ask us again and then click Yes.

Figure 2-9. First time remote login
It will display the Raspberry Pi desktop. Speed of operations will be a bit slow as the Pi is streaming the desktop over a network. However, it works pretty well.
This is how we can access the Pi’s desktop with a Windows computer/laptop. However, none of the methods we have learned allows us to transfer a file between a Windows computer and the Pi. We will learn how to do it in the next section of this chapter.
WinSCP
For file transfers between a Windows computer and a Raspberry Pi, we will use WinSCP ( https://winscp.net/eng/index.php ). WinSCP is a free open-source SFTP and FTP client for Windows. Its main function is the secure file transfer between local and remote computers.
Download its setup ( https://winscp.net/eng/download.php ) and install it. Create its shortcut on the Windows desktop. Open WinSCP by double-clicking the icon (Figure 2-10).
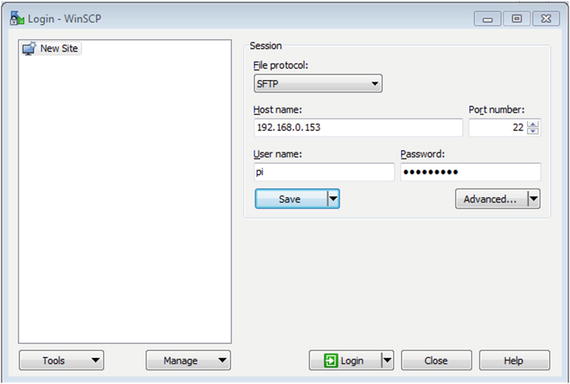
Figure 2-10. WinSCP window
Enter the IP address of the Pi in the host name text box. Also, enter pi as the username and raspberry as the password.
We can also save the settings for future use. The save session (Figure 2-11) dialog box is as follows.
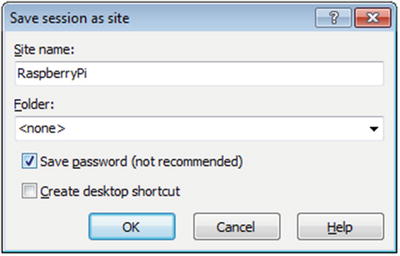
Figure 2-11. Save session
Once we login, if we are connecting for the first time then the following dialog box (Figure 2-12) is displayed. Click the Add button to continue.

Figure 2-12. First time login dialog box
Once we login, the following window (Figure 2-13) is displayed.

Figure 2-13. WinSCP file transfer window
The file system of the local Windows computer is in the left panel and Raspberry Pi’s pi user’s home directory i.e. /home/pi is in the right panel. We can transfer files between both computers now.
Connecting to Raspberry Pi Using Linux or macOS
Let’s learn to connect to the Pi using a Linux computer or macOS.
Remote Login with SSH
SSH is built into Linux distributions and macOS. We can use SSH to connect to the Pi from a Linux computer (which could also be another Raspberry Pi) or from the Mac terminal, without installing additional software.
Open the terminal in your Linux computer or Mac and type the following command:
ssh [email protected]192.168.0.2 is my Pi’s IP address. Replace it with the IP address of your Pi. Once we press Enter, it will show a security/authenticity warning prompt. Type yes to continue. This warning is shown only when we connect for the first time.
Now it will prompt for the password. Enter pi user’s default password raspberry. We will see the Raspberry Pi prompt which will be identical to the one found on the Raspberry Pi itself.
Forwarding Using SSH
We can also forward our X11 session over SSH to allow use of graphical applications by using the -Y flag in the ssh command as follows,
ssh -Y [email protected]Let’s access a graphical program like scratch remotely. Run the following command,
scratch &It will start a new X11 session of the Pi program scratch in a new window on a Linux computer or Mac. The & makes the command run in the background.
SCP for File Transfer
In Windows, we used WinSCP for the file transfer between the Windows computer and the Pi. In the same way, we can transfer files between a Linux computer/Mac and the Pi. We need to use the scp utility for that. It is built into all Linux distributions and macOS.
To copy a file from the Pi to a Linux computer or Mac, we have to run the following command in the terminal on the Linux computer or the Mac:
scp [email protected]:/home/pi/test.txt /home/ashwinThe command above copies test.txt from /home/pi directory of Pi to /home/ashwin directory of our Linux computer or Mac.
In the same way, we might want to copy a file from a Linux computer or Mac to the Pi. To do that, run the following command in the terminal of the Linux computer or the Mac:
scp /home/ashwin/test_again.txt [email protected]:/home/piYou can read more about the scp command in detail on www.computerhope.com/unix/scp.htm .
Conclusion
In this chapter, we explored various ways to connect to the Pi remotely. We also learned how to transfer files between the Pi and other computers with Linux, Windows, and Mac as OS.