
In this chapter, we will learn how to increase the computing power of the various models of Raspberry Pi by overclocking the various components of this amazing little computer. We will study how to overclock through raspi-config and by altering the contents of config.txt.
Overclocking means to configure a computer’s hardware parts to run at a faster rate than what was certified by the original manufacturer. The rate at which the part operates is generally specified in terms of clock frequency like MHz, GHz, etc. Usually the operating voltage of the overclocked component is also increased, which helps maintain the component’s operational stability at the accelerated speeds. However, the downside of overclocking is that the given semiconductor device will generate and dissipate more heat when operated at higher frequencies and voltages than the stock settings, so most overclocking attempts will increase power consumption and heat dissipation as well. To mitigate the increased heat dissipation in the overclocked component, we usually have to install heatsinks and cooling systems.
Let’s get started with the basics of overclocking Raspberry Pi. In this chapter, we will explore in detail how to install passive heatsinks and how to overclock various models of Raspberry Pi.
Risks of Overclocking Raspberry Pi
Overclocking Raspberry Pi allows us to get the best out of it. However, we should not do it without understanding the risks involved. It is vitally important that we understand what we are getting into.
Here are a few risks of overclocking which we MUST be aware of:
Life reduction: Components may fail sooner.
Heat generation: Operating at higher speeds generates and dissipates more heat.
File corruption: Many overclockers have observed file corruptions at un-optimized overclocking settings.
Warranty-voiding: Forced overvolting will void the warranty.
Installing a Heatsink on Pi
A heatsink is a device or substance for absorbing excessive, unwanted heat. If you are planning to overclock your Pi then installing heatsinks on the processor, RAM, and GPU is recommended.
Most heatsinks have adhesive stickers glued to them. Use them to install the heatsinks on the chips of Pi. Most people use passive heatsinks only when working with the Raspberry Pi, as active heat dissipation mechanisms like liquid cooling and/or radiators would be overkill for the Raspberry Pi.
Procuring Heatsinks
Many distributors sell heatsinks online. You can google the keywords raspberry pi heatsink.
The following are links to the websites of various distributors selling heatsinks:
Overclocking the Pi with raspi-config
We can overclock the Pi using the overclock option in the raspi-config tool.
The following (Figure 7-1) is a screenshot of overclock options in Pi B and Pi B+.
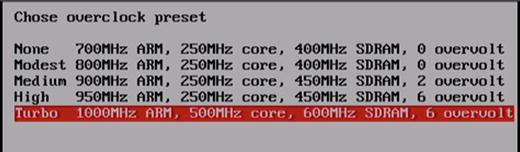
Figure 7-1. Overclock options in Pi B and Pi B+
The following (Figure 7-2) is a screenshot of overclock options in Pi 2.

Figure 7-2. Overclock options in Pi 2
Overclocking the Pi with /boot/config.txt
We have learned how to overclock with raspi-config; however, it does not allow fine-tuning of the Pi which is to be overclocked. There is another way of overclocking the Pi, which we can do manually by changing a few parameters in/boot/config.txt.
Options in /boot/config.txt
We can add or change options in the /boot/config.txt file. If you have already used the raspi-config tool for overclocking and/or memory splitting, then you will find many of these options already present in the /boot/config.txt file.
arm_freq: Frequency of a core in the ARM in MHz.
core_freq: Frequency of GPU processor core in MHz.
h264_freq: Frequency of hardware video block in MHz.
isp_freq: Frequency of image sensor pipeline block in MHz.
v3d_freq: Frequency of 3D block in MHz.
avoid_pwm_pll: Don’t dedicate a pll to PWM audio. This will reduce analogue audio quality slightly. The spare PLL allows the core_freq to be set independently from the rest of the GPU, allowing for more control over overclocking.
dram_freq: Frequency of SDRAM in MHz.
over_voltage: ARM/GPU core voltage adjust.
over_voltage_sdram_c: SDRAM controller voltage adjust.
over_voltage_sdram_i: SDRAM I/O voltage adjust.
over_voltage_sdram_p: SDRAM phy voltage adjust.
force_turbo: Disables dynamic cpufreq driver and minimum settings below. Enables H.264/V3D/ISP overclock options. May set warranty bit.
temp_limit: Overheat protection. Sets clocks and voltages to default when the SoC reaches this Celsius value. Setting this higher than the default voids warranty.
gpu_mem: GPU memory in megabyte. Sets the memory split between the ARM and GPU. ARM gets the remaining memory. No need to set this if the value is already set using raspiconfig.
/boot/config.txt Options for the Various Models of Pi
Every Pi is unique. The values of the options in /boot/config.txt for overclocking the Pi have to be customized for the individual Pi. There is no single set of values for these options which is the best fit for all Pis. I have learned this by trial and error. If the values you set for the overclocking options are not the best fit, the Pi will either be unstable or not boot up at all. In these cases, you can try changing the values of the overclocking options in config.txt on the microSD card by using some other computer and then boot up the Pi with the same card. Do it until you get a set of stable and optimal values for your Pi. In general, for any type of hardware (such as CPU and RAM), overclock settings depend on the individual IC.
We can find detailed explanations of the options above at the eLinux RPi configuration page ( http://elinux.org/RPiconfig ).
Options for Pi B and Pi B+
The following are the values of the overclocking options for Pi B and Pi B+:
arm_freq=950core_freq=450sdram_freq=500gpu_mem=16
Options for Pi 2
The following are the values of the overclocking options for Pi 2:
arm_freq=1100over_voltage=4core_freq=550sdram_freq=483over_voltage_sdram_p=0over_voltage_sdram_i=0over_voltage_sdram_c=0gpu_mem=16force_turbo=1avoid_pwm_pll=1v3d_freq=450h264_freq=0isp_freq=0avoid_safe_mode=1
Options for Pi 3
The following are the values of the overclocking options for Pi 3:
arm_freq=1350over_voltage=6temp_limit=80core_freq=500h264_freq=333avoid_pwm_pll=1gpu_mem=450v3d_freq=550sdram_freq=588sdram_schmoo=0x02000020over_voltage_sdram_p=6over_voltage_sdram_i=4over_voltage_sdram_c=4force_turbo=1
If your Pi does not boot up or becomes unstable with the values listed above, try to tweak the values to get the best settings.
We cannot cover all possible combinations of working settings for stable overclock. Explore the following web links for information related to overclocking:
http://linuxonflash.blogspot.in/2015/02/a-look-at-raspberry-pi-2-performance.html
https://github.com/retropie/retropie-setup/wiki/Overclocking
After overclocking, use the cat /proc/cpuinfo command to check the processor speed for all models.
Note
DO NOT insert the microSD card of an overclocked Pi into another Pi. Remember! Every piece of hardware has unique settings for overclocking. If you want to use the microSD card of an overclocked Pi for another Pi, disable overclock settings in /boot/config.txt and then use it with the other Pi.
Conclusion
In this chapter, we learned how to overclock the various models of Raspberry Pi. From the next chapter onward, we will start studying how to exploit the computational power of the cluster we built. We will write code in Python 3 with MPI4PY for demonstrating concepts in MPI and parallel programming.