
Simplicity is prerequisite for reliability.
—Djikstra
Flux is an application architecture introduced by Facebook for building client-side applications. It complements the React paradigm of composable view components by using a unidirectional data flow. It’s more of a pattern than a framework, and one can start using Flux immediately without an excess load of code. Redux is a predictable state container for JavaScript applications, which means it helps us to write applications that behave consistently in different environments: client, server, or native. It also makes your applications easy to debug and test.
Before we delve into its details, it is important to know one of the most popular, commonly used MVC patterns. We can then learn about what challenges we face with MVC and how Flux and Redux can solve these challenges.
MVC pattern
MVC problem
Flux
Flux deep dive
Redux
Redux core concepts
Redux with React Native
Benefits of using Redux
MVC Pattern
Model: This element manages the behavior and data of an application.
View: This is the representation layer of the model in the UI.
Controller: This element takes user input and makes necessary manipulations to the model, which causes the view layer to get updated.
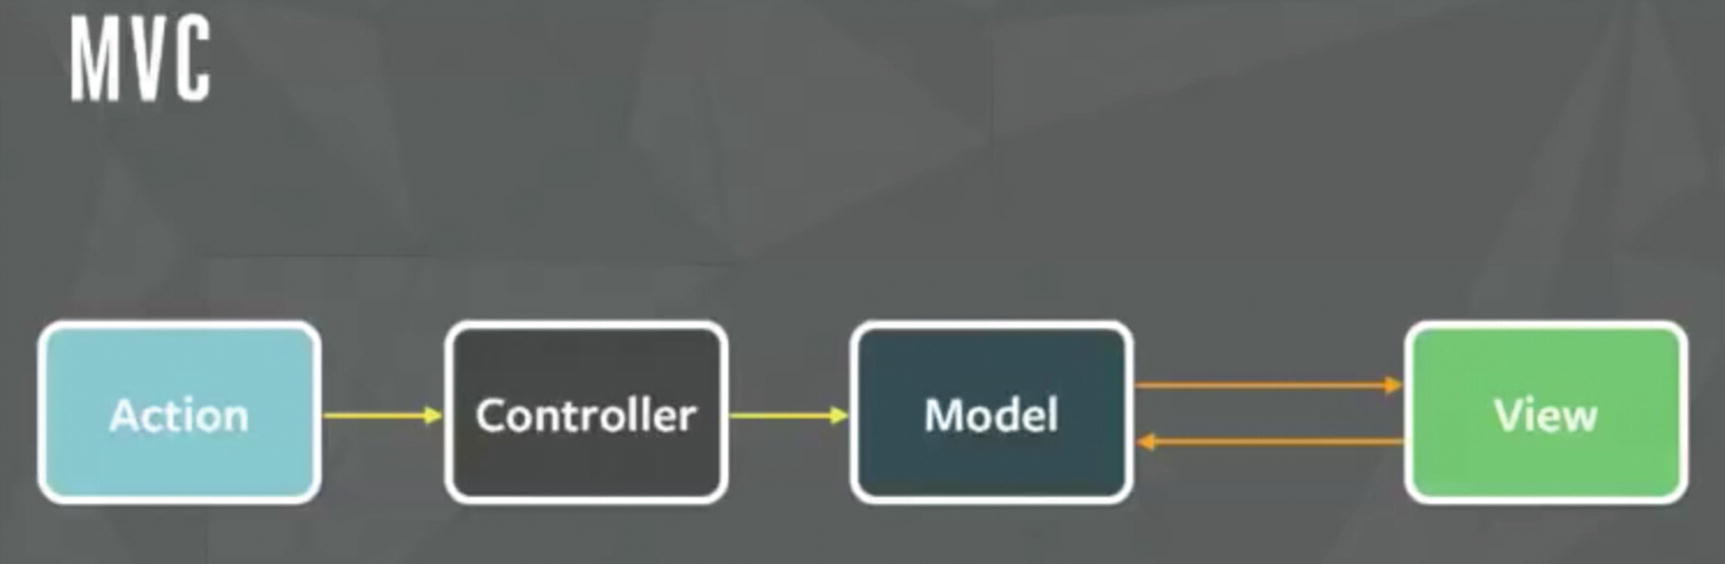
Simple MVC pattern
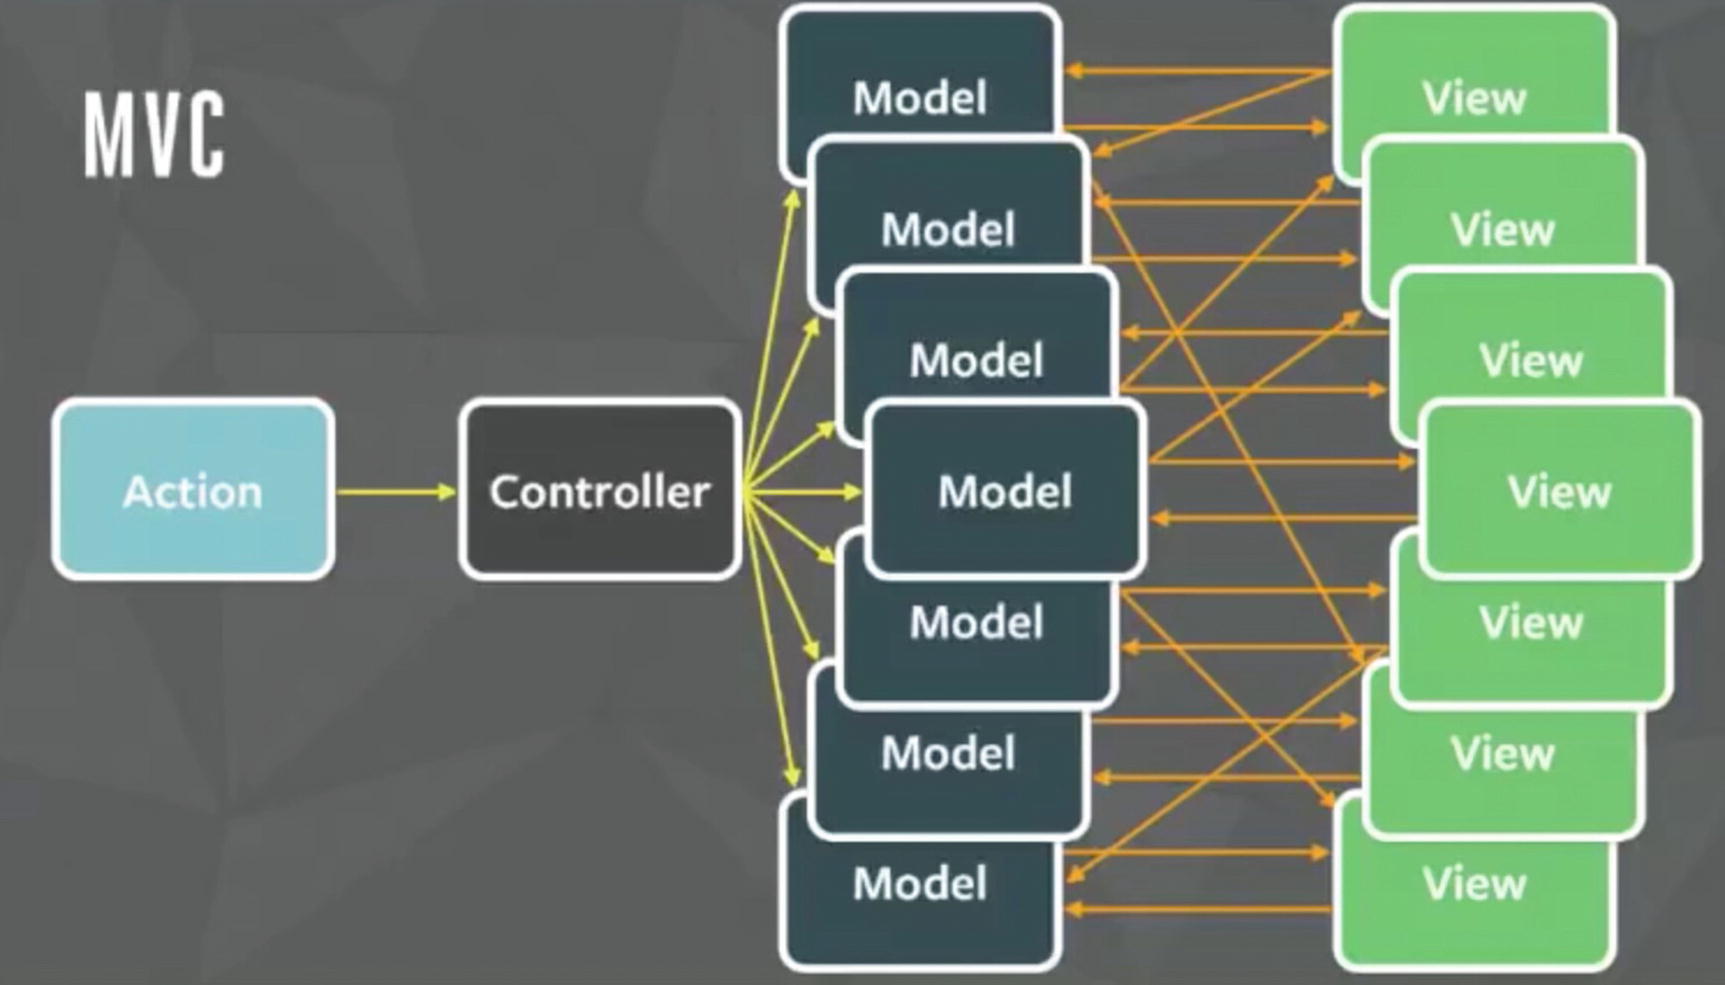
MVC pattern for a large application
Wow! That is an explosion of arrows. Welcome to the real world where many models and views interact with each other. A controller triggers another model and this goes on like spaghetti, which often ends up in an infinite loop. The worst part is that it’s really difficult to debug code in such a situation, eventually making the system fragile. Well, Facebook faced a similar problem with this pattern and solved it with a new pattern called Flux.
Flux
Flux abjures MVC in favor of a unidirectional data flow. Flux works well because the single directional data flow makes it easy to understand and modify an application as it grows and becomes more complex. Earlier we found that two-way data bindings lead to cascading updates, where change in one data model leads to an update in another data model, making it very difficult to predict what would change as the result of a single user interaction.

React App data flow
Although controllers do exist in a Flux application, these are controller views, where views are found at the top of the hierarchy that retrieve data from the stores and forward these data to their children.
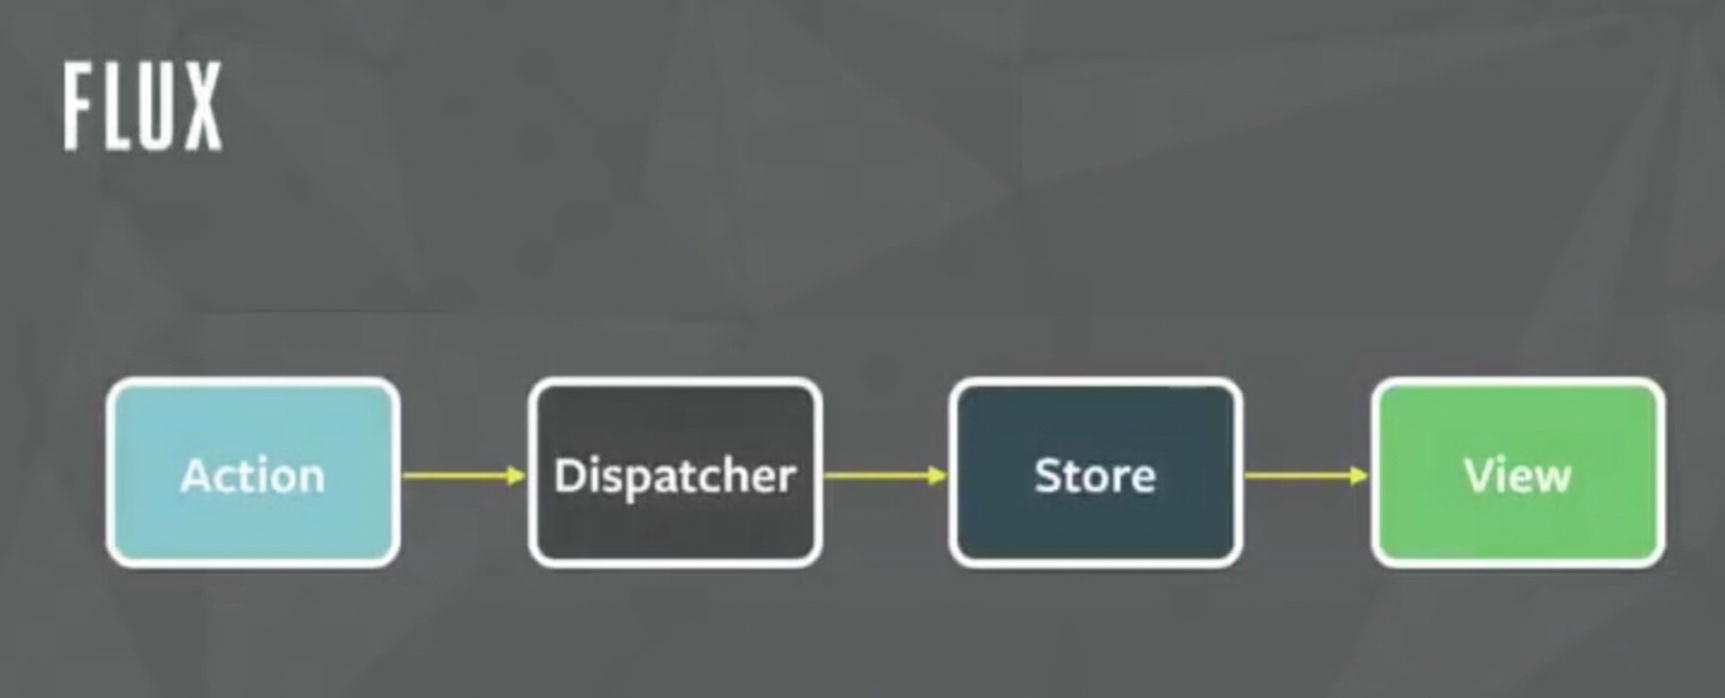
Flux data flow
As an application grows, eventually the dispatcher becomes more vital, as it is responsible for managing dependencies between stores by invoking the registered callbacks in a specific order.
When a user interacts with a React view, the view sends an action (usually represented as a JavaScript object with some fields) through the dispatcher, which notifies the various stores that hold the application’s data and business logic. When the stores change state, they notify the views that something has updated. This works especially well with React’s declarative model, which allows the stores to send updates without specifying how to transition views between states.
It improves data consistency.
It is easier to pinpoint the bugs.
You can perform more meaningful unit tests. Because all the states of a module are there in the same place, we can test a module independently.
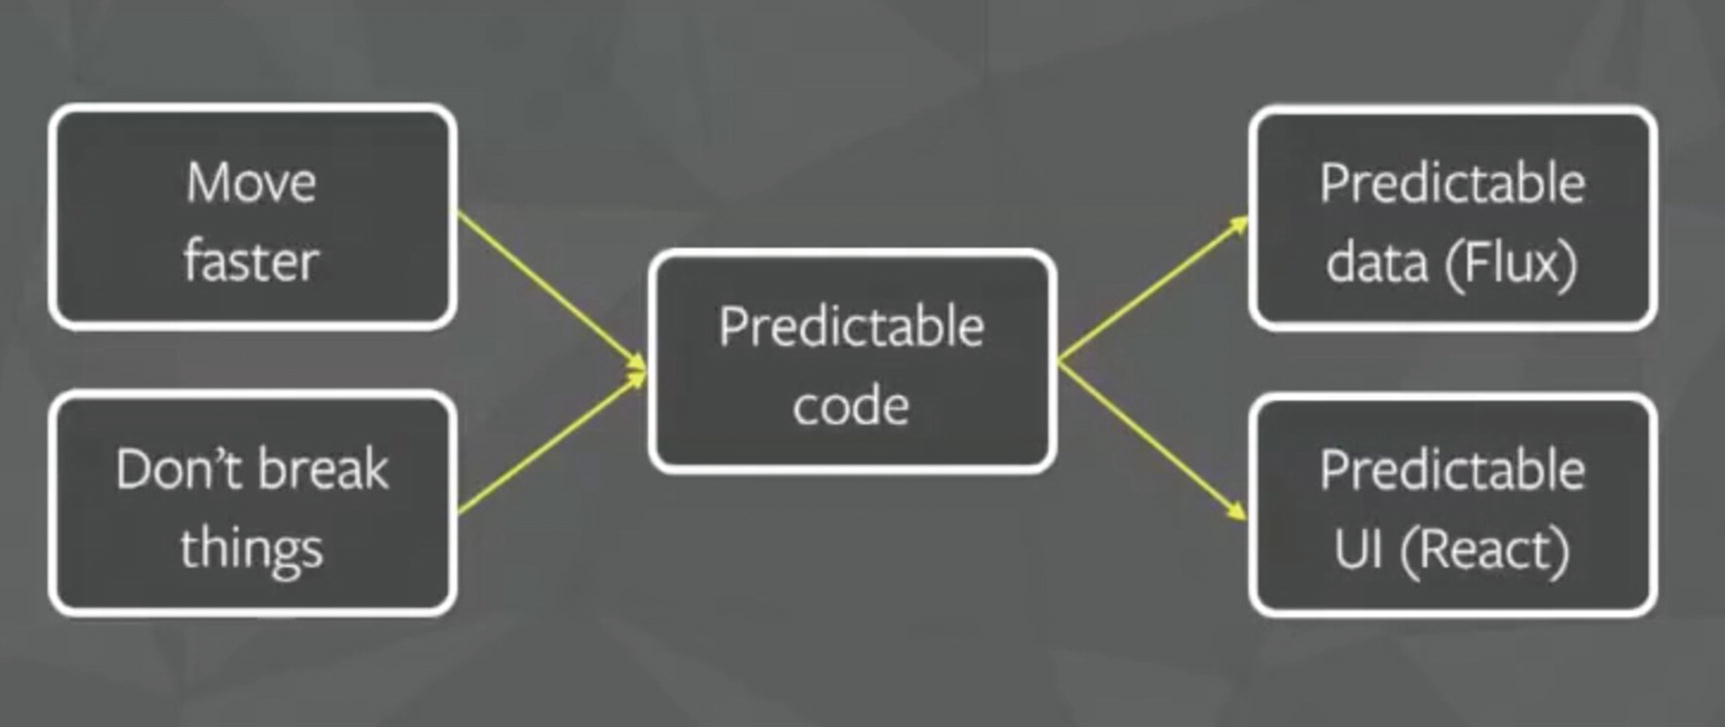
It includes predictable code.
Success of Flux
One of Facebook’s most popular features was its chat functionality. However, it was extremely buggy and had a high rate of negative user feedback. The new chat system that Facebook implemented is using a Flux pattern that provides a seamless experience. You can have look at example chat code in a Facebook React example at https://github.com/facebook/flux/tree/master/examples .
Flux Deep Dive
As we now know what Flux is, let’s look into and understand the concepts like dispatcher, store, and action
The Dispatcher
The dispatcher is the central hub that manages all data flow in a Flux application. It is essentially a registry of callbacks into the stores and has no real intelligence of its own; in essence, it is a simple mechanism for distributing the actions to the stores. Each store registers itself and provides a callback. When an action creator provides the dispatcher with a new action, all stores in the application receive the action via the callbacks in the registry. Dispatcher also acts like a traffic controller. If it gets an action even when the data layer is still processing, it makes sure to run the action. With the dispatcher, you know where your action starts and what changes it makes to the data layer. There are cascading effects that build up in between. You are indeed in full control of your system.
The Need for Dispatcher [dispatch() and waitFor()]
As an application grows, dependencies across different stores also increase. Imagine, for example, we have a situation where Store A needs Store B to update itself first, so that it can itself know how to update, too. We need the dispatcher to be able to invoke the callback for Store B and finish that callback before moving forward with Store A. To assert this dependence, a store needs to communicate with the dispatcher to first complete the action to update Store B. The dispatcher provides this functionality through the waitFor() method.
The dispatch() method provides a simple, synchronous iteration through the callbacks, invoking each in turn. When waitFor() is encountered within one of the callbacks, execution of that callback stops and waitFor() provides us with a new iteration cycle over the dependencies. After the entire set of dependencies has been fulfilled, the original callback then continues to execute.
Further, the waitFor() method can be used in different ways for different actions, within the same store’s callback. In one case, Store A might need to wait for Store B. In another case, though, it might need to wait for Store C. Using waitFor() within the code block that is specific to an action allows us to have fine-grained control of these dependencies.
Problems arise, however, if we have circular dependencies; that is, if Store A needs to wait for Store B, and Store B needs to wait for Store A. This could wind up in an endless loop. The dispatcher now available in the Flux repo protects against this by throwing an informative error to alert the developer that this problem has occurred. The developer can then create a third store and resolve the circular dependency.
Stores
Stores contain the application state and logic. Their role is somewhat similar to a model in a traditional MVC, but they manage the state of many objects—they do not represent a single record of data like ORM (Object Relational Mapping) models do. More than simply managing a collection of ORM-style objects, stores manage the application state for a particular domain within the application.
As mentioned earlier, a store registers itself with the dispatcher and provides it with a callback. This callback receives the action as a parameter. Within the store’s registered callback, a switch statement based on the action’s type is used to interpret the action and to provide the proper hooks into the store’s internal methods. This allows an action to result in an update to the state of the store via the dispatcher. After the stores are updated, they broadcast an event declaring that their state has changed, so the views can query the new state and update themselves.
Actions
When new data enter the system, whether through a person interacting with the application or through a web API call, those data are packaged into an action—an object literal containing the new fields of data and a specific action type. We often create a library of helper methods called action creators that not only create the action object, but also pass the action to the dispatcher.
Different actions are identified by a type attribute. When all of the stores receive the action, they typically use this attribute to determine if and how they should respond to it. In a Flux application, both stores and views control themselves; external objects do not act on them. Actions flow into the stores through the callbacks they define and register, not through setter methods.
Letting the stores update themselves eliminates many entanglements typically found in MVC applications, where ascading updates between models can lead to unstable state and make accurate testing very difficult. The objects within a Flux application are highly decoupled, and adhere very strongly to the Law of Demeter, the principle that each object within a system should know as little as possible about the other objects in the system. This results in software that is more maintainable, adaptable, testable, and easier for new engineering team members to understand.
Redux
Now that we have read about Flux, next we discuss another pattern called Redux. Redux can be considered a predecessor to the Flux architecture, and it is also inspired by the functional programming language Elm. Redux was created by Dan Abramov in mid-2015. During that time, the React world was going through major changes and new things were coming every other day. No one, though, could imagine that a small library of just 2 KB would create such a tectonic shift in the way we interact with and create React applications.
Redux was built on top of functional programming concepts. Functional programming by design allows us to write clean and modular code that is easier to test, debug, and maintain. With functional programming, code is in the form of small functions that are isolated in scope and logic, thus making the code reusable. Because small pieces of code are isolated in nature, there is hardly any coupling and these tiny functions can be used as modules in an app. In functional JavaScript you will see pure functions, anonymous functions, and higher order functions used very often. Redux uses pure functions a lot, so a good understanding of this concept is important.
Pure functions return a value based on arguments passed to them. They do not modify or mutate existing objects, but they return new ones. These functions do not depend on the state from which they are called, but they return only one and the same result for any provided argument. That’s why they are very predictable. Because pure functions do not modify any value, they don’t have any observable side effects. Redux uses something called reducers, which are pure functions. We will learn in detail about reducers and other Redux code concepts in the next section.
Redux Core Concepts

Redux data flow
Action
Actions are events that send data from the application (user interactions, API calls, form submissions, etc.) to the store. The store always gets the information from actions. Internal actions are simple JavaScript objects that have a type property (usually constant), describing the type of action and payload of information being sent to the store. To send them to the store we use store.dispatch().
Action creators, as the name suggests, are the functions that create actions. It is easy to conflate the terms action and action creator, so do your best to use the proper term. To call these action creator functions anywhere in the app we use dispatch. As mentioned earlier, the dispatch() function can be accessed directly from the store as store.dispatch(), but more likely you’ll access it using a helper like react-redux’s connect() method. You can use bindActionCreators() to automatically bind many action creators to a dispatch() function.
Note
Action creators can also be asynchronous and have side effects. This is an advanced topic, so we don’t need to go in-depth right now.
Reducer
This is a very simple reducer that takes the current state and an action as arguments and then returns the next state. In the case of complex applications, we will be using the combineReducers() utility that is provided by Redux. It combines all the reducers of the app into a single index reducer. Every reducer is responsible for its own part of the app’s state, and the state parameter is different for every reducer. The combineReducers() utility makes the file structure much easier to maintain.
Store
getState(): Allows access to state.
dispatch(action): Allows state to be updated.
subscribe(listener): Registers listeners.
replaceReducer(nextReducer): Replaces the reducer currently used by the store to calculate the state.
Redux with React Native
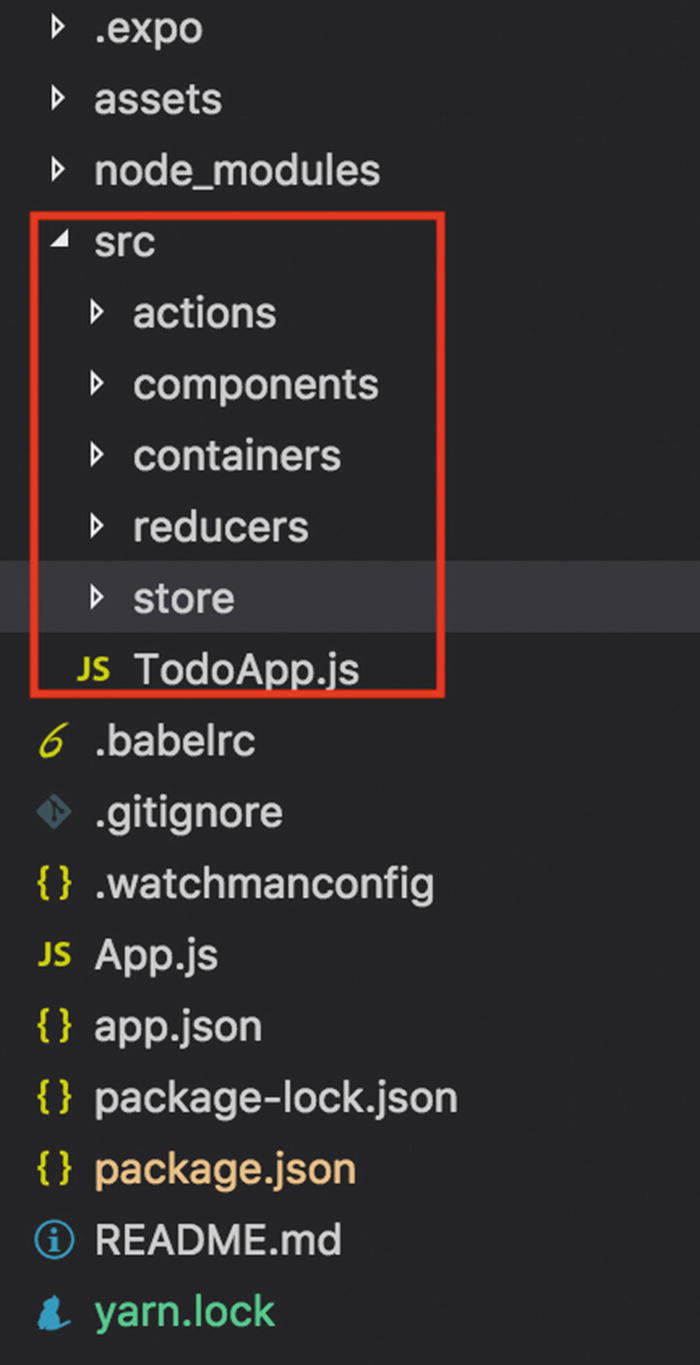
List of project folder structure
You would have to create all these folders: components, containers, reducers, store, and a TodoApp.js file. Within these folders we would have more JavaScript files reside inside our action, stores, reducers, and components. This way our code stays modularized and the logic remains isolated. Here, the Redux part is managed under the action, reducer, and the store folder, but we would need components that will use them.
Hence, we have two folders here: components, which consists of plain dumb components, which are the presentational components of the app having no idea that Redux exists or not in the app. Second, we have smart components that interact with Redux, and they reside in the containers folder.
Here, we have imported something called createStore from redux. Here we are combining all our reducers with rootReducer and exporting the same. Soon you will see how we have created two reducers that we plan to use with our store using rootReducer.
Here, we have imported our store and also used something called Provider from react-redux. Once we pass our Provider and store within that, it can be accessed anywhere in TodoApp no matter how many levels deep it is. Great! With this our store is set up.
Although our store is setup, we require some UI components. If you look at the containers folder, we have an addTodo component, which is a simple TextInput that will be used to create a new todo. Therefore, on this text input field there will be some action that will trigger it to create a new todo.
Here we have two actions—ADD_TODO and TOGGLE_TODO—that are responsible for adding a new record in the list and marking a record complete using their respective actions. We are able to determine the type of actions using action.type.
Here we are using something called CombineReducers from redux. This helps is keep the logical part separate but use it such in a way that we have only one reducer.
Working with the Components
This will update the todo list and also the text input state with an empty string so that new values can be added later.
To display the data, we use a dumb component whose only purpose is to display the to-do list. This component has nothing to do with Redux. You can find this dumb component inside component/TodoList.js

Showing the to-do list on an iPhone
As you saw, there is some work involved in using Redux along with your application, and as with any new piece of technology or new pattern, developers should always ask this: Why should I use it in the first place?”
Expected outcomes: With Redux there is no confusion about where to locate our one source of truth; that will always be the store.
Maintainability and organization of code: With a strict structure in place and predictable outcomes, maintaining the code becomes easier. Redux is also particular about how the code should be organized, and this becomes pivotal in maintaining the source code as an application becomes large.
Tools: With developer tools, developers can track what’s happening in the application in real time.
Community: Redux is not something that has just appeared; it has indeed passed the test of time. The community is flourishing, and you can easily get support and regular updates for the library.
Ease of testing: Redux functions by design are small, pure, and isolated, which makes them perfect candidates to for which to write tests. Redux apps automatically make testing easy for the application.
Summary
In this chapter you learned about the Flux pattern, how it differs, and how it solves a fundamental problem differently from the traditional MVC pattern. We also looked closer at Flux core concepts. Next, you learned about the successor of Flux, Redux, its core concepts, benefits, and how to use it with React Native applications, which will be useful in real-world applications and in the upcoming chapters. Chapter 4 covers how to create UIs and navigation in React Native apps. Finally, you learn how to use animation in your views.