In the previous edition of this book, we said it was only a matter of when, not if, digital would replace film for most applications. Now we look back on that statement and laugh, because in the short time between these editions, the transition from film to digital has largely become complete. In addition, photographers have latched onto the idea of processing files of raw data straight from the camera’s sensor because it provides a level of control and potential quality comparable to developing and printing your own film.
That said, anyone who has made the switch from film to digital can tell you that the time savings of digital photography (compared to film) is often offset by new tasks that photographers didn’t have to worry about before. Having total control over the processing of every image means a photographer must now set aside the time and acquire the skills to do it right, instead of sending film to the lab and getting something else done while waiting for the lab to develop or print it. Digital storage is so cheap and capacious that a typical shoot now produces far more frames than it would have using film. But that also means there are that many more frames to cull and process afterward, burdening a photographer further.
The good news is that Adobe Photoshop CS3 benefits from what everyone learned from earlier stages in the transition to serious digital photography. Photoshop CS3, along with the Adobe Bridge and Adobe Camera Raw software included with it, can fulfill the key tasks of a high-volume digital camera workflow from beginning to end—something that wasn’t possible in previous versions. Also, Adobe has added so many useful features to Adobe Camera Raw 4.x that in some cases, you may not even need to open the images in Photoshop.
We assume that you’re not interested in spending any more time than you have to on each image, so we’ve set up this chapter with that idea as the guiding principle. This chapter is about how to get through Adobe Camera Raw in the fewest number of moves, and we’ll also talk about processing large numbers of images as quickly as possible. If your photography is more about spending the bulk of your time on a few important images, concentrate on the sections about culling images in Bridge and working in Camera Raw. But before we get into strategies for these workflows, let’s look at digital raw capture.
Camera Raw appears as a file format in the Open dialog in Photoshop, but it isn’t actually a single file format. Rather, it’s a catchall name for camera files that consist of unprocessed data straight from the camera’s sensor. One of the reasons they’re called raw files is that they haven’t even been processed into the RGB color of more common camera formats such as JPEG. Each camera produces its own flavor of raw data, so Camera Raw and its competitors usually need to be updated for the raw formats of new cameras.
A list of officially supported cameras appears on Adobe’s Web site. As we write this, the URL is www.adobe.com/products/photoshop/cameraraw.html. Cameras that are not on the list sometimes work anyway; this is called unofficial support and it sometimes means the software company is still testing the camera. Adobe wisely doesn’t officially support a new camera until it has thoroughly tested a final, shipping version of the camera. If you want to buy a new camera that shoots in raw format, check Adobe’s list to see if it’s supported yet; if it isn’t, have patience. Chances are that the raw format of any significant new camera will be supported in the next release of Camera Raw, which is updated about four times a year.
Digital still cameras use color filters over each sensor in the area array to split the incoming light into its red, green, and blue components. Each sensor captures only one color, depending on which filter that covers it. The actual capture is essentially a file that records the amount of light recorded by each element in the array.
Considerable processing is required to turn this raw capture into an RGB color image—so much in fact, that today’s on-the-fly raw processing would not have been practical on the computers available just a few years ago. When your camera is set up to save JPEG files (that’s the default for most digital cameras), the conversion is performed by the camera’s firmware, using the on-camera settings for white balance, tone, saturation, sharpness, and so on. However, when you tell your camera to save images in its raw format, the processing is deferred until you open the image on the computer using specialized software (like Camera Raw).
Shooting raw images is much more flexible than shooting JPEG. When you shoot raw, the only on-camera settings that permanently affect your capture are the shutter speed, aperture value, ISO value, and focus. All other settings—white balance, tone curve, color space, contrast, saturation—are written into the capture as metadata (literally, data about data) that accompanies the raw information. Camera Raw may use this metadata as guidance in processing the capture into an RGB image, but the settings have no effect on the actual capture of the image pixels.
Raw captures allow tremendous flexibility in postprocessing, letting you reinterpret white balance and exposure with no degradation to the image. Rather than stretching or squeezing levels, you’re simply reinterpreting the way the captured photons get converted into an RGB image.
Raw capture offers other key benefits:
It creates a smaller file on disk than an uncompressed RGB image.
It allows you to capture a high-bit image from a one-shot camera.
It allows you to convert the image into RGB spaces other than the ones supported by the camera.
Digital Raw Workflow Quick Start

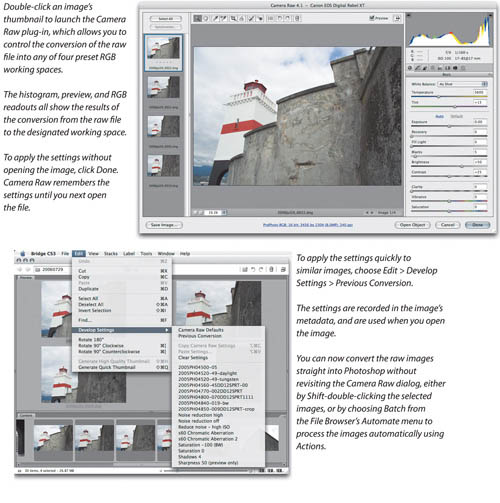
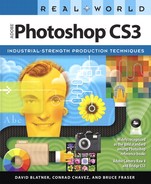
Figure 5-1. Start by copying raw images to a new folder (never open images directly from the camera storage media). To do this, from within Bridge you can launch Adobe Photo Downloader. Point Bridge to the image folder using the Folders panel. Bridge will generate thumbnails and previews, and reads the metadata from each image. This not only gives you large previews, but also verifi es that the raw images were copied correctly to the computer.
There are several disadvantages to using/shooting raw, too. Of course, the primary one is that you need to process the images, which takes time. But raw files are also larger than JPEG images, so it may take longer to save them to your camera’s storage medium (which will fill faster, too). However, we’ve struggled with most of the software that converts raw files, and we’re convinced that Camera Raw is one of the fastest available—fast enough to make shooting raw worthwhile for all but the most time-critical applications.
Moreover, Camera Raw starts working for you automatically as soon as you point Bridge at a new folder of raw images, quickly generating thumbnails and previews so you can see the raw images in enough detail to make an initial choice between the “hero” shots you plan to keep and the less successful efforts you plan to discard (or revisit later).
If you want to simply jump in with both feet, take a quick look at Figure 5-1, then get to work. But the combination of Bridge and Camera Raw is complex enough that you’ll probably want to read the rest of this chapter to get the rest of the juicy details! (There is even an entire book on the subject: Real World Camera Raw with Adobe Photoshop CS3—which expands on many of the ideas in this chapter.)
We’ve spent most of this chapter looking at the various tools offered by Bridge and Camera Raw. But knowing what buttons to push to get the desired result just means you know how to do the work. To turn that understanding into a practical workflow, you need to understand and optimize each part of the process.
There are four basic stages in a raw workflow. You may revisit some of them—going back and looking at the initial rejects, or processing the images to different kinds of output file—but everything you do will fall into one of four stages.
Copying files from the camera. You start by copying the raw images to at least one hard disk.
Verifying images. You point Bridge at the newly copied images and let it cache the thumbnails, previews, and metadata.
Preproduction. You work with the images in Bridge, selecting, sorting, applying metadata, and editing with Camera Raw.
Production. You process the raw images to output files.
In the remainder of this chapter, we’ll look at each of these four stages, but our emphasis lies in the preproduction stage—the work you do in Bridge and Camera Raw—because most of the actual work happens in this stage.
There are likely as many workflows are there are photographers—maybe more! One of the wonderful things about Bridge, Camera Raw 4.x, and Photoshop CS3 is the incredible workflow flexibility that they offer. The price of this flexibility is, of course, complexity. There are multiple ways to accomplish most tasks, and it may not be obvious at first glance which way is optimal in a given situation. Understanding the different ways of accomplishing the basic tasks is the tactical level. But to make a workflow, you also need a strategy that tells you how and when to employ those tactics.
Even a single photographer may need more than one workflow. On the one hand, there’s the workflow you need when you’re on a shoot, the client is looking over your shoulder, and you need to agree on the hero shots before you strike the lighting and move on. On the other hand, there’s the workflow you’d like to follow when you’re reviewing personal work with no deadlines attached. Between these extremes are many points on the continuum.
We can’t build your workflow for you, so we’ll offer two key principles of workflow efficiency that should always guide you.
Do things once, early, and efficiently.
Do things automatically whenever possible.
Be methodical.
When you apply metadata such as copyright, rights management, and keyword to your raw file, the metadata is automatically carried through to all the TIFFs, JPEGs, or PSDs that you derive from that raw file.
By the same token, if you exploit the power of Camera Raw to its fullest, many of your images may need little or no postconversion work in Photoshop, so applying Camera Raw edits to your images is likewise something that can often be done only once.
A key strategy that helps you do things once is: Start with the general and proceed to the specific. Start with the things that can be done to the greatest number of images, then make increasingly more detailed treatments of ever-decreasing numbers of images, reserving the full treatment—careful hand-editing in Camera Raw and Photoshop, applying image-specific keywords, and so on—to those images that truly deserve the attention.
Automation is a vital survival tool for more easily dealing with the volumes of data a raw workflow entails. Once you’ve told a computer how to do something, it can do that something over and over again. Photoshop actions are obvious automation features, but metadata templates and Camera Raw presets are important automations, too.
We rarely open a single image from Camera Raw directly in Photoshop unless we’re stacking multiple renderings of the raw file into the same Photoshop image.
In the vast majority of cases, we convert our raw images using either Batch or Image Processor commands on the Tools > Photoshop submenu in Bridge. Upon opening any images—raw or otherwise—in Photoshop, we often use actions to create adjustment layers so that the images are immediately ready for editing.
Once you’ve found a rhythm that works for you, stick to it. Being methodical in this way makes mistakes less likely and allows you to focus on the important image decisions that only you can make.
For better or worse, computers always do exactly what you tell them to, even if that’s jumping off a cliff. Established routines (and Actions) help ensure that you’re telling the computer to do what you really want it to.
The first thing you’ve got to do is get your images off the camera and into your computer. There are two parts to this: The hardware you use to connect the computer to the camera, and the software you use to transfer the images from the camera to your computer.
Hardware. You can use the cable that came with the camera, but using a card reader is generally faster and more efficient, as we explain below.
Software. After the computer sees the card, you can use any software that transfers the images to your hard disk. The simplest way is to mount the card as a volume on the desktop and drag the images from there to a folder on your hard disk. We recommend using software designed to copy images from a camera, such as the Adobe Photo Downloader, because camera-download utilities provide an opportunity to automate several important tasks as the images are copied. We talk more about this in “Using Adobe Photo Downloader” below.
Best practices. Transferring your images from the camera to the computer is one of the most critical, yet often one of the least examined, stages of your workflow. It’s critical because at this stage, your images exist only on the camera media. Compact Flash, Secure Digital, and microdrives aren’t dramatically more fragile than other storage media, but at this stage, there’s only one copy! Losing previews or camera raw settings is irritating, but you can redo the work. If you make mistakes while you copy images to your computer, you can lose images.
Tip
Image files on a memory card can be corrupted by something as simple as pulling the card out of the reader without first ejecting it in the software. If you think you’ve lost images on a card, do not format it! Doing so will permanently delete any recoverable data on the card. Cards from major vendors often include data-recovery software such as PhotoRescue—turn to that software first. If that fails, and the data is truly irreplaceable, several companies offer data recovery from memory cards, usually at a fairly hefty price.
The following ground rules have thus far prevented us from losing even a single image.
Don’t use the camera as a card reader. Most cameras will let you connect them to the computer and download your images, but that’s a bad idea for at least three reasons: Cameras are very slow as card readers, when the camera is acting as card reader, you can’t shoot with it, and you’re draining the camera’s battery.
Never open images directly from the camera media. It’s been formatted with the expectation that the only thing that will write to it is the camera. If something else writes to it, maybe nothing will happen, but then again, maybe something bad will.
Don’t rely on just one copy of the images. Always copy them to two separate drives before you start working.
Don’t erase your images from the camera media until you’ve verified the copies. See “Verifying Images,” later in this chapter.
Always format the cards in the camera in which they will be shot. Formatting camera cards with a computer is not reliable.
Following these rules takes a little additional time up front, but much less time than a reshoot would (if reshooting is even a possibility).
With Photoshop CS2, you had to copy images to your computer by manually dragging and dropping them from the card to a folder on your computer. If you wanted to automate the process, you had to find a camera-download utility. Fortunately, Photoshop CS3 comes with the Adobe Photo Downloader utility, which simplifies and automates downloading. Among other things, it can:
Set a folder on your hard disk as a destination for images being copied from the card.
Tip
If the wrong program launches when you plug in a camera or card, make sure that the program you want to use (such as Adobe Photo Downloader) is set as the default downloader, and check other photo downloaders on your machine (such as Adobe Lightroom or Apple Image Capture) and make sure they’re not set to be the default downloader. In most cases, download behavior is set in a program’s preferences.
Rename images to your standard as you import them.
Make a backup copy of the images in a different folder.
Apply a metadata template to all incoming images (we talk about this later, in “Applying Keywords and Metadata”). For example, you can add a copyright notice to every image as it’s imported.
Opening Adobe Photo Downloader. You won’t find Adobe Photo Downloader as a stand-alone application—you launch it from Adobe Bridge. To open Adobe Photo Downloader, start Adobe Bridge and then choose File > Get Photos from Camera. If an alert appears asking you if you want Adobe Photo Downloader to launch whenever you connect a camera or card, you can click No until you make a final decision as to whether you prefer Adobe Photo Downloader to other methods. When you do make a final decision, the next time that alert appears, you can click Don’t Show Again so it won’t come up every time you start the utility.
Dialog Views. You can display the Photo Downloader window as a Standard dialog or Advanced dialog (see Figure 5-2). The Standard Dialog contains most of the features, but we prefer the Advanced Dialog because you can do a few more very useful things: See previews of the images you’re about to copy, deselect any images you don’t want to copy, and apply a metadata template to all incoming images.

Copying images is something you don’t want to do more than once, so take a little time to get it right the first time. When you’re done setting the following options, click Get Photos to start copying images.
Previews, source, and image selection. In the Advanced Dialog, check the previews to see if you’re downloading what you want. If the previews don’t look right, make sure the Source pop-up menu is set correctly, in case there are multiple cameras or cards plugged in to the computer.
If you don’t want to download an image, deselect its check box. To change this option for multiple images at once, Command-click (Mac) or Ctrl-click (Windows) the images you want to change (they’ll become selected, indicated by blue borders), and then change the check box for any selected image. The Check All and UnCheck All buttons at the bottom of the Advanced dialog are shortcuts for changing the check boxes.
Save Options. The location is the folder where the images will be copied; click the Choose button to change the folder. If you want Photo Downloader to automatically create subfolders for your shoots, choose a folder-naming option from the Create Subfolder(s) pop-up menu.
Tip
Add your Location folder as a Favorite in Bridge or on your desktop, so that you can always get to it in one click.
To have Photo Downloader automatically rename images as they’re copied, choose a renaming option from the Rename Files pop-up menu. In addition to the date-based naming options, the Same As Subfolder option bases the filenames on the name of their subfolder.
The “Preserve Current Filename in XMP” option only applies if you rename a file. It keeps the original filename in the image’s XMP metadata, and you can view this information in Bridge.
Advanced Options. We recommend checking the Open Adobe Bridge check box, because if it’s on, as soon as the images are copied, Adobe Bridge opens to that folder, so that you can work with your images right away.
We also like to check the Convert to DNG option, because the DNG (Digital Negative) format packages raw sensor data in one convenient, vendor-independent file, without storing the metadata in separate “sidecar” files that you have to track along with the raw file. For information about the options you find when you click the Settings button, see “The Main Control Buttons” later in this chapter.
The Save Copies To check box creates a second copy of each image in the folder you specify. The best way to use the Save Copies To check box is to set the folder to a completely different hard disk. This may all seem paranoid, but professional photographers require this level of backup in case something goes horribly wrong, often using a small portable drive as their backup. For example, if a photojournalist copies photos from a card to a laptop, then erases the card so that he or she can take more photos, and then the laptop’s hard disk dies (and you know that happens), the only existing images of a one-time event may be gone forever.
Apply Metadata. If you’ve set up metadata templates in advance, you can choose one from the Template to Use pop-up menu. We recommend that you create and apply a template that at least adds your name and copyright information to all images you shoot. For more information about setting these up, see “Using Metadata Templates” later in this chapter.
We recommend that you carefully consider your Photo Downloader settings in the context of how you want your overall photo collection to be organized. If you work out folder and file-naming conventions and your standard metadata in advance, your photo collection will automatically build itself in an organized fashion. If you just copy images without taking advantage of the automatic organizational options available in today’s downloading utilities, you’ll have a growing pile of images to rename, annotate, and organize later, and take it from us, that isn’t any fun to deal with.
Once you’ve copied the raw files to your hard disk, the next thing to do is to point Adobe Bridge at the folder containing the raw images. (If you checked the Open Adobe Bridge option in Photo Downloader, this should happen automatically.) If you haven’t opened Adobe Bridge yet, it’s in the Adobe Bridge CS3 folder, inside the Applications folder (Mac) or Program Files folder (Windows).
Bridge is command central for dealing with hundreds of images. You’ll use it to make your initial selects, to apply and edit metadata including Camera Raw settings, and to control the processing of the raw images into a deliverable form.
But before you start doing any of these things, give Bridge a few minutes to generate the thumbnails (see Figure 5-3) and previews and to read the image metadata. It’s a good idea to let it finish building the cache for the folder before starting work.

Tip
Professional photographers use the term “selects” (as a noun) to describe the best images from a shoot. If you also use Adobe Lightroom, you’ll notice that it calls selects Picks.
The reason is simple. While you can identify and open raw images as soon as the thumbnail appears, the thumbnails are generated by the camera and Bridge simply displays them. To build the high-quality previews, though, Camera Raw has to actually read the raw data. A good way to inspect the high-quality previews in detail is with the loupe; see “Evaluating and Comparing” later in this chapter.
If there’s a problem reading the images, the problem will only show up on the high-quality thumbnail and preview. The initial thumbnails are the camera-generated ones, and they don’t indicate that the raw file has been read successfully. The high-quality ones do indicate that the raw file has been read successfully, so wait until you see them before you erase the raw image files from the camera media.
If you see a problem at this stage, check the second copy (if you made one) or go back to the camera media if you haven’t erased the card already. It’s fairly rare for the data to get corrupted in the camera (though it does sometimes happen, particularly in burst-mode shooting), so the first suspect should be the card reader.
When you want to turn raw camera files into usable images, Adobe Camera Raw is your friend. Like the Photo Downloader, Camera Raw isn’t stand-alone software; it’s plug-in software that you can use only from within Photoshop or Bridge.
Camera Raw can be the first stage of your digital workflow if you use it to prepare images that you intend to send to Photoshop for more precise editing. However, the controls in Camera Raw are quite capable—so much so that many images may not need to be sent to Photoshop. While Camera Raw can’t print, it does have the ability to generate DNG, JPEG, TIFF, and Photoshop files on its own. If you use Camera Raw this way, it can be the last stage in your digital workflow.
There may be times when you want to work in Camera Raw but you don’t need to pass the images to Photoshop just yet. That’s why you can also open Camera Raw from Bridge. In Bridge, you can run Camera Raw without having to open Photoshop, which can free up RAM on your computer for other things.
Tip
If you try to open many images in Camera Raw but your available RAM is limited, Camera Raw may display an alert telling you that you’re opening too many images at the same time. If you don’t want to open fewer images, first make sure you don’t have unnecessary applications running, and then make sure you’re launching Camera Raw from Bridge instead of from Photoshop. Bridge needs less RAM to operate than Photoshop, so Camera Raw can open more files at once from Bridge than it can from Photoshop.
The ability to open Camera Raw in either Photoshop or Bridge may seem incidental, but there are practical advantages. For example, if you want to edit the Camera Raw settings for one or more images but don’t plan on opening them in Photoshop, you can open Camera Raw in Bridge while Photoshop is busy (such as when it’s running a batch process). Or you could edit an image in Camera Raw in Photoshop while Bridge is busy caching a folder full of images. You can even open one Camera Raw window in Bridge and another in Photoshop, though doing so can make you one very confused puppy!
The subtle clue as to which application is currently hosting Camera Raw appears in one button: When Camera Raw is hosted by Bridge, the default button is labeled Done (clicking it closes Camera Raw, applies the settings to the raw file, and returns you to Bridge). When in Photoshop, the button is labeled Open (clicking it closes Camera Raw, applies the settings to the raw file, and opens the converted image in Photoshop).
If you already know which shots you want to open in Camera Raw, you can skip this section and go on to the next one. However, there’s another option if you usually shoot more than one frame of each subject to ensure that you get the right shot: After you copy images to your hard disk, use Bridge to narrow down your shoot, selecting only the best images to open and edit in Camera Raw and Photoshop. Doing this has several benefits:
You can rate images to prioritize them. You can also mark images as rejected so that you can delete them, freeing up disk space.
You can compare multiple images and use a loupe to compare images in detail.
You can stack images to keep related images together.
You can filter your images to display only images that contain specific metadata, such as a keyword.
If you need to narrow down your shoot before going into Camera Raw, you should read about the above Bridge features above in detail before you start working in Camera Raw. See “The Preproduction Phase” later in this chapter.
You can open a supported file with Camera Raw in several ways:
In Photoshop, choose File > Open, select one or more raw files, and click Open.
In Bridge, or on your desktop, select at least one raw file and double-click it.
In Bridge, you can also open a selected, supported file in Camera Raw by pressing Return.
Opening the file from your desktop works as long as Photoshop is the application that is set to open your camera’s raw files; if the file icon has an Adobe icon with a “CRW” badge, you should be able to double-click it. A raw file opened in Photoshop automatically opens in Camera Raw.
If you open multiple files in Camera Raw, you’ll see the filmstrip which lets you select which images are affected by the settings you change, along the left side of the dialog. You can also use the Synchronize button to spread settings from one image to others inside Camera Raw (see “Filmstrip Mode,” later in this chapter).
Tip
Camera Raw is now so packed with features that it deserves its own book. Fortunately, such a book does exist. To gain a complete understanding of Camera Raw, pick up a copy of Real World Camera Raw with Adobe Photoshop CS3 by Bruce Fraser and Jeff Schewe, by the very same Adobe Press that brought you this book.
Turn off default autocorrection. Camera Raw autocorrects images by default. Some people seem to love this feature, while others hate it because it tries to “correct” your manual exposure settings, like bracketing. Fortunately, the behavior is easily changed: Open Camera Raw preferences and turn off the check box for Apply Auto Tone Adjustments and click OK, make sure that White Balance is set to As Shot, then choose Save New Camera Raw Defaults from the Camera Raw menu. Note that the defaults are per camera model, so you’ll need to do this for each camera model you use. You can still apply autocorrection to an individual image by clicking Auto, or by pressing Command-U in Mac OS X or Ctrl-U in Windows. See “Using Auto Tone Adjustments,” later in this chapter, for more details.
One of the biggest changes to Camera Raw in Photoshop CS3 is that you can now open TIFF and JPEG images in Camera Raw and lets you use Camera Raw features on them. This doesn’t magically bring the inherent qualities of raw files to TIFF and JPEG files, however; it just makes some tasks easier. For example, it can sometimes be easier to get rid of a color cast using the White Balance control in Camera Raw rather than playing with the various color-correction features in Photoshop. Another powerful advantage is that you can now use Camera Raw and Bridge batch-processing features on TIFF and JPEG files, such as the ability to synchronize nondestructive Camera Raw adjustments instantly across multiple images. This means that even photographers who shoot in JPEG can take advantage of the Camera Raw workflow, even if the images themselves are not as flexible as raw files.
By default, TIFF and JPEG images open in Photoshop. To open a TIFF or JPEG image in Camera Raw, Control-click (Mac) or right-click (Windows) an image and choose Open in Camera Raw from the context menu. In Photoshop, you can choose File > Open, select a TIFF or JPEG image, change the Format pop-up menu to Camera Raw, and then click Open, although you can open only one file at a time this way.
The Camera Raw dialog offers two sets of controls; one static set that is “sticky” (the settings remain unchanged until you change them) and another that is dynamic, and image-specific. The later set changes depending on which tab is currently selected (see Figure 5-4).

The static controls fall into several groups: the toolbar, including the preview controls; the histogram; the Camera Raw menu, and the main control buttons. Let’s look at each of these.
The Camera Raw toolbar (see Figure 5-5) contains eleven buttons, including two new tools and a new button that opens the Preferences dialog.
Edits in Camera Raw never change the pixels in the original files. Whether you edit raw, TIFF, or JPEG files, Camera Raw stores its changes as metadata, only applying the changes to files you export from Camera Raw or open in Photoshop. The changes are stored in the file if Camera Raw can write to the file’s metadata (DNG, TIFF, and JPEG files). If that’s not possible, the changes are stored in an XMP metadata sidecar file with the same base name as the raw file.

Zoom and pan. The zoom (magnifying glass) and pan (grabber hand) tools work just like their Photoshop counterparts.
White balance. The White Balance tool (press I) lets you set the white balance by clicking on the image. Unlike the white Eyedropper in Levels or Curves, it doesn’t allow you to choose a source color, and it doesn’t affect the luminance of the image. Instead, it lets you set the white balance—the color temperature and tint—for the capture by clicking on pixels you think should be neutral.
Tip
The White-balance tool in Camera Raw works best on a light gray that’s close to diffuse highlight, but one that still contains detail, rather than on a specular highlight that’s pure white. The second-to-lightest gray patch on the old 24-patch Macbeth ColorChecker works well, as do bright (but not blown-out) midday clouds.
Click-balancing with the white balance tool provides a very quick way to set color temperature and tint simultaneously, especially if you placed a gray card in the image. You can always fine-tune the results using the individual Temperature and Tint controls in the Basic tab, which we’ll cover in due course.
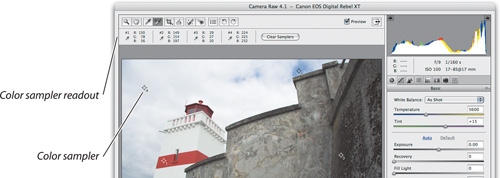
Color samplers. The Color Sampler tool (press S) lets you place as many as nine individual color samplers, each of which gets its own readout, in the image (see Figure 5-6). Combined with the static RGB readout, the Color Sampler tool lets you monitor the values of up to ten different locations in the image, which should be enough for any reasonable use.
Crop. The Crop tool (press C) lets you drag a cropping rectangle, choose one of several common predefined aspect ratios, or define your own custom aspect ratio from the tool’s pull-down menu (see Figure 5-7). The same menu allows you to clear the crop. The Camera Raw preview always shows the crop in the context of the whole image, but you’ll see the crop in filmstrip previews, Bridge previews and thumbnails, and of course in the image itself when you open it in Photoshop.

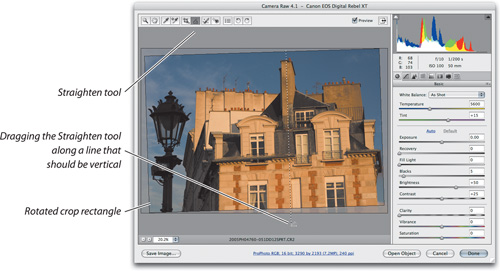
Straighten. The Straighten tool (press A) is an enormous time-saver for those of us who sometimes fail to keep our horizons horizontal. It should really be called the Straighten and Crop tool because it also automatically applies the crop that maintains the maximum rectangular image when the Crop tool is set to Normal, or a straightened crop of the specified aspect ratio when the Crop tool is set to something else. If there’s an existing crop, it’s preserved and rotated. Compared to straightening and cropping an image in Photoshop using the Measure tool, Arbitrary Rotate tool, and the Crop tool, we much prefer the Straighten tool’s speed and simplicity (see Figure 5-8).
Rotate buttons. The Rotate 90 Degrees Left and Right buttons (press L and R, respectively) aren’t really tools—you don’t have to do anything inside the image preview—but since they’re placed so closely to the toolbar (see Figure 5-5), we’ll deal with them here. Clicking on them or pressing their keyboard shortcut rotates the image preview. When you finish editing the image in Camera Raw, the rotation is applied to thumbnails and previews in Bridge, and is honored whenever you open the raw image in Photoshop.
Tip
All of the keyboard shortcuts for zooming in Photoshop (seen on the View menu in Photoshop) also work in Camera Raw; for example, press Command-Option-0 (Mac) or Ctrl-Alt-0 (Windows) to display actual pixels. For the Pan tool, hold down the spacebar. Press Z to choose the Zoom tool and H for the Hand tool. Double-clicking the hand tool fits the entire image in the preview, and double-clicking the zoom tool zooms to Actual Pixels view.
Retouch. The new Retouch tool (press B) is a spot touch-up tool, similar to the Spot Healing Brush in Photoshop (see “The Healing Brushes and the Patch Tool” in Chapter 11, “Essential Image Techniques”). To retouch a spot, select the Retouch tool, position it over the center of the spot you want to remove, and drag until the resulting circle is larger than the spot (see Figure 5-9). Press V to toggle the Show Overlay check box to see if the retouch looks good. If it doesn’t, you can drag the green dashed circle to change the retouching source, or drag the red dashed circle to change the retouched spot. You can also change the size of the circles by dragging the edge of either circle, or by changing the Radius value in the options below the toolbar. If you set the Radius when no spots are selected, you’ll be setting the default radius. You can tell that a spot is selected when you can see both the source and destination circles. A lone circle is deselected; click inside it to select it.
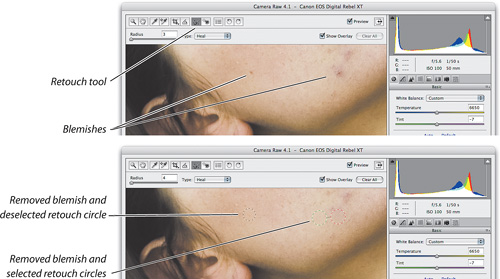
The Type pop-up menu in the toolbar determines how the Retouch tool works. When the Retouch tool is set to Heal, it tries to smoothly merge the source (the green dashed circle) to the destination (the red dashed circle) by matching texture, lighting, and shading. It’s more common to choose Heal from the Type pop-up menu, particularly when removing skin blemishes. To exactly copy one spot to another, choose Clone from the Type pop-up menu.
Though Photoshop has more retouching options, such as the ability to remove long scratches and power lines, there are two good reasons to perform spot retouching in Camera Raw. First, the edits are nondestructive, so you can change them later at any time; in Photoshop, actual pixels are altered in the original image. Second, it follows our recommendation to do any edits you can as early as possible in the digital workflow, so that you only have to do them once.
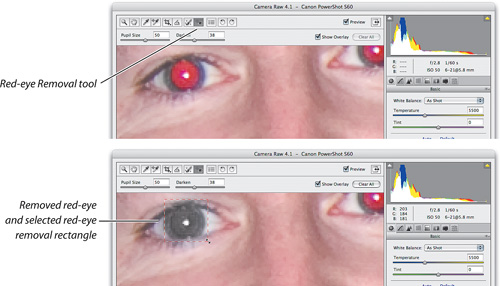
Red eye removal. The Red-eye Removal tool (press R) is a quick way to get rid of red-eye from on-camera flash. Drag a rectangle around an entire eye (it works better if you surround more eye, not less), and Camera Raw detects red-eye and applies the default correction settings (see Figure 5-10). Like the Retouch tool, you can resize a red-eye rectangle by its edges, reposition it by dragging, add multiple rectangles (most people have more than one eye), and select and deselect rectangles. When a rectangle is selected, you can change the Pupil Size and Darken values in the toolbar. Don’t make a rectangle much bigger than an eye, or you may have trouble getting the Pupil Size to be small enough.
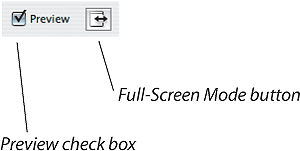
Two sets of controls affect the preview image (Figure 5-11). The Zoom buttons and the Zoom level menu control the size of the preview image, while the Preview check box affects its state.
Zoom Level menu. The Zoom Level menu lets you choose a zoom level for the image preview. But if you find yourself using this feature, go back and read the tip about keyboard shortcuts for zooming, on page 150.
Preview check box. The Preview check box (press P to turn this on or off) applies only to the current editing tab, toggling between its current settings and those that were in effect when you opened the image. It has no effect on changes you’ve made in other tabs. To see the settings that applied before you opened the image—toggle between Image Settings and Custom Settings on the Settings menu (see Figure 5-14).
Tip
If you see a yellow warning triangle in the image area of the Camera Raw dialog, Camera Raw isn’t finished processing the image. Don’t judge image quality until the yellow warning triangle goes away.
Full-screen mode. To make the Camera Raw window fill the entire monitor, click the Full-Screen Mode button next to the Preview check box. Full-screen mode works best if you have a fast machine, because Camera Raw takes longer to refresh the dialog when it’s larger. Along those lines, if your machine is on the slow side, you can speed things up by making the Camera Raw dialog smaller.
The histogram and RGB readout provide information about the current state of the image (see Figure 5-12). The histogram displays the histograms of the red, green, and blue channels that will be created by the current conversion settings, not the histogram of the raw image (which would look strange since digital cameras capture at linear gamma—all the image data would be scrunched over to the left). The histogram can show you, at a glance, exactly what’s happening to your exposure and clipping at the current image settings. If you’re unfamiliar with histograms, see “The Histogram Palette” in Chapter 7.

Note that if the clipping disappears when you set the Space menu (in the Workflow Settings) to ProPhoto RGB, you can be certain that it’s showing gamut clipping from a smaller output space.
Shadow and highlight clipping warnings. The Shadow and Highlight Clipping Warning buttons, at the top left and right corners of the histogram (see Figure 5-13), provide a quick way to check for shadow and highlight clipping. The shortcuts are U (for underexposed) and O (for overexposed), respectively. These are most useful for a quick check on the state of the image. For a more interactive clipping display that’s more useful when you’re actually making adjustments, hold down the Option key (Mac) or Alt key (Windows) while dragging the Exposure or Blacks slider.

Tip
For more information about avoiding clipped highlights and shadows, see “The Basic Tab,” later in this chapter.
RGB readout. The RGB readout (see Figure 5-12) shows the RGB values for the pixels under the cursor. The values are those that will result from the conversion at the current settings. The RGB readout always reads 5-by-5 screen pixels at zoom levels of 100 percent or less, so it may display different values at different zoom levels. When you fit the entire image in the window, you’re sampling an average of many pixels. At zoom levels greater than 100 percent, the sample size is always 5-by-5 image pixels.
EXIF readout. To the right of the RGB values is a panel that displays information from the image’s EXIF data (see Figure 5-12), if present in the image. If the EXIF readout is blank, as it will be in a scanned image, the image doesn’t contain EXIF data. EXIF data does, however, exist in images produced by digital cameras, unless the last person who saved an image chose to strip the EXIF data from the file.
The Settings pop-up menu lets you change the settings applied to the image (see Figure 5-14). The items that always appear are Image Settings, Camera Raw Default, Previous Conversion, and Custom Settings.
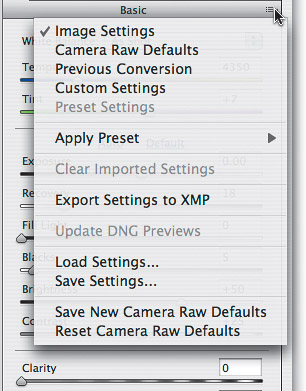
Image Settings. If Image Settings is available, you’ve previously applied edits to the image. If you’re working on an image, choosing Image Settings will show you the settings that were in effect before you started editing. If the image is brand-new and has never been edited, the Image Settings values equal those of the next item, Camera Raw Default.
Camera Raw Defaults. Camera Raw Defaults is what it says—it’s the default setting that applies to all images unless and until you override it. It’s also the setting used by Bridge to create high-resolution previews when it sees a folder full of new raw images. If you find that the shipping default settings aren’t to your liking, you can set your own Camera Raw Defaults for each supported camera model. If you get yourself in a mess by doing so, you can return Camera Raw to the shipping default settings using the appropriate commands from the Camera Raw menu.
Previous Conversion. Choosing Previous Conversion applies the settings from the last image you opened in Camera Raw to the current image.
Custom Settings. Custom Settings denotes the current settings you’re applying in Camera Raw. As we mentioned previously, you can toggle between Image Settings and Custom Settings to compare your current edits with the ones that were in effect when you opened the image in Camera Raw.
You can also save your own custom settings as presets, which then become available from this menu. It’s easy to overlook the mechanism for doing so, though, because it lives on the Camera Raw menu, which—although it’s one of the most important of the static controls—is unfortunately an unlabeled button. Let’s take a look at this menu next.
Preset Settings. If you last applied Camera Raw settings to the image by choosing a preset, the name of the preset appears here.
Apply Preset submenu. Presets you’ve created with Camera Raw appear in this submenu, but it’s easier to apply them from the Presets tab.
Clear Imported Settings. Camera Raw and Bridge are no longer the only software that can read and write Camera Raw settings. Adobe Lightroom does it too, since Lightroom and Camera Raw use the same raw-processing engine. However, Lightroom and Camera Raw are not always updated at the same time, so occasionally one of them will add controls that aren’t available yet in the other. When you open a raw image using software that’s missing options that were available in the last application that edited it, you may find it difficult to control the image because it’s influenced by settings you can’t change. When that’s the case, Clear Imported Settings is a way to set those options to their default values.
Exporting Settings to XMP. The Export Settings to XMP command offers a way to write a sidecar .xmp file when you have the Camera Raw Preferences set to save edits in the Camera Raw cache. This offers a way to produce sidecar files when you want to copy the images to removable media for use on another computer while preserving the edits. If the preference is set to use sidecar files, Export Settings will export a sidecar file only if one doesn’t already exist. If there’s an existing sidecar file, Export Settings does nothing.
Update DNG Previews. When you edit a DNG file, your changes are written to the DNG metadata, but by default, the DNG preview isn’t updated. Update DNG Previews rewrites the preview so that you can see the current state of the file in applications that don’t render DNG on the fly. If you want DNG previews to update automatically, check the Update JPEG Previews check box in the DNG File Handling section of the Camera Raw Preferences dialog.
The Load Settings and Save Settings commands let you load and save settings or settings you make with any of the image-specific controls—the ones located in the tabs below the histogram. When you choose Save Settings, a dialog appears asking you which settings you want to save. This means you can save a preset for just a few options without changing any others. For example, you could create a setting that only applies color noise reduction (see Figure 5-15).

When you save settings to the default location, they appear on the Settings menu automatically. That location on a Mac is (username)LibraryApplication SupportAdobeCamera RawSettings. In Windows, it’s Documents and Settings(username)Application DataAdobeCamera RawSettings. These saved settings also appear in the Presets tab and in the Edit > Develop Settings submenu in Bridge. If you save settings anywhere else, you can load them using the Load Settings command in Camera Raw.
The Camera Raw Preferences (see Figure 5-16) let you decide whether your raw edits are saved in the Camera Raw database or in sidecar .xmp files, and whether to apply sharpening to the converted image or to the preview only. They also allow you to choose the location and size of the Camera Raw cache and let you purge the Camera Raw cache. Camera Raw 3.1 and later added settings that control the behavior of DNG files—they have no effect on other raw formats.
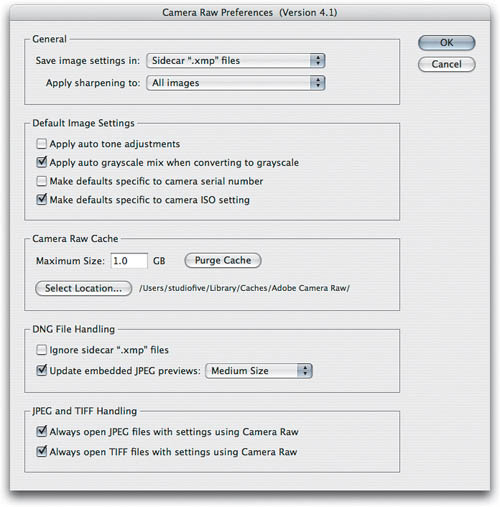
Save Image Settings In. Camera Raw treats the raw images as read-only, so your Camera Raw edits for the image get saved either in a sidecar .xmp file—a small file designed to travel with the image—or in the Camera Raw database. Each approach has strengths and weaknesses, and choose your approach using the Save Image Settings In option in this dialog.
Saving your edits in the Camera Raw database means that you don’t have to keep track of sidecar files or worry about making sure that they get renamed along with the image—the Camera Raw database indexes the images by file content rather than name, so if you rename the raw file, the Camera Raw database will still find the correct settings. The major disadvantage is that when you move the images onto a different computer or burn them to a CD or DVD, the edits won’t travel with the images.
Saving your edits in sidecar files allows the edits to travel with the images. Adobe gives you a lot of help in handling the .xmp sidecar files. By default, Bridge hides them and automatically keeps them with their respective images when you use Bridge to move or rename them. The only danger is that if you move or rename the images outside Bridge, you need to keep track of the sidecars yourself.
A solution to this potentially confusing issue is to convert your raw images to DNG format (see “The Main Control Buttons,” later in this chapter for more on this). Camera Raw treats raw files as read-only because all the vendors’ proprietary formats—Canon’s CRW and CR2, Nikon’s NEF, Olympus’ ORF, and so on—are undocumented. Rather than taking the risk of messing up the file by writing metadata such as Camera Raw settings into it, Camera Raw uses sidecar files or its own database. But DNG is a completely documented, open format, so when you use DNG, Camera Raw settings and other metadata get written directly into the DNG file itself.
Apply Sharpening To. The Apply Sharpening To option lets you choose whether to apply sharpening to the previews and to the converted image, or to the previews only. Setting this option to Preview Images Only lets you enjoy reasonably sharp preview, but apply more nuanced sharpening to the converted images. Note that this preference only affects the Sharpness setting, not either of the noise-reduction settings, which are found on the same Detail tab as the Sharpness control (see “The Detail Tab,” later in this chapter).
If you plan to apply sharpening later in your workflow, such as in Photoshop, it’s better to set this to Preview Images Only. However, if you’re going to export final images from Camera Raw, you probably want to set this option to All Images—otherwise no Camera Raw sharpening will be applied to the exported images.
Default Image Settings. Click the Preferences icon in the toolbar to see the Default Image Settings preferences. Uncheck Apply Auto Tone Adjustments if you don’t want Camera Raw to automatically adjust each image that you open in Camera Raw; Apply Auto Grayscale Mix When Converting to Grayscale is a similar preference for the times when you convert color images to black and white using the Convert to Grayscale check box in the HSL/Grayscale tab (see “The HSL/Grayscale Tab” later in this chapter), but we think you should leave that one on. Make Defaults Specific to Camera Serial Number is useful if you own multiple bodies of the same camera and want different defaults for each camera. Conrad likes to check Make Defaults Specific to Camera ISO Setting, because he wants different ISO settings to use different default settings for noise reduction.
Camera Raw cache. The Camera Raw cache holds pre-parsed raw data for the most recently used raw files, which is used to speed up the following operations:
Opening the Camera Raw dialog
Switching between images in the Camera Raw filmstrip
Updating the thumbnails in the Camera Raw filmstrip in response to settings changes
Rebuilding the thumbnails/previews in Bridge in response to settings changes
The cache file sizes average about 5 MB, so at the default size limit of 1 GB, the Camera Raw cache will hold the pre-parsed data for about the 200 most recently accessed images. If you commonly edit folders with more than 200 raw files, you will probably want to increase the Camera Raw cache’s size limit. Nothing is stored exclusively in the Camera Raw cache, so purging it never means you will lose data.
DNG File Handling. The two check boxes under DNG File Handling control the behavior of DNG files. They have no effect on other raw formats.
Ignore Sidecar “.xmp” Files. This preference addresses a relatively obscure situation that arises only when you have a DNG and a proprietary raw version of the same image in the same folder, and they’re identically named except for the extension. If you edit the proprietary raw file, Camera Raw also applies the edits to the DNG, to maintain compatibility with older versions of Photoshop CS and Photoshop Element, which write sidecar files for DNG instead of writing to the DNG file itself. This setting lets you tell Camera Raw to ignore sidecar files and leave the DNG file alone in this situation.
Update Embedded JPEG Previews. This setting controls when the embedded JPEG previews in DNG files get updated. When it’s turned on, Camera Raw updates the embedded preview as soon as you dismiss Camera Raw after editing a DNG file, thereby incurring a speed penalty since the previews take time to write and save.
You can defer the speed hit by turning this item off. Then, when you want to update the previews, choose Update DNG Previews from the Camera Raw menu, which opens the Update DNG Previews dialog where you can choose the preview size.
Tip
If you want Camera Raw to use the same JPEG preview size that it applied the last time you chose the Update DNG Previews command, hold Option/Alt while choosing Update DNG Previews to skip the Update DNG Previews dialog and apply the last-used preview size.
When you choose Full Size, Camera Raw embeds both Full Size and Medium Size previews. The downside is that Full Size previews take longer to build, and make a slightly larger file. Bear in mind, though, that you can choose whether Photoshop or Bridge will get tied up generating the previews so you can continue working in the other application while the one hosting Camera Raw builds the previews.
JPEG and TIFF Handling. These two options need a little bit of decoding because the way they work isn’t obvious. Turning on the check boxes for Always Open JPEG Files with Settings Using Camera Raw and Always Open TIFF Files with Settings using Camera Raw does not mean JPEG and TIFF files will always open in Camera Raw. The clues are the words “with settings.” If you turn on these check boxes, then files in those formats will open in Camera Raw if they already contain Camera Raw settings—in other words, they will open in Camera Raw if you’ve previous edited them in Camera Raw. If you haven’t edited them in Camera Raw, they’ll open in Photoshop even if you’ve checked these options. And if you uncheck these options, files in those formats always open in Photoshop, even if you’ve edited them in Camera Raw.
Tip
The Bridge preference Prefer Camera Raw for JPEG and TIFF Files doesn’t affect how those file types open. If the images contain Camera Raw settings, it controls whether Bridge uses Camera Raw settings to render JPEG and TIFF thumbnails.
If you want to ensure that a JPEG or TIFF file opens in Camera Raw even if it doesn’t contain Camera Raw settings, you must open the file in one of two ways: Either select the file in Bridge and use the File > Open with Camera Raw command (which is also available on the context menu); or in Photoshop choose File > Open, and then change the Format pop-up menu to Camera Raw.
The main control buttons (see Figure 5-17) let you specify the action that Camera Raw will perform on your raw image.
Save Image. Click Save Image (Command-S in Mac OS X or Ctrl-S in Windows) to export a copy of the raw image as a DNG, TIFF, JPEG, or Photoshop file directly from the Camera Raw dialog without opening the image in Photoshop. Clicking Save Image opens the Save Options dialog, which lets you specify the destination, the file format, any format-specific options such as compression, and the name for the saved file or files. When you click Save in the Save Options dialog, you’re returned to Camera Raw, and the file gets saved in the background.
It’s also worth noting that Camera Raw is in itself a DNG converter. If you’ve decided that you want to stay with proprietary raw files as your working files, but would prefer to hand off DNG files when you need to submit raw images (to make sure that your metadata gets preserved), you can do it straight from Camera Raw.
If you don’t want the Camera Raw dialog to go away after you’re done saving, hold down Option (Mac) or Alt (Windows) to change the Save Image button into the Save button. When you click the Save button, the Save Options dialog doesn’t appear; the selected images in Camera Raw are saved using the last settings you used in the Save Options dialog.
Tip
The Save button is especially useful when you select multiple images in filmstrip mode, because the conversion happens in the background. That means that you can keep working in Camera Raw while Camera Raw exports image after image.
Open. Click Open (Command-O in Mac OS X or Ctrl-O in Windows) to close the Camera Raw dialog and open the image in Photoshop using the settings you applied in Camera Raw. These settings are written to the raw file’s metadata, and Bridge’s previews and thumbnails are updated to reflect the new settings. When Camera Raw is hosted by Photoshop, Open is the default button.
If you want to open selected images in Photoshop but you don’t want the current Camera Raw settings to be saved with the raw files (maybe you’re experimenting), press Option (Mac) or Alt (Windows) to change the Open button to Open Copies. Finally, if you want to open selected images in Photoshop as Smart Objects (see “Smart Objects” in Chapter 11), press Shift to change the Open button to Open Objects.
If this button already says Open Object or Open Objects, the default behavior of the button has been changed. That’s set in the Camera Raw Workflow Options, which we will talk about soon.
Cancel. Click the Cancel button (press Esc) to ignore any adjustments you’ve made since opening Camera Raw, close the Camera Raw dialog, and return you to the host application, leaving the raw file settings unchanged. If you have many images open in Camera Raw, all of those images lose all changes you made to them in the current Camera Raw session.
To return all Camera Raw settings to the state they were in when you launched Camera Raw (either Image Settings, if the image had previously had its own Camera Raw settings applied, or Camera Raw Defaults if it hadn’t), press Option (Mac) or Alt (Windows) to change the Cancel button to Reset. The Camera Raw dialog stays open after you click Reset.
Done. Click Done (or press Return or Enter) to close the Camera Raw dialog, write the settings you applied in Camera Raw to the raw file’s metadata, and return to the host application. Previews and thumbnails in Bridge are updated to reflect the new settings. When Camera Raw is hosted by Bridge, Done is the default button.
While it may be obvious that you adjust settings in Camera Raw by dragging the sliders, you can also take advantage of other adjustment tricks. Some give you more precision and others give you more speed.
You don’t have to drag the slider itself. For more precision, position the cursor over the name of an option until the cursor turns into a two-headed arrow, and drag left or right using the entire width of the monitor. This gives you finer control than you get by using the short width of a slider.
When the cursor is blinking a value or a value is highlighted, press the up arrow or down arrow keys to adjust the value. The amount of the adjustment varies depending on the setting. Add the Shift key to adjust the value by a larger amount.
Undo does work. Even though the Undo command is not available on the Edit menu when Camera Raw is open, you can still undo changes in the Camera Raw image controls by pressing the traditional Undo keyboard shortcut, Command-Z (Mac) or Ctrl-Z (Windows). Press the Undo shortcut again to toggle between the current and previous values. In addition, Camera Raw 4 has multiple undo; just add the Option (Mac) or Alt (Windows) key to the Undo shortcut to move back through Undo steps, or add the Shift key to move forward through Undo steps.
At the bottom of the Camera Raw dialog is blue underlined text that looks like a Web link. You’ll notice that the text is a line of image specifications; click the text to open the Workflow Options dialog and change the specs (see Figure 5-18). These controls apply to the current image or to all the images being converted in a batch process. The workflow options aren’t saved with individual images; the Camera Raw dialog simply continues to use the settings until you change them again.

Space. Choose a destination color space for the conversion from one of four preset working spaces: Adobe RGB (1998), Colormatch RGB, ProPhoto RGB, or sRGB IEC61966-2.1 (the last being the “standard” flavor of the sRGB standard). See the sidebar “Camera Raw and Color” for details on how Camera Raw handles the color management aspect of the conversion. Note that the space you choose here determines the boundaries for the clipping warnings in the Camera Raw dialog.
Depth. Choose whether to produce an 8-bit/channel image or a 16-bit/channel one. A 16-bit/channel file needs twice as much storage space as an 8-bit/channel one, but it provides 128 times the tonal steps between black and white, so it offers much more editing headroom.
Crop Size. Choose the pixel dimensions of the converted image. If you see a minus sign (−) after a set of dimensions, choosing those dimensions will downsample the image. Similarly, if you see a plus sign (+) after a set of dimensions, choosing those dimensions will upsample the image. The dimensions in the middle of the list (with no minus or plus sign) represent the number of pixels saved into the image file by the camera.
Tip
To use Camera Raw to resample an image to pixel dimensions that aren’t in the Size pop-up menu, use the Crop tool in Camera Raw instead. The Crop tool lets you specify pixel dimensions up to 10,000-by-10,000 pixels, so you can use it to produce a much larger file than the sizes that appear on the Size menu in Camera Raw. The Crop tool method works for downsampling too.
Resolution. Choose a resolution for the converted image. Changing Resolution doesn’t change the number of pixels in the converted image, only their density.
If you want to set image resolution or pixel dimensions with more control than you have in the Workflow Options dialog, leave the settings at the native values, wait until you’ve opened the image in Photoshop, and then choose the Image > Image Size command in Photoshop.
The image controls—the ones you’re likely to change with each image—occupy the rest of the Camera Raw dialog. The tabs are:
Basic, which deals with color balance, essential tone mapping, and overall image quality.
Tone Curve, where you can fine-tune contrast.
Detail, which provides controls for sharpening and noise reduction.
HSL/Grayscale, where you can adjust specific color ranges, or, if you turn on its Convert to Grayscale check box, tonal ranges.
Split Toning, where you can tone highlights and shadows differently, is a technique that adds depth to limited-color images.
Lens Correction, which can correct chromatic aberration, defringing, and vignetting.
Calibration, which lets you fine-tune the built-in color profiles in Camera Raw to better match the behavior of your specific camera body.
Presets, a list of all of the presets available to Camera Raw.
You can switch quickly between tabs by pressing keys 1 through 8 together with the Command and Option keys (Mac) or the Ctrl and Alt keys (Windows). For example, on the Mac, press Command-Option-2 to display the Tone Curve tab.
Tip
On Mac OS X, Command-Option-8 is the default shortcut for enabling or disabling screen zooming for the visually impaired. If you’d rather use that shortcut for the Presets tab in Camera Raw, open the Keyboard & Mouse system preference, click the Keyboard Shortcuts tab, and change the Turn Zoom On Or Off shortcut to a different shortcut (Conrad changed it to Command-Option-9).
These image controls are really the meat and potatoes of Camera Raw, offering very precise control over your raw conversions. Some of the controls may seem to offer functionality that also exists in Photoshop, but there’s a significant difference between editing the tone mapping in Camera Raw, which tailors the conversion from linear to gamma-corrected space, and editing the tone mapping by stretching and squeezing the bits in a gamma-corrected space in Photoshop.
The more work you do in Camera Raw, the less work you’ll need to do afterward in Photoshop. At the same time, if you get your images close to the way you want them in Camera Raw, they’ll be able to withstand much more editing in Photoshop—which you may need to do to optimize for a specific output process, or to harmonize the appearance of different images you want to combine into a single one.
The controls in the Basic tab (Command-Option-1 in Mac OS X or Ctrl-Alt-1 in Windows) let you tweak the essential tonal and color qualities of an image, such as white balance and overall contrast (see Figure 5-19). It’s the default tab in Camera Raw. Three controls in this tab deserve special attention: The Temperature, Tint, Exposure, and Recovery controls. They let you do things to the image that simply cannot be replicated in Photoshop after you convert the image.

Clarity and Vibrance have no direct analogs in Photoshop, although you can replicate their effects with some effort. Fill Light is somewhat like the Shadow portion of the Highlight/Shadow feature in Photoshop.
The Contrast, Brightness, and Blacks controls provide similar functionality to Levels and Curves in Photoshop, with the important difference that they operate on the high-bit linear data in the raw capture, rather than on gamma-encoded data postconversion. If you make major corrections (“major” meaning more than half a stop) with the Exposure slider, you’ll certainly want to use the Recovery, Brightness, Contrast, Fill Light, and Blacks controls to shape the raw data the way you want it before converting the raw image. With smaller Exposure corrections, you may still need to shape the tone in Camera Raw rather than in Photoshop, especially if you want to avoid shadow noise in underexposed images.
Tip
There are an awful lot of controls in Camera Raw, but unlike with Photoshop, it’s easy to remember what order to use the controls to preserve the best image quality. Adobe intentionally designed the control layout so that you can simply go through the tabs from left to right, and within each tab, adjust the controls from top to bottom.
The Saturation control in Camera Raw offers slightly finer global adjustments than the Hue/Saturation command in Photoshop, though unlike the Photoshop command, it doesn’t allow you to address different color ranges selectively. But in Camera Raw 4.1 or later, you can do that in the HSL/Grayscale tab.
White Balance. The two controls that set the white balance, Temperature and Tint, are the main tools for adjusting color in the image. Setting the white balance correctly should make the rest of the color more or less fall into place in terms of hue. Note that the “correct white balance” includes (but isn’t limited to) “accurate white balance”—you can use white balance as a creative tool, too.
Temperature. The Temperature control lets you specify the color temperature of the lighting in Kelvins, thereby setting the blue-yellow color balance. Lowering the color temperature makes the image more blue to compensate for the yellower light; raising the color temperature makes the image more yellow to compensate for the bluer light. If this seems counterintuitive—we think of higher color temperatures as bluer and lower ones as yellower—the trick is to remember that the Temperature control compensates for the color temperature of the light, so if you tell Camera Raw that the light is bluer, it makes the image yellower.
Tip
If you can’t figure out the white balance for an outdoor shot and the White Balance Eyedropper isn’t helping, try choosing Daylight from the White Balance pop-up menu as a starting point. Automatic white balance may not work properly with a scene dominated by a color that isn’t neutral, such as a green forest.
Tint. The Tint control lets you fine-tune the color balance along the axis that’s perpendicular to the one controlled by the Temperature slider—in practice, it’s closer to a green-magenta control than anything else. Negative values add green; positive ones add magenta.
Figure 5-20 shows an image as shot, and with some white-balance adjustments that greatly alter the character of the image. Notice that the adjustments involve the use of both the Temperature and Tint sliders.

The white-balance controls let you alter the color balance dramatically with virtually no image degradation, which you simply can’t do once the image is converted and opened in Photoshop. The freedom with which you can reinterpret the white balance is one of the main advantages of capturing raw rather than JPEG images.
Tip
Because half of the linear data in a raw capture describes the brightest f-stop, many digital photographers use the Expose to the Right (ETTR) technique. With ETTR, you set the camera exposure so that as much data as possible is as far to the right of the camera’s histogram as possible, but without clipping the highlights. As a result, you’ll probably have to lower the brightness of each image in Camera Raw, but it’s worth it: ETTR optimizes the signal-to-noise ratio (translation: image noise becomes less visible).
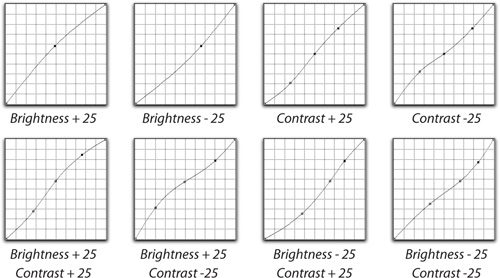
Tone-mapping controls. Learning how the four tone-mapping controls—Exposure, Blacks, Contrast, and Brightness—interact is essential if you want to exercise control over your images’ tonal values. It may not be obvious, but the controls work together to produce a five-point curve adjustment.
Exposure and Blacks set the white and black endpoints, respectively. Brightness adjusts the midpoint. Contrast applies an S-curve around the midpoint set by the Brightness, darkening values below the midpoint and brightening those above. Figure 5-21 shows Brightness and Contrast adjustments translated approximately into Photoshop point curves.
Let’s go into even more depth on each of these controls.
Exposure. The Exposure slider is first and foremost a white-clipping adjustment, like the white triangle in the Levels dialog in Photoshop. Half of the data in a raw capture is devoted to describing the brightest f-stop, so placing the highlights correctly is your highest priority. First set the Exposure slider, holding down Option (Mac) or Alt (Windows) to see the clipping display, so that the only clipping is on specular highlights. If this causes the overall image to be too dark, then raise Exposure back up and use the Recovery slider to restore the highlights (see Figure 5-22).

Large increases in exposure value (more than about three-quarters of a stop) will increase shadow noise and may even make some posterization visible in the shadows, simply because large positive exposure values stretch the relatively few bits devoted to describing the shadows further up the tone scale. If you deliberately underexpose to hold highlight detail, your shadows won’t be as good as they could be. We certainly don’t advocate overexposure—perfect exposure is always best—but slight overexposure is often better than significant underexposure.
Recovery. The Recovery slider offers the amazing ability to let you recover highlight information from overexposed images. Figure 5-22 shows a fairly typical example of highlight recovery. The actual amount of highlight data you can recover depends primarily on the camera model, and secondarily on the amount of compromise you’re prepared to tolerate in setting white balance. But it’s not at all unusual to recover two-thirds of a stop, and it’s often possible to recover more.
Tip
Don’t forget to use the shadow and highlight clipping warnings (press U and O keys to toggle them); they help you see whether you need to increase or decrease your Blacks and Exposure values. See “The Histogram and RGB Readout” earlier in this chapter.
In Camera Raw 3, the only way to recover highlights was to set Exposure to a negative value. That still works, but naturally it often makes the image darker than you want it to be, which often requires additional Tone Curve tweaks. In Camera Raw 4, the addition of Recovery lets you set Exposure to a more reasonable value.
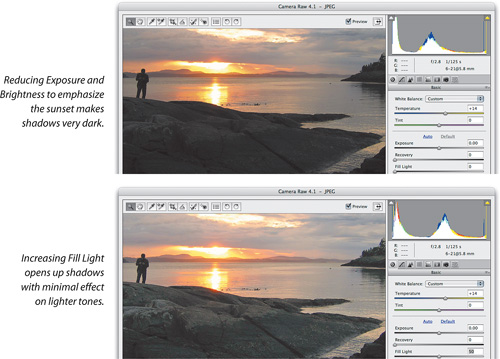
Fill Light. The Fill Light slider opens up shadows in a way that isn’t easily reproduced by Brightness, Contrast, or the Tone Curves (see Figure 5-23). For example, if you open up the shadows with a curve, you might lighten the rest of the image too much. Fill Light gets around this by lightening the shadows as much as it can without affecting the highlights.
You may experience a slight delay the first time you drag the Fill Light slider for each image, because it initially generates a mask, which Fill Light uses to restrict the adjustment to the shadows. On a slower machine, drag Fill Light a little, let go, and wait for it to build the mask before tuning your adjustments. You can’t see or adjust this invisible mask, but it works well in most cases.
Blacks. The Blacks slider is the black-clipping control, like the black input slider in the Levels dialog in Photoshop. But because the Blacks slider operates on linear-gamma data, small moves make bigger changes than does the black input slider in Levels. If you think the default value of 5 is too aggressive, you may want to set a lower default value.
Brightness. The Brightness control is a nonlinear adjustment that works very much like the gray input slider in Levels. It lets you redistribute the midtone values without clipping the highlights or shadows. Note, however, that when you raise Brightness to values greater than 100, you can drive 8-bit highlight values to 255, which looks a lot like highlight clipping. But if you check the 16-bit values after conversion, you’ll probably find that they aren’t clipped.
Contrast. Contrast applies an S-curve to the data, leaving the extreme shadows and highlights alone. Increasing the Contrast value from the default setting of +25 lightens values above the midtones and darkens values below the midtones, while reducing the Contrast value does the reverse. The midpoint around which Contrast adds the S-curve is determined by the Brightness value, so if Contrast isn’t doing what you want, make sure Brightness is set correctly.
Intensity controls. Camera Raw 4 features three controls in this section, where Camera Raw 3 contained only the Saturation command.
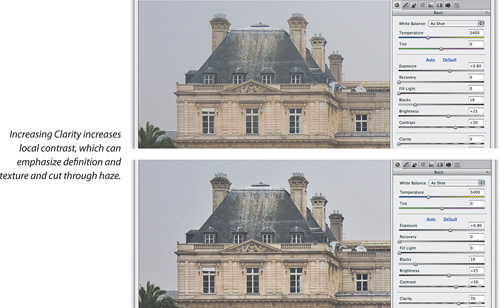
Clarity. The Clarity slider controls local contrast, and can help produce that quality some photographers call “pop.” Instead of adjusting contrast uniformly, Clarity adjusts contrast among adjacent areas of light and dark within an image (see Figure 5-24). Most images benefit from applying a moderate amount of Clarity, but as you increase the value, back off if you start to see unsightly halos around edges. Also, go easy when applying Clarity to portraits, because the way Clarity accentuates details and texture is usually not flattering for human faces. Clarity can dramatically improve images that naturally have low local contrast, such as reflections, foliage, and subjects photographed through haze.
Perhaps you’ve used Photoshop to enhance local contrast by setting the Unsharp Mask filter to a high Radius and low Amount value. The Clarity slider is based on a similar principle, but with additional processing. Clarity can appear to have a sharpening effect, but it’s important to note that Clarity is not a substitute for sharpening. For that, there’s the Detail tab.
Vibrance. The Vibrance slider is intended as a “safer” version of the Saturation slider. It applies a greater increase in color saturation to colors that are not already saturated (see Figure 5-25). For example, if you increase saturation for an image that contains both muted and saturated reds, the muted reds become more saturated but the bright reds are prevented from becoming ridiculously saturated. It’s a good way to improve color with less of a chance of colors going out of gamut.
Vibrance has one more key function. The Photoshop team built skin-tone protection into Vibrance, so you can boost image saturation much further before people in your image acquire radioactive tans.
Saturation. The Saturation slider adjusts color intensity evenly for all colors. While every image editor needs a Saturation feature, the fact that Camera Raw now has Vibrance means that you may reach for the Saturation slider less often than you used to.

Improving printed output with the new camera raw controls. The tonal range and color gamut of print is so much narrower than what your camera and monitor can produce that it isn’t unusual to spend a lot of time using layers and masks in Photoshop to shoehorn an image into the gamut of your printed output. Now, in Camera Raw 4.x, you can achieve many of the same goals just by using the four new sliders—Recovery, Fill Light, Clarity, and Vibrance. Recovery and Fill Light are quick and reliable ways to move highlight and shadow detail a little closer to the midtones and away from the extreme ends of the tonal scale that are harder to print. Because compressing detail into the midtones usually means you lose a little contrast, you can then use the intelligent Clarity and Vibrance sliders to preserve and enhance contrast in the resulting range of tones and colors without pushing them back out to the extremes, as the Contrast slider would.
It may not be possible for you to use Camera Raw to completely prepare an image for printed output—for one thing, you can’t load a printer profile and visually check your adjustments against it—but those four sliders can reduce the amount of work you have to do with layers and masks in Photoshop to compress an image’s tonal and color range.
When you click Auto (see Figure 5-26) in the Basic tab (it’s on by default), Camera Raw tries to come up with optimum settings for each image, essentially autocorrecting tone and exposure. While the word “auto” usually makes us squirm, this feature is more sophisticated than it might seem at first glance.

However, keeping Auto as part of the default setting makes it difficult for you to learn the behavior of a camera because Camera Raw adjusts each image individually, so you don’t get to see a consistent baseline interpretation. Beginners will likely find that Use Auto Adjustments provides a quick way to get decent results, but it also makes it much more difficult for them to learn the relationship between shutter speed, aperture setting, and the result. If you don’t want Auto to be applied to new images by default, click the Preferences button in the Camera Raw toolbar (Command-K in Mac OS X or Ctrl-K in Windows), and in the Default Image Settings options group, uncheck Apply Auto Tone Adjustments.
Tip
To free up space in the Camera Raw window, Camera Raw 4 lacks the Auto check boxes that were next to each slider in Camera Raw 3.7 and earlier. You can still reset each slider individually—just double-click a slider.
In Camera Raw 3, Auto was a toggle; you could turn it on and off with a shortcut. However, its behavior was confusing in the way it interacted with the defaults and any settings you changed. In Camera Raw 4, Auto now works like other options. Once you apply it, you can either undo it or apply a different option or preset.
Camera Raw contains default settings for images shot by each camera model. They’re applied as you download images from a camera. You can create your own defaults, and the image metadata will tell Camera Raw which default to use for each camera model.
If you’re editing an image and want to return to the camera defaults, click Default in the Basic tab (see Figure 5-27).

You can save a new Camera Raw setup. For example, you may find the default Blacks setting of 5 a little too high or you may notice that you consistently find yourself lowering the Color Noise Reduction slider. So set the controls the way you want them, then choose Save New Camera Raw Defaults from the Camera Raw menu.
Tip
A common question is how to import images into Camera Raw and Bridge without applying Auto adjustment. Simply click Default (which neutralizes Auto) and then save new Camera Raw defaults.
Getting good default settings (“good default settings” means different things to different people) is generally an iterative process. Don’t be afraid to experiment. It won’t harm your raw files in any way, and if you get hopelessly messed up, you can easily set everything back to the shipping defaults and start over by choosing Reset Camera Raw Defaults from the Camera Raw menu.
You can fine-tune camera defaults in Camera Raw preferences. See “Camera Raw Preferences” a little later on. No set of defaults will do equal justice to every image, so just try to find default settings that provide a good starting point for your images and hence save you time.
With the dramatic expansion of tabs and sliders in Camera Raw 4 (the Basic tab alone is now loaded with eleven, count ‘em, eleven sliders), it can be hard to figure out which slider to move to fix a particular problem. Although it’s generally a good idea to move through the sliders from top to bottom, there are some interrelationships among the sliders in the Basic tab, and with sliders in other parts of Camera Raw, that you should keep in mind.
Just about all the other controls depend on your setting Exposure and Blacks correctly—the clipping points for white and black. If you don’t set both Exposure and Blacks correctly, your image’s tonal range will be suboptimal, and you’ll probably spend extra time wrestling with the other controls to try and compensate for that basic problem.
Similarly, setting White Balance correctly will make it easier to use all of the other color controls in Camera Raw.
If you find yourself consistently making the exact same selective color corrections on your processed raws, you may want to visit the Camera Calibration tab to tweak the color for your specific camera (see “The Camera Calibration Tab,” later in this chapter).
Many people are unclear about the difference between Exposure and Brightness. Exposure is much more important because it affects white-point clipping. Brightness only shifts the tonal midpoint up or down, without clipping. To see the difference, watch the histogram as you adjust each slider.
If you set Brightness and Contrast as well as you can in the Basic tab, you probably won’t have to make major moves in the Tone Curve.
Some users ask how they can use the Basic tab in the same way that they use Levels in Photoshop. For the white, black, and gray (middle) slider in Levels, adjust Exposure, Blacks, and Brightness, respectively, in Camera Raw. The controls do not correspond exactly because corrections are applied using Gamma 1.0 in Camera Raw (Photoshop uses the gamma of the working space), but it’s as close as you’re going to get. Note that in both sets of controls, you can hold down the Option (Mac) or Alt (Windows) key to preview any clipping of highlights or shadows.
We see a distressingly large number of photographers who convert their raw images at Camera Raw default settings, then complain that Camera Raw produces flat, unsaturated results that require a lot of Photoshop work. The defaults in Camera Raw tend to be more conservative than those of proprietary raw converters, which generally aim to match the in-camera JPEG. They often bury shadow detail to hide noise and produce a pleasingly contrasty result. Camera Raw, on the other hand, shows you everything the camera has captured, warts and all, and lets you work with all the bits so that you can create better quality than any automatic converter.
Raw files are always interpreted, as when printing color negative film. There is no definitive way to develop a raw file. The default appearance of images in each raw converter reflects the philosophy of the team that created it, and Camera Raw is no exception to that. We suggest that you refine the look you want by using the Camera Raw controls on a representative sample of images, and then set the Camera Raw defaults (see the earlier section, “Camera Raw Defaults”) so that your preferred adjustment apply to all the images you download from your camera.
The old Curve tab in Camera Raw 3 is now the Tone Curve tab in Camera Raw 4 (see Figure 5-28). The Tone Curve tab (Command-Option-2 in Mac OS X or Ctrl-Alt-2 in Windows) offers a luminosity-based curve control that lets you fine-tune the image’s tonality. If you’re used to thinking of the Curves command in Photoshop as the best way to edit images, you may be tempted to skip the slider controls in the Basic tab and use the Tone Curve tab for all your tone-mapping adjustments, but that’s not a good idea. To understand why it isn’t a good idea, you need to know a little about how the Tone Curve tab actually works.

Like the sliders on the Basic tab, the Tone Curve tab operates on the linear capture—in fact, the slider adjustments and the curve adjustments get concatenated into a single operation during the raw conversion. But the user interface for the Tone Curve tab makes it appear that the curve is operating on gamma-2.2-encoded data. (If the curve interface corresponded directly to the linear data, the midtone value would be around level 50, and the three-quarter tone would be all the way down at level 10 or so, which would make it pretty hard to edit!)
The key point is that the Tone Curve tab settings are applied in addition to and after the slider adjustments in the Basic tab. You’ll find that it’s much easier to use the sliders for rough tonal shaping and the Tone Curve tab for fine-tuning than it is to try to do all the heavy lifting in the Tone Curve tab. In other words, instead of trying to do everything in the Tone Curve tab, use it to refine your Basic tab adjustments.
There’s one more significant change from Camera Raw 3: There’s a new type of curve-editing interface, Parametric, and it’s now the type of curve you see first when you click the Tone Curve tab. The point curve from Camera Raw 3 has literally been pushed into the background. Yes, Parametric is a technical-sounding term, but bear with us—in the end, we think you’ll decide that Parametric curve editing is actually much easier than the old Point curve interface.
If you’ve ever used an audio equalizer (like the one in iTunes, for example), you already have a head start in understanding the Parametric tab in Camera Raw. As in an audio equalizer, you get a series of sliders, each corresponding to a tonal range. You simply grab the slider representing the range you want to boost or cut, and drag. All right—it isn’t quite that simple; for instance, the Camera Raw sliders are horizontal, not vertical like the ones you see in audio equalizers. But the basic idea is the same. We think that the following sequence is the simplest path through the Parametric tab (see Figure 5-29). We’ll use the example of an image that needs a little more contrast.

Drag the Darks and Lights sliders. To increase contrast (which is usually what you’ll need to do), drag the Darks slider to the left and drag the Lights slider to the right.
If you think that the extreme highlights and shadows still need work, drag the Highlights and Shadows sliders. These sliders affect only the ends of the curves, and not every image needs these adjustments. However, the Highlights and Shadows sliders are a good way to control the tones at the ends of the tonal scale.
With some images, you may find that a slider isn’t giving you enough control in the tonal range you want to adjust. In this case, turn to the three Range sliders along the bottom of the curve graph. Those three sliders define the four ranges affected by the four horizontal sliders. For example, if you wish the Darks slider’s effect were a little higher on the tonal scale, drag the first slider under the graph to the right a little. High-key and low-key images are situations in which you may want to shift or expand the tonal range controlled by a particular slider.
If you’ve done a good job setting Exposure, Blacks, Brightness, and Contrast in the Basic tab, you’ll probably find that you don’t need to move the Parametric sliders very far.
Tip
If you’ve been trained to avoid using the master curve in the Photoshop Curves dialog to edit RGB images, don’t worry about that in Camera Raw. In Camera Raw 4.1 (and in Lightroom), the Tone Curve is engineered to minimize the hue shifts that can occur when you use a single curve to edit RGB images, resulting in a clean tonal edit.
If you can’t remember the above sequence, just think of it as moving from the inside out: Adjust the inner Darks and Lights sliders first, and then if necessary, adjust the outer Highlights and Shadows sliders.
Parametric curves can be easier than point curves because parametric curves work as if the key points are already placed for you, and it’s easier to create a curve that avoids posterization. If you need still more control, or you’re just too used to placing your own points, you can still use the Point tab.
The Point tab is based on the Curves dialog in Photoshop and they share some features. When you click the Point tab, you’ll find that by default, Camera Raw 4 applies a Medium Contrast curve preset (it’s selected in the Curve pop-up menu). If you prefer a different default, you can edit the curve points and then save a new Camera Raw Default.
To place a new point on the curve, click the curve. A more efficient way to place a point is to position the mouse over a tone in the image that you want to adjust, and then Command-click (Mac) or Ctrl-click (Windows). This adds a new point on the curve at the tone you clicked. You can preview where on the curve a point will be added if you keep the Command (Mac) or Ctrl (Windows) key pressed as you move the mouse over the image; a small circle appears on the curve, marking the level you’re currently mousing over. There are three ways to delete a curve point: Command-click (Mac) or Ctrl-click (Windows) a point, select it, and press the Delete key, or drag it over one of the adjacent curve points.
Control-Tab (on both Mac and Windows) selects the next curve point, and Control-Shift-Tab selects the previous point. To select multiple curve points, Shift-click each one. The up, down, left, and right arrow keys move the selected curve point by one level: add Shift to move in increments of 10 levels. You can also enter numeric values for the selected curve point in the Input and Output entry fields.
To make saved tone curves appear on the Tone Curve menu, save them in UsernameLibraryApplication SupportAdobeCamera RawCurves (Mac), or Documents and SettingsUsernameApplication DataAdobeCamera RawCurves (Windows). This is a different folder from the one for all other Camera Raw settings and subsets, but if you save a subset containing only a tone curve, it’s saved in this folder automatically. If you save tone curves anywhere else, you can load them using the Load Settings command in Camera Raw (see “Loading and Saving Settings,” earlier in this chapter).
Adjustments and previewing. The most practical way to adjust the curve is to place points on it by Command-clicking (Mac) or Ctrl-clicking (Windows), then use the arrow keys to make an adjustment, wait for the preview to update, and continue to fine-tune using the arrow keys. Figure 5-30 shows a typical Tone Curve tab adjustment.

If you’ve used the Curves dialog in Photoshop, you might notice that the Tone Curve tab in Camera Raw doesn’t preview your curve edits in real time. The Curves dialog in Photoshop adjusts pixel values directly, but the Tone Curve tab in Camera Raw has to do a lot more work. The raw data is in linear form (gamma 1.0) and the Tone Curve interface is in gamma 2.2, so Camera Raw must map your edits between the two. By not providing real-time preview, it’s easier for the curve interface to be responsive.
Adjustments to the Parametric and Tone Curve tabs are cumulative, so if a curve isn’t doing what you expect it to, check the other tab to see if there’s an existing adjustment there that contradicts what you’re trying to do.
The sliders in the Detail tab (Command-Option-3 in Mac OS X or Ctrl-Alt-3 in Windows) let you apply overall sharpening and reduce noise in both the Luminance and Color components of an image (see Figure 5-31). Camera Raw 4.1 expands sharpening from the old single slider to four surprisingly powerful and intelligent controls. To see the effect of these controls, you need to zoom the preview to at least 100 percent. At other magnifications, the actual results of sharpening can’t be represented accurately on a monitor.
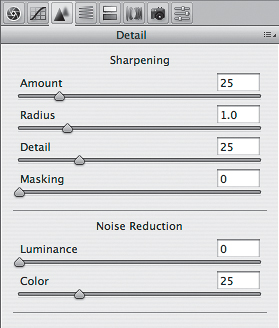
Color noise is often more noticeable than luminance noise. If you see color splotches in areas that should be neutral, try turning up Color noise reduction, but not so far that you lose saturation in color details. Luminance noise reduction is more apparent at very high ISO speeds and with some types of image content.
Sharpening is yet another feature that Adobe has greatly expanded in Camera Raw 4.1. However, the four Sharpening sliders don’t resemble either of the two prominent sharpening dialogs in Photoshop (Unsharp Mask and Smart Sharpen). The reason for this is that Camera Raw 4.1 sharpening is based on advanced edge-masking techniques documented by Bruce and others. Edge masking can restrict sharpening to the edges (where you want it), and away from broad areas like skin (where you don’t want it).
To preview the effect of only the Sharpening slider you’re adjusting, set the magnification to 100 percent and then Option-drag (Mac) or Alt-drag (Windows) a Sharpening slider. You’ll see a grayscale preview that nicely isolates the effect for you so you can clearly see what’s changing. When previewing the Masking option, your sharpening settings are applied to white areas at full strength, gray areas at partial strength, and are not applied at all to black areas; you may want to turn off the shadow and highlight clipping warnings so that they don’t distract you. In most of our examples, we’ll show you the grayscale preview because it makes it easier to see what’s going on.
Amount. The Amount slider (see Figure 5-32) adjusts how much sharpening Camera Raw applies. In most cases, a low to moderate value is appropriate. The Radius, Detail, and Masking sliders use different methods to modify the strength of the Amount value in various parts of the image.

Radius. The Radius slider (see Figure 5-33) controls the width of the halo around each detail that’s sharpened. If the halos become visible or details start to smear or smeared or look like blobs, you’ve set Radius too high.

Detail. The Detail slider (see Figure 5-34) affects how much the Radius halos are visible on high-frequency details, such as skin pores or other fine textures. A low Detail value filters out Radius halos on those details, while letting the Radius value to apply to larger features. Setting Detail to its maximum value lets Radius apply to all details without modification.
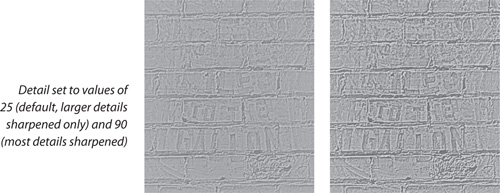
Masking. The Masking slider (see Figure 5-35) affects the degree to which sharpening is restricted to edges only. Edges are considered to be the image areas with highest contrast. At zero, no masking is applied—the current Amount, Radius, and Detail values are applied to the entire image at full strength. As you increase the Masking value, less sharpening is applied to non-edge areas, while edges continue receiving full-strength sharpening. Increasing the Masking value can help you sharpen images that are blurrier than average, because when you increase the Masking value, you can use much higher Amount values without accentuating noise, grain, or other unwanted detail in non-edge areas.

So how much sharpening is enough? That depends on how you use Camera Raw in your workflow.
If you use Camera Raw in between your camera and Photoshop, you can apply capture sharpening—just enough sharpening to make up for the softness inherent in all image sensors. Then, in Photoshop, apply the appropriate amount of output sharpening to the versions of the image that you prepare for different output media. If you do this, first open Camera Raw preferences and choose All Images from the Apply Sharpening To pop-up menu.
Tip
For a deeper explanation of the principles behind edge masking, see “Edge Masking” in Chapter 10. Actually, reading all of Chapter 10 will give you insight into all of the Detail tab.
If you would rather use Photoshop sharpening controls for all sharpening, open Camera Raw preferences and choose Preview Images Only from the Apply Sharpening To pop-up menu. Then, don’t use the Camera Raw Sharpening controls at all.
If you intend to use Camera Raw as the final step in your workflow, saving completed images directly from Camera Raw, apply the appropriate amount of sharpening for your final output. If you do this, first open Camera Raw preferences and choose All Images from the Apply Sharpening To pop-up menu.
The sensors in today’s digital SLR cameras are rather noise-free at low ISO speed settings, but if you shoot at high ISO speed settings or use a digital point-and-shoot camera, noise is likely to be present.
To minimize noise when you shoot digital, never underexpose your images. Noise lives in the shadows, so if you boost shadows in Camera Raw or Photoshop, noise becomes more visible. If you shoot so that an image file is brighter than normal (without clipping highlights), the act of lowering Exposure or Brightness in Camera Raw pushes noise further down into the shadows, hiding it.
It’s difficult to show typical noise scenarios in print because noise that looks objectionable on the displayed RGB file is often invisible by the time the image has been converted to CMYK and printed.
Tip
The Color Noise Reduction slider can make a big difference at low values, so you can easily be tempted to turn it up further. Be careful, though—increasing Color Noise Reduction too far can dull bright colors in important details.
While the Luminance slider comes first in the Detail tab, we often try the Color Noise Reduction slider first, so that’s how we’re covering the options here. Camera Raw defaults agree with us: By default, Luminance is set to 0 and Color is set to 25.
Color Noise Reduction. Color noise appears as random speckles of color rather than gray. In our experience, all cameras need some amount of color-noise reduction (see Figure 5-36). While the visibility of color noise varies with ISO speed, the required correction seems to vary less than it does with luminance noise. That means you can generally find a good default value for your camera, and then deviate from it only when you see an obvious problem. Now that Camera Raw reads TIFF and JPEG images, it’s worth noting that the Color Noise Reduction slider can also work wonders with the visible color grain in scanned color film.
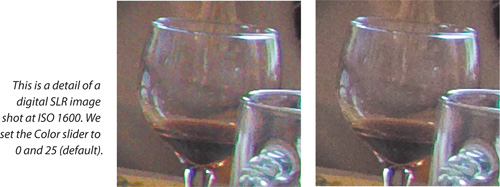
Luminance Noise Reduction. The Luminance Noise Reduction slider (see Figure 5-37) lets you control grayscale noise that makes the image appear grainy—a typical problem when shooting at high ISO speeds. The default setting is zero, which provides no smoothing; but some cameras benefit from a small amount—say 2 to 4—of luminance noise reduction even at slow speeds, so you may want to experiment to find a good default for your camera. At high ISO speeds—800 and up—you’ll typically need to apply luminance smoothing at even higher settings.

At very high settings, the Luminance slider produces images that look like they’ve been hit with the Median filter, so always check the entire image at 100 percent size or larger before committing to a setting.
The controls in the HSL/Grayscale tab (Command-Option-4 in Mac OS X or Ctrl-Alt-4 in Windows) are new in Camera Raw 4. The controls in this tab have two main purposes: to correct specific ranges of color and to convert an image to grayscale while controlling how colors map to gray tones.
HSL stands for Hue, Saturation, and Luminance; see Chapter 3, “Color Essentials,” to review those color concepts. With these powerful controls, you may not need to move some images on to Photoshop when you can’t nail the color balance with the Temperature and Tint sliders in Camera Raw. Hue, Saturation, and Luminance each gets a tab of their own, and each of those tabs contains eight sliders (see Figure 5-38). That’s a lot of sliders, but don’t be intimidated, because each tab is simply a variation on the same idea.

Each tab contains a slider for eight color ranges. These ranges were not chosen strictly mathematically, but because they are colors that typically need correction in photographs. To figure out how to use the controls, first you identify what’s wrong with the color you want to correct in the image, in terms of hue, saturation, or luminance (see Figure 5-39).
If a color isn’t quite the right hue, such as grass that’s too yellow, go to the Hue tab and then drag that color’s slider to shift it to the correct color.
If a color needs to be less or more vivid, click the Saturation tab and drag that color’s slider left to gray down the color, or right to increase saturation. You might use this to make a blue sky more blue.
If you want a color to be lighter or darker, click the Luminance tab and drag that color’s slider left to darken it, or right to lighten it.
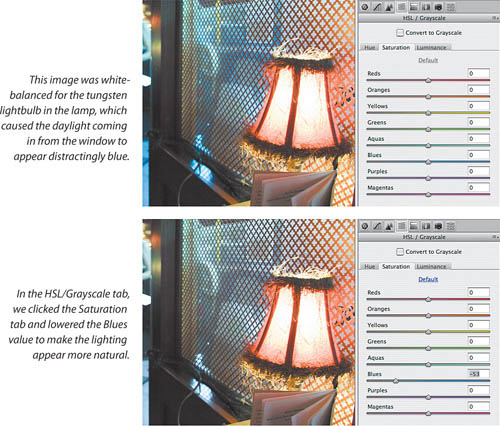
If you don’t see much of a change, you probably aren’t dragging the correct color slider. It’s also possible for a slider to change a part of the image you weren’t expecting; for example, a black object can change if it has a color cast. To adjust skin tones, try the Oranges and Yellows sliders first.
In Camera Raw 3, it was possible to convert an image to grayscale by setting Saturation to zero in the Basic tab, and you could control the lightness of colors in the grayscale image by playing with the Calibrate tab (something that the Calibrate tab was not designed for). In Camera Raw 4, grayscale conversion is much more straightforward, with controls actually designed for that purpose. And the results are very good.
To convert an image to grayscale, simply turn on the Convert to Grayscale check box at the top of the HSL/Grayscale panel. You’ll notice that in addition to the image losing all its color, the Hue, Saturation, and Luminance tabs disappear and are replaced by a single Grayscale Mix tab (see Figure 5-40). On top of that, the sliders in the Grayscale Mix tab move around by themselves and take on new values.

What happened? When you turn on the Convert to Grayscale check box, by default Camera Raw tries to calculate how to get the best distribution of tones out of that particular image, and that’s why the Grayscale Mix sliders adjust themselves. In many cases, the Auto Grayscale Mix is a great starting point, and you may be satisfied with it. If not, you can drag the sliders yourself.
Tip
If you don’t want Camera Raw to automatically calculate grayscale mix values, open Camera Raw preferences and uncheck the Apply Auto Grayscale Mix When Converting to Grayscale check box. If you just want to set all of the sliders for the current image to their original values, click Default in the HSL/Grayscale panel.
Here’s how the Grayscale Mix sliders work: When you convert to grayscale, you take away hue and saturation. What’s left is the luminance value of each color. However, as you change the saturation of different colors, they occupy different ranges of tones. For instance, at maximum saturation, pure yellow is lighter than any other color. When you convert to grayscale, the resulting distribution of tones can appear unnatural or just weak. The Grayscale Mix sliders let you make specific color ranges lighter or darker in grayscale, so you can get the tone and contrast relationships that bring out the image qualities you want to emphasize. For example, if you drag the Reds slider to the left to darken reds, red lipstick darkens and stands out more effectively. If you’ve ever placed a color filter in front of a camera lens when shooting black-and-white film, it’s the same idea, but with a lot more control.
The controls in the Split Toning tab (Command-Option-5 in Mac OS X or Ctrl-Alt-5 in Windows) are new in Camera Raw 4, and let you apply different colors to the lighter and darker parts of an image. This is more of a special effect, not an image-correction feature. Here’s how to use Split Toning.
Split toning typically starts with a grayscale image (see Figure 5-41). If the image in Camera Raw is still in color, you can switch to the HSL/Grayscale tab and turn on the Convert to Grayscale check box, and then return to the Split Toning tab.
Drag both Saturation sliders to a value well above zero, or your Hue changes won’t be visible. You can leave one of the Saturation sliders at zero if you don’t want to apply a color to that tonal range.
Set the Hue sliders to the hues you want for highlights and shadows.
Drag the Balance slider to control at what point along the whole tonal scale the Highlights hue changes over to the Shadows hue.
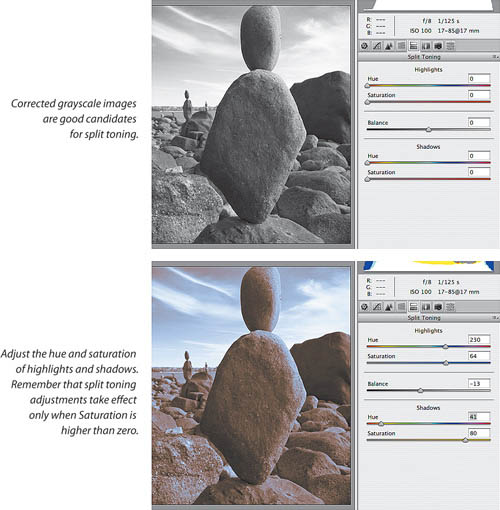
The one time you may not want to use Split Toning in Camera Raw is when you want to produce a true multitone image, such as a duotone, tritone, or quadtone. Those are best produced in Photoshop, where you can use the Image > Mode > Duotone command to create and control separate channels for each ink. The results of the Split Toning tab are suitable for reproduction in most other media, such as printing on RGB or CMYK devices, and of course on-screen media. However, if you do want to create a multitone image from a raw image, you can use the Convert to Grayscale option and Grayscale Mix in the HSL/Grayscale tab to create a high-quality grayscale, which you can immediately convert to a multitone image in Photoshop.
The controls in the Lens Corrections tab (Command-Option-6 in Mac OS X or Ctrl-Alt-6 in Windows) let you address problems that occasionally show up in digital captures, especially with lower quality sensors and lenses.
Chromatic aberration. Chromatic aberration is the name given to the phenomenon where the lens fails to focus the red, green, and blue wavelengths of the light to exactly the same spot, causing red and cyan color fringes along high-contrast edges. In severe cases, you may also see some blue and yellow fringing. It typically happens with wide-angle shots, especially with the wide end of zoom lenses, and is typically worse at more open aperture settings.
Tip
To see the color fringes clearly and to judge the optimum settings for the sliders, set the Sharpness slider in the Detail tab to zero. Color fringes are usually most prominent along high-contrast edges, and sharpening makes it harder to see exactly where the color fringes start and end.
Chromatic Aberration R/C. This slider lets you reduce or eliminate red/cyan fringes by adjusting the size of the red channel relative to the green channel. While the red/cyan fringes are usually the most visually obvious, chromatic aberration usually has a blue/yellow component too.
Chromatic Aberration B/Y. This slider lets you reduce or eliminate blue/yellow fringes by adjusting the size of the blue channel relative to the green channel.
Figure 5-42 shows before-and-after versions of a chromatic aberration correction. As with the controls in the Detail tab, zoom the preview to 100 percent or more when making corrections with the chromatic aberration sliders.

Tip
When correcting chromatic aberration, Option/Alt-Drag a slider to hide the other channel. This makes it much easier to apply exactly the right amount of correction to both channels. Red/cyan fringing is usually much easier to see than blue/yellow fringing, but chromatic aberration is almost always a combination of both.
Vignetting. Vignetting, where the corners are darker because the lens fails to illuminate the entire sensor area evenly, is a problem you may encounter when shooting wide open.
Vignetting Amount. This slider controls the amount of lightening or darkening (negative amounts darken, positive amounts lighten) applied to the corners of the image.
Vignetting Midpoint. This slider controls the area to which the Vignetting Amount adjustment gets applied. Smaller values reduce the area; larger ones increase it.
Defringe. The Defringe option (see Figure 5-43) helps minimize color fringing, which can occur when sensors are overloaded by light, and shows up more often in high-contrast scenes. You may see it in specular highlights such as chrome, or at other times when the raw data is clipped to white, such as sunlight sparkling on the ocean, or city lights at night. It’s often called purple fringing, because it often appears as a fuzzy purple border around a highlight.

If you see color fringing, choose Highlights or All Edges from the Defringe pop-up menu, depending on the extent of the color fringing. The color fringe should disappear and the affected edge should take on the natural color of the objects around it.
The controls in the Camera Calibration tab (Command-Option-7 in Mac OS X or Ctrl-Alt-7 in Windows) let you fine-tune the default tone and color rendering of raw images. In Photoshop CS2, this was called the Calibrate tab.
As we explained earlier in this chapter (see the sidebar “Camera Raw and Color”), Camera Raw contains two built-in generic profiles for each supported camera. The controls in the Camera Calibration tab let you fine-tune the behavior of the built-in camera profiles to tweak for any variations between your camera and the one that was used to build the built-in Camera Raw profiles for the camera model (see Figure 5-44).
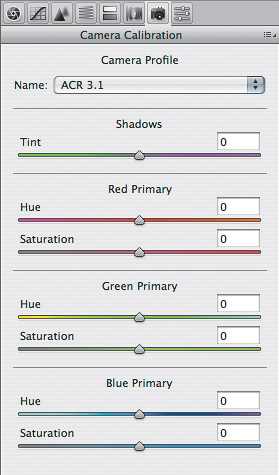
Camera Profile. For most cameras, there’s only one choice on the Camera Profile pop-up menu—the version of Camera Raw (ACR) that was used to produce the profile. Don’t be concerned if the version doesn’t match the version number of the current Camera Raw, because once Adobe creates a camera profile, there’s usually no need to update it. If Adobe has updated the profile of your camera, you may see another choice in the Camera Profile pop-up menu. It’s usually a good idea to use the newest profile, but if you have older images that were corrected using an older profile, in some cases you’ll need to choose the older profile to see the image as you edited it back then.
You can’t add your own camera profiles to the Camera Profile pop-up menu. We explain why in the earlier sidebar “Camera Raw and Color.”
Using the Calibrate controls. By far the easiest way to get good Camera Calibration tab settings for your specific camera is to employ the free AcrCalibrator script written by our friend and colleague Thomas Fors. You can download the script, along with the instructions for using it, from this Web site: www.fors.net/chromoholics/.
Besides the script, you’ll need a GretagMacbeth ColorChecker—the old 24-patch ColorChecker, in either its full-sized or miniature form, is ideal, but you can also use the newer ColorChecker SG, which contains the old target. Tom’s site provides good directions for lighting and shooting the target. Simply follow the instructions that accompany the script, and let it do its thing.
If you’re a driven control freak who distrusts anything automatic (or you’re simply deranged), Bruce documented the manual process on which the script is based in the book Real World Camera Raw with Adobe Photoshop CS2, and at www.creativepro.com/story/feature/21351.html.
You can store your favorite Camera Raw settings in the Presets tab (Command-Option-8 in Mac OS X if you’ve disabled the Universal Access shortcut for screen zooming in System Preferences; or Ctrl-Alt-8 in Windows). The Presets tab (see Figure 5-45) is new in Camera Raw 4, but the presets feature isn’t new. Adobe simply gave presets their own tab, making them much easier to manage.
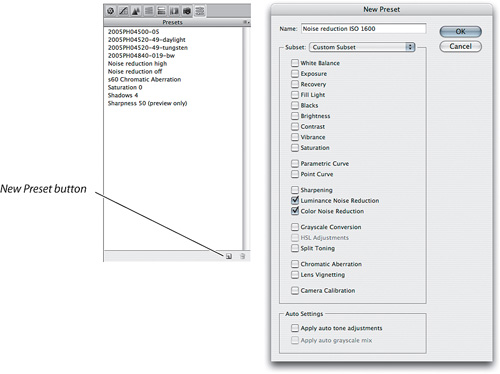
To create a new preset here, first adjust the settings you want to save in any of the other Camera Raw tabs. Then click the New Preset button at the bottom of the Presets tab. In the New Presets dialog, turn on check boxes for the settings you want to save. The Subset pop-up menu can select predefined groups of settings for you; it’s also useful to use the Subset pop-up menu when you want to save only a few settings—it’s faster to select a subset than to manually uncheck a lot of check boxes. Click OK and it’s in the list, ready for you to apply to any image.
While you can also apply a preset by choosing it from the Apply Preset submenu on the Camera Raw Settings menu, it’s easier just to click it in the Presets tab. In addition, the Presets tab is easier than a submenu when it comes to trying a few presets, one after the other.
To delete a preset, select it and then click the trash can icon at the bottom of the Presets tab. If you want to rename or manage your presets, they’re stored in UserNameLibraryApplication SupportAdobeCameraRawSettings (Mac), and Documents and SettingsUserNameApplication DataAdobeCameraRawSettings (Windows).
If you had to adjust every slider on every image with a lot of images open in Camera Raw, you might conclude that Camera Raw was an instrument of torture rather than a productivity tool. Fortunately, the combination of Camera Raw, Bridge, and Photoshop offers several ways of editing multiple images. One of these is built right into Camera Raw itself: When you select multiple images to open, either by selecting them in Bridge or in the Open dialog in Photoshop, Camera Raw opens them in filmstrip mode (see Figure 5-46). In filmstrip mode, changes you make in the image controls apply to all images selected in the filmstrip.
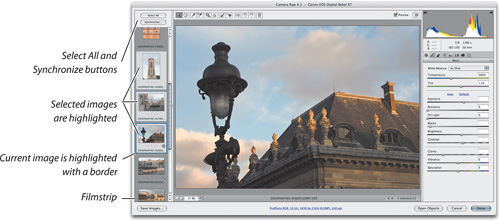
The filmstrip mode in Camera Raw offers a great deal of flexibility when it comes to editing multiple images. You can select all the open images using the Select All button, which makes all your edits apply to all the selected images. You can also select contiguous ranges of images by Shift-clicking, or discontiguous images by Command-clicking (Mac) or Ctrl-clicking (Windows) images. When the focus is on the filmstrip, you can navigate through the images using the up and down arrow keys, or select them all by pressing Command-A.
Tip
To zoom multiple images at once, select the images in the filmstrip before changing the magnification.
You can also click a star rating under each filmstrip, and you can mark images for deletion by pressing the Delete key.
When you select more than one image, the Synchronize button becomes available at the top of the filmstrip (see Figure 5-46). The Synchronize button lets you apply all the settings or any subset for the image that’s currently being previewed, to any additional images you select. This feature is of most use when you open a series of images that need similar corrections, but within that general mandate, you have a great deal of flexibility in how you choose to work. It’s also useful when you’ve edited one image in Camera Raw and then you realize you want to apply the same edits to other images in the filmstrip.
For example, you can synchronize tonal adjustments, or noise reduction, all the settings, or whichever combination of settings is most applicable. A general rule of thumb is to start out by applying the settings that are applicable to the largest number of images, then whittle them down to smaller groups that can take the same corrections.
Thus far, we’ve largely focused on editing individual images in Camera Raw. But if you tried to edit every image individually in Camera Raw, even in filmstrip mode, you probably wouldn’t have much time to have a life. Back in the days of film, you didn’t scan every image and edit it in Photoshop. Instead, you looked at the film on a light table, and picked those images that were worthy of further attention.
That’s where Bridge comes in. You can make your initial selects from a shoot using Bridge as a digital light table. When you want to convert your images, you can host Camera Raw in Bridge and have it convert images in the background. You can also use Bridge to add and edit metadata—one of the first things we do to a new folder of raw images is to add our copyright notices to each image. And while we admit to being less assiduous than we really should be, we also use Bridge to add keywords to images so that we have some hope of finding them again several years hence. See the sidebar “All About Metadata,” later in this chapter.
Bridge is a surprisingly deep application that serves the entire Adobe Creative Suite, not just Photoshop, and a comprehensive guide to its features would require a book in its own right. Nevertheless, we want to guide you through a number of our favorite features and describe how we use this powerful application.
While Bridge CS3 still won’t replace digital asset management programs, some of the enhancement in Bridge CS3 make it much more effective within a digital image workflow.
It’s faster. Bridge CS2 was maligned for being sluggish. Bridge CS3 fixes many of the performance issues, although you’ll still wait for it to build the initial cache for folders containing raw images. There are also new options that help you tune performance.
It’s easier to find photos. The new Filter panel organizes the content in the folder you’re viewing, potentially saving you from having to make some types of searches. For example, you can quickly see all photos with a certain keyword, date, or rating.
It’s easier to organize and compare photos. Several new features make Bridge much more useful when sifting through groups of images. When you select multiple images in the Content panel, the Preview panel can now display all of the images you selected (up to nine). In addition, you can inspect an image in detail by adding a loupe to any image in the Preview panel. You can also group multiple images as a stack, which is similar to the stacks in Lightroom and Apple Aperture.
Also, Bridge workspaces are more accessible, so it’s easier to manage your windows; and metadata templates are much easier to create and edit. All in all, Bridge CS3 is a respectable upgrade.
On single-monitor systems, we usually keep Bridge hidden or in the background unless we’re actually using it. On dual-monitor systems, we keep Bridge open on the second monitor all the time.
The simplest way to launch Bridge is the way you launch any other application on your platform of choice. From Photoshop, you have the following additional options:
Choose File > Browse, or press Command-Option-O (Mac) or Ctrl-Alt-O (Windows).
Click the Go to Bridge button in the Options bar (see Figure 5-47).
Turn on the Automatically Launch Bridge option in Photoshop General Preferences—that way, whenever you launch Photoshop, Bridge automatically launches too.
Before we look at any more details of how Bridge and Camera Raw work, or how you can automate your workflow, we want to focus on some theories and philosophies that we think are helpful. First, we’ll give you an orientation of the things you’ll want to do in a digital workflow, and if you need more details on specific features, see “Bridge Windows” and “Bridge Commands” at the end of this chapter.
An efficient workflow requires planning. You can flail around and try everything—it’s actually not a bad way to get your feet wet—but at some point, you have to decide what works and stick with it. The issues in this section are, in our experience, important Bridge workflow aspects to think about in advance.
How do you want to store the Bridge cache? Certain changes you make to a folder using Bridge, such as sort order and information that can’t be stored in XMP files, are stored in the Bridge cache. By default, Bridge stores the cache in one centralized location on your computer, but you can also have Bridge keep folder information in cache files that are stored inside each folder you’ve managed with Bridge. Each approach has its strengths and weaknesses, but your life will be simpler, and your workflow more robust, if you pick one approach and stick to it. Bridge provides control over the cache in two places: the Cache panel of the Preferences dialog (see “Cache Preferences” later in this chapter), and in the Tools > Cache submenu (see “Cache Commands” later in this chapter).
Where do you want to store Camera Raw settings for individual images? Raw files are read-only, except for the raw files you store in the DNG format. If you edit read-only raw files, those changes have to be stored somewhere. You can save the Camera Raw settings for each image in the Camera Raw database, in sidecar XMP files, or in the case of DNG format, in the DNG file itself.
The Camera Raw database indexes images by their content, not by their filenames, so you can copy, move, or rename them willy-nilly without losing track of your raw settings—but only as long as the images remain on the same computer as the Camera Raw database. Move the raw files to another computer, and their settings will be left behind on the originating computer. If you always remember to use the Export Settings command in Camera Raw to write out a sidecar .xmp file for the image, and you always remember to include the sidecar file with the image, there’s no problem. But that’s a lot of “always remembering.”
Bridge does its best to keep track of sidecar .xmp files. As long as you copy, move, and rename your raw files only in Bridge, the sidecar files travel with them automatically. But if you copy, move, or rename your raw files outside of Bridge, you must keep track of your sidecar files and move them with the images manually. Again, it’s not an ideal solution.
A third alternative is to use the DNG format instead. The convenience of having all the metadata, including Camera Raw settings, stored in the file itself outweighs the one-time speed bump entailed in converting the raws to DNG. But if you want to use your camera vendor’s converter, and your camera doesn’t write DNG, you should stick with proprietary raws for your working files, at least for now.
To control how Bridge handles Camera Raw Settings, see “Camera Raw Preferences” earlier in this chapter.
How do you want to name your files? If you’d like to name your files consistently instead of accepting the rather meaningless default camera file names, we suggest the following two simple rules:
Adopt a naming convention that makes sense to you, and stick to it (in other words, be consistent).
If you want that name to be consistently readable across platforms and operating systems, stick to alphanumeric characters—no spaces (the underscore is a good alternative), and no special characters.
The only place a period should appear is immediately in front of the extension—today’s operating systems tend to treat everything following a period as an extension, and promptly hide it, so periods in the middle of filenames often cause those filenames to be truncated. Many special characters are reserved for special uses by one or another operating system. Including them in filenames can produce unpredictable results. For example, in Mac OS X, if a filename starts with a period, the system treats it as an invisible file, and it’s a good idea to avoid colons or any type of slash character.
It’s worth the time to put a lot of thought into your file naming convention and to test it all the way through your workflow before you use it in production so that you can watch for potential gotchas. For example, how do you distinguish a raw file from its derivative files, such as a layered Photoshop version for print, a mid-resolution version for HDTV, and a low-resolution sRGB JPEG for the Web? Conrad likes to use a unique date-based base filename for an image (such as 20070418-463) and add a consistent set of characters to tell him which variant it is (such as 20070418-463_PRT.psd and 20070418-463_WEB.jpg).
Another question to consider is how you want the images to sort. Do you want images to list in proper order when you sort by name? Then you’ll want to number using leading zeros, and if you use the date in the filename, you’ll want to use a year-month-day convention. For example, for June 2, 2007, you’ll want to write dates as 2007-06-02, not 6-2-07.
Once you settle on a filename convention, you can craft the Adobe Photos Downloader or Tools > Batch Rename dialog to rename your incoming files consistently.
What’s your system for rating and labeling images? Bridge and Camera Raw offer two independent mechanisms, labels and ratings, for flagging images. The ratings system mimics the time-honored practice of making selects on a light table by marking the keepers from the first round with a single dot, adding a second dot to the keepers from the second round, and so on. Of course, the primary difference between labels and ratings is that ratings are on a scale, while labels aren’t. For that reason, we recommend that you reserve ratings for ranking images. It’s entirely up to you what labels mean.
There are different philosophies for rating images. Some photographers always start at one star and use successive passes to narrow down the images by adding additional stars, reserving five stars for only the very best images. Others use three stars as a baseline, with four and five stars marking keepers, and one and two stars marking alternates. Ratings can be read by other software that understands IPTC metadata, so if you hand off images to someone else down the line, you may want to make sure that you use a rating systems that meshes well with theirs.
Labels are available for purposes that aren’t easily taken care of using keywords, ratings, and other metadata, and labels are often used only temporarily during the editing process. For example, you might use a label to mark just the images you want to upload to an online gallery, or to mark images with unusual lighting conditions that require special attention. For more information, see “Rating and Labeling” and “The Filter panel” later in this chapter.
Working the flow. These four issues—Bridge cache, Camera Raw settings, naming conventions, and rating/labeling strategies—are things that can’t be changed later without considerable pain. By all means, spend some time trying out the options before setting your strategies in stone, but once you’ve found the approach that works best for you, don’t change it arbitrarily. If you do, you risk losing work, whether it’s Camera Raw edits, Bridge thumbnails, or ratings, or simply winding up with a bunch of incomprehensibly named files. Any of these violates the first workflow principle—do things once, early, and efficiently. When you don’t, you pay for it with that most precious commodity: your time.
The best way to resolve the four issues is to take a workflow view that’s both long and wide. Think of every way that you’re likely to use your images at every stage of your workflow, and all of the problems you’ve encountered in your experience. The more you design workflow standards that take into account your entire workflow and the requirements of yourself and your clients, the more easily you can reduce and avoid unwanted complexity, inconsistency, and unintended consequences.
It isn’t hard to build an image manager for most image formats. File formats such as JPEG are so familiar and computers so fast now that you just read the file and make a little thumbnail if it doesn’t already have one.
Sounds simple, but it isn’t that simple for raw file formats. By definition, raw images are records of sensor impulses that have not yet been converted into RGB channels, so for you to be able to see a raw image in a file manager such as Adobe Bridge, one of two things needs to happen: Either the file needs to provide a prerendered preview of the contents, or the viewing software needs to generate a preview from the raw data as fast as it can. In practice, both happen. When you shoot in raw format, your camera embeds a preview image in the raw file. That’s good, but not necessarily good enough. The preview represents only the default rendering of the camera, and depending on how you set your camera, the preview may not even be at full resolution. Besides, as soon as you use any software to make any adjustment to a raw file, the built-in preview immediately becomes inaccurate.
Fortunately, Bridge can generate its own preview from a raw file. As soon as you point Bridge to a folder of raw files, it uses the Camera Raw engine to generate thumbnails and generously sized previews that allow you to make good judgments about each image without actually converting it, so that you can quickly make your initial selects.
Note that the previews are based on the Camera Raw default settings for your camera. If you find that they’re consistently off, it’s a sign that you need to change the default develop settings for your camera (see “Using Camera Raw Defaults” earlier in this chapter).
Bridge stores image previews in its cache. Bridge will seem slow when you view images for which a cache hasn’t been built yet, so for best performance, try to set aside time to let Bridge build the cache for a folder you need to work on; see “Verifying Images” earlier in this chapter. As you edit raw files, Bridge updates the previews so that they accurately represent all of the adjustments you’ve made.
Bridge also gives you control over how the cache works in the Cache panel of the Preferences dialog (see “Cache Preferences” later in this chapter) and in the Tools > Cache submenu (see “Cache Commands” later in this chapter).
Preproduction generally means doing the minimum number of things to the maximum number of images so that you can quickly get to the point where you can pick the “hero” images that are truly deserving of your time, while leaving the rejects ready for revisiting.
Because the order in which you perform preproduction tasks—such as selecting, sorting, renaming, assigning keywords, and so on—isn’t critical, the order in which we’ll discuss them is arbitrary. In those cases where the result of one task depends on the prior completion of another, we’ll point that out.
We do, however, offer one golden rule: Start with the operations required by the largest number of images, and complete these before you start handling individual images on a case-by-case basis. For example, the first thing we always do with a folder full of new raw images is to select all the images and enter our copyright notice by applying a metadata template.
Similarly, if you know that you want to add the same keyword or keywords to all the images in a shoot, do it early (see “Applying Keywords and Metadata,” later in this chapter). But if you don’t care about copyrighting or keywording your rejects, you can make your initial selects first.
One of the most useful improvements to Bridge CS3 is in the area of evaluating and comparing images, which you need to do before you can rate and label images. You can now preview multiple images at the same time and use a loupe to see image details and compare sharpness. Unfortunately, these functions don’t appear in the user interface at all, so you can only discover them by accident or learn about them in a book (voilà!).
Tip
If the Preview panel isn’t big enough for you, you can do a fair bit of evaluating, rating, and labeling in Slideshow mode. Choose View > Slideshow, press H to view the zoom, rating, and labeling shortcuts, and then do these tasks full-screen.
Evaluating a single image. To evaluate an image, make sure the Preview pane is visible and select an image in the Content panel to make it appear in the Preview panel. When you’re purely evaluating images, you may want to create a workspace with a large Preview pane so that the image is easier to see. To inspect an image in detail, click the Preview image to bring up a loupe (see Figure 5-48), which you can drag around an image. You can zoom the loupe by pressing the plus (+) or minus (−) keys. When you drag the loupe in a way that would push it off the edge of an image, it automatically flips around so that you can still see it. To put the loupe away, click the loupe again—we find that it sometimes takes a couple of tries.
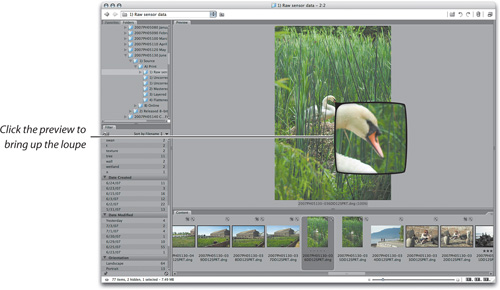
Comparing multiple images. To compare up to nine images at the same time (see Figure 5-49), select more than one image in the Content panel using the standard shortcuts for selecting multiple images (Shift-click or Command/Ctrl-click depending on which images you want to select). You can’t zoom images in the Preview panel, but you can click to add a loupe to each image by clicking each one of them. For example, if you want to see which of five images has the eyes in sharpest focus, click and drag a loupe to the eye in each image.
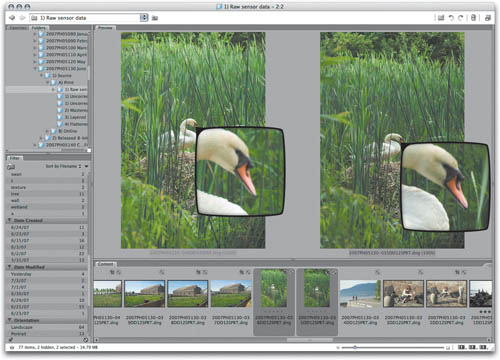
Tip
To use an entire second monitor for previewing images, choose Window > New Synchronized Window, put the new window on a second monitor, and display only the Preview panel in that window. Because it’s synchronized, the second window updates as you change the selection in the Content panel. This is especially useful if you need more space to compare multiple images.
The key (literally) to using multiple loupes is the Command key (Mac) or Ctrl key (Windows). If you have multiple loupes in position in different images and you want to move them all at the same time, Command-drag (Mac) or Ctrl-drag (Windows) any of the loupes. To change the zoom level of all loupes simultaneously, hold down Command (Mac) or Ctrl (Windows) as you press the plus (+) or minus (−) keys.
In Bridge CS2, the only way to inspect images was to go through the slow process of opening them in Camera Raw and zooming in. We think the multiple-image capability and loupe are overdue and very welcome.
Ratings give you a way to separate the keepers from the rejects. Labels let you mark images for any reason. Ratings and labels become part of the image’s metadata that you can use to search and to filter which images get displayed.
The fastest way to apply ratings and labels is with the keyboard. Many photographers and photo editors are used to looking at image after image and pressing a key to rate them. All of the ratings and labels shortcuts are listed on the Label menu in Bridge CS3. You can use the same shortcuts in Camera Raw if you’ve opened multiple images so that the filmstrip is visible in Camera Raw.
You can also apply ratings in the Content pane or Camera Raw by clicking or dragging in the star ratings area under a thumbnail. In the Content pane, you may need to enlarge the thumbnail until you can see the row of stars.
Bridge CS3 and Camera Raw 4 support the new Reject rating. The Reject rating was added because many photographers requested a way to mark images that they didn’t even want to rate. At first glance it might seem that you could leave the rating blank, but it was not always clear whether no rating meant “have not rated yet” or “do not want.” Some photographers used a label to mark rejects, but this also caused problems because labels aren’t defined the same way by different users or programs, while ratings are more consistently used. The Reject rating solves all of these problems.
Bridge makes it easy to rapidly narrow the field by applying ratings and then using the Filter panel to display files by their rating. You’ll usually need multiple passes to complete the process.
Choose a rating workspace. Start by choosing a workspace that makes it easy to apply and view images and ratings. We suggest the Horizontal Filmstrip workspace (see Figure 5-49), which you can quickly apply by pressing Command-F5 (Mac) or Ctrl-F5 (Windows). You can also choose it from a numbered workspace button at the bottom right corner of a Bridge window or from the Window > Workspace menu.
Mark the rejects. Select the first image and decide whether you want to keep using it. If you’re positive that don’t even want to save it, reject it by pressing Option-Delete (Mac) or Alt-Delete (Windows). The word “Reject” will appear in red below the image (see Figure 5-50). Your rejects don’t have to be definitive at this point, because you’re not going to delete them just yet. You can add more rejects later. However, rejects should be images that are just plain unusable—bad compositions, unwanted facial expressions, exposures that can’t be saved with any tools, that sort of thing.

Rate the rest. In the Filter panel, click to check No Rating (see Figure 5-51) and make sure no other rating levels are checked. You are now seeing all of the images that haven’t been rated. The great thing about the No Rating filter is that as you rate images, they become hidden, so you only see the images that still need to be rated without being distracted by the rest. Of course, if you want to see images that have already been rated, just turn on the Filter panel check boxes for other rating levels.
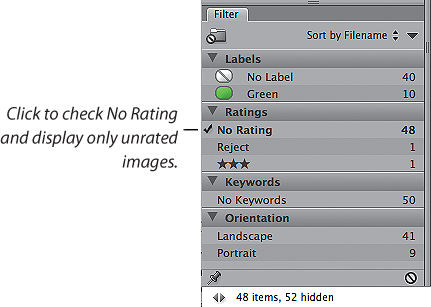
Tip
Having trouble seeing images well enough to rate them? Try enlarging the thumbnails or selecting multiple images so that you can compare them in the Preview panel. Just remember to change the selection before you apply the rating, because applying a rating affects all selected images.
From here on out, it’s pretty easy. Just press the keyboard shortcut for the star rating you want to apply to each image: Press Command (Mac) or Ctrl (Windows) together with a number key from 1 to 5. To remove the rating from selected images, press Command-0 (Mac) or Ctrl-0 (Windows). Those shortcuts apply a specific rating, but if you want to bump an image’s current rating up or down, press the Command/Ctrl key along with the comma key (,) to lower the rating by one star, or the period key (.) to raise the rating. It may make more sense to remember those two keys by their Shift meanings, the less-than sign (<) and greater-than sign (>), because that’s what they do to the rating. Don’t press Shift to apply them, though.
Tip
You can rate or label a selected image by pressing a number key alone (without the Command or Ctrl modifier) if you open the Metadata pane of the Preferences dialog and turn on the check box Require the Command/Ctrl key to Apply Labels and Ratings. You might prefer to leave that preference off to avoid applying ratings accidentally through stray keypresses. (You must still press Command/Ctrl to rate images in Camera Raw.)
After you rate an image, press an arrow key to move to another image in the Content view or Camera Raw filmstrip.
Don’t feel that you have to get all your ratings right the first time. You can always go back and adjust them. Some photographers prefer to rate shots all in one pass. Others use a multiple-pass method, applying one star first, then making another pass to add another star to the standouts, and repeating that until they find their four- or five-star images. It’s all up to you.
Labels. While the stars are incremental, labels are not—they’re simply arbitrary markers. You can apply any of the first four labels by pressing the Command (Mac) or Ctrl (Windows) key together with a number key from 6 to 9 (see Figure 5-52).
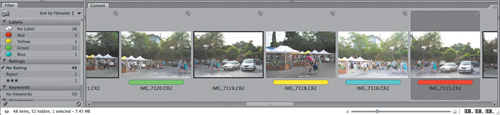
Tip
If thumbnails appear without label and rating information under them, check the View menu to make sure that the Show Thumbnail Only command is not checked.
Labels are less portable than ratings. Your labels will show up as white on any machine that uses a different label definition than yours, which is almost certain to happen if you use something other than the default label definitions (red, yellow, green, blue, and purple), and reasonably likely to happen even if you do use the default definitions, since the recipient may not. They can always search for your label text, but it’s probably simpler just to use ratings.
For more information, see “Rating, Labeling, and the Label Menu” later in this chapter.
To work efficiently, look for and select images that require approximately the same edit. Once you’ve done so, you can apply the edits in any of the following three ways (or mix and match the techniques as required). Remember, at this stage in the workflow, you’re simply aiming for good, not perfect. (Perfect comes later, when you’ve whittled the images down to the few you’ll actually deliver.)
Edit by example in Bridge. Select the first of the images that need the same edit, then open it in Camera Raw. The choice of host application—Bridge or Photoshop—depends on what else is going on. If Photoshop is busy batch-processing files, host Camera Raw in Bridge. If Bridge is busy building the cache, host Camera Raw in Photoshop. If they’re both busy, host Camera Raw in Bridge—Bridge’s multithreading lets you work in Camera Raw even while Bridge itself is busy doing other tasks.
Make your edits—white balance, exposure, whatever the image needs—and then dismiss the Camera Raw dialog by clicking Done (it’s the default option in Camera Raw hosted by Bridge, but not in Camera Raw hosted by Photoshop).
Now, from the Apply Camera Raw Settings submenu (in Bridge’s Edit menu), choose Copy Camera Raw Settings, or press Command-Option-C (Mac) or Ctrl-Alt-C (Windows). Then select all the other images that need the same edit and choose Paste Camera Raw Settings or press Command-Option-V (Mac) or Ctrl-Alt-V (Windows). If necessary, select the combination of subsets or settings you want to apply from the Paste Camera Raw Settings dialog first (see “Select, Find, and Edit with the Edit Menu,” later in this chapter).
This approach works well when you need to apply the same settings to a large number of images that are identifiable by relatively small thumbnails, because you can select them quickly. But if you need to make small changes to the settings for each image, the following two approaches are better ideas.
Edit by applying presets. If you’ve saved presets for Camera Raw in the Settings folder for Camera Raw (see “Loading and Saving Settings” earlier in this chapter) you can apply them to all the selected images by choosing Apply Camera Raw Settings from Bridge’s Edit menu, then choosing the settings or settings subsets from the submenu. Saving settings subsets as presets is particularly powerful, because you can simply choose them in succession. Each one affects only the parameters recorded when you saved it, so you can load a preset for White Balance, followed by one for Exposure, Brightness, Contrast, Calibrate settings, and so on.
Edit in Camera Raw. The method that offers the most flexibility is to open multiple images in Camera Raw. The number of images you can open in Camera Raw depends on how much RAM is available. As a result, you can open more images in Camera Raw when you host it from Bridge rather than Photoshop, simply because Bridge doesn’t need as much RAM as Photoshop.
That said, it’s more practical to work with smaller sets of images. If you open ten or more images, you’ll get a dialog asking if you really want to open ten files. We recommend clicking the Don’t Show Again check box, and cheerfully opening as many images as your machine can reasonably handle without bogging down (if the hardware is at all recent, it’s almost certainly a considerably larger number than 10).
When you open multiple images, Camera Raw works in Filmstrip mode, which contains the Synchronize button so that you can transfer settings from one image to any other images selected in the filmstrip. For all the details about that, see “Filmstrip Mode” earlier in this chapter.
You can mix and match these approaches. Editing in Camera Raw brings you the benefits of zoomable previews and Undo. (And if you simply can’t resist the temptation, you can fine-tune individual images too.)
By default, Bridge sorts images by filename, so new images appear in the order in which they were numbered by the camera. However, as we noted earlier, you can vary the sort order by choosing any of the options at the top of the Filter panel (see Figure 5-53), or in the View > Sort submenu.

You can also create a custom sort order by dragging the thumbnails around, just as you would with chromes on a light table. When you do so, the Manually item on the Sort menu is checked. Your custom sorting order is stored only in the Bridge cache for the folder. If you move or rename the folder, Bridge will still remember the sort order. But if you combine images from several folders into a different folder, you have in effect created a new sort order, and it may well not be the one you wanted. So a simple way to preserve that order is to use Batch Rename to rename the images including a numbering scheme that reflects your custom sort order (see “The Tools Menu,” later in this chapter).
The key to being efficient with keywords and metadata is the same as that for being efficient with applying Camera Raw edits: Look for and select images that need the same treatment, and deal with them all at once.
IPTC metadata. The only metadata that is editable in Bridge (or in Photoshop, for that matter) is the IPTC metadata. For recurring metadata such as copyright notices, metadata templates provide a very convenient way to make the edits (see “Using Metadata Templates,” later in this chapter).
Alternatively, you can select multiple images and then edit the metadata directly in the Metadata panel (see Figure 5-54). Click in the first field you want to edit and type in your entry. Then press Tab to advance to the next field. Continue until you’ve entered all the metadata shared by the selected images, and then click the check mark icon at the lower right of the panel, or press Enter or Return, to confirm the entries.

Keywords. Keywords show up in the IPTC section of the Metadata panel, but you can’t enter or edit them there; you have to use the Keywords panel (see Figure 5-55). The Keywords panel contains individual keywords grouped into sets (represented by the folder icons). The default keywords and sets are pretty useless unless you know a lot of people called Julius or Michael, but you can easily replace them with ones that are more useful for your purposes.
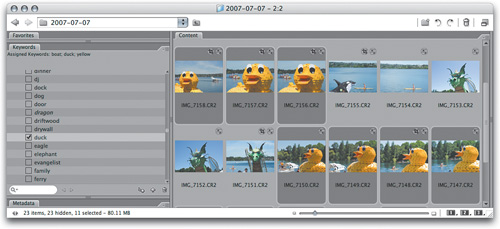
To apply a keyword, select one or more images and then click in the column to the left of the keyword. A check mark appears in the column, and Bridge writes the keyword to each file (or its XMP sidecar file, or to the Camera Raw database if the file is read-only). To remove a keyword, select the images and then turn off the check mark.
Deleting a keyword from the Keywords panel doesn’t delete the keyword from any images to which it has been applied; it only deletes it from the panel. So it makes sense to store in the panel only the keywords you know you’ll use a lot. For keywords that apply only to the current session, we create them in a set called Temp and delete them when we’re done, to keep the panel manageable.
Bridge CS3 replaces the keyword sets of Bridge CS2 with hierarchical keywords. The Keywords panel doesn’t look any different in this respect, but it does work differently. You can still create a parent keyword and add child keywords under it, but applying a parent keyword no longer applies all of its child keywords by default. Now you have the option of applying a child keyword or both a child keyword and its parent; Shift-click a keyword check box to accomplish the latter. For more information about applying keywords and the additional new features in the Keywords panel, see “The Keywords panel” later in this chapter.
Let’s face it: Using the Metadata panel is like filling out a form (name, contact info, copyright info, keywords, caption, city, state... you get the idea). Filling out forms is no fun, particularly if you have to do it more than once. This fact makes applying metadata seem like a chore to many people. Metadata templates go a long way toward making metadata entry much less of a chore.
A metadata template is simply a preset that contains any prefilled metadata you want. We highly recommend that you get to know metadata templates and use them thoughtfully, because they can save you a lot of time. Not only do they save time in a Bridge window, but you can also apply a metadata template as you import images from a camera (see “Copying Files from a Camera” earlier in this chapter) so that images already have your fundamental metadata before you first view them in Bridge.
Use the Create Metadata Template command to make a new metadata template. As with all metadata commands, you can find this command under the Tools menu (choose Tools > Create Metadata Template), or you may find it easier to click the Metadata panel menu and choose the command there. Now you can begin creating your template.
To use an existing template as a starting point, choose it from the pop-up menu at the top right corner of the dialog (see Figure 5-56).
Enter a Template Name, and fill out any metadata fields that you want to include in the template.
Check your spelling. You don’t want an error to creep into the hundreds of images that may be edited with a metadata template!
Make sure you turn on the check box to the left of any field you want to include in the template. To force a field to be blank, leave it blank and check its check box. Unchecked fields don’t affect existing data.
Click Save.
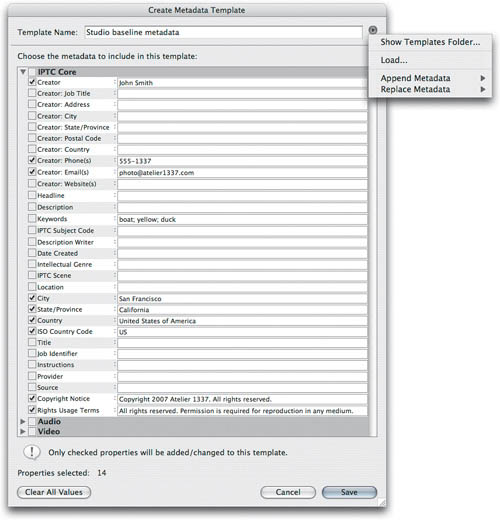
To edit a metadata template, just choose its name from the Edit Metadata Template submenu, which is on the same menu as the Create Metadata Template command.
To edit a metadata template, select the images you want to change. Then, choose the name of the template from the Append Metadata or Replace Metadata submenus, which are on the same menu as the Create Metadata Template command. The difference between Append Metadata and Replace Metadata requires a little explanation.
Append Metadata. The data in a metadata template field (such as City) is applied to the image only if the same field in the image is empty. If there’s already data in that field in the image, then the template data for that field isn’t applied to the image, which keeps the existing data for that field.
Replace Metadata. The data in a metadata template field always replaces the data in the same field in an image.
Note that Append Metadata and Replace Metadata only change image metadata for the fields where the check box is on. If a field’s check box is off in a metadata template, neither Append nor Replace will change that field in an image.
Adobe has worked hard to make sure that you can exchange metadata and Camera Raw settings between Bridge CS3 and Lightroom 1. Version numbers are important—as Adobe updates both products, their feature sets change, and one product may gain features that the other product doesn’t know about and can’t render or support. So watch your updates and read your ReadMe files to be aware of compatibility changes. As we write this, Camera Raw 4.1, Bridge CS3 2.1, and Lightroom 1.1 settings are completely compatible.
As we mentioned earlier, you can store Camera Raw settings and metadata separately from the images in the Camera Raw database or in XMP sidecar files, or with the image in DNG files. For Bridge and Lightroom to communicate, the one option that won’t work is the Camera Raw database, because Lightroom doesn’t read it. You must store settings and metadata in either XMP sidecar files or DNG files.
Even when the versions are compatible and the files are present, you’ve got two programs writing to the same files, and that can lead to synchronization problems. You sometimes have to be a traffic cop to make sure data goes where it’s supposed to. Here are the rules of the road:
Bridge to Lightroom. If you’re using DNG files, you’re OK because the settings are inside the files that Lightroom will be opening. If you aren’t using DNG files, then read on. In the General pane of the Camera Raw Preferences dialog, the Save Image Settings In pop-up menu should be set to Sidecar .xmp Files. If it isn’t, then after you edit images in Camera Raw, you must choose Export Settings to XMP from the Camera Raw settings menu to create the sidecar files.
Tip
You can also keep the Lightroom Library view and file metadata up to date using folder synchronization. In the Lightroom Library module, choose Library > Synchronize Folder, make sure Scan for Metadata Updates is checked, and click Synchronize.
If you’re in Lightroom and for some reason you don’t see changes you made in Bridge, select the out-of-date images in the Library module and choose Metadata > Read Metadata From File.
Lightroom to Bridge. In Lightroom, you may want to choose File > Catalog Settings and turn on the Automatically Write Changes into XMP check box so you don’t have to do it manually. We say you may want to choose it, because having that option on can cause a lot of CPU and disk activity in the background as Lightroom checks and updates every image in your library. If that option is off, then select the images in the Library module in Lightroom and choose Metadata > Save Metadata To File. Now the metadata is updated for Bridge to read.
You may see your Lightroom changes the next time you view that folder in the Content panel in Bridge. If you don’t see the changes in Bridge, press F5 (the shortcut for View > Refresh). If that doesn’t do it, you may want to purge that folder’s cache (choose Tools > Cache > Purge Cache For Folder).
If you started this digital workflow by bringing raw files in from your camera, no matter how much work you’ve done with them in Bridge and Camera Raw, if you want to be able to use those files anywhere else, you must convert them to a non-raw file format. The production phase is where you actually produce those versions of your best images, your selects.
Like so many other aspects of the digital workflow that you’ve seen up to this point, when it comes to the production phase, you’ve got choices.
If you need to print an image, or you know that an image needs more work than Camera Raw can handle, you can use Camera Raw to open the image in Photoshop as a new Photoshop document. From there, you can save the image in any file format Photoshop supports.
If you’ve been able to achieve all of the necessary adjustments and edits in Camera Raw and now all you need is a final file (such as a TIFF or JPEG file), you can save the image directly from Camera Raw and call it done.
If you need to run Photoshop automation or actions on one or more images, you can use the Tools > Photoshop submenu in Bridge, which includes the powerful Batch command.
The exercise of your creative judgment is one aspect of the workflow that you can’t automate, but automation can and will speed up the execution of that creative judgment. When it comes to efficiency in converting raw images, actions are the key. We generally convert raw images in batches using actions rather than simply opening them in Photoshop.
The most basic way to open a raw image in Photoshop from Bridge is to select the image in Bridge and choose File > Open in Camera Raw or press Command-R (Mac) or Ctrl-R (Windows). In the Camera Raw dialog, verify the blue, underlined Workflow Options at the bottom of the dialog (if necessary, click the underlined text to change them), and when everything’s ready, click Open Image (see Figure 5-57). For more information about the output options, see “Camera Raw Workflow Options” earlier in this chapter.

If you want to convert multiple images, select them in Bridge before opening Camera Raw. After the Camera Raw dialog opens, be sure to click Select All before clicking Open Images.
Tip
We like to open raw images in Photoshop as a Smart Object (clicking the Open Object button in the Camera Raw dialog), because it makes it possible to edit the raw file in that Photoshop document without re-importing it.
Keep in mind that if you turned on the Open in Photoshop as Smart Objects check box in Workflow Options dialog, the Open Image button will say Open Object instead. Whatever the button currently says, you can temporarily switch it to the alternate button by holding down the Shift key. For more information about Smart Objects, see “Smart Objects” in Chapter 11.
When you double-click a raw file in Bridge, Camera Raw opens, hosted either by Bridge or Photoshop. This depends on whether you checked or unchecked the Double-Click Opens Camera Raw Settings in Bridge preference in the General panel of the Preferences dialog in Bridge.
In Photoshop CS2, we only saved files from Camera Raw to convert them to DNGs or occasionally to generate JPEG or TIFF files. More commonly, we ran the images from Bridge through Photoshop using batch actions, because there were too many tasks that Camera Raw could not do.
This has changed. Camera Raw 4.1 has many more tone and color corrections than Camera Raw 3 did, includes spot healing and cloning, and can apply sharpening using options that are in some ways more sophisticated than anything in Photoshop, short of building your own sharpening actions. If you tend to shoot well-exposed, well-focused images, you may find that thanks to Camera Raw 4.1, many more of those images do not need to go on past Camera Raw to Photoshop, except for printing. You can export those images as final files straight from Camera Raw 4.1.
To save files from Camera Raw, select the images you want to save (if you have multiple images open in Camera Raw), and click Save Images (see Figure 5-57). Specify settings in the Save Options dialog and click Save. Most of the settings in the Save Options should look familiar: Choose a location for the saved files and customize filenaming (see “Batch Rename” later in this chapter). In the Format pop-up menu, choose Digital Negative (DNG), TIFF, JPEG, or Photoshop.
Camera Raw saves files in the background, so you can continue to work on other images in the Camera Raw dialog. While Camera Raw is saving in the background, you can close Camera Raw and do more work in Bridge, or select different images to open Camera Raw again, all without interrupting the background save operation. As Camera Raw saves images in the background, it displays a progress indicator at the bottom of the Camera Raw dialog (see Figure 5-58); click the underlined status text to open the Camera Raw Save Status dialog. This dialog lists all files remaining to be processed, and you can click Stop to cancel the save.
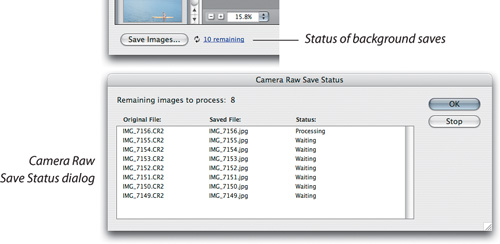
Saving directly from Camera Raw is useful when you’ve done everything the image needs in Camera Raw, but when some images need additional work in Photoshop. The Photoshop submenu offers a variety of useful routines for creating images in a deliverable form, but by far the most powerful and flexible is the Batch command. That’s what we’ll tackle next.
The Batch command is one of the most powerful features in Photoshop. It’s conceptually very simple. You point it at a batch of images, it runs an action on them, it (optionally) renames the images, and then it does one of the following:
As you’ll see shortly, though, the devil is in the details, and some of the details in the Batch dialog are distinctly counterintuitive. To open the Batch dialog from within Photoshop, choose File > Automate > Batch. To batch process files from within Bridge, select the images you want to process and then choose Tools > Photoshop > Batch.
The Batch dialog is split into four different sections, each of which controls a different aspect of the batch process’s behavior (see Figure 5-59).
Play lets you choose an action from an action set that will be applied to all the images. Note that we discuss actions and how to create them in more detail later in this chapter, as well as in Chapter 11.
Source lets you choose the images on which the batch will be executed, and also lets you pick some very important options we’ll explore in a moment. Your choices from this menu are: a folder full of images (click the Choose button to choose the specific folder); the currently open files; images imported through the Photoshop File menu’s Import command; or—when running Batch from within Bridge—the images that are currently selected in Bridge. For raw images, the source will invariably be a folder or the selected images in Bridge.
Destination lets you control what happens to the processed images. Choose None to leave them open in Photoshop after processing. To save the changed files and close them, choose Save and Close (more on this soon); Folder lets you designate a folder in which to save the processed images. This section also includes the same renaming features offered by Batch Rename.
When you process raw images, you’ll choose None or, much more commonly, Folder. Save and Close often ends up being a “hurt-me” button, because its normal behavior is to overwrite the source image. With raw files, this is usually impossible and always undesirable. Photoshop can’t overwrite files in formats it can’t write, including most raw image formats; but if you use a camera that records its raw images as .tif, there’s a real danger of overwriting your raws if you choose Save and Close—so avoid it!
Errors lets you choose whether to stop the entire batch when an error is encountered or log the errors to a file. We usually stop on errors when we’re debugging an action used in Batch and log them to a file when we’re actually running a batch in a production situation. However, when processing raw files, the batch typically either works on all files or fails on all files.
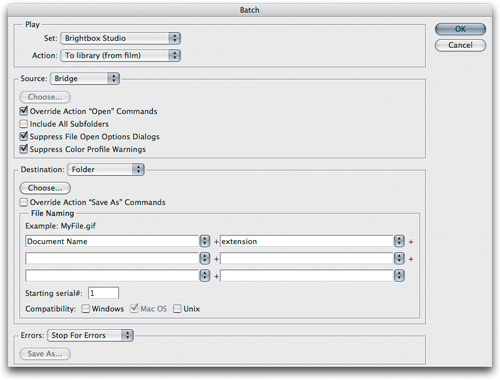
The difficulties that users typically encounter in running the Batch dialog are in the way the selections in the Source and Destination sections interact with the action applied by the batch operation. Here are The Rules. (Note: These are our rules, and we swear by them. They don’t represent the only possible approach, but by the time you’re sufficiently skilled and knowledgeable to violate them with impunity, you’ll have long outgrown the need for a book like this one!)
Rules for opening files. To make sure that the raw files get opened and processed the way you want them in a batch operation, you need to record an Open step in the action. In the case of raw images, you’ll want to make sure that the Settings menu in Camera Raw is set to Image Settings so that it applies the custom-tailored Camera Raw settings you’ve made for each image, and you’ll also want to make sure that the Camera Raw workflow settings—Space, Bit Depth, Size, and Resolution—are set to produce the results you want.
Now comes one of the counterintuitive bits. If you record an Open step in the action, you must turn on the Override Action Open Commands option in the Batch dialog. If you don’t, the batch will simply keep opening the image you used to record the Open step in the action. Override Action Open Commands doesn’t override everything in the recorded Open command; it just overrides the specific choice of file to open, while ensuring that the Selected Image and workflow settings get honored.
Some people find this set of behaviors so frustrating and counterintuitive that they latch onto the fact that you can run Batch using an action that doesn’t contain an Open step and hence doesn’t require messing around with the check box. The problem with doing so is that you lose control over the Camera Raw workflow settings—the batch will just use the last-used settings. So you may expect a folder full of 6144-by-4096-pixel images and get 1536-by-1024-pixel ones instead, or wind up with 8-bit sRGB instead of 16-bit ProPhoto RGB. If you simply follow The Rules, you will have complete control over the workflow settings.
Rules for saving files. To make sure that the processed files get saved in the format you want, you need to record a Save step in the action that will be applied in Batch. This Save step dictates the file format (such as TIFF, JPEG, or PSD) and options that go with that format (TIFF compression options, JPEG quality settings, and so on).
Now comes the second counterintuitive bit. You must turn on the option labeled Override Action “Save As” Commands in the Batch dialog, or the files won’t get saved where you want them, won’t get saved with the names you want, or possibly won’t even get saved at all! When you turn on this option, the file format and parameters recorded in the action’s Save step will be applied when saving the file, but the name and destination will be overridden by the options you specify in the Batch dialog.
Rules for running a batch operation. Two other settings commonly trip people up. Unless you turn on the Suppress File Open Options Dialogs check box, the Camera Raw dialog pops up whenever the batch opens a file, and waits for you to do something. Turning on this option just opens the image directly, bypassing the Camera Raw dialog. The Camera Raw settings for each image are used, but the batch operation isn’t interrupted by the appearance of the dialog.
If the workflow settings recorded in the action result in an image in a color space other than your Photoshop working space, you should also turn on the Suppress Color Profile Warnings check box; otherwise the batch may get interrupted by the Profile Mismatch warning. The day always gets off to a bad start when you find that the batch operation you’d set up to generate 2000 Web-ready JPEGs overnight is stalled on the first image with a warning telling you that the file is sRGB when your working space is ProPhoto RGB! (This feature didn’t work in Photoshop CS. Fortunately, it’s fixed in Photoshop CS2 and later.)
Playing by The Rules. If you follow this relatively simple set of rules, your batch operations won’t fall prey to any of these ills, and they’ll execute smoothly with no surprises. If you fail to do so, it’s very likely that your computer will labor mightily and then deliver either results that are something other than you desired or, even more frustrating, nothing at all!
So with The Rules in mind, let’s look first at creating some actions and then at applying them through the Batch command.
Writing actions for batch-processing raw images is relatively simple. You don’t need to worry about making sure that the action can operate on files that already have layers or alpha channels, or that are in a color space other than RGB. You’re always dealing with a known quantity.
Bear in mind that if your actions call other actions, the other actions must be loaded in the Actions palette in Photoshop, or the calling action will fail when it can’t find the action being called. An easy way to handle this is to make sure that any actions on which other actions are dependent are saved in the same set as the actions that depend on them.
Let’s begin with a simple action that opens a raw image at its native resolution and saves it as a maximum-quality JPEG in the sRGB color space.
Creating an action and action set. Start out by creating a new action set called “Batch Processing” in which to save the actions you’ll create in the rest of this section (see Figure 5-60 and “Actions, Automate, and Scripting,” in Chapter 11, “Essential Image Techniques.”)
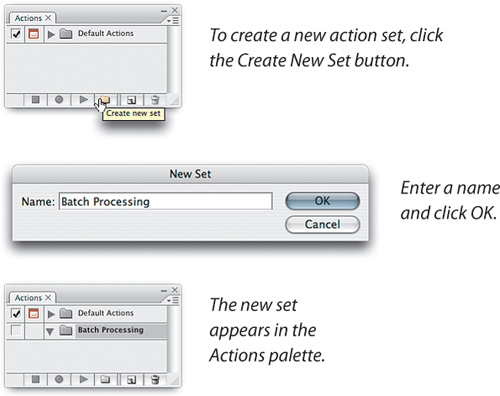
Creating a new action. Before creating the action, select a raw image in Bridge that has already had custom Camera Raw settings applied. That way, once you’ve created the action, you can start recording immediately without recording any extraneous steps, such as selecting a file, and you can correctly record the Camera Raw Selected Image setting.
Now click the Create New Action icon in the Actions palette in Photoshop, enter a name (such as “Save as JPEG”) for the action, and then click Record to dismiss the dialog and start recording the action.
Recording the Open step. Now that you’re recording, switch back to Bridge and open the image in Camera Raw by pressing Command-O (Mac) or Ctrl-O (Windows)—you must open the image in Camera Raw hosted by Photoshop. The Camera Raw dialog will appear (see Figure 5-61).
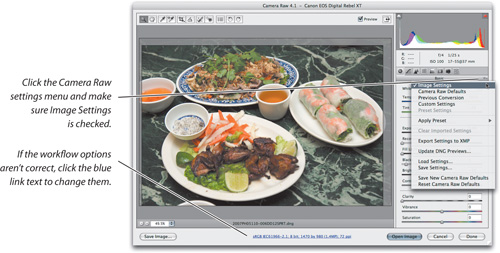
When you use the action in Batch, the Camera Raw dialog won’t appear, so it’s essential to get the settings right when you record this step. You need to record several key settings in the Camera Raw dialog.
Set the Settings menu to Image Settings to ensure that each image gets opened using its own custom settings, rather than the ones you chose for this particular image.
Set the Space pop-up menu to sRGB to produce a converted image that’s already in sRGB, the standard color space for the Web.
Set the Depth menu to 8 bits/channel, because you’re simply saving JPEGs (which only support 8-bit channels), and this action won’t include any operations that could benefit from a higher bit depth.
Set the Size menu to the desired size (in this case, we chose 1536 by 1024).
Set the Resolution field to 72 pixels per inch (to preserve the polite fiction that Web images are 72 ppi; see Chapter 12, “Image Storage and Output”).
Then click OK to open the image. (If the Profile Mismatch warning appears, click OK to dismiss it. This doesn’t get recorded in the action, and anyway, you’ll suppress the warning when you use the action in Batch.) The image opens, and the Open step appears on the Actions palette.
Recording the Save step. To record the Save step, choose Save As from the File menu, or press Command-Shift-S (Mac) or Ctrl-Shift-S (Windows). The Save As dialog appears. The filename and the destination for saving that you enter has no impact on the batch process because you’ll use the Batch dialog to specify that, so we tend to use an obvious test name such as “test.jpg” and choose the Desktop or a test folder as a destination, to simplify later cleanup.
Tip
Always, always, always test and debug your actions on expendable copies of images in a test folder before you run them on the real thing. There’s nothing worse than watching irreplaceable originals come out of the end of an action completely messed up because of an inadequately tested action. Similarly, we recommend that you set your actions to save processed files to an output folder, not over the original files, so that you can check them, and if necessary, chuck them if something goes horribly wrong.
In this example, make sure that the format is set to JPEG, and incorporate any other settings in this dialog that you want to include in the action. Then click Save to proceed to the JPEG Options dialog, set the desired quality, set the Format Options to Baseline (Standard) for maximum compatibility with JPEG-reading software, and then click OK. The file is saved on the Desktop as “test.jpg,” and the Save step appears in the Actions palette. Then close the open document so that a Close step appears in the Actions palette.
Stop and save the action set. Finally, click the Stop button in the Actions palette to stop recording. Photoshop doesn’t allow you to save individual actions to disk—only action sets. So if you want to save an action as soon as you’ve written it, you need to select the action set that contains it in the Actions palette and then choose Save Actions from the Actions palette menu (see Figure 5-62).
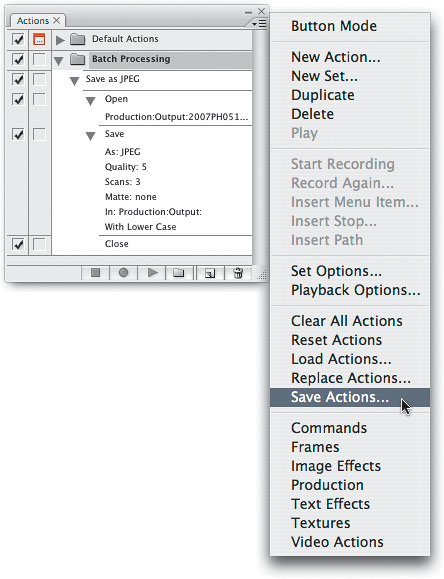
Until you save actions explicitly using the Save Actions command, they exist only in Preferences in Photoshop, and those are updated only when you choose File > Quit (Mac) or File > Exit (Windows) to close Photoshop normally. If Photoshop is unexpectedly closed for any other reason, such as a crash or power outage, any unsaved actions will be lost. So if your actions are even slightly complex, it’s a very good idea to save them before doing anything else. You can save actions anywhere, but if you want them to appear automatically in the Actions palette even if you delete the preferences, save them in the Adobe Photoshop CS3PresetsActions folder.
When you expand the steps in the Actions palette by clicking the triangles beside those that have them, you can see exactly what has been recorded for each step (see Figure 5-62 and Figure 5-63). When you use this action in Batch with the appropriate overrides selected (see “Rules for Batching Files,” earlier in this chapter) the filenames and folder locations you recorded will be overridden by the settings in the Batch dialog, and all the other settings you’ve recorded here—the Camera Raw workflow settings and the JPEG Save Options—will be honored.
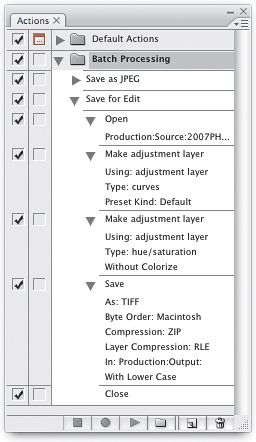
Variants. You can create variants of this action by recording different Open or Save steps. For example, you can create larger JPEGs by changing the Size setting in the Camera Raw dialog to one of the larger sizes, and you can embed thumbnails or create lower-quality JPEGs by making those settings in the Save As and JPEG Options dialogs, respectively. To save in a different format with different options, just choose the desired format and options when you record the Save step.
Now let’s try a more complex example: an action that produces 16-bit/channel TIFFs with adjustment layers set up for final editing in Photoshop. It’s designed for use on “hero” images that merit individual manual edits in Photoshop. It doesn’t actually do any of the editing, because the required edits will almost certainly be different for each image in a batch. Instead, it simply does a lot of the repetitive grunt work involved in setting up an image for editing, so that when you open the image, all the necessary adjustment layers are already there, waiting for you to tweak them. (Or, if you don’t need them, you can throw them away later.)
Create the new action. You can record this action in the same set as the previous one, since it’s also designed for raw processing. As before, select a raw image in Bridge that has had custom Camera Raw settings applied before you start recording the new action. Then click the Create New Action icon in the Actions palette, enter a name (such as “Save for Edit”) in the New Action dialog, and click Record to start recording.
Recording the Open step. As before, start by launching Camera Raw from Bridge by pressing Command-O (Mac) or Ctrl-O (Windows). In the Camera Raw dialog, again make sure that Settings is set to Selected Image. This time, though, you’ll make some different workflow settings.
In the Space menu, choose ProPhoto RGB, our preferred working space.
Set the Depth menu to 16 bits per channel, because you’ll want to make the edits in Photoshop in 16-bit/channel mode.
Set the Size menu to the camera’s native resolution.
Enter 240 pixels per inch in the Resolution field, because you’ll almost certainly check your edits by printing to an inkjet printer at 240 ppi (see Chapter 12, “Image Storage and Output”).
Then click OK to open the image. The image opens, and the Open step appears on the Actions palette.
Adding the edits. This action adds three different editing layers to the image before saving and closing; a Levels adjustment layer; a Curves adjustment layer; and a Hue/Saturation adjustment layer, as follows.
Add a Levels adjustment layer by choosing Levels from the New Adjustment Layer submenu (under the Layer menu). Just click OK to create a Levels adjustment layer that does not, as yet, apply any adjustments. Remember, you’ll make the adjustments on an image-by-image basis in Photoshop; the action just does the grunt work of creating the layers.
Add two more adjustment layers—a Curves layer, then a Hue/Saturation layer—and click OK when their respective adjustment dialogs appear.
Recording the Save step. As before, choose Save As from the File menu, naming the file “foo” and save it on the Desktop for easy disposal after you’re finished making the action. This time, choose TIFF as the format, make sure that the Layers and Embed Color Profile check boxes are turned on (creating untagged ProPhoto RGB files is a very bad idea). Then click Save to advance to the TIFF Options dialog and make your preferred settings. (Again, see Chapter 12, “Image Storage and Output,” for advice.)
Finally, close the image (to record that step in the action as well), and click the Stop button in the Actions palette to stop recording. Figure 5-63 shows the resulting action in the Actions palette with all the steps expanded.
As with the earlier, simpler action, when you use this action in a batch process with the necessary overrides applied in the Batch dialog, the filenames and locations will be overridden by the Batch settings, while everything else in the Open and Save steps will be honored.
Using the actions we’ve just shown you in Batch is really very simple—as long as you remember The Rules! (If you need to take another look, refer back to “Rules for Batching Files,” earlier in this chapter.) Play by The Rules, and all will go smoothly. Violate them at your peril.
Common errors. Other than choosing incorrect settings in the Batch dialog, there are three common situations that can cause a batch operation to fail.
There isn’t sufficient space on the destination volume to hold the processed files.
No source files were selected in Bridge.
Files with the same names as the ones you’re creating already exist in the destination folder.
If these points seem blindingly obvious, we only mention them because they’ve tripped us up more than once. With those caveats in mind, let’s look at setting up the Batch dialog to run the Save for Edit action you built in the previous section. As we pointed out earlier, the key settings in Batch are the overrides in both the Source and Destination sections of the panel.
Tip
If you get a “Folder Not Found” error during a batch process, check all folder paths used in the action, in actions called by that action (if present) and in the Batch dialog. Also check if you’ve set the Errors pop-up menu at the bottom of the Batch dialog to Log Errors To File. If you have, click the Save As button and choose that folder again to ensure it’s a valid path.
Source settings. Whenever you run a batch operation using an action that includes an Open step, you must check Override Action Open Commands in the Source section. To process raw images, you also need to turn on Suppress File Open Options Dialogs—otherwise the Camera Raw dialog will pop up for every image. And whenever you run an unattended batch operation, it’s a good idea to check Suppress Color Profile Warnings so that the batch process doesn’t get stuck on a Profile Mismatch warning.
Destination settings. Similarly, whenever you run a batch operation using an action that includes a Save As step, you must turn on Override Action “Save As” Commands in the Destination section; otherwise the files won’t get saved. Figure 5-64 shows the Batch dialog set up to run the Save for Edit action.

In Bridge, you can open as many windows as you like by choosing File > New Window, or pressing Command-N (Mac) or Ctrl-N (Windows). Each window can show the contents of a different folder or volume (subfolders appear as folder icons).
Bridge CS3 has a new type of window: the synchronized window (see Figure 5-65). Choose File > New Window, or press Command-Option-N (Mac) or Ctrl-Alt-N (Windows). When you open a new synchronized window, its panels display information with about the same content as the window that was active when you created the new synchronized window. When two windows are synchronized, selecting different files in one window changes the displayed content in all windows synchronized to the first window. This gives you more flexibility in the content you can display, but the biggest benefit is that you can spread out your Bridge work area across multiple monitors. For example, you can have a synchronized window on a second monitor that contains only the Preview panel, so that you can preview a selected image at a much bigger size than when the Preview panel had to share space with other panels in just one Bridge window.
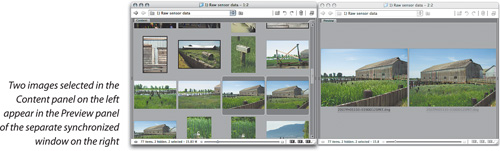
Tip
If you see two numbers separated by a colon in a Bridge window title bar, you’re looking at a synchronized window. For example, 2:2 means you’re looking at the second of two synchronized windows.
A few additional tricks can help you manage your Bridge windows. First, you can, of course, minimize windows to the Dock (Mac) or Taskbar (Windows). Also, you can set windows to either Compact mode or Ultra-Compact mode. In these modes, Bridge windows by default “float” above Full-mode windows, so they’re easily available (see Figure 5-66). The compact modes are useful at times when you’re in another application and you need Bridge close by, such as when you’re laying out a publication in Adobe InDesign and dragging content into it from Bridge.

Tip
If a Bridge window doesn’t respond to a keyboard shortcut, it may not be the foreground window, especially if one of the other windows is in Compact mode. To activate a Full mode window, select one or more thumbnails in that window. (It isn’t enough to click the window; you actually have to select a thumbnail in the window.)
You can cycle through all open Full-mode windows by pressing Command-~ (tilde key, Mac) and Alt-Tab (Windows), but the shortcut doesn’t apply to Compact or Ultra-Compact windows, so it’s just as well that they float by default.
You can toggle between Full and Compact modes by pressing Command-Return (Mac) or Ctrl-Enter (Windows). The shortcut toggles between Full and either Compact or Ultra-Compact modes, depending on which of the compact modes you’d last applied to the window.
In Full mode, Bridge windows contains several panels (see Figure 5-67) that you can arrange into workspaces. Bridge provides several default workspaces that you can apply from the Window > Workspaces menu. It’s faster to choose them from the three numbered buttons at the bottom right corner of a Full-mode window. Holding the mouse button down on any of the three buttons reveal the same menu of workspaces, and here’s why: When you choose a workspace from any of these buttons, that workspace becomes the default for that button, so all you have to do to get that workspace next time is click that button. That means you can preset three different workspaces into those buttons for one-click access to them.
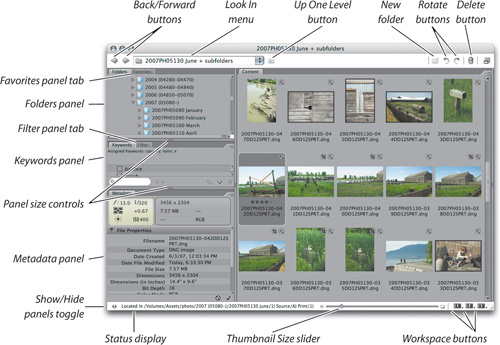
Tip
Compact windows don’t have to float. You control this by turning off Compact Windows Always Float on Top from a compact window’s menu. But turning off floating can make Compact- and Ultra-Compact-mode windows hard to find.
The default workspace (Window > Workspace > Default) displays all panels except for the Inspector (only useful if you’re using the Version Cue file management system). The default workspace is divided into three vertical panes. The center pane contains the Content panel, which lists the files in the folder you’re currently viewing. The left-hand pane contains the Favorites, Folders, and Filter panels; in other words, it determines which files you see in the Content panel. The right-hand pane contains the Preview, Metadata, and Keywords panels; in other words, it shows you details about the file you select in the Content panel. By now you may have noticed that as you go from left to right in the default workspace, the information you see about your files goes from general to specific.
We talk about each panel in more detail a little later.
Bridge’s tools and buttons are arranged in three logical groups. The navigation controls are at the upper left of the window, the content controls are at the upper right, and the display controls are at the lower right.
Navigation controls. The Back/Forward buttons work like those in Web browsers, letting you move backward and forward through recently visited folders. The Look In menu shows the current folder and its path, the number of recently visited folders specified in the Preferences in Bridge, and folders or Navigation controls. You can add items to this list by choosing Add Folder to Favorites from the File menu or by dragging a folder into the Favorites panel. The Up One Level button lets you navigate upward through the folder hierarchy.
Tip
If you frequently receive images from a source other than directly from a digital camera, such as from a scanner, set up a drop folder where new images are deposited and add it to your Favorites in Bridge. Click the folder in the Favorites panel to monitor all new images as they come in.
Content controls. The content controls are in a somewhat loose logical grouping, but they all affect the main window content in some way. The New Folder icon lets you create a new folder inside the folder you’re currently browsing. You can do the same by pressing Command-Shift-N (Mac) or Ctrl-Shift-N (Windows). The Rotate Left and Rotate Right buttons (press Command-[ and Command-], respectively, on the Mac, or Ctrl-[ and Ctrl-] in Windows) rotate the selected thumbnails and previews and instruct Bridge to apply the rotation to the file when it gets opened. The Trash icon (press the Delete key) moves selected items to the Trash/Recycle Bin but doesn’t empty it; do that from your desktop.
Display controls. The Thumbnail Size slider at the bottom of a Full mode Bridge window lets you control the size at which thumbnails in Bridge are displayed. You can also change thumbnail size using the same keyboard shortcuts for the Zoom tool in Photoshop and Camera Raw: To zoom in or out, press Command-+ (plus sign) or Command-- (minus sign) (Mac) or Ctrl-+ (plus sign) or Ctrl--(minus sign) (Windows). To the right of the Thumbnail Size slider are the three workspace preset buttons we mentioned earlier.
The main window in Bridge—the one that displays thumbnails—lets you do a great deal of your work, but the other panels are very useful for specialized tasks.
Tip
The new Bridge Home item in the Favorites panel is a great way to find information and tutorials about Photoshop and Creative Suite 3 applications if you’re connected to the Internet.
The Favorites panel. The Favorites panel (see Figure 5-68) is a handy place for storing shortcuts to places that you often want to return to in a Bridge window. In addition to actual volumes and folders, the Favorites panel can hold Collections, which are saved search criteria that act as virtual folders. You can configure the preset items from the Preferences in Bridge (see “Bridge Menu Commands,” later in this chapter) and you can add items to the Favorites panel by dragging or by choosing File > Add to Favorites. The Bridge Central favorite in Creative Suite 2 is replaced by Bridge Home in CS3. Also, Collections are no longer a Favorites item, because you can store them in any folder, which you can then add to the Favorites panel.
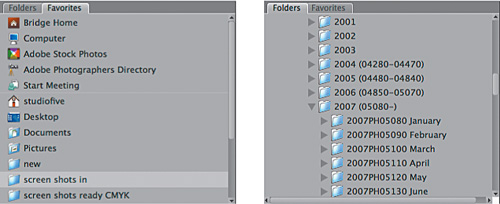
The Folders panel. The Folders panel (see Figure 5-68) displays the volume and folder hierarchy, allowing you to navigate to different folders. Once you click on one of the folders, you can navigate up and down the folders list using the up and down arrow keys, and you can collapse and expand volumes or folders that contain subfolders using the left and right arrow keys. Command-up arrow (Mac) or Ctrl-up arrow (Windows) moves you up to the next level in the folder hierarchy. The panel menu contains but one command, Refresh.
Tip
When a folder is selected in the Folders panel, you can use the right arrow and left arrow keys to expand and collapse that folder.
The Filter panel. The Filter panel (see Figure 5-69) lists some of the more useful metadata found in images in the Content panel, such as creation dates, file types, ratings, labels, and keywords so you can quickly show subsets of images. For example, if you want to see only the images in the Content panel that have a rating of five stars, just click the five-star listing in the Filter panel. The Filter panel is new in CS3 because it significantly expands on the filtering capabilities of CS2, where only a few filter options were available. The top of the Filter panel includes sort options and an extremely useful folder icon that can display the contents of all subfolders within the current folder.
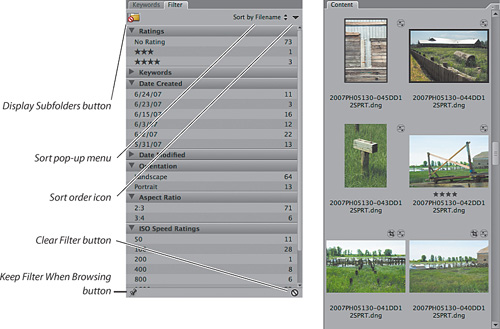
Tip
If you find yourself working through a list of images between Bridge and Photoshop, here’s a way to run the round-trip from the keyboard: In the Content panel in Bridge, press an arrow key to go to the next image, then press Enter or Return to open the image in Photoshop. When you’re done with that image in Photoshop, press Command-Option-W (Mac) or Ctrl-Alt-W (Windows) to close the image and return to Bridge in one keystroke. That’s the Photoshop shortcut for File > Close and Return to Bridge.
The Content panel. The Content panel (see Figure 5-69) displays the files you’ve selected using the Favorites, Folders, or Filter panel. It displays the listed content as thumbnail images, which you can adjust in size using the slider at the bottom of the window. Although Bridge in Photoshop CS3 is primarily used with photographs, Bridge can display any file type supported by the Adobe Creative Suite, such as PDF documents or InDesign documents, so the Content panel can be useful for quickly inspecting files on your hard disks. You can get around in the Content panel using the usual keyboard shortcuts—arrow keys and the Home, End, Page Up, and Page Down keys.
The Metadata panel. The Metadata panel (see Figure 5-70) displays the metadata associated with the currently selected image or images (see the sidebar “All About Metadata”). When you have more than one image selected, many of the fields will likely read “Multiple Values Exist.”
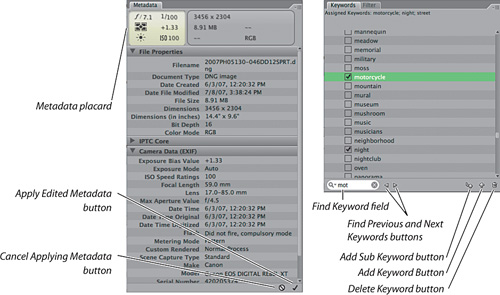
Metadata fields that are editable appear in the panel with a pencil icon next to the title. To edit these fields, select the images or images whose metadata you wish to edit, and then either click the pencil icon or click directly in the text area to enter the new metadata. To confirm entries, click the Apply check box at the panel’s lower-right corner, or press Enter (Mac) or Alt-Enter (Windows). The only IPTC field that isn’t editable here is the Keywords field. To edit keywords, you need to use the Keywords panel.
The Metadata panel’s menu lets you launch a search using the Find command (press Command-F in Mac OS X or Ctrl-F in Windows), which is replicated in Bridge’s Edit menu; increase or decrease the font size used in the panel; and append or replace metadata from saved templates, which appear in the menu. The Preferences command takes you directly to the Metadata panel of Bridge Preferences. It’s definitely worth taking the few minutes needed to decide which fields you want to display—very few Photoshop users need to see them all! There are several new metadata categories you can display (or hide) in Bridge CS3, including Audio, Video, and DICOM (medical) metadata.
The Metadata panel contains two separate sets of IPTC metadata. The older IIM (Information Interchange Model) set is there for compatibility with legacy images—it has been superseded by the new IPTC Core schema for XMP metadata. You can find out more about the IPTC standards at www.iptc.org.
The Keywords Panel. The Keywords panel (see Figure 5-70) lets you create keywords and apply them to a selected image or images. The keywords are written into the Keywords field of the IPTC metadata, so they’re visible in the Metadata panel—you just can’t edit or apply them there. Bridge CS3 contains important keyword enhancements, such as hierarchical keywords, and the ability to enter keywords by typing.
To create a keyword, click the New Keyword button at the bottom of the Keywords panel, type the keyword, and press Return or Enter.
To apply a keyword, turn on the check box to the left of the keyword. You can also start typing a keyword into the search field at the bottom of the Keywords panel; as you type, Bridge highlights matches in the keyword list. If the keyword you want is highlighted in green, press Return or Enter to apply that keyword. If the keyword you want is highlighted in yellow, it’s an alternate match that you must select manually, either by turning on its check box with the mouse or pressing the up arrow and down arrow keys to highlight the keyword in gray and then pressing Return or Enter. If nothing’s highlighted, the keyword doesn’t exist yet, so simply press Return or Enter to apply the keyword and add it to the list of keywords. You can also move among highlighted alternates by clicking the Find Previous Keyword and Find Next Keyword buttons at the bottom of the Keywords panel, next to the search field. Note that the search field in the Keywords panel doesn’t search for keywords in images, but in the keyword list.
Bridge CS3 2.1 supports hierarchical keywords, which replace the keyword sets in Bridge CS2. To create a sub-keyword (or child keyword), click the New Sub Keyword button at the bottom of the Keywords panel. A parent keyword appears with a triangle to the left of its name, which you can click to expand and collapse the list of its sub-keywords. It’s very important to understand that unlike Bridge CS2, clicking a parent keyword doesn’t apply all of the child keywords, and by default, clicking a sub-keyword doesn’t apply the parent keyword. If you want a parent keyword to be applied when you apply one of its child keywords, open Bridge Preferences, click the Metadata panel, and turn on the Automatically Apply Parent Keywords option (see Figure 5-74).
Bridge CS3 and Lightroom support hierarchical keywords, but as we write this, not many other programs do. If you send images to colleagues such as stock-photo agencies, who use other software, consult with them before using hierarchical keywords. You may be required to modify how your applications write those keywords into image metadata. In the Metadata panel of the Bridge Preferences dialog, the options Write Hierarchical Keywords and Read Hierarchical Keywords determine whether keywords are written to image metadata are written or read as a hierarchy or as a flat list of keywords. Both options let you customize the character Bridge uses to recognize keyword hierarchies when the character appears between keywords. Setting these options may become easier in the future if hierarchical keywords catch on and standards for handling them emerge.
Tip
You can temporarily reverse the behavior of the Metadata preference Automatically Apply Parent Keywords by Shift-clicking a sub-keyword’s check box. For example, if the preference is on, Shift-clicking a sub-keyword’s check box won’t apply the parent keyword.
The Preview panel. The Preview panel displays the selected image, always fitting the image to the size of the Preview panel. While you may be using the Preview panel primarily with photos, the Preview panel in Bridge CS3 lets you play back content such as audio, video, and Flash content, and you can turn pages in PDF files. The Preview panel is where you can display the loupe and compare multiple selected images at once, as we discussed in “Evaluating and Comparing,” earlier in this chapter.
The Inspector panel. The Inspector panel is only used with the Version Cue file management system, which is outside the scope of this book.
Bridge serves not only Photoshop, but the entire Creative Suite, so a good many of its menu commands aren’t relevant to a digital raw workflow. Moreover, many of the menu commands offer relatively inefficient ways to accomplish tasks that can be performed more easily by other means, so we’ll content ourselves with providing an overview of the menus, along with details about the commands we find particularly useful.
The Bridge menu, which is found only in the Mac version of Bridge, contains only one important command: Preferences (Command-K in Mac OS X or Ctrl-K in Windows). You can also open the Preferences dialog from the Camera Raw menu (see “The Camera Raw Menu” earlier in this chapter). In Windows, Preferences is on the Edit menu. The Preferences dialog contains six different panels.
General Preferences. The Appearance preferences (see Figure 5-71) let you customize the shade of gray for the overall user interface; the Image Backdrop actually affects the background color of the Content and Preview panels. You might have noticed that the screen shots for this book are set to a lighter gray than the default dark gray that Bridge ships with; that’s because Conrad (who made the screen shots) prefers more of a middle gray.
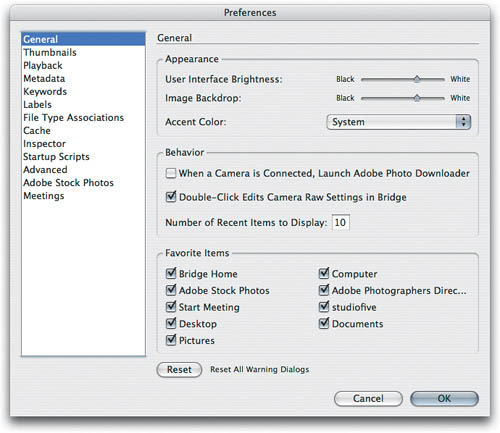
The Behavior preference affects how files open. If you turn off the Double-Click Edits Camera Raw Settings in Bridge option, double-clicking opens Camera Raw in Photoshop instead.
Favorite Items controls what’s displayed in the Favorites panel; turning off individual Favorite Items frees up space in the Favorites panel. The Reset button lets Bridge once again display all of the alert dialogs in which you’ve previously checked Don’t Show Again.
Thumbnails Preferences. The Performance and File Handling (see Figure 5-72) options let you trade off performance and quality. The default settings try to balance the two goals. For best performance, turn off Prefer Adobe Camera Raw for JPEG and TIFF files, select Quick Thumbnails, and lower the Do Not Process Files Larger Than value. For the most accurate Bridge thumbnails in Content view, turn on Prefer Adobe Camera Raw for JPEG and TIFF files, select High Quality Thumbnails, and raise the Do Not Process Files Larger Than value.

If Convert to High Quality When Previewed is selected, by default all thumbnails display a quick preview or a preview already embedded in the file; but when you select a file (causing it to appear in the Preview panel), Bridge takes the time to generate a high-quality preview. It’s a good balance between performance and quality, but it also means that you’ll see a mix of quick and high-quality thumbnails.
The Details options control how much information you see in the Content panel, and whether you want to see tool tips pop up in front of images as you mouse over them. The more lines of metadata you add, the fewer thumbnails you can display. However, you can toggle between displaying thumbnails with and without metadata by choosing View > Show Thumbnail Only, or pressing Command-Shift-T (Mac) or Ctrl-Shift-T (Windows).
Playback Preferences. The Playback preferences apply to audio and video files, but you may find them useful if you manage audio clips that accompany your photographs, if you use the movie mode on fixed-lens (point-and-shoot) cameras, or if you preview files to use with the Video Layers features in Photoshop CS3 Extended. Most are self-explanatory, but the Stack Playback Frame Rate deserves a description—it sets the playback frame rate for the Play button that appears in a stack when you create a stack of ten or more still images.
Metadata Preferences. The Metadata preferences (see Figure 5-73) let you specify which metadata fields are displayed on the Metadata panel. If you don’t have a GPS-enabled camera, for example, you may as well hide all the GPS fields. This panel also offers the Hide Empty Fields option, which can save space. The Show Metadata Placard option displays the section at the top of the Metadata panel that contains EXIF information (and resembles a camera LCD), and the section next to it that contains file properties. The Metadata placard duplicates information that is shown in the Camera Data EXIF and File Properties sections of the Metadata panel, but if you find the Metadata placard useful as a quick reference, you can leave the option on.
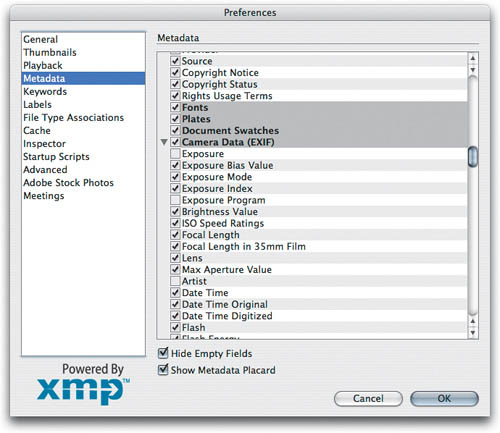
Keywords Preferences. We described these options (see Figure 5-74) in “The Keywords panel,” earlier in this chapter. In Bridge CS3, these preferences are exclusively concerned with handling hierarchical keywords.

Labels Preferences. These options let you associate text with label colors (you can’t change the colors) to something more useful than the color names (see Figure 5-75). The label text is searchable in Bridge, and can be displayed both in the Metadata panel and as an additional line of metadata accompanying the thumbnails if you choose that option in the General Preferences tab. If you change the label text in Preferences, images that have previously had labels applied lose the label color—it turns white—but the label text remains part of the image’s metadata.
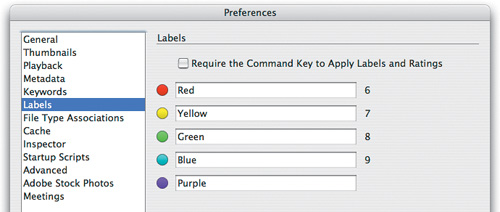
File Type Associations Preferences. These options let you specify the default application for opening files from Bridge. They apply only to the behavior you get when opening files from Bridge, and have no effect on OS-level behavior (see Figure 5-76).
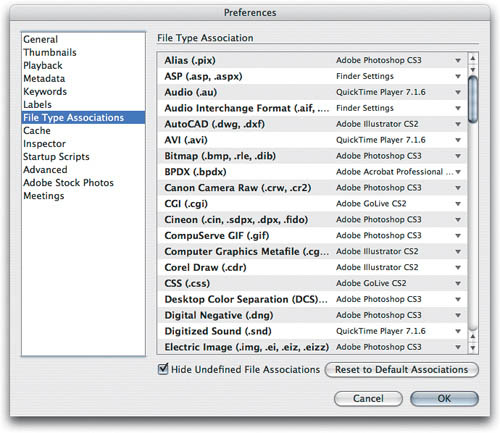
Cache Preferences. The Bridge cache holds the image thumbnails and previews, custom sort order, and—for file types that can’t store metadata either in the file itself or in a sidecar .xmp file—label and rating information. For raw files, only the thumbnails, previews, and custom sort order are stored uniquely in the Bridge cache, but since the thumbnails and previews take some time to generate, they’re pretty important.
You can let Bridge keep its cache only in a single, central location, determined by the Cache Location preference (see Figure 5-77) or you can have Bridge use decentralized caches, which are stored in each folder you browse with Bridge. The decentralized caches contain only the information about the items in that folder. Turn on the Automatically Export Caches to Folders When Possible check box to enable that option. The only advantage offered by using a centralized cache is simplicity—you know where all your cache files are. The significant disadvantages of the centralized cache are:
If you move or rename a folder outside Bridge, the connection to the cache files is lost.
When you burn a folder full of images to a CD or DVD, you first have to go through the extra step of exporting the cache. If you don’t, the recipient of the CD or DVD has to take the time to recache the folder, rebuilding thumbnails and previews, and any custom sort order is lost. By the way, the “When Possible” part of the Automatically Export Caches to Folders When Possible preference refers to the fact that you can’t create new cache files on a read-only volume, such as a DVD; cache updates can happen only in the Bridge centralized cache.
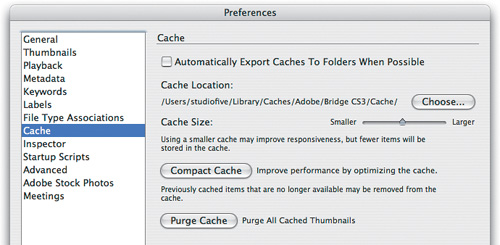
Using decentralized caches avoids both problems. The cache files are written directly into the folder to which they pertain, and travel with the folder even when it’s renamed or moved. But note that if Bridge for some reason can’t write a decentralized cache (the volume may be read-only, or mounted on a server) it writes to the central cache instead.
The only real downside to using decentralized caches is that every folder that Bridge has opened ends up with two additional files, named Adobe Bridge Cache.bc and Adobe Bridge Cache.bct. By default, Bridge hides these files, but the Mac OS X Finder does not. In Windows, it depends on whether you’ve set your Folder Options to display hidden and system files. If all this file management makes you squirrely, by all means, use the centralized cache; otherwise it’s well worth suffering the small inconvenience to obtain the benefits of decentralized caching. (And besides, it’s often useful to be able to see the cache files so that you can check that they’re present and up-to-date.)
For Cache Size, we recommend the default size or larger, unless you are running very low on disk space or have a small hard disk in a computer, such as a notebook. The Compact Cache button optimizes the cache, which can be good to do periodically. The Purge Cache button causes Bridge to rebuild thumbnails from scratch, which can help when thumbnails don’t seem to reflect the actual contents of files.
Inspector Preferences. You might find this panel blank if you aren’t using the Version Cue file-management system. This preference controls what displays in the Version Cue panel. Version Cue is outside the scope of this book.
Startup Scripts Preferences. Because one of the functions of Bridge is to be a central management application for the Creative Suite, it serves many masters, and the Startup Scripts panel (see Figure 5-78) is evidence of that. It lists all of the scripts that load various functions that you may or may not care about. Scripts that you may not care about still take time to load at startup, so if you want to lighten that load and speed up Bridge a little, turn off the check boxes for any functions you don’t anticipate using. You’ll probably want to leave on any check boxes having to do with Photoshop and Bridge.

Advanced Preferences. This panel contains preferences that don’t fit into the other categories (see Figure 5-79). Use Software Rendering bypasses your video card when it renders in Bridge; try working with this check box on if you believe your video card is having problems drawing content, particularly when using the loupe. The International preferences let you customize the user interface and keyboard input in case you want to set your operating system to one language but use Bridge in another.
Adobe Stock Photos and Meetings Preferences. The Adobe Stock Photos and Meetings Preferences only matter if you use these features. They’re online services that require accounts; we don’t cover them in this book.
The bulk of the commands on the File menu let you do things that are better accomplished via keyboard shortcuts—opening images, creating new windows, and so on.
In the case of raw images, the subtle difference between Open (Command-O in Mac OS X or Ctrl-O in Windows) and Open in Camera Raw (Command-R in Mac OS X or Ctrl-R in Windows) is that the former opens the raw image or images in Camera Raw hosted by Photoshop, while the latter opens the raw image or images in Camera Raw hosted by Bridge. There are several easier ways to open images than choosing the menu commands, including context menus and the aforementioned keyboard shortcuts, and the ones listed in Table 5-1.
Table 5-1. Keyboard shortcuts for opening raw images
To do this... | ...press this. |
|---|---|
Open raw images in Camera Raw hosted by Bridge, leaving Photoshop unaffected. | Command/Ctrl-R |
Open raw images in Camera Raw hosted by Photoshop, bringing Photoshop to the foreground and leaving Bridge visible in the background. | Command/Ctrl-O, Return/Enter, or Command/Ctrl-down arrow |
Open raw images in Camera Raw hosted by Photoshop, bringing Photoshop to the foreground and hiding Bridge. | Option-Return/Alt-Enter, or Command-Option-down arrow / Ctrl-Alt-down arrow |
Open raw images directly into Photoshop, bypassing the Camera Raw dialog, bringing Photoshop to the foreground and leaving Bridge visible in the background. | Shift-Return/Enter, or Command-Shift-down arrow / Ctrl-Shift-down arrow |
Open raw images directly into Photoshop, bypassing the Camera Raw dialog, bringing Photoshop to the foreground and hiding Bridge. | Option-Shift-Return / Alt-Shift-Enter, or Command-Option-Shift-down arrow / Ctrl-Alt-Shift-down arrow |
Three submenus on the File menu don’t have keyboard shortcuts but are sometimes useful: Copy To, Move To, and Place. Copy To and Move To are quick ways to copy or move selected files to folders on your Recent Folders list. Place sends selected files to the target application; the number of applications you see on the Place menu depend on how many compatible Creative Suite applications you’ve installed. If you have only Photoshop, that’s the only application you’ll see, and if you have the entire Creative Suite, you’ll see a number of applications on the Place menu. Applications that don’t directly open images, such as InDesign, require that you already have a document open in the target application before you can place a file from Bridge. When placing into Photoshop, if you have a document open in Photoshop, Bridge will place an image into that document, and if there is no document open, Photoshop simply opens the file.
Most of the other commands are self-explanatory. However, the File Info command, which opens the File Info panel (see Figure 5-80), deserves a closer look. While Bridge allows you to open File Info when multiple images are selected, it’s a relatively inefficient way to apply keywords and other metadata when compared to the Metadata and Keywords panels. Nevertheless, the File Info panel is still useful for taking image-specific keywords that we don’t want to save in a keyword set and adding them to small numbers of images, and for examining metadata in something close to raw form. For example, in File Info you can see exactly how the camera encodes things like shutter speed and aperture value, or the date and time a photo was shot, by looking in the Advanced panel of File Info under EXIF Properties. If you still want to create a metadata template in the File Info dialog, the metadata pop-up menu is still present under the round button at the top right corner of the File Info dialog, as it was in Photoshop CS2.
In Windows, the Edit menu hosts the Bridge Preferences command. It also hosts the usual Copy, Paste, Cut, and Duplicate commands, as well as the Rotate commands (whose functionality is replicated by the Rotate buttons in Bridge). The important commands for the raw workflow are the various Select commands, the Find command, and the Apply Camera Raw Settings command.
There are a few minor changes to the Edit menu in Bridge CS3. The Select commands for labeled files are gone (you can do that more directly in the new Filter panel), and the Apply Camera Raw Settings submenu is now labeled Develop Settings.
Select commands. The Select commands offer quick ways to manipulate selections. Select All (Command-A in Mac OS X or Ctrl-A in Windows), Deselect All (just add the Shift key to the Select All shortcut) and Invert Selection (Command-Shift-I in Mac OS X or Ctrl-Shift-A in Windows) do exactly what they say—Invert Selection deselects the files that were selected and selects those that weren’t. The two remaining commands, Select Labeled (Command-Option-L in Mac OS X or Ctrl-Shift-L in Windows) and Select Unlabeled (Command-Option-Shift-L in Mac OS X or Ctrl-Alt-Shift-L in Windows), work in conjunction with the Label feature in Bridge, which lets you apply one of five labels, or no label, to images. See “Rating, Labeling, and the Label Menu,” later in this chapter.
Find command. The Find command lets you perform searches using a wide range of search criteria (see Figure 5-81), including a handy selection of metadata fields which are new in Bridge CS3, such as ISO (speed).
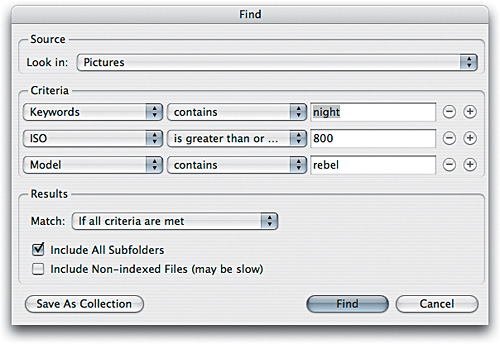
In addition to the criteria, the Find dialog has the following important features:
The Match menu lets you choose whether to find files if any criterion is met (equivalent to an “or” between the criteria), or to find files only if all criteria are met (equivalent to an “and” between the criteria).
Include All Subfolders does what it says—it extends the search to include any subfolders in the folder specified in the Look In menu.
Tip
The CS2 feature Show Find Results In New Browser Window option is not present in Bridge CS3, but you can create a new window before searching. If you don’t create a new window, you can easily return to the previous view by clicking the Back button. Search results also appear in the Recent Folders menu, so you can always pull those up again too.
Include Non-Indexed Files looks at files that have not yet been added to the Bridge cache. Turning this option on may add time to the search, because non-indexed files need to be indexed.
Save As Collection. When you perform a search, you have the option to save the search criteria as a Collection. When you click the Save As Collection button, you can save the search results in any folder you want, and optionally add it to your Bridge Favorites.
When you open a collection, the saved search runs and the current results appear (see Figure 5-82). To refine the search, click Search Again and the Find dialog appears so you can edit the criteria.

Develop Settings. The Develop Settings submenu lets you apply Camera Raw Defaults or Previous Conversion (the last-used Camera Raw settings) to selected images. It also lets you copy settings from an image and apply them to others by pasting, or clear existing settings from an image. Finally, it lets you apply any saved settings that you’ve saved in the Settings folder for Camera Raw (see “Loading and Saving Settings” earlier in this chapter).
The difference between applying Camera Raw defaults and clearing Camera Raw settings is rather subtle. The effect on the image is identical in both cases, but Bridge offers a useful piece of feedback that shows whether or not an image has settings applied to it (see Figure 5-83). When you apply Camera Raw defaults, Bridge treats the image as having settings applied; when you clear the settings, Bridge treats the image as having no settings applied.

The Copy Camera Raw Settings command (Command-Option-C in Mac OS X, or Ctrl-Alt-C in Windows) copies all the Camera Raw settings from the selected image. When you choose Paste Camera Raw Settings (Command-Option-V in Mac OS X, or Ctrl-Alt-V in Windows), the dialog shown in Figure 5-84 appears, giving you the opportunity to choose all the settings, choose any individual parameter, or choose everything in between and apply your choices to the image or images to which you’re pasting the settings.
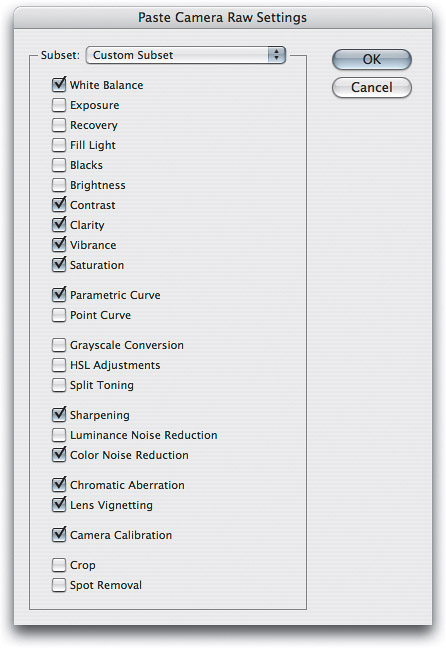
Pasting Camera Raw Settings to multiple images offers an alternative to working directly in Camera Raw in filmstrip mode.
The commands on the View menu offer a variety of controls over the way Bridge displays both its windows and their contents. In the former category, several of the commands replicate the functionality of the control buttons in Bridge’s windows—Compact Mode, As Thumbnails, As Filmstrip, As Details, and As Versions and Alternates (the last is relevant for Version Cue users only). Others show and hide the individual panels—Favorites, Folders, Preview, Metadata, and Keywords.
Slideshow and Slideshow Options. The Slideshow command offers an alternative to Bridge’s light table metaphor by presenting selected images as a slideshow; you can also enter the slideshow by pressing Command-L (Mac) or Ctrl-L (Windows). While you’re in the slideshow, you can rate, rotate, and zoom the image while enjoying the benefits of a large image preview. Press H (with no modifier) to display all the keyboard shortcuts that apply in the slideshow (see Figure 5-85).
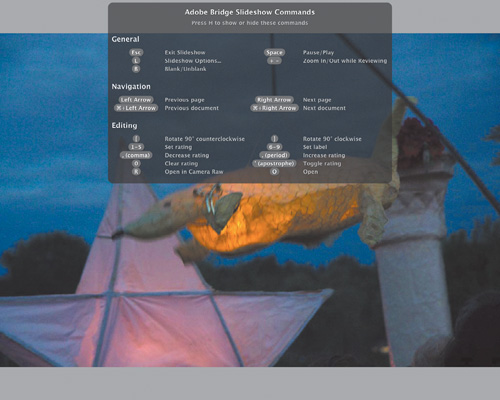
Tip
To zoom in the slideshow, press the − or + key. To toggle between the current view and 100 percent (Actual Pixels) magnification, click the image. At magnifications above 100 percent, drag to pan the image.
The Slideshow Options command lets you adjust how the slideshow displays, such as how the image fits on screen and whether to display its caption. It’s easier to use the Slideshow Options dialog (see Figure 5-86) while the slideshow is running (in the slideshow, press L) because you will see the effects of your changes interactively.
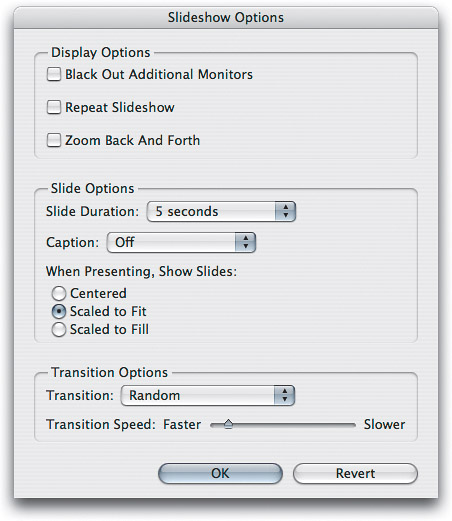
Sort. You can sort the contents of the Bridge window based on the file properties listed in the Sort submenu. Or, if you sort images into a custom order by dragging their thumbnails around, you’ll see a check mark next to the Manually item. Choosing Manually from the submenu has no effect unless you’ve previously sorted your images manually, in which case it switches to the last manual sort order you used. If you like to keep the Filter panel open, you may find that the Sort menu at the top of the Filter panel is more accessible.
Tip
The commands for showing and hiding panels that were under the View menu in Bridge CS2 have moved to the Window menu in Bridge CS3.
Show Thumbnail Only. The Show Thumbnail Only command suppresses the display of the filenames and any other optional metadata displayed under the thumbnails in the Content panel only (see Figure 5-87). Press Command-T (Mac) or Ctrl-T (Windows) to toggle the metadata display.

Content filtering commands. These commands control the types of content Bridge displays in its windows. There used to be more of these commands under the View menu in Bridge CS2, but in CS3, Adobe sensibly moved most of them over to the new Filter panel, leaving only three here.
Show Hidden Files displays sidecar .xmp files and Bridge cache files, as well as files that are normally hidden by the operating system, in its windows and in the Content panel. By default, it’s turned off.
Show Folders toggles the display of folders in the Content pane. By default, it’s turned on. The only time you might want to turn this off is if you are trying to concentrate on the images in a folder and you don’t want to be distracted by folders that are also stored there.
Sort. Content panel sorting options are in this menu. If the content doesn’t seem to be sorting the way you think it should, check this menu. The Manually command is turned on if you rearranged content by dragging it around in the Content panel.
Refresh. Does what it says. We don’t use it often, although it can come in handy if you suspect that the Content pane isn’t showing the current state of a folder. If refreshing doesn’t improve matters, think about purging that folder’s cache (Tools > Cache > Purge Cache For Folder).
Stacks are a new feature in Bridge CS3. You can use stacks to simplify the Content panel view by grouping similar images (see Figure 5-88). For example, if you bracket the exposure of a scene, you can keep all of the bracketed frames in one stack by selecting the images and choosing Stack > Group As Stack or press Command-G (Mac) or Ctrl-G (Windows). When a stack is selected, you can expand or collapse it by clicking the number in the top left corner of the stack that tells you how many files are in the stack. If you want a particular image to be at the top of a stack, open the stack, select an image, and choose Stack > Promote to Top of Stack.
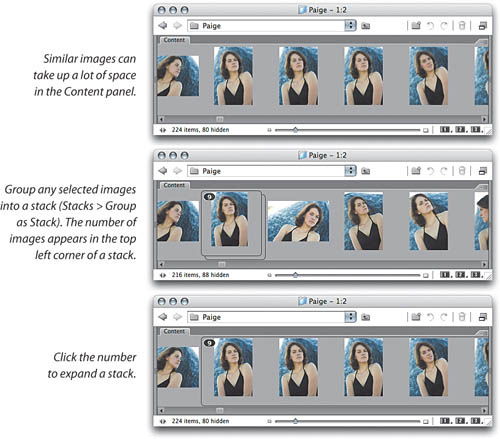
Bridge stacks are not to be confused with Image Stacks in Photoshop CS3 Extended (see “Reducing Noise in Image Stacks” in Chapter 10, “Sharpness, Detail, and Noise Reduction”).
The Label menu offers a not-very-efficient alternative to the keyboard shortcuts for applying labels or ratings to your images. The only things you can do from this menu that you can’t do with keyboard shortcuts are to remove a label and to apply the fifth label, which by default is called Purple (though you can change its name in Bridge’s Preferences; see “Labels Preferences,” earlier in this chapter).
Labels and ratings are entirely separate. Labels apply the selected label color to the image thumbnail’s label area and write the label text into the image’s metadata (in the Label field under File Properties). Ratings apply zero to five stars to the image thumbnail’s rating area, and write the rating (from one to five) into the image’s metadata (in the Rating field under File Properties).
Tip
To work more efficiently in Camera Raw, apply a label to images you want to process together in Bridge (you can apply a label with a single-key shortcut). Then filter the view to show each labeled group.
You can search images by label and by rating and sort images by label or by rating. Perhaps most usefully, you can use the Filter panel to specify which images are displayed in the Bridge window based on label, on rating, or both.
Labels and ratings are simply arbitrary flags that you can apply to images. It’s entirely up to you to decide what they mean. For some suggestions on how to use these features, see “Rating and Labeling” earlier in this chapter.
Applying labels and ratings. By far the easiest way to apply labels or ratings is to use the keyboard shortcuts (most of which also work in Camera Raw). Look on the Label menu to see the keyboard shortcuts for each label and rating. Inside Camera Raw, the purple label can be toggled using Command-Shift-0 (Mac) or Ctrl-Shift-0 (Windows). A slower but sometimes convenient alternative is to click and drag in the rating area of the thumbnail—dragging to the right increases the rating, and dragging to the left reduces it. Last but not least, Command-’ (apostrophe), toggles one star on or off. New in Bridge CS3 and Camera Raw 4 is the Reject rating.
Tip
The Reject rating is a good safety valve. Instead of trashing unwanted images right away, mark them with the Reject rating. When you’re ready to trim down the number of images, set the Filter panel to show only rejects, review them carefully to make sure you aren’t going to delete something you want to keep, and then trash them all at once.
The Tools menu provides access to several useful Photoshop-hosted automation features as well as the Batch Rename feature, allows you to manipulate Bridge’s cache files, and provides an alternative means of applying metadata templates if you don’t want to use the Metadata panel menu.
Batch Rename. In the Batch Rename dialog (see Figure 5-89), you can rename selected files and their filename extensions. Files are renamed in the order they appear in the Content panel, which means you can change the numbering sequence by manually reordering files before you batch-rename them.

Tip
The Preserve Current Filename in XMP Metadata option gives you your only opportunity to undo a batch rename. Choose File > Batch Rename again, but this time, set just one New Filenames option, and set it to Preserved Filename.
The Preserve Current Filename in XMP Metadata option actually adds a custom metadata tag containing the current filename. If you’ve already applied Camera Raw settings before renaming, you can skip this option because the Camera Raw settings metadata already contains the original filename. But if you’re renaming otherwise-untouched raw files and you want the original filename to be retrievable, it’s a good idea to turn on this option.
Metadata Template commands. In Photoshop CS2, the only place to create and manage metadata templates was in the File Info dialog in either Bridge or Photoshop. In Photoshop CS3, Adobe wisely added a section to the Tools menu where you can more easily create, apply, and edit metadata templates. To use these commands, see “Using Metadata Templates” earlier in this chapter.
Cache commands. The Tools menu contains two commands for managing the Bridge cache. Use the Build And Export Cache command to create a cache for the current folder and subfolders and store the cache in the current folder. Use this command to build a folder cache in advance, so that you can have optimal performance while working with the images in that folder. Use the Purge Cache for Folder command to delete and rebuild the cache for a folder if you suspect that the cache is having problems representing the contents of the folder. When you purge a cache, attributes stored only in the cache may be deleted, such as the folder’s sort order; metadata stored inside individual files should not be affected.
Photoshop submenu. The Photoshop submenu (see Figure 5-90) provides access to several useful features that also appear on the File > Automate menu in Photoshop. If you have any Photoshop actions that you’d like to run on multiple files selected in Bridge, this is the place to do it. To run any of these automations using images selected in Bridge as the source, you must launch them from the Tools menu—if you try to launch them from the File > Automate submenu in Photoshop, you’ll find that Bridge is either grayed out or simply unavailable as the source.

To invoke any of the Automate features from Bridge, use the Content panel to select the images you want processed through the automation, then choose that automation from the Tools > Photoshop submenu. Photoshop then goes to work, opening the images using the Camera Raw settings you’ve applied, or the camera-specific default settings (if you haven’t applied settings to the image), then processing them using the settings you’ve specified for the automation. You can keep working in Bridge while Photoshop is processing the images. In Photoshop CS2, if you started automation from Bridge while Photoshop was busy with a previous automation, the second wouldn’t start, but Photoshop CS3 can now queue automations, moving on to the next one after the previous one finishes.
Photoshop Services menu. Photoshop Services are online services that support Photoshop. For example, you can select images in Bridge and use Photoshop Services to print, store, sell, or back up your images. These services are generally provided by companies other than Adobe.
The Window menu in Bridge CS3 is considerably longer than it was in Bridge CS2. As in Bridge CS2, the Window menu contains some of the standard operating system commands such as Minimize and Bring All To Front (Mac). It also contains the Workspace submenu and the Download Status command; you’ll use Download Status only if you’re downloading content from an online service such as Adobe Stock Photos. Bridge CS3 also adds a list of open windows to the bottom of the Window menu, a glaring omission from Bridge CS2 that we’re very happy to see in CS3.
While the Window > Workspace submenu is useful for managing workspaces, as with any submenu, it’s a hassle to guide the mouse two levels deep into a menu. We think you’ll prefer to control workspaces from the workspace buttons at the bottom left corner of a Full Mode window in Bridge (see Figure 5-91).

The only command that lives only in the Window > Workspace submenu is the Reset To Default Workspace command. Bridge CS3 adds the Default, Horizontal Filmstrip (see Figure 5-92), and Vertical Filmstrip to the list of built-in workspaces on the Workspace menu.

Bridge windows are eminently configurable. You can dock the panels as you wish by dragging their tabs to other panels, resize them by dragging their borders, and remove panels you don’t need using the View menu commands. You can’t drag a panel to another Bridge window, however.
Tip
You can apply a workspace by pressing Command (Mac) or Control (Windows) and a function key; refer to the shortcuts on the Window > Workspace submenu. In Mac OS X, the VoiceOver system shortcut (Command-F5) conflicts with the Bridge shortcut for the Horizontal Filmstrip workspace, but you can redefine or turn off that shortcut in the Keyboard Shortcuts tab of the Keyboard & Mouse system preferences.
Whenever you create a panel arrangement you like, save it as a workspace. To do this, configure a window the way you want the workspace to appear, then choose Save Workspace from the Workspace submenu, or from the menu that appears when you click and hold one of the three numbered workspace buttons at the bottom right corner of a Bridge window. Specify options (see Figure 5-93), and then click Save. Turn on the Save Window Location As Part Of Workspace option if you always want the window to appear in the same place (very useful on dual-monitor setups). Your saved workspace is then added to the Workspace menu.

We highly recommend that you select three of your favorite workspaces for the three workspace buttons at the bottom right of a Bridge window, so that all you have to do to apply one of those three workspaces is to click on the button.
Tip
The default workspace uses three columns of panels. You can adjust panel widths or hide panels by dragging the dividers.
For those of you who have to know where everything gets saved, workspaces are stored in UsersUserNameLibraryApplication SupportAdobeBridgeWorkspaces on Mac the and in Documents and SettingsUsernameApplication DataAdobeBridgeWorkspaces in Windows.