The biggest speed boost you can give to Photoshop is to accelerate your own productivity. If you get paid by the hour, rather than by the amount of work accomplished, you may want to skip this chapter. If you want to realize the full potential of Photoshop as a lean, mean, pixel-processing machine, read on! We’ll break you of the habit of choosing tools by clicking on their icons, and help you avoid those lengthy mouse voyages up to the menu bar.
As applications pile on the palettes and options, screen space remains a premium even as monitor sizes grow. Space is an even bigger challenge if you need to manage multiple windows. Use these tips to shuffle and stack windows as expertly as a Las Vegas casino dealer.
Screen modes. Click and hold the Screen Mode icon at the bottom of the Tools palette to see four screen modes. We like to cycle through the modes by pressing F. You can also pick a screen mode from the Screen Mode submenu (under the View menu), but the other ways are so much more convenient that you’ll probably go to the View menu only if you’re recording an action that plays back a screen mode change.
In addition to the Standard Screen Mode (regular windows), Full Screen Mode (black background with no menu bar) and Full Screen Mode with Menu Bar (gray background), Photoshop CS3 adds a new Maximized Screen Mode (see Figure 6-1)—a middle ground between Standard Screen Mode and the two full screen modes. As you show and hide palettes, Maximized resizes the document workspace so that it always stays out of the way of the open palettes. Maximized Screen Mode may throw off veteran Mac Photoshop users, because it is unlike either the Standard or Full Screen modes that existed in previous versions. Think of Maximized as Full Screen Mode with scroll bars. Maximized is actually welcomed by many who’ve switched from Windows to the Mac, because Maximized is a standard feature in Windows. We like to work in Full Screen mode instead of wasting space on title bars, scroll bars, and the like.

Note
In Photoshop CS2, each document window could have its own screen mode. In Photoshop CS3, changing the screen mode affects all document windows.
Changing the surrounding color. All modes surround the document with gray except for Full Screen mode, which is black. To change this, Control-click (Mac) or right-click (Windows) the surrounding area and choose an option from the context menu that appears. You can also change the surrounding color by Shift-clicking the Paint Bucket tool, but frankly, that’s more work because we can never remember where the Paint Bucket is hiding in the Tools palette. (Psst... it’s under the Gradient tool.)
Tip
If you used Photoshop CS2, you may be wondering how to show and hide the menu bar. The old Shift-F shortcut in CS2 no longer works in Photoshop CS3. Instead, switch to Full Screen Mode with or without the menu bar, and change the surrounding color if needed.
Full Screen scroll. Just because your image is in Full Screen mode doesn’t mean you can’t scroll around: Just hold down the spacebar (to get the Hand tool) and drag. In the Full Screen mode, you can use the Hand tool to slide past the edge of the image into the gray or black area, no matter how far you’re zoomed in; going past the edge is something scroll bars can’t do (see Figure 6-2). Scrolling past the image edge is useful when you’re cropping or retouching close to the edge of an image, and it’s a big reason Conrad prefers the Full Screen mode over the Maximized mode.
Tip
If a document opens at too low of a magnification, try closing palettes. Photoshop wants to show you the whole document when you first open one, and there’s less space to show everything when more palettes occupy the workspace.
Tidy up your windows. When you have multiple document windows open, Photoshop will neatly arrange them on your screen if you choose Tile Horizontally, Tile Vertically, or Cascade from the Arrange submenu (under the Window menu). The Tile commands display windows side-by-side, while Cascade stacks the windows with a slight offset.
Flip through the windows. We often find ourselves in Photoshop with five or more windows open at a time—a frustrating situation when we need to move through them all quickly. You can press Control-Tab to switch from one open document to the next. (In this case, it’s the Control key on both Mac and Windows.) This way, you can rotate through the windows without taking your hands off the keyboard, even if you’re in Full Screen mode with no menus.
Two windows on the same document. Are you often jumping back and forth between two views? For example, between different magnifications, color modes, or preview modes? If so, consider opening a second window by selecting New Window from the Arrange submenu (under the Window menu). Whenever you change something in one window, Photoshop updates the other window almost immediately.
From window to folder. To open another image in the same folder as a document currently open in Photoshop in Mac OS X, Command-click on the title in the document window’s title bar and select the folder from the pop-up menu that appears. This tells Photoshop to switch to the desktop and open that folder. In Windows, you can see a document’s folder path by holding the cursor over a document’s title bar until a tool tip appears.
In this section, we first explore some of the fastest ways to move around your image, including zooming in and out. Then we discuss moving pixels around both within your document and from one document to another. It’s funny, but we find that even expert users forget or never learn this basic stuff, so we urge you to read this section even if you think you already know all there is to know about navigating Photoshop.
Images have pixels. Computer monitors have pixels. But how does one type of pixel relate to the other type of pixel? When one image pixel is displayed on one monitor pixel, you’re seeing every detail of the image. In Photoshop, this happens at 100 percent magnification, or the Actual Pixels command under the View menu. This view doesn’t necessarily tell you how big the image will appear in print or even on the Web, because different monitors have different resolutions.
At 400 percent, the image is magnified four times, so each image pixel is displayed using 16 monitor pixels (see Figure 6-3). At 50 percent, you’re seeing only one-quarter of the pixels in the image, because zooming out causes Photoshop to downsample four image pixels to one monitor pixel. At any percentage other than 100, you’re not seeing a fully accurate view of your image, because you aren’t seeing the exact number of pixels in the image.

When you’re viewing at an integral multiple of 100 (25, 50, 200, 400 percent, and so on), Photoshop displays image pixels evenly. At 200 percent, four screen pixels (two horizontal, two vertical) equal one image pixel; at 50 percent, four image pixels equal one screen pixel, and so on. However, when you’re at any “odd” percentage, the program has to jimmy the display in order to make things work. Photoshop can’t cut a screen pixel or an image pixel in half, so instead it fakes the effect using anti-aliasing. Magnifications lower than 100 percent can give you a distorted view of resolution-dependent effects, such as sharpening.
The moral of the story is that you should always return to the Actual Pixels (100 percent) view to get the most accurate view of your image. You’ll be doing this all the time, so learn the shortcuts: Command-Option-0 (zero) (Mac) or Ctrl-Alt-0 (Windows), or double-click the Zoom tool in the Tools palette.
Don’t select the zoom tool. We never select the Zoom tool from the Tool palette because it takes too long. You can temporarily switch to the Zoom tool by holding down Command-spacebar to zoom in or Command-Option-spacebar to zoom out (Mac), or Ctrl-spacebar to zoom in or Ctrl-Alt-spacebar to zoom out (Windows). Each click is the same as choosing Zoom In or Zoom Out from the View menu.
Drag to zoom. When you drag a rectangle using the Zoom tool, the area you drag magnifies to fill the window.
Zoom with keyboard shortcuts. If you just want to change the overall magnification of an image, zoom in and out by pressing Command-+ (plus sign) or Command-− (minus sign) in Mac OS X, or by pressing Ctrl-+ (plus sign) or Ctrl-− (minus sign) in Windows. When zooming, the window won’t extend under the edges of palettes; if you want this to happen, use one of the Full Screen modes. In Mac OS X, adding the Option key to this mix tells Photoshop to zoom in or out without changing the size of the window. For some reason, it’s just the opposite in Windows: The Ctrl key zooms without resizing, and holding down Ctrl and Alt zooms and resizes. In any case, if you want the opposite behavior to be the default, disable the Zoom Resizes Windows check box in the General Preferences dialog.
Zoom with the scroll wheel. If your mouse has a scroll wheel, you can use it to scroll or zoom. By default, it’s set to scroll, and pressing Option (Mac) or Alt (Windows) makes the scroll wheel zoom instead. To reverse this behavior, check Zoom with Scroll Wheel in General Preferences.
Fit image within screen. Double-clicking on the Hand tool is the same as clicking Fit Screen in the Options bar when the Zoom tool or Hand tool is selected, or pressing Command-0 (zero) (Mac) or Ctrl-0 (Windows)—it makes the image and the document window as large as it can without going outside the screen’s boundaries. The image may not zoom to the full width or height of the monitor if palettes are present.
Zoom field in the document window. At the bottom left corner of the window, Photoshop displays the current magnification percentage. This isn’t only a display; you can change it. Double-click to select the whole field, type the zoom percentage you want, then press Return or Enter. If you’re not sure what percentage you want, press Shift-Return instead of Return and the field will remain selected so you can enter a different value (see Figure 6-4).

Using Print Size magnification. Generations of Photoshop users have been baffled by the View > Print Size command, mostly because when you choose it, it never matches the size of the image when you actually print it! Well, never say never; there is a way to make it work. The only way the Print Size command can know the actual print size is to know the resolution of your monitor, so that the rulers become accurate. To make Print Size work right, do the following:
Open the Displays system preference (Mac) or the Displays control panel (Windows), and note your monitor’s current resolution setting (for example, 1280 × 854 pixels).
Grab an actual, real-world ruler and measure the width of your monitor image (not the frame in inches). Be careful not to scratch your screen!
Divide the horizontal pixel dimension of your monitor by the horizontal real-world dimension of your monitor. For example, my wide-screen LCD monitor is set to 1680 pixels across a physical width of 17 inches, and 1680/17 = 98.8 pixels per inch.
Open the Preferences dialog, click the Units and Rulers pane, and enter your pixels per inch value into the Screen Resolution field (see Figure 6-5).

Now when you choose View > Print Size, Photoshop can take into account both your screen resolution and the resolution of the image in the Image > Image Size dialog, and correctly display the printed size of the image. Another wonderful result of all this is that your rulers now match the real world at Print Size magnification. If the rulers don’t match exactly, adjust the Screen Resolution field slightly until they do.
If you’re like most Photoshop users, you find yourself moving around the image a lot. Do a little here . . . do a little there . . . and so on. But when you’re doing this kind of navigation, you should rarely use the scroll bars. There are much better ways.
Tip
To use the Zoom or Hand tool on every open image window at the same time, hold down the Shift key as you click the Zoom tool or drag the Hand tool.
Use the Hand. The best way to make a small move around your image is to select the Hand tool with your keyboard (by pressing the spacebar) instead of choosing it from the Tool palette. Then just click-and-drag to where you want to go.
End Up Down Home. Many people ignore the very helpful Page Up, Page Down, Home, and End keys when working in Photoshop, but we find them invaluable for perusing an image for dust or scratches.
When you press Page Up or Page Down, Photoshop scrolls the image by one whole window of pixels up or down. While there’s no Page Left or Page Right button, you can jump one window of pixels to the left or right by pressing Command-Page Up or Command-Page Down in Mac OS X, or Ctrl-Page Up or Control-Page Down in Windows. You can scroll in 10-pixel increments by adding the Shift key to any of the shortcuts above.
Also note that pressing the Home button jumps you to the top left corner, and the End button jumps you to the bottom right corner of the document. David often uses this technique when using the Crop tool to quickly adjust the top left and bottom right corners.
If you’re on a laptop, these keys may be overlaid with the arrow keys. For example, on a Mac laptop, the Up Arrow key also has Page Up printed on it. To use the Page Up function of that key, add the Fn key at the bottom left corner of the keyboard, so that you press Fn-Up Arrow to get Page Up.
Match up your windows. When you’re working on multiple images at the same time, it’s often helpful to sync up their views. Several commands on the Arrange submenu (under the Window menu) automate this process. The Match Zoom feature sets the magnification percentage for every open image to the zoom level of the current document. Match Location leaves the magnification alone but scrolls each document window to the same part of the image as the current file. For instance, if the current file displays the lower-right corner, then all the images will scroll to the lower-right corner. (Unfortunately, Match Location is only approximate; it won’t match to the exact pixel.) The one we use most often is Match Zoom and Location. You can guess what it does.
Context-sensitive menus. When you Control-click (Mac) or right-click (Windows), Photoshop displays a context-sensitive menu that changes depending on what tool you have selected in the Tool palette; it’s worth trying out with any tool you use (see Figure 6-6).
For brush or retouching tools, the context menu is a quick way to adjust the brush. The context-sensitive menu for the Move tool lets you select a layer. If you have four layers in an image and three of them overlap in one particular area, you can Control-click (or right-click) on that area and Photoshop asks you which of the three layers you want to jump to. If the Move tool isn’t selected, you can almost always get the Move tool’s context menu by Command-Control-clicking in Mac OS X, or Ctrl-right-clicking in Windows.
The context-sensitive menu for the Marquee tool contains a mishmash of features, including Delete Layer, Duplicate Layer, Load Selection, Reselect, Color Range, and Group into New Smart Object (we have no idea why Adobe picked these and left others out). Many of these features don’t have keyboard shortcuts, so this menu is the fastest way to perform them.
You can use the Navigator palette as command central for all scrolling and zooming (see Figure 6-7). However, we rarely use this palette because we zoom much faster with the keyboard shortcuts, but if you get along with the Navigator palette, don’t let us stop you from using it.
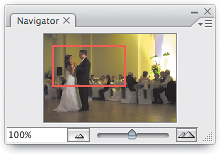
A thumbnail of the image fills most of the palette, with a red frame marking the contents of the active window. (If your image has a lot of red in it, you might want to change the frame color by choosing Palette Options from the Palette menu). Dragging the outline pans the contents of the active window. Command-dragging (Mac) or Ctrl-dragging (Windows) lets you define a new outline, thereby changing the zoom percentage.
The percentage field at the lower left of the palette works exactly like the one at the lower left of the image window. You can click the Zoom In and Zoom Out buttons instead of using the keyboard shortcuts for zooming. David’s favorite feature in this palette is the magnification slider, which lets him change the zoom level dynamically, but you can also do that by scrolling a mouse wheel while pressing Option (Mac) or Alt (Windows).
Before we talk about moving things around, it’s useful to understand that in Photoshop, multiple types of moves can be available at any one time. For instance, if you’ve selected an area on a layer, at that moment you can move the selection boundary or the selected pixels, and the way you want to go dictates which tool or keyboard shortcut you use.
If you simply make a selection and then drag it with one of the selection tools, you move the selection boundary but not the selected pixels. If you want to move the pixels, use the Move tool (press M). No matter what tool is selected, you can always temporarily get the Move tool by holding down the Command (Mac) or Ctrl (Windows) key.
When you move or copy selected pixels with the Move tool, you get a floating selection, which is like a temporary layer that disappears when you deselect. While the selection is still floating, you can use the Fade command (in the Edit menu) to change its opacity or blend mode.
With the Move tool, you don’t have to worry about positioning the cursor first—just drag anywhere within the document window. This is a great speedup, especially when you’re working with heavily feathered selections. Also, if you want to move an entire layer and the layer is already selected in the Layers palette, you can use the Move tool to drag the entire layer right away, without using a selection tool or the command first.
Our selection tips don’t apply only to selected pixels. They’ll also work on objects like a selected path, or on the currently selected layer or layer mask in the Layers palette. Most of the tips also work on the selection boundary itself if you choose Edit > Transform Selection first.
Moving precisely. If it’s hard to keep your hand steady when working precisely, try the arrow keys and the Options bar instead of the mouse.
With the Move tool selected, each press of an arrow key moves the layer or selection by one pixel. If you add the Shift key, the selection moves 10 pixels. Modifier keys work, too: Hold down the Option key (Mac) or Alt key (Windows) when you first press an arrow key, and the selection is duplicated, floated, and moved one pixel (don’t keep holding down the Option/Alt key after that, unless you want a lot of duplicates). Remember that you can always get the Move tool temporarily by adding the Command key (Mac) or Ctrl key (Windows) to any of these shortcuts.
To move an object or layer precisely by entering X and Y coordinates, first choose Edit > Free Transform. (If you’re moving the selection boundary, choose Select > Transform Selection instead.) Then enter new X and Y coordinates in the Options bar.
Moving multiple layers. Layers are great, but you often can’t do the same thing to more than one layer at the same time. Fortunately, moving layers is easy: Simply select more than one layer in the Layers palette. If you’ve ever selected multiple files in a folder on your desktop, it’s the same thing in the Layers palette: Shift-select the first and last layers; to select a discontiguous range, Command-click (Mac) or Ctrl-click (Windows) each layer you want to add to the selection.
Copying pixels. If you select pixels and choose Edit > Copy, you only get the pixels on the currently active layer(s) (the one(s) selected on the Layers palette). To copy selected pixels across all visible layers, select Copy Merged instead (Command-Shift-C in Mac OS X, Ctrl-Shift-C in Windows).
Some people use this technique to make a merged copy of the entire image (not just a selection). It works, but remember that when you can achieve the same result using the clipboard and using layers, layers are usually faster and use less RAM. The fastest and most efficient way to merge all layers into a new document is to choose Layer > Duplicate Layers, and choose New from the Destination pop-up menu to merge all layers and send them to a new document in one step.
Tip
Making a selection and using the Paste Into command (or the Paste Outside feature that you get by adding the Shift key) lets you create both a layer and a layer mask in one step.
Pasting pixels. In the most common color modes, such as RGB and CMYK, pasting pixels into a document automatically creates a new layer. When a selection is active, you’ll also see the Edit > Paste Into command (Command-Shift-V in Mac OS X, or Ctrl-Shift-V in Windows), which adds a new layer with a layer mask based on the selection so that the pixels you’re pasting appear only inside the selection. If you add the Shift key to the Paste Into keyboard shortcut, the pixels you’re pasting appear only outside the selection, because adding Shift inverts the layer mask that’s created.
Drag and Drop Selections and Layers. To move selected pixels (or a layer) from one document to another, drag it from one window into the other (if you’ve got a selection, remember to use the Move tool, or else you’ll just move the selection boundary itself). Again, dragging requires less memory than copying and pasting. If you’re trying to copy an entire layer, you can also just click its thumbnail in the Layers palette and drag it to the other document’s window. Either way, if you want to drop the selection smack in the exact center of the destination document, Shift-drag instead.
Moving pixels is all very well and good, but where are you going to move them? If you need to place pixels with precision, you should use the ruler, guides, grids, and alignment features. The ruler is the simplest: you can hide or show it by pressing Command-R (Mac) or Ctrl-R (Windows). Wherever you move your cursor, you can track the cursor position using the tick marks appear in the rulers (or the coordinates on the Info palette).
Guides. You can add a guide to a page by dragging it out from either the horizontal or vertical ruler. Or, if you care about specific placement, you can watch the ruler tick marks or the Info palette coordinates, or select View > New Guide so you can type in a numerical position. (If you don’t think in inches, you can change the default measurement system; see “Switch Units,” later in this chapter.) Table 6-1 lists a number of grids and guides keystrokes that can help you use these features effortlessly.
Table 6-1. Grids and guides keystrokes
To do this . . . | Press this . . . |
|---|---|
Hide/Show Extras (grids, guides, etc.) | Command-H (Mac) Ctrl-H (Windows) |
Hide/Show Guides | Command-’ (apostrophe) (Mac) Ctrl-’ (Windows) |
Hide/Show Grid | Command-Option-’ (Mac) Ctrl-Alt-’ (Windows) |
Snap To Guides | Command-; (semicolon) (Mac) Ctrl-; (Windows) |
Lock/Unlock Guides | Command-Option-; (Mac) Ctrl-Alt-; (Windows) |
Snap to ruler marks. We almost always hold down the Shift key when dragging a guide out from a ruler; that way, the guide automatically snaps to the ruler tick marks. If you find that your guides are slightly sticky as you drag them out without the Shift key held down, check to see what layer you’re on. When Snap To Guides is turned on, objects snap to the guides and guides snap to the edges and centers of objects on layers.
Switching guide direction. Dragged out a horizontal guide when you meant to get a vertical one? No problem: Just Option-click (Mac) or Alt-click (Windows) the guide to switch its orientation (or hold down the Option/Alt key while dragging the guide out of the ruler).
Mirroring guides. If you rotate your image by 90 degrees, or flip it horizontally or vertically, your guides will rotate or flip with it. If you don’t want this to happen, choose View > Lock Guides, or press Command-Option-; (Mac) or Command-Option-; (Windows).
Guides outside the image. Just because your pixels stop at the edge of the image doesn’t mean your guides have to. You can place guides out on the area surrounding the image and they’ll still be functional. This is just the ticket if you’ve got a photo that you need to place so that it bleeds off the edge of your image by 0.25 inch.
Change guides and grids. Guides are, by default, cyan. Grid lines are, by default, set one inch apart. If you don’t like these settings, change them in the Guides, Grid & Slices pane of the Preferences dialog, or just double-click any guide with the Move tool.
Alignment and distribution. People often use the alignment features in page-layout applications, but Photoshop has alignment and distribution features, too, and they’re a godsend for anyone who really cares about precision in their images. Alignment lines up layers, and distribution spaces layers evenly between the two outermost selected layers. Here’s how you can align or distribute layers:
Select two or more layers in the Layers palette.
If you want the layers to align or distribute to each other, make sure no pixels are selected by choosing Select > Deselect or press its shortcut, Command-D (Mac) or Ctrl-D (Windows).
If you want layers to align or distribute within a specific area, use the Rectangular Marquee tool to drag a selection boundary. To align or distribute to the canvas size, make sure the Background layer is one of the selected layers, or choose Edit > Select All. When a selection exists, the Layer > Align command changes to Align Layers to Selection.
Press V to activate the Move tool, and then click on one of the Align buttons in the Options bar (see Figure 6-8). Alternatively, you can also Choose Layer > Align or Layer > Distribute and then choose a command from the Align submenu.
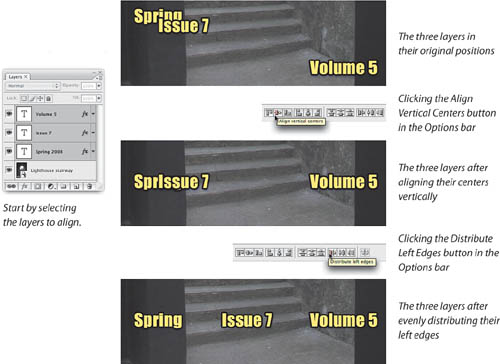
Aligning or distributing to a specific object. Normally, when you align along the left edges, Photoshop moves all the layers except for the one that has the leftmost data (or the rightmost data when aligning left, and so on). You can force Photoshop to lock one layer and move the others by linking the layers: Select the layers, click the Link icon at the bottom of the Layers palette, then click on the layer you want to remain in place. Now when you choose from the Align or Distribute submenu, all the layers move except for the currently selected layer.
When distributing layers vertically, Photoshop “locks” the layers that are closest to the top and the bottom of the image canvas; when distributing horizontally, it locks the leftmost and rightmost layers. All the layers in between get moved. For example, if you choose Vertical Centers from the Distribute Linked submenu, Photoshop moves the layers so that there is an equal amount of space from the vertical center point of one layer to the next.
Dialogs seem like simple things, but since you probably spend a good chunk of your time in Photoshop looking at them, wouldn’t it be great to be more efficient while you’re there? Here are a bunch of tips that will let you fly through those pesky beasts.
Yes, you can. The most important lesson to learn about dialogs in Photoshop is that just because one is open doesn’t mean you can’t do anything else. For instance, if the Curves dialog is open, you can still scroll and zoom the document. Check the menu bar when a dialog is open—you can use any command that isn’t dimmed. For example, because palette commands are available on the Window menu, you can even open and close palettes when a dialog is open. The palette we end up opening most often from inside dialogs is the Info palette, because it gives us readouts of color values.
Scrub-a-dub-dub. You can edit values in dialogs by scrubbing, or dragging horizontally over a value. For example, if you’re in the Image Size dialog, hold down Command (Mac) or Ctrl (Windows) as you position the mouse over any number field. When the cursor appears as a finger with a two-headed horizontal arrow, you can drag left to lower the value, or drag right to raise the value (see Figure 6-9). This also works in palettes that have number fields, including the Options bar. For faster scrubbing, hold down the Shift key, which multiplies the normal adjustment by ten.
Save your settings. Many dialogs in Photoshop have Save and Load buttons that let you save to disk all the settings that you’ve made in a dialog. They’re particularly useful when you want to use the same dialog settings on many images.
For instance, let’s say you’re adjusting the tone of an image with Curves. You increase this and decrease that, and add some points here and there... Finally, when you’re finished, you click OK and realize that you’d like to apply the same curve to 50 other images shot under the same conditions. Instead of laboriously reconstructing the same curve 50 times, just click the Save button in the Curves dialog to save the curve settings as a file. Now, from any other image, you can open the Curves dialog, click the Load button, and select the curves setting files you saved. This is especially useful when you build actions that automate your workflow, because you can have your action load a settings file. You can also send settings files to your colleagues so they can load them.
Instant replay. There’s one other way to undo and still save any tonal-adjustment settings you’ve made. If you hold down the Option (Mac) or Alt (Windows) key while selecting a command from the Image > Adjust submenu, the dialog opens with the last-used settings. Similarly, you can add the Option/Alt key to the adjustment’s keyboard shortcut. For instance, in Mac OS X, Command-L is the shortcut for Levels, so Command-Option-L opens the Levels dialog with the same settings you last used. This is a great way to specify the same Levels or Curves (or Hue/Saturation, or any other adjustment) for several different images. But as soon as you quit Photoshop, it loses its memory.
Most of the tonal- and color-correction features and many filters offer a Preview check box in their dialogs. Plus, all the filters that have a dialog have a proxy window that shows the effect applied to a small section of the image (some dialogs have both). If you’re working on a very large file on a relatively slow machine, and the filter you’re using has a proxy window, you might want to turn off the Preview check box so that Photoshop doesn’t slow down redrawing the screen while you’re making adjustments. However, most of the time, unless we’re working with a very slow filter like Smart Sharpen, we just leave the Preview feature on.
We use the Preview check box to view “before” and “after” versions of our images, toggling it on and off to see the effect of the changes without leaving the dialog. (Sometimes the changes we make are subtle and gradual, but a before-and-after usually lets us see exactly what we’ve accomplished.) In Photoshop CS3, we now press the P key to toggle the Preview check box. If you loved this shortcut in Adobe Camera Raw and wished it were in Photoshop (like we did), Photoshop CS3 grants your wish. Pressing P for Preview works in most, but mysteriously not all, Photoshop CS3 dialogs.
The following tips don’t apply to the dialogs for the more creative filters, such as Dry Brush and Plastic Wrap. They use a different dialog that provides a large preview image inside the dialog but not in the main window. We don’t really cover those filters because they’re more about special effects, and we’re more about image correction.
Proxies. The proxy in dialogs shows only a small part of the image, but it updates almost instantly. Previewing time-consuming filters such as Smart Sharpen or Reduce Noise on a large file can take a long time. Some very time-consuming filters such as the Distort filters offer a large proxy instead of a preview.
Before and after in proxies. You can always see a before-and-after comparison by clicking in the proxy. Hold down the mouse button to see the image before the filter is applied, and release it to see the image after the filter is applied. This is obviously quicker than redrawing the whole window with the Preview check box.
Change the proxy view. To see a different part of the image, click-and-drag in the proxy (no modifier keys are necessary). Alternatively, you can click in the document itself. The cursor changes to a small rectangle and wherever you click shows up in the Preview window.
Similarly, you can zoom the proxy in and out. The slow way is to click on the little (+) and (-) buttons. Much faster is to click the proxy while pressing the Command (Mac) or Ctrl (Windows) key to zoom in, or the Option (Mac) or Alt (Windows) key to zoom out. However, we rarely zoom in and out because you see the true effect of a filter only at 100 percent view.
Note that proxies only show the layer you’re working on at any one time. This makes sense, really; only that layer is going to be affected.
We love keyboard shortcuts. They make everything go much faster, or at least they make it feel like we’re working faster. Here are a few shortcuts that we use all the time inside dialogs.
Option/Alt. Holding down the Option (Mac) or Alt (Windows) key in a dialog almost always changes the Cancel button to a Reset button, letting you reset the dialog to its original state (the way it was when you first opened it). If you want to go keyboard shortcuts the whole way, press Command-Option-period to do the same thing (there’s no equivalent shortcut in Windows).
Command-Z/Ctrl-Z. You already know the shortcut Command-Z (Mac) or Ctrl-Z (Windows) because it’s gotten you out of more jams than you care to think about. You can use the same shortcut to undo within most dialogs, too. Inside dialogs, you get only one undo step.
Arrow keys. When a dialog contains a number field, you can change those numbers by pressing the Up or Down arrow key. Press once, and the number increases or decreases by one. If you hold down the Shift key while pressing the arrow key, the number changes by 10. (Note that some dialog values change by a tenth or even a hundredth; when you hold down Shift, they change by 10 times as much.) This is a great way to fine-tune adjustments without cramping your mouse hand.
A few dialogs use the arrow keys in a different way. In the Lens Flare filter, for instance, the arrow keys move the position of the effect.
Tab key. As in most Mac and Windows applications, the Tab key selects the next text field in dialogs with multiple text fields. Shift-Tab to move to the previous field instead.
P for Preview. As we mentioned a little earlier, press P to toggle the Preview check box in any dialog that has one.
Before we move on to essential tips about tools, we need to take a quick look at the New dialog, which has a few very helpful (and in some cases hidden) features. For instance, note that the New dialog has an Advanced button; when you click this, you’re offered two additional settings: Color Profile and Pixel Aspect Ratio. Color Profile lets you specify a profile other than the working space for your image. (You can choose the default working space too, but since that’s what you’d get anyway, it’s a bit pointless to choose it here.) Note that we cover working spaces in Chapter 4, “Color Settings.” Pixel Aspect Ratio lets you use nonsquare pixels, in case your image is destined for video. If video isn’t in your game plan, then avoid this pop-up menu entirely.
Preset document sizes. The Preset pop-up menu in the New dialog lets you pick from among many common document sizes, such as A4, 640 × 480, and 4 × 6 inches. You may not see very many choices if you click the Preset pop-up menu, but that’s because it’s a two-stage process: First choose a category from the Preset pop-up menu, and then choose a size from the Size pop-up menu. If you need a preset other than the ones on the list, just set the New dialog the way you want it, then click the Save Preset button (see Figure 6-10). You can delete user-created presets using the Delete Preset button, but the built-in ones that ship with Photoshop are there to stay.
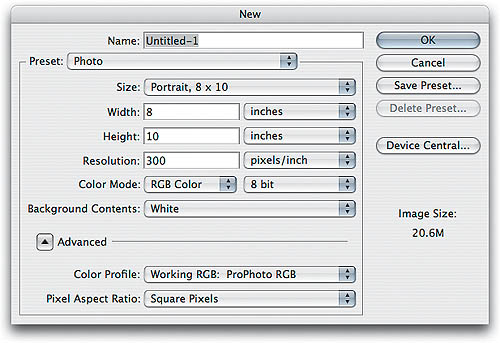
When you save a document preset, Photoshop gives you the choice of which settings to remember: Resolution, Mode, Bit Depth, Content, Profile, and Pixel Aspect Ratio. For example, let’s say you turn off the Profile check box; when you later choose your preset from the Preset pop-up menu, Photoshop leaves the image’s profile set to the current working space instead of overriding it.
Note that some built-in presets (those having to do with video), can also automatically add guides to the document. Unfortunately, there’s currently no way to save presets with guides yourself.
Clairvoyant image size. The New dialog tries to read your mind. If you have something copied to the Clipboard when you create a new document, Photoshop automatically selects Clipboard from the Preset pop-up menu and plugs the pixel dimensions, resolution, and color model of that copied piece into the proper places of the dialog for you. If you’d rather use the values from the last new image you created, hold down Option (Mac) or Alt (Windows) while selecting New from the File menu, or press Command-Option-N (Mac) or Ctrl-Alt-N (Windows).
Break up measurements. Photoshop is just trying to help make your life easier: When you select a measurement system (inches, picas, pixels, or whatever) in the New dialog—or the Image Size or the Canvas Size dialogs—Photoshop changes both the horizontal and vertical settings. If you want vertical to be set to picas and horizontal to be millimeters, then hold down the Shift key while selecting a measurement system. That tells the program not to change the other setting, too.
Copying sizes from other documents. In the New dialog, notice that all open documents are listed at the bottom of the Preset pop-up menu. If you want your new document to match an open document, simply choose the name of that document in this menu.
You can change keyboard shortcuts you don’t like, and you can add shortcuts where there weren’t any before. Of course, the ability to change keyboard shortcuts is great for you, but can wreak havoc for others using your machine. Fortunately, Photoshop lets you save keyboard shortcut sets, and you can include a set as part of a saved workspace that also includes your favorite palette arrangement and menu customizations.
Use your own set. To edit or add a keyboard shortcut, choose Edit > Keyboard Shortcuts or press Command-Option-Shift-K (Mac) or Ctrl-Alt-Shift-K (Windows). If you edit the default set, it’s saved as “Photoshop Default (modified),” so you can still get the original default back (just choose Photoshop Defaults from the Set menu). We recommend giving sets useful names; otherwise they can be lost when you choose another set or if you need to reset your preferences while troubleshooting a problem. To save a new set, click the New Set button (see Figure 6-11); by default, Photoshop saves the set in the proper location on your hard drive (inside your Photoshop application folder, in Presets > Keyboard Shortcuts).
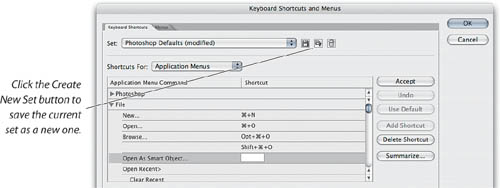
To customize keyboard shortcuts, follow these steps:
Pick Application Menus, Palette Menus, or Tools from the Shortcuts For pop-up menu.
Click an expansion triangle to reveal menu commands, and then select a command or tool from the list.
When the field in the Shortcut column is highlighted, you can type the keyboard shortcut you want to apply to this feature. If the shortcut is already in use, Photoshop alerts you and gives you choices.
If you want to create another shortcut for the same feature (there’s no reason you can’t have more than one shortcut that does the same thing), click the Add Shortcut button. If you’re done with this feature and want to change another, click the Accept button. When you’re done applying shortcuts, click OK.
Note that you can edit or add keyboard shortcuts for palette menus and tools in addition to regular menu commands. You can even save shortcuts for third-party features that appear as commands, such as Import and Automate plug-ins, filters, or scripts!
Tip
If you don’t want to apply a new keyboard shortcut and the Shortcut field is still highlighted, press Cancel to back out of the change. Be careful. If you press Cancel a second time, you’ll close the dialog without saving changes.
What was that shortcut again?. With the advent of editable keyboard shortcuts, the number of different shortcuts for you to keep track of threatens to overwhelm any mortal’s brain. Fortunately, you can click the Summarize button in the Keyboard Shortcuts and Menus dialog to export a list of every feature and its shortcuts. Photoshop saves this file in HTML format, so you can open it in any Web browser and you can print it.
Conflicts with system shortcut keys (Mac only). In Mac OS X, Apple appropriated two keyboard shortcuts that were crucial for Photoshop users: Command-H and Command-M. Photoshop users know these as the shorcuts for Hide Selection and Open Curves dialog. The Mac OS X folks use these shortcuts for Hide Application and Minimize Application. In Photoshop, the Photoshop keyboard shortcuts always win. However, you can hold down the Control key, too, to get the system shortcuts (press Command-Control-H to get Hide Application, and so on).
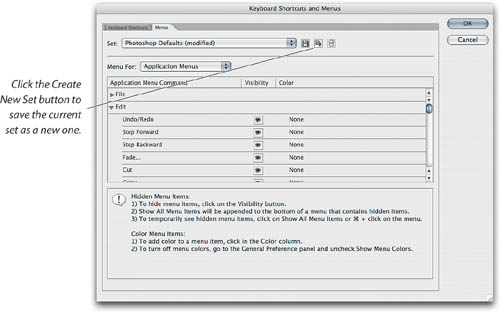
Photoshop is practically overflowing with menu commands. If you have trouble remembering which commands apply to your workflow, you can customize Photoshop menus by colorizing or hiding them. We think menu customization works best when you spend most of your time using Photoshop in a very specialized way, or when you’re trying to train yourself or others on a specific workflow.
To edit menu commands, choose Menus from the Edit menu or press Command-Option-Shift-M (Mac) or Ctrl-Alt-Shift-M (Windows) to open the Keyboard Shortcuts and Menus dialog—it’s the same dialog used for customizing keyboard shortcuts, but when opened with the Menus command, it opens showing the Menus tab (see Figure 6-12). As with keyboard shortcuts, you can save your customizations as a set, and we recommend that you do so. Note that you can’t hide the Quit or Close commands in Photoshop.
After you’re finished moving around in your image, zooming in and out, and moving pixels hither and yon, it’s time to get down to work with the tools in Photoshop. The tools have all sorts of hidden properties that can make life easier and—more importantly—more efficient. While we think it’s best to talk about a tool in the chapter where it applies the most (for example, we take a good close look at the Selection tool in Chapter 9, “Making Selections”) some tools can be used in more than one area, and those are the tools we’ll look at here.
Tool shortcuts. The most important productivity tip we’ve found in Photoshop has been the ability to select any tool with a keyboard shortcut. Like other programs in the Adobe Creative Suite, Photoshop tool shortcuts do not use any modifier keys. You press the key alone, without pressing Command, Option, Control, or Alt. Figure 6-13 shows the tool shortcuts.

Some tools in the Tool palette keep multiple related tools undercover. For instance, the Dodge tool also “contains” the Burn and the Sponge tools. The slow way to access the different modes is to press the tool icon to bring up the flyout palette containing the different modes. A faster method is to press the tool’s keyboard shortcut once to select it, and then hold down the Shift key while pressing it again to toggle among the choices. Press M once, and you jump to the Marquee tool; then press Shift-M, and it switches to the elliptical Marquee tool; press Shift-M once more, and it switches back to the rectangular Marquee tool. Note that this shortcut doesn’t cycle through the single-row marquee or the single-column marquee.
Tip
A very efficient way to use Photoshop (or any Adobe Creative Suite software) is the two-handed method: Keep one hand on the mouse or stylus and the other hand over the keyboard, ready to press single-key tool shortcuts. By switching tools using your nonmouse hand on the keyboard, you can keep the mouse over the area you’re editing instead of repeatedly pulling the mouse or stylus over to the Tools palette.
Photoshop lets you change this behavior: If you turn off the Use Shift Key for Tool Switch check box in the General panel of the Preferences dialog—see “Setting Preferences,” later in this chapter—then you don’t have to hold down the Shift key to rotate through the tools; each time you press M, you’ll get a different tool. Conrad prefers to use Shift to cycle through tools, because it ensures that pressing a letter key selects the last tool you used in a tool group. If you cycle without Shift and the Tools palette is hidden, pressing a letter could cycle to another tool in the group that isn’t the tool you thought you were using.
Change a tool’s blend mode. You can change blend modes (Normal, Screen, Multiply, and so on) by pressing Shift-minus sign and Shift-plus sign. If you have a painting tool selected (like the Brush tool), this changes the mode of the selected tool. If you’re using a tool that doesn’t use blend modes, the shortcut escalates to change the mode of the layer itself.
Activate the opposite tool. Some tools have an opposite, kind of like an evil twin except that the opposite tool isn’t evil (perhaps just misunderstood). When you’re using one of these tools, you can get its opposite by pressing Option (Mac) or Alt (Windows). For example, if you’re using the Blur tool, pressing Option/Alt temporarily changes it into the Sharpen tool. The same thing happens with the Dodge and Burn tools.
Options bar shortcuts. The tools on the Tool palette only go so far. You often need to modify the tool’s default settings on the Options bar. Try this: Select a tool, then press Return. The Options bar, even if hidden, appears at this command. Plus, if there is a number-input field on the Options bar, Photoshop selects it for you. When you press Return with the Lasso or Marquee tools selected, for example, the Feather field becomes highlighted on the Options bar.
If there is more than one number-input field on the Options bar, you can press Tab to jump from one to the next. Finally, when you’re finished with your changes, press Return again to exit from the bar and resume work.
You can customize the brushes in Photoshop (see Figure 6-14). It’s important to remember that these brush presets aren’t only for painting with the Brush tool—they also work with any tool that paints, such as the Eraser tool, the Clone Stamp tool, the History Brush tool, and so on. While most of the brush options are designed for fine-art work (simulating charcoal, water colors, and so on), every now and again you may find them helpful in a production environment, too—especially for detailed retouching.

Brush shortcuts. Did you know that the [ and ] keys (the square brackets) increase and decrease the diameter of a brush? Plus, Shift-[ and Shift-] change the brush’s hardness. We now keep one hand on the keyboard and one on our mouse (or tablet pen); when we want to change tools, we press the key for that tool. When we want to change brush size, we cycle through the brushes with the [ and ] keys until we find the size we like. Here’s one more shortcut, too: The Command and period keys move up and down through the brush presets.
Fastest brush selection. Actually, one of the best ways to select a brush is probably via the context menu. On the Mac, hold down the Control key when you click with any of the painting tools and Photoshop displays the Brushes menu wherever you click. In Windows, right-click to see the menu. After selecting a brush size, press Enter or Esc to make the palette disappear.
Hovering pseudoselections. Instead of selecting a brush from the Brushes palette, then painting with it to see how it will really look, hover the cursor over the preset for a moment and Photoshop will display a sample of that brush at the bottom of the palette. If you don’t like it, hover over another brush. When you find one you like, click on it to select it.
Opacity by the numbers. In between changing brush sizes, we’re forever changing brush opacity while painting or retouching. If you’re still moving the sliders around on the Options bar, stop it. Instead, just type a number from 0 to 9. Zero gives you 100 percent opacity, 1 gives you 10 percent, 2 gives you 20 percent, and so on. For finer control, press two number keys in quick succession—for example, pressing 45 gets you 45 percent opacity. If you have a non-painting tool selected in the Tool palette, then typing a number changes the opacity of the layer you’re working on (unless it’s the Background layer, of course). Note that if the Airbrush feature in the Options bar is turned on, then typing numbers affects the Flow percentage rather than the Opacity setting.
Touching up line art. We talk about scanning and converting to line art in Chapter 11, “Essential Image Techniques,” but since we’re on the topic of painting tools, we should discuss the Pencil tool for just a moment. One of the best techniques for retouching line-art (black-and-white) images is the Auto Erase feature on the Options bar. When Auto Erase is turned on, the Pencil tool works like this: If you click on any color other than the foreground color, that pixel—along with all others you touch before lifting the mouse button—is changed to the foreground color (this is the way it works, even with Auto Erase turned off). If you click on the foreground color, however, that pixel—along with all others you encounter—is changed to the background color. This effectively means you don’t have to keep switching the foreground and background colors while you work.
Sampling exactly the right layers. If you’re working on a multilayer image, you may find yourself frustrated with tools like the Smudge, Blur, Magic Wand, or the Clone Stamp tools. That’s because sometimes you want these tools to “see” more layers than just the one you’re working on, and sometimes you do not. Photoshop CS3 expands gives you a choice for each of these tools with the Sample pop-up menu on the Options bar. (Note that in older versions, this was a check box called Use All Layers or Sample Merged.)
When Sample is set to Current Layer, each tool acts as though the other layers weren’t even there. If you choose All Layers, Photoshop samples from the other visible layers (both above and below it) and acts as though they were merged together. A third option, Current and Below, does what it says.
So what good are these new options? One common use is when you want to patch or clone onto a new empty layer, leaving the original layers intact. This is called nondestructive cloning, because if you are unhappy with the results, you can simply erase the patches on the new layer and try again. Without the Sample menu options, you would be able to paint only on the same layer you’re sampling. With the Sample pop-up menu, you can choose Current and Below or All Layers to paint on a blank layer while sampling from other layers that remain intact (see Figure 6-15).

The button next to the Sample pop-up menu is the Ignore Adjustment Layers button, also new to Photoshop CS3 and definitely a worthwhile addition. In previous versions of Photoshop, if you cloned or healed in a document included adjustment layers and you sampled multiple layers, the sample would include the effect of adjustment layers. This was frustrating, because the sample would not match the rest of the layer and the adjustment layer would be applied again to the merged sample. We had to remember to turn off adjustment layers before sampling multiple layers and then turn them back on, and this drove us up the wall. Fortunately, the wonderful new Ignore Adjustment Layers button means that we can now leave adjustment layers on and sample multiple layers perfectly.
If you want your samples or selections to involve only one layer, that’s a situation where you’ll want to choose Current Layer from the Sample pop-up menu.
Photoshop CS3 goes even further in helping you clone effectively, in the form of the new Clone Source palette. We cover the Clone Source palette in Chapter 11, “Essential Image Techniques.”
We almost always scan a little bigger than we need, just in case. So we end up using the Cropping tool a lot. The nice thing about the Cropping tool (as opposed to the Crop feature on the Image menu) is that you can make fine adjustments before agreeing to go through with the paring. Just drag one of the corners or side handles. Here are a couple more ways you can fine-tune the crop.
See what gets cropped. By default, Photoshop darkens the area outside the cropping rectangle so that you can see what’s going to get cropped out before you press Enter. You can adjust this by clicking the Color swatch in the Options bar (when the Cropping tool is selected) and picking a different color from the Color Picker (such as white). You may want to increase the opacity of the color in the Options bar, too. David likes to ghost the cropped-out pixels to near-white, while Conrad likes cropped-out pixels to match the full-screen background color around the image.
Rotating and moving while cropping. You can crop and rotate at the same time with the Crop tool: after dragging out the cropping rectangle with the Crop tool, just place the cursor outside the cropping rectangle and drag to rotate the rectangle. When you press Return or Enter, Photoshop crops and rotates the image to straighten the rectangle. It can be tricky to get exactly the right angle by eye—keep an eye on the Info palette. Also, if the cropping rectangle isn’t in the right place, you can always move it—just place the cursor inside the cropping rectangle and drag.
Adjusting for keystone distortion. What do you do about lines in your image that are supposed to be vertical or horizontal, but aren’t? For example, if you take a picture of a painting hanging on a wall, you often need to do so from one side to avoid flash reflections, so the subject ends up being skewed rather than rectangular. Fortunately, our faithful Cropping tool offers a cool option: adjusting for perspective. The key is to turn on the Perspective check box in the Options bar after drawing the cropping rectangle; this lets you grab the corner points and move them where you will.
However, positioning the corner points of the cropping “rectangle” can be tricky. You must first find something in the image that is supposed to be a rectangle and set the corner points on the corners of that shape. In the example of a building, you might choose the corners of a window. Then, hold down the Option and Shift keys (Mac) or Alt and Shift keys (Windows) while dragging one of the corner handles; this expands the crop but retains its shape. When you have the cropping shape the size you want it, drag the center point icon to where the camera was pointing (or where you imagine the center of the focus should be). Then press Enter or Return (see Figure 6-16).

By the way, we find that when we’re using this tool, Photoshop often alerts us that either the center point or the corner points are in the wrong position. This usually happens when you haven’t selected the corner points of something that should be rectangular. In other words, Photoshop acts as a safety net, stopping you when you choose a distortion that isn’t likely to happen in a real photograph. Sometimes simply moving the center point to a different location (by trial and error) does the trick.
For serious distortion corrections, though, you’re better off using the Lens Correction filter, which we discuss in Chapter 10.
Save that layer data. When you crop, you don’t have to lose what’s beyond the newly cropped edges of the document. After you drag a crop rectangle, you’ll see a Hide button on the Options bar. Click that button and after you commit to the crop, the cropped-out pixels will be remembered as big data—material that hangs outside the actual visible image rectangle. Then, if you didn’t get the crop just right, you can either move the image around with the Move tool or re-crop using a different rectangle (see “Expand the Canvas by Cropping,” later in this chapter). Note that this only works on layers other than the Background layer.
Resampling while cropping. Warning: The Cropping tool may be changing your resolution or even resampling your image data without your knowing it! The Height, Width, and Resolution fields in the Options bar (when you have the Cropping tool selected) let you choose a size and resolution for your cropped picture. Basically, these fields save you the step of visiting the Image Size dialog after cropping. But remember that when you use them, they always change your image resolution or resample the image (see Chapter 2, “Image Essentials,” for more on the pros and cons of resampling). That means your image resolution can drop or increase without your realizing it. (In this case, Photoshop is not resampling the data, just adjusting the size of the pixels.) Instead, see the next tip for how to crop to an aspect ratio without altering any other image specs.
If you type a value into the Resolution field, Photoshop resamples the image to that value. This resampling behavior is handy when you want to resample down, but be careful that you don’t ask for more resolution than you really have; resampling up is usually best avoided. (Note that you can only set the Height, Width, and Resolution values before you start cropping; once you draw a cropping rectangle, the Options bar changes.)
Cropping to an aspect ratio. Let’s say you want to crop your image to a 4-by-6 aspect ratio (height-to-width, or vice versa), but you don’t want to resample the image (which adds or removes pixels, causing blurring) or change the image resolution. This is a common requirement in Web design, where pixel-perfect graphics would be ruined by resampling. The Cropping tool can’t perform this task, so you’ll need a different technique. First, select the Marquee (rectangular selection) tool and choose Fixed Aspect Ratio from the Style pop-up menu in the Options bar. The Options bar then lets you type values in the Height and Width fields (here you’d type 4 and 6). Next, marquee the area you want cropped, and then select Crop from the Image menu. See Chapter 9, “Making Selections,” for tips and tricks for the Marquee tool.
Expand the canvas by cropping. Once you’ve created a cropping rectangle with the Cropping tool, you can actually expand the crop past the boundaries of the image (assuming you zoom back until you see the gray area around the image in the document window). Then, after you press Enter, the canvas size actually expands to the edge of the cropping rectangle. This is David’s favorite way to enlarge the canvas.
Tip
To toggle all snap-to options on or off, choose View > Snap. The shortcut is Command-Shift-; (Mac) or Ctrl-Shift-; (Windows).
Cropping near the border. If you’re trying to shave just a sliver of pixels off one side of an image, you’ll find it incredibly annoying that Photoshop snaps the cropping rectangle to the edge of the image whenever you drag close to it. Fortunately, you can temporarily turn off this behavior by unchecking the command View > Snap > Document Bounds. Or, you can hold down the Control key to temporarily disable snapping.
The Eraser tool has gotten a bad rap because people assume you have to use a big, blocky eraser. No, you can erase using any brush—one that’s soft or hard, like an airbrush, or even with the textured brushes in the Brushes palette. And what’s more, you can control the opacity of the Eraser (don’t forget you can just type a number on the keyboard to change the tool’s opacity). This makes the eraser fully usable, in our opinion. However, just because a tool is usable doesn’t mean you have to use it. Whenever possible, we much prefer masking to erasing. The difference? Masks (which we cover in Chapter 8) can “erase” pixels without actually deleting them. Masks just hide the data, and you can always recover it later. Nevertheless, the Eraser tool can, on occasion, get you out of a jam. Here are a few tips:
Erase to History. The Erase to History feature (it’s a check box on the Options bar when you have the Eraser tool selected) lets you use the Eraser tool to replace pixels from an earlier state of the image (see “When Things Go Worng,” later in this chapter, for more on the History feature). Erase to History more or less turns the Eraser into the History Brush tool. For instance, you can open a file, mess with it until it’s a mess, then revert parts of it to the original using the Eraser tool with Erase to History turned on.
The important thing to remember is that you can temporarily turn on the Erase to History feature by holding down the Option (Mac) or Alt (Windows) key while using the Eraser tool.
Watch Preserve Transparency when erasing. Note that the Eraser tool (or any other tool, for that matter) won’t change a layer’s transparency when you have the Preserve Transparency check box turned on in the Layers palette. That means it won’t erase pixels away to transparency; rather it just paints in the background color. Don’t forget you can turn Preserve Transparency on and off by pressing / (forward slash).
Erasing to transparency. When you use a soft-edged brush to erase pixels from a layer (rather than the Background layer), the pixels that are partially erased—that is, they’re still somewhat visible, but they have some transparency in them—cannot be brought back to full opacity. For example, if you set the Eraser to 50 percent opacity and erase a bunch of pixels from a layer, there’s no way to get them back to 100 percent again. The reason: You’re not changing the pixel’s color, only the layer’s transparency mask. This isn’t really a tip, it’s just a warning. What you erase sometimes doesn’t really go away.
One of the complaints Adobe heard most in times gone by was that blends in Photoshop resulted in banding. The answer they always gave was to “add noise” to the blend. It’s true; adding noise reduces banding significantly. Fortunately, Photoshop adds noise for us. Of course, you can stop it by turning off the Dither check box in the Options bar, but there’s almost no reason to do so. You may want to turn dithering off if you’re doing scientific imaging or printing to a continuous-tone device that can actually reproduce the gradient without banding.
Adding more noise. If you’re still getting banding even with Dither turned on, you may want to add even more noise to a blend. However, note that you don’t always need to apply the Add Noise filter to the entire gradient; use the filter selectively.
Instead, you might find it better to add noise to only one or two channels. View each channel separately (see Chapter 9, “Making Selections”) to see where the banding is more prevalent. Then add some noise just to the blend area in that channel.
Blends in CMYK. Eric Reinfeld pounded it into our heads one day: If you’re going to make blends in Photoshop images that will end up in CMYK mode, create them in CMYK mode. Sometimes changing modes from RGB to CMYK can give you significant color shifts in blends.
Many custom CMYK profiles produce strange results when you make a blend. In particular, blues tend to have a saturation “hole” and become less saturated when you expect them to become more so. You can often get better results by creating the blend in one of the CMYK working spaces that ship with Photoshop, then assigning your custom profile to the result. The CMYK profiles that come with Photoshop may not represent your exact printing conditions, but they tend to offer much smoother gradients than third-party profiles built with any of the common profiling tools. This is a mildly perverse use of color management, but it works—see Chapter 4, “Color Settings,” for more detail about assigning profiles.
Gradients on layers. Some people make hard work of creating a blend that fades away into transparency. They go through endless convolutions of Layer Masks and Channel Options, or they spend hours building custom gradients, and so on. They’re making it difficult for themselves by not opening their eyes. When you have the Gradient tool selected, the Options bar offers a pop-up menu with various gradient presets in it (see Figure 6-17). By default, these presets include gradients that use transparency. You can create or edit a gradient preset by clicking once on the gradient swatch in the Options bar. You can also select a different set of gradient presets from the pop-out menu to the right of the swatch.

Gradients as a layer. If you harbor even the slightest suspicion that you might need to edit a gradient, and you don’t need anything on a layer except a gradient, think about adding it as a gradient layer, which is a kind of adjustment layer that you can edit at any time. To create a gradient layer, choose Layer > New Fill Layer > Gradient, or click the Create New Fill or Adjustment Layer button at the bottom of the Layers palette and choose Gradient Layer. After you create a gradient layer, you can edit its settings by double-clicking it in the Layers palette—much faster and easier than painting it all over again with the Gradient tool! However, if you’re creating a gradient on a mask, you’ll need to use the Gradient tool.
In Photoshop CS3, the Ruler tool is the tool formerly known as the Measurement tool. Adobe changed the name to avoid confusion with the new Count tool in Photoshop Extended. We still sometimes hear people complain that Photoshop doesn’t have a measuring tool. We think it’s because the Ruler tool hides under the Eyedropper tool by default. The Ruler tool is extremely useful for measuring distances and angles. The keyboard shortcut for this tool is I (or Shift-I if it’s hiding under the Eyedropper tool). Here’s a rundown of how this tool works.
To measure between two pixels, click-and-drag from one point to the other with the Ruler tool.
Once you have a measuring line, you can hide it by selecting any other tool from the Tool palette. To show it again, select the Ruler tool.
You can move the measuring line by dragging the line (not the endpoints). If you drag an endpoint, you just move that end of the line.
You can’t really delete a measuring line, but you can move it outside the boundaries of the image window.
You can turn the measuring line into a V-shaped compass in order to measure an angle by Option-clicking (Mac) or Alt-clicking (Windows) one end of the measuring line and dragging (see Figure 6-18).

Where do you find the measurement? On the Info palette or the Options bar, of course. The palette displays the angle and the horizontal and vertical distances, along with the total distance in whatever measurement system you’ve set up in Units Preferences.
Measuring before rotating. We know you always hold the camera perfectly level, but you may occasionally have to level someone else’s crooked photo or scan. Again, the Ruler tool can help immensely. If you select Arbitrary from the Rotate Canvas submenu (under the Image menu) immediately after using the Ruler tool, Photoshop automatically grabs the angle and places it in the dialog for you.
There are two things to note here. First, the angle in the Rotate Canvas dialog is usually slightly more accurate than the one on the Info palette (within half a degree). Second, if the angle is more than 45 degrees, Photoshop automatically subtracts it from 90 degrees, assuming that you want to rotate it counterclockwise to align with the vertical axis instead of the horizontal axis.
Count tool. The Count tool is new in Photoshop CS3 Extended. It’s grouped with the Ruler, Eyedropper, and Color Sampler tools. It’s intended for the common scientific task of counting objects in an image, such as stars or microbes. The Count tool is out of the scope of this book, so we aren’t giving it much space, but if you do need to count objects, you can simply click the Count tool on each object you want to count in an image, and the tool leaves behind a label with the current count. The Photoshop Help file also includes a procedure for counting objects automatically, if they can be isolated easily using Photoshop selection tools.
While the majority of images touched by Photoshop are edited by a single person, people are increasingly working on pictures in teams. Perhaps the team is a retoucher and a client, or perhaps it’s four Photoshop users, each with specific skills—whatever the case, it’s important for these folks to communicate with each other. Enter the Notes tools (press N). Photoshop has two Notes tools: one for text annotations and one for audio annotations. We suggest using audio annotations to your images only if you’ve never learned to type or if you’re tired of having so much extra space on your hard drive—audio notes can make your files balloon in size (each 10 seconds of audio you add is about 140 K compared to about 1 K for 100 words of text notes).
To add a text annotation, click once on the image with the Notes tool and type what you will. If you type more than can fit in the little box, Photoshop automatically adds a scroll bar on the side. In addition, you can change the note’s color, author, font, and size in the Options bar at any time.
Double-clicking on a note opens it (so you can read or listen to it) or closes it (minimizes it to just the Notes icon). Single-clicking on the Notes icon lets you move it or delete it (just press the Delete key). Or, if you want to delete all the notes in an image, press the Clear All button in the Options bar. Clearing all notes can be useful when you’re creating a final version of an image.
Not just for Photoshop. If you want to send a Photoshop image with annotations to someone who doesn’t have Photoshop, relax. If you choose File > Save As to save the image in Photoshop PDF format, text and audio annotations can be read and heard using Adobe Acrobat or the free Adobe Reader. You can also use Preview in Mac OS X, but you can only read text annotations.
Move the Notes away. By default, Photoshop places your notes windows at the same place in your image as the Notes icon. However, that means the little notes window usually covers up the image so you can’t see what the note refers to. We usually drag the Notes icon off to the side or slightly out into the area that surrounds the picture. Conrad likes to keep notes just visible in the corner of an image because he’s missed notes that were outside the image area; when he doesn’t want to see notes he simply presses Command-H (Mac) or Ctrl-H (Windows), which toggles the View > Extras command. If you can’t see notes in your Photoshop file but you suspect that they’re there, make sure the Annotations item is turned on in the Show submenu (under the View menu). When this is off, no Notes icons appear.
Each tool in the Tool palette offers one or more options, such as the size of a brush’s diameter, or whether a selection is feathered, or what mode a tool will paint in (Multiply, Screen, and so on). It’s a hassle to remember to set all the tool options, especially if you need to change them frequently. Fortunately, Photoshop can remember multiple tool settings for you if you use the Tool Presets feature.
The Tool Presets feature lives in two places: at the far left side of the Options bar, and in the Tool Presets palette (choose Window > Tool Presets). We find that the palette is most useful for fine artists who need to switch among various tool presets, often within the same image (see Figure 6-19). Production folks like us tend to keep the palette closed and select tools from the Tool Presets pop-up menu in the Options bar. One of the reasons that tool presets live on the Options bar is that a tool preset includes the settings you’ve made in the Options bar.
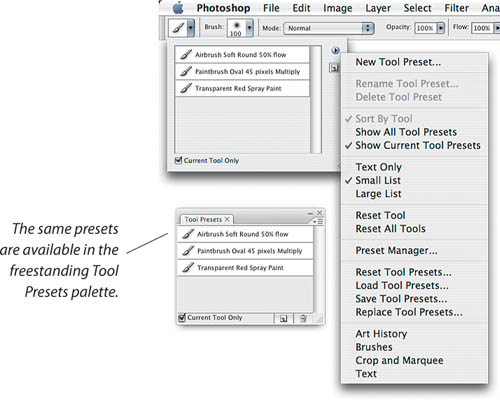
To create a new tool preset, select any tool in the Tool palette, change the Options bar to the way you want it, click on the Tool Presets pop-up menu in the Options bar, then click the New Tool Preset button (it looks like a little page with a dog-eared corner). Or, even faster, after setting up the tool, you can Option-click (Mac) or Alt-click (Windows) the Tool Presets icon in the Options bar. When Photoshop asks you for a name, we suggest giving the tool preset a descriptive name, like “ShapeTool Circle 50c20m.”
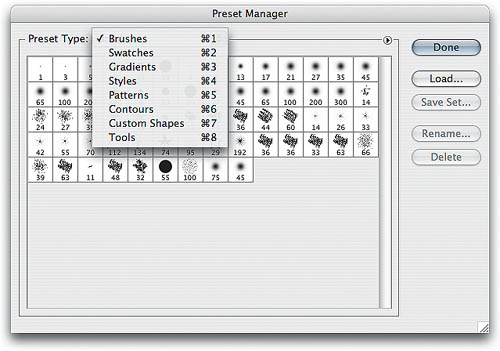
Photoshop also comes with several premade collections of tool presets, such as Art History and Brushes. The trick to finding these (and doing all sorts of other things with tool presets, like saving your own sets), is to open the Preset Manager dialog (see Figure 6-20) by choosing Preset Manager from the Tools palette menu; the same menu is available in the top right corner of the Tool Presets pop-up menu from the Options bar.
Unfortunately, there’s no way to edit a tool preset once you make it—you can only create a new one and delete the old one by choosing Delete Tool Preset from the Tool Preset menu.
To reset the tool options for either a single tool or for all the tools, Control-click (Mac) or right-click (Windows) on the Tool Presets icon on the Options bar.
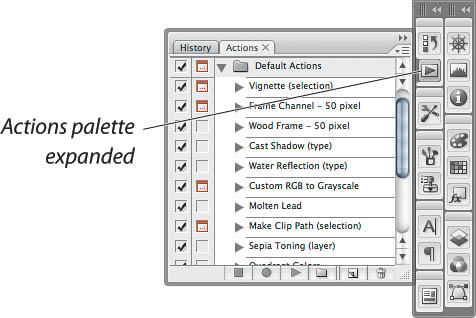
There’s little doubt that palettes are both incredibly useful when you need them and incredibly annoying when they’re in your way. You don’t have to accept how the palettes are arranged by default. The most important tip is that you can regroup palettes by dragging a palette tab to another palette tab, or stack them by dragging a palette tab to the bottom of another palette. Photoshop CS3 extends the traditional grouping and stacking behavior with palette docks that stick to the left and right sides of the monitor.
The new palette docks and workspaces in Photoshop CS3 change the rules a bit. If you think you’re pretty familiar with palettes in Photoshop, you may be able to skip most of this section, but you’ll still want to read the all-new Workspace tips.
In the past, workspaces were simply a way to save palette arrangements, keyboard shortcuts, and custom menu sets for quick and easy recall. In Photoshop CS3, workspaces gain a new set of features that help you work with large collections of palettes in faster, more space-efficient, and less obtrusive ways.
Tip
If you or one of your “friends” has hopelessly scrambled your shortcuts, menus, or workspace beyond recognition, just reset your settings. On the Window > Workspace submenu, you’ll find the commands Reset Palette Locations, Reset Keyboard Shortcuts, and Reset Default Workspace.
To save a workspace, set up the palettes the way you want them, optionally load any custom keyboard shortcut and menu sets, and choose Window > Workspace > Save Workspace. Saved workspaces appear on a Workspace pop-up menu on the Options bar, as well as at the bottom of the Workspace submenu, below the workspaces that come with Photoshop. For even easier recall, use the Keyboard Shortcuts and Menus dialog to assign keyboard shortcuts to your favorite workspace menu commands.
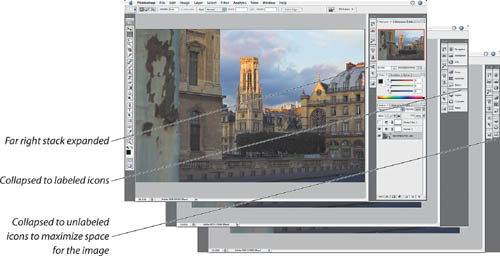
New workspace features. Photoshop CS3 introduces the same turbocharged workspaces that now appear in the rest of the Adobe Creative Suite 3 applications: You can create vertical stacks of grouped palettes and dock them to the edge of the screen, collapse palettes into labeled or unlabeled icons to save space, and automatically expand and collapse the docked stacks to maximize your screen space.
If a palette group has a light gray top bar, it’s free-floating. If it has a dark gray top bar, it’s docked to the side of the monitor or to another palette stack (see Figure 6-21). As always, you can drag a palette tab to dock it with others or tear off a palette dock so that it’s free-floating.
To expand or collapse a stack, click the dark gray bar at the top of a stack (see Figure 6-22). If the bar is very narrow, you can click the light gray double triangle icon at the right edge of the dark gray bar; it does the same thing.
To make a stack narrower or wider, drag the vertical ribs at the left side of a dark gray top bar. You can set the width of both the collapsed and expanded state of a stack. A collapsed stack can be as narrow as a vertical stack of unlabeled icons (see Figure 6-22), or if you’re still learning what the icons represent, you can widen a collapsed stack to reveal the labels. If you need to free up as much space as possible while still keeping a stack visible, we recommend collapsing palettes all the way down to the icons—remember, you can still see an icon title by holding the mouse over an icon until its tool tip appears.
You can dock a palette to either side of the screen or to another palette stack; just drag a palette tab to either side of the screen until a blue line appears at a dockable location (either the screen edge or the edge of already docked palettes). We find that having multiple stacks against the side of the screen starts to make sense on high-resolution, widescreen monitors, where there’s actually room to spread out horizontally. If you have room to leave frequently used palettes open, you don’t have to repeatedly expand and collapse palettes.
You can dock palettes only to the sides of your main monitor, not to the top or bottom. You can’t dock stacks at all on any other connected monitor. However, you can keep free-floating palettes on another monitor and group them however you like. In other words, if you prefer to keep your palettes on a second monitor, like we do, you can continue to do that in Photoshop CS3.
When you click a collapsed icon to pop open a palette (see Figure 6-23), by default the palette stays open until you click its icon again or click another palette. However, when palettes stay open, they tend to intrude upon the image area. If you’d prefer that an expanded palette puts itself away, open the Preferences dialog, click the Interface panel, and then click Auto-Collapse Icon Palettes.

We think workspaces are extremely useful, because there is no one right way to arrange things. When Conrad connects his laptop to a color-calibrated desktop monitor, he likes to use the higher-quality desktop monitor as the main image viewing area and place as many palettes as possible on the laptop monitor. When he uses the laptop by itself, there isn’t nearly enough room to replicate the two-monitor desktop arrangement, so he becomes picky about which palettes are visible. To switch instantly between the two palette arrangements, Conrad saved each arrangement as its own workspace.
We recommend that you save your favorite palette arrangement even if you don’t need to create any others. Like your customized keyboard shortcuts and menus, if you don’t save a palette arrangement in a workspace, it exists only in the Photoshop preferences file, so save your favorite workspace to avoid losing it if something happens to the Preferences file.
The flexibility of workspaces in Photoshop CS3 may reduce the amount of manual palette arrangement that was the norm in earlier versions. Still, when you need to maximize the amount of free screen space or create a specific palette arrangement, you need to know all of the ins and outs of palettes in Photoshop.
Make the palettes go away. If you only have one monitor on which to store both your image and the plethora of Photoshop palettes, you should remember two keyboard shortcuts. First, pressing Tab makes the palettes disappear (or reappear, if they’re already hidden). We find this absolutely invaluable, and use it daily.
Second, pressing Shift-Tab makes all palettes except the Tool palette disappear (or reappear). We find this only slightly better than completely useless; we would prefer that the shortcut hid all the palettes except the Info palette.
As we mentioned earlier, you can leave docked palettes hidden and reveal them temporarily by moving the mouse to the edge of the screen where they’re docked.
Making palettes smaller. Another way to maximize your screen real estate is by collapsing one or more of your open palettes. If you double-click on the palette’s name tab, the palette collapses to just the title bar and name (see Figure 6-24). Or if you click the zoom box of a palette, the palette reduces in size to only a few key elements. For instance, if you click the zoom box of the Layers palette, you can still use the Opacity sliders and Mode pop-up menu (but the Layer thumbnails and icons get hidden).

Mix and match palettes. There’s one more way to save space on your computer screen: mix and match your palettes. As in other Adobe software, you can drag one palette on top of another to group them (see Figure 6-25). Then if you want, you can drag them apart again by clicking and dragging the palette’s tab heading. (In fact, these kinds of palettes are called “tabbed palettes.”)

For instance, David always keeps his Layers, Channels, and Paths palettes together on one palette. When he wants to work with one of these, he can click on that palette’s tab heading. Or better yet, he uses a shortcut to make it active (see “Actions” in Chapter 11, “Essential Image Techniques,” for more on how to define your own keyboard shortcuts).
Conrad, on the other hand, always keeps his Layers and Channels palettes separate, even when he’s working on a single-monitor system. He likes to see the different views of a document’s structure simultaneously. Neither of us ever mixes the Info palette with another palette, because we want it open all the time.
Photoshop offers one more way to combine palettes: by docking them. Docking a palette means that one palette is attached to the bottom of another one. Docked palettes always move together, and when you hide one, they both disappear. To dock one palette to another, drag it over the other palette’s bottom edge; don’t let go of the mouse button until you see the bottom edge of the palette become highlighted (see Figure 6-26).
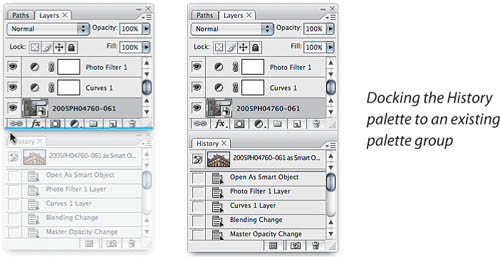
Where’s the Palette Well?. Many users took advantage of the Palette Well, a slot in the Options bar where you could stash palettes as a compact row of tabs in Photoshop CS2. Adobe didn’t carry the Palette Well forward into the new docking palette machinery, since you can now collapse docked palettes all the way down to a vertical row of icons. If you simply can’t reprogram your muscle memory and must have palette tabs at the right side of the Options bar, you can create a group of palettes and stash them there in collapsed form (see Figure 6-27).

Scrubby sliders. We talked about adjusting number fields by scrubbing them—Command-dragging (Mac) or Ctrl-dragging (Windows) over a number field (see “Dialog Tips” earlier in this chapter). You can do the same thing over number fields in most palettes.
Palette menus. Most palettes have a pop-up menu at the top right corner of the palette. They’ve always been there, but in Photoshop CS3 the icon has changed to resemble a tiny menu (see Figure 6-28). When clicking a palette menu, take care not to click the Close icon above it by mistake. Get to know your palette menus—sometimes it seems like half of the power of Photoshop is inside palette menus, which are so easy to miss.
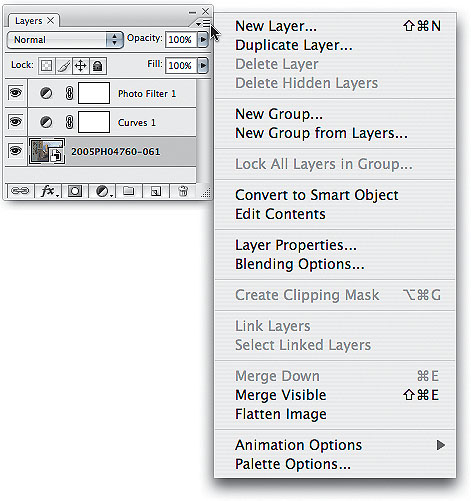
Reset Palette Locations. Every now and again, your palettes might get really messed up—placed partly or entirely off your screen, and so on. Don’t panic; that’s what Reset Palette Locations (in the Workspace sub-menu, in the Window menu) is for. Reset Palette Locations is best used when you haven’t created your own workspace, because it sets palette positions back to the factory defaults. If you have created your own workspace, it’s best to choose the workspace instead, of course.
In every version since Photoshop 3.0 (when the layers feature was introduced), the Layers palette has become increasingly important to how people use Photoshop. With such a crucial palette, there have to be at least a few good tips around here...
Displaying and hiding layers. Every click takes another moment or two, and many people click in the display column of the Layers palette (the one with the little eyeballs in it) once for each layer they want to show or hide. Cut out the clicker-chatter, and just click and drag through the column for all the layers you want to make visible. Or Option-click (Mac) or Alt-click (Windows) in the display column of the Layers palette. When you Option/Alt-click an eyeball, Photoshop hides all the layers except the one you clicked on. Then, if you Option/Alt-click again, it redisplays them all again.
Creating a new layer. Layers are the best thing since sliced bread, and we’re creating new ones all the time. But if you’re still making a new layer by clicking on the New Layer button in the Layers palette, you’ve got some learning to do: Just press Command-Shift-N (Mac) or Ctrl-Shift-N (Windows). If you want to bypass the New Layer dialog, press Command-Option-Shift-N (Mac) or Ctrl-Alt-Shift-N (Windows).
Renaming layers. It’s a very good idea to rename your layers from “Layer 1” or “Layer 2” to something a bit more descriptive. However, don’t waste time looking for a “rename layer” feature. Instead, just double-click on the layer name to rename it. Note that this works in the Channels, Paths, and File Browser palettes, too.
Text layers name themselves after the text you’ve typed. They also rename themselves if you edit the text, so they’re fairly low-maintenance. However, if you manually rename a text layer, it will no longer update when you edit its text in the document.
Duplicating layers. Duplicating a layer is a part of our everyday workflow, so it’s a good thing that there are various ways to do it.
In the Layers palette, drag the layer’s thumbnail on top of the New Layer button.
In the Layers palette, Option-drag (Mac) or Alt-drag (Windows) the layer’s thumbnail to a new position in the Layers palette.
Press Command-J (Mac) or Ctrl-J (Windows). If some pixels are selected, then only those pixels will be duplicated to a new layer.
Select Duplicate Layer from the Layers palette menu or by Ctrl-clicking (Mac) or right-clicking (Windows) a layer.
In the document window (not the Layers palette), Control-click (Mac) or right-click (Windows) a layer with the Marquee, Lasso, or Cropping tool and choose Duplicate Layer from the context menu.
The method you use at any given time should be determined by where your hands are. (Keyboard? Mouse? Coffee mug?)
Moving and duplicating layer masks. In the Layers palette, simply drag a layer mask’s thumbnail to a new layer. To duplicate a layer mask, Option-drag (Mac) or Alt-drag (Windows) a layer mask thumbnail.
Selecting layers. You can select different layers (without ever touching the Layers palette) by using shortcuts: Press Option-[ or Option-] (Mac) or Alt-[ or Alt-] (Windows) to select the next visible layer behind or in front of the current layer. Add Shift to extend the selection to multiple layers. To select the top and bottom layers, respectively, press Option-. (period) and Option-, (comma) in Mac OS X, or press Alt-. (period) and Alt-, (comma) in Windows.
Tip
If only one layer is visible when you press the layer arrangement shortcuts, Photoshop hides that layer and shows the next layer. This is great for cycling through a number of layers, though it doesn’t always work when you have layer groups.
Rearranging layers. To move the selected layer down or up in the Layers palette, press Command-[ or Command-] (Mac) or Ctrl-[ or Ctrl-] (Windows). To move the selected layer to the bottom or top of the layer stack, add the Shift key to either shortcut.
Faster layer selection. Perhaps the fastest way to select a layer is to select the Move tool and then turn on the Auto Select Layer check box in the Options bar. Now you can switch to a layer simply by clicking with the Move tool on a pixel on that layer. If you don’t have the Move tool selected when you want to switch layers, simply activate the Move tool temporarily by pressing Command (Mac) or Ctrl (Windows) as you click.
A variation on Auto Layer Select is clicking layer content while pressing modifier keys, skipping the context menu entirely. Using any tool, Command-Option-Control-click (Mac) or Ctrl-Alt-right-click (Windows).
On the other hand, we personally find Auto Layer Select somewhat irritating because it’s too easy to select the wrong layer. Instead, we prefer to Control-click (Mac) or right-click (Windows) layer content and choose the layer we want to select from the context menu that appears.
These techniques typically work only when you click on a pixel that has an opacity greater than 50 percent. (We say “typically” because it sometimes does work if the total visible opacity is less than 50 percent. See “Info Palette,” later in this chapter.) In general, if you make sure you click on reasonably opaque areas of layers, these techniques should work fine.
Creating layer groups. The more layers you have in your document, the more difficult it is to manage them. Fortunately, Photoshop offers layer groups in which you can group contiguous layers (layers that are next to each other). Layer groups are so easy to use that they don’t require a great deal of explanation. They basically work like (and look like) the folders on your desktop. Here are the basics, though.
To create a layer group, select the layers you want to group and then press Command-G (Mac) or Ctrl-G (Windows), which is the keyboard shortcut for Layer > Group Layers. You can also click the New Layer Group button in the Layers palette (see Figure 6-29), but then you have to drag layers into the group yourself.
To add a layer to a group, just drag it on top of the group. Or, to create a new layer inside the group automatically, select the group or any layer within the group (in the Layers palette) and click the New Layer button. You can remove a layer from a group simply by dragging it out.
You can move layer groups in the same way you move layers: just drag them around in the palette. You can also copy a whole group of layers to a different document by dragging the layer group over.
If you have more than one layer group, it’s helpful to color-code them: just double-click on the layer group’s name and pick a color in the Group Properties dialog. You should probably name the group, too, while you’re there (the default “Group 1” doesn’t help identify what’s in it). Watch out, though: If you drag a color-coded layer out of the group, it still retains its color-coding!
If you want to move all the layers within a layer group at the same time, select the layer group in the Layers palette. This is easier and faster than linking the layers together or selecting them all.
You can add a layer mask to the layer group (see Chapter 8, “The Digital Darkroom,” for more on masks) and it’ll apply to every layer in the group. Similarly, locking a group locks every layer within the group.
You can nest one layer group inside another. Just drag one layer group onto another. Or, if you select a layer inside a group first, when you create a new group, it will also be nested. You can nest your layer groups up to five deep.
Layer groups act almost like a single layer, so when you show or hide the group, all the layers in that group appear or disappear.
When you delete a layer group, Photoshop lets you choose to delete the group and the layers and sets inside it or just the group itself (leaving the layers and nested sets intact).
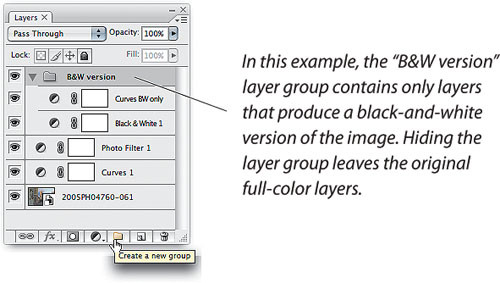
Unfortunately, you can’t apply a layer effect to a layer group or use a layer group as a clipping mask (see Chapter 8).
Layer groups and blending modes. If you had your coffee this morning, you’ll notice that you can change the blending mode of a layer group. Normally, the blending mode is set to Pass Through, which means, “let each layer’s blending mode speak for itself.” In this mode, layers inside the group look the same as they would if they were outside the group. However, if you change the group’s blending mode, a curious thing happens: Photoshop first composites the layers in the group as though they were a single layer (following the blending modes you’ve specified for each layer), and then it composites that “single layer” with the rest of your image using the layer group’s blending mode. In this case, layers may appear very differently whether they’re inside or outside that group.
Similarly, when you change the opacity of the group, Photoshop first composites the layers in the group (using their individual Opacity settings) and then applies this global Opacity setting to the result.
The Layer Comps palette is one of David’s favorite features in Photoshop. David loves keeping his options open, and is forever trying to decide among various permutations of reality. For instance, he’ll picture in his mind’s eye five different ways to drive to the grocery store before committing to one. The Layer Comps palette won’t help him with his driving choices, but it’s an awesome help when making decisions about how to edit an image in Photoshop.
The Layer Comps palette is like a clever combination of the Layers palette and the History palette: It lets you save the state of your document’s layers so you can return to it later. It seems like the Layer Comps feature should be part of the Layers palette, but perhaps Adobe figured the Layers palette was already complex enough. While the snapshots feature of the History palette can perform most of the same tasks as the Layer Comps palette, the History palette is significantly more memory-intensive and—this is important—layer comps can be saved with the document while snapshots disappear when you close the file. Saving a layer comp makes almost no difference to your file size (each comp is only a few K on disk).
Layer comps don’t only record visibility. A layer comp doesn’t just remember which layers are visible. It also remembers the position of items on each layer, layer effects, and the layer’s blending mode (see Figure 6-30). To create a layer comp, press the New Layer Comp button in the Layer Comps palette. Now Photoshop displays the New Layer Comp dialog, which lets you name the layer comp (it’s easy to lose track of what each layer comp represents), specify which settings Photoshop should remember, and insert a comment about the comp.
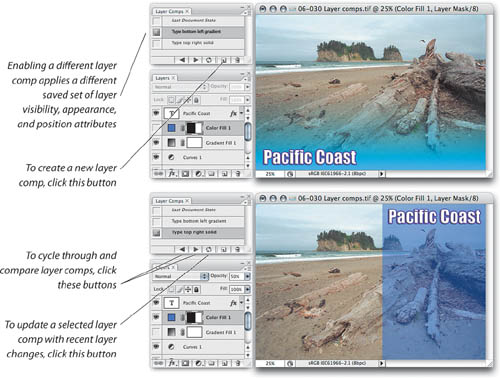
Photoshop can remember three kinds of information about your layer comps: Visibility, Position, and Appearance.
By default, layer comps just remember the visibility of each layer—that is, which layers and layer groups are visible and which are hidden in the Layers palette.
When you turn on the Position check box, the layer comp remembers where on the layer the pixel data is sitting. For example, let’s say you save a layer comp with Position turned on, and then use the Move tool to reposition the image or text on that layer. When you return to the saved layer comp, the image or text reverts back to where it was when you saved the comp.
The Appearance option tells the program to remember any layer effects and blending modes that you’ve applied to your layers. For example, let’s say you save a layer comp with Appearance turned off, then you change the blending modes of one or more layers in the Layers palette. When you return to the saved layer comp, the blending-mode changes remain because you hadn’t told the layer comp to retain the appearance of the layers.
For a quick and dirty layer comp with the default name, no comment, and the same attributes as the last comp you made (by default, just the Visibility option), hold down the Option/Alt key while clicking the New Layer Comp button. Remember that, like layers and channels, you can always rename a layer comp by double-clicking on its name in the palette. If you double-click on the thumbnail (anywhere other than its name), you open the Layer Comp Options dialog.
Quick display of comps. Once you have saved one or more layer comps in the Layer Comps palette, you can return to a comp state by clicking the small square to the left of the comp name. You can also click the left and right arrow icons at the bottom of the Layer Comps palette. Better yet, if you have ten comps but only want to cycle through three of them, select those three (Command- or Ctrl-click on the comps to select more than one) and then use the arrow buttons in the palette. If you use layer comps much, we strongly suggest that you use the Keyboard Shortcuts feature (in the Edit menu) to apply keyboard shortcuts to the Next Layer Comp and Previous Layer Comp features so you don’t have to click those silly arrow buttons all the time.
You’ll notice a layer comp called Last Document State in the Layer Comp palette. This is just the state of your document before you chose a layer comp. For example, let’s say you display a layer comp, then hide some layers and move some text around. Now if you select any layer comp, your changes disappear—but if you click on the Last Document State comp, the changes return.
Updating comps. Need to change the layer comp? You don’t have to delete it and start over. Just set up the Photoshop document to reflect what you want the comp to look like, then select the comp in the palette and click the Update Layer Comp button (that’s the one that looks like two rotating arrows).
Sending comps to clients. The fact that Photoshop saves layer comps—comments and all—with your files is pretty cool. That means you can save a file as a PSD, TIFF, or PDF file and have someone else open the file in Photoshop and browse through the Layer Comp palette. Even cooler, however, are the three Export Layer Comp scripts in the Scripts submenu (under the File menu): Export Layer Comps to Files, Export Layer Comps to PDF, and Export Layer Comps to WPG. Each of these lets you save all (or the currently selected) layer comps to one or more flattened files on disk. The PDF can even be a slideshow presentation that progresses automatically every few seconds if you want. It took us some time before we figured out what WPG is: It’s a Web Photo Gallery of your comps, ready to post on a Web site.
Note that when you run the last two of these scripts (each written in JavaScript, by the way), you’ll see each of your comps appear twice. The first time, Photoshop is flattening and saving to disk; the second time, it’s opening that flattened version and adding it to the presentation.
Clear comp warnings. If, after making one or more layer comps, you delete or merge a layer, you’ll notice that small warning icons appear in the Layer Comps palette. These tell you that Photoshop can no longer return to the layer comp as saved (because the layer no longer exists as it was when you made the comp). You can still choose a layer comp that has a warning icon—it’ll still apply to all the layers that still do exist. If you delete a layer and you don’t want to see the warning icons anymore, Control-click (or right-click in Windows) on one of the icons and choose Clear All Layer Comp Warnings from the context menu.
In a battle of the palettes, we don’t know which Photoshop palette would win the “most important” prize, but we do know which would win in the “most telling” category: the Info palette. We almost never close this palette. It just provides us with too much critical information.
At its most basic task, as a densitometer, it tells us the gray values and RGB or CMYK values in an image. But there’s much more. When you’re working in RGB, the Info palette shows you how pixels will translate to CMYK or grayscale. When working in Levels or Curves, it displays before-and-after values (see Chapter 7, “Image Adjustment Fundamentals”). Especially note the Proof Color option, which shows the numbers that would result from the conversion you’ve specified in Proof Setup, which may be different from the one you’ve specified in Color Settings (see Chapter 4, “Color Settings”). The Proof Color numbers appear in italics—a clue that you’re looking at a different set of numbers than the ones you’d get from a mode change.
But wait, there’s more! When you rotate a selection, the Info palette displays the selection’s angle. And when you scale, it shows percentages. If you’ve selected a color that is out of the CMYK gamut (depending on your setup; (see Chapter 4, “Color Settings”), a gamut warning appears on the Info palette.
Finding opacity. When you have transparency showing (e.g., on layers that have transparency when no background is showing), the Info palette can give you an opacity (Op) reading. However, while Photoshop would display this automatically in earlier versions, now you have to do a little extra work: You must click on one of the little black Eyedroppers in the Info palette and select Opacity (see Figure 6-31).
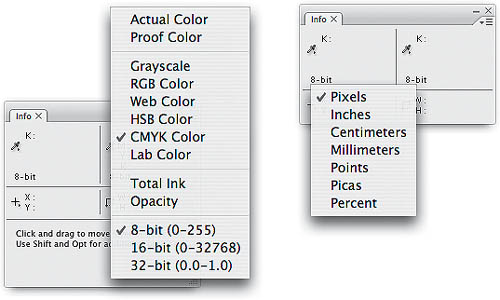
Switch units. While we typically work in pixel measurements, we do, on occasion, need to see “real world” physical measurements such as inches or centimeters. Instead of traversing the menus to open the Units dialog (on the Preferences submenu under the File menu), we find it’s usually faster to select from the Info palette menu. Just click on the XY cursor icon (see Figure 6-31). Another option: double-clicking in one of the rulers opens the Units Preferences dialog. You can also do this by Control-clicking (Mac) or right-clicking (Windows) on one of the rulers. If the rulers aren’t visible, press Command-R (Mac) or Ctrl-R (Windows).
Expand the display. To display a wealth of data in the Info palette, choose Palette Options from the Info palette menu, turn on check boxes in the Status Information section, and click OK (see Figure 6-32).

The Color Picker and the Color palette both fit into one category, so we almost always group them into one palette on our screens and switch between them as necessary.
Most novice Photoshop users select a foreground or background color by clicking once on the icons in the Tool palette and choosing from the Color dialog. Many pros, however, have abandoned this technique, and focus instead on these color palettes. Here are a few tips to make this technique more...ah...palettable.
Switching color bars. Instead of clicking on the foreground color swatch in the Tool palette, you might consider typing values into the Color palette. Are the fields labeled “RGB” when you want to type in “CMYK” or something else? Just choose a different mode from the Color palette menu. If you like choosing colors visually rather than numerically, you can use the color bar at the bottom of the palette (no, the Color Bar is not just another place to meet people). While the spectrum of colors that appear here usually covers the RGB gamut, you can switch to a different spectrum by Shift-clicking on the area. Click once, and you switch to CMYK; again, and you get a gradient in grayscale; a third time, and you see a gradient from your foreground color to your background color. Shift-clicking again takes you back to RGB. You can also use the context menu to choose a color space.
Just remember that changing the color spectrum only changes the way you specify the color. The color is stored in the document in the color space of the document itself. For example, if you’re working in an RGB document and you specify a color in CMYK, the color is translated into RGB as you apply it to the document.
Editing the color swatches. You’ve probably ignored all those swatches on the Swatches palette because they never seem to include colors that have anything to do with your images. Don’t ignore...explore! You can add, delete, and edit those little color swatches on the Swatches palette. Table 6-2 shows you how. If you’re looking for Web-safe colors or other useful colors, check out the palette menu.
You can’t actually edit a color that’s already there. Instead, you can click on the swatch (to make it the current foreground color), edit the foreground color, then Shift-click back on the swatch (which replaces it with the current foreground color).
There is a school of thought that dictates, “Don’t give people what they want, give them what they need.” The Photoshop engineering team spends hours listening to and thinking about what people ask for, and then comes back with a feature that goes far beyond what anyone had even thought to request. For example, people long asked Adobe for multiple undos (the ability to sequentially undo steps that you’ve taken while editing a Photoshop image). The result is the History palette, which goes far beyond a simple undo mechanism into a much more powerful way of working in Photoshop.
The History palette, at its most basic, remembers what you’ve done to your file and lets you either retrace your steps or revert back to any earlier version of the image. Every time you do something to your image—paint a brushstroke, run a filter, make a selection, and so on—Photoshop saves this change as a state in the History palette (see Figure 6-33). At any time, you can revert the entire image to any previous state, or—using the History Brush tool or the Fill command, which we’ll discuss in a moment—selectively paint back in time.
The only issue with using History is that it can vastly increase the size of your scratch files. It’s unlikely that heavy History use will hurt performance significantly, though if Photoshop has to hunt for something in 50 GB of scratch disk space, you may experience a momentary lapse in responsiveness—the bigger danger is that you run out of scratch disk space and find yourself unable to do anything, possibly including saving the file. If you plan on using 1000 history states, make sure you have plenty of scratch disk space!
Turning off History. If you’re low on disk space or just want to avoid the History feature’s heavy scratch disk overhead, you can reduce the number of history states to just one. While having one history state may be too limiting if you’re in the middle of trial-and-error design or image editing, you won’t need more than one history state if you’re executing basic production steps or running batch actions. To change the number of history states, open the Preferences dialog and click the Performance panel, type a value into the History States option, and click OK.
The default value of 20 history states is a good balance between flexibility and disk space usage.
The History palette has two sections: snapshots and states. Let’s take a look at each of these and how you can use them.
Snapshots. The History palette lets you save any number of snapshots—representing a moment in time for your image—so that at any time you can go back to a specific state. There are two main differences between snapshots and states.
Photoshop records almost everything you do to an image as a state. By default, snapshots are only recorded when you first open an image and when you click the New Snapshot button in the History palette.
When the number of states recorded on the History palette exceeds the Maximum Remembered States value (set in the History Options dialog), the oldest states start dropping off the list. Snapshots don’t disappear until you close the document.
What’s in the snapshot. When you click the New Snapshot button on the History palette (or select New Snapshot from the palette menu), Photoshop saves the whole document (individual layers and all). Depending on how many layers you have and how large your document is, this might require a lot of scratch space. If you Option-click (Mac) or Alt-click (Windows) the button, Photoshop offers two other less-storage-intensive snapshot choices: a version of the image with merged layers, or just of the currently selected layer. (If you find yourself Option/Alt-clicking the button a lot in order to get these options, then turn on the Show New Snapshot Dialog By Default check box in History Options. That way, you don’t have to press the Option/Alt key anymore.)
Stepping through states. As we mentioned earlier, Photoshop saves every brushstroke, every selection, every anything you do to your image as a state on the History palette (though the state only remains on the palette until you reach the maximum number of states or you close the document). There are three ways to move among your images’s states.
To revert your image to a state, you can click on any state’s thumbnail in the History palette.
You can move the active state marker to a different state on the History palette.
To step back to the last state, press Command-Z (Mac) or Ctrl-Z (Windows), which works like a standard undo. But you can also move backward one state at a time by pressing Command-Option-Z (Mac) or Ctrl-Alt-Z (Windows), or move forward one state at a time by pressing Command-Shift-Z (Mac) or Ctrl-Shift-Z (Windows).
In general, when you move to an earlier state, Photoshop grays out every subsequent state on the History palette, indicating that if you do anything now, those grayed-out states will be erased. This is like going back to a fork in the road and choosing the opposite path than the one you took before. Photoshop offers another option: If you turn on the Allow Non-Linear History check box in the History Options dialog, Photoshop doesn’t gray out or remove subsequent states when you move back in time (though it still deletes old states when you hit the maximum number of states).
Non-Linear History is like returning to the fork in the road, taking the opposite path, but then having the option to return to any state from the first path. For example, you could run a Gaussian Blur on your image using three different amounts—returning the image to the pre-blurred state in the History palette each time—and then switch among the three states to decide which one you want to use.
The primary problem with Non-Linear History is that it may confuse you more than help you, especially when you’re dealing with a number of different forks in the road.
The History Brush. Returning to a previous state returns the entire image to that state. But the History feature lets you selectively return portions of your image to a previous state, too, with the History Brush and the Fill command. Before painting with the History Brush, first select the source state in the History palette (see Figure 6-33). For instance, let’s say you sharpen a picture of a face with Unsharp Masking (see Chapter 10) and find that the lips have become oversharp. You can select the History Brush, set the source state to the presharpened state, and brush around the lips (though you’d probably want to reduce the opacity of the History Brush to 20 or 30 percent by pressing 2 or 3 first).
The History Brush tool (press Y) is very similar to the Eraser tool when the Erase to History check box is turned on in the Options bar, but the History Brush lets you paint with modes, such as Multiply and Screen. We used to prefer the History Brush over Erase To History or Fill From History, because they didn’t work on high-bit files, but that limitation has disappeared in Photoshop CS3, so now we use whichever gets the job done most easily.
Take a snapshot before an action. If you run an action in the Actions palette that has more steps than your History States preference, you won’t be able to undo the action. That’s why, before running the action, you should either save a snapshot of your full document or set the source state for the History Brush to the current state. The latter works because the source state in the History palette isn’t automatically deleted when the History palette exceeds the maximum number of states you’ve set.
Fill with History. One last nifty technique that can rescue you from a catastrophic “oops” is the Fill command on the Edit menu (press Shift-F5). This lets you fill any selection (or the entire image, if nothing is selected) with the pixels from the current source state on the History palette. We prefer this to the History Brush or Eraser tools when the area to be reverted is easily selectable. Sometimes when we paint with those tools, we overlook some pixels (it’s hard to use a brush to paint every pixel in an area at 100 percent). This is never a problem when you use the Fill command.
You’ve always been able to press Option-Delete (Mac) or Alt-Delete (Windows) to fill a selection or layer with the foreground color. In version 4, Photoshop added the ability to automatically preserve transparency on the layer when you add the Shift key (slightly faster than having to turn on the Preserve Transparency check box in the Layers palette). Similarly, you can fill with the background color by pressing Command-Delete (add the Shift key to preserve transparency). To fill the layer or selection with the current history source state, press Command-Option-Delete (Mac) or Ctrl-Alt-Backspace (Windows). And, of course, you can add the Shift key to this to fill with Preserve Transparency turned on.
Persistent states. Remember that both snapshots and states are cleared out when you close a document. If you want to save a particular state or snapshot, drag its thumbnail over the Create New Document button on the History palette. Now that state is its own document that you can save to disk. If you want to copy pixels from that document into another image, simply use the Clone Stamp tool (you can set the source point to one document and then paint with it in the other file).
Copying states. Although Photoshop lets you copy states from one document to another simply by dragging them from the History palette onto the other document’s window, we can’t think of many good reasons to do this. The copied state completely replaces the image that you’ve dragged it over.
When History stops working. Note that you cannot use the History Brush or the Fill From History feature when your image’s pixel dimensions, bit depth, or color mode has changed. Pixel dimensions usually change when you rotate the whole image, use the Cropping tool, or use the Image Size or Canvas Size dialogs.
Purging states. As we said earlier, the History palette takes up a lot of scratch disk space. If you find yourself running out of room on your hard disk, you might try clearing out the History states by either selecting Clear History from the History palette menu or choosing Histories from the Purge submenu (under the Edit menu). The former can be undone in a pinch; the latter cannot. Curiously, neither of these removes your snapshots, so you have to delete those manually if you want to save even more space. Remember that closing your document and reopening it will also remove all snapshots and history states.
History Log. Although there’s no way to keep history states and snapshots after you close a document, you can keep a record of what you did, and it’s called the History Log. The History Log is text that records your edits, but you can only read it—you can’t play it back or reload it. You can use the History Log to track your edits down to the settings you used in dialogs, and you can use that to manually reproduce the edits made to the file.
If you want to keep a History Log, turn on the History Log check box in the General panel of the Preferences dialog (see Figure 6-34). You can choose whether you want to save a log with each file (select Metadata) or maintain a central log for all files (Text File). You can also use the Edit Log Items pop-up menu to set the level of detail for the log.

This all seems simple enough, but there are privacy issues you might want to think about. If you increase the History Log’s level of detail, the History Log can record minutiae like the folder paths and names of files you open, and the text you enter on text layers. If you choose to store the History Log in metadata, it travels wherever the image travels. For example, if you type “My Stupid Boss” on a text layer because you’re just playing around, and then you delete the text, the original text entry is still in the log. If you store the log in the image metadata, and your boss views the file in Adobe Bridge, which can display the metadata, your boss may come across the log entry containing that text. If you or your organization have an interest in restricting certain information, you may not want detailed editing records to travel with the file. You might limit the level of detail or choose not to store the log in file metadata.
If you set up the History Log in a way that’s appropriate for your work, it can be a valuable tool in analyzing your processes and techniques.
There’s a scene in Monty Python’s Life of Brian in which Brian is trying to persuade his followers to think for themselves. He shouts, “Every one of you is different! You’re all individuals!” One person raises his hand and replies, “I’m not.”
This is the situation we often find with Photoshop users. Even though each person uses the program differently, they think they need to use it just like everyone else does. Not true. You can customize Photoshop in a number of ways through its Preferences submenu (on the Photoshop menu in Mac OS X, and on the Edit menu in Windows).
We’re not going to discuss every preference here—we’re just going to take a look at some of the key items. (We also discuss preferences where relevant elsewhere in the book; for example, we explore color preferences more in Chapter 4.)
Return of Preferences. If you make a change in one of the many Preferences dialogs and then, after closing the dialog, you realize you want to change some other preference, you can return to the last Preferences panel you saw by pressing Command-Option-K (Mac) or Ctrl-Alt-K (Windows).
Navigating through Preferences. The Preferences dialog contains many different panels, each of which offers a different set of options (see Figure 6-34). Sure, you can select each screen from the pop-up menu at the top of the dialog, or by clicking the Next and Prev buttons. But the fastest way to jump to any of the first nine panels while in the Preferences dialog is to press a number key along with Command (Mac) or Ctrl (Windows). For example, if you want to switch to the fourth Preferences pane (Performance) on a Mac, press Command-4. Instead of clicking Next, you can press Command-N (Mac) or Ctrl-N (Windows); instead of clicking Prev, press Command-P (Mac) or Ctrl-P (Windows).
Tip
In Windows, the Preferences folder may be hidden by default. To see it in Windows XP, in a folder window choose Tools > Folder Options, and in the Folder Options dialog, select Show Hidden Files and Folders. To see it in Windows Vista, in a folder window choose Organize > Folder and Search Options, click the View tab, and then select Show Hidden Files and Folders in the Advanced Settings list.
Propagating your preferences. Any time you make a change to one of the Preferences dialogs, Photoshop remembers your alteration, and when you quit, saves it in the file Adobe Photoshop CS3 Prefs.psp. In Mac OS X, it’s in UsersusernameLibraryPreferencesAdobe Photoshop CS3 Settings. In Windows XP, it’s in Documents and SettingsusernameApplication DataAdobeAdobe Photoshop CS3Adobe Photoshop CS3 Settings. In Windows Vista, it’s in UsersUsernameAppDataRoamingAdobe Adobe Photoshop CS3Adobe Photoshop CS3 Settings.
If anything happens to the Adobe Photoshop CS3 Prefs.psp file, all your hard-won preference settings are gone. Because of this, on the Mac, we recommend keeping a backup of that file, or even the whole settings directory (people often back up their images without realizing they should back up this sort of data file, too).
Certain kinds of crashes can corrupt the Photoshop Preferences file. If Photoshop starts acting strange on us, our first step is always to replace the Preferences file with a clean copy (if no copy of the Preferences file is available, then Photoshop will build a new one for you). To reset the Preference files, hold down the Command, Option, and Shift keys (Ctrl, Alt, and Shift keys in Windows) immediately after launching the program—Photoshop will ask if you really want to reset all the preferences.
Tip
In Mac OS X, you create a Zip archive by choosing File > Create Archive Of (filename). In Windows, it’s File > Send To > Compressed (Zipped) Folder.
Conrad doesn’t like going all the way back to the default preferences because there are so many performance-altering settings to remember (scratch disks and so on). He prefers to use the built-in ability of both Mac OS X and Windows to create a ZIP archive of the Preferences file in the same folder as the original, so that when something goes wrong, he can trash the bad prefs file and unzip the known good one.
If you administer a number of different computers that are running Photoshop, you may want to standardize the preferences on all machines. The answer: Copy the Photoshop Prefs file to each computer. Finally, note that Photoshop doesn’t save changes to the preferences until you Quit. If Photoshop crashes, the changes don’t get saved.
UI Font Size. If you have a high-resolution monitor, you may want to increase the UI Font Size setting to keep text in the Photoshop user interface from becoming too small to read.
Export Clipboard. When the Export Clipboard check box is on, Photoshop converts whatever is on the Clipboard into your operating system’s clipboard format when you switch out of Photoshop. This is helpful—indeed, necessary—if you want to paste a selection into some other program. But if you’ve got 10 MB on the Clipboard, that conversion is going to take some time. In situations when you’re running low on RAM, the operating system may slow down. Since the Clipboard is probably the least reliable mechanism for getting images from Photoshop into some other application, we recommend leaving Export Clipboard off until you really need it.
Resize Image During Paste/Place. When this option is off, if you place or paste a graphic into a Photoshop document and the Photoshop document is much smaller than the incoming graphic, you’ll only see the center of the incoming graphic and can’t grab its handles unless you zoom out. Turning on this option always scales down an incoming graphic to fit it within the current document. Sounds convenient, so why would you want to turn it off? If you regularly place graphics that need to maintain their original size, you don’t want Photoshop to scale them at all—in that case, you should keep this option off.
Use Grayscale Toolbar Icon. By default, the Photoshop icon at the top of the toolbar is blue. If you would rather that your user interface be a neutral gray (a better background for color correction), you’ll want to turn on this option (see Figure 6-35), in addition to choosing a neutral gray user interface color in your operating system preferences. The screen shots in this book use this preference, combined with the nice, neutral Graphite color scheme in the Appearance system preference in Mac OS X.

Show Menu Colors. This preference makes a difference only if you’ve used the Edit > Keyboard Shortcuts command to colorize menu commands. For example, if you choose Window > Workspace > What’s New in CS3 and you can’t figure out why the new commands aren’t appearing in blue like they’re supposed to, it’s because this preference is turned off.
Remember Palette Locations. This does what it says—it remembers which palettes were open, which were closed, and where they were located on the screen the last time you quit. We leave this turned on, but we tend to rely on the Save Workspace feature to manage our palettes instead. Note that if you change your monitor resolution, the palettes return to their default locations anyway.
Image Previews. When you save a document in Photoshop, the program can save little thumbnails of your image as file icons. Image previews increase file size on disk by a small amount, so if you need the smallest possible files, you might set this option (see Figure 6-36) to Never Save or Ask When Saving. We always set Image Previews to Ask When Saving, so we can control it on a file-by-file basis.
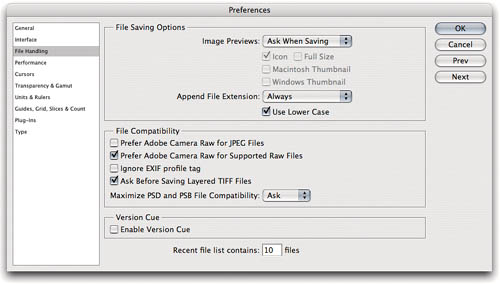
Ask Before Saving Layered TIFF Files. Many benighted souls still don’t realize that TIFF files are first-class citizens that can store anything a Photoshop (.psd) file can, including Photoshop layers. We discuss this in detail in Chapter 12, but we should point out one thing here: When the Ask Before Saving Layered TIFF Files option is turned on in Preferences (as is by default), Photoshop will always alert you when you try to save a file that was a flat (nonlayered) TIFF but now has layers. For example, if you open a TIFF image and add some type, the text shows up on a type layer. Now if you press Command-S (Mac) or Ctrl-S (Windows) to save the file, Photoshop displays the TIFF Options dialog, in which you can either flatten the layers or keep them.
If you find yourself staring at this dialog too much and you keep thinking to yourself, “If I wanted to flatten the image, I would have done it myself,” then go ahead and turn this option off in the Preferences dialog. Then Photoshop won’t bother you anymore, and layered documents will always save as layered files.
Ignore EXIF Profile Tag. This option exists because some early digital cameras embedded the wrong profile into their images, and turning on this option decreased the chance that Photoshop would misinterpret such an image’s color. If you use a recent camera or shoot in raw format, keep this option turned off.
Maximize PSD and PSB File Compatibility. People have strong opinions about this feature, which was known in earlier versions as Maximize Backwards Compatibility in Photoshop Format, Include Composited Image with Layered Files, or 2.5 Format Compatibility. Many users strongly resent the fact that turning on this option can greatly increase file size, because Photoshop saves a flattened version of your layered image along with the layered version. Because Photoshop can open a file just as easily whether this option is off or on, a lot of people choose to turn it off and save the disk space.
However, there are good reasons why this preference exists, and those reasons are enough for us to set this option to Ask.
Some non-Adobe programs claim to view or open layered Photoshop files, but (of course) they don’t contain the entire Photoshop imaging engine. To view Photoshop files, they depend on the flattened compatibility copy that’s provided by the Maximize PSD and PSB File Compatibility option. Without it, you see a placeholder (see Figure 6-37). For example, if you save a Photoshop document with this option turned off and then you try to view the document in a non-Adobe application such as Apple Preview, you won’t be able to view the contents.
If you use Photoshop files in other Adobe Creative Suite programs such as Adobe InDesign or Adobe After Effects, you need to leave this option on, for the same reasons we just talked about.
If you use a digital asset manager, chances are you won’t be able to view layered Photoshop files in it unless the files were saved with Maximize PSD and PSB File Compatibility turned on. Adobe Lightroom 1.1 falls into this category.
Some programs can only understand 8-bit RGB Photoshop files, and they can’t handle Photoshop files saved in other color modes or at other bit depths unless Maximize PSD and PSB File Compatibility is turned on.
Future versions of Photoshop may interpret blending modes slightly differently than they do today due to improvements or bug fixes. If changes occur, and that change affects the look of your file, then you would at least be able to recover the flattened version, if there is one.
Conrad uses Photoshop files in other Creative Suite applications, and on top of that, he uses a couple of different digital asset managers, so he prefers to leave this option set to Always.
Painting Cursors and Other Cursors. We like to set our Painting Cursors (see Figure 6-38) to Normal Brush Tip or Full Size Brush Tip. Both display the diameter of the currently selected brush, but the difference is that Normal only marks the diameter of the areas that are 50 percent opacity or more based on the opacity and hardness of the current brush.

For Other Cursors, we prefer the Precise setting because it helps us position the cursor better than the default cursor icons do. If you set Other Cursors to Standard, you can temporarily display cursors in Precise mode; just press the Caps Lock key.
Gamut Warning. When you turn on View > Gamut Warning (or press Command-Shift-Y on the Mac or Ctrl-Shift-Y in Windows), Photoshop displays all the out-of-gamut pixels in the color you choose here. We recommend you choose a really ugly color (in the Transparency & Gamut Preferences dialog, see Figure 6-39) that doesn’t appear anywhere in your image, such as a bright lime green. This way, when you switch on Gamut Warning, the out-of-gamut areas are quite obvious.
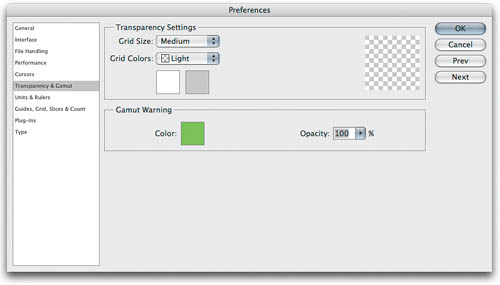
Note, however, that Gamut Warning is of limited use. It tells you which colors are out of gamut, but not how they look. It’s generally more informative to set up and use the View > Proof Colors command instead.
Transparency. Transparency is not a color—it’s the absence of any color at all, even black or white. Therefore, when you see it on a layer, what should it look like? Typically, Photoshop displays transparency as a grid of white and gray boxes in a checkerboard pattern. The Preferences dialog lets you change the colors of the checkerboard and set the size of the squares. We’ve never found a reason to do so, but in the event you’re creating a design that actually uses a gray checkerboard, you can use this preference to avoid confusing those areas with transparent areas.
It’s 11 PM on the night before your big presentation. You’ve been working on this image for 13 hours, and you’re beginning to experience a bad case of “pixel vision.” After making a selection, you run a filter, look carefully, and decide that you don’t like the effect. But before you can reach Undo, you accidentally click on the document window, deselecting the area.
That’s not so bad, is it? Not until you realize that undoing will only undo the deselection, not the filter...and that you haven’t saved for half an hour. The mistake remains, and there’s no way to get rid of it without losing the last 30 minutes of brain-draining work. Or is there? In this section of the chapter, we take a look at the various ways you can save yourself when something goes terribly wrong.
Undo. The first defense against any offensive mistake is, of course, Undo. You can find this on the Edit menu, but we suggest keeping one hand conveniently on the Command or Ctrl and Z keys (Mac) or Ctrl and Z keys (Windows), ready and waiting for the blunder that is sure to come sooner or later. Note that Photoshop is smart enough not to consider some things undoable. Taking a snapshot, for instance, doesn’t count; so you can take a snapshot and then undo whatever you did just before the snapshot. Similarly, you can open the Histogram, hide edges, change foreground or background colors, zoom, scroll, or even duplicate the file, and Photoshop still lets you go back and undo the previous action.
Revert. You’d think this command would be pretty easy to interpret. If you’ve really messed up something in your image, the best option is often simply to revert the entire file to the last saved version by selecting Revert from the File menu. When you apply the Revert command, you don’t lose your undo/History steps—Revert simply becomes another step you can undo. This is useful, because it means you can undo a Revert!
Note that if the only changes you’ve made are in the Missing Profile or Profile Mismatch dialogs that may appear while opening a file, Photoshop CS3 doesn’t enable the Revert command.
History. If you get disoriented after hitting the Undo and Redo shortcuts too many times, or you just want to see the entire list of undo steps available, simply open the History palette and get oriented, then click on the history state on which you want to start over. See “History Palette” earlier in this chapter.
It’s a tradition in Mac software to include Easter eggs—those wacky little undocumented, nonutilitarian features that serve only to amuse the programmer and (they hope) the user. Note that if your friends think you have no sense of humor, you might want to skip this section; it might just annoy you. There are several Easter eggs in Photoshop—the usual ones that are included just for fun, and one important tribute.
Red Pill. A tradition even more venerable than Easter Eggs is code names. Almost all software has a code name that the developers use before the product is christened with a real shipping name. Photoshop code names have been Big Electric Cat (Photoshop 4), Strange Cargo (Photoshop 5), Venus in Furs (Photoshop 6), Liquid Sky (Photoshop 7), Dark Matter (Photoshop CS), and Space Monkey (Photoshop CS2). Most of the code names are favorite pop culture references of the Photoshop team; Google can help you track those down. The code name for Photoshop CS3 was Red Pill. To see the Red Pill splash screen in Photoshop in Mac OS X, hold down the Command key while choosing About Photoshop from the Photoshop menu. In Photoshop for Windows, press Ctrl and choose About Photoshop from the Help menu (see Figure 6-40).
Tip
To speed up display of long, scrolling lists such as the credits, hold down the Option or Alt key once they start rolling.
Credits and quotes. If you leave open the standard About Photoshop screen or the Red Pill splash screen, you’ll notice that the credits at the bottom of the screen start to scroll by, thanking everyone and their dog for participating in the development process.
The now-legendary Adobe Transient Witticisms demonstrate just how twisted people get when building a new version of Photoshop. Here’s how to find them in Photoshop CS3: Wait until the scrolling credits stop scrolling at the end, then, as soon as they’ve finished, Option-click (Mac) or Alt-click (Windows) in the space between Version 10.0 and the credits.
In Memoriam. On a more somber note, the Photoshop team felt that it was only fitting to remember this book’s coauthor, Bruce Fraser, with more than just a line in the splash screen credits. While readers appreciated Bruce’s gift for explaining the most technical aspects of Photoshop and digital imaging in clear, down-to-earth language, the Photoshop team valued Bruce just as much for his ability to clearly express the real needs and concerns of Photoshop users. As Bruce passed away before Photoshop CS3 was complete, the Photoshop team included an additional Easter egg in memory of Bruce Fraser.
Viewing the Bruce Fraser memorial Easter egg takes a bit more effort than viewing other hidden splash screens, because you have to process it in Photoshop.
Open the alternate Red Pill splash screen as we just described.
Take a screen shot and put it on the Clipboard, which you can do in one step. In Mac OS X, press Control-Command-Shift-4 (Mac) and drag a rectangle around the splash screen. On Windows, press Print Screen (Windows).
Close the splash screen.
In Photoshop choose File > New (the Preset pop-up menu should say Clipboard), click OK, and choose Edit > Paste.
Choose Image > Adjust > Levels, and drag the black Input slider all the way to the right. You should see a portrait of Bruce taken by his friend Jeff Schewe (see Figure 6-41).

Paw Prints. While the Levels dialog is open on the alternate splash screen, you can check out yet another version of the splash screen. Option-click (Mac) or Alt-click (Windows) the Cancel button; pressing the Option/Alt modifier key changes Cancel to Reset so you can undo your earlier slider change. Choose Red from the Channel pop-up menu, and then slowly drag the white slider to the left. You will first see the face of a cat appear in the red pill; when you drag the white slider all the way to the left, you’ll see red cat paw prints and Jeff Tranberry’s dedication at the bottom of the splash screen.
Merlin Lives!. Finally (at least, this is the last one we know about), there’s a little hidden dialog nestled away. When you hold down the Option/Alt key while selecting Palette Options from the palette menus in either the Paths, Layers, or Channels palette, Merlin happily jumps out.