
Chapter 5. Python Extensions
Simplicity, carried to the extreme, becomes elegance.
The main objective of this chapter is to show you how you can extend Python to take advantage of existing binary library modules. Python provides a couple of ways to achieve this, and we’ll take a look at both of them.
Out of the box, Python cannot directly access the underlying hardware, nor can it interface directly with the software library modules provided by most hardware vendors. Python can, however, communicate with anything connected to a serial port or to a USB device that utilizes what is referred to as a virtual serial port (many USB–to–RS-485 converters use this technique). For those types of applications, an extension module typically isn’t necessary.
One way to give Python access to the real world, or just add some faster or specialized functionality, is to use the C programming language to create extensions. These are basically dynamically linked library (DLL) objects that give Python capabilities beyond what is included in its own libraries. We’ll mainly be using extensions as “wrappers” for the DLL modules supplied with commercial instruments and interfaces, but they might also be used to optimize a particular part of a Python program to improve on processing speed.
Another approach is to use Python’s ctypes library, which contains methods to directly access the functions in an external DLL. The ctypes library can be used directly from within a Python program without the need to write any C code, and it supports both the Linux and Windows environments. The downside is that if you need additional functionality in the interface between your program and the external library object, it will need to be written in Python, and it won’t be as fast as the equivalent code written in C as a wrapper for the external library. ctypes also imposes a processing penalty in that it is not particularly fast. But, if your application doesn’t have a need for speed, it might be the easiest way to go.
Which method to use depends largely on what you want to accomplish with the interface. If the external DLL already does everything you need, there’s probably no good reason to go through the process of writing your own extension wrapper in C. On the other hand, if you need to incorporate some additional functionality, such as error checking, buffer handling, or custom capabilities based on the functions in the external DLL, you should probably consider writing a custom wrapper in C.
Throughout this chapter I’ll be using the acronym DLL to refer to both Windows-style DLL objects and Linux-type .so (shared object) dynamic libraries. Python’s shared library objects typically have a .pyd extension. Also, bear in mind that most discussions about vendor DLL modules that provide an API for data acquisition and control hardware will, by default, be referring to the Windows environment. The reality is simply that there isn’t much available (yet) for Linux. The electronics engineering world is very Windows-centric, and that’s just something we’ll have to deal with when working with plug-in cards for data acquisition and control signal output.
Creating Python Extensions in C
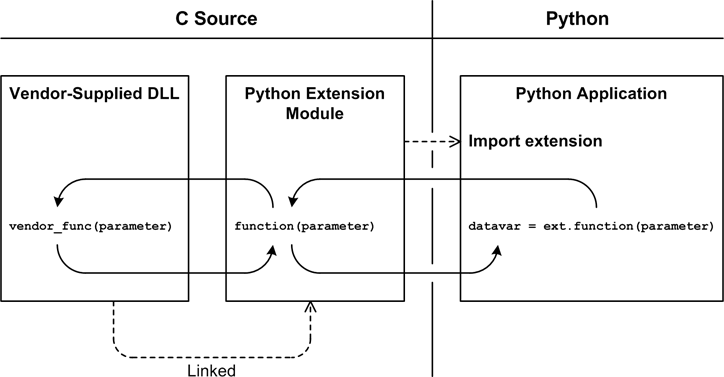
In order to use Python for an automated instrumentation application, we will need to build a bridge between an instrument or interface hardware and the Python application that will access it. In some cases the application program interface (API) DLL supplied by the vendor provides all the necessary functionality; the Python program just needs to be able to access it. In a situation like this you might want to consider using the ctypes library, discussed in a later section. In other cases, however, the vendor’s DLL may not supply the necessary functionality, or it may be architected such that it is difficult to use without helper functions of some sort. This is where C comes into the picture. Figure 5-1 shows the relationships between a low-level API library object, an extension module, and a Python application.
This section is an overview of the basic steps involved in creating a Python extension module. In some ways this might seem like a big step from the overviews of Python and C presented in the preceding chapters, but not to worry. The intent here is to take a look at what is entailed, and not get too wrapped up in the gory details. Later, when we explore some specific applications in detail, we will go through the steps involved and explain each one. By that point you should be comfortable enough with Python that it will all make a lot more sense. Of course, if you already know Python or C, or both, this won’t be much of a stretch for you: it’s just a new library API to learn and some caveats to observe.
Python’s C Extension API
Adding new functionality to Python is straightforward and fairly painless. Python provides an API for just this purpose that defines the types, macros, and external variables and functions needed to allow a Python application to import an extension module written in C and treat it as if it had been written in Python from the outset. The Python API is incorporated into a C source file by including the header file Python.h and then linking the module with the Python libraries.
The intent of this section is to provide an overview of what an extension module looks like and how it is structured, since in this book we will be building most of our extensions by hand. While something like the SWIG tool (available from http://www.swig.org) can help automate the process of creating a C extension module, using the header files for the external module or modules to create (most of) the necessary extension code, most of what we will need extensions for won’t really warrant this approach. SWIG does, however, have some interesting uses, one of which is using Python to test C code. A description of this can be found here: http://www.swig.org/papers/Py96/python96.html.
Extension Source Module Organization
The internal layout of an extension source module typically follows a pattern like the one shown in Figure 5-2.
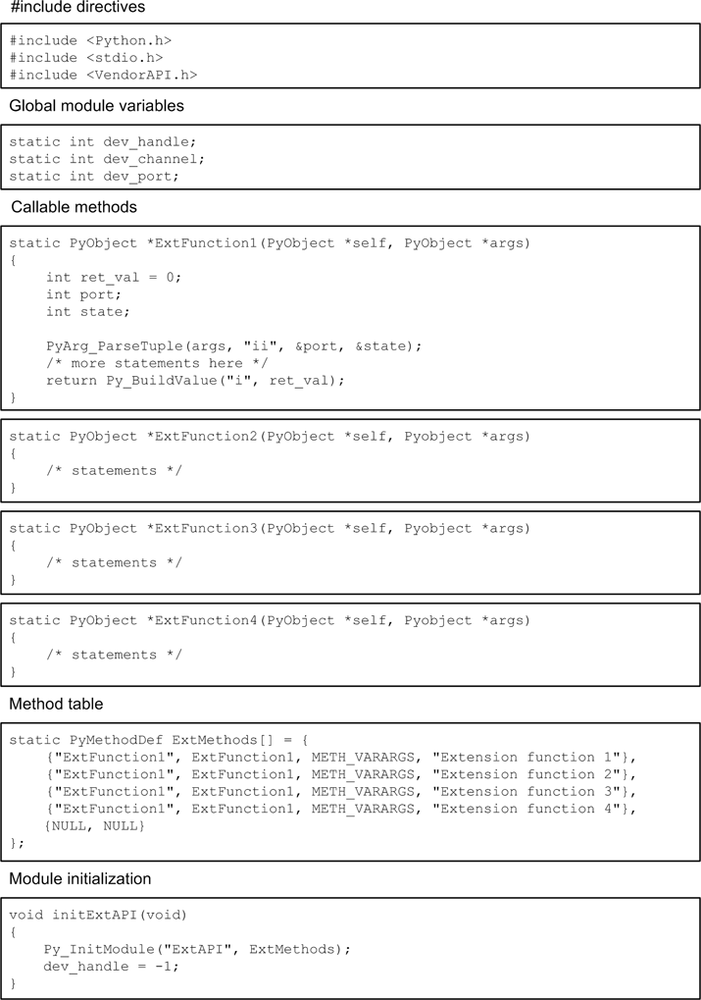
The primary sections shown in Figure 5-2 are described in Table 5-1.
Section | Purpose |
| Python.h must be the first header file included. One would also want to include whatever C standard library headers are necessary and the vendor-supplied API header file. |
Global module variables | Any necessary global module variables are declared here, and are defined as static. In fact, just about every variable and function in the module is defined as static, with the exception of the initialization function. |
Callable methods | An extension module may
have any number of methods available to a Python program.
Although Python treats these as methods, they are written as
functions in the C source module. Each is defined as static with
a type of |
Method table | The method table provides the dynamic linkage between the methods in the compiled extension module and whatever Python program is importing it. |
Initialization | The initialization function always begins with the “init” prefix. This is what Python will expect to execute when the extension is imported. |
Python API Types and Functions
The skeleton example shown in Figure 5-2 utilizes the following types from the Python API:
PyObjectRepresents an arbitrary Python data object.
PyMethodDefDefines the methods declared in the extension module as a
NULL-terminated array. This table is passed to the Python interpreter by the extension module’s initialization function.
It also uses the following API functions:
PyArg_ParseTuple()Parses the arguments in the list pointed to by the
*argsparameter according to a format definition string and sets the values of the variables following the parameter definition string.Py_BuildValue()Builds a Python return value according to a format definition string.
Py_InitModulePasses the address of the method table to the interpreter.
The Method Table
The method table defines the entry points for accessing the internal functions in the extension, and it deserves a bit more explanation. The full syntax of an entry in the table is as follows:
{method_name, method_function, method_flags, method_docstring}The fields are defined in detail in Table 5-2.
Field | Description |
| A C |
| A pointer to a function
within the extension module that is called when the name is
invoked. It is of the type |
| A bit field used to
indicate either a calling convention or a binding convention.
|
| An optional string that
will be used as the docstring for the function. In other words,
this is what will appear if you type |
Method Flags
The method_flags entry is a bit field. Its value depends on what flags are specified, and each flag is
defined to be a value that is the equivalent of setting a unique bit
within an integer variable. Although this implies that the flags can be
combined without overwriting each other, in actuality only the calling
convention flags METH_VARARGS and
METH_KEYWORDS can be used at the same
time, although they can be combined with a binding flag. For a detailed
discussion of the method flags, refer to the Python documentation (you
can view it online here: http://docs.python.org/c-api/structures.html).
We will be using only a few of the available method flags. The rest are more useful when dealing with complex interfaces that we won’t be using. Table 5-3 lists the three most common method flags. In reality, if you are writing your own extension it is usually possible to design the extension functions such that the more esoteric flags are not necessary.
Field | Description |
| This defines the typical
calling convention. In this case, the extension functions are of
the type |
| If you want to use
functions with predefined keyword values (i.e., a Python-style
parameter of the type |
| Functions that take no
parameters still need to define two input parameters, although
the functions don’t need to check them. The first parameter,
|
METH_VARARGS example
We can use PyArg_ParseTuple() to extract the parameter values and write the data into
variables defined within the function:
static PyObject *ex_varargs(PyObject *self, PyObject *args)
{
int param1;
double param2;
char param3[80];
PyArg_ParseTuple(args, "ids", &dev_handle, ¶m2, param3);
return PyString_FromFormat("Received %d, %f, %s" % (param1, param2, param3));
}Notice that we don’t need the address operator with the string
(although we could have used ¶m3[0] to achieve the same effect).
Also note that if the function takes three parameters, it needs to
receive three parameters when called; no more, no less.
METH_KEYWORDS example
A function using the METH_KEYWORDS calling convention uses the
Python C API method PyArg_ParseTupleAndKeywords() to extract
parameter values and associate parameter keywords with names. The
syntax of PyArg_ParseTupleAndKeywords() is defined
as:
int PyArg_ParseTupleAndKeywords(PyObject *arg, PyObject *kwdict,
                                char *format, char **kwlist, ...);
The parameter kwdict is a
pointer to a dictionary object passed in from the Python runtime when
the function is called, and kwlist
is a null-terminated list of strings containing the names of the
parameters. METH_KEYWORDS is useful
when you want to assign a value to a specific parameter by name. In
other words, a METH_KEYWORDS
function supports both positional and named parameters. The PyArg_ParseTupleAndKeywords() function is
used as follows:
static PyObject *ex_keywords(PyObject *self, PyObject *args, PyObject *kw)
{
int param1;
double param2;
char param3[80];
static char *kwlist[] = {"param1", "param2", "param3", NULL}
if (!PyArg_ParseTupleAndKeywords(*args, *kw, "ids", kwlist,
&dev_handle, ¶m2, param3);
return NULL;
return PyString_FromFormat("Received %d, %f, %s" % (param1, param2, param3));
}Passing Data
Passing integers between an application program and a wrapper is
fine, but what if we want to work with things like strings,
floating-point values, lists, or other Python objects? The methods
PyArg_ParseTuple(), PyArg_ParseTupleAndKeywords(), and Py_BuildValue() can handle the common Python
data types, and there are also other methods available, such as PyArg_VaParse(), PyArg_Parse(), PyArg_UnpackTuple(), and Py_VaBuildValue(). Refer to Python’s C API documentation for details.
The key to PyArg_ParseTuple() and PyArg_ParseTupleAndKeywords() lies in
understanding the various format codes that are used. Table 5-4 lists some of the
more commonly used codes.
Code | Python type | C type | Description |
|
|
| Converts a Python integer
to a small (byte-sized) |
|
|
| Converts a Python
character (a string of length 1) to a C |
|
|
| Converts a Python
floating-point number to a C |
|
|
| Converts a Python complex
number to a C |
|
|
| Converts a Python
floating-point number to a C |
|
|
| Converts a Python integer
to a C |
|
|
| Converts a Python integer
to a default C |
|
|
| Converts a Python integer
to a C |
|
|
| Creates a pointer to a
string. The string may not be |
|
|
| Generates two values: the first is a pointer to the string, and the second is its length. |
|
|
| Creates a pointer to a
string, which may be |
|
|
| Same as |
For example, if we had an extension function that expected a floating-point value as an input parameter, like, say, an analog output function, we could write something like this:
static PyObject *WriteAnalog(PyObject *self, PyObject *args)
{
    int     dev_handle;
    int     out_port;
    float   out_value;

    PyArg_ParseTuple(args, "iif", &dev_handle, &out_port, &out_pin, &out_value);
    rc = AIOWriteData(dev_handle, out_port, out_pin, out_value);

    return Py_BuildValue("i", rc);
}
In this example, the function AIOWriteData() would be supplied by the
vendor’s DLL. In reality, analog I/O tends to be somewhat more complex
than this, because there are often parameters for things like the output
range (+/− V), the reference source, a conversion clock, and so
on.
Using the Python C Extension API
There are many other functions and types available in Python’s API that we have not covered here. However, what we have already seen should be sufficient for most of the extension modules we will need to create.
Generic Discrete I/O API
Let’s take a look at what an extension written in C for a hypothetical discrete digital I/O card would look like. First off, the device uses a DLL to access the hardware via the PCI bus, so we need to know what API functions the DLL exposes. These are defined in the header file supplied with the DLL. This is a very simple piece of hardware, so just eight basic functions are needed. Here is the hypothetical header file (PDev.h) we’ll be using:
/* PDev.h - API for a simple discrete digital I/O card */

typedef int dev_handle;

#define PDEV_OK  1
#define PDEV_ERR 0

/*
 * Open Device Channel
 *
 * Opens a channel to a particular I/O device. The device is specified
 * by passing its unit number, which is assigned to the device by a
 * setup utility. dev_handle is an int type.
 *
 * Returns:   If dev_handle is > 0 then handle is valid
 *            If dev_handle is = 0 then an error has occurred
 */
dev_handle PDevOpen(int unit_num);

/* Close Device Channel
 * Closes a channel to a particular I/O device. Once a channel is
 * closed it must be explicitly re-opened by using the PDevOpen API
 * function. Closing a channel does not reset the DIO configuration.
 *
 * Returns:   If return is 1 (true) then channel closed OK
 *            If return is = 0 then an error has occurred
 */
int PDevClose(dev_handle handle);

/*
 * Reset Device Configuration
 *
 * Forces the device to perform an internal reset. All
 * configuration is returned to the factory default
 * setting (All DIO is defined as inputs).
 *
 * Returns:   1 (true) if no error occurred
 *            0 (false) if error encountered
 */
int PDevCfgReset(dev_handle handle);

/*
 * Configure Device Discrete I/O
 *
 * Defines the pins to be assigned as outputs. By default all
 * pins are in the read mode initially, and they must be
 * specifically set to the write mode. All 16 I/O pins are
 * assigned at once. For any pin where the corresponding binary
 * value of the assignment parameter is 1, then the pin will
 * be an output.
 *
 * Returns:   1 (true) if no error occurred
 *            0 (false) if error encountered
 */
int PDevDIOCfg(dev_handle handle, int out_pins);

/*
 * Read Discrete Input Pin
 *
 * Reads the data present on a particular pin. The pin may be
 * either an input or an output. If the pin is an output the
 * value returned will be the value last assigned to the pin.
 *
 * Returns:    The input value for the specified pin, which
 *             will be either 0 or 1. An error is indicated
 *             by a return value of −1.
 */
int PDevDIOReadBit(dev_handle handle, int port, int pin);

/*
 * Read Discrete Input Port
 *
 * Reads the data present on an entire port and returns it as a
 * byte value. The individual pins may be either inputs or outputs.
 * If the pins have been defined as inputs then the value read
 * will be the value last assigned to the pins.
 *
 * Returns:   An integer value representing the input states
 *            of all pins in the specified port. Only the
 *            least significant byte of the return value is
 *            valid. An error is indicated by a return value
 *            of −1.
 */
int PDevDIOReadPort(dev_handle handle, int port);

/*
 * Write Discrete Output Pin
 *
 * Sets a particular pin of a specified port to a value of either
 * 0 (off) or 1 (on, typically +5V). The pin must be defined as
 * an output or the call will return an error code.
 *
 * Returns:   1 (true) if no error occurred
 *            0 (false) if error encountered
 */
int PDevDIOWriteBit(dev_handle handle, int port, int pin, int value);

/*
 * Write Discrete Output Port
 *
 * Sets all of the pins of a specified port to the unsigned value
 * passed in port_value parameter. Only the lower eight bits of the
 * parameter are used. If any pin in the port is configured as an
 * input then an error code will be returned.
 *
 * Returns:   1 (true) if no error occurred
 *            0 (false) if error encountered
 */
int PDevDIOWritePort(dev_handle handle, int port, int value);
Our hypothetical device has two 8-bit ports, and the pins (bits) of each port may be set to be either inputs or outputs. Pins may be read or written either individually or as a group of eight bits (a port).
Generic Wrapper Example
Let’s create a simple wrapper for the device’s DLL. We won’t try to be clever here, although there are some things that could be implemented if we wanted to give the wrapper extended capabilities. I’ll talk about those a little later.
The first step is to determine what we will need to import, and define any global variables the wrapper will need:
#include    <Python.h>
#include    <stdio.h>
#include    <PDev.h>
Notice that in this example we don’t really need any static global variables.
So, now that we have the top of the file, let’s do the bottom. The second step is to create the initialization function, which is what Python will execute when the wrapper DLL (a .pyd file) is loaded, and define the function mapping table:
static PyMethodDef PDevapiMethods[] = {
    {"OpenDevice",      OpenDev,    METH_VARARGS,
                        "Open specific DIO device."},
    {"CloseDevice",     CloseDev,   METH_VARARGS,
                        "Close an open DIO device."},
    {"ConfigOutputs",   ConfigDev,  METH_VARARGS,
                        "Config DIO pins as outputs."},
    {"ConfigReset",     ConfigRst,  METH_VARARGS,
                        "Reset all DIO pins to input mode."},
    {"ReadInputPin",    ReadPin,    METH_VARARGS,
                        "Read a single specific pin."},
    {"ReadInputPort",   ReadPort,   METH_VARARGS,
                        "Read an entire 8-bit port."},
    {"WriteOutputPin",  WritePin,   METH_VARARGS,
                        "Write to a specific pin."},
    {"WriteOutputPort", WritePort,  METH_VARARGS,
                        "Write to an entire port."},
    {NULL, NULL}
};


/*******************************************************************************/
/*  initPDevapi
 *
 *  Initialize this module when loaded by Python. Instantiates the methods table.
 *
 *  No input parameters.
 *
 *  Returns nothing.
 *******************************************************************************/
void initPDevAPI(void)
{
    Py_InitModule("PDevapi", PDevapiMethods);

    dev_handle = −1;
}
There’s nothing fancy here; I’ve basically just mapped the functions in the API to wrapper functions on a one-to-one basis. This does mean, however, that the Python code that calls this module will need to be responsible for keeping track of the device ID and the device handle, at a minimum.
Lastly, we define the interface functions. Here’s the entire extension, which I’ve called PDevAPI.c:
#include <Python.h>
#include <stdio.h>
#include <PDev.h>
static PyObject *OpenDev(PyObject *self, PyObject *args)
{
int dev_num;
int dev_handle;
PyArg_ParseTuple(args, "i", &dev_num);
dev_handle = PDevOpen(dev_num);
return Py_BuildValue("i", dev_handle);
}
static PyObject *CloseDev(PyObject *self, PyObject *args)
{
int dev_handle;
int rc;
PyArg_ParseTuple(args, "i", &dev_handle);
rc = PDevClose(dev_handle);
return Py_BuildValue("i", rc);
}
static PyObject *ConfigDev(PyObject *self, PyObject *args)
{
int dev_handle;
char cfg_str[32];
int rc;
memset((char *) cfg_str, '�', 32); /* clear config string */
PyArg_ParseTuple(args, "is", &dev_handle, cfg_str);
rc = PDevDIOCfg(dev_handle, cfg_str);
return Py_BuildValue("i", rc);
}
static PyObject *ConfigRst(PyObject *self, PyObject *args)
{
int dev_handle;
int rc;
PyArg_ParseTuple(args, "i", &dev_handle);
rc = PDevCfgReset(dev_handle);
return Py_BuildValue("i", rc);
}
static PyObject *ReadPin(PyObject *self, PyObject *args)
{
int dev_handle;
int in_port;
int in_pin;
int in_value;
PyArg_ParseTuple(args, "iii", &dev_handle, &in_port, &in_pin);
in_value = PDevDIOReadBit(dev_handle, in_port, in_pin);
return Py_BuildValue("i", in_value);
}
static PyObject *ReadPort(PyObject *self, PyObject *args)
{
int dev_handle;
int in_port;
int in_value;
PyArg_ParseTuple(args, "iii", &dev_handle, &in_port);
in_value = PDevDIOReadPort(dev_handle, in_port);
return Py_BuildValue("i", in_value);
}
static PyObject *WritePin(PyObject *self, PyObject *args)
{
int dev_handle;
int out_port;
int out_pin;
int out_value;
PyArg_ParseTuple(args, "iii", &dev_handle, &out_port, &out_pin, &out_value);
rc = PDevDIOWriteBit(dev_handle, out_port, out_pin, out_value);
return Py_BuildValue("i", rc);
}
static PyObject *WritePort(PyObject *self, PyObject *args)
int dev_handle;
int out_port;
int out_value;
PyArg_ParseTuple(args, "iii", &dev_handle, &out_port, &out_value);
rc = PDevDIOWritePort(dev_handle, out_port, out_value);
return Py_BuildValue("i", rc);
}
static PyMethodDef PDevapiMethods[] = {
{"OpenDevice", OpenDev, METH_VARARGS,
"Open specific DIO device."},
{"CloseDevice", CloseDev, METH_VARARGS,
"Close an open DIO device."},
{"ConfigOutputs", ConfigDev, METH_VARARGS,
"Config DIO pins as outputs."},
{"ConfigReset", ConfigRst, METH_VARARGS,
"Reset all DIO pins to input mode."},
{"ReadInputPin", ReadPin, METH_VARARGS,
"Read a single specific pin."},
{"ReadInputPort", ReadPort, METH_VARARGS,
"Read an entire 8-bit port."},
{"WriteOutputPin", WritePin, METH_VARARGS,
"Write to a specific pin."},
{"WriteOutputPort", WritePort, METH_VARARGS,
"Write to an entire port."},
{NULL, NULL}
};
/*******************************************************************************/
/* initPDevapi
*
* Initialize this module when loaded by Python. Instantiates the methods table.
*
* No input parameters.
*
* Returns nothing.
*******************************************************************************/
void initPDevAPI(void)
{
Py_InitModule("PDevapi", PDevapiMethods);And that’s it.
I should point out that this API uses integers and strings only as parameter values, and the functions return only integers. The extension code shown is just a translation wrapper between the device API and Python, nothing more. In many cases, however, that’s all a wrapper really needs to be.
Calling the Extension
In a real-life situation, you would probably want to create a Python module with functions for opening the device channel and saving the handle the API returns in a persistent variable object, writing to specific bits and then verifying that the bits changed state as expected, and even setting up an output pattern playback capability, among other things.
Let’s assume that we want to get the value of a particular input pin and write an 8-bit value to a port to set the status of some external hardware based on the true or false state of that particular input pin. Here’s a simple example:
import PDevAPI

PDdevID = 1
PDev = 0

# open device, check for error return
PDev_handle = PDevAPI.OpenDevice(PDevID)

if PDev_handle:
    # define port 0 as inputs, port 1 as outputs
    PDevAPI.ConfigOutputs(PDev_handle, 0xFF00)

    pinval = PDevAPI.ReadInputPin(PDev_handle, 0, 2)
    if pinval:
        portval = 49
    else:
        portval = 0
    PDevAPI.WriteOutputPort(PDev_handle, 1, 42)
    PDevAPI.CloseDevice(PDev_handle)
    return 1
else:
    print "Could not open device: %d" % PdevID
    return 0
The example starts by attempting to open the interface to the
hardware. If it succeeds, the handle value contains some positive
integer, which is equivalent to True
in Python. Should it fail and return 0, we can treat it as False.
Next, we want to define the inputs and outputs. The call to
PDev.ConfigOutputs does this. The
value of 0xFF00 indicates that we
want the uppermost 8 bits of the 16 bits available in the hardware to be
outputs:
0xFF0016 = 11111111000000002
Now that we have a valid device handle and the I/O has been
configured, we can read a specific bit and take action based on its
returned value. In this case we will write the decimal value 42 to the output port if the input bit is
true; otherwise, we write all 0 bits to the output port.
The number 42 is interesting in its own right, but in this case it is the decimal equivalent of 001010102. These might be control signals for a bank of heater elements, a set of valves, perhaps some lights, or just about anything else that could be controlled effectively in an on/off fashion.
Lastly, let’s look at some of things I didn’t put into this code.
For starters, there’s no error return checking for the ConfigOutputs(), ReadInputPin(), WriteOutputPort(), and CloseDevice() calls. I left this out just to
keep things simple, but in reality you would probably want to include
this, especially if whatever this interface is controlling could
possibly do something that could cause damage in the real world. In
fact, it’s not uncommon for high-reliability software to have as many,
or even more, lines of code dedicated to error checking and fault
handling than lines of code that deal directly with the control logic.
It’s easy to set an output value, but it can take some effort to detect
a problem after the value has been set, when something doesn’t work
correctly. The software must then take action to try to recover from the
fault, or at least put the system into a safe state to minimize any
possible damage. In a later chapter I’ll show you how to do a simple
fault analysis so you can get an idea of what might go wrong, and the
possible actions the software could take to deal with the
problem.
The example also doesn’t provide any support for dealing directly with bits. We could easily write a couple of utility functions that would allow us to enable or disable a specific bit without disturbing any other bits in the byte that makes up a port. A time-honored way to do this is called read-modify-write. Here’s how to set a particular bit:
def SetPortBit(PDev_handle, portnum, bitpos):
    # read the current port state
    portval = PDevAPI.ReadInputPort(PDev_handle, portnum)

    if portval >= 0:
        insval = 1 << bitpos
        # change the designated bit
        newval = portval | insval
        # write it back out
        rc = PDevAPI.WriteOutputPort(PDev_handle, portnum, newval)
    else:
        rc = 0
return rc
The shift operation generates a value that is a power of two
(2n). So, a bit at
position 20 is 1,
24 is 16, and so on. The resulting value, or
mask, is then ORed into the value read from the port (most
discrete digital I/O devices will allow you to read from any port or
pin, even those designated as outputs), and the mask value is applied.
It doesn’t matter what is already at the designated bit position, it
will be set to 1. The rest of the bits in the mask value are 0s, so a 1
in the original data in portval stays
1, and a 0 stays 0. (Refer back to Chapter 3 for an overview of how
Python’s bitwise operators work.)
Clearing a bit (setting it to 0) involves creating a mask with all
the bits except the one we want to clear set to 1, and then using an
AND instead of an OR. Here’s an example:
def ClearPortBit(PDev_handle, bitpos):
    # read the current port state
    portval = PDevAPI.ReadInputPort(PDev_handle, portnum)

    if portval >= 0:
        insval = 1 << bitpos
        newval = ~insval & portval
        rc = PDevAPI.WriteOutputPort(PDev_handle, portnum, newval)
    else:
        rc = 0
return rc
The function ClearPortBit() reads
the current output port state, creates a bit value using a left shift,
and then applies the one’s complement of the bit value to the current
port value using Python’s bitwise AND
operator. If bitpos is 2 and the
resulting value of insval is 4, the
bit at position 22 is 1, or 00000100 in
binary. Inverting this results in 11111011, or 251. When this is
ANDed with the port bit values in
portval, any port bit that is a 1
will remain 1, 0s will remain 0s, and the bit we want to clear at
22 will always end up as 0.
You might be concerned about the output port glitching, or outputting a short spike when the new value is written back, but not to worry. A correctly designed discrete digital I/O port will not do this, so you can safely assume that the hardware will do what you expect. If you do happen run across some hardware that behaves this way, well, you might want to consider using something else instead. The reason you don’t have to worry is that almost every discrete digital I/O device made utilizes latches. The data is loaded into the latch, and the latch drives the output pins. The result is that any latched output that is already a 1 will remain a 1. (See Chapter 2 for a schematic of a latched discrete digital I/O port.)
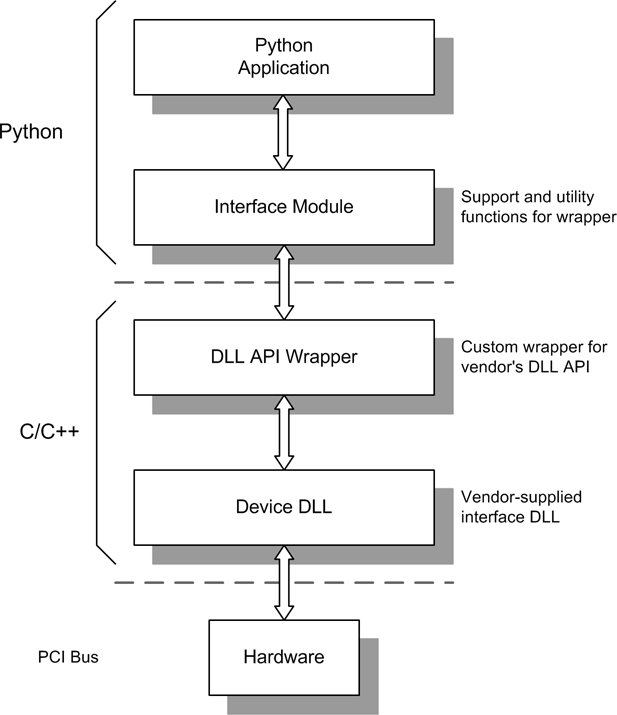
You could, of course, write utility functions to handle bit manipulation in C and put them into the extension, rather than writing them in Python, as I’ve done. The resulting code would execute faster than native Python, but it might not be worth the trouble. It is often easier to keep the core low-level I/O functions in the wrapper module, and then create a module specifically to interface with the low-level wrapper. The Python interface module could also implement error checking and parameter verification, and provide additional utilities that aren’t speed-critical. In effect, the wrapper would have two parts: one part in C to interface with the hardware, and one part in Python to provide extended capabilities to the application that uses it. Figure 5-3 shows this concept in block diagram form.
Python’s ctypes Foreign Function Library
There is another way to get at the functions exposed by a DLL: ctypes, Python’s library for accessing external DLL objects. This section provides a general overview of ctypes.
The ctypes library gives Python programs the ability to directly access the functions within an external DLL without the need to create interface code in C. ctypes is part of the standard distribution with Python 2.5 and later, and it supports both Linux and Windows environments, with the usual caveats concerning the fundamental differences between the two platforms.
Loading External DLLs with ctypes
ctypes exports three primary interface classes: cdll, windll, and oledll. cdll
is used for both Linux and Windows and supports library modules that use
the cdecl calling convention. The
windll class supports Windows
libraries that use the stdcall
convention. oledll also uses the
stdcall convention, but it assumes
that the library functions return an HRESULT error code. cdecl is the default for C programs, so most
library objects on Linux will use this convention. On a Windows system
you should check the appropriate Windows technical documentation to see
what the various library objects use as their calling convention.
Using ctypes is straightforward. Here is what happens when the Windows C runtime library, msvcrt (Microsoft Visual C Run-Time), is accessed using ctypes:
>>>from ctypes import *>>>msvcrt = cdll.msvcrt>>>msvcrt<CDLL 'msvcrt', handle 78000000 at 97b0f0> >>>msvcrt.printf("Testing... ")Testing... 11 >>>rc = msvcrt.printf("Testing... ")Testing...
This calls the trusty printf()
function, which behaves exactly like you might expect. Note that the
call returns the number of characters passed to printf(). If you look up the documentation for
the printf() function you will see
that this is exactly what it is supposed to do, although in most cases
the return value is simply ignored. In order to catch the return value
and prevent it from showing up on the console, I used the variable
rc.
On a Linux system, you will need to specify the full name of the shared library object:
libc = cdll.LoadLibrary("libc.so.6")Alternatively, you can pass the library name into the class constructor method, like this:
libc = CDLL("libc.so.6")This technique also works with Windows DLLs:
libc = CDLL("msvcrt.dll")Notice that with Windows the .dll extension is supplied automatically, but with Linux the full name must be used.
Once a DLL has been loaded using one of the ctypes classes, its internal functions are accessed as methods of the resulting ctypes object.
Basic Data Types in ctypes
When calling a function in an external DLL or capturing a return value, one needs to be aware of how ctypes translates between Python’s native data types and those used in C. Table 5-5 shows a comparison of ctypes, C, and Python data types.
ctypes type | C type | Python type |
|
| 1-character |
|
| 1-character |
|
|
|
|
|
|
|
|
|
|
|
|
|
|
|
|
|
|
|
|
|
|
|
|
|
|
|
|
|
|
|
|
|
|
|
|
|
|
|
|
|
|
|
|
|
|
|
|
Understanding how ctypes handles the conversion between Python and C is essential. For example, if we want to pass a floating-point value to a DLL function from Python, it must be converted into the appropriate type. Just handing off a float value from Python won’t work.
Let’s assume that a DLL has been loaded and we now have an object
called someDLL to reference it. If it
contains a function called someFunc()
that we want to use, and this function accepts an integer parameter and
a floating-point parameter, we might think that the following would
work:
int_var = 5
float_var = 22.47
someDLL.someFunc(int_var, float_var)
Unfortunately, this won’t work, and Python will issue an exception traceback. The reason for this is that all Python types except for integers and strings have to be wrapped with the appropriate ctypes type, like this:
someDLL.someFunc(int_var, c_double(float_var))
This will now work as expected.
The native Python object types None, integer, long, and string are the only types that can be used
directly as parameters via ctypes to functions in a
DLL. A None object is passed as a
NULL pointer. A string object is passed as a pointer to the
location in memory where the data resides. Integer types (both integer and long) are passed as whatever the platform’s
default C int type happens to be.
Note that a long data object will be
masked to fit into the default C int
type.
Using ctypes
Although ctypes may appear to be simple, it can quickly become rather complex if you want to do things like pass pointers, define a callback function, or get the value of a variable exported from a DLL. We will stick with the basic capabilities in this book, but I would encourage you to take a look at the ctypes documentation located at http://docs.python.org/library/ctypes.html. Also, the various data types in ctypes are useful for more than just accessing an external DLL. In Chapter 12 I’ll show you how to use ctypes to handle binary data directly in a Python program, including C structures, and in Chapter 14 we’ll see how ctypes is used in a commercial API for a USB interface device.
Summary
In this chapter we’ve seen the basics of what is involved with creating an interface between a Python program and an external device via a vendor-supplied DLL. Fortunately, adding functionality to Python is not necessarily a painful process; it just requires some up-front planning. This means that reading the available documentation on designing and implementing Python extensions is really not optional, which is why this chapter is peppered with URLs to sources of information.
Reading and understanding the API for a foreign DLL is also essential. When creating a wrapper extension for an existing DLL, the biggest obstacle one typically encounters is the API for the DLL. Occasionally it will be necessary to contact the vendor directly and request some technical support. Be forewarned, however, that many vendors either don’t have a clue about Python or don’t want to be bothered with it, so you may need to invest some time experimenting to find the best approach for creating a working interface.
With what we’ve covered here, you should be able to see where you want to go from where you are, and have a general idea about how to get there. In Chapter 14 we’ll see a working extension wrapper for real hardware using ctypes, and we’ll fill in more of the details in the process.
Suggested Reading
Interestingly, it seems that there are no books devoted solely to the subject of creating extensions for Python. There are, however, resources available at various websites, the foremost being Python’s primary documentation site:
- http://docs.python.org/release/2.6.5/
The official Python documentation for version 2.6.5 contains several sections on the topic of extending Python using C or C++. This should be your first stop when looking for additional information.
- http://docs.python.org/release/2.6.5/extending/index.html
http://docs.python.org/release/2.6.5/c-api/index.html These two sections of the online Python documentation provide a detailed discussion of extension modules and the functionality available for creating them.
- http://docs.python.org/library/ctypes.html
This is essential reading if you want to use the ctypes library.