All users in your organization with access to Salesforce CRM require a username, an e-mail address, a password, and a profile along with an active user license.
Depending on the features your organization has purchased, you can have user options such as Marketing, Service Cloud, and Mobile, which give particular users the ability to access other features that are only available with a specific user license. A user can be assigned to one or more of these options.
You can also create and manage other types of users outside your organization by applying the appropriate licenses that provide limited access to your Salesforce organization, as detailed later in this chapter.
In association with the user license, you can govern all users' access to data using the options available in either the profile settings or the sharing features.
Profile settings control access to applications and objects, while sharing features control access to specific records.
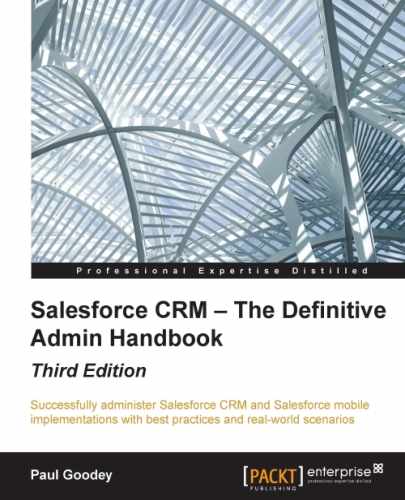
To go to the user detail page, navigate to Setup | Manage Users | Users.
The user detail page shows you a list of all the users in your organization as well as any portal users.
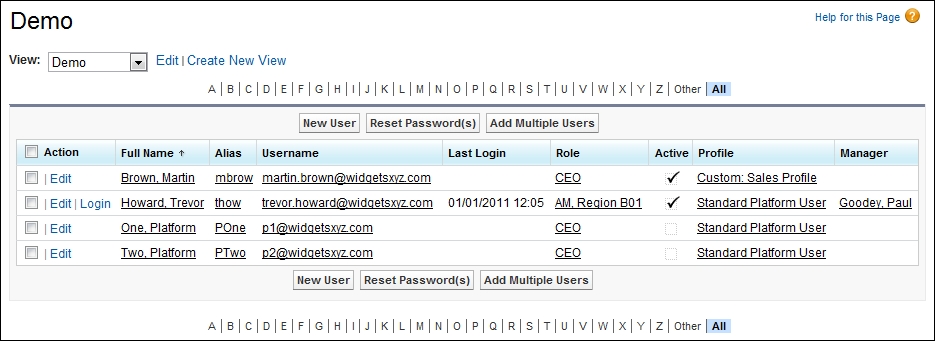
To show a filtered list of users, select a predefined list from the View drop-down list, or click on Create New View to define your own custom view.
For example, you can create a view with search criteria of Last Login, less than, LAST 28 DAYS to show all users who have not logged in for 28 days, as shown in the following screenshot:
As the system administrator of Salesforce CRM, you can perform various user management actions, such as creating new users, resetting passwords, and even delegating user administration tasks to other users within your organization. The following list of user actions will be covered:
- Creating new users
- Viewing and editing user information
- Password management
- Session management
- Logging in as another user
- Creating custom user fields
The steps to create a new user are as follows:
- Click on New User
- Enter fields in the General Information and Locale Settings sections
- Check the Generate new password and notify user immediately box
- Save the new user details
To create a new user for your organization, navigate to the user detail page. This page displays a list of all the users in your organization. To go to the New User page, navigate to Setup | Manage Users | Users. Now, click on the New User button.
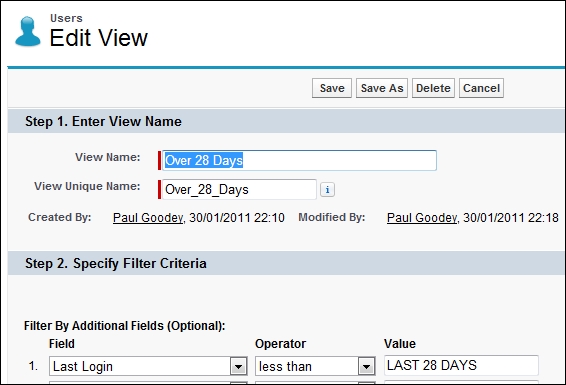
Looking at the top section of the page, you will see the General Information section, as shown in the following screenshot:
The mandatory user information is shown with a red bar and requires the entry of the user's last name, e-mail address, username user license, and profile.
The e-mail address automatically becomes the username, but you can change it prior to saving it, if required.
Note
Restricting the domain names of users' e-mail addresses
You can restrict the domain names of users' e-mail addresses to a list of values such as [email protected], [email protected], and so on. After this, attempts to set a user's e-mail address to an unlisted domain (such as [email protected]) will result in an error.
This feature can only be enabled by sending a request to Salesforce customer support. When selecting a user license, note that some further options become unavailable depending on the license type you choose. For example, the Marketing User and Allow Forecasting options are not available for Force.com user licenses because the Forecasts and Campaigns tabs are not available to users with that license. Also, the selection of a profile from the available list depends on the user license you have chosen.
You can select various checkboxes that give the user additional features or options. The types of additional features are available by selecting one or more of the following example checkboxes:
- Marketing User
- Offline User
- Knowledge User
- Force.com Flow User
- Service Cloud User
- Site.com Publisher User
- Salesforce CRM Content User
You will not be able to select these features if they are not supported by your user license type. Also, you will be unable to save the new user record if you do not have any remaining licenses available for these features.
At the bottom of the New User edit page, there are further sections that include the Locale Settings section, as shown in the following screenshot:

Complete the required information, which is displayed with a red bar, and then check the Generate new password and notify user immediately checkbox, and save the details by clicking on the Save button. Upon saving, the user's login name and a temporary password are e-mailed via Salesforce.com to the new user.
The following table lists the key standard user fields with the required fields shown in bold:
|
First Name |
Last Name |
Alias |
|
Username |
|---|---|---|---|---|
|
Community Nickname |
Title |
Company |
Department |
Division |
|
Role |
User License |
Profile |
Active |
Grant Checkout Access |
|
Marketing User |
Offline User |
Knowledge User |
Service Cloud User |
Mobile User |
|
Mobile Configuration |
Accessibility Mode |
Color-Blind Palette on Charts |
Salesforce CRM Content User |
Receive Salesforce CRM Content Email Alerts |
|
Receive Salesforce CRM Content Alerts as Daily Digest |
Allow Forecasting |
Call Center |
Phone |
Extension |
|
Fax |
Mobile |
Email Encoding |
Employee Number |
Mailing Address Fields |
|
Time Zone |
Locale |
Language |
Delegated Approver |
Manager |
|
Receive Approval Request Emails |
Newsletter |
Admin Newsletter |
Development Mode |
Send Apex Warning Emails |
After saving the User Edit page, you are presented with the details page for the user where you can view the information that was entered, as shown in the following screenshot:
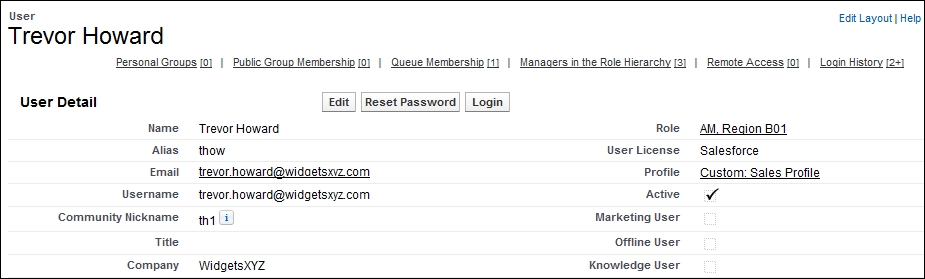
In the view's User Detail page, the following types of read-only fields (among others) can be seen:
- Used Data Space
- Last Login
- Last Password Change or Reset
There are also situations where you might consider it appropriate to recycle an active user record, but it is better to deactivate users when they are no longer using Salesforce and create a new record for each new user.
A typical real-world example of recycling a user record, and one to avoid, is sometimes encountered when a sales team is organized into sales territories.
The sales team user records in Salesforce are stamped with a territory indicator, and any account records that are located in their particular territory are assigned to the user record (set as the record owner). This way, the user record simply acts as a container for the territory.
Managing user records in this way results in both audit and maintenance issues. For example, if Tina Fox changes her sales territory, all her personal information (username, password, e-mail, address, phone number, and so on) has to be transferred to a new user record, requiring Tina to reactivate a new password and re-enter both personal details and all her personal preferences in the Salesforce application.
The issue worsens if the user record (or territory) that Tina is getting reassigned to is held by, say, Timothy Little, as he would also need to reset his personal details.
This approach leads to a technically complex method of territory reassignment and a very disappointing user experience for your sales team. Fortunately, Salesforce provides features such as criteria-based sharing rules, sales teams, and territory management to better manage the organization of sales territories.
If you have several users to add, you can add more than one at a time. To add multiple users, navigate to Setup | Manage Users | Users. Now, click on the Add Multiple Users button.
As you can see, this can be a quick method to create users, as not all required fields have to be entered in this page:
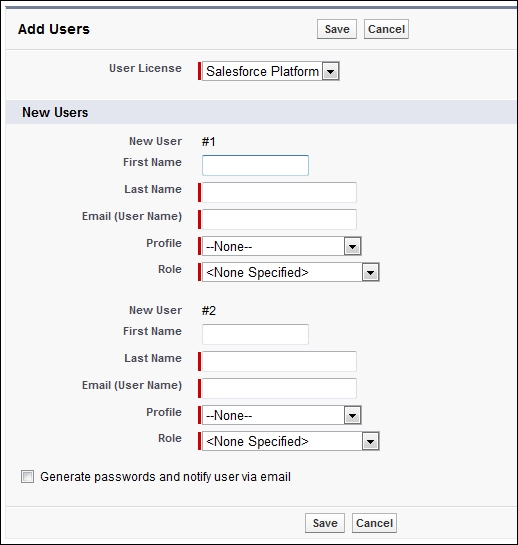
If, however, after initially saving multiple user records, you attempt to edit a user record via the user edit screen, you will be prompted to fill out all mandatory fields.
If you have an organization with a large number of users or a complex role hierarchy, you can delegate aspects of user administration to users who are not assigned with the system administrator profile.
This allows you to focus on tasks other than managing users for every department or structure that your company has within Salesforce. This provides further benefits for global organizations that encounter time zone and cultural differences, as it allows a user based in that region with local knowledge to create users, which saves time and results in a better user experience.
For example, you might want to allow the manager of the Asia Pacific Operations team to create and edit users in the Asia Pacific Operations Team Leader role and all subordinate roles.
There are currently two options to provide this delegated user management access:
- Create a profile with the Manage Users permission
- Use delegated administration
This option is not recommended and should be very carefully considered, as it allows a much greater range of system administration functions to be carried out by the user.
In addition to creating and managing users, the Manage Users permission also allows the user to perform the following:
- Expire all passwords
- Clone, edit, or delete profiles
- Edit or delete sharing settings
- Edit user login hours
By providing users with the Manage Users permission, as you can see, there are many other permissions that are switched on, which introduces security risks.
Delegated administration is a more secure method to provide delegated user management access, as it allows you to assign limited administrative privileges to the selected non-administrator users in your organization.
Delegated administrators can perform the following tasks:
- Create and edit users and reset passwords for users in specified roles and all subordinate roles
- Assign users to specified profiles
- Log in as a user who has granted login access to his or her administrator
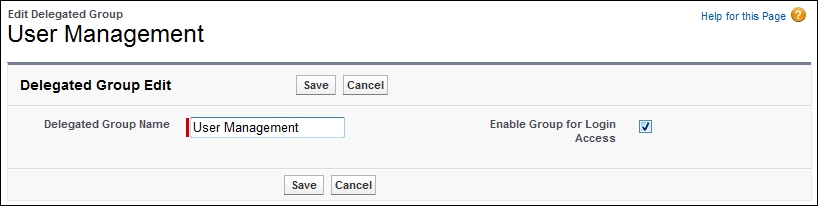
To create delegated groups, navigate to Setup | Security Controls | Delegated Administration. Now, click on the New button or select the name of an existing delegated administration group.
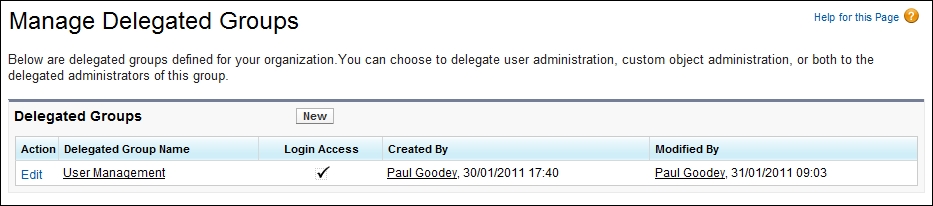
Here, we look at the existing group that has been named User Management:
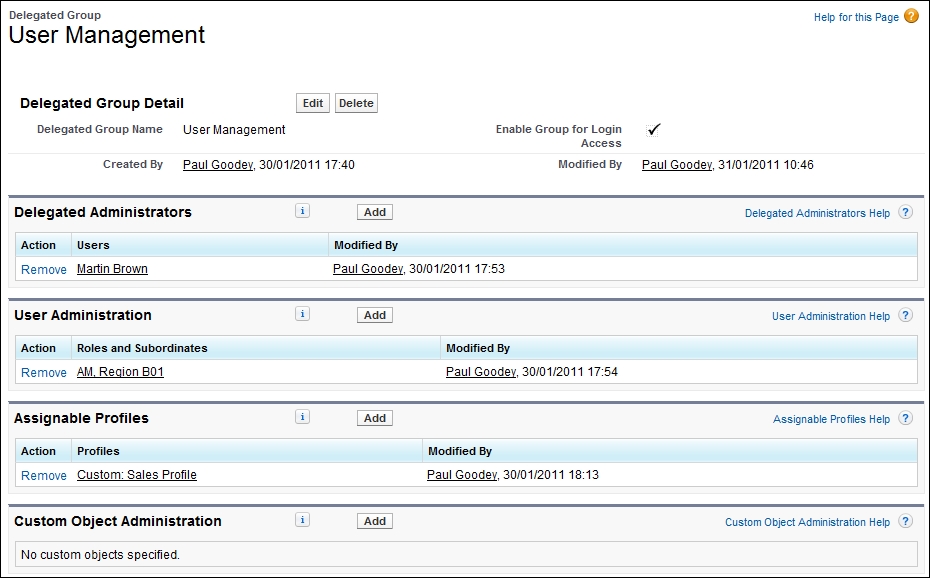
The Delegated Administrators section allows you to select and add the users that are to be given the delegated administration permission.
The User Administration section allows you to select and add roles that the delegated administrators can assign to the users they create and edit. They can assign users for the stated roles and all subordinated roles.
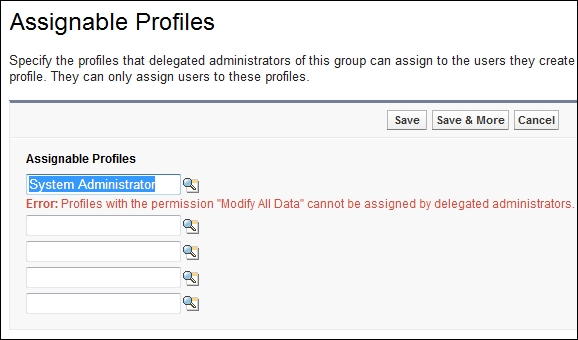
The Assignable Profiles section allows you to select and add profiles that the delegated administrators can assign to the users they create and edit.
To enforce security, profiles with the Modify All Data permission (such as the System Administrator profile) cannot be assigned by a delegated administrator. See the following example message that is shown when you attempt to allow the delegated administrator to assign the System Administrator profile:
Select the Enable Group for Login Access option if you want to allow delegated administrators in this group to log in as users who have granted login access to their administrators and are in the roles selected for the delegated administrator group.
To look at how users can grant login access to their administrators, refer to the Logging in as another user section toward the end of this chapter.
Tip
Agreement in using active user licenses by delegated user administrators
If you have established delegated user management in your organization, you will need to have an agreement between yourself and the delegated user administrators about how many of the available licenses can be used for each area of the organization. You cannot automatically limit the number of active users that can be created by users with these permissions.