Visual Workflow allows you to build collections of screens, which are known as Flows, to guide users through the process of collecting and updating data.
Working with flows involves the creation of a structured set of steps to enable users to complete specified business processes. These business processes could be, for example, call scripts for a customer support team, questionnaires and surveys for customers or employee interactions, or processes to handle incoming sales enquiries for your organization.
Use cases for flows are many and varied, and the Visual Workflow options allow you to create screens that collect and display information, create and update Salesforce records, and carry out logic based on input from users—all from within the drag-and-drop Visual Workflow user interface.
Working with Visual Workflow involves these three concepts: flow design, flow management, and runtime. Flow design and management is carried out using Flow Designer, which is part of the Salesforce CRM setup options. Once the flow has been designed and created, you can then manage it by setting properties, activating, deactivating, deleting, or running it—all from within the Salesforce CRM application. Finally, users can then run activated flows, again from within Salesforce. Here, you can configure the flow to be run from a custom button, link or tab, from within a Visualforce page, or directly using the Salesforce flow URL.
Visual Workflow and the Flow Designer are accessed by navigating to Setup | Create | Workflow & Approvals | Flows.
To create and manage flows in Cloud Flow Designer, click on New Flow or edit an existing flow.
Flow Designer has a drag-and-drop user interface that lets you configure screens and define branching logic without writing any code, as shown in the following screenshot:
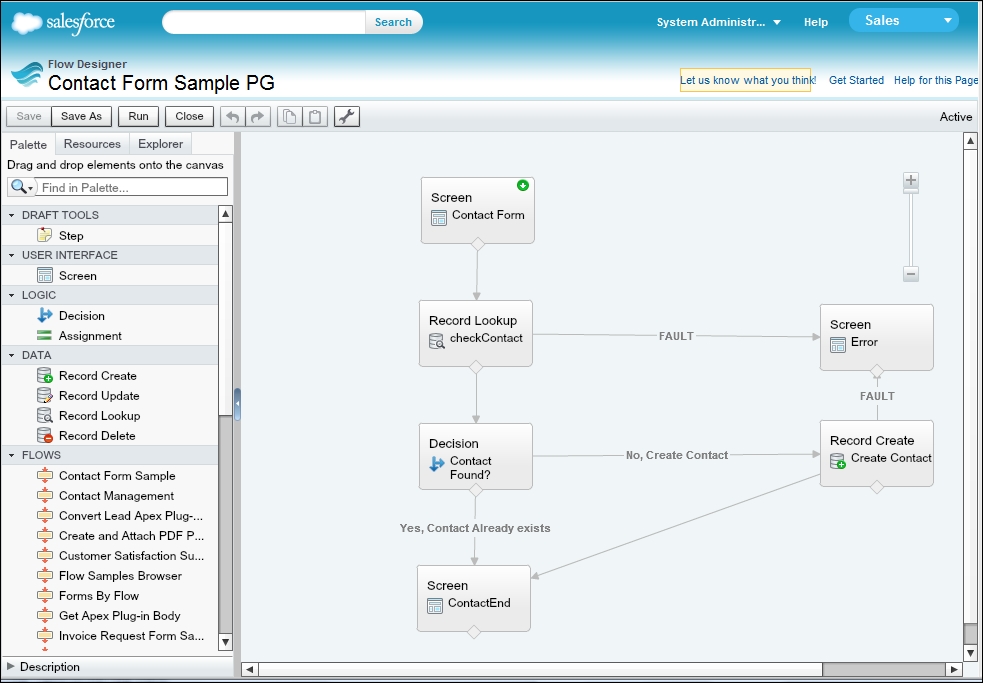
The Flow Designer user interface has the following features and functional sections:
- The buttons in the button bar section let you save, close, undo or redo, view properties of, or run the flow.
- The status indicator on the right-hand side of the bar indicates that the flow is active, saved, or whether it has any warnings or errors.
- The Palette tab lists all the element types available for the flow. Here, you can drag and drop elements from the palette onto the canvas to configure them.
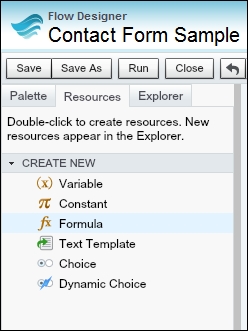
- The Resources tab lets you create new resources for the flow, such as variables, constants, formulas, and so on. Once created, the new resources will appear in the Explorer tab.
- The Explorer tab is a library of all the elements and resources that have been created for the flow.
- The Description pane is used to show details for the selected item when you click on them in the Pallet, Resources, and Explorer tabs.
- Canvas is where your flow is built. Here, elements are added from the palette then configured and connected to create a structured set of steps for the flow.
It is useful to have a general idea of how the flow will be built in Salesforce CRM to help ensure a successful and smooth implementation. Take into account the following considerations before you start to configure your flow:
- Use a Step element as a placeholder if you are unsure of exactly which element you need at a given point in the flow. This allows for iterative building of the flow, allowing you to further refine it as your understanding of the process develops.
- To select multiple elements, either click and select an area around the multiple elements to highlight them or use control-click to select individual elements. You can then press the Delete button on your keyboard to delete them all at once.
- To view the description or details for an item in the Palette, Resources, or Explorer tab, click on the item and look at the caption in the Description pane.
Now, let's look at the Palette, Resources, and Explorer tabs in more detail.
The Palette tab lists the element types that are available for the flow. Here, you can drag and drop elements from the Palette tab onto the main canvas. Once created, the new elements appear in the Explorer tab.
Elements are the key aspects of building flows. They represent an action such as collecting or displaying information from users, or querying, creating, updating, and deleting data records. Elements can be connected to create a structured set of steps consisting of screens, inputs, outputs, and branch logic through which users are guided.
The following elements are available in the Cloud Flow Designer:
- Step: This is a placeholder element that you can use to quickly sketch out a flow and then convert into a Screen element
- Screen: This is a user-facing screen that can be used to collect input or display output
- Decision: This uses conditions to determine where to route users next in the flow
- Assignment: This is used to set or change the value of variables
- Record Create: This is used to create a new record and insert resource values into its fields
- Record Update: This is used to update one or multiple records' fields with resource values
- Record Lookup: This is used to find a record and assign its fields to variables
- Record Delete: This is used to delete records that match certain criteria
- Subflows: This is used for nested flow
- Apex Plug-In: This uses logic built-in apex code via apex classes or Appexchange packages
From within the DRAFT TOOLS section, the Step element can be used to diagram the flow of your business process. The Step element is simply a placeholder, and it cannot be used in an active flow. Instead, it is used to quickly diagram the series of steps for the business process that is being built. Once you have each step in place and you want to get the flow activated, you can hover over the Step element and click on the Convert Element (double-arrow icon) option. This then enables the conversion of the draft Step element into a Screen element, which is the building block for every flow.
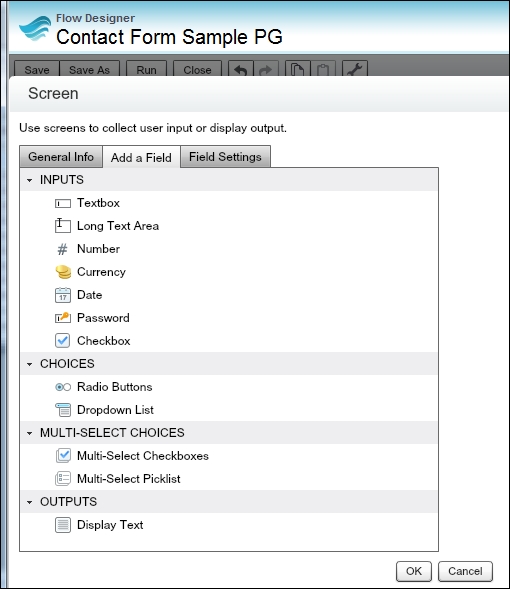
The Screen element can be created using the Convert Element option on a Step element, as described previously, or it can be created from within the USER INTERFACE section. The screen elements contain the series of windows that the user will see along with the built-in navigational buttons (for previous and next). The Screen element has various options for user interaction, and it is from the Add a Field tab on the Edit screen that you can select from these sections: INPUTS, CHOICES, MULTI-SELECT CHOICES, or OUTPUTS, as shown in the following screenshot:
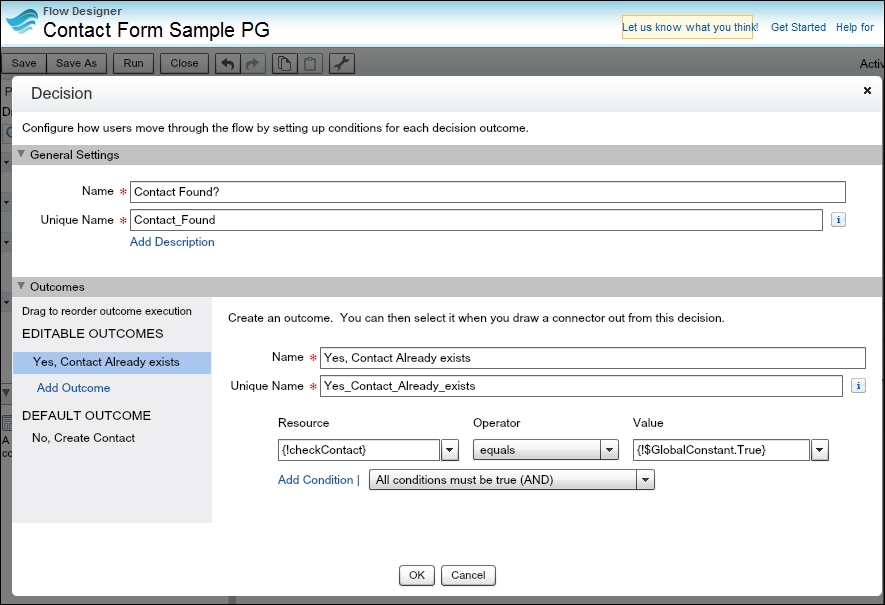
After interacting with a Screen element, the user might then need to be directed along a specified path in the flow depending on how they responded. The Decision element under the LOGIC section allows you to configure how users move through the flow by setting up conditions for each decision outcome.
The Decision element is used to navigate the flow and route the user to the next screen or interaction based on their response within the previous Screen element. Within the Decision element, you can create Editable Outcome for each of the responses, as shown in the following screenshot:
The Resources tab lets you create new resources for the flow, such as variables, constants, formulas, and so on, as shown in the following screenshot:
After new resources have been created or items from the Palette tab have been added to a flow, they appear in the Explorer tab.
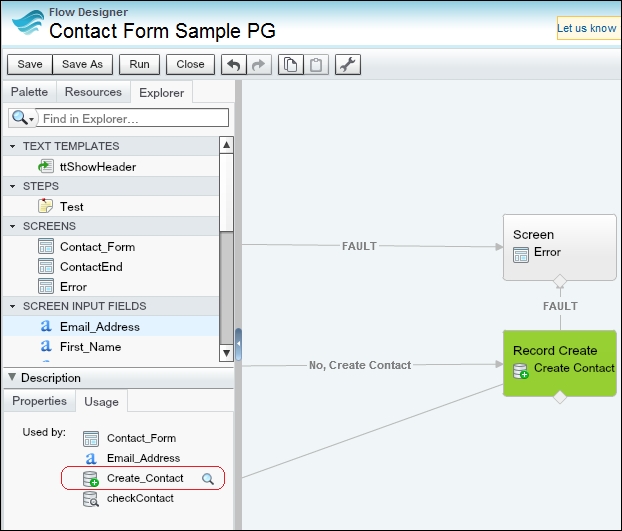
By double-clicking on items in the Explorer tab, you can access the edit page for them. You can single-click on an item to view details for the item in the Description pane. When viewing items within the Explorer tab, the Description pane includes two subtabs:
- Properties: This shows you information about the element or resource you have selected, such as its label, unique name, description, and data type.
- Usage: This lists the elements where the selected item is used. To see where one of the listed elements is located on the canvas, hover over it and click on the magnify icon, as shown in the following screenshot:
After you have created a flow in Flow Designer, the options for saving are:
- Initial save: When saving for the first time, a dialog box appears. Enter a flow name, unique name, and description. Once the flow has been saved, the unique name cannot be modified.
- Quick save: Having saved the flow, the Save button works as a quick-save, overwriting your previous work. Note that the Save button is unavailable when editing active flows. Here, you must use Save As to save the changes as either a new flow or a new version of the flow.
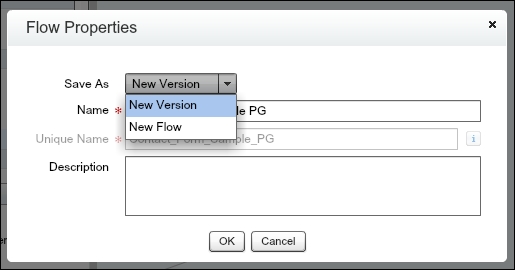
- Save as: Once you have saved the flow, this button is available with two options: Save As New Flow, which opens a dialog box where you can input new details and save as an entirely new flow, or Save As New Version, which saves the flow as a new version of the current flow (as shown in the following screenshot). This option is useful if you are about to make changes to a flow and want to keep the old flow as a backup just in case you need to retrieve it later:
Tip
Saving a flow considerations
Consider the following when saving a flow or flow version:
- If you have the flow detail page open in one browser tab, then open a flow version in a new browser tab to edit it. After saving and closing it, you must refresh the first flow detail page before you can successfully run the flow version you just edited.
- If you have changed the flow properties and the save operation fails for some reason, the flow properties do not revert to the previous values.
- Each flow can have up to 50 versions.
- You can update the flow name and description when you save a new version but not the unique name.
Flows can be run directly from the flow URL or from a custom web tab, link, or button pointing to the flow URL.
Depending on how you wish to set up flows for your users, you have the following specific options:
- Add the flow as a custom link on a detail page
- Add it as a custom button on a detail page
- Add it as a link on the Home page
- Add it as a flow within a Visualforce page
In order to run flows, users require either one of the following permissions to be set up:
- Run Flows profile permission
- Force.com's Flow User field enabled on the user detail page
Consider the following when running flows:
- Do not use the browser's back or forward buttons to navigate through a flow. This might result in inconsistent data between the flow and Salesforce.
- A single flow can have up to 50 different versions. When users run a flow, they see the active version, which might not necessarily be the latest version.