Salesforce automation allows the management and control of the phases required for the sales process within a Customer Relationship Management (CRM) system. Enabling and automating these phases within CRM systems helps improve quality and also minimizes the time that sales representatives spend on each phase.
Salesforce automation in Salesforce.com is performed within the Sales App, which can be accessed from the App Menu in the top-right corner of the Salesforce CRM screen.
At the core of the Sales App in Salesforce CRM are the account, contact, and opportunity management functions that track and record each stage in the sales process for new and existing customers.
Accounts can be sorted by standard views or customized views, and users can add new accounts and edit existing accounts. Associated contacts and activities are also listed in the same page of the account where users can manipulate other operations, such as viewing, adding, and editing, as required. Account views can be filtered based on time variables, such as by viewing recently modified or created accounts, new accounts this week, and so on.
In Salesforce CRM, account management is carried out using the facilities found in the Accounts tab and is typically where customer information is located.
Account records are used to store the company information from converted leads and can also be used for the storage of company information for partners, suppliers, and even competitors.
Accounts might be considered "business accounts" from a business-to-business (B2B) perspective and are usually the company records stored within the application. However, Salesforce provides another variety of accounts called person account, which allows organizations with a business-to-consumer (B2C) business model to manage the relationships with individuals. The business account and person account records offer very similar features and fields; however, person accounts do not have certain fields or features such as a Reports To field, a Parent Account field, or the Account Hierarchy feature.
Business account information consists of company name, type, company website, industry, annual revenue, billing and shipping addresses, account record owner, date of creation and modification, and so on.
Tip
Naming convention for accounts
Having consistent account names is essential to ensure clean and accurate account data. It can be useful to adopt an appropriate account naming policy to be used by all users in Salesforce. One way to achieve this is to ensure that accounts are named using their full legal name wherever possible.
As described earlier in this book, accounts are also the primary mechanism used in the organization of records.
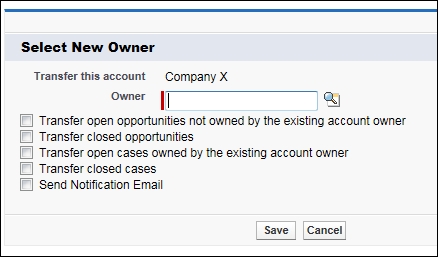
They are used within the record sharing and ownership hierarchy and are the parent object for standard objects, such as contacts, opportunities, and so on. When changing the ownership of account records, you have the option to reassign these child records, as shown in the following screenshot:
Contact management is performed using the facilities found in the Contacts tab. Contacts are the individuals that your users want to keep in touch with. For the sales team, this is likely to be people such as purchasers and key decision makers. For the marketing team, this might include the CEOs, CFOs, and other influencers. For support, the contacts could be any of the users of the product or service that your organization provides.
Salesforce CRM provides the facility for users to store, view, sort, filter, delete, edit, and find contact information that might or might not be associated with accounts. Each contact is recorded with details, such as title, contact details (address, cell phone, work phone, fax, and e-mail address), date of creation and modification, and contact record owner.
Activities in Salesforce are made up of tasks and events. Unlike other areas of functionality, there is no access to Activities from the tab; instead, they are created and viewed from related lists on other types of records, such as account, contact, case, and so on. Users can view activities both in the context of a relevant item (such as where they relate to an account, for example) or as a standalone mechanism from their calendar and task lists from the Salesforce CRM home page.
The Activity History related list of a record shows all completed tasks, logged phone calls, expired events, such as meetings, outbound e-mails, and so on for the record and any linked records.
Creating and scheduling appointments with customers is a central activity of most customer-oriented businesses. Marketing, sales, and customer support teams spend time getting in touch with prospects and customers and use a variety of means to agree on a time and place to meet.
To improve this activity, Salesforce provides the Cloud Scheduler facility, an automated system that's used to manage the scheduling and presentation of suitable appointment times to individuals through a web interface.
Note
As part of the Cloud Scheduler feature, Salesforce creates a unique web page for the meeting that displays the proposed meeting times. When invitees visit the web page, they can select the times that are suitable for them and then send a response.
The Cloud Scheduler feature requires the new user interface theme to be enabled and is supported with one of these compatible browsers: Internet Explorer 7 or 8, Firefox 3.0 or higher, Safari 3.2 or higher, and Chrome 6.0 or higher
All the responses from invitees are then tracked by Salesforce and a date and time that fits everyone can then be selected and chosen as the confirmation for the meeting.
First of all, the settings for the Cloud Scheduler can be configured by navigating to Setup | Customize | Activities | Cloud Scheduler. The New Meeting Request button for the Cloud Scheduler can be added to page layouts with an Open Activities related list, such as contacts, leads, or person accounts (if enabled).
For users to request a meeting with a person account, you might also need to add the Email field to the page layout by navigating to Setup | Customize | Accounts | Person Accounts | Page Layouts.
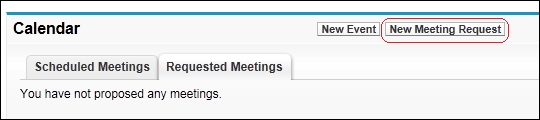
You can also include the New Meeting Request button on the user's home page. This is displayed above the Scheduled Meetings and Requested Meetings tabs, as shown in the following screenshot:
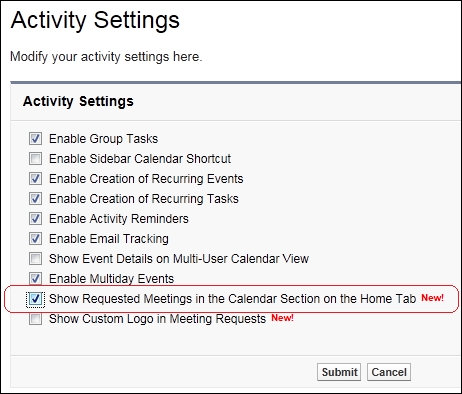
If this section is not displayed on the home page, then Show Requested Meetings in the Calendar Section on the Home Tab needs to be selected by navigating to Setup | Customize | Activities | Activity Settings, as shown in the following screenshot:
This section offers an overview of how users within your organization can request a meeting with coworkers and customers using Cloud Scheduler.
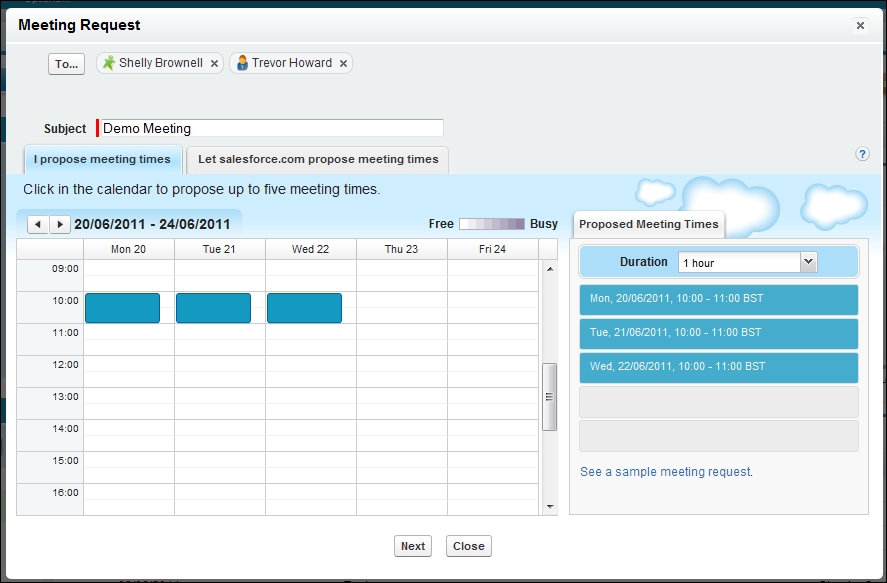
Users can either navigate to the contact or the Lead Detail page of the individual they want to request a meeting with through the Open Activities related list, or they can navigate to the calendar section on their home page. They can then click on the New Meeting Request button to display the Meeting Request page. Here, users click to invite other Salesforce users, leads, contacts, or person accounts to the meeting and click in the calendar to propose up to five meeting times; or they can choose to let the Salesforce application automatically propose times, as shown in the following screenshot:
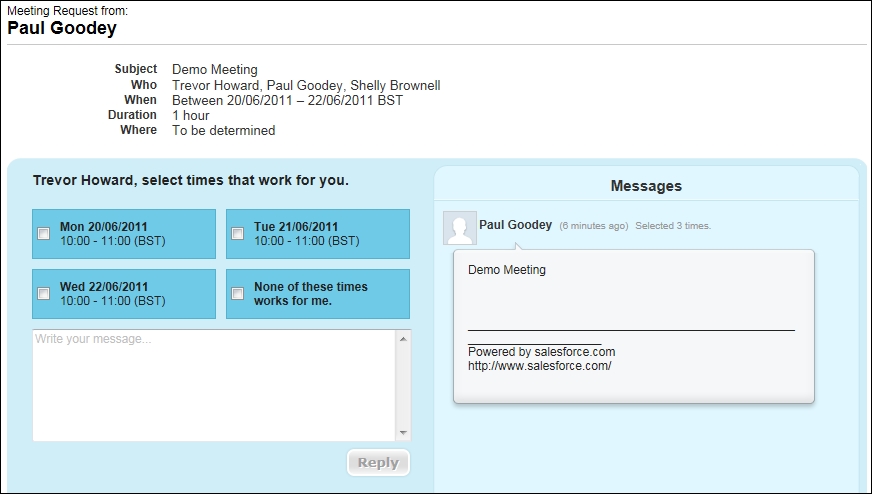
Salesforce e-mails a meeting request to the invitees so that they can pick the times they are available. Within the e-mail is a link that the invitees click on; it is called Respond to This Request and it opens the meeting's web page. Within the web page, invitees can pick the proposed times that are suitable for them, and then send a reply, as shown in the following screenshot:

Opportunity management is performed using the facilities found in the Opportunities tab.
Opportunities in Salesforce CRM are the sales deals that the sales team in your organization creates and updates. By adding new opportunities, the sales team is building the sales pipeline that will be used to produce figures for both individual sales forecasts as well as the wider company sales forecast.
Opportunity records are also important for other users in your organization to track, such as the marketing team that might want to monitor the effectiveness of marketing campaigns or the customer support team that might need to have an up-to-date view of customer spending when negotiating support contracts.