
Hour 7. Loading and Drawing Images
What You’ll Learn in This Hour
• How to draw with a custom back buffer
• How to add a bitmap file asset to the project
• How to load a bitmap asset into memory
• How to draw a bitmap image
Double-Buffered Drawing
While getting started learning about bitmap programming with the Android SDK (namely, the Canvas class), it will be helpful to see a practical use for a bitmap and a purposefully created Canvas of our own. Normally, we use the Canvas parameter that is automatically passed to the onDraw() method, so there is no need to create one. But to use a secondary or back buffer for drawing, you will need to learn how to create a Canvas and a Bitmap at runtime. This is a helpful way to get introduced to bitmap programming, and it’s extremely practical, as well.
Double buffering is a technique in which a copy or buffer of the “screen” is kept in memory, and all graphics drawing takes place on that memory buffer, which is then drawn to the screen all at once, once per frame. The advantage to this technique is performance—drawing to the screen is often slower than drawing to a bitmap in memory, and that slowdown often results in noticeable flicker on the screen. You will have an opportunity to explore real-time screen updates in the next hour when we get into the Runnable interface and worker threads. Until then, the examples will continue to be of the “run once” variety.
Creating a Memory Bitmap
You will need to create a Bitmap object to represent the “surface” for the memory screen buffer. The actual screen, as represented in video memory, is called the frame buffer or front buffer. A secondary screen, such as the one we are planning to create, is called a back buffer.
To use Bitmap, you have to import the android.graphics.Bitmap namespace. Some programmers may dislike the practice, but for quicker results while learning, I recommend including the entire android.graphics namespace by using this line:
import andriod.graphics.*;
Declaring a new Bitmap variable goes like this:
Bitmap bufferBitmap;
Creating the new object is done using a static method called Bitmap.createBitmap(), with parameters for the width, height, and color depth. Here is an example:
bufferBitmap = Bitmap.createBitmap( 600, 500, Bitmap.Config.ARGB_8888);
The resolution of this Bitmap is 600 by 500, but you can specify any size you want using these two parameters in the call to Bitmap.createBitmap().
The third parameter, Bitmap.Config.ARGB_8888, specifies 32-bit color and is the normal or default constant to use. It is rare to find an Android device without support for 32-bit color, so we can assume that it is on devices running Android 4.
The new Bitmap variable is now ready to use. To use it for drawing, you need a Canvas to go with it.
Creating a Drawing Canvas
When you have a new Bitmap variable ready to go, you can create a new Canvas object based on that Bitmap variable (or object). Any drawing methods invoked by the resulting Canvas will be output onto the base Bitmap.
First, define the new Canvas variable:
Canvas bufferCanvas;
Next, create the object with a Bitmap as the single parameter to the constructor:
bufferCanvas = new Canvas(bufferBitmap);
The Canvas is now ready and will draw onto the associated Bitmap object. You can use any of the drawing methods found in Canvas that we have studied over the past two hours, such as Canvas.drawCircle().
Using the Back Buffer
The Buffered Graphics Demo program demonstrates how to use a back buffer for graphics output by filling a Bitmap with circles and then drawing the custom buffer to the screen with a single call to Canvas.drawBitmap(). Figure 7.1 shows the output. We will revisit this example again in the next hour and show it running within a loop. Presently, because the screen refreshes only once, it is not very apparent how a back buffer helps with performance and quality. But with a loop and timing, you can see the results in real-time, and then it will make more sense.

Figure 7.1. The Buffered Graphics Demo uses a back buffer for drawing.
package android.program;
import java.util.Random;
import android.app.Activity;
import android.content.Context;
import android.graphics.*;
import android.os.Bundle;
import android.util.*;
import android.view.*;
public class Main extends Activity {
@Override public void onCreate(Bundle savedInstanceState) {
super.onCreate(savedInstanceState);
requestWindowFeature(Window. FEATURE_NO_TITLE);
setContentView( new DrawView( this ));
}
public class DrawView extends View {
Bitmap bufferBitmap;
Canvas bufferCanvas;
Point screenSize;
Random rand = new Random();
public DrawView(Context context) {
super (context);
//get the screen size before the main canvas is ready
DisplayMetrics metrics = new DisplayMetrics();
getWindowManager().getDefaultDisplay().getMetrics( metrics );
screenSize = new Point( metrics.widthPixels-20,
metrics.heightPixels-20 );
//create the back buffer
bufferBitmap = Bitmap. createBitmap ( screenSize.x, screenSize.y,
Bitmap.Config .ARGB_8888 );
bufferCanvas = new Canvas(bufferBitmap);
}
@Override public void onDraw(Canvas canvas) {
super.onDraw(canvas);
//fill the back buffer with graphics
drawOnBuffer();
//copy the back buffer to the screen
canvas.drawBitmap(bufferBitmap, 0, 0, new Paint());
}
public void drawOnBuffer() {
Paint paint = new Paint();
paint.setAntiAlias( true );
//clear the buffer with color
bufferCanvas.drawColor(Color. WHITE );
//draw random circles
for ( int n=0; n<500; n++) {
//make a random color
int r = rand.nextInt(256);
int g = rand.nextInt(256);
int b = rand.nextInt(256);
paint.setColor(Color. rgb (r, g, b));
//make a random position and radius
int x = rand.nextInt(bufferCanvas.getWidth());
int y = rand.nextInt(bufferCanvas.getHeight());
int radius = rand.nextInt(100) + 20;
//draw one circle
bufferCanvas.drawCircle( x, y, radius, paint);
}
}
}
}
Loading a Bitmap File
The Android SDK supports several bitmap file formats that can be loaded and used as the source for game graphics. Here are the bitmap formats supported in Android 4.0:
• JPEG
• GIF
• PNG
• BMP
• WEBP
Among these five bitmap formats, the only one that is suitable for game development is the PNG format, which is an acronym for Portable Network Graphics. The reason why PNG is the only suitable format for use in a game is that it is a lossless format with support for 32-bit color. Lossless means the pixels are preserved exactly when saved. You could very well use any of the other four formats for a game, but PNG alone (among those listed) supports an alpha channel, which is essential for transparency.
There are several steps to loading a bitmap file in an Android program. We’ll go over each step and then show a complete example at the end.
Adding a Bitmap Asset
Media files that you want to use in a game are treated as assets. Another word that you might see often is resource. We want to load a bitmap file and draw it on our Android device. Before continuing, you will need a bitmap file to draw. Any bitmap file will do, as long as it’s in a supported format (with one of the file extensions previously listed). If a file you want to draw is not in a supported format, you can convert the image from one format to another with a graphic editor.
I use GIMP (http://getgimp.com). I like that it’s open source and free, but more so that it is powerful and easy to learn. You may use any graphic editor, although some do not support all the features you will need for working with game graphics. A graphic editor program must, at the very least, support the capability to create and edit an alpha channel in a 32-bit image. Most graphic editors do support this. Microsoft Paint (which comes with Windows) does not, so it is not a good candidate for editing game images. If you do not like or have access to GIMP, you might try Paint.NET (http://www.getpaint.net). Commercial graphic editors also work, including Photoshop, Paint Shop Pro, and CorelDRAW, among others.
The file we’re going to use for this tutorial on loading bitmaps is shown in Figure 7.2. It is the image of a castle, created by Reiner Prokein (http://www.reinerstileset.de), who offers game artwork such as this for free.

Figure 7.2. The castle.png bitmap file used in this example.
In the Android project, you should see a folder called Assets. The files and folders of a project are found in Package Explorer in Eclipse. To add an asset file to the project, drag the file into the Eclipse GUI, and Eclipse will take care of the import. When you drop in the file, Eclipse brings up the File Operation confirmation dialog shown in Figure 7.3.

Figure 7.3. The File Operation dialog comes up when you add an asset file to the project.
This dialog gives you the option of having Eclipse copy the file into the project or just linking to it at its original location. Normally, you will want to use the Copy option. After the file has been added to the project, Eclipse automatically compiles the file as a resource in the Android package, and you can load it by name without any special techniques. (You’ll learn how to load a file from this location in a moment). When the file has been added, it will appear as shown in Figure 7.4.

Figure 7.4. The castle.png file has been added to the assets folder in the project.
If you want to see the file properties for an asset (such as its location in disk), right-click the file and choose Properties from the context menu. The properties dialog is shown in Figure 7.5.
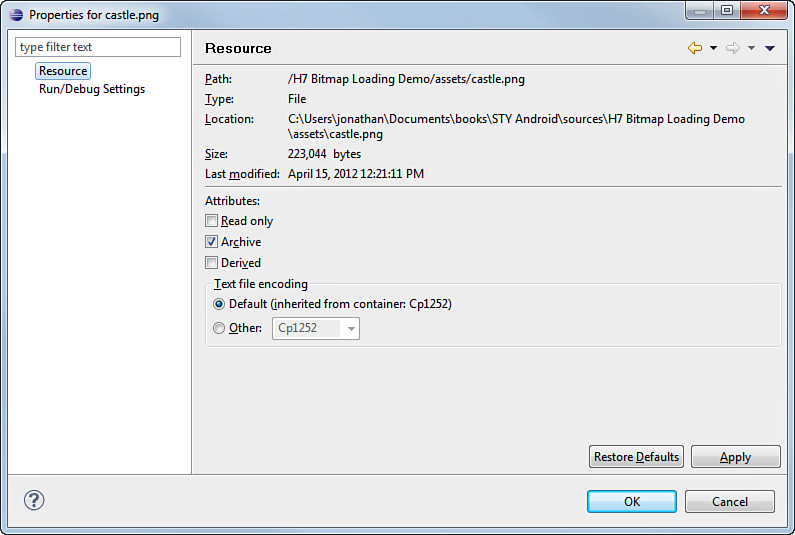
Figure 7.5. The file properties for the castle.png bitmap file.
Using AssetManager
A class called android.content.res.AssetManager is used to load assets for a game, including bitmap files. You will need an AssetManager object to load the assets for a game from the compiled resources in the Android application package. You can get access to the assets from the View constructor’s single parameter: Context. When you create a subclass of View, as we have done in several examples already, you gain access to the Context parameter. It is in this constructor that we want to load the assets for a game, anyway, so here is how the object is obtained:
AssetManager assets = context.getAssets();
Using InputStream
The next step to loading an image is to create an object of type java.io.InputStream and set it to receive data from a method from our AssetManager object (which was called assets). AssetManager.open() accepts a parameter containing the name of your bitmap file resource.
InputStream istream = assets.open("castle.png");
Using BitmapFactory
Now that you have an input stream of data from the source asset file (castle.png in this case), you will use the BitmapFactory.decodeStream() method to read the data in and return it as a Bitmap. This is the last step. If the source file is valid, the result will be a Bitmap ready to draw.
Before reading the file stream, though, we need to tell BitmapFactory how to decode the bitmap into the desired color depth (if necessary). This takes any source image and ensures it is in the appropriate format for your game. You can do this using the BitmapFactory.Options class:
BitmapFactory.Options options = new BitmapFactory.Options();
After creating the options object, you can set the preferred image format to 32-bit with the constant Bitmap.Config.ARGB_8888, like so:
options.inPreferredConfig = Bitmap.Config.ARGB_8888;
Now we are ready to use the BitmapFactory class to decode the bitmap data into the desired format. Note in the following line that the return value is a Bitmap object.
castle = BitmapFactory.decodeStream(istream,null,options);
Closing the Input Stream
Because we’re done with the file input stream now, we can close it by calling istream.close(). This is an important final step that should not be skipped, or the input file will be left in an open state.
istream.close();
The Complete Bitmap Loading Code
All file input/output classes in Android will potentially throw an exception error, so we have to wrap file i/o code in a try...catch handler to catch any such exceptions. When dealing with files, exceptions are common, as it’s common for an asset file to be named wrong or not imported into a project correctly. However, after a game has been debugged and is ready for release, it’s very rare to run into file i/o issues at that point. Nevertheless, we have to trap exceptions as a requirement of InputStream. Here is our complete bitmap file loading code with error handling included:
try {
AssetManager assets = context.getAssets();
InputStream istream = assets.open("castle.png");
BitmapFactory.Options options = new BitmapFactory.Options();
options.inPreferredConfig = Bitmap.Config.ARGB_8888;
castle = BitmapFactory.decodeStream(istream,null,options);
istream.close();
} catch (IOException e) {
e.printStackTrace();
}
Drawing a Bitmap
The next step, drawing the bitmap, is extremely easy. Android offers us additional features for drawing a bitmap with special effects (like scaling) that we will explore later. For now, let’s just start off with simple, basic bitmap drawing code.
Canvas.drawBitmap() has several overloads, but the one you will want to use for starters draws the whole bitmap to the target location on the screen:
public void drawBitmap (Bitmap bitmap, float left, float top, Paint paint)
The first parameter is the source bitmap. Then you specify the left (X) and top (Y) position. Next, supply an optional Paint parameter. If you don’t want to use the Paint parameter, just pass null.
You can draw it by using the code we used already to load the castle bitmap:
canvas.drawBitmap(castle, 20, 20, null);
The program example in the resource file for this hour is called Bitmap Loading Demo, if you want to load and run it directly. The program output is shown in Figure 7.6. As you can see, a problem exists with the transparency of the image. This particular castle.png image has no alpha channel, so the background color is showing up in the rendered scene.

Figure 7.6. The castle.png image is drawing without transparency.
Creating an Alpha Channel for Transparency
Using your favorite graphic editor, open up the image you want to convert to 32-bit color with an alpha channel. This short tutorial will show you how to do it using GIMP. The steps will be very similar using other graphic editors.
1. First, find the Color Select tool in your graphic editor’s tool palette. Figure 7.7 shows the tool’s location in GIMP 2.4. If you have a newer version of GIMP or a different graphic editor, the tool should still be similar in function and these instructions will still apply—just adapt to the tool you’re using.

Figure 7.7. Using the Color Select tool to highlight the background pixels of the image.
2. Next, using the Color Select tool, click one of the background pixels of the image. Although it is not visible on the printed page, the background color of this image is magenta with an RGB value of (255,0,255). We’re going to convert this into a transparent mask using an alpha channel. Figure 7.8 shows that GIMP has highlighted the background (note the dashed line around the border of the castle’s pixels).

Figure 7.8. Highlighting the background pixels using the Select Color tool.
3. Next, with the background pixels selected, use the Layer menu and choose Mask, Add Layer Mask from the menu, as shown in Figure 7.9.

Figure 7.9. Preparing to add a new layer mask.
4. This menu choice brings up the Add Layer Mask dialog shown in Figure 7.10. Choose the option called Selection so that that new layer is based on the selected pixels. Use the Invert Mask option to reverse the selection for the mask (so that the castle’s pixels are chosen instead of the background’s pixels).

Figure 7.10. The Add Layer Mask dialog.
5. The previous step should have added a mask to the image, which will have the effect of hiding or masking the background pixels. The final step is to apply the mask, which will result in the addition of an alpha channel to the image. Use the Layer menu again, choose Mask, and then Apply Layer Mask. See Figure 7.11.

Figure 7.11. Applying the layer mask results in the addition of an alpha channel.
The image now has an alpha channel! Save it as a PNG file so that the Android SDK can load it as a 32-bit image with transparency intact. Save the file before continuing. You can follow these basic steps for all other artwork you intend to use in your Android games.
When you edit an image used in a game, be sure to copy it into the project again. If you find that you’re doing a lot of editing of images, you might want to use the Link option instead of the Copy option when adding the file to the assets folder of the project. This way, changes made to the source image (outside of the project) will be used without requiring the extra step of dragging the file over again. You might set up a special folder for the artwork in your game. Don’t worry, Eclipse will still compile the asset files into the package for deployment.
Finished Example
For the sake of completion, we’ll see a finished example of the source code that loads and draws a bitmap from a file. The final result, using the 32-bit RGBA version of the castle image with a transparency mask in the alpha channel, is shown in Figure 7.12.
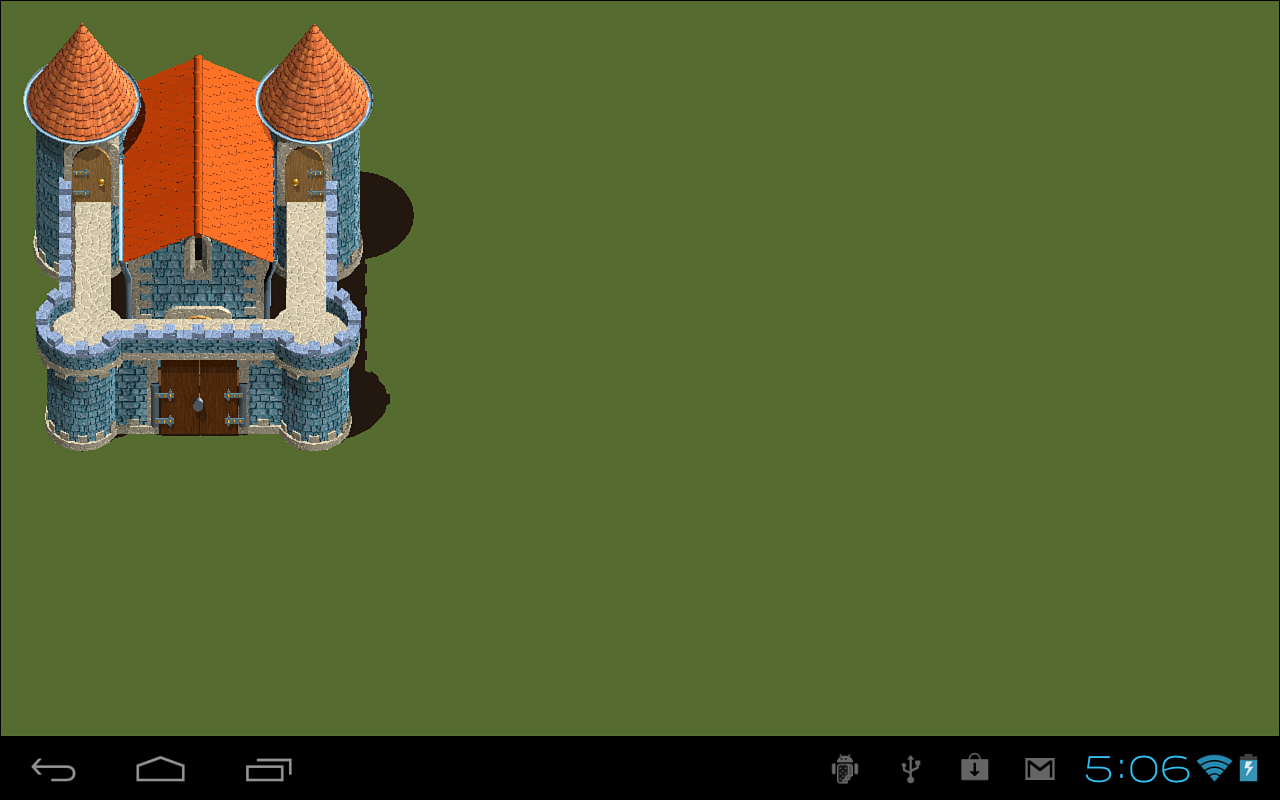
Figure 7.12. The Bitmap Loading Demo program drawing the castle with transparency.
package android.program;
import java.io.*;
import android.app.Activity;
import android.content.Context;
import android.content.res.AssetManager;
import android.graphics.*;
import android.os.Bundle;
import android.view.*;
public class Main extends Activity {
@Override public void onCreate(Bundle savedInstanceState) {
super.onCreate(savedInstanceState);
requestWindowFeature(Window.FEATURE_NO_TITLE);
setContentView(new DrawView(this));
}
public class DrawView extends View {
Bitmap castle = null;
public DrawView(Context context) {
super(context);
try {
AssetManager assets = context.getAssets();
InputStream istream = assets.open("castle.png");
BitmapFactory.Options options = new BitmapFactory.Options();
options.inPreferredConfig = Bitmap.Config.ARGB_8888;
castle = BitmapFactory.decodeStream(istream,null,options);
istream.close();
} catch (IOException e) {
e.printStackTrace();
}
}
@Override public void onDraw(Canvas canvas) {
super.onDraw(canvas);
canvas.drawColor(Color.rgb(85,107,47));
canvas.drawBitmap(castle, 20, 20, null);
}
}
}
Summary
Bitmaps are essential for any serious game development effort on any platform. Now you have the tools and know-how to load and draw bitmaps with the Android SDK, so you’re ready to start doing some more serious work on this platform. In the next few hours, you will learn to do real-time animation!
Q&A
Q. The back buffer program example introduced an interesting new concept for Android graphics. Given the performance of the examples in this hour, do you think that double buffering is necessary? Discuss the pros and cons.
A. Answers will vary.
Q. Adding bitmap assets to a project seems fairly seamless, but in a large game project with several members contributing, how should the assets be managed? Should the programmer drag and drop images into the project as they are updated by the artist? Given what you now know about how Eclipse manages assets in an Android project, how would you tackle this issue?
A. Answers will vary.
Workshop
Quiz
1. What is the class used to work with bitmap images in memory?
2. What class gives access to bitmap files in the assets folder of a project by providing an input stream?
3. What class is used to decode the input stream from a bitmap file, converting it into a bitmap image in memory?
Answers
1. Bitmap
2. AssetManager
3. BitmapFactory
Activities
There seems to be a lot of code required to load a bitmap file into memory. Try writing your own method that encapsulates all this functionality, making it possible to load a bitmap with only a single method call.