
Hour 19. Manipulating Sprites with Matrix Transforms
What You’ll Learn in This Hour
• Using matrix translation
• Using matrix rotation
• Using matrix scaling
• Combining all three transforms into one matrix
• Drawing animation frames with matrix transforms
This hour delves into the awesome subject of matrix transforms, giving us the capability to rotate, scale, and translate a sprite. Although we can already translate (move) and scale a sprite using the known drawBitmap() methods, an additional overload of the method takes a Matrix parameter instead. Because matrix math is much faster than trigonometry (that is, using sine and cosine), and because a matrix can handle all three transforms at once, this is clearly where we want to go with our 2D rendering system.
Matrix Translation
To draw with matrix transforms, we use an overloaded version of the drawBitmap() method, which looks like this:
void drawBitmap(Bitmap bitmap, Matrix matrix, Paint paint)
Conceptually, the matrix parameter passed to drawBitmap() is three matrices, one each for rotation, scaling, and translation. It is possible to use three separate matrices and combine them into one by multiplying them together before rendering (and that is often preferred). The Matrix class can do some limited work with the transforms internally with one matrix (see Figure 19.1), but it’s easier (and more importantly, standardized) to separate them, one matrix per transform. We’ll examine the internal structure of a matrix shortly. It is a better practice to use three separate matrices and combine them before rendering.
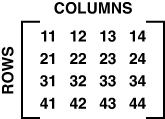
Figure 19.1. A typical matrix is composed of 4 columns and 4 rows.
The Matrix class contains a 3×3 matrix for transforming coordinates, but the illustrations featuring a 4×4 grid apply just as well because the concepts are the same. Matrices store values used to transform an object. Beginning with an identity matrix, addition and multiplication of matrices results in extremely fast transforms!
Addition and subtraction of matrices is done with the help of a zero matrix. Just like adding zero to any real number results in the unchanged number, so adding or subtracting a matrix from a zero matrix results in the original unchanged matrix. Think of this as a starting point when performing addition or subtraction operations on a matrix. Remember, a matrix represents a system, or sequence, of equations. Figure 19.2 shows an illustration of a zero matrix.
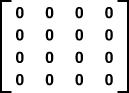
Figure 19.2. An example of a zero matrix.
An identity matrix, illustrated in Figure 19.3, is used for multiplication and division operations. An identity matrix is filled with zeroes, except for the diagonal from upper left to lower right, represented by matrix elements 11, 22, 33, 44. We use an identity matrix to reset any existing transformations back to the origin (0,0,0). Every transform must start with the identity matrix; otherwise, transforms become additive.
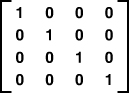
Figure 19.3. An example of an identity matrix.
We’ll begin our study of transforms with the simplest one: translation, or simply, movement. Translation is a mathematical term that involves movement on a Cartesian coordinate system and may be calculated with simple addition.
Coordinate Systems
To help visualize how translation works in a coordinate system, take a look at Figure 19.4. The directions in which values increase (+) and decrease (−) are important to keep in mind as you are translating your game objects on the screen. The Z axis is often hard to visualize. Whereas the X and Y axes appear flat, the Z axis goes in and out of the diagram, giving it depth.
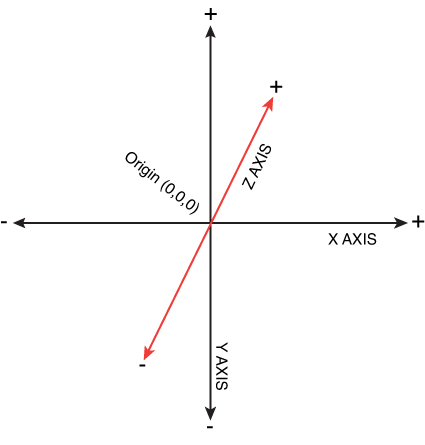
Figure 19.4. A 3-axis coordinate system.
Note the position of the origin label, which refers to the intersection point of the two axes at (0,0). The origin can be redefined in your game by adding a center point value to any translation calculations you need to perform on any game object. For instance, in the previous hour you used an animation subclass called CircularMovementAnimation to move an object around a center point on a circular path. This class uses a fixed center point. That point becomes the origin of a local coordinate system for each object.
Now take a look at Figure 19.5, which shows the four quadrants of the Cartesian system. On an Android screen, the origin refers to the upper-left corner of the screen. On an Android screen, the origin is at the upper left; X increases to the right, and Y increases downward toward the bottom of the screen. Thus, you may be tempted to view an Android screen with 4th quadrant coordinates. But that would be wrong because Y decreases downward in the 4th quadrant. So, which quadrant represents the screen of an Android (or any other computer display)? Unfortunately for us, none of them map to a screen!
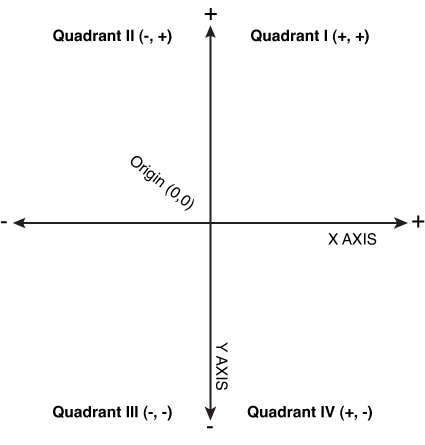
Figure 19.5. The four quadrants of a Cartesian coordinate system.
The way we can solve this dilemma is by using the 1st quadrant and inverting the Y values. This is inconvenient, but we can solve the problem by inverting any results for Y by multiplying it by −1. Thus, we have to work with an inverted 1st quadrant. It’s not really as complex as that might sound because we aren’t using any complex trigonometry calculations—-most of that is done by support class methods.
A cleaner view of the coordinate system we use for a 2D, sprite-based game is shown in Figure 19.6 The two axes are easier to read in this simpler view without the third dimension. You can translate each object in your game based on an individual coordinate system, or you can use a global coordinate system.
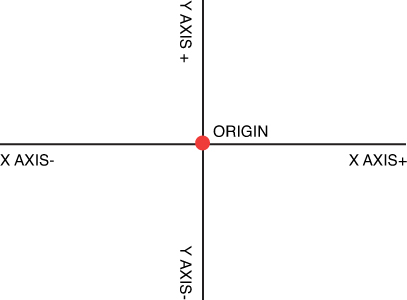
Figure 19.6. A simpler view of a 2D coordinate system with two axes.
Based on this simpler view of the coordinate system, we can illustrate how translation works by showing two frames of before and after translation occurring on a specific point. In Figure 19.7, a point is located at (100,−50). This phrase is really an incorrect way to put it because a point is a coordinate pair; a point is not an object located somewhere—it is the coordinate. A point has one dimension, which means it does not exist except as a location. (And, no, this isn’t quantum mechanics, so we can know the position of a point—although a probability point might be fun to try to simulate).
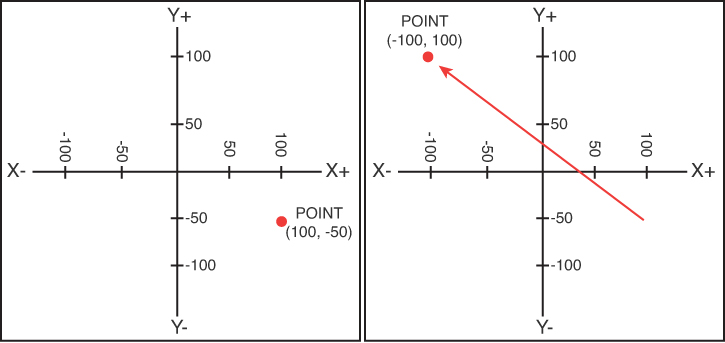
Figure 19.7. Translating a point to a new location creates a line.
The point at (100,−50) is translated by the values (X:−200, Y:+150) to arrive at a destination point of (−100,100). In gameplay code, we can cause a game object to move by a certain amount without regard for the destination, or we can explicitly move it to a specific location. The former technique involves velocity, whereas the latter involves relocation. If you want to give an object the ability to move but want it to stay put for a while, you would set its velocity to (0,0).
Matrix Translation Options
Because it is understood now that the Matrix class uses a single shared matrix for all thee types of transforms, how exactly does it store them? Take a look at Figure 19.8, which shows where in the matrix the translation values are stored.
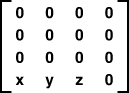
Figure 19.8. Illustration showing where the translation values are stored in the matrix.
The Matrix class has several methods for doing translation. We’re not going to obsessively cover every single one in detail, just the useful ones (you’re free to explore the rest by opening the JavaDoc page on the Matrix class). First, we’ll take a look at the explicit setting with a method called setTranslate():
void Matrix.setTranslate(float dx, float dy)
Next, we have two additional methods for tweaking the translation values of a matrix. The first, postTranslate(), applies a translation to the matrix after the other transforms (rotation and scaling).
boolean postTranslate(float dx, float dy)
And preTranslate() applies the translation before the other transforms.
boolean preTranslate(float dx, float dy)
In case you were wondering why it is important to pre- or post-translate, it has to do with the identity or reset state of a matrix and whether transforms have already been applied. Generally, you will need to do rotation and scaling before translation, or the object’s position will be translated with rotation and scaling applied as well, with bizarre results!
Matrix Rotation
As you learned in the previous section on translation, an overloaded version of the drawBitmap() method is used to draw with transforms stored in a matrix. The very same method is used for rotation and scaling as well because all three transforms are stored in the same matrix passed in this call:
void drawBitmap(Bitmap bitmap, Matrix matrix, Paint paint)
We can set the rotation value explicitly using the setRotate() method:
void setRotate(float degrees)
There is also a postRotate() and preRotate() method pair for rotation, and each takes a degree parameter:
boolean postRotate(float degrees)
boolean preRotate(float degrees)
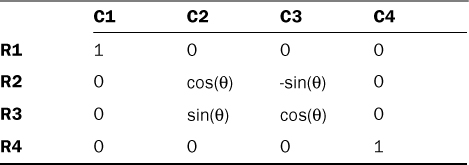
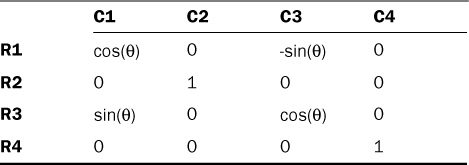
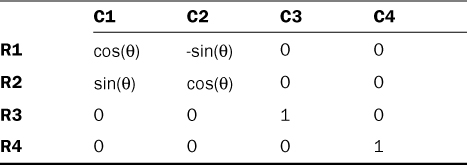
Figure 19.9 shows the position of the rotation values in the matrix. I think you’ll agree that this is difficult to discern. Although translation was obvious, rotation is a bit confusing in how it is stored.
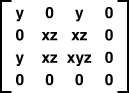
Figure 19.9. Illustration showing where the rotation values are stored in the matrix.
It is generally better to use radians rather than degrees for rotation because trig functions like sine and cosine always work with radians. To convert from one to the other, use Math.toDegrees() or Math.toRadians().
To help you see where this matrix result comes from, here are three tables, numbered 19.1, 19.2, and 19.3, showing how each value of the rotation vector is calculated and stored in the matrix—one each for the X, Y, and Z values, respectively. It is indeed quite complex only when all three vector properties are stored together. Individually, the X, Y, and Z components are straightforward sine and cosine calculations.
Matrix Scaling
The scaling transform also shares the matrix with rotation and translation. We can set the scale value explicitly using the setScale() method:
void setScale(float sx, float sy)
Likewise, we have two familiar support methods available for scaling:
boolean postScale(float sx, float sy)
boolean preScale(float sx, float sy)
Figure 19.10 shows the position of the scale values in the matrix along the diagonal.
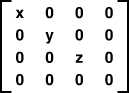
Figure 19.10. Illustration showing where the scale values are stored in the matrix.
Matrix Transforms Demo
Now that you have basic matrix transforms under your belt, so to speak, you can use this powerful new technique to revolutionize the Sprite class. It’s going to require a bit of extra work to upgrade the class. To support transforms, the existing Sprite class, which supports frame animation, will need an additional scratch bitmap used to hold a single frame that is then transformed and drawn to the screen.
Combining Three Matrices
The Sprite class will use four matrices in total to support transforms:
• Translate matrix
• Rotate matrix
• Scale matrix
• Combined matrix
We’ll need to add these new matrices to the Sprite class and initialize them properly:
private Matrix p_mat_translate;
private Matrix p_mat_scale;
private Matrix p_mat_rotate;
private Matrix p_matrix;
Just prior to drawing, each of the three transform matrices is set to its associated value from local Sprite properties. Then a fourth matrix will combine them all into one that can be passed along for rendering.
The scale matrix is set with the following line (note that parameters are local to the Sprite class):
p_mat_scale.setScale(p_scale.x, p_scale.y);
The rotate matrix is set with
p_mat_rotate.setRotate( (float)Math.toDegrees(p_rotation));
The translate matrix is set with
p_mat_translate.setTranslate(position.x, position.y);
Finally, the three are combined into one using Matrix.postConcat(), which combines them.
p_matrix = new Matrix(); //set to identity
p_matrix.postConcat(p_mat_scale);
p_matrix.postConcat(p_mat_rotate);
p_matrix.postConcat(p_mat_translate);
Rendering Frames to a Scratch Bitmap
The drawBitmap() method is quite useful, but one thing it cannot do is draw animation frames and use transforms at the same time. To accomplish this feat, we must render a sprite frame in two steps. First, one frame is copied to a scratch bitmap. Second, the scratch bitmap is drawn to the screen with transforms.
These are the new properties to add to the Sprite class:
private Bitmap p_frameBitmap;
private Canvas p_frameCanvas;
At the appropriate place in the code, they are created like so:
p_frameBitmap = Bitmap.createBitmap(p_width, p_height, Config.ARGB_8888);
p_frameCanvas = new Canvas(p_frameBitmap);
All of the code previously written to draw a frame out of a sprite sheet still applies, but we have made a minor change to the drawBitmap() line. Rather than drawing directly to the screen, the frame is drawn to the scratch bitmap via p_frameCanvas:
p_frameCanvas.drawBitmap(p_texture.getBitmap(), src, dst, p_paint);
After this line, the scratch bitmap (p_frameBitmap) contains a single frame of animation. It is this bitmap that can now be drawn to the screen with transforms.
Getting the Screen Resolution (Precanvas)
An issue will come up frequently during the load() event if we don’t add a new feature to the engine. That issue is the capability to get the screen resolution before the canvas has been created. This comes up when you want to initialize game objects on the screen without knowing exactly what type of Android device the game is running on—for instance, placing certain sprites randomly on the screen. Remember, the canvas is null until the drawing stage, so during load(), there is no canvas. After the canvas is valid, it’s easy to get the screen resolution (via Canvas). Prior to that, though, we have to use another technique.
private Point p_screenSize;
This initialization code is added to the onCreate() event in Engine.java prior to calling the abstract load() method. In order to use DisplayMetrics in the following code, be sure to add import android.util.DisplayMetrics in your program.
//get the screen dimensions
DisplayMetrics dm = new DisplayMetrics();
getWindowManager().getDefaultDisplay().getMetrics(dm);
p_screenSize = new Point(dm.widthPixels,dm.heightPixels);
Next, these helper methods are added to Engine.java to provide access to the screen size.
public Point getSize() {
return p_screenSize;
}
public int getScreenWidth() {
return p_screenSize.x;
}
public int getScreenHeight() {
return p_screenSize.y;
}
“Warping” Behavior
It’s time for a new type of animation, a subclass like those demonstrated in the previous hour. This is where we blur the line between animation and behavior because this new technique is very clearly a behavior—in other words, it involves the movement or activity of a sprite and not just what it looks like. Take a look at Figure 19.11 for an illustration of the technique. In this illustration, game objects are moving toward the left in one direction. When they hit the left edge, they are automatically sent to the right edge again. The new animation class is called WarpRect. Let’s peruse the code first and then explain how it works.
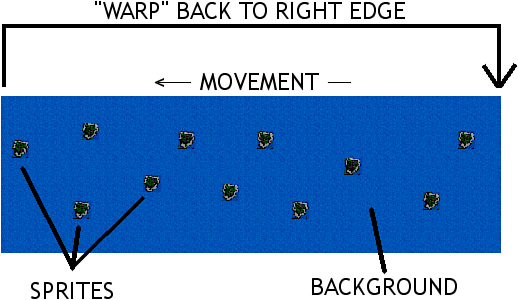
Figure 19.11. Illustration showing how warping from one edge to another works.
/**
* WarpRect class - derived from Animation
* Requires game.engine.Engine to build.
*/
package game.engine;
import android.graphics.Point;
import android.graphics.Rect;
import android.renderscript.Float2;
public class WarpRect extends Animation {
private Rect p_bounds;
private Float2 p_velocity;
private Point p_size;
public WarpRect(Rect bounds, Point size, Float2 velocity) {
animating = true;
p_bounds = bounds;
p_velocity = velocity;
p_size = size;
}
@Override
public Point adjustPosition(Point original) {
Point modified = original;
modified.x += p_velocity.x;
modified.y += p_velocity.y;
if (modified.x < p_bounds.left)
modified.x = p_bounds.right-p_size.x;
else if (modified.x > p_bounds.right-p_size.x)
modified.x = p_bounds.left;
if (modified.y < p_bounds.top)
modified.y = p_bounds.bottom-p_size.y;
else if (modified.y > p_bounds.bottom-p_size.y)
modified.y = p_bounds.top;
return modified;
}
}
As you can tell from the code, WarpRect affects only the position and no other sprite property. The purpose of this animation is to set a boundary and velocity for an object, cause it to move, and keep the object inside the boundary by warping around at the edges. As an object hits the top edge, it is moved to the bottom edge, and so on. This behavior contrasts with a reboundlike behavior, in which a sprite will bounce off of a boundary wall rather than warping to the other side. Both behaviors are useful in a variety of gameplay scenarios. For instance, you can use movement of objects (such as clouds) moving from right to left, warping back to the right edge, to simulate the appearance of movement.
Updated Sprite Class
Because the Sprite class has undergone significant changes again this hour, we’ll show the source code for the class with the new code highlighted in bold. It has become quite a complex, versatile class for the game engine, extremely capable at this point of handling most gameplay needs.
/**
* Sprite Class
* Requires game.engine.Engine to build.
*/
package game.engine;
import java.util.LinkedList;
import java.util.ListIterator;
import android.graphics.*;
import android.graphics.Bitmap.Config;
import android.renderscript.Float2;
public class Sprite {
private Engine p_engine;
private Canvas p_canvas;
private Texture p_texture;
private Paint p_paint;
public Point position;
private int p_width, p_height;
private int p_columns;
private int p_alpha;
private LinkedList<Animation> p_anims;
private int p_frame;
private Float2 p_scale;
private float p_rotation;
private Matrix p_mat_translate;
private Matrix p_mat_scale;
private Matrix p_mat_rotate;
private Matrix p_matrix;
private Bitmap p_frameBitmap;
private Canvas p_frameCanvas;
public Sprite(Engine engine) {
this(engine, 0, 0, 1);
}
public Sprite(Engine engine, int width, int height, int columns) {
p_engine = engine;
p_width = width;
p_height = height;
p_columns = columns;
p_canvas = null;
p_texture = new Texture(engine);
p_alpha = 255;
p_paint = new Paint();
p_anims = new LinkedList<Animation>();
position = new Point(0,0);
p_frame = 0;
p_scale = new Float2(1.0f,1.0f);
p_rotation = 0.0f;
p_mat_translate = new Matrix();
p_mat_scale = new Matrix();
p_mat_rotate = new Matrix();
p_matrix = new Matrix();
p_frameBitmap = null;
p_frameCanvas = null;
}
public void draw() {
p_canvas = p_engine.getCanvas();
//fill in size if this sprite is not animated
if (p_width == 0 || p_height == 0) {
p_width = p_texture.getBitmap().getWidth();
p_height = p_texture.getBitmap().getHeight();
}
//create the frame scratch bitmap
if (p_frameBitmap == null) {
p_frameBitmap = Bitmap.createBitmap(p_width, p_height, Config.
ARGB_8888);
p_frameCanvas = new Canvas(p_frameBitmap);
}
/**
* First, copy the animation frame onto a scratch bitmap.
*/
//define the source rect representing one frame
int u = (p_frame % p_columns) * p_width;
int v = (p_frame / p_columns) * p_height;
Rect src = new Rect(u, v, u+p_width, v+p_height);
//define the destination location
int x = 0;// position.x;
int y = 0;// position.y;
int w = p_width; //(int)(p_width * p_scale.x);
int h = p_height; // (int)(p_height * p_scale.y);
Rect dst = new Rect(x, y, x+w, y+h);
//copy frame onto temp bitmap
p_paint.setAlpha(p_alpha);
p_frameCanvas.drawBitmap(p_texture.getBitmap(), src, dst, p_paint);
/**
* Second, draw the scratch bitmap using matrix transforms.
*/
//update transform matrices
p_mat_scale = new Matrix();
p_mat_scale.setScale(p_scale.x, p_scale.y);
p_mat_rotate = new Matrix();
p_mat_rotate.setRotate( (float)Math.toDegrees(p_rotation));
p_mat_translate = new Matrix();
p_mat_translate.setTranslate(position.x, position.y);
p_matrix = new Matrix(); //set to identity
p_matrix.postConcat(p_mat_scale);
p_matrix.postConcat(p_mat_rotate);
p_matrix.postConcat(p_mat_translate);
//draw frame bitmap onto screen
p_canvas.drawBitmap(p_frameBitmap, p_matrix, p_paint);
}
//add an animation technique to this sprite
public void addAnimation(Animation anim) {
p_anims.add(anim);
}
//run through all of the animations
public void animate() {
if (p_anims.size() == 0) return;
ListIterator<Animation> iterator = p_anims.listIterator();
while (iterator.hasNext()) {
Animation anim = iterator.next();
if (anim.animating) {
p_frame = anim.adjustFrame(p_frame);
p_alpha = anim.adjustAlpha(p_alpha);
p_rotation = anim.adjustRotation(p_rotation);
p_scale = anim.adjustScale(p_scale);
position = anim.adjustPosition(position);
}
else
{
p_anims.remove(anim);
return;
}
}
}
/**
* Color manipulation methods
*/
public void setAlpha(int alpha) {
p_alpha = alpha;
}
public int getAlpha() {
return p_alpha;
}
public void setPaint(Paint paint) {
p_paint = paint;
}
/**
* common get/set methods
*/
public void setTexture(Texture texture) {
p_texture = texture;
}
public Texture getTexture() {
return p_texture;
}
public void setPosition(Point position) {
this.position = position;
}
public Point getPosition() {
return position;
}
public int getWidth() {
return p_width;
}
public void setWidth(int width) {
p_width = width;
}
public int getHeight() {
return p_height;
}
public void setHeight(int height) {
p_height = height;
}
public Point getSize() {
return new Point(p_width,p_height);
}
public int getFrame() {
return p_frame;
}
public void setFrame(int frame) {
p_frame = frame;
}
public Float2 getScale() {
return p_scale;
}
public void setScale(Float2 scale) {
p_scale = scale;
}
public void setScale(float scale) {
p_scale = new Float2(scale,scale);
}
public float getRotation() {
return p_rotation;
}
public void setRotation(float radians) {
p_rotation = radians;
}
}
The Sprite Transforms Demo
Following is the complete source code for the Sprite Transforms Demo program shown in Figure 19.12. The asteroid sprites are moving in random locations and warping within the box shown on the screen. The spaceship is independent of the asteroids and does not interact with them in any way. The purpose of the spaceship is to show dramatically how rotation and scaling work in conjunction with translation. Because all the sprites in this scene are drawing with transforms, it’s an effective demonstration of the new capabilities. You will need to use bitmap files for this project: asteroid_sheet.png and ship1.png. Both are included in the book resource files.
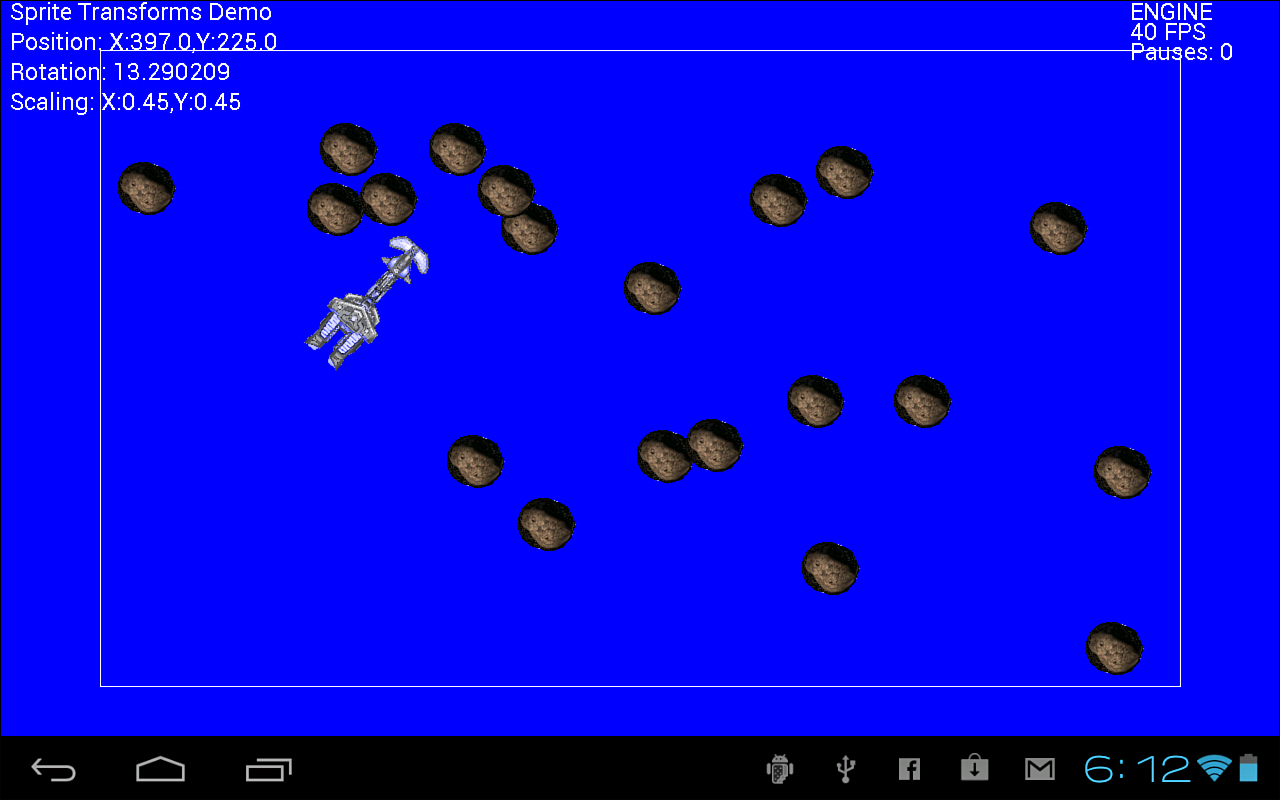
Figure 19.12. The Sprite Transforms Demo draws a bunch of sprites with matrix transforms.
package android.program;
import java.util.LinkedList;
import java.util.ListIterator;
import java.util.Random;
import android.graphics.*;
import android.graphics.Paint.Style;
import android.renderscript.Float2;
import game.engine.*;
public class Game extends game.engine.Engine {
Canvas canvas;
Timer timer;
Point touch,oldTouch;
LinkedList<Sprite> asteroids;
Texture asteroid_image;
Sprite ship;
Texture ship_image;
Random rand;
Paint paint;
Rect boundary;
public Game() {
canvas = null;
paint = new Paint();
timer = new Timer();
asteroids = null;
asteroid_image = null;
ship = null;
ship_image = null;
}
public void init() {
setScreenOrientation(Engine.ScreenModes.LANDSCAPE);
rand = new Random();
touch = oldTouch = new Point(0,0);
}
public void load() {
int x,y,w,h;
w = getScreenWidth();
h = getScreenHeight();
boundary = new Rect(100,50,w-100,h-50);
asteroid_image = new Texture(this);
if (!asteroid_image.loadFromAsset("asteroid_sheet.png")) {
fatalError("Error loading asteroid_sheet");
}
asteroids = new LinkedList<Sprite>();
for (int n=0; n<20; n++) {
Sprite asteroid = new Sprite(this, 60, 60, 8);
asteroid.setTexture(asteroid_image);
x = boundary.left;
y = boundary.top;
w = boundary.width();
h = boundary.height();
asteroid.position = new Point(x+rand.nextInt(w),
y+rand.nextInt(h));
asteroid.addAnimation(new FrameAnimation(0, 63, 1));
Float2 vel = new Float2(rand.nextFloat()*10-5.0f,
rand.nextFloat()*10-5.0f);
asteroid.addAnimation(new WarpRect(boundary,
new Point(60,60), vel));
asteroids.add(asteroid);
}
ship = new Sprite(this);
ship_image = new Texture(this);
if (!ship_image.loadFromAsset("ship1.png")) {
fatalError("Error loading ship1");
}
ship.setTexture(ship_image);
ship.position = new Point(200,200);
ship.addAnimation(new ThrobAnimation(0.2f, 0.8f, 0.001f));
int cx = getScreenWidth()/2-60;
int cy = getScreenHeight()/2-60;
ship.addAnimation(new CircularMovementAnimation(
cx,cy,200,0,0.05f));
}
public void draw() {
canvas = getCanvas();
drawText("Sprite Transforms Demo", 10, 20);
drawText("Position: " + toString(ship.position), 10, 50);
drawText("Rotation: " + toString(ship.getRotation()), 10, 80);
drawText("Scaling: " + toString(ship.getScale()), 10, 110);
//draw the asteroids with transforms
ListIterator<Sprite> iter = asteroids.listIterator();
while (iter.hasNext()) {
Sprite asteroid = (Sprite)iter.next();
asteroid.draw();
}
//draw the ship sprite with transforms!
ship.draw();
//draw border to show WrapRect boundary
paint.setColor(Color.WHITE);
paint.setStyle(Style.STROKE);
this.getCanvas().drawRect(boundary, paint);
}
public void update() {
if (timer.stopwatch(20)) {
//animate the asteroid sprite group
ListIterator<Sprite> iter = asteroids.listIterator();
while (iter.hasNext()) {
Sprite asteroid = (Sprite)iter.next();
asteroid.animate();
}
//animate the ship sprite
ship.animate();
//manually update rotation
float r = ship.getRotation();
ship.setRotation(r + 0.01f);
//manually reset scaling
if (ship.getScale().x <= 0.2f)
ship.addAnimation(new ThrobAnimation(0.2f, 0.8f, 0.001f));
}
}
}
Summary
This hour concludes our work on sprite animation and matrix transforms. It has been quite a hard job over the past three hours to get to this point, as I’m sure you will agree! But now we’re beginning to see a major payoff after all our hard work. The Sprite class is completely decked out with awesome capabilities and ready to be put to the test in a serious game project! We’re essentially done with this aspect of the engine and need to move into some new gameplay techniques in the very next hour, which will cover collision detection.
Q&A
Q. The Sprite class can now do real-time transforms. How does this improve the capabilities of the class over the earlier version?
A. Answers will vary, but try to focus on how transforms use matrixes, which simplify (and speed up) transform calculations.
Q. The addition of support for multiple animations in a single sprite opens the door for doing unique special effects, such as rotating one sprite around another. What are some interesting effects you can recall from some classic video games that might be duplicated now in your own games?
A. Answers will vary, but discussion should resolve around some classic arcade games.
Workshop
Quiz
1. What Sprite methods allow you to manipulate the scale of a sprite?
2. What data type makes it possible for Sprite to use transforms?
3. What Sprite method updates the animation(s) currently in use?
Answers
1. getScale() and setScale()
2. Matrix
3. animate()
Activities
The Sprite class has matured significantly in the past few hours, so if you have not spent much time with it beyond the example in this hour, a good exercise will be for you to write your own new code using Sprite to put it through its paces. See what it can do and get creative with the transforms it can now do!